grandMA3 (v2.4): Current-generation grandMA3 manual.
# grandMA3 User Manual
## Subtopics [Section titled “Subtopics”](#subtopics) * [New in the Manual](/grandma3/2-3/news/) * [About the Help](/grandma3/2-3/about_the_manual/) * [Device Overview](/grandma3/2-3/device_overview/) * [System Overview](/grandma3/2-3/system/) * [First Steps](/grandma3/2-3/first_steps/) * [grandMA3 onPC](/grandma3/2-3/onpc/) * [Show File Handling](/grandma3/2-3/show_file_management/) * [Workspace](/grandma3/2-3/workspace/) * [Command Syntax and Keywords](/grandma3/2-3/command_syntax_keywords/) * [Windows, Views, and Menus](/grandma3/2-3/wvm/) * [Networking](/grandma3/2-3/network/) * [DMX In and Out](/grandma3/2-3/dmx/) * [Single User and Multi User Systems](/grandma3/2-3/user/) * [Patch and Fixture Setup](/grandma3/2-3/patch/) * [Operate Fixtures](/grandma3/2-3/operate_fixtures/) * [Label Objects](/grandma3/2-3/wvm_pool_label/) * [Notes](/grandma3/2-3/notes/) * [Scribbles](/grandma3/2-3/scribbles/) * [Appearances](/grandma3/2-3/appear/) * [Images](/grandma3/2-3/images/) * [Supported File Formats](/grandma3/2-3/file_formats/) * [Screenshots](/grandma3/2-3/screenshot/) * [Meshes](/grandma3/2-3/meshes/) * [Videos](/grandma3/2-3/videos/) * [Gobos](/grandma3/2-3/gobos/) * [Symbols](/grandma3/2-3/symbols/) * [Groups](/grandma3/2-3/group/) * [Presets](/grandma3/2-3/presets/) * [Worlds and Filters](/grandma3/2-3/worldfilter/) * [MAtricks and Shuffle](/grandma3/2-3/matricks/) * [Cues and Sequences](/grandma3/2-3/cue_sequence/) * [Executors](/grandma3/2-3/executor/) * [Masters](/grandma3/2-3/masters/) * [Recipes](/grandma3/2-3/recipes/) * [Phasers](/grandma3/2-3/phaser/) * [Generator - Random](/grandma3/2-3/generator/) * [Bitmap](/grandma3/2-3/bitmap/) * [XYZ](/grandma3/2-3/xyz/) * [Tags](/grandma3/2-3/tags/) * [Macros](/grandma3/2-3/macros/) * [Agenda](/grandma3/2-3/agenda/) * [Timers](/grandma3/2-3/timers/) * [Timecode Show](/grandma3/2-3/timecode/) * [Layouts](/grandma3/2-3/layouts/) * [Plugins](/grandma3/2-3/plugins/) * [Quickeys](/grandma3/2-3/quickeys/) * [Data Pools](/grandma3/2-3/datapool/) * [System](/grandma3/2-3/system_information/) * [Remote In and Out](/grandma3/2-3/remote_inputs/) * [Sound](/grandma3/2-3/sound/) * [RDM (Remote Device Management)](/grandma3/2-3/rdm/) * [Local Settings](/grandma3/2-3/local_settings/) * [Update the Software](/grandma3/2-3/update/) * [Fixture Types](/grandma3/2-3/fixture_types/) * [File Management](/grandma3/2-3/file_management/) * [Show Creator](/grandma3/2-3/show-creator/) * [Control other MA Devices](/grandma3/2-3/control_other_ma_devices/) * [Troubleshooting](/grandma3/2-3/troubleshooting/) * [Glossary](/grandma3/2-3/glossary/) * [grandMA3 List of Trademarks](/grandma3/2-3/key_grandma3_listoftrademarks/)
# About the Help
> Use this guide to learn how grandMA3 can help you to make an aMAzing show.
Use this guide to learn how grandMA3 can help you to make an aMAzing show. Start at the beginning, visit each section, use the [context sensitive help](/grandma3/2-3/atm_open_help_console/#h2_2095429847), connect with the community to work your way through a show, or use our huge pdf document. ## Support [Section titled “Support”](#support) Contact us for any questions about your MA product. MA Lighting and its extensive distributor network offer unparalleled technical support. Call on our expertise for help with any problem, no matter if it is about the operation, software features, software installations, or troubleshooting. ### MA Forum [Section titled “MA Forum”](#ma-forum) Share your knowledge and get help from other MA users in the official MA Forum. A community can be stronger and better than an individual. Be part of the MA community! Go to . ### Central Support [Section titled “Central Support”](#central-support) If you need further assistance or manufacturer support, please fill out an email request on [www.malighting.com in](http://www.malighting.com%C2%A0in) Training and Support. Your request will automatically be sent to (in English or German). This email service is monitored during MA Lighting’s regular business hours in Germany from 8.30 am until 5 pm (CET), Monday through Friday. ### Emergency Hotline [Section titled “Emergency Hotline”](#emergency-hotline) In any case of a show critical emergency please contact the MA Lighting support hotline. Phone +49 5251 68 88 65 99 Please note that this 24/7 hotline is strictly for emergency cases. ### Intellectual Property [Section titled “Intellectual Property”](#intellectual-property) MA Lighting Technology has registered multiple patents, trademarks, design patents, and utility models for its products.\ We will take legal action against the violation of this intellectual property. For more information see: Subtopics * [Open the Help in the Console](/grandma3/2-3/atm_open_help_console/) * [Structure of the Help Manual](/grandma3/2-3/structure_manual/) * [Open the Help in Web Browser](/grandma3/2-3/atm_open_help_webbrowser/) * [Open the Help as PDF](/grandma3/2-3/atm_open_help_pdf/) * [Navigate in the Help](/grandma3/2-3/atm_navigate_in_the_help/) * [Videos in the Help](/grandma3/2-3/atm_videos_in_the_help/)
# Agenda
> The agenda allows you to schedule objects, such as sequences, macros, or plugins, to be executed by the console based on the calendar. Commands can also be defi
The agenda allows you to schedule objects, such as sequences, macros, or plugins, to be executed by the console based on the calendar. Commands can also be defined, such as shutting down the system at a certain time. You can also schedule events that repeat every minute, every day, every week, every month, and/or every year, for example, the Saint-Patrick’s Day cue every year. To learn about the Agenda keyword, see [Agenda](/grandma3/2-3/keyword_agenda/) ## Subtopics [Section titled “Subtopics”](#subtopics) * [View Modes](/grandma3/2-3/agenda_modes/) * [Create an Agenda Entry](/grandma3/2-3/agenda_entry/) * [Edit an Agenda Entry](/grandma3/2-3/agenda_edit/) * [Agenda Toolbar](/grandma3/2-3/agenda_toolbar/)
# Edit an Agenda Entry
> To edit an agenda entry from the Month, Week, and Day layout mode, press Edit, then tap the agenda entry you wish to edit. You can also tap and hold or right-cl
To edit an agenda entry from the **Month**, **Week**, and **Day** layout mode, press Edit, then tap the agenda entry you wish to edit. You can also tap and hold or right-click an agenda entry. The **Edit Agenda Event** pop-up opens. 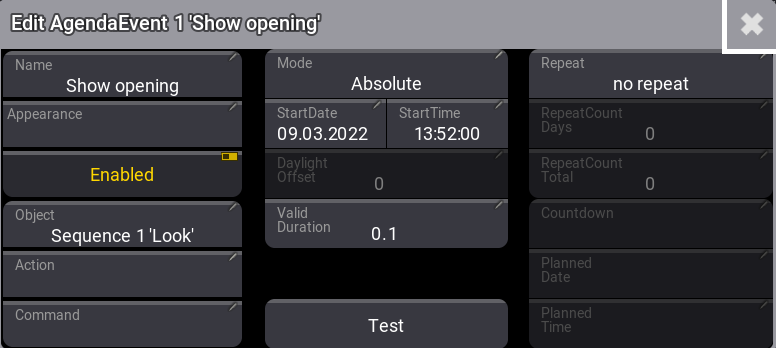 To learn about the properties that can be defined here, see [Create an agenda entry](/grandma3/2-3/agenda_entry/). | | | | ------------------------------------------ | -------------------------------------------------------------------------------------------------------- | |  | **Hint:** | | | Agenda events can also be edited using the toolbar. See [Agenda toolbar](/grandma3/2-3/agenda_toolbar/). | | | | | ------------------------------------------ | ---------------------------------------------------------------------------------------------------------- | |  | **Hint:** | | | Events can be deleted from any view mode by pressing Delete and then tapping the event you wish to delete. |
# Create an Agenda Entry
> 1. Tap and hold View Mode in the title bar, then slide your finger into the list and select Sheet.
### Create an Agenda Entry Using the Sheet View Mode [Section titled “Create an Agenda Entry Using the Sheet View Mode”](#create-an-agenda-entry-using-the-sheet-view-mode) 1. Tap and hold View Mode in the title bar, then slide your finger into the list and select Sheet. 2. To create a new agenda event, right-click or tap and hold New AgendaEvent. A new entry is created with the system date and time. | | | | ------------------------------------------ | --------------------------------------------------------------------------------------------------------- | |  | **Hint:** | | | You can also create an entry from the Sheet View mode by pressing Edit and then tapping New AgendaEvent. |  Agenda Viewer The following is a list of the properties to be defined by the user: * **Name**: Enter the name of the event that will be displayed in all layout modes. * **Appearance**: Assign an appearance to define how the entry looks in the calendar views. * **Note**: For more information, see [Note](/grandma3/2-3/notes/). * **Mode**: When set to Absolute, the agenda uses the entered start date and time. Twilight times like Dawn, Sunrise, Sunset, and Dusk can also be used. See [Date and time](/grandma3/2-3/si_date_and_time/) to learn how to configure the grandMA3 software to calculate the correct twilight time for your location. * **StartDate**: Tap and hold a cell to open the **Edit StartDate** pop-up, then edit the day, month, and year. Use Today in the title bar to quickly enter today’s date. * **StartTime**: Tap and hold a cell to open the **Edit StartTime** pop-up, then edit the hours, minutes, and seconds. Use Now in the title bar to quickly enter the current time. * **Daylight Offset**: When a twilight time is set in the mode column, it defines an offset for an event. For example, if you want an event to start 15 minutes before dawn. See [Date and time](/grandma3/2-3/si_date_and_time/) to learn about twilight times. * **Valid Duration**: Enter a duration value to allow the backcasting of events if the console is not switched on or the agenda is disabled during a scheduled entry. * **Enabled**: To enable or disable an agenda entry. Disabled entries are displayed with a red color font. * **Object**: Tap and hold a cell to open the Assignment Editor pop-up, and select a **Plugin**, **Macro**, or **Sequence** to be executed. 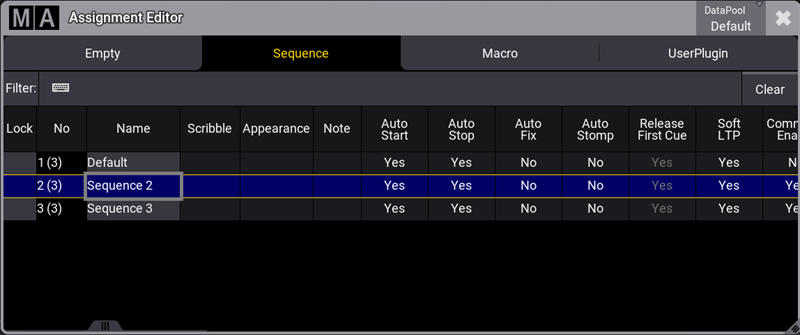 Assignment Editor * **Action**: Tap and hold a cell, then select an action to use when the defined object is executed. * **Command**: Define a command here to be executed instead of defining an object to be triggered. E.g., Go+ Executor 101. * **Repeat**: This field defines whether an entry is repeated and, if so, how often. Tap and hold a cell to open the **Edit Repeat of Agenda** pop-up. There are two main settings to define the repetition of an agenda entry, Schedule and Iterations. ### Schedule Settings [Section titled “Schedule Settings”](#schedule-settings) 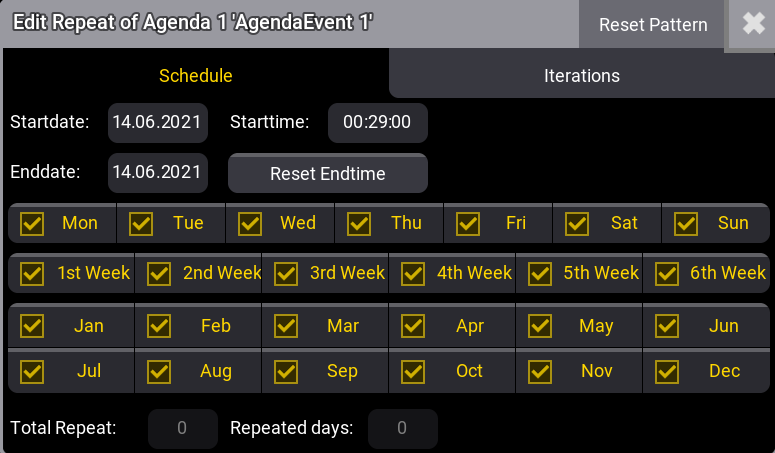 The start date and time are linked to the agenda event and, therefore, are identical. To get repetitions, at least a different end date or end time must be set. * Tap Reset Pattern in the title bar to reset the repeat settings you made previously. * Tap Reset Endtime to reset the end date back to the agenda event date. Tap a day, week, or month cell to enable or disable it. This will define at which days, weeks, or months the event will be repeated. | | | | ------------------------------------------ | -------------------------------------------------------------------------------------------------- | |  | **Hint:** | | | The week settings are the weeks within a full month and not the weeks from the start date onwards. | ### Iterations Settings [Section titled “Iterations Settings”](#iterations-settings) 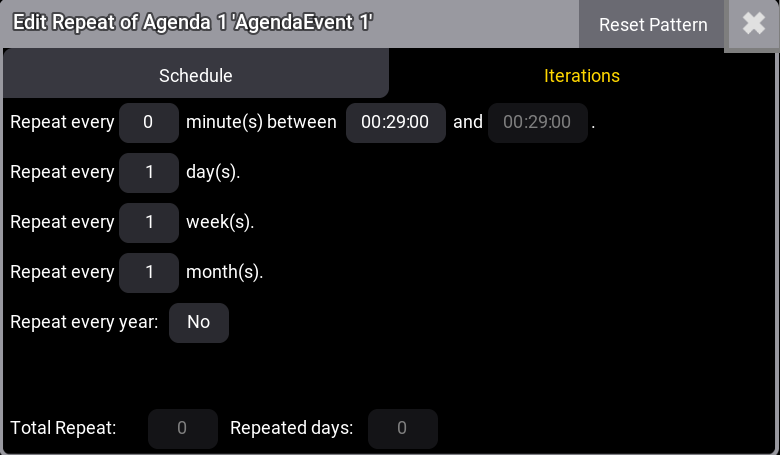 Iterations settings allow defining repeat per minute, days, weeks, and months. These settings are counted from the start date onward.\ To repeat an event every year again, set **Repeat every year** to yes. The following describes the last five columns of the agenda window in the title bar when ViewMode is set to **Sheet**. (These columns can not be edited.) * **Countdown**: Displays the remaining days or time until the next launch of an event. * **Planned Date**: Displays the next date when the event will be launched. * **Planned Time**: Displays the next time when the event will be launched, * **Repeat Count Days** and **Repeat Count Total**: These two columns are similar to the edit repeat pop-up. This is a quick way to verify the repeat pattern. Tap Delete Old in the title bar to erase all preceding events, including the valid duration.
# View Modes
> The agenda window can display the data using five different view modes.
The agenda window can display the data using five different view modes. Open an agenda window, see [Add Windows](/grandma3/2-3/wvm_add_window/). From the add window dialog, tap Tools, and then tap Agenda Viewer. 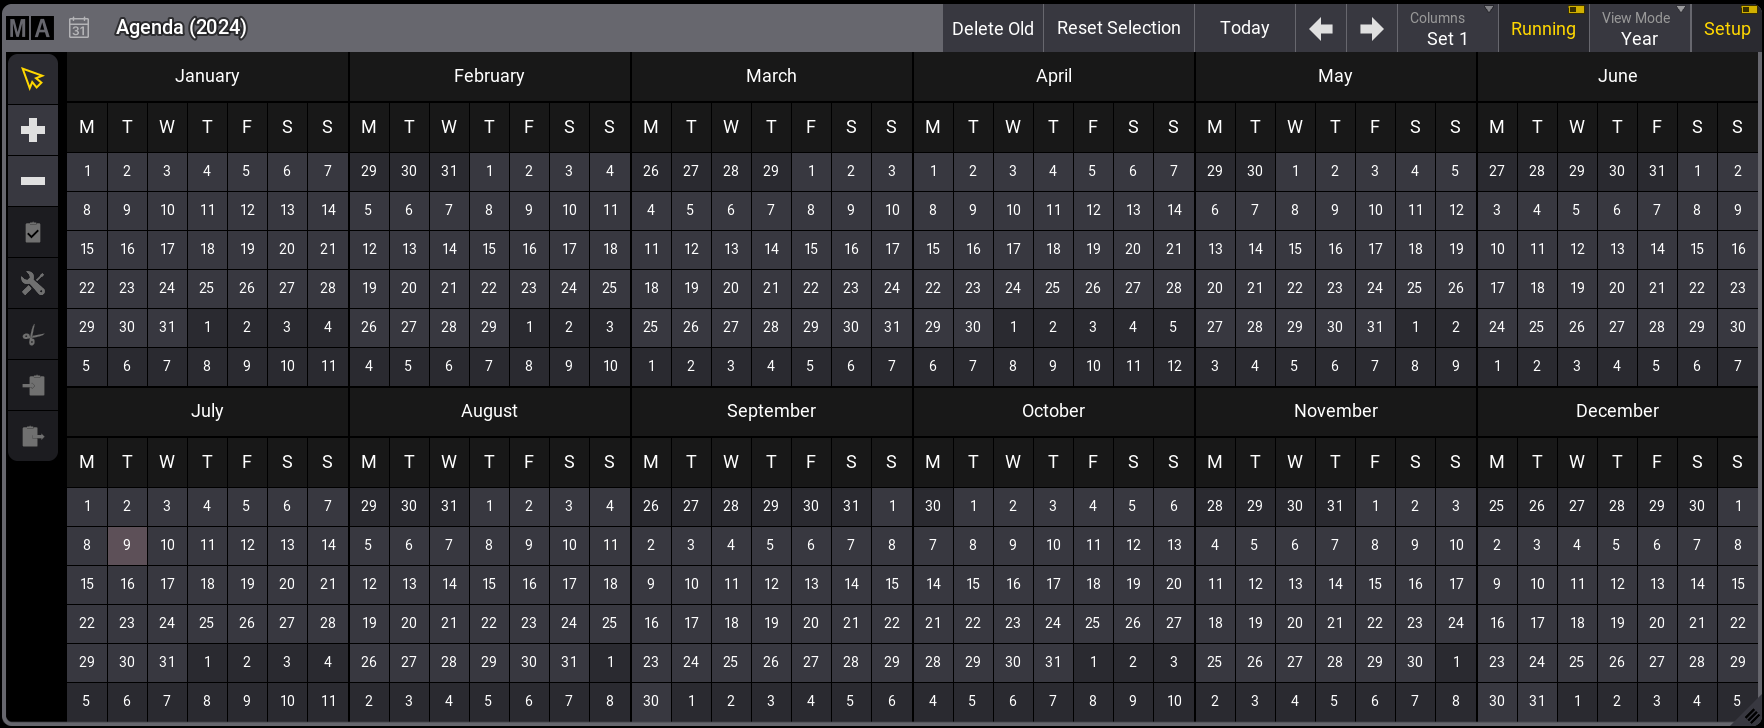 Agenda window To change the view, tap View Mode in the title bar. * **Sheet**: Displays all agenda entries in a spreadsheet format. | | | | ------------------------------------------ | -------------------------------------------------------------------------------------------------- | |  | **Hint:** | | | To sort the agenda entries in the sheet view by name, right-click or tap and hold a column header. | * **Year**: Displays a calendar view of the year. The current date has a light gray background. Days with at least one enabled event are indicated by a green background. Days that have all events disabled are indicated by a bright red background. * **Month**: Displays all agenda entries of the selected month. * **Week**: Displays all agenda entries of the selected week. * **Day**: This mode is divided into two sections. It displays a smaller monthly overview on the left and entries for the selected day on the right. | | | | ------------------------------------------ | -------------------------------------------------------------------------------------------------------------------------------------------------------------------------------------------------------------------------------------- | |  | **Hint:** | | | \*\*- \*\*Disabled events are displayed with red font color. - Repeated events are displayed with  on the right side. This applies to the month, week, and day view modes. |
# Agenda Toolbar
> Create or edit an agenda entry using the toolbar within the 5 available view modes; Sheet, Year, Month, Week, and Day. For more information, see Agenda Modes.
Create or edit an agenda entry using the toolbar within the 5 available view modes; **Sheet**, **Year**, **Month**, **Week**, and **Day**. For more information, see [Agenda Modes](/grandma3/2-3/agenda_modes/). To enable the toolbar, tap Setup in the title bar. 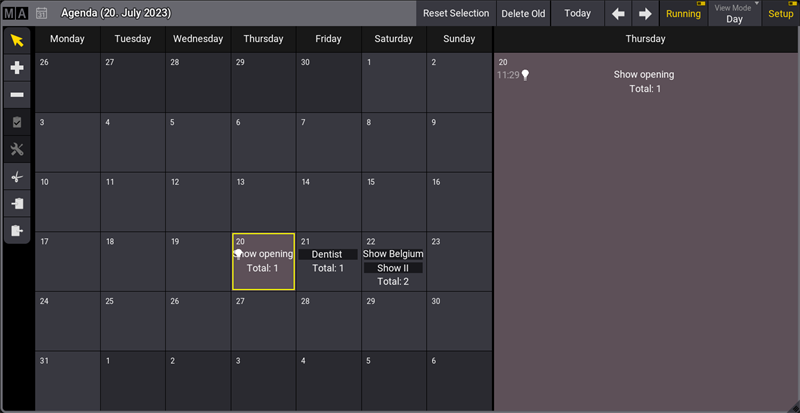 Agenda window with view mode day To select an event, tap  in the toolbar, then tap the event you wish to select. To create an event, tap  in the toolbar, then tap a day in the agenda. To delete an event, tap  in the toolbar, then tap the event you wish to delete. Select an event, then tap  in the toolbar to execute it immediately. This will verify if the set object or command will be executed correctly. Select the event you wish to edit, then tap  in the toolbar. This opens the Edit Agenda pop-up. See [Edit an agenda entry](/grandma3/2-3/agenda_edit/) for more information. To cut an agenda entry, tap  in the toolbar, then tap the entry you wish to cut. Notice that  (the paste tool) is selected in the toolbar and awaits the user to tap a day where to paste the cut entry. To copy an agenda entry, tap  in the toolbar, then tap the day you wish to copy. Notice that  (the paste tool) is selected in the toolbar and awaits the user to tap a day where to paste the copied entry. Use  and  in the title bar to change the day, week, month, or year. | | | | ------------------------------------------ | ------------------------------------------------------------------------------------------------------------ | |  | **Hint:** | | | The day, week, month, or year is displayed in brackets in the title bar according to the selected View Mode. | Tapping Today in the title bar will set the agenda to today’s date.
# Appearances
> Appearances are sets of looks that can be assigned to pool objects, presets, view buttons, or windows.
Appearances are sets of looks that can be assigned to pool objects, presets, view buttons, or windows. All appearances are stored in the **Appearance Pool,** which can be created like any other window. Learn how in the [Add Windows topic](/grandma3/2-3/wvm_add_window/). [ Paste to Command Line](#ma_cmd?Store%20ScreenContent%20Default%20%22WindowAppearancePool%22%20%2FAutoFit) ## Subtopics [Section titled “Subtopics”](#subtopics) * [Create Appearances](/grandma3/2-3/appear_create/) * [Assign Appearances](/grandma3/2-3/appear_use/) * [Delete Appearances](/grandma3/2-3/appear_delete/)
# Create Appearances
> Edit an empty pool object in the Appearance Pool to create a new appearance.
Edit an empty pool object in the **Appearance Pool** to create a new appearance. To edit an appearance pool object, use one of these 3 options: * Press Edit and then tap an appearance in the pool. * Open the [swipey commands](/grandma3/2-3/wvm_pool/#h2__1144791563) on the pool object and select Edit. * Use the command line: **Edit Appearance \[“Appearance\_Name” or Appearance\_Number]**. If you edit an existing pool object, the editor will open with the current state of the appearance. This is the **Appearance Editor**: 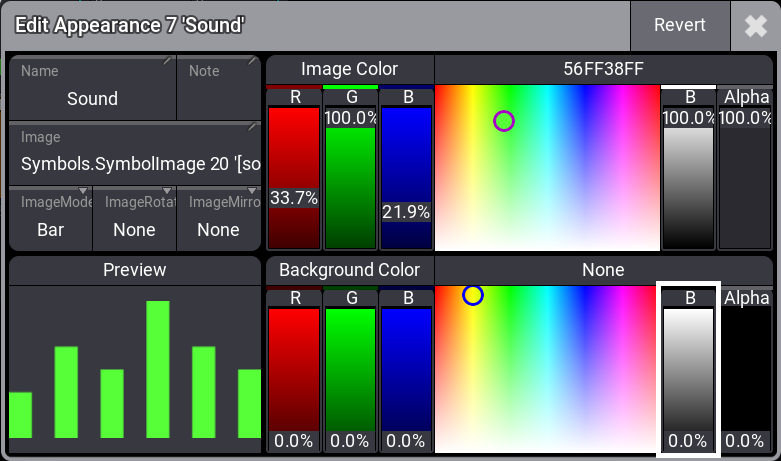 There are six input boxes, two sets of faders with a color picker and the hex color code to adjust the color, and a preview area displaying a preview of the appearance. *** ### Set a Background Color [Section titled “Set a Background Color”](#set-a-background-color) The **Background Color** fader and color picker can be used to change the background of the appearance. The default background is transparent (**Alpha** fader at 0%, **B** fader at 0%). Increase the Alpha value and use the R (red), G (green), and B (blue) faders to mix any color in the RGB range. You can also tap in the color picker area to select a color or edit the hex color code above the color picker. *** ### Label the Appearance [Section titled “Label the Appearance”](#label-the-appearance) To edit the name, use the [Label keyword](/grandma3/2-3/keyword_label/) or tap Name in the appearance editor. Appearances can be labeled like any [other pool object](/grandma3/2-3/wvm_pool/#label_pool_object). *** ### Add an Image to the Appearance [Section titled “Add an Image to the Appearance”](#add-an-image-to-the-appearance) Appearances can use an image. The image is placed in front of the background but behind the label. 1. Tap the **Image** input box to add an image. The **Select Image dropdown** opens with a list of all images. 2. Tap ImageSource in the title bar to display different objects stored in the images, videos, gobos, or symbols pool. 3. Tap the desired image in the pop-up. | | | | ------------------------------------------ | ----------------------------------------------------------------------------------------------------------------------------- | |  | **Hint:** | | | Appearances that use an image will not display the name on the appearance object in the pool if the name is the default name. | Media objects (images, videos, symbols, and gobos) can be **assigned** to an appearance. Assigning images to an empty appearance will create a new object in the appearances pool. | | | | ------------------------------------------ | ------------------------------------------------------------------------------ | |  | **Hint:** | | | Assigning an appearance to another one creates a copy of the first appearance. | The images have different modes. Their modes define how the image is adapted to the aspect ratio. These are the different modes: * **Stretch**\ The image is stretched to fit the appearance area. \[+] [Show Image](javascript:void\(0\)) \[-] [Hide Image](javascript:void\(0\))  Fixture sheet with stretched appearance * **Bar**\ The entire image is displayed and fitted to the appearance area without changing the aspect of the image. \[+] [Show Image](javascript:void\(0\)) \[-] [Hide Image](javascript:void\(0\))  Fixture sheet with appearance set to Bar * **Crop**\ The image is fitted to fill the entire appearance area. The aspect of the image is kept, but it is cropped. \[+] [Show Image](javascript:void\(0\)) \[-] [Hide Image](javascript:void\(0\))  Fixture sheet with cropped appearance * **Tile**\ The image is tiled. This means that the image is repeated in its original size to fill the entire appearance area. The aspect of the image is kept. \[+] [Show Image](javascript:void\(0\)) \[-] [Hide Image](javascript:void\(0\))  Fixture sheet with tiled appearance * **Center**\ The image is displayed in its original size with the center of the image aligned with the center of the appearance area. The aspect of the image is kept. \[+] [Show Image](javascript:void\(0\)) \[-] [Hide Image](javascript:void\(0\))  Fixture sheet with centered appearance To change the mode: 1. Tap the **Image\*\*\*\*Mode** button. This toggles through the different modes. You can also swipe the button to open the **Select ImageMode dropdown**. 2. Select a mode in the dropdown. *** ## Change the Image Color and Orientation [Section titled “Change the Image Color and Orientation”](#change-the-image-color-and-orientation) Adjust the color of the image using the top set of faders and color picker in the appearance editor. It is also possible to edit the hex color code directly.\ To edit the hex color code, tap the input field above the color picker and adjust the hex code in the Edit ImageRGBA pop-up. This means that the same image can be used on different appearances with different color hues and transparency. | | | | -------------------------------------------------- | -------------------------------------------------------------------------------------------------------------------------------------------- | |  | **Restriction:** | | | Color can only be added to an image, not removed from it. This means that black areas in an image cannot be changed, but white areas can be. | To rotate the image, tap ImageRotation in the appearance editor. The image can be rotated by 90°, 180°, or 270°. To mirror the image, tap ImageMirror in the appearance editor. The image can be mirrored vertically or horizontally or both. Tap the video below to see the example. [Vimeo video](https://player.vimeo.com/video/936310066?title=0\&byline=0\&portrait=0\&color=ffeb0f) *** ### Revert Changes [Section titled “Revert Changes”](#revert-changes) To revert the changes made in the latest editing process: 1. Tap Revert. A pop-up opens. 2. Tap OK. The changes are reverted.
# Delete Appearances
> To delete appearances, use one of the following options:
To delete appearances, use one of the following options: * Press Delete and tap the appearance you want to delete in the appearances pool. * Use the swipey commands on the pool object in the appearances pool.\ For information, see [Pool Windows – Swipey](/grandma3/2-3/wvm_pool/#h2__1144791563). * Use the command line.\ For more information on deleting pool objects, see [Delete Pool Objects](/grandma3/2-3/wvm_pool_delete/). For more information on the Delete keyword, see [Delete Keyword](/grandma3/2-3/keyword_delete/). If the appearance is used somewhere, a warning pop-up will open; tap Ok to delete. | | | | ------------------------------------------ | --------------------------------------------------------------------------------------------------------------------------------------------------------------------------------------------- | |  | **Hint:** | | | If appearances are assigned to other objects, deleting individual appearances in the appearance pool will delete the links to the objects. Oopsing the deletion will reassign the appearance. |
# Assign Appearances
> Almost all pool objects and many windows can have an appearance assigned.
Almost all pool objects and many windows can have an appearance assigned. There are multiple ways to assign appearances: * **Appearance Pool Objects** 1. Press Assign. 2. Tap an appearance in the appearances pool. 3. Tap the object you want to assign the appearance to. or 1. Open the [swipey commands](/grandma3/2-3/wvm_pool/#h2__1144791563) on an object in the appearances pool and choose Assign. 2. Tap the object you want to assign the appearance to. * **Pool Objects** 1. Open the [swipey commands](/grandma3/2-3/wvm_pool/#h2__1144791563) on the pool object and select Edit or Edit Setting. A pop-up opens.\ For some pool objects, for example sequences or macros, additionally tap Settings in the title bar of the pop-up. 2. Tap Appearance. A dropdown opens. 3. Select an appearance. * **Other Objects**\ This applies for example to cues. 1. Edit the cell in the **Appearance** column. A dropdown opens. 2. Select an appearance.
# Navigate in the Help
> To increase or decrease the size of the content displayed within the help window:
## Buttons in the Title Bar [Section titled “Buttons in the Title Bar”](#buttons-in-the-title-bar) To increase or decrease the size of the content displayed within the help window: * Tap (plus) or  (minus) * Tap on Zoom Factor and swipe left or right * Tap Zoom Factor and choose a percentage in the drop-down list Tap  (left arrow) to reverse through the history of previously viewed help topics. Tap  (right arrow) to advance through the history of previously viewed help topics. *** ## Scrolling in the Help [Section titled “Scrolling in the Help”](#scrolling-in-the-help) * Two-finger tap and swipe in X or Y direction to scroll through a help topic. * Use the screen encoder to scroll through a help topic in the XY direction. For more information, see [User Settings](/grandma3/2-3/user_settings/). *** ## Topics Tab [Section titled “Topics Tab”](#topics-tab) The topics tab in the help window displays the available topics in a tree structure. Single topics are indicated by  next to them. Multiple topics of the same category are sorted within a folder () and are called subtopics. Tap > to the left of any topic to show or hide any related subtopics. Tap the name of any topic to display its content in the main area of the window. Subtopics are also displayed in a bullet list at the end of the topic. If the help window is too small to display both the main area and the topics and search tabs, a burger menu () appears in the upper left corner. It contains the topic and search tabs. The root topics in the tree structure are divided into the different products within the family. These main sections include: * [grandMA3 User Manual](https://help.malighting.com/grandMA3/2.3/HTML/help.html) * [grandMA3 Quick Start Guide](/grandma3/2-3/qsg/) * [grandMA3 Quick Manual consoles](/grandma3/2-3/grandma3_quick_manual_consoles/) * [grandMA3 Quick Manual processing](/grandma3/2-3/grandma3_quick_manual_processing_units/) * [grandMA3 Quick Manual Nodes](/grandma3/2-3/grandma3_quick_manual_nodes/) * [grandMA3 Quick Manual Nodes DIN-Rail](/grandma3/2-3/grandma3_quick_manual_nodes_din-rail/) * [grandMA3 Quick Manual onPC command wing XT](/grandma3/2-3/grandma3_quick_manual_onpc_command_wing_xt/) * [grandMA3 Quick Manual onPC command wing](/grandma3/2-3/grandma3_quick_manual_onpc_command_wing/) * [grandMA3 Quick Manual onPC fader wing](/grandma3/2-3/grandma3_quick_manual_onpc_fader_wing/) * [grandMA3 Quick Manual viz-key](/grandma3/2-3/grandma3_quick_manual_viz-key/) * [grandMA3 Quick Manual onPC Rack-Unit](/grandma3/2-3/grandma3_quick_manual_onpc_rack-unit/)[\ ](/grandma3/2-3/grandma3_quick_manual_viz-key/) * [grandMA3 Quick Manual I/O Nodes](/grandma3/2-3/grandma3_quick_manual_i_o_nodes/) * [Release Notes](/grandma3/2-3/release_notes/) | | | | ------------------------------------------------ | ---------------------------------------------------------------------------------------------------------------------------------------------------------------------------------------------------- | |  | **Important:** | | | The complete grandMA3 documentation consists of the grandMA3 User Manual and the respective grandMA3 Quick Manual with technical specifications, safety instructions, and declaration of conformity. | *** ## Search Tab [Section titled “Search Tab”](#search-tab) To find topics containing a specific search term, use the search function: 1. Open the search tab in the help window. 2. Tap into the white field. 3. Type the term, such as cue, in the search box. 4. Press Please. The search results are shown. To open a virtual keyboard in the software, tap on the keyboard icon on the left of the search box.  *Help window - Search tab* To search for a specific product or search term, the brand name or the series name (for example grandMA3) is not necessary. *** ## Listed Subtopics [Section titled “Listed Subtopics”](#listed-subtopics) A list of subtopics that are related to the current topic is displayed at the bottom of the help page. To open a related topic, tap it in the list.  Listed subtopics *** ## Breadcrumbs [Section titled “Breadcrumbs”](#breadcrumbs) Breadcrumbs are navigation elements that provide links to the related sections of the current topic and subtopics. Breadcrumbs are located at the top of each topic. To go back in a topic, tap the corresponding section in the breadcrumbs.  Breadcrumbs to navigate in the help
# Open the Help in the Console
> There are different ways to open the help in the console.
| | | | ------------------------------------------------ | ------------------------------------------------------------------------------------------------------------------------------------------------------------------------------------------------------------------------------------------------------------------------------------------------------------ | |  | **Important:** | | | The help topics included in the software represent the status and volume of the help pages at the date of release.The most up-to-date version of the manual is published online. For more information on the online user manual, see [Open the Help in Web Browser](/grandma3/2-3/atm_open_help_webbrowser/) | There are different ways to open the help in the console. ## Open the Search Tab [Section titled “Open the Search Tab”](#open-the-search-tab) To open the help pop-up on the search tab: * Press Help and then press Please. * Type **Help** and then press Please.\ For more information, see [Help Keyword](/grandma3/2-3/keyword_help/). The help pop-up opens to the search tab. To search for a topic, just start typing. *** ## Open the Last Viewed Topic [Section titled “Open the Last Viewed Topic”](#open-the-last-viewed-topic) To open the help pop-up on the topic you last viewed: * Double-tapin the [Control Bar](/grandma3/2-3/ws_ui_control_bar/). * Double-press Help. *** ## Help Window [Section titled “Help Window”](#help-window) To open the help window: * Open the Add Window dialog, tap the More tab, then tap Help. For more information, see the [Add Windows](/grandma3/2-3/wvm_add_window/) topic. * Store the Help view button on a view bar. For more information, see [Store a View Directly on a View Button](/grandma3/2-3/wvm_store_recall/#h2__179579878).
# Open the Help as PDF
> You can download PDF files of different versions of the manual as well as single topics.
You can download PDF files of different versions of the manual as well as single topics. *** ## Download Manual for a Software Version [Section titled “Download Manual for a Software Version”](#download-manual-for-a-software-version) A PDF version of the user manual is available for each version of the software. To download a PDF of the entire manual: 1. Navigate to the **Downloads** section of the MA Lighting website: 2. Select a product family in the list on the left side. 3. Click **Offline User Manuals + QuickMAnual**. 4. Click **Archive** at the bottom of the list. 5. Click on the version of the manual you want to download.\ The PDF file is saved to your downloads folder. \[+] [Show Image](javascript:void\(0\)) \[-] [Hide Image](javascript:void\(0\)) 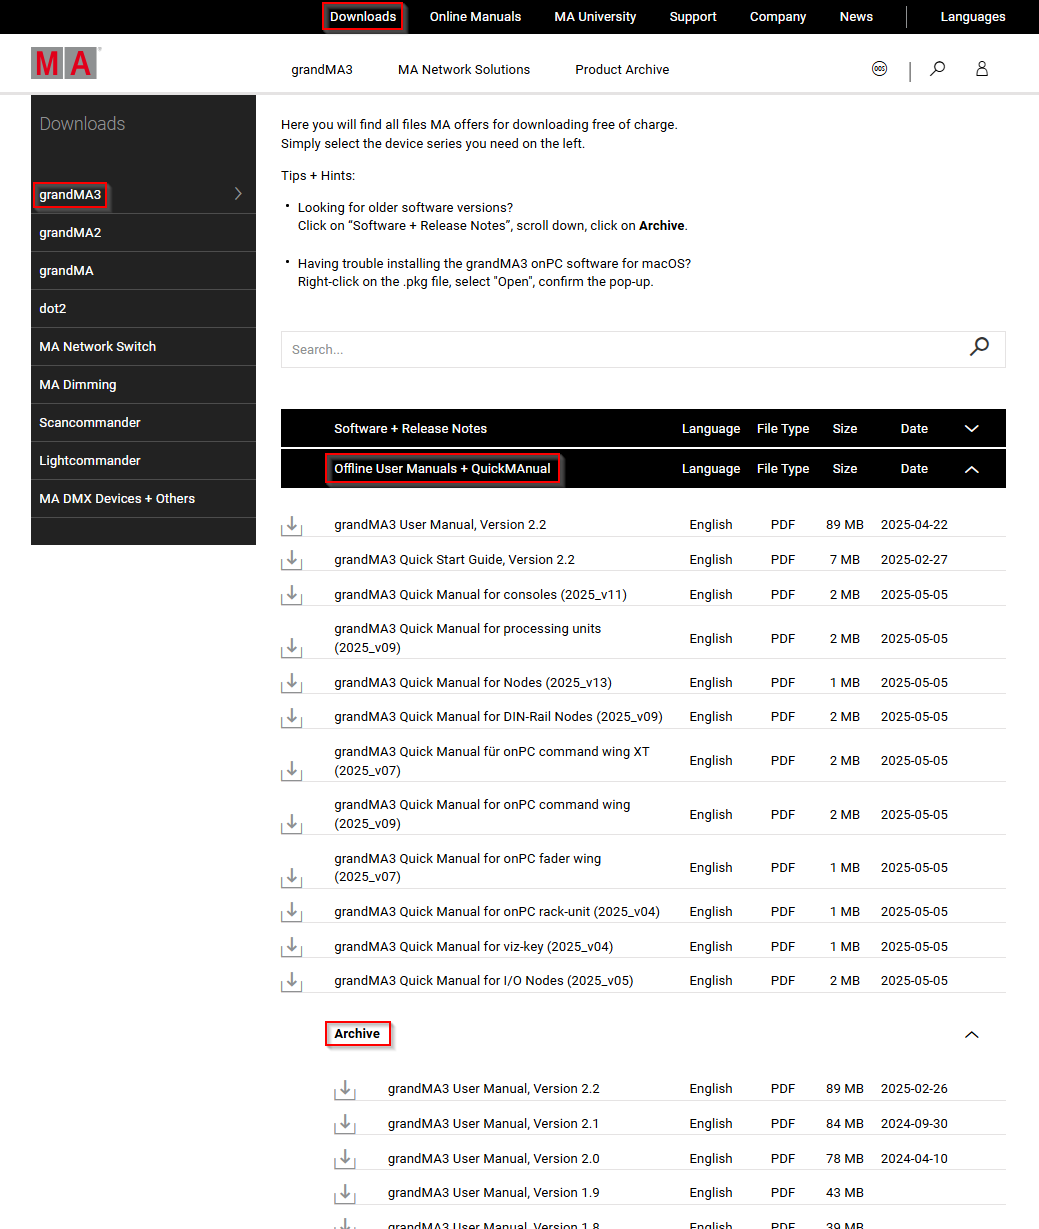 Download section on the MA Lighting website *** ## Create PDFs in the Online Help [Section titled “Create PDFs in the Online Help”](#create-pdfs-in-the-online-help) Download single topics from the [online help](/grandma3/2-3/atm_open_help_webbrowser/) as a PDF document to view them offline. To download the contents of a topic as a PDF file: 1. Click the printer icon () next to the topic title. 2. As destination choose **Save as PDF**. 3. Click Save.\ The topic PDF is saved to your downloads folder.
# Open the Help in Web Browser
> The help topics included in the software represent the status and volume of the help pages at the date of release.
The help topics included in the software represent the status and volume of the help pages at the date of release. The help system is constantly being updated and extended. The most up-to-date and complete version of the grandMA3 help manual can be accessed on the following website: The website includes links to documentation for the following product families: * grandMA3 series * grandMA2 series * dot2 series * MA Network Switch \[+] [Show Image](javascript:void\(0\)) \[-] [Hide Image](javascript:void\(0\)) 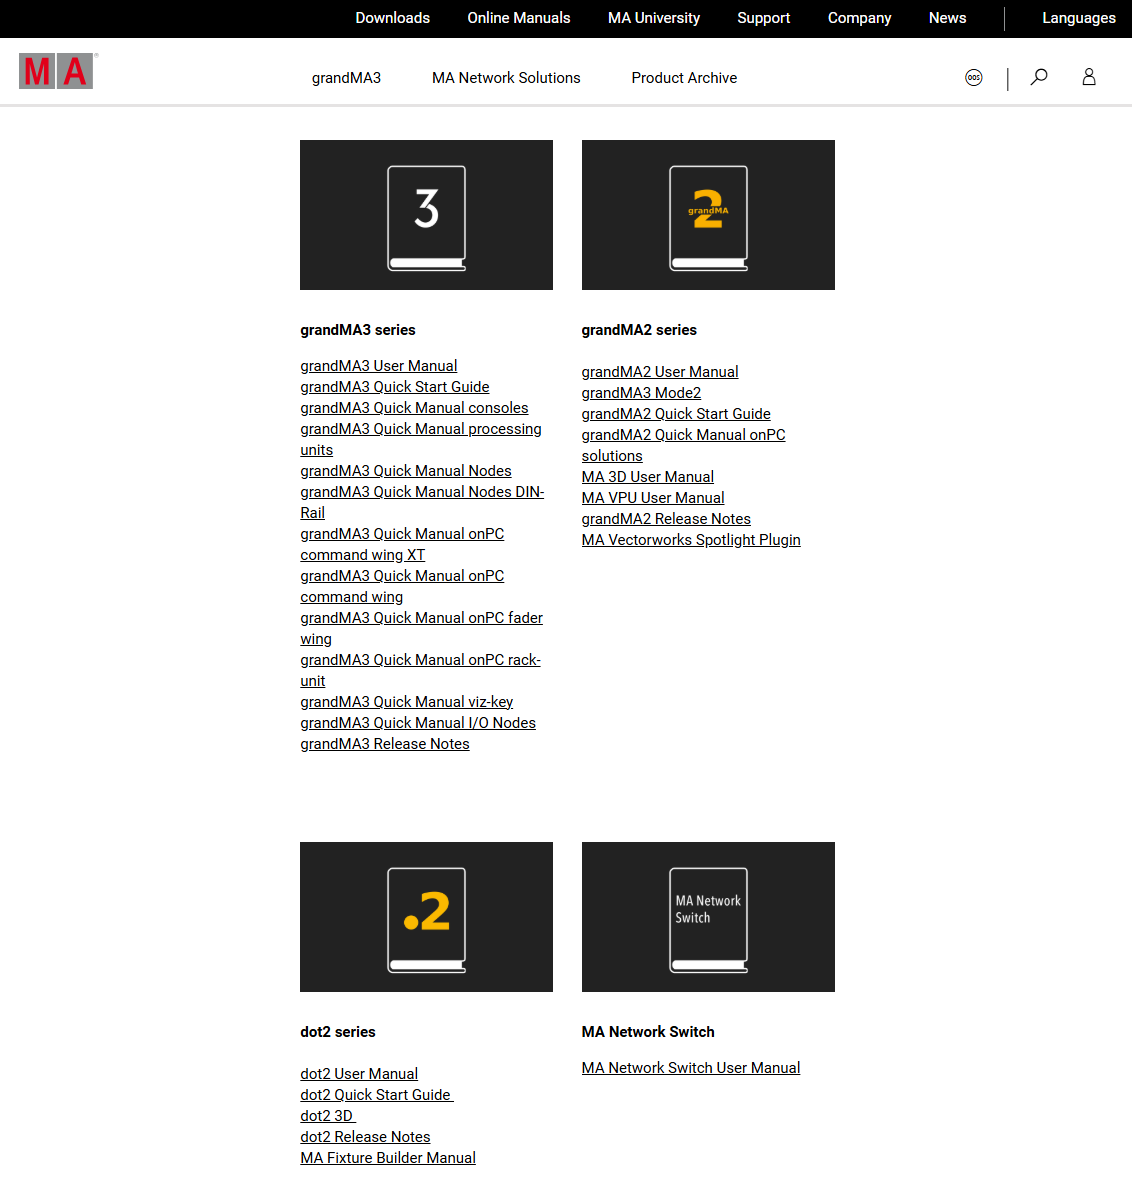 Online Manuals on the MA Lighting website | | | | ------------------------------------------ | --------------------------------------------------------------------------------------------------------------------------------------------------------------------------------------------------------------------------------------------------------------------------------- | |  | **Hint:** | | | The grandMA3 online manual includes all versions of the manual since software version 2.0.You can download all versions of the manual, including software versions prior to 2.0, as PDF files. For more information see [Open the Help as PDF](/grandma3/2-3/atm_open_help_pdf/). |
# Videos in the Help
> The Help system offers micro-videos to introduce the user to specific features or tasks in the software. The average video length is less than one minute. A top
The Help system offers micro-videos to introduce the user to specific features or tasks in the software. The average video length is less than one minute. A topic can have several videos. A video is indicated by a play icon () . | | | | ------------------------------------------ | ------------------------------------------------------------------------------------------------------------------------------------------------------------ | |  | **Hint:** | | | Videos in the help are only visible when an internet connection is established! For more information, see [Networking](/grandma3/2-3/network/#h2_275512621). | When the internet connection is interrupted, a placeholder is shown instead of the video:  Help window - Video placeholder Videos are recorded in the grandMA3 onPC software. For better visualization, mouse effects are used: * Mouse highlight effect in a yellow color. * Left mouse click effect in a red color. * Right mouse click effect in a gray color. *** ## Play a Video [Section titled “Play a Video”](#play-a-video) To start playing a video: * Tap the play icon (). The video starts. To stop playing a video: * Tap anywhere in the video area. The video stops. Or * Tap the pause button () in the video control bar. To restart a video: * Tap the restart button () after the video is finished. *** ## Video Control Bar [Section titled “Video Control Bar”](#video-control-bar) The video control bar is located at the bottom of the video area.  Video control bar * To display the video control bar in the console, tap the video area. The video control bar appears for several seconds. * To display the video control bar in grandMA3 onPC, hover the mouse over the video area. * To jump to a specific position in the video, tap the timeline in the control bar. To change the playback speed of the video: 1. Tap the gear icon  on the right. The settings open. 2. Tap Speed. A dropdown menu opens. 3. Tap a value to increase or decrease the speed of the video. 4. Tap  to close the settings. The playback speed is changed. *** Example The following video shows an example of how to open a video and change the playback speed: [Vimeo video](https://player.vimeo.com/video/1093106854?title=0\&byline=0\&portrait=0\&color=ffeb0f)
# Bitmap
> The Bitmaps allow the use of media files (images, gobos, symbols, or videos) for mapping them to a selection of fixtures. Bitmaps are organized in the Bitmaps p
| | | | -------------------------------------------------- | ------------------------------------------------------------------------------------------------------------------------------------------------------------------------------------------------------------------------------------------------------------------------------------------------------------------------------ | |  | **Known Limitation:** | | | The system can overload and crash if a high-resolution (8K) video is previewed in the Layout Viewer. The video source should not exceed a resolution of 1 920 x 1 080 pixels. Maximum frame rate is 60 Hz, but since the DMX output is a maximum of 30 Hz, it is recommended to also use this framerate for the video sources. | The Bitmaps allow the use of media files (images, gobos, symbols, or videos) for mapping them to a selection of fixtures. Bitmaps are organized in the **Bitmaps** pool. The Bitmap pool is part of the data pools. To address the Bitmap pool objects, use the [Bitmap keyword](/grandma3/2-3/keyword_bitmap/).  Example of the Bitmaps pool | | | | ------------------------------------------ | ------------------------------------------------------------------------------------------------------- | |  | **Hint:** | | | For testing purposes, three simple video clips are provided. These can be imported into the Video pool. | | | | | ------------------------------------------ | ----------------------------------------------------------------------------------------------------------------------------------------- | |  | **Hint:** | | | If NDI input is used in a setup with several consoles and processing units, the NDI stream must be available at all calculating stations. | ## Bitmap Canvas [Section titled “Bitmap Canvas”](#bitmap-canvas) The canvas is an essential concept for Bitmaps. To be able to output a Bitmap to fixtures, it is necessary to select fixtures and arrange them in the Selection Grid. The Bitmap applies the dynamic value changes coming from the media file to a canvas. This canvas is mapped to the selection grid. The Selection Grid window shows the selected fixtures and their arrangement. It is a very useful programming tool. Learn more about it in the [Selection Grid topic](/grandma3/2-3/operate_selection/). A purple rectangle in the selection grid represents the canvas. It is visible as long as one attribute of the selection uses a Bitmap as a value. The canvas should be in the same area as the arranged fixtures for the fixture to be affected by the Bitmap. The size and aspect of the canvas can be changed using different settings in the Bitmap Configuration. The selected fixtures should be arranged in the selection grid in a manner that makes sense for the desired output. The canvas can be adjusted automatically or by different built-in functions. The Bitmap Editor is described below. The editor has some buttons related to the canvas and the fixture arrangement in the canvas area. Tapping At applies the Bitmap to the current selection. Tapping Dimensions From Selection changes the width and height of the selected Bitmap Configuration (see below) to match the current selection’s size in the selection grid. Tapping Format Selection scales the current selection in the grid so it fits as close as possible to the size of the canvas. The ratio of the selection in the selection grid is taken into account when scaling the selection. Toggling On Auto Format automatically performs a “Format Selection” when the Bitmap is applied to a new selection. ## Bitmap Editor [Section titled “Bitmap Editor”](#bitmap-editor) The best way to create a new bitmap is by editing an empty pool object. This opens the **Bitmap Editor**: 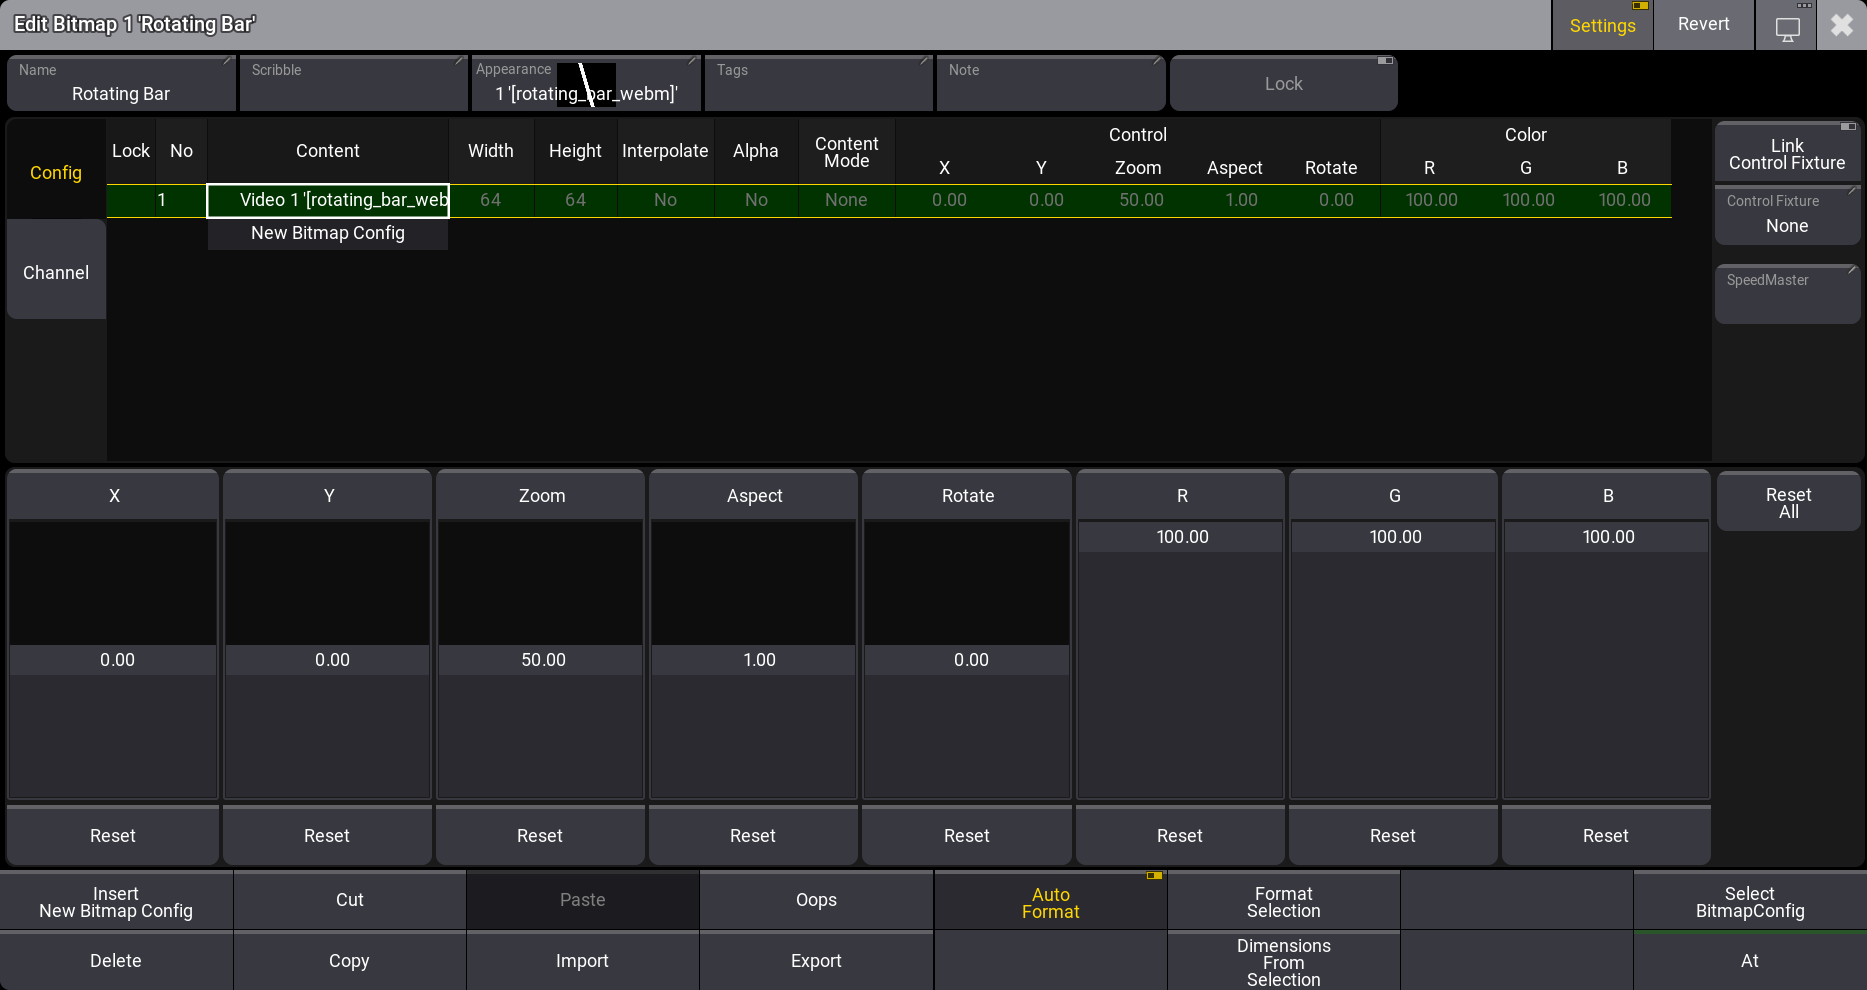 The Bitmap editor can be used to edit the Bitmap. The top area of the editor gives access to the Bitmap Configurations or the Bitmap Channels. Tap the relevant tab on the left side to switch between the two. On the right side of this area, there are some buttons to add connections to a Bitmap Control Fixture (read more about this below) and a Speed Master. Below this area are on-screen faders that give access to change the **Control** and **Color** attributes of the selected Bitmap Configuration. Each on-screen fader has a Reset button below. Tapping this will reset the associated fader value to the default value. A Reset All button resets all the attributes represented by the on-screen faders. At the bottom of the editor are the usual editor buttons and some special buttons for the Bitmap editor. The special buttons are described in the following text. The encoder toolbar changes to show the same attributes as the on-screen fader while the editor has focus.  This is the encoder toolbar shown when the Bitmap editor has focus. The title bar has a Revert button. Tapping this discards all current changes to the valid values when the Bitmap editor was opened. There is also a Settings button which toggles the visibility of the bitmap settings. ## Bitmap Configuration [Section titled “Bitmap Configuration”](#bitmap-configuration) The bitmap configuration is a sheet with columns containing settings and rows representing different media files. The bitmap can contain several rows with bitmap configurations but only plays the selected bitmap configuration. The selected row is marked with a green background color. A row can be selected by tapping it in the list and then tapping Select Bitmap Config in the bottom area. The Bitmap Configuration has the following settings organized in columns: * **Content**:\ This is the media file played back by the Bitmap Configuration. * **Width**:\ This is the width of the canvas to which the content is mapped. The default value is 64 pixels or squares in the selection grid. * **Height**:\ This is the height of the canvas to which the content is mapped. The default value is 64 pixels or squares in the selection grid. * **Interpolate**:\ Smoothens the transition from fixture to fixture when playing back a media file. * **Alpha**:\ The used media file’s alpha channel is considered and made transparent when enabled. * **Content Mode**:\ This setting has three different options: * **None** (default value):\ The media file uses the part of the canvas based on the media file size, the canvas size, and the zoom. The result can be that the media file only takes up a small part of the canvas. * **Clip**:\ The media file scales to use the whole canvas size. * **Wrap**: The media file is displayed several times across the canvas. * **Control - X**:\ Moves the canvas on the X-axis in the selection grid. * **Control - Y**:\ Moves the canvas on the Y-axis in the selection grid. * **Control - Zoom**:\ Zooms the canvas in the selection grid and keeps the aspect ratio. * **Control - Aspect**:\ Changes the aspect ratio of the canvas in the Y direction in the selection grid. * **Control - Rotate**:\ Rotates the canvas in the selection grid. * **Color - R**:\ Changes the red color of the played-back media files. * **Color - G**:\ Changes the green color of the played-back media files. * **Color - B**:\ Changes the blue color of the played-back media files. Adding a new bitmap configuration will set the values for Control, Width, and Height to the values of the currently selected bitmap configuration. ## Bitmap Channel [Section titled “Bitmap Channel”](#bitmap-channel) The bitmap channels define which fixture attributes respond to the media file content. The bitmap channel sheet has different fixture attributes in rows and the channel settings in columns. These are the settings: * **Attribute**:\ The fixture attribute defines what the bitmap should affect. * **Source**:\ The source defines which part of the media file should be analyzed to create the values for the fixture attribute. * **Value - Low**:\ Defines the low value of the fixture attribute to which the source should be mapped. * **Value - High**:\ Defines the high value of the fixture attribute to which the source should be mapped. Attributes can be added to change what the Bitmap effects. For instance, Tilt can be added, and a pixel’s intensity in a video can be used to dynamically change the tilt between the low and high values. ## Bitmap Control Fixture [Section titled “Bitmap Control Fixture”](#bitmap-control-fixture) One or several special Bitmap Control fixtures can be added to the patch. The Bitmap Control fixture has attributes to change the Color values and some of the Control values in the Bitmap Configuration. It can also be used to change the selected Bitmap Configuration. The right side of the Bitmap editor has a Control Fixture button. Tapping this opens a small select pop-up where one of the patched Bitmap Control fixtures can be selected. Selecting a fixture here automatically toggles On the Link Control Fixture. When this is On, then the selected Bitmap Control fixture can be used to control the Bitmap Configuration values. This fixture has programmer values that can be stored in cues or presets. A suggested workflow could be the following. It assumes normal patched fixtures and an existing Bitmap. 1. Patch at least one fixture using the MA Lighting Bitmap Control fixture type. Give it at least a FID number. 2. Select the fixtures which should use the Bitmap and arrange them in the Selection Grid. 3. Tap the desired Bitmap in the pool or use the keyword to apply the Bitmap to the selected fixtures. 4. Select the Bitmap Control fixture. 5. Apply the desired Bitmap to the Bitmap Control fixture by tapping the Bitmap generator object in the pool or by using the At Bitmap syntax. This will set the Bitmap Generator as the value on the Object attribute in the Gobo feature group of the Bitmap Control fixture. To apply a different Bitmap Configuration, scroll through the Config attribute. The attributes X, Y, R, G, B, and Zoom of the Bitmap Control fixture modify the corresponding settings of the Bitmap generator. ## Speed Master [Section titled “Speed Master”](#speed-master) The speed of the Bitmap is relevant when the content is a video. As a default, the Bitmap will play the video using the speed of the video. A Speed Master can be assigned to the Bitmap by tapping SpeedMaster on the right side. This Speed Master will then adjust the playback speed of the Bitmap. ## Using Bitmaps [Section titled “Using Bitmaps”](#using-bitmaps) Bitmaps must be applied to a selection of fixtures. This can be done by tapping a Bitmap with a selection of fixtures. It can also be done using the following syntax: At Bitmap \[“Bitmap\_Name” or Bitmap\_Number] This applies the Bitmap to the relevant attributes, based on the Bitmap Channels, in the programmer. These programmer values can be stored in presets or cues. The Bitmap Fixture connected to a Bitmap can also be stored in Presets and Cues.
# MA Network Switch
> The MA Network Switch is the perfect device for a full lighting control solution. The combination of console, switch, and networking devices provides the easies
The MA Network Switch is the perfect device for a full lighting control solution. The combination of console, switch, and networking devices provides the easiest solution even for complex lighting systems. You can control the MA Network Switch by using the web interface or directly with a grandMA3 console in Mode2 or a grandMA2 onPC. For more information about how to control the MA Network Switch by using the web interface, see the [MA Network Switch manual](https://help.malighting.com/grandMA2/en/help/key_control_ma_switch.html). To learn how to control the MA Network Switch from a grandMA3 console in [Mode2](https://help.malighting.com/grandMA2/en/help/grandma3_mode2/index.html) or a grandMA2 onPC, read the topic [Control the MA Network Switch](https://help.malighting.com/grandMA2/en/help/key_control_ma_switch.html) in the [grandMA2 User Manual](https://help.malighting.com/grandMA2/en/help/index.html). There, you will find out how to add the MA Network Switch to the network configuration, configure ports, or edit groups and presets. For more information about changing to grandMA3 Mode2, read the [Mode2 topic](https://help.malighting.com/grandMA2/en/help/grandma3_mode2/index.html) in the section grandMA3 Mode2 of the [grandMA2 User Manual](https://help.malighting.com/grandMA2/en/help/index.html).
# RemoteHID
> The Remote HID feature allows using the local HID devices (typically mouse and keyboard) to control other grandMA3 stations that are available in the network as
The Remote HID feature allows using the local HID devices (typically mouse and keyboard) to control other grandMA3 stations that are available in the network as if the local HID devices are connected to the remote device. A use case for this feature is controlling onPC stations that are used for visualization right at a console. Instead of placing several mice and keyboards on the table, only one set of mouse and/or keyboard is needed. | | | | -------------------------------------------------- | ----------------------------------------------------------------------------------------- | |  | **Restriction:** | | | It is not a remote desktop feature. The display of the remote device needs to be visible. | To control another station from the local console, follow these steps: 1. Enable RemoteHID in Menu - Network menu on the remote station. 2. Execute the RemoteHID command on the local station: RemoteHID IP \[remote\_ip\_address] - Or - RemoteHID \[remote\_station\_type] \[“remote\_hostname”] 3. When the connection has been established, the screen of the local station changes to olive green. During the connection, only the executors, including the 100mm faders and Go+\[Large], Go-\[Large], and Pause\[Large] remain usable on the local station. All other elements are blocked. The remote function can be ended using one of the following options: * Press MA + MA + Off * Use the keyboard shortcut Shift + Ctrl + Alt + E ### Example [Section titled “Example”](#example) A preprogramming setup where there are a console and a powerful graphics computer running grandMA3 onPC optimized for 3D visualization. They are connected in a session on a local LAN network. The grandMA3 onPCs hostname is “3D” and RemoteHID is enabled. From the console, there is a need to change a setting in the 3D window on the grandMA3 onPC. In the command line, type: | | | | ------------------------------------------------------------------ | --------------------------------------- | |  | User name\[Fixture]>RemoteHID onPC “3D” | Now, the mouse and keyboard connected to the console can be used to operate the computer. Finish the connection by pressing MA + MA + Off
# grandMA3 Nodes
> To adjust the settings in the grandMA3 Nodes, it may be convenient to control them from a connected console or a onPC station.
To adjust the settings in the grandMA3 Nodes, it may be convenient to control them from a connected console or a onPC station. For more information, read the [Session topic](/grandma3/2-3/network_session/) in the [Networking section](/grandma3/2-3/network/). | | | | ------------------------------------------ | --------------------------------------------------------------------------------------------------------------------------------------------------------------------------------------------------------------------------------------------------------------------------------------------------------------------------------------------------------------- | |  | **Hint:** | | | If you want to use Art-Net or sACN using grandMA3 nodes, make sure to switch the console to [Mode2](https://help2.malighting.com/Page/grandMA2/mode2/en/). For information on how to configure the xPort Nodes in Mode2 see [Configure xPort Nodes in the Console](https://help2.malighting.com/Page/grandMA2/control_ma_xport_node_configure_on_console/en/). | ## Change Name and Set IP Address [Section titled “Change Name and Set IP Address”](#change-name-and-set-ip-address) To change the name and to set the IP address of a grandMA3 Node, open the Network Interface Menu: * Press Menu.\ \- Opens the [menu select pop-up](/grandma3/2-3/wvm_menus/). * Tap Network.\ \- Opens the Network menu.  Network menu
# Command Syntax and Keywords
> The command line is an essential way of communication between the console and its operator.
The command line is an essential way of communication between the console and its operator. Using keywords, special characters, and numerical identifiers is how the operator tells the console what to do. | | | | ------------------------------------------------ | ----------------------------------------------------------------------------------------------------------- | |  | **Important:** | | | Depending on the use case, some commands can be executed using the [Please key](/grandma3/2-3/key_please/). | ### Example [Section titled “Example”](#example) * To delete sequence 1, type: | | | | ------------------------------------------------------------------ | ------------------------------------- | |  | User name\[Fixture]>Delete Sequence 1 | * Or use the keys in the command section of the console and press: Delete + Sequ + 1 + Please *** ## Keywords [Section titled “Keywords”](#keywords) The keywords that are mostly used have their own corresponding keys. For more information on the multiple functions of the keys see [Keys](/grandma3/2-3/keys/). | | | | ------------------------------------------------ | ---------------------------------------------------------------------------------------------------- | |  | **Important:** | | | All keywords can be entered in the command line using the internal or any other connected keyboard. | To view the commands issued to the console, tap MA in the left corner of the command line. The **Command Line History** opens. For more information on the usage of the command line in detail see [Command Line](/grandma3/2-3/ws_ui_command_line/). ## Subtopics [Section titled “Subtopics”](#subtopics) * [Syntax Rules](/grandma3/2-3/csk_syntax_rules/) * [Parent Child Concept](/grandma3/2-3/csk_parent_child/) * [General Keywords](/grandma3/2-3/csk_general_keywords/) * [Option Keywords](/grandma3/2-3/option_keywords/) * [Extended Command Line Syntax Options](/grandma3/2-3/extended_command_line/)
# Command Editor
> When editing a command, for example, in a macro, a cue, or an agenda event, the Edit Command pop-up opens:
## Command Input [Section titled “Command Input”](#command-input) When editing a command, for example, in a macro, a cue, or an agenda event, the **Edit Command** pop-up opens: ## Subtopics [Section titled “Subtopics”](#subtopics) * [user profile settings](/grandma3/2-3/user_settings/)
# Control other MA Devices
> This section describes how to control other MA devices via the console.
This section describes how to control other MA devices via the console. ## Subtopics [Section titled “Subtopics”](#subtopics) * [grandMA3 Nodes](/grandma3/2-3/comad_xport_nodes/) * [MA Network Switch](/grandma3/2-3/comad_network_switch/) * [RemoteHID](/grandma3/2-3/comad_remotehid/)
# General Keywords
> Using keywords provides one of many possibilities to operate the grandMA3 console.
Using keywords provides one of many possibilities to operate the grandMA3 console. The following subtopics cover each of the available grandMA3 keywords. These are arranged in alphabetical order. Each topic describes various means of entering the keyword into the command line, provides definition, proper syntax, and depicts examples of the keywords. ## Subtopics [Section titled “Subtopics”](#subtopics) * [; (Semicolon)](/grandma3/2-3/keyword_semicolon/) * [/ (Slash)](/grandma3/2-3/keyword_slash/) * [. (Dot)](/grandma3/2-3/keyword_dot/) * [= (Equal)](/grandma3/2-3/keyword_equal/) * [#Object](/grandma3/2-3/keyword_hashsquarebrackets/) * [$ (Dollar Sign)](/grandma3/2-3/keyword_dollarsign/) * [<<< (GoFastBackward)](/grandma3/2-3/keyword_gofastbackward/) * [>>> (GoFastForward)](/grandma3/2-3/keyword_gofastforward/) * [- (Minus)](/grandma3/2-3/keyword_minus/) * [\* (Asterisk)](/grandma3/2-3/keyword_asterisk/) * [% (Percent)](/grandma3/2-3/keyword_percent/) * [+ (Plus)](/grandma3/2-3/keyword_plus/) * [Absolute](/grandma3/2-3/keyword_absolute/) * [Acceleration](/grandma3/2-3/keyword_acceleration/) * [Action](/grandma3/2-3/keyword_action/) * [Agenda](/grandma3/2-3/keyword_agenda/) * [ActivationGroup](/grandma3/2-3/keyword_activationgroup/) * [Align](/grandma3/2-3/keyword_align/) * [AlignTransition](/grandma3/2-3/keyword_aligntransition/) * [Appearance](/grandma3/2-3/keyword_appearance/) * [Assign](/grandma3/2-3/keyword_assign/) * [At](/grandma3/2-3/keyword_at/) * [Attribute](/grandma3/2-3/keyword_attribute/) * [AutoCreate](/grandma3/2-3/keyword_autocreate/) * [AutoStore](/grandma3/2-3/keyword_autostore/) * [Bitmap](/grandma3/2-3/keyword_bitmap/) * [Black](/grandma3/2-3/keyword_black/) * [Blind](/grandma3/2-3/keyword_blind/) * [Block](/grandma3/2-3/keyword_block/) * [BPM](/grandma3/2-3/keyword_bpm/) * [Call](/grandma3/2-3/keyword_call/) * [CancelSoftwareUpdate](/grandma3/2-3/keyword_cancelsoftwareupdate/) * [Camera](/grandma3/2-3/keyword_camera/) * [Capture](/grandma3/2-3/keyword_capture/) * [ChangeDestination](/grandma3/2-3/keyword_changedestination/) * [Channel](/grandma3/2-3/keyword_channel/) * [ChangeMulticastBase](/grandma3/2-3/keyword_changemultcastbase/) * [ChannelFunctionDefault](/grandma3/2-3/keyword_channelfunctiondefault/) * [ChannelSet](/grandma3/2-3/keyword_channelset/) * [Chat](/grandma3/2-3/keyword_chat/) * [ChatJoin](/grandma3/2-3/keyword_chatjoin/) * [ChatLeave](/grandma3/2-3/keyword_chatleave/) * [CleanUp](/grandma3/2-3/keyword_cleanup/) * [Clear](/grandma3/2-3/keyword_clear/) * [ClearActive](/grandma3/2-3/keyword_clear_active/) * [ClearAll](/grandma3/2-3/keyword_clear_all/) * [ClearSelection](/grandma3/2-3/keyword_clear_selection/) * [Clone](/grandma3/2-3/keyword_clone/) * [CommandDelay](/grandma3/2-3/keyword_commanddelay/) * [Collect](/grandma3/2-3/keyword_collect/) * [Collection](/grandma3/2-3/keyword_collection/) * [Color](/grandma3/2-3/keyword_color/) * [ColorDefinition](/grandma3/2-3/keyword_colordefinition/) * [ColorTheme](/grandma3/2-3/keyword_colortheme/) * [Configuration](/grandma3/2-3/keyword_configuration/) * [Console](/grandma3/2-3/keyword_console/) * [Cook](/grandma3/2-3/keyword_cook/) * [Copy](/grandma3/2-3/keyword_copy/) * [Cue](/grandma3/2-3/keyword_cue/) * [CopyCrashLog](/grandma3/2-3/keyword_copycrashlog/) * [CueAbsolute](/grandma3/2-3/keyword_cueabsolute/) * [CueDelay](/grandma3/2-3/keyword_cuedelay/) * [CueFade](/grandma3/2-3/keyword_cuefade/) * [CueInDelay](/grandma3/2-3/keyword_cueindelay/) * [CueInFade](/grandma3/2-3/keyword_cueinfade/) * [CueOutDelay](/grandma3/2-3/keyword_cueoutdelay/) * [CueOutFade](/grandma3/2-3/keyword_cueoutfade/) * [CueRelative](/grandma3/2-3/keyword_cuerelative/) * [CueUpdate](/grandma3/2-3/keyword_cueupdate/) * [CurrentEnvironment](/grandma3/2-3/keyword_currentenvironment/) * [CurrentUser](/grandma3/2-3/keyword_current_user/) * [CurrentUserProfile](/grandma3/2-3/keyword_current_user_profile/) * [Cut](/grandma3/2-3/keyword_cut/) * [DataPool](/grandma3/2-3/keyword_datapool/) * [Deceleration](/grandma3/2-3/keyword_deceleration/) * [Deactivate](/grandma3/2-3/keyword_deactivate/) * [Decimal8](/grandma3/2-3/keyword_decimal8/) * [Decimal16](/grandma3/2-3/keyword_decimal16/) * [Decimal24](/grandma3/2-3/keyword_decimal24/) * [Default](/grandma3/2-3/keyword_default/) * [Delay](/grandma3/2-3/keyword_delay/) * [DeleteGlobalVariable](/grandma3/2-3/keyword_deleteglobalvariable/) * [Delete](/grandma3/2-3/keyword_delete/) * [DeleteOtherVersion](/grandma3/2-3/keyword_deleteotherversion/) * [DeleteUserVariable](/grandma3/2-3/keyword_deleteuservariable/) * [Disconnect](/grandma3/2-3/keyword_disconnect/) * [Dismiss](/grandma3/2-3/keyword_dismiss/) * [Display](/grandma3/2-3/keyword_display/) * [DMXAddress](/grandma3/2-3/keyword_dmx_address/) * [DMXLayer](/grandma3/2-3/keyword_dmx_layer/) * [DMXReadout](/grandma3/2-3/keyword_dmxreadout/) * [DMXUniverse](/grandma3/2-3/keyword_dmx_universe/) * [DoubleSpeed](/grandma3/2-3/keyword_doublespeed/) * [Down](/grandma3/2-3/keyword_down/) * [DumpLog](/grandma3/2-3/keyword_dumplog/) * [Drive](/grandma3/2-3/keyword_drive/) * [DropOwnership](/grandma3/2-3/keyword_dropownership/) * [Echo](/grandma3/2-3/keyword_echo/) * [Edit](/grandma3/2-3/keyword_edit/) * [EditSetting](/grandma3/2-3/keyword_editsetting/) * [Eject](/grandma3/2-3/keyword_eject/) * [EditRecipe](/grandma3/2-3/keyword_editrecipe/) * [Effect](/grandma3/2-3/keyword_effect/) * [EncoderBank](/grandma3/2-3/keyword_encoderbank/) * [EncoderBar](/grandma3/2-3/keyword_encoderbar/) * [EndIf](/grandma3/2-3/keyword_endif/) * [Environment](/grandma3/2-3/keyword_environment/) * [Exchange](/grandma3/2-3/keyword_exchange/) * [Executor](/grandma3/2-3/keyword_executor/) * [Export](/grandma3/2-3/keyword_export/) * [Extension](/grandma3/2-3/keyword_extension/) * [Extract](/grandma3/2-3/keyword_extract/) * [Fade](/grandma3/2-3/keyword_fade/) * [FaderCrossFade](/grandma3/2-3/keyword_fadercrossfade/) * [FaderCrossFadeA](/grandma3/2-3/keyword_fadercrossfadea/) * [FaderCrossFadeB](/grandma3/2-3/keyword_fadercrossfadeb/) * [FaderMaster](/grandma3/2-3/keyword_fadermaster/) * [FaderRate](/grandma3/2-3/keyword_faderrate/) * [FaderSpeed](/grandma3/2-3/keyword_faderspeed/) * [FaderTime](/grandma3/2-3/keyword_fadertime/) * [FaderTemp](/grandma3/2-3/keyword_fadertemp/) * [FeatureGroup](/grandma3/2-3/keyword_featuregroup/) * [Filter](/grandma3/2-3/keyword_filter/) * [Fix](/grandma3/2-3/keyword_fix/) * [Fixture](/grandma3/2-3/keyword_fixture/) * [FixtureClass](/grandma3/2-3/keyword_fixture_class/) * [FastSync](/grandma3/2-3/keyword_fastsync/) * [FixtureLayer](/grandma3/2-3/keyword_fixture_layer/) * [FixtureType](/grandma3/2-3/keyword_fixturetype/) * [Flash](/grandma3/2-3/keyword_flash/) * [Flip](/grandma3/2-3/keyword_flip/) * [Fog](/grandma3/2-3/keyword_fog/) * [Freeze](/grandma3/2-3/keyword_freeze/) * [Full](/grandma3/2-3/keyword_full/) * [Gel](/grandma3/2-3/keyword_gel/) * [Generator](/grandma3/2-3/keyword_generator/) * [GetGlobalVariable](/grandma3/2-3/keyword_getglobalvariable/) * [GetUserVariable](/grandma3/2-3/keyword_getuservariable/) * [Go+](/grandma3/2-3/keyword_goplus/) * [Go-](/grandma3/2-3/keyword_gominus/) * [Goto](/grandma3/2-3/keyword_goto/) * [Grid](/grandma3/2-3/keyword_grid/) * [GridPosition](/grandma3/2-3/keyword_gridposition/) * [GridStore](/grandma3/2-3/keyword_gridstore/) * [GoboImage](/grandma3/2-3/keyword_goboimage/) * [Group](/grandma3/2-3/keyword_group/) * [HalfSpeed](/grandma3/2-3/keyword_halfspeed/) * [Help](/grandma3/2-3/keyword_help/) * [HelpLua](/grandma3/2-3/keyword_helplua/) * [Hex8](/grandma3/2-3/keyword_hex8/) * [Hex16](/grandma3/2-3/keyword_hex16/) * [HelpKeyword](/grandma3/2-3/keyword_helpkeyword/) * [Hex24](/grandma3/2-3/keyword_hex24/) * [Highlight](/grandma3/2-3/keyword_highlight/) * [Hold](/grandma3/2-3/keyword_hold/) * [Houselights](/grandma3/2-3/keyword_houselights/) * [Hz](/grandma3/2-3/keyword_hz/) * [If](/grandma3/2-3/keyword_if/) * [IfActive](/grandma3/2-3/keyword_ifactive/) * [IfProgrammer](/grandma3/2-3/keyword_ifprogrammer/) * [IfOutput](/grandma3/2-3/keyword_ifoutput/) * [Image](/grandma3/2-3/keyword_image/) * [Import](/grandma3/2-3/keyword_import/) * [Index](/grandma3/2-3/keyword_index/) * [Insert](/grandma3/2-3/keyword_insert/) * [Integrate](/grandma3/2-3/keyword_integrate/) * [Interface](/grandma3/2-3/keyword_interface/) * [Invert](/grandma3/2-3/keyword_invert/) * [Invite](/grandma3/2-3/keyword_invite/) * [IP](/grandma3/2-3/keyword_ip/) * [JoinSession](/grandma3/2-3/keyword_joinsession/) * [Key](/grandma3/2-3/keyword_key/) * [Keyboard](/grandma3/2-3/keyword_keyboard/) * [KeyboardShortcut](/grandma3/2-3/keyword_keyboardshortcut/) * [Kill](/grandma3/2-3/keyword_kill/) * [KnockIn](/grandma3/2-3/keyword_knockin/) * [KnockOut](/grandma3/2-3/keyword_knockout/) * [Label](/grandma3/2-3/keyword_label/) * [Layout](/grandma3/2-3/keyword_layout/) * [LearnSpeed](/grandma3/2-3/keyword_learnspeed/) * [LeaveSession](/grandma3/2-3/keyword_leavesession/) * [Library](/grandma3/2-3/keyword_library/) * [List](/grandma3/2-3/keyword_list/) * [ListOwnership](/grandma3/2-3/keyword_listownership/) * [ListReference](/grandma3/2-3/keyword_listreference/) * [Load](/grandma3/2-3/keyword_load/) * [Loaded](/grandma3/2-3/keyword_loaded/) * [Learn](/grandma3/2-3/keyword_learn/) * [LoadShow](/grandma3/2-3/keyword_loadshow/) * [ListCrashLog](/grandma3/2-3/keyword_listcrashlog/) * [Lock](/grandma3/2-3/keyword_lock/) * [LogIn](/grandma3/2-3/keyword_login/) * [LogOut](/grandma3/2-3/keyword_logout/) * [Lowlight](/grandma3/2-3/keyword_lowlight/) * [Lua](/grandma3/2-3/keyword_lua/) * [LuaFile](/grandma3/2-3/keyword_luafile/) * [Macro](/grandma3/2-3/keyword_macro/) * [MArker](/grandma3/2-3/keyword_marker/) * [Master](/grandma3/2-3/keyword_master/) * [MAtricks](/grandma3/2-3/keyword_matricks/) * [Measure](/grandma3/2-3/keyword_measure/) * [Media](/grandma3/2-3/keyword_media/) * [MemoryInfo](/grandma3/2-3/keyword_memoryinfo/) * [Menu](/grandma3/2-3/keyword_menu/) * [Mesh](/grandma3/2-3/keyword_mesh/) * [Move](/grandma3/2-3/keyword_move/) * [Multipatch](/grandma3/2-3/keyword_multipatch/) * [MyRunningPreset](/grandma3/2-3/keyword_myrunningpreset/) * [MyRunningMacro](/grandma3/2-3/keyword_myrunningmacro/) * [MyRunningSequence](/grandma3/2-3/keyword_myrunningsequence/) * [MyRunningSoundFile](/grandma3/2-3/keyword_myrunningsoundfile/) * [MyRunningTimecode](/grandma3/2-3/keyword_myrunningtimecode/) * [MyRunningTimer](/grandma3/2-3/keyword_myrunningtimer/) * [Natural](/grandma3/2-3/keyword_natural/) * [NDI](/grandma3/2-3/keyword_ndi/) * [NewShow](/grandma3/2-3/keyword_newshow/) * [Next](/grandma3/2-3/keyword_next/) * [NextY](/grandma3/2-3/keyword_nexty/) * [NextZ](/grandma3/2-3/keyword_nextz/) * [NetworkNode](/grandma3/2-3/keyword_networknode/) * [NonDim](/grandma3/2-3/keyword_nondim/) * [Normal](/grandma3/2-3/keyword_normal/) * [Note](/grandma3/2-3/keyword_note/) * [Off](/grandma3/2-3/keyword_off/) * [Offset](/grandma3/2-3/keyword_offset/) * [NetworkSpeedTest](/grandma3/2-3/keyword_networkspeedtest/) * [On](/grandma3/2-3/keyword_on/) * [onPC](/grandma3/2-3/keyword_onpc/) * [OSC](/grandma3/2-3/keyword_osc/) * [Oops](/grandma3/2-3/keyword_oops/) * [OutputLayer](/grandma3/2-3/keyword_outputlayer/) * [Page](/grandma3/2-3/keyword_page/) * [Part](/grandma3/2-3/keyword_part/) * [Park](/grandma3/2-3/keyword_park/) * [Paste](/grandma3/2-3/keyword_paste/) * [Patch](/grandma3/2-3/keyword_patch/) * [Pause](/grandma3/2-3/keyword_pause/) * [Percent](/grandma3/2-3/keyword_percent_word/) * [PercentFine](/grandma3/2-3/keyword_percentfine/) * [Phase](/grandma3/2-3/keyword_phase/) * [Physical](/grandma3/2-3/keyword_physical/) * [Plugin](/grandma3/2-3/keyword_plugin/) * [Preset](/grandma3/2-3/keyword_preset/) * [PresetUpdate](/grandma3/2-3/keyword_presetupdate/) * [Press](/grandma3/2-3/keyword_press/) * [Preview](/grandma3/2-3/keyword_preview/) * [Previous](/grandma3/2-3/keyword_previous/) * [PreviousY](/grandma3/2-3/keyword_previousy/) * [PreviousZ](/grandma3/2-3/keyword_previousz/) * [Programmer](/grandma3/2-3/keyword_programmer/) * [Property](/grandma3/2-3/keyword_property/) * [ProcessingUnit](/grandma3/2-3/keyword_processingunit/) * [PSR](/grandma3/2-3/keyword_psr/) * [Pyro](/grandma3/2-3/keyword_pyro/) * [Quickey](/grandma3/2-3/keyword_quickey/) * [Rate1](/grandma3/2-3/keyword_rate/) * [RDM](/grandma3/2-3/keyword_rdm/) * [Readout](/grandma3/2-3/keyword_readout/) * [Reboot](/grandma3/2-3/keyword_reboot/) * [Recast](/grandma3/2-3/keyword_recast/) * [Reconnect](/grandma3/2-3/keyword_reconnect/) * [Record](/grandma3/2-3/keyword_record/) * [Relative](/grandma3/2-3/keyword_relative/) * [Release](/grandma3/2-3/keyword_release/) * [ReloadAllPlugins](/grandma3/2-3/keyword_reloadallplugins/) * [ReloadUI](/grandma3/2-3/keyword_reloadui/) * [Remote](/grandma3/2-3/keyword_remote/) * [RemoteHID](/grandma3/2-3/keyword_remotehid/) * [RemoteCommand](/grandma3/2-3/keyword_remotecommand/) * [Remove](/grandma3/2-3/keyword_remove/) * [RenderQuality](/grandma3/2-3/keyword_renderquality/) * [Reset](/grandma3/2-3/keyword_reset/) * [Restart](/grandma3/2-3/keyword_restart/) * [Root](/grandma3/2-3/keyword_root/) * [RealtimeChannel](/grandma3/2-3/keyword_realtimechannel/) * [RunningMacro](/grandma3/2-3/keyword_runningmacro/) * [RunningPreset](/grandma3/2-3/keyword_runningpreset/) * [RunningSoundFile](/grandma3/2-3/keyword_runningsoundfile/) * [RunningSequence](/grandma3/2-3/keyword_runningsequence/) * [RunningTimecode](/grandma3/2-3/keyword_runningtimecode/) * [RunningTimer](/grandma3/2-3/keyword_runningtimer/) * [SaveShow](/grandma3/2-3/keyword_saveshow/) * [ScreenConfiguration](/grandma3/2-3/keyword_screenconfiguration/) * [ReSync](/grandma3/2-3/keyword_resync/) * [ScreenContent](/grandma3/2-3/keyword_screencontent/) * [Scribble](/grandma3/2-3/keyword_scribble/) * [Seconds](/grandma3/2-3/keyword_seconds/) * [Select](/grandma3/2-3/keyword_select/) * [Selection](/grandma3/2-3/keyword_selection/) * [SelectFixtures](/grandma3/2-3/keyword_selectfixtures/) * [Sequence](/grandma3/2-3/keyword_sequence/) * [SendMIDI](/grandma3/2-3/keyword_sendmidi/) * [SendOSC](/grandma3/2-3/keyword_sendosc/) * [SendMVR](/grandma3/2-3/keyword_sendmvr/) * [Set](/grandma3/2-3/keyword_set/) * [SetGlobalVariable](/grandma3/2-3/keyword_setglobalvariable/) * [SetUserVariable](/grandma3/2-3/keyword_setuservariable/) * [Shuffle](/grandma3/2-3/keyword_shuffle/) * [ShutDown](/grandma3/2-3/keyword_shutdown/) * [SnapDelay](/grandma3/2-3/keyword_snapdelay/) * [Session](/grandma3/2-3/keyword_session/) * [SoftwareImport](/grandma3/2-3/keyword_softwareimport/) * [SoftwareUpdate](/grandma3/2-3/keyword_softwareupdate/) * [SoundChannel](/grandma3/2-3/keyword_soundchannel/) * [Solo](/grandma3/2-3/keyword_solo/) * [SpecialExecutor](/grandma3/2-3/keyword_specialexecutor/) * [Speed](/grandma3/2-3/keyword_speed/) * [Speed1](/grandma3/2-3/keyword_speed1/) * [SpeedMaster](/grandma3/2-3/keyword_speedmaster/) * [Stage](/grandma3/2-3/keyword_stage/) * [Station](/grandma3/2-3/keyword_station/) * [StationSettings](/grandma3/2-3/keyword_stationsettings/) * [Step](/grandma3/2-3/keyword_step/) * [Stomp](/grandma3/2-3/keyword_stomp/) * [Store](/grandma3/2-3/keyword_store/) * [Sound](/grandma3/2-3/keyword_sound/) * [SwitchTograndMA2Software](/grandma3/2-3/keyword_switchtograndma2software/) * [SwitchTograndMA3Software](/grandma3/2-3/keyword_switchtograndma3software/) * [Swap](/grandma3/2-3/keyword_swap/) * [Temp](/grandma3/2-3/keyword_temp/) * [Thru](/grandma3/2-3/keyword_thru/) * [Time](/grandma3/2-3/keyword_time/) * [Timecode](/grandma3/2-3/keyword_timecode/) * [TimecodeSlot](/grandma3/2-3/keyword_timecodeslot/) * [Timer](/grandma3/2-3/keyword_timer/) * [Toggle](/grandma3/2-3/keyword_toggle/) * [Top](/grandma3/2-3/keyword_top/) * [Tag](/grandma3/2-3/keyword_tag/) * [TopUp](/grandma3/2-3/keyword_topup/) * [Transition](/grandma3/2-3/keyword_transition/) * [Type](/grandma3/2-3/keyword_type/) * [UIChannel](/grandma3/2-3/keyword_uichannel/) * [UIGridSelection](/grandma3/2-3/keyword_uigridselection/) * [Unblock](/grandma3/2-3/keyword_unblock/) * [Universal](/grandma3/2-3/keyword_universal/) * [Unlock](/grandma3/2-3/keyword_unlock/) * [Unpark](/grandma3/2-3/keyword_unpark/) * [Unpress](/grandma3/2-3/keyword_unpress/) * [Up](/grandma3/2-3/keyword_up/) * [Update](/grandma3/2-3/keyword_update/) * [UpdateContent](/grandma3/2-3/keyword_updatecontent/) * [User](/grandma3/2-3/keyword_user/) * [User1](/grandma3/2-3/keyword_user1/) * [User2](/grandma3/2-3/keyword_user2/) * [UserProfile](/grandma3/2-3/keyword_userprofile/) * [Video](/grandma3/2-3/keyword_videos/) * [Version](/grandma3/2-3/keyword_version/) * [View](/grandma3/2-3/keyword_view/) * [ViewButton](/grandma3/2-3/keyword_viewbutton/) * [Width](/grandma3/2-3/keyword_width/) * [World](/grandma3/2-3/keyword_world/) * [Zero](/grandma3/2-3/keyword_zero/)
# Parent Child Concept
> The general selection syntax is not only applying to fixtures (Parent) and their levels of sub-fixtures (Child), but furthermore the general selection syntax ap
The general selection syntax is not only applying to fixtures (Parent) and their levels of sub-fixtures (Child), but furthermore the general selection syntax applies to all types of objects that use a hierarchic structure. Objects that use hierarchic structures are, for example: * Preset Pools with Presets. * Pages with Executors. * Macro with Macro lines. | | | | ------------------------------------------ | ------------------------------------------------------------------------------------------------------------------------------------------------------- | |  | **Hint:** | | | To learn more about selecting fixtures and its sub-fixtures using syntax commands, see [Select Fixtures](/grandma3/2-3/operate_select_fixtures/) topic. | To gain a faster and more logical way (for example to select, copy, move or delete objects) in the hierarchical structure, the dot (.) is an important tool in the selection syntax: * The dot (.) ends the selection on the current level and then steps one level down in the hierarchical structure.\ Instead of using the dot (.) as a separator, dedicated keywords for the objects in the next level of the hierarchy can be used. For example, Page 1 Executor 201. To restart at the top level of the hierarchy within one command, the starting keyword (for example Fixture) has to be entered again. For example, Fixture 5.2 Fixture 3 . To select fixtures in the same hierarchic structure within one command, (+) can be used. For example, Fixture 5.2 + 3. ## Dot Selection Behavior [Section titled “Dot Selection Behavior”](#dot-selection-behavior) It is not necessary to recall the subcategory of an object in a syntax command, after the subcategory is already called using the dot (.). This behavior is shown in the examples below. Do not use the following command: Clone Fixture 101 At Fixture 102 If Preset 21.101 Thru 21.105 Use a command with a omission of “21.” instead: Clone Fixture 101 At Fixture 102 If Preset 21.101 Thru 105 Do not use the following command: Move Preset 1.1 Thru 1.3 At 1.5 Use a command with a omission of “1.” instead: Move Preset 1.1 Thru 3 At 1.5 *** ## Examples for Selection Syntax [Section titled “Examples for Selection Syntax”](#examples-for-selection-syntax) To recreate the examples, the following should be prepared:\*\*\*\* * The grandMA3 demo show file is loaded. * A fixture sheet window is open. * The following fixture type is patched: * Ayrton Alienpix - RS Ex 16 Bit * Quantity: 3 * FID: 301 - 303 1. To select the second sub-fixture of fixture 301.1, type: | | | | ------------------------------------------------------------------ | ----------------------------------- | |  | User name\[Fixture]>Fixture 301.1.2 |  Second sub-sub-fixture of fixture 301 is selected 2. To select only the sub-sub-fixtures 2 to 4 of fixtures 301 to 303, type: | | | | ------------------------------------------------------------------ | --------------------------------------------------- | |  | User name\[Fixture]>Fixture 301 Thru 303.1.2 Thru 4 | In this example all fixtures on the top level have to be selected: Fixture 301 Thru 303.1.. And after the dot, the sub-fixtures are selected: 2 Thru 4.  Sub-sub-fixtures 2 to 4 are selected. 3. To select sub-sub-fixtures 4 to 6 of fixture 301, all sub-fixtures of fixture 302, and sub-sub-fixtures 1 to 5 of fixture 303, type: | | | | ------------------------------------------------------------------ | ------------------------------------------------------------------------------------ | |  | User name\[Fixture]>Fixture 301.1.4 Thru 6 Fixture 302.1. Thru Fixture 303.1. Thru 5 | In this example the . 4 in Fixture 301.1.4 steps down to the sub-fixture level. Fixture 302.1. needs to be entered to restart at the top level with fixture 302. If Fixture 302 would not be entered, the second sub-fixture of sub-fixtures 4 to 6 would be selected.  Different sub-sub-fixtures are selected for each fixture type 4. To select the fixtures as a replacement for a lasso selection, starting at fixture 302 and ending it at fixture 303.1 including the parent fixtures as a replacement for a lasso selection, type: | | | | ------------------------------------------------------------------ | ---------------------------------------------------------- | |  | User name\[Fixture]>Fixture 302. Fixture 303 Fixture 303.1 | 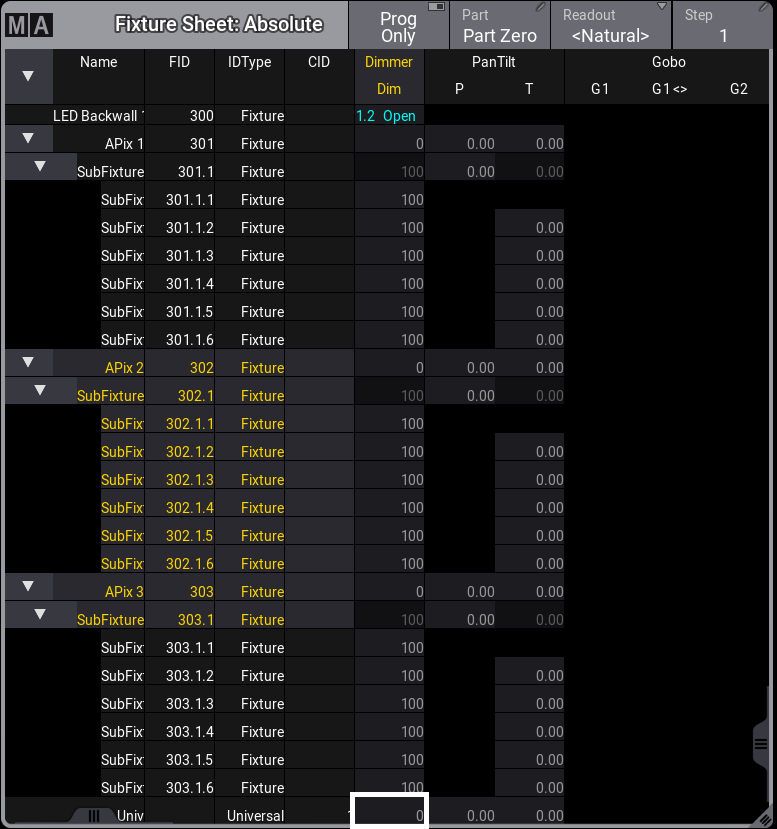 This fixture selection is a replacement for a lasso selection. 5. To select all sub-fixtures on the first sub-fixture level for all fixtures, type: | | | | ------------------------------------------------------------------ | ------------------------------------- | |  | User name\[Fixture]>Fixture Thru.Thru | *** ## Deleting Syntax [Section titled “Deleting Syntax”](#deleting-syntax) * The following examples are used in general, and are not in correspondence with the demo show file. To delete executor 201 on all pages, type: | | | | ------------------------------------------------------------------ | ---------------------------------------- | |  | User name\[Fixture]>Delete Page Thru.201 | or type: | | | | ------------------------------------------------------------------ | ------------------------------------------------- | |  | User name\[Fixture]>Delete Page Thru Executor 201 | This second example describes the additional rule of the first rule from above: Instead of using Page x.y, the Executor keyword is used to address the executors.
# Syntax Rules
> The command line syntax is used to create valid commands.
The command line syntax is used to create valid commands. Object keywords are used to allocate objects in the show file. Help keywords are used to create a relation between functions and objects. Playback keywords provide control over playback functionalities. Fader keywords are related to anything that has to do with faders. For more information see [Command Line History](/grandma3/2-3/ws_ui_command_line/). ## General Rules [Section titled “General Rules”](#general-rules) The general rules are: | | | | ------------------------------------------------ | ----------------------------------------------------- | |  | **Important:** | | | The basic syntax is as follows: \[Function] \[Object] | * All objects have a default function which is used if no function is given. * Most functions have a default object or an object type which is used if no object is given. * Objects are arranged in a hierarchical tree structure. * If an object does not support the function applied, the function is passed on to a child or parent object. *** ## Terminology [Section titled “Terminology”](#terminology) * \[Square brackets]:\ Description of non-literal content. - (Parentheses):\ Description of optional content. * “Quotation marks”/‘Quotation marks’:\ Quotation marks are used to enter a definite name or content. If the line ends after the word in quotation marks, the quotation marks at the end may be omitted. If the name or content is not a keyword and does not contain special characters, the quotation marks can be left out altogether. | | | | ------------------------------------------------ | ------------------------------------------------------------------------------------------------------------------------------------------------------------------------------------------------------------------------------------------------------------------------------ | |  | **Important:** | | | If an option or any other part of the keyword command requires two types of quotation marks - single (’) and double quotation marks (”) - make sure to always use an equal pair. For more information see the [RemoteCommand keyword](/grandma3/2-3/keyword_remotecommand/). | * Capitalization:\ In general, capitalization is important. Only when using keyword commands, the console does not distinguish between upper case and lower case. In such topics, capitalization is used to improve readability only. *** ## []()Use the Command Line [Section titled “Use the Command Line”](#use-the-command-line) It is possible to abbreviate all the commands using the shortcuts of the corresponding keywords. Each keyword has its own shortcut. Every keyword topic also names the respective shortcut. For more information see [General Keywords](/grandma3/2-3/csk_general_keywords/). | | | | ------------------------------------------------ | ---------------------------------------------------------------------------------------------------------------------------------------------------------------------------------- | |  | **Important:** | | | Shortcuts are subject to change as new keywords are added to the software. We advice you read the corresponding keyword topics and the release notes to check for recent changes. | ## Example [Section titled “Example”](#example) * To store cue 20 in sequence 8 using the overwrite function, type: Full version of the syntax: | | | | ------------------------------------------------------------------ | ------------------------------------------------------ | |  | User name\[Fixture]>Store Sequence 8 Cue 20 /Overwrite | Abbreviated version of the syntax: | | | | ------------------------------------------------------------------ | ------------------------------------- | |  | User name\[Fixture]>S Seq 8 Cue 20 /O | Very short version of the syntax: * To copy cue 2 to cue 6 of the selected sequence, type: | | | | ------------------------------------------------------------------ | ----------------------------- | |  | User name\[Fixture]>Co 2 At 6 | | | | | ------------------------------------------ | ------------------------------------------------- | |  | **Hint:** | | | The examples use the full version in the manual. |
# Content Sheet
> The Content Sheet is used to see the fixtures and values stored in cues. It looks much like the Fixture Sheet but has a masking function that only displays what
The Content Sheet is used to see the fixtures and values stored in cues. It looks much like the Fixture Sheet but has a masking function that only displays what is stored in cues and cue parts. It is like a combined Sequence Sheet in tracking mode and a Fixture Sheet. The Fixture Sheet is a window that shows all the patched fixtures that have an ID. It has different modes that can use different versions of the attribute values for each fixture.\ Learn more in [Fixture Sheet topic](/grandma3/2-3/operate_fixture_sheet/). The Sequence Sheet shows the cues in a sequence and all the settings related to cue transition. It also has a mode called Track Sheet that shows the attributes values in the cues.\ Learn more in the [Sequence Sheet topic](/grandma3/2-3/cue_sequence_sheet/). The Fixture Sheet is a window that shows all the patched fixtures that have an ID. It has different modes that can use different versions of the attribute values for each fixture.\ Learn more in [Fixture Sheet topic](/grandma3/2-3/operate_fixture_sheet/). The Content Sheet can be masked to limit what is seen in the sheet using the Mask Buttons. Learn more in the [Sheet Masking topic](). It could look like this:  *Content Sheet* The Title Bar shows the sequence ID and the cue ID of the cue being shown. If a world other than the default Full world is selected, it is also displayed in the title bar (Small World icon with a name and number next to it). The values displayed in the sheet can be edited directly in the sheet, just like in the Sequence Sheet in [Track sheet mode](/grandma3/2-3/cue_tracking/). The look of the content sheet is very customizable. The content sheet settings control this. [Read more about it ](/grandma3/2-3/cue_content_sheet/#h2_948195719)[below](/grandma3/2-3/cue_content_sheet/#h2_948195719). The example image above shows most of the pan and tilt values with a small note saying “Part 2”. This indicates that the values are stored in cue part 2. A red “DUP” in the lower right corner means duplicate data is stored in a different part of the cue. If Show Parts is turned On, the parts are separated into different frames. The same example cue would look like this: 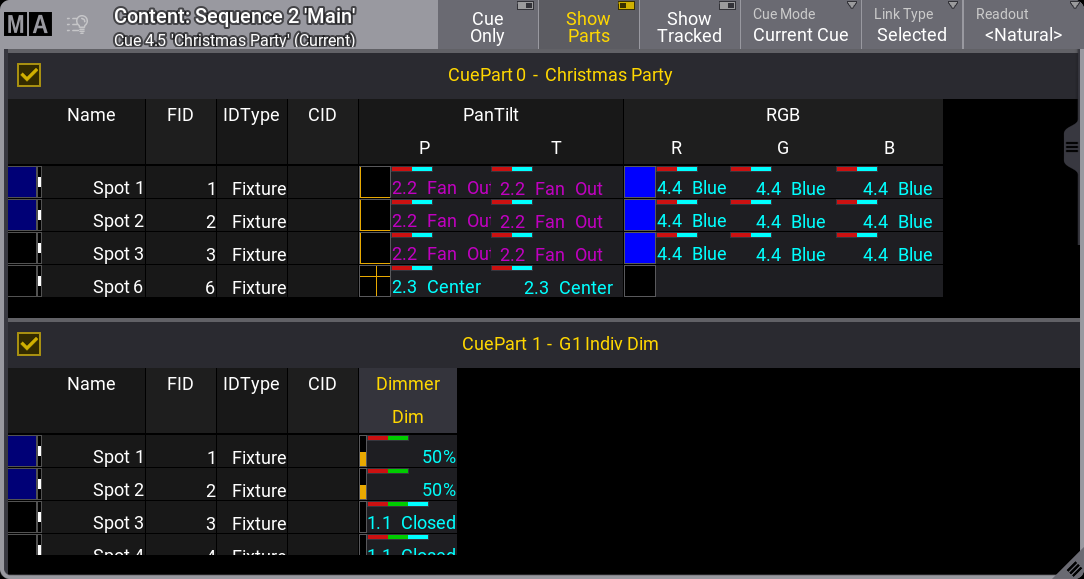 Content Sheet with multiple part frames Each frame with a cue part can be toggled On or Off by tapping the checkmark in the frame. The content sheet can automatically follow the active cue being played back. The setting **Cue Mode** defines which cue to show in the sheet. Setting the mode to **Manual** makes it possible to select a specific cue instead of following the active cue. In manual mode, an extra section on the left displays a list of all the cues in the sequence. 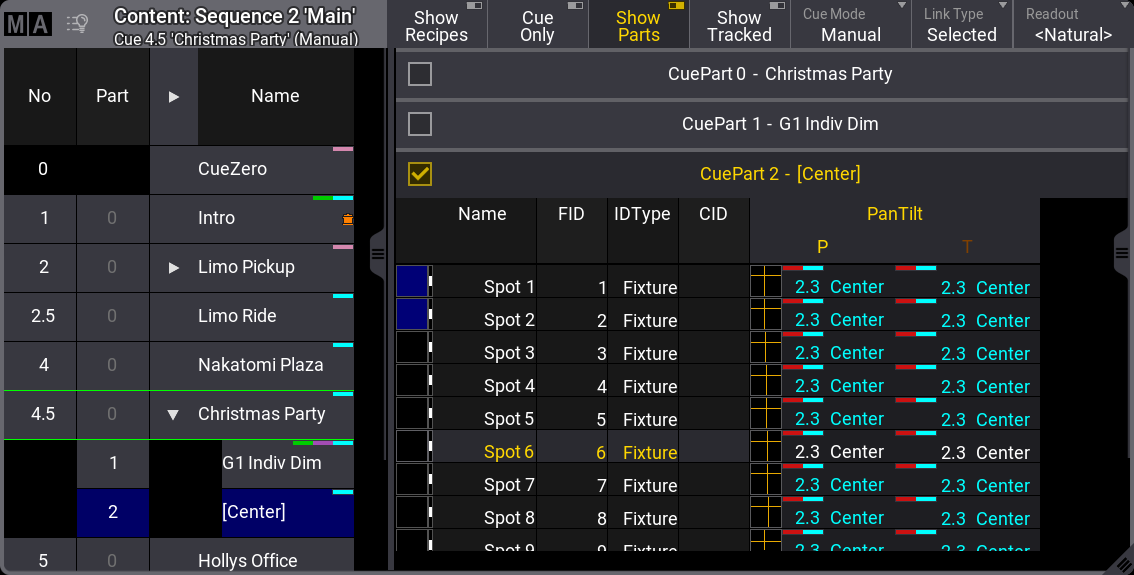 Content Sheet in Manual mode The green frame around a cue indicates the active cue being output. The blue background indicates the selected cue being displayed in the content sheet. Tapping a cue in the list makes it the selected cue. Tapping the part number in the cue list automatically deselects the other parts if Show Parts is active. ## Content Sheet Settings [Section titled “Content Sheet Settings”](#content-sheet-settings) The content sheet has a lot of settings. They can be accessed by tapping the MA logo in the upper left corner of the sheet. The settings are divided into three different tabs - Display, Mask, and Mask Buttons. This is a short description of each of the display settings: * **Show Parts**:\ Turning this On separates the cue parts into individual frames. Each frame can be turned On or Off by tapping the upper left corner of each frame. If this setting is Off, the cue parts are combined into one frame showing the cue part number in the lower right corner of each relevant attribute. * **Cue Only**:\ It defines if the cue only function is On/Off when editing values.[](/grandma3/2-3/cue_tracking/) * **Fixture Sort**:\ This On/Off button activates the sorting of fixtures. The fixtures are sorted in the selection order to the top or left hand side of the sheet showing the fixtures. * **CuePart Appearance**:\ This defines how the cue part appearance is displayed in the sheet. The options are: * **Off**:\ Cue part appearance is not displayed. * **Number**:\ The appearance is only shown on the cue number column. * **Num+Name**:\ The appearance is displayed in the number and name columns. * **Sheet Mode**:\ The sheet mode changes how the sheets look. There are four different modes: * **Fixture**:\ This shows a matrix with the fixtures in rows and the attributes in columns. * **Channel**:\ This shows the fixtures as tiles with the dimmer attribute. * **Dimmer+**:\ Looks similar to the **Channel** mode. However, it additionally displays the attributes of the selected feature group. Vertical gray separators are displayed when there is a jump in IDs and when the IDType changes for fixtures that do not have a fixture ID. This mode can display the **Fixture Graphics**, but does not display the **Feature Graphics**. * **Sheet/Filter**:\ Similar to **Dimmer+**. However, it displays all attributes unless there is a defined filter in the **Mask** tab of the sheet settings. * **Cue Mode**:\ Cue Mode has three different options: * **Current Cue:**\ This will make the sheet display the information related to the current active cue. * **Previous Cue:**\ This will display the values from the previous cue. This is the last active cue, even if the sequence order is jumped. * **Next Cue:**\ This displays the values for the next cue if a triggering action is performed on the sequence. If a cue is “Loaded”, the loaded cue will be displayed. * **Manual**:\ This mode allows selecting a specific cue. When this mode is selected, a list of the cues appears on the left side. Tap the desired cue in the list to see the content. If the setting is available in the title bar, the different options can be toggled by tapping the button in the title bar. * **Feature Sort**:\ This On/Off button activates feature sorting. The selected feature is moved before the other features in the sheets showing features. * **Font Size**:\ This selects the font size in the window. It is a swipe button that opens a list of sizes from 10 to 32. There is also a **Default** property. The default is the same as size 18. * **Readout**:\ This selects the value readout for fixture attributes. It is a swipe button that opens a list of readout types with the following options: * **Auto**:\ This makes the sheet follow the selected readout in the [Encoder Bar](/grandma3/2-3/ws_encoder_bar/). * **Natural**:\ Each attribute has a defined Natural readout. This is defined in the [Attribute Definition](/grandma3/2-3/patch_attribute_definitions/). Selecting this option will show the different readouts defined for the attributes. * **Percent**:\ This is a range from 0 to 100. * **PercentFine**:\ This is a range from 0.00 to 100.00. * **Physical**:\ This uses the physical range defined in the fixture type definition. * **Decimal8**:\ This is a decimal range from 0 to 255. * **Decimal16**:\ This is a decimal range from 0 to 65 535. * **Decimal24**:\ This is a decimal range from 0 to 16 777 215. * **Hex8**:\ This is a hexadecimal range from 00 to FF. * **Hex16**:\ This is a hexadecimal range from 0000 to FFFF. * **Hex24**:\ This is a hexadecimal range from 000000 to FFFFFF. * **#Columns**:\ This input button sets the number of columns a sheet should display (the settings **Transpose** and **Adjust Columns** must be switched On except in the DMX Sheet). The DMX Sheet shows all the DMX channels and their output values. Learn more in the [DMX Sheet topic](/grandma3/2-3/patch_dmx_sheet/). * **Layer Toolbar**:\ This On/Off button shows or hides a [layer toolbar](/grandma3/2-3/ws_eb_encoder_toolbar/) at the bottom with the different Layers. * **Fixture Appearance**:\ This defines how the appearance of the fixtures is shown in the sheets. There are three options: * **None**:\ The fixture appearance is not shown. * **Enabled**:\ The appearance of the fixture type is shown. * **Graphic**:\ The appearance is shown with a colored background to match the output. * **Preset**:\ This defines how the preset information is displayed in the sheets. There are six properties which are different combinations of these three elements: * **ID**:\ Shows the ID number of the preset. * **Name**:\ Shows the name of the preset. * **Value**:\ Shows the values stored in the preset. * **Color Mode**:\ This switches the color readout between RGB and CMY. The default value is to follow the setting in the [User Profile](/grandma3/2-3/user_settings/#h2_989550839). The user profile setting is shown between ”<>”. * **Time Format**:\ This defines the time format for the windows. This can be used to select a different format than the default set in the [user profile](/grandma3/2-3/user_settings/#time_frame_readout). * **Fixture Graphics**:\ This defines which graphics are displayed in front of the name column in sheets showing the fixture graphic. Resizing the name column to a very small size will hide the graphic.\ This setting has the following options: * **None**:\ No graphic is shown. * **Flip**:\ Adds the flip indicator for fixtures with position attributes on the left side of the **Name** column. * **Simple**:\ Adds a simple square graphic indicating combined color and dimmer values next to the flip indicator in the **Name** column. * **Gobo**:\ Adds a gobo image on the simple graphic. It only displays the gobo of one gobo wheel at a time. Gobo wheels in ascending order define which gobo is displayed. For example, when Gobo 1 is set to open, then the gobo of Gobo 2 is displayed. * **Fixture Select**:\ When this is On, fixtures can be selected by tapping the name or ID in the sheet. * **Show Tracked**:\ This On/Off setting shows or hides all the values tracked from previous cues. Turning it Off hides the tracked values and only shows the values stored in the cue. * **Frame Readout**:\ This defines the frame readout for this window. It can be used to overwrite the default set in the [user profile](/grandma3/2-3/user_settings/#time_frame_readout). * **Feature Graphic**:\ Shows or hides a small graphic next to each feature in the sheets showing the features. * **Channel Set**:\ This setting defines the readout of values that are part of channel sets. It has three options: * **Value**:\ Displays only the value. * **Value + Name**:\ Displays the value and channel set name. * **Name**:\ Displays only the channel set name. * **Merge Cells**:\ Cells can be merged to show a value only once if the adjacent cell has the same value and belongs to the same feature or feature group. For instance, if all red, green, and blue values are “100”, then “100” are only shown once. * **None**:\ Cells are not merged. * **Feature**:\ The values of a feature are merged to only be shown once if the two or more adjacent values are the same. * **Feature Group**:\ The values of a feature group are merged to only be shown once if the two or more adjacent values are the same. * **Link Type**:\ This setting defines which sequence is shown in the sheet. \ There are three different link types. The options are: * **Fixed**:\ The sheet displays the information from a specific sequence. The selection is made in the Sheet Settings. Read about the **Fixed Target** setting above. It can also be set using the [Assign](/grandma3/2-3/keyword_assign/) and [Sequence](/grandma3/2-3/keyword_sequence/) keywords and tapping the sheet’s title bar. * **Selected**:\ The sheet displays information from the selected sequence. * **LastGo**:\ This automatically shows the latest sequence to receive one of the trigger commands (<<<, >>>, Go+, Go-, Goto, Load, On, Select, Top, Temp, Flash, Toggle On, Pause). This includes if the sequence is triggered from a running timecode recording. A sequence can be excluded from LastGo by turning Off the **Include Link Last Go** setting in the [Sequence Settings](/grandma3/2-3/cue_sequence_settings/). LastGo only shows sequences triggered by the same user profile. * **Fixed Target**:\ This setting defines the sequence a sheet displays if the **Link Type** is **Fixed**. Tapping this setting opens an **Assignment Editor** pop-up where a sequence can be selected. This is a short description of each of the mask settings: * **Layer**:\ It selects which layer is displayed in the window. It is a swipe button that opens a list of the layers. A special property is **Auto**. This property makes the window follow the selected layer in the [Encoder Bar](/grandma3/2-3/ws_encoder_bar/). * **Show Recipes**:\ This On/Off button shows or hides the cue recipes at the bottom of the sheet. Read more about it in the [Cue Recipes topic](/grandma3/2-3/cue_recipe/). * **Show Notes**:\ This On/Off button shows or hides the notes for the selected cue at the bottom of the sheet. Read more about it in the [Notes topic](/grandma3/2-3/notes/). * **Show ID Type**:\ It shows the ID Type of the fixtures on the sheet. This setting is only relevant when the **Sheet Mode** is different than **Fixture**. * **Sorted By**:\ This defines how the sheet is sorted. The two options are: * **FID:**\ The sheet is sorted by FID. * \*\*CID: \*\*\ The sheet is sorted by CID. * **Show Fixture Name**:\ It shows the name of the fixtures on the sheet. This setting is only relevant when the **Sheet Mode** is different than **Fixture** in the fixture sheet.\*\*\*\* In the sequence sheet this setting is only relevant when Track Sheet is enabled. * **Group By ID Type**:\ This organizes the sheet by ID type, grouping together fixtures with the same ID type. Learn more about the Mask Buttons in the [Sheet Masking topic](/grandma3/2-3/worldfilter_filter_rules/).
# Copy Cues
> Cues can be copied to a new or existing cue.
Cues can be copied to a new or existing cue. The [Copy keyword](/grandma3/2-3/keyword_copy/) is needed for this operation. The general syntax is Copy Cue \[“Cue\_Name” or Cue\_Number] At \[“New\_Cue\_Name” or New\_Cue\_Number]. Different options define what and how the cue is copied. These options appear in a pop-up when the copy command is executed. 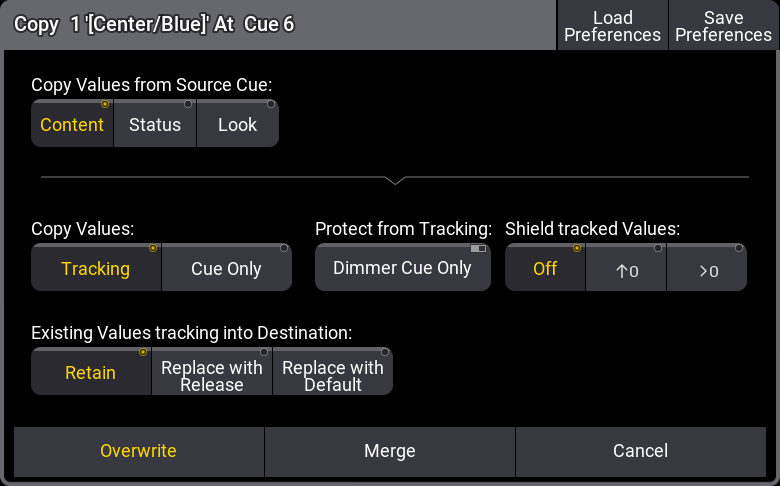 Copy cue pop-up **Copy values from Source Cue** have three different radio buttons that are mutually exclusive: * **Content**:\ Copies only the values stored in the source cue. * **Status**:\ Copies the status of the source cue. Status includes the values stored in the cue and all tracked values from former cues. * **Look**:\ If the fixture’s dimmer attribute has a value status above 0% in the source cue, then the status values of all attributes in the source cue are copied.\ If the fixture’s dimmer attribute has a value status of 0% in the source cue, then only the dimmer attribute is copied from the source cue.\ This means that the current status of the dimmer value is always copied. **Copy Values** define\*\*\*\* how values should track through the sequence. There are two radio buttons: * **Tracking**:\ The new values are added as normal tracking values and will track onward. * **Cue Only**:\ The new values are added using Cue Only. Attributes that do not have a previous value it can return to will store the default value in the following cue. Cue Only is a function that stores values at the destination, but also stores the previouslly tracked values in the following cue. The result is that following cue keeps the same look. Learn more about **Cue Only** in the [Store Cues Topic](/grandma3/2-3/cue_store/). A single option in the **Protect from Tracking** section is **Dimmer Cue Only**. Turning this On will store the dimmer attributes as Cue Only, but the other attributes can be stored as tracking using the other settings. The **Shield tracked Values** have three options. It is about the Tracking Shield function. Learn more in the [Tracking Shield topic](/grandma3/2-3/cue_tracking_shield/). The options are: * **Off**:\ Tracking Shield is not used. * **↑0**:\ Protects attributes in the next cue where the dimmer value increases starting from zero. * **>0**:\ Protects attributes in the next cue where the dimmer value is above zero **Existing Values tracking into destination** also has three mutually exclusive radio buttons. This setting defines what should happen with values that track into the new copied cue from previous cues. * **Retain**:\ The tracking values are kept and tracked into the new cue. * **Replace With Release**:\ Tracking values are replaced with the “Release” special value. * **Replace With Default**:\ Tracking values are replaced with the default value.
# Delete Cues
> Cues can be deleted using the Delete keyword.
Cues can be deleted using the [Delete keyword](/grandma3/2-3/keyword_delete/). This can be accessed using the command line input or the [Delete key](/grandma3/2-3/key_delete/). Deleting a cue opens a pop-up asking for confirmation. 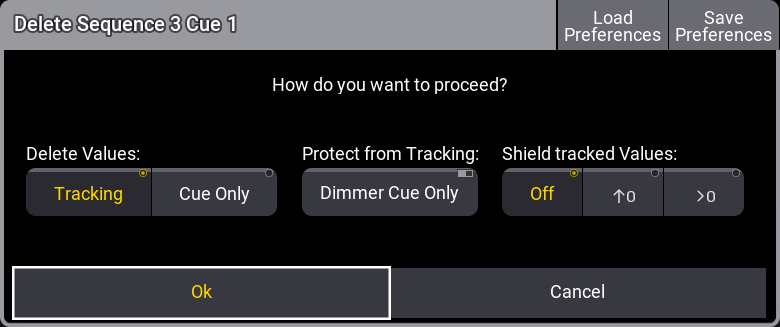 Delete Cue pop-up Some settings influence how the deletion affects the following cues. Delete Values has two options: Tracking and Cue Only. The option defines whether the deletion should be done using Tracking or Cue Only rules. Protect from Tracking can be used to delete the dimmer attributes using Cue Only. Shield tracked Values can be used to define how the Tracking Shield should respond to the deletion. Learn more in the [Tracking Shield topic](/grandma3/2-3/cue_tracking_shield/). Tap Ok to delete the cue with the selection options and close the pop-up. Tapping Cancel closes the pop-up and does not delete the cue. Deleting the last cue in a sequence does not open the pop-up; it simply deletes the cue.
# Move In Black
> Move in black (MIB) is a function where tracking sequences look ahead and preposition attributes of fixtures that are fading the dimmer in from zero to automati
Move in black (MIB) is a function where tracking sequences look ahead and preposition attributes of fixtures that are fading the dimmer in from zero to automatically prevent transitions where the fixture would move the attributes into position while the fixture is fading in. MIB is enabled on a cue part basis by giving the MIB property of the cue part a value that tells the console when and how it should do the prepositioning. MIB settings are applied to cues and affect all fixtures stored in the cue. A special **Hold** value can be stored on the Dimmer attribute to prevent a MIB action for specific fixtures. **Hold** is similar to giving the dimmer attribute a value of 0%, but it does not trigger the MIB function for the fixture. Hold can found in the calculator for the dimmer attribute, in the **Specials** tab. It can also be applied using the [Hold Keyword](/grandma3/2-3/keyword_hold/). While the MIB is in progress, the MIB indicator in the Fixture Sheet indicates this: * Fast flashing: Fixtures intensity fade to 0% in order to do an MIB. * Slow flashing: Fixtures do the MIB. When a fixture has moved in black, it has a deep-sea green background color (see more at the bottom of this topic). If the fixture is selected and an absolute dimmer value above 0 is given, then there is a [User Profile Setting](/grandma3/2-3/user_settings/#h2_989550839) called **KnockIn MIB** defining what happens. * **Off**:\ Only the actively changed attributes are activated in the programmer. The moved in black attributes stay in the MIB’ed state and are not automatically active values in the programmer. The result can be that what is seen in the output is not what is stored in the cue, so when the cue is played back, it will not look like it did when it was stored. * **Post**:\ The attributes that have been moved in black are activated in the programmer to ensure the fixture’s current state is active. This means that if the cue is stored or updated and played back, it will look like it did when it is played back. This function only regards absolute values. *** Several options and properties modify MIB behavior. Two of them are **MIB Fade** and **MIB Delay** timing properties. **MIB Fade** is the fade time of attributes that will be positioned by MIB. It is available in different places. There is an order of importance in which MIB fade time to apply: 1. Per cue part 2. Per attribute in a fixture type 3. Global in the show file When a MIB fade time is specified in the cue part, the individual attribute MIB fade time will be ignored. When the MIB fade time of the cue is set to default, the global MIB fade time will be applied unless an attribute has an individual MIB fade time set. **MIB Delay** is the delay time the attributes wait from having the dimmer closed until the MIB fade is performed. The MIB delay time can be specified per cue part or global in the show file. The same ruleset as for MIB fade applies: When the MIB delay time of the cue is set to default, the global MIB delay time will be applied. When the MIB fade and/or MIB delay is performed between cues, the MIB times specified in the (future) cue part where the dimmer opens again will be applied. For example, a fixture is moving in cue 3 to be ready for cue 5. The MIB times specified in cue 5 is used for the MIB. ## Cue MIB Settings [Section titled “Cue MIB Settings”](#cue-mib-settings) The sequence sheet can display several columns for the different MIB settings. Read more about the sequence sheet in the [Look at Cues and Preferences](/grandma3/2-3/cue_sequence_sheet/). * **MIB Preference**:\ This specifies a cue’s suitability for MIB. It is a percentage number from 0(never) to 100(best). The MIB modes Early, UponGo, and Late prioritize the cue with the highest rated suitability and choose this cue for executing the MIB. The MIB mode Defined does not respect the MIB preference.\ Edit the cell to type a number or select one of the following preference options: * **Never(0)**:\ An MIB will never be performed. * **Worst(1)**:\ If there are no other options, then this cue will be used. * **Bad(25)**:\ It is not optimal, but it is better than the two others. * **Normal(50)**:\ This is the default value. * **Good(75)**:\ This is a better cue than normal. * **Best(100)**:\ This is the optimal cue to perform the MIB. * **MIB Mode**:\ Defines how early or late the MIB shall be performed per cue part. * **Default**:\ Performs MIB corresponding to the MIB mode setting of the sequence setting **MIB Mode**. * **None**:\ MIB will not be performed for this cue. * **Defined**:\ A specific cue can be defined in the **MIB Target** column where the MIB is to be performed. The MIB is performed when the specified cue is active. * **Early**:\ Performs the MIB as soon as the dimmer is closed. Typically, after the cue transition has finished. * **UponGo**:\ Performs the MIB with the next cue transition after the dimmer has closed. The MIB executes with the cue after **Early** would have triggered the MIB. * **Late**:\ Performs the MIB latest in the cue before the dimmer opens again. * **MIB Target**:\ A specific cue where MIB is performed for this cue part, see MIB Mode above. When setting an MIB target, the **MIB Mode** will be changed to **Defined**, and vice versa. When changing an MIB Mode that is not \*\*Defined, \*\*the **MIB Target** will be removed. * **MIB MultiStep**:\ It is possible to decide whether a phaser where the fixtures are already prepositioned shall keep running with the closed dimmer or if they shall be paused. This can prevent unwanted noise and movement of stepper motors for prepositioned fixtures running a phaser, especially when it would disturb the audience. The two options are: * **Running**:\ A phaser is running with a closed dimmer. * **Paused**:\ A phaser will be prepositioned but does not start running until opening the dimmer. * **MIB Fade**:\ The MIB fade time per cue part. It can be a set time or default. Default takes the global show file MIB fade time, or the attribute MIB fade time. * **MIB Delay**:\ The MIB delay time per cue part. It can be a set time or default. Default takes the global show file MIB delay time or the attribute MIB delay time. The sequence sheet hides those MIB cells that are not considered for the different combinations of MIB settings or if a cue or cue part is not suitable for MIB. ## Global MIB Settings [Section titled “Global MIB Settings”](#global-mib-settings) To change the global MIB Preferences, go to Menu - Preferences and Timings. In the Timings tab, there is a section called MIB Timings. This defines the default **MIB Fade** and **MIB Delay** times. This value is input as time. For more information about MIB fade and MIB delay, please read above. The property **MIB Transition** defines which transition type will be applied to the fade of MIB. Read more about the different types of transitions in the [Cue Timing topic](/grandma3/2-3/cue_timing/). The MIB Transition can only be defined for all MIB fades globally in the show file. It is not possible to define a different transition type for a single MIB fade per cue or cue part. In the Cues tab, there is a section called **MIB Preferences**. Here, it is possible to change the defaults that will be set to a new cue when it is stored. * **MIB Mode**:\ The MIB Mode is used when storing a new cue that can execute MIB. * **MIB Fade**:\ The MIB fade time is used when storing a new cue that can execute MIB. Default uses the time set in the timing tab. * **MIB Delay**: \ The MIB delay time is used when storing a new cue that can execute MIB. Default uses the time set in the timing tab. * **MIB MultiStep**: \ The MIB MultiStep settings are described above. For more information about these settings, read above. ## Sequence MIB Settings [Section titled “Sequence MIB Settings”](#sequence-mib-settings) There are sequence-wide MIB settings within the sequence settings. Read more about the settings in the [Sequence Settings topic](/grandma3/2-3/cue_sequence_settings/). The purpose of the sequence MIB settings is to have the option to overwrite the cue-based MIB settings with the MIB settings. When setting the MIB to any option except Enabled, the sequence sheet displays the corresponding setting in yellow in the MIB Mode column header. It also adds exclamation marks before and after the mode set in the cues, for instance, !Late!, to indicate that the set value is overwritten. The MIB Mode setting selects the default MIB mode used when doing a MIB. The MIB Mode per cue or cue part must be set to Default. For more information about the different MIB Mode types per sequence, please read the above. ## MIB Color Indicators [Section titled “MIB Color Indicators”](#mib-color-indicators) Attribute values will be displayed with special colors within the fixture sheet and the sequence sheet in track mode to show when the MIB is performed. The tracking sheet view shows when the MIB is performed in this example. 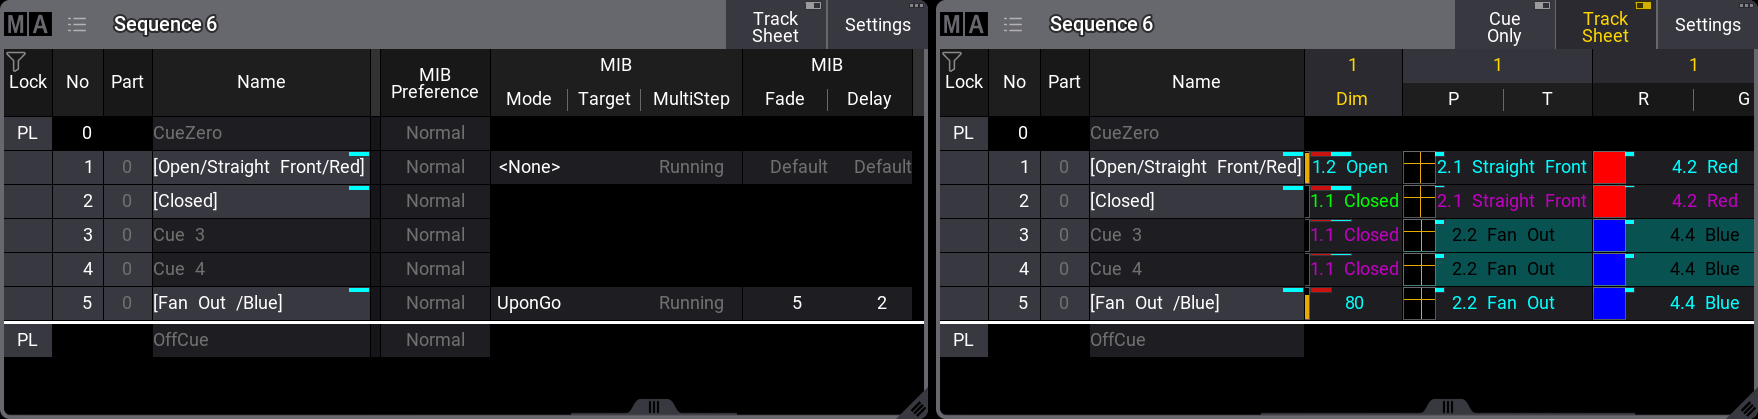 Two versions of the sequence sheet showing MIB data and the Track Sheet The fixtures need to be ready for cue 5. In cue 5, the MIB Mode is set to “UponGo”. This means that when the fixtures fade to 0% in cue 2, they are ready to MIB with the next cue trigger. When cue 3 is activated, they will perform the MIB for cue 5. The default color indicators are a deep-sea green background and black text color. Read more about the MIB colors in the fixture sheet and other grandMA3 colors in the [Colors topics](/grandma3/2-3/ws_colors/).
# Play Back Cues
> Cues are stored in a Sequence. All sequences are stored in a sequence pool.
Cues are stored in a Sequence. All sequences are stored in a sequence pool. When a cue is active, the sequence is active in the pool. It is not possible to run a cue without playing back the sequence. Executors are controls that allow for easy hands-on playback of the sequences. Executors can playback or trigger other objects than sequences as well. Sequences do not need to be associated with an executor to playback cues. ## Relevant Playback Commands [Section titled “Relevant Playback Commands”](#relevant-playback-commands) Many keywords can be used for playback operations. They are all listed using the [Help](/grandma3/2-3/keyword_help/) command. For sequence playback, there are some very common keywords (read details about them by following the links): * **[Go+](/grandma3/2-3/keyword_goplus/)**\ Use this to trigger the next cue with a “Go” trigger or to specify a cue (Go+ Cue \[“Cue\_Name” or Cue\_Number]). This command triggers subsequent cues using a follow or timed trigger. * **[Go-](/grandma3/2-3/keyword_gominus/)**\ Use this to trigger the previous cue or a specific cue using Go- Cue \[“Cue\_Name” or Cue\_Number]. Using the syntax that specifies the cue number does not trigger subsequent cues. * **[Goto](/grandma3/2-3/keyword_goto/)**\ Use this command to go to a specific cue. The specified cue is triggered when the command is executed. Please note that this command also asserts tracked values so that the visual result can be different than a normal Go command. The **Assert** mode for the cue is relevant. “None” and “Assert” will assert tracked values using the cue timing from the cue where the value is stored. “X-Assert” will assert the tracked values using the cue timing of the “Goto” cue. Learn more about the Goto keyword in the [Goto Keyword topic](/grandma3/2-3/keyword_goto/ "Goto Keyword description"). * **[Load](/grandma3/2-3/keyword_load/)**\ This is used to preload cues. The cue is then ready to be triggered via a Go+ command. Several cues in different sequences can be loaded and triggered together with the Go+ [Loaded](/grandma3/2-3/keyword_loaded/) syntax. * **[Pause](/grandma3/2-3/keyword_pause/)**\ Executing this command will pause all running fades, delays, and phasers, effectively halting all values where they currently are. The fade and delay are also resumed using the Pause command. * **[Top](/grandma3/2-3/keyword_top/)**\ This keyword is used to trigger the first cue * **[<<< (GoFastBackward)](/grandma3/2-3/keyword_gofastbackward/)**\ If a target cue is not specified, the previous cue in the sequence is triggered, ignoring any cue timing and jumping to the cue using the timing defined in the Playback Timings. The default timing is 0 seconds. A cue can be specified, and this will trigger the specified cue only (<<< Cue \[“Cue\_Name” or Cue\_Number]). This keyword does not trigger follow and timed cues. This timing is set in the **Preference and Timings** menu under **Timings**. Learn more in the [Cue Timing topic](/grandma3/2-3/cue_timing/). * **[>>>(GoFastForward)](/grandma3/2-3/keyword_gofastforward/)**\ If a target cue is not specified, the next cue in the sequence is triggered, ignoring any cue timing and jumping to the cue using the timing defined in the Playback Timings. The default timing is 0 seconds. A cue can be specified, and this will trigger the specified cue only (>>> Cue \[“Cue\_Name” or Cue\_Number]). This keyword does not trigger follow and timed cues. This timing is set in the **Preference and Timings** menu under **Timings**. Learn more in the [Cue Timing topic](/grandma3/2-3/cue_timing/). But there are many more that can be useful. These functions can be assigned to executor keys for easy access (See how in the [Assign Object to an Executor topic](/grandma3/2-3/executor_assign/)), but they can also always be sent directly to the sequence. For instance, the following command can be used if you want to go to cue 4 in sequence 6: | | | | ------------------------------------------------------------------ | ----------------------------------------- | |  | User name\[Fixture]>Goto Cue 4 Sequence 6 | The order of sequence and cue does not matter. So it could also be: | | | | ------------------------------------------------------------------ | ----------------------------------------- | |  | User name\[Fixture]>Goto Sequence 6 Cue 4 | The system interprets it as in the last example. The Command Line History window shows this response: | | | | ---- | --------------------- | | OK : | Goto Sequence 6 Cue 4 | If an executor handles a sequence, the playback commands can also be sent to the executor. | | | | ------------------------------------------------------------------ | ------------------------------------ | |  | User name\[Fixture]>Go+ Executor 101 | This will send the go command to the object assigned to Executor 101. If this object is a sequence, the next cue will be triggered. *** ## Sequence Priorities [Section titled “Sequence Priorities”](#sequence-priorities) When several sequences affect the same fixture attributes, then priorities become important. The priority setting is a property of the sequence. These settings can be opened by pressing the Assign key and then one of the executors keys where the sequence is assigned. This opens the **Assign Menu**. On the right side of the menu, there are some buttons. Please tap Edit Settings. These are all the settings available for a sequence. The settings can also be opened by tapping Settings in the title bar of a sequence sheet. All the settings are discussed in the [Sequence Settings topic](/grandma3/2-3/cue_sequence_settings/). The priority setting can be found in the **Playback** group of settings. Tapping it toggles through the different properties, swiping it opens a small select pop-up like this: 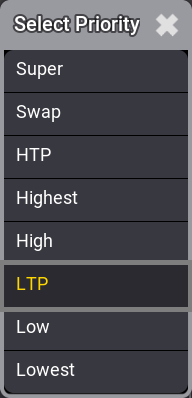 Select Priority pop-up This is the list of possible priority properties. This is a short explanation of the priorities: * **Super:**\ This priority is the LTP priority above any other playbacks and even above the programmer. * **Swap:**\ Intensity is working as LTP with higher priority than HTP. * **HTP (Highest Takes Precedence):**\ The highest intensity value will be used. Other parameters will use LTP. * **Highest**:\ Highest LTP priority - Like LTP but with the highest possible LTP priority. * **High:**\ High LTP priority - like LTP but a higher priority than normal LTP. * **LTP (Latest Takes Precedence):**\ This is the normal LTP priority. The newest attribute value is prioritized over the old value. * **Low:**\ Low LTP - This is a lower LTP priority. * **Lowest**:\ Lowest LTP - This is the lowest possible LTP priority. LTP is one of the most used priority settings. There are five different levels of LTP priority to give different sequences different levels of LTP priorities. The list in the pop-up is also prioritized, where Super at the top has the absolute highest priority. This also means that HTP sequences have a higher priority than LTP sequences. ## Soft LTP [Section titled “Soft LTP”](#soft-ltp) This option relates to how intensities change from one sequence to another when the values transfer from the original sequence to the new one. When an attribute has a value from a cue and another cue in a different sequence with the same LTP priority is beginning to send new values to the same attribute, then Soft LTP might influence how the transition from the old value to the new value happens. This is only relevant when the new value is applied by moving the master of the new sequence. In this case, the attribute can jump from the old value to the new value and immediately have the value it should have according to the master position (Soft LTP Off), or it can start to fade from the old value to the new value using the master position as a crossfader (Soft LTP On). | | | | ------------------------------------------------ | --------------------------------------------------------------------------------------------------------------------------------------------------------------------------------------------------------------------------------------------------------------------------------------------------------------------------------------------------------------------------- | |  | **Important:** | | | Both sequences need to be active, and both need to send value to the same attributes. **Auto Start** and **Auto Stop** are turned On by default for sequences. If these properties are turned Off, the sequences must be turned On manually for the SoftLTP function to affect the transition.If the Master faders are both at 100%, then SoftLTP does not have a function. | ### Example [Section titled “Example”](#example) 1. Patch a fixture with a dimmer attribute. 2. Give the dimmer a 50% value and store this in a new sequence - call this sequence “Original”. 3. Give the dimmer a value of 100% and store this as a new cue in a new sequence. Call this sequence “New”. 4. Assign an executor fader as the master for sequence “New”. 5. Ensure **Auto Start** and **Auto Stop** are active for sequence “New”. 6. Open a fixture sheet and make sure it is set to show the **Output** layer. 7. Run the cue on sequence “Original” and have the master at zero for sequence “New”. The dimmer value should now be 50%. 8. Now move the master slowly up from zero and see the output value change. **Soft LTP On**: The dimmer will fade from 50% to 100% while the master moves up to 100 (fade from the “Original” value to the “New” value). **Soft LTP Off**: The dimmer will jump down to the value dictated by the master position and fade up together with the master (jump from the “Original” value to the “New” value based on fader position). 9. Now try to move the fader slowly down to zero. **Soft LTP On**: The dimmer fades from 100% to 50% (from the “New” value to the “Original” value). **Soft LTP Off**: The dimmer value will fade down to 0% with the master, and when the sequence turns Off then the dimmer will jump to 50% (Fade down with “New” master position - jump to “Original” value when “New” is turning Off).
# Cue Recipes
> Recipes can be used in cues and presets. See the Recipe topic to learn the basics of recipes and the Recipe Preset topic to learn about using recipes in presets
Recipes can be used in cues and presets. See the [Recipe](/grandma3/2-3/recipes/) topic to learn the basics of recipes and the [Recipe Preset](/grandma3/2-3/presets_recipes/) topic to learn about using recipes in presets. It is a good idea to read the recipe topic before this one. This topic is about recipes in cues. A recipe can contain multiple lines describing what should happen based on a set of information. The recipe “cooks” values into the cue. A recipe line can contain information about a selection, values, MAtricks reference, filter, individual fade, delay, speed, phase values, and grid values. Values from recipes can be combined with conventionally stored values. ## Adding Cue Recipes [Section titled “Adding Cue Recipes”](#adding-cue-recipes) Recipes are added to each cue part in a sequence. The best way to access the recipes is by turning On the Show Recipes mask in a [Sequence Sheet](/grandma3/2-3/cue_sequence_sheet/): 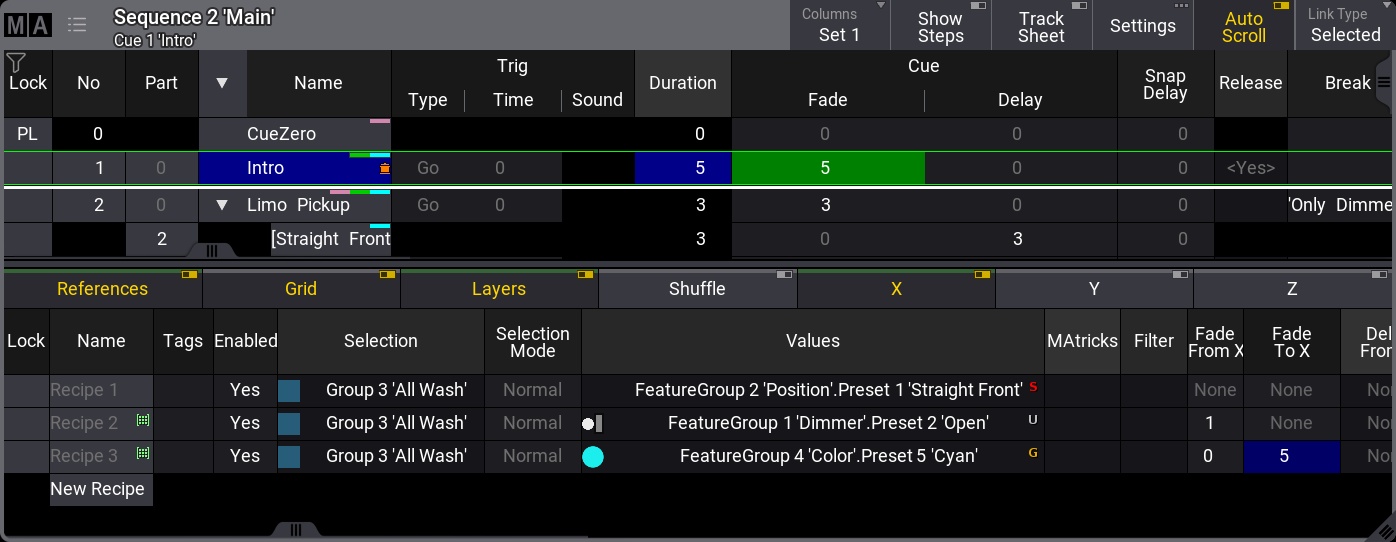 Sequence sheet with cue recipes showing This gives access to adding, editing, and deleting recipe lines. Showing the recipe lines in the sequence sheet adds a filter line that allows filtering of the different elements in the recipe - not to be confused with the Filter column on the recipes. This line can be moved up or down by tapping and holding the line and sliding it up and down. Release the screen at the desired location. Learn more about this line and the different columns in the [Recipes](/grandma3/2-3/recipes/) topic. The cells in the recipe lines can be edited and more lines can be added by tapping and holding the New Recipe. Each line can contain a set of information. The MAtricks reference column and the individual MAtricks columns only take effect when there is ranged data from, for instance, a [MAgic preset](/grandma3/2-3/presets_create/) or a timing range. Making changes to the recipe line automatically cooks the line using the merge option. Recipe lines without a group do not auto-cook. Deleting an already cooked recipe line does not auto-cook. The recipe needs to be manually cooked to reflect the new result. Cooking can be done using the [Cook keyword](/grandma3/2-3/keyword_cook/). An entire sequence can be cooked in one command. The general syntax for cook is: Cook \[object] (/option) There are four options: * **Merge** - Default if nothing else is specified. Removes values that are flagged as cooked, then cooks the values from the recipes and also replaces values at the destination based on the recipe ingredients. * **MergeLowPriority** - Replace existing cooked data and add new data based on the recipe ingredients, but do not change non-cooked data. * **Overwrite** - Delete all contents of the target object and cook new data based on the recipe ingredients. * **Remove** - Delete any data from the target object that has been cooked but never updated. Executing a cook command without an option keyword opens a pop-up prompting for which option to use. It also includes a cancel option that cancels the cook command. A cue with recipe information gets the small pot icon in the name column. It does not indicate whether there are cooked values or not; it only indicates if there are recipe lines and if the lines are valid. Activating the Track Sheet mode in the Sequence Sheet makes the attribute values visible for each cue. Values that come from a recipe have a small green marker in the upper right corner. 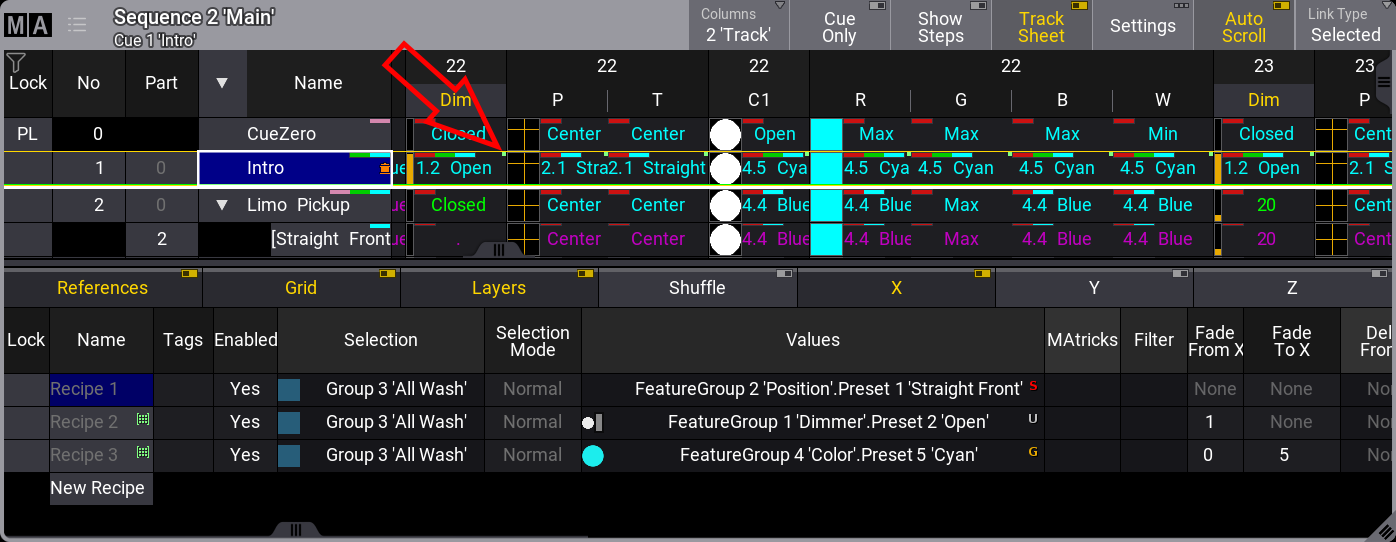 Sequence Sheet in Track Sheet mode showing the Recipe marker
# Renumber Cues
> Cues can be renumbered. This cannot be used to change the order of the cues.
Cues can be renumbered. This cannot be used to change the order of the cues. Single cues can be renumbered but it can also be a range of cues. Giving the same cue number to two or more cues is impossible - they must be unique. Setting the cue number to a previous number already used is prevented by the system. Entering a cue number used later in the sequence, all following cues will be renumbered until no collision with existing cue numbers occurs. There is no command or keyword to renumber cues. It can be done in the [Sequence Sheet](/grandma3/2-3/cue_sequence_sheet/). *** **Requirement**: Have a sequence with cues. **Procedure:** 1. Open the sequence sheet window. 2. Select the cue numbers to be renumbered using the number column in the sheet. 3. Press Edit and tap inside the cue selection.\ This opens an Edit Cue Number pop-up.  Edit cue number pop-up. 4. Type the new cue number. If several cues are to be renumbered, use the lasso selection when tapping the cue numbers.
# Cues and Sequences
> Fixture values can be stored in Presets or Cues.
Fixture values can be stored in [Presets](/grandma3/2-3/presets/) or **Cues**. Cues are organized in **Sequences**. [Executors](/grandma3/2-3/executor/) can control and playback sequences. The sequence is played back from the sequence pool. The executors are handles for the sequence. The sequences are all in the **Sequence Pool**. This is created like any other window - see more in the [Add Window topic](/grandma3/2-3/wvm_add_window/).  *Sequence pool with sequence 1 running a cue* The sequence contains information about the cues and how to transition from one cue to another. Cues can contain fixture values (sometimes called “hard values”), references to presets, and recipes. Read the [Store Cues topic](/grandma3/2-3/cue_store/) to learn about making cues. All cues have a minimum of one step. If there is more than one step, then it is a [Phaser](/grandma3/2-3/phaser/). Follow the phaser link to read about multi-step cues. Cues have **Cue Parts**. All values are actually stored in the parts. All cues automatically have part 0. Other parts can be created, but it is not necessary. Creating several parts allows for the separation of values into different sub-cues. The parts can have different timing or properties, but parts are connected to the primary (parent) cue. This means that all the cue parts in a cue trigger together with the primary cue. The cues in a sequence can be seen in a **Sequence Sheet**. Read more about looking at the sequence in the [Look at Cues and Sequences topic](/grandma3/2-3/cue_sequence_sheet/). Sequences have a lot of different settings. Read the [Sequence Settings topic](/grandma3/2-3/cue_sequence_settings/) for more information. ## Executor Style [Section titled “Executor Style”](#executor-style) The sequence pool objects can be presented in a different style called **Executor Style**. The same pool shown above can look like this:  Sequence Pool using Executor Style It is a setting for the entire pool, not for the individual pool objects. It can be changed in the\*\* Pool Settings\*\*, which can be accessed by tapping the black MA logo in the upper left corner. Each sequence pool object shows up to three cues. If there is an active cue, it is in the center with a blue background. If there are no active cues, the center cue is the first cue in the sequence. This style makes the pool object look similar to how it looks on the executor labels. Learn more in the [What are Executors topic](/grandma3/2-3/executor/). See the [Common Window Settings topic](/grandma3/2-3/wvm_settings/#h2__522911071) for the other pool settings. ## Pool Action and Object Action [Section titled “Pool Action and Object Action”](#pool-action-and-object-action) A sequence pool has a pool action for the pool objects. The individual sequence pool objects also have an object action. This action is performed when the sequence is tapped in the pool without a (relevant) keyword in the command line. The object action is used if the **Use Object Action** is active in the **Sequence Pool Settings** (link below). The defined pool or object action is performed when the sequence is tapped in the pool without a (relevant) keyword in the command line. A small icon in the upper right corner of the pool title object indicates the selected pool action. If **Use Object Action** is activated in the settings, a small hand with an index finger icon  will be displayed next to the pool action. See the example image below. A big icon is added to the pool object when **Use Object Action** is activated. The pool object is grayed out if the object action is set to **None** (see sequence 10 in the example below). There is no icon displayed if the object action is set to \*\*Pool Default \*\*(see sequence 11 in the example below).  Example of the sequence pool with pool objects assigned all the possible object actions. The pool action is set in the **Sequence Pool Settings**. This is described in the [Common Window Settings topic](/grandma3/2-3/wvm_settings/#h2__522911071). The object action is set in the object editor described in the [Sequence Settings topic](/grandma3/2-3/cue_sequence_settings/). ## Reference [Section titled “Reference”](#reference) If a sequence is referenced somewhere, it gets a small reference icon (). Referenced means that it is used or assigned somewhere. The [Info window](/grandma3/2-3/si_info_window/) can show where an object is referenced. ## Filters [Section titled “Filters”](#filters) The sequence can have a world or a filter assigned as an input filter and an output filter. If there is an input filter, there is a small icon () in the pool object. The input filter only allows the data in the world or filter to be stored in the sequence. If an output filter is assigned, the pool object has a small icon ( ). The output filter allows only the fixtures and attributes in the world or filter to be played back from the sequence. See the example image at the top. Sequence three has both an input and output filter assigned, and this is a combined filter icon (). Read more about filtering sequences in the [Worlds and Filters section](/grandma3/2-3/worldfilter/). ## Shared Data [Section titled “Shared Data”](#shared-data) Two sequences can be connected and share the cue data. If a sequence shares data with another sequence, then it has a small icon () in the pool object. See sequences two and three in the example image above. Shared data means that the cue content and the cue settings (for example, fade times) are the same. Changing one of the two sequences will also change the other sequence. For example, creating cues, changing cue content, or deleting cues. The sequence settings can be different. Different executors can control the different linked sequences and playback different cues in the two (or more) linked sequences. This can be useful if, during rehearsal, a video programmer and a lighting programmer want to work with one sequence but must be able to run different cues. The relevant input and output filters can be assigned to the two shared sequences. Two different executors can be assigned to control the two linked sequences. Now, one sequence can playback and store video data, and the other can run and store light data. All values are stored in the same linked sequence. So when the show is ready, an operator can remove the filters and just playback one sequence with all the data. Subtopics * [What is Tracking](/grandma3/2-3/cue_tracking/) * [Sequence Sheet](/grandma3/2-3/cue_sequence_sheet/) * [Content Sheet](/grandma3/2-3/cue_content_sheet/) * [Sequence Settings](/grandma3/2-3/cue_sequence_settings/) * [Store Cues](/grandma3/2-3/cue_store/) * [Update Cues](/grandma3/2-3/cue_update/) * [Copy Cues](/grandma3/2-3/cue_copy/) * [Cue Recipes](/grandma3/2-3/cue_recipe/) * [Store Settings and Store Preferences](/grandma3/2-3/cue_store_settings_preferences/) * [Play Back Cues](/grandma3/2-3/cue_playback/) * [Move In Black](/grandma3/2-3/cue_mib/) * [Cue Timing](/grandma3/2-3/cue_timing/) * [Renumber Cues](/grandma3/2-3/cue_renumber/) * [Delete Cues](/grandma3/2-3/cue_delete/)
# Sequence Settings
> Each sequence has a lot of different settings. The settings can be accessed from the title bar of each sequence sheet or the executor assign menu. Each of these
Each sequence has a lot of different settings. The settings can be accessed from the title bar of each [sequence sheet](/grandma3/2-3/cue_sequence_sheet/) or the [executor assign menu](/grandma3/2-3/executor_assign/). Each of these two locations has a button called Edit Settings or Settings. Tap this to open the settings.  *Sequence settings pop-up* The settings are divided into different sections. Label, Start, Playback, Speed, Protect, and MIB. Read about the different settings in each section below. Each user profile has default sequence settings. These settings are used when a new sequence is created. The default can be loaded and stored from this pop-up. The title bar has two relevant buttons. The left one is Load from Default. Tapping this loads the stored sequence defaults. Next to this is Save as Default. Tapping this stores the current settings as the new default. ## []()Label [Section titled “Label”](#label) This group is about the name and look of the sequence. **Name** Edit this input field to change the name of the sequence. **Scribble** This scribble field can be used to select or create a scribble for the sequence. This scribble is visible in the sequence pool and on the executor label. **Appearance** This appearance field can be used to select or create an appearance for the sequence. This appearance is visible in the sequence pool and on the executor label. **Tags** A tag can be added to the sequence. Learn more about tags in the [Tags topic](/grandma3/2-3/tags/). **Note** This input field can be used to add a note to the sequence. **Prefer Cue Appearance** When this option is enabled, and the current cue has an appearance, the cue appearance will be displayed on the executor or in the layout instead of the sequence appearance. **Executor Display Mode** The executor display mode defines how the sequence will be displayed on an executor: * **Data only**:\ Only the cues with their appearances will be displayed. The cue appearance is only displayed in the line of the cue and not in the background. * **Appearance only**:\ Only the sequence or cue appearance will be displayed. No cue names, fade bar, etc., will be displayed. This can be handy for sequences with only one cue, color cues, or gobo cues. * **Both**:\ Each cue line displays its cue appearance, and the sequence appearance or the appearance of the current cue will be displayed in the background of the executor. ## []()Start [Section titled “Start”](#start) The settings in this section are about starting and stopping the sequence. **Auto Start** The **Auto Start** feature switches the executor ‘On’ when the master is moved from zero. **Auto Stop** The **Auto Stop** feature switches the executor ‘Off’ when the master is moved down to zero. **Master Go Mode** The **Master Go** function is active if auto stop is turned Off. Tapping this button opens the **Select Master Go Mode** pop-up. There are four options here. They all take effect when the master fader is moved from zero and up. The options are: * **None**:\ The cue is still running. * **Go**:\ It executes a Go. * **On**:\ The current cue is reloaded (fading in again). * **Top**:\ The first cue is activated. **Auto Fix** The **Auto Fix** feature can be activated for each executor. It will automatically [Fix](/grandma3/2-3/keyword_fix/) active executors and keep them visible even when pages are changed. The executor is automatically unfixed when it is switched off. **Cue Zero Mode** This setting defines what is automatically stored in Cue Zero. There are three options: * **Off**:\ No attributes are automatically stored in the cue. This is the default option. * **All Used Attributes**:\ This adds default values for all attributes of the fixtures used in the sequence. * **Only Used Dimmers**:\ This adds default dimmer attributes of the fixtures used in the sequence. **Auto Stomp** If auto stomp is On, an **absolute** value from a cue will stomp a phaser running from a different playback. ## []()Playback [Section titled “Playback”](#playback) The playback settings are about running the cues. Running or playing back cues is described in the [Play Back Cues topic](/grandma3/2-3/cue_playback/). **Tracking** This turns On or Off value tracking in the sequence. Read more in the [What is Tracking topic](/grandma3/2-3/cue_tracking/). **Wrap Around** Wrap around allows the sequence to return to the top/first cue if a Go (forward) command is performed after the last cue in the sequence is reached. This is automatically disabled if the “Off Cue” has a trigger. **Release First Cue** This setting defines if the first cue releases tracking values. These tracking values can come from the last cue if **Wrap Around** is active. If **Release First Cue** is On then it adds a **\** to the **Release** column in the first cue of the sequence. Learn more about the different columns in the [Look at Cue and Sequences topic](/grandma3/2-3/cue_sequence_sheet/). The first cue can manually be set to release by editing the field in the sequence. **Restart Mode** There are three different restart modes: * **First Cue**:\ This always restarts the sequence with the first cue. * **Current Cue**:\ This restarts the sequence with the cue where it was when the sequence was turned Off. * **Next Cue**:\ This restarts the sequence with the next cue based on where it was when the executor was turned Off. **Cue Command** This option defines how the cue commands can be executed. It can be set to follow the value set for each cue in the sequence’s **Command** column, or it can force the execution or disable the execution of the commands in the **Command** column in a sequence. The stored commands are not deleted or removed; they are just disabled. * **Enabled**:\ Each cue command can be enabled or disabled in the **Command Enabled** column. Disabling the command does not delete or remove the command. They are just disabled. * **Force No**:\ The cue command execution is disabled for the entire sequence. The **Command Enabled** column header will display “Force No” if this option is selected. The user-defined settings in the Command Enabled column are not changed to show “No”. It shows the user-set value with exclamation marks before and after. * **Force Yes**:\ The cue command execution is forced to be enabled for the entire sequence. The **Command Enabled** column header will display “Force Yes” if this option is selected. The user-defined settings in the Command Enabled column are not changed to show “Yes”. It shows the user-set value with exclamation marks before and after. **XFade Reload** When this option is enabled, the Xfader needs to be pulled back to 0 after completing a crossfade to do the next crossfade. \*\*Output Filter \*\* The output filter can have a [Filter or World](/grandma3/2-3/worldfilter/) assigned. Tapping the button opens the **Assignment Editor** pop-up: 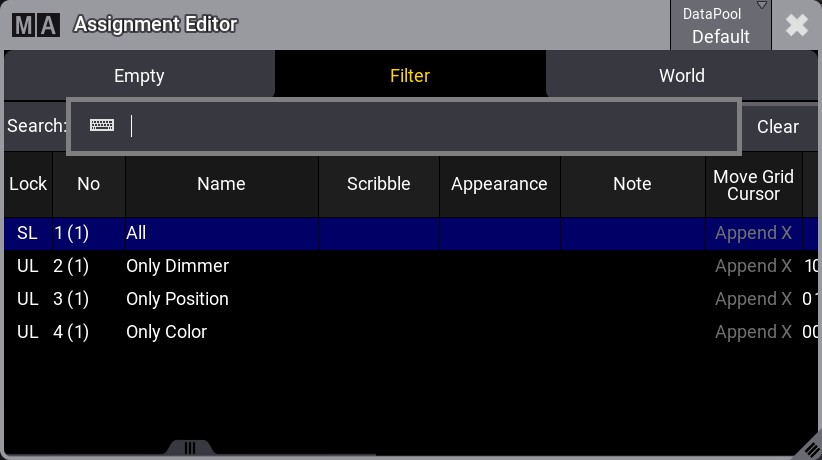 *Tap a world or filter in the list to apply an output filter* The editor has three tabs. **Empty** can be used to select no filtering. **Filter** and **World** are lists of each type. Each lists the possible choices of their type. Tap the desired filter or world to apply it. The fixtures and attributes in the world or filter are allowed to pass the output filter and be output from the sequence. The same sequence can be played back from several executors, and each executor shares the output filter settings. If different output filters are needed, the sequence should be linked or shared with another. The other sequence can have different output filter settings. Read about linked sequences in the [Cues and Sequences topic](/grandma3/2-3/cue_sequence/). If the sequence has an output filter applied, there is a small output filter icon () in the sequence pool button. **Priority** This is the priority of the sequence. The priorities are described in the [Play Back Cue topic](/grandma3/2-3/cue_playback/). **Soft LTP** The Soft LTP function is described in the [Play Back Cue topic](/grandma3/2-3/cue_playback/). **Playback Master** Here it is possible to select a [Playback Master](/grandma3/2-3/masters_playback/). It functions as a sub-master that multiple sequences can share. **XFade Mode** This is used to set how the two CrossfadeA/XFadeA and CrossfadeB/XFadeB faders work. There are two crossfade modes: * **Split**:\ The dual crossfaders work as masters for the current/next cue. * **AB**:\ The dual crossfaders work as crossfaders for increasing/decreasing values. **Object Action** The sequence can have an action assigned. This action can be used when the sequence is tapped in the pool. The pool option **Use Object Action** must be active for the sequence object action to take effect. The pool object actions are shown with a big icon on the pool objects.  It has the following options: * **None**:\ Tapping the object does not trigger an action. * **Pool Default**:\ The action set for the pool is used. * **Select**:\ This action selects the sequence. * **Flash**:\ This performs a flash action on the sequence while it is tapped. * **Go+**:\ This will perform a Go+ action on the sequence. * **Temp**:\ This performs a temp action on the sequence while it is tapped. * **Toggle**:\ This action toggles the sequence On or Off. * **Goto**:\ Tapping this performs a Goto action on the sequence. This opens a pop-up where a cue can be selected to complete the goto command. * **Load**:\ Tapping this performs a Load action on the sequence. This opens a pop-up where a cue can be selected to complete the load command. * **Top**:\ Tapping this performs a Top action on the sequence. This is similar to an automatic Goto action to the first cue (after CueZero) in the sequence. ## []()Speed [Section titled “Speed”](#speed) Speed and rate can be used to adjust the stored times without reprogramming the show. For instance, a cue can have a fade time of 5 seconds. A rate master can adjust the fade time live while playing it back. All sequences have their own individual rate and speed, but they can be linked to a global master. This master can then adjust the timing for multiple sequences simultaneously. Read more details in the [Speed Masters topic](/grandma3/2-3/masters_speed/). **Rate Master** The sequence has a rate master. It can be linked to a shared global speed master, or it can have an individual rate master. Tapping this button will open the **Select Rate Master pop-up**. In the pop-up, it is possible to select the **None** option for having an individual rate master for the sequence or select one of the global speed masters. **Rate Scale** Enabling this binds the rate to defined steps instead of a variable value. Tapping this button opens the **Select Rate Scale pop-up**. Choosing one of the steps in the pop-up, selects the multiplier or divider. This multiplies or divides the rate by the selected factor. **Speed Master** The sequence has a speed master. It can be linked to a shared global speed master, or it can have an individual speed master. Tapping this button will open the **Select Speed Master pop-up**. In this pop-up, it is possible to select the **None** option for having an individual speed master for the sequence or select one of the global speed masters. **Speed Scale** If a sequence is assigned to a global speed master (read above), it can be useful to adjust a speed scale. Tapping this button will open the **Select Speed Scale pop-up**. In the pop-up, selecting one of the multipliers or dividers is possible. This multiplies or divides the speed by the selected factor. **Speed from Rate** This links the speed to follow the rate. ## []()Protect [Section titled “Protect”](#protect) This group of settings is used to protect the sequence from different actions. **Input Filter** The playback filter is described in a little bit more detail in the [Cues and Sequences topic](/grandma3/2-3/cue_sequence/). Tapping this button opens the **Assignment Editor pop-up**: See above about the output filter. The fixtures and attributes in the world or filter are allowed to pass the filter and can be stored in the sequence. **Swap Protect** Activating this option protects this sequence from the Swap playback action. Learn more about this action in the [Swap Keyword topic](/grandma3/2-3/keyword_swap/). **Kill Protect** Activating this option protects this sequence from the Kill playback action. Learn more about this action in the [Kill Keyword topic](/grandma3/2-3/keyword_kill/). **Include Link Last Go** This setting is On as default. When it is set to Off, playing back a sequence will not trigger the LinkLastGo functionality in the [sequence sheet](/grandma3/2-3/cue_sequence_sheet/). **Use Executor Time** This makes the executor playback cues using the stored timing. If this is turned on, it is affected by the **Exec Time** master fader, who overwrites the timing. **Off when Overridden** The Off when Overridden function allows a sequence to be automatically turned Off if another sequence has taken control with all the attributes in the sequence = this executor does not control any attributes. **Lock Sequence** The sequence is locked against changes when this is On. It can still be played back. ## []()MIB [Section titled “MIB”](#mib) This group is about MIB settings for the sequence. Read more about MIB in the [Move In Black topic](/grandma3/2-3/cue_mib/). **MIB** Enable, disable, or force MIB for the sequence. The options are: * **Enabled**:\ MIB will be performed according to the cue and cue part MIB settings. * **Never**:\ MIB will never be performed for this sequence. All cue and cue part-specific MIB settings will be ignored. * **Force Early**:\ Forces the early MIB for all cues that can perform MIB as soon as the dimmer is closed. Further MIB settings specified per cue or cue part will be ignored. * **Force UponGo**:\ MIB is forced to be executed with the next cue transition after the dimmer is closed. For all cues that can perform MIB. Further MIB settings specified per cue or cue part will be ignored. * **Force Late**:\ Forces the MIB latest in the cue before the dimmer opens again. For all cues that can perform MIB. Further MIB settings specified per cue or cue part will be ignored. **MIB Mode** This setting defines which MIB mode will be executed when doing a MIB. The **MIB Mode** per cue or cue part needs to be set to **Default**. The options are: * **None** * **Early** * **UponGo** * **Late** Learn about the mode types in the MIB topic (link above).
# Sequence Sheet
> The different sequences are best seen in the Sequence Pool.
The different sequences are best seen in the [Sequence Pool](/grandma3/2-3/cue_sequence/). The best way to see the cues inside a sequence is the **Sequence Sheet**: 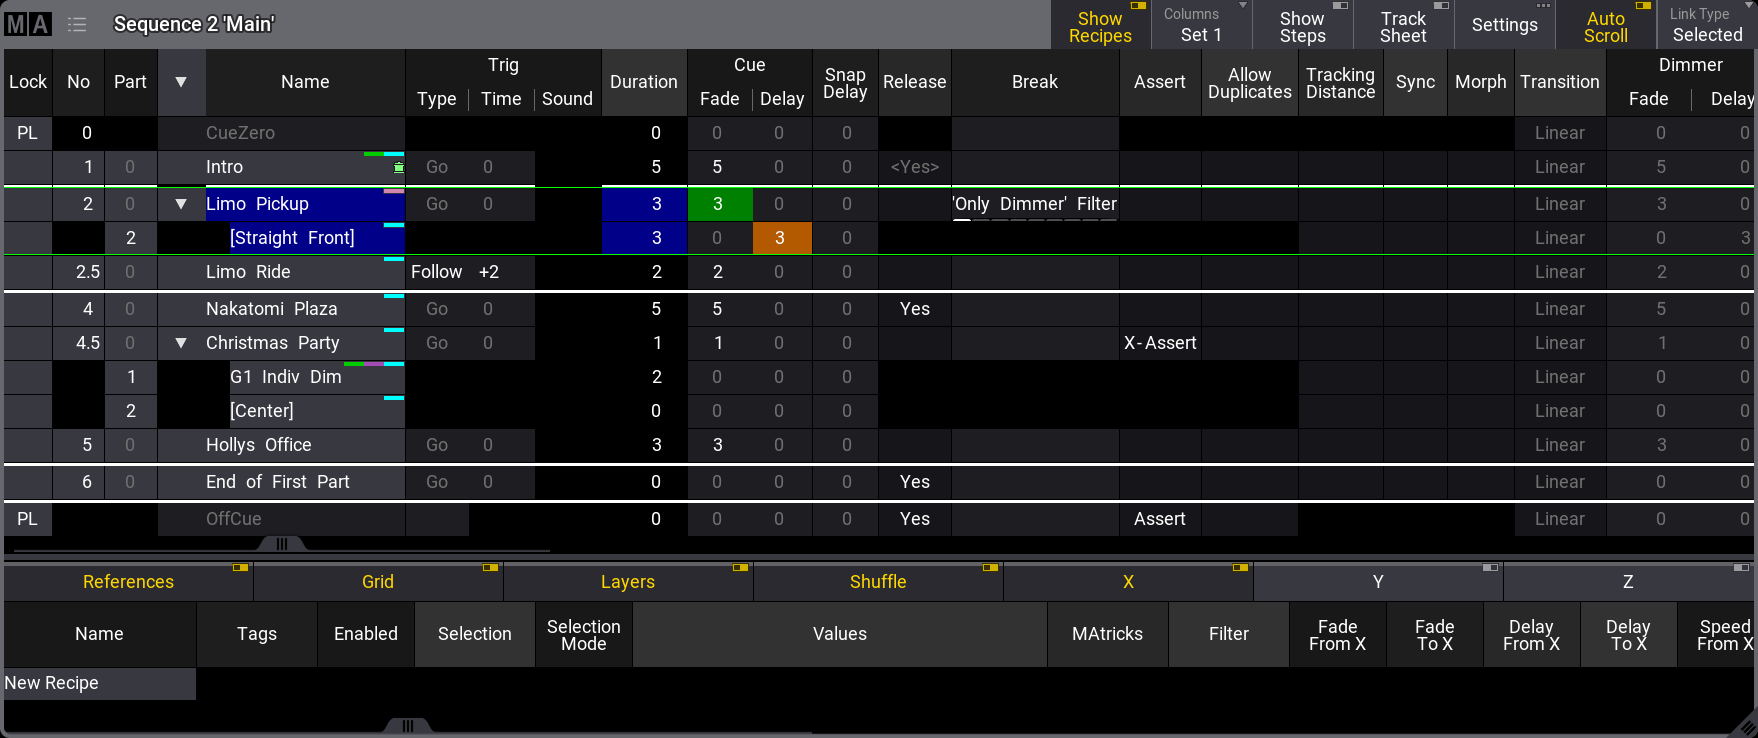 *Sequence sheet for a sequence called “Main” - Cue 2 is active* The sheet shows the cues and cue parts in rows. The different cue settings are in columns. Read below for a description of the different columns. The purpose of this sheet is to see the cues in a sequence. It also shows the active cue with a green frame. Cue fades, and delays are visualized with moving bars while the fades are running. The sheet can be created as a window in a view using the [Add Window pop-up](/grandma3/2-3/wvm_add_window/), or displayed as a temporary pop-up by editing a sequence pool object. The sheet can show a lot of different markers and colors - read more about all these in the [Colored Indicators topic](/grandma3/2-3/ws_colors_markers/). The sheet can display a value tracking section. In this section, all the stored attribute values are displayed. This can be a very handy tool for seeing the flow of an attribute through the cues. These values can also be edited directly in the sheet. Most other fields in the sheet can be edited directly. This can affect the look of the show. For instance, the cue fade and delay times are stored when the cue is created. The default timing is used if nothing else is defined. The cue timing can be edited in this sheet. Tapping this sheet to give it focus changes the encoder toolbar to make it easy to edit the cue timings. Read more about the toolbar [below.](/grandma3/2-3/cue_sequence_sheet/#sequence_edit_bar) When a trigger type is set for the OffCue of a sequence, Wrap Around will be disabled. Enabling Wrap Around for a sequence removes the trigger type for the OffCue. ## Title Bar [Section titled “Title Bar”](#title-bar) The left side of the title bar has the MA logo. Tap this to open the settings for the sheet. Read about them [below](/grandma3/2-3/cue_sequence_sheet/#sequence_sheet_settings). Next to the logo are the sequence number and name. Information about the active world (if different than world 1) is displayed below the Sequence number and name. Some buttons can be on the right side of the title bar. This can be defined by editing the title bar in the window settings. Learn more in the [Title Bar Configuration topic](/grandma3/2-3/wvm_title_bar_configuration/). ## Main Part of the Sheet [Section titled “Main Part of the Sheet”](#main-part-of-the-sheet) The main part of the sheet is below the title bar. Here is the sheet with rows and columns. A sequence sheet setting defines how the cue timing is displayed in the sheet. The option is called **Condensed Timing**. The cue fade and delay are actually four different times because there are both fade and delay for values fading in (or up) and for dimmer values fading down. The condensed view shows this in two columns where the time can be separated by a slash (/). The value on the left is the InFade. the value on the right is the OutFade. The list below shows the uncondensed timing columns. Read more in the [Cue Timing topic](/grandma3/2-3/cue_timing/). The order of the columns and which columns are visible can be changed and stored in **Columns** sets. It can also be edited dynamically. Learn more in the [Adjustable Columns topic](/grandma3/2-3/ws_ui_adjustable_columns/). This is a short description of each of the possible columns in the sheet: * **Lock**:\ Editing this cell adds or removes “UL”. This means **User Locked** and protects the cue content and settings from being changed. “PL” means **Position Locked**, and it is a system lock that cannot be removed. * **No**:\ This is the cue number. * **Part**:\ This shows the cue part number. * **Name**:\ This is the cue (part) name. If the cue contains part cues, an arrow allows them to fold and unfold the parts. In the example above, there are cue parts in cues 2 and 4.5. It is unfolded so the parts can be seen. * **Trig Type**:\ There are five different trigger types. Editing this cell opens a small select pop-up with the five different options: * **Go**:\ The cue needs a valid command (Go+, Goto, Go-, >>>, <<<, Kill) to be triggered. * **Time**:\ The cue is triggered a set time after the previous cue is triggered. The time is set in the **Trig Time** column. * **Follow**:\ A follow cue is triggered when the previous cue is completely done with the cue transition (which includes all individual timing). * **Sound**:\ This will trigger the cue using a sound as the trigger. Choosing one of 22 different frequency areas in the Trig Sound column is possible. Learn more about sound input in the [Sound Window topic](/grandma3/2-3/sound_viewer/). * **BPM**:\ This will trigger the cue using the beats in the sound input. This can become useful with several cues triggered by the BPM (beats per minute). * **Trig Time**:\ The values stored here are only used if the trigger is **Time** or **Follow**.\ If the trigger is **Time**, then the time in the cell will be used. The time starts counting down when the previous cue is triggered. If the previous cue uses a “Follow” trigger, then the cue’s countdown is started when the follow cue is triggered.\ If the trigger is **Follow**, then positive time values can be added in the time cell. This time will be added as a wait between the previous cue’s completion of its transition and the triggering of this cue. * **Trig Sound**:\ This setting defines the sound used to trigger the cue when the **Trig Type** is sound. * **Duration**:\ This is the overall cue time transition time. It is a combination of the longest fade time and any delays. This is the time used with the Follow trigger. The cell cannot be edited. It always shows the complete transition time. * **CueIn Fade**:\ This is the fade time for all non-snap attributes and dimmer values that increase in value. * **CueIn Delay**:\ This is the delay or wait time between the trigger and the actual cue in fade begins. * **CueOut Fade**:\ This is the fade time for dimmer values that go down in value. The default values for this are the same as the CueIn Fade time - it is linked to the cue in fade with the **None** value. * **CueOut Delay**:\ This is the delay for the **Out Fade** (only dimmer values). Its default value is the same as the CueIn Delay value. * **Snap Delay**:\ This can be used to control when “snap” attributes change values. * **Release**:\ Changing the value to **Yes** in this cell makes the cue release tracked values. Learn more in the [What is Tracking topic](/grandma3/2-3/cue_tracking/). * **Break**:\ A break blocks new values of attributes being tracked. Editing the cell opens an **Assignment Editor** pop-up where a filter or world can be selected. The selected filter or world defines what is blocked by the break. Learn more in the [Break topic](/grandma3/2-3/cue_tracking_break/). * **Assert**:\ Assert can be used to make tracked values take precedence as if they are stored values in the cue. There are three options: * **None**:\ Tracked values are not asserted * **Assert**:\ The tracked values take precedence as if they are stored values in the cue. Values are asserted using the timing from the cue where the values are originally stored. * **X-Assert**:\ Like assert, but the tracked values are asserted using the timing from the cue where the X-Assert is set. * **Allow Duplicates**:\ If several parts of the same cue are to contain values for the same attributes, use **Allow Duplicates** to enable this function. Absolute and relative values in multiple parts will use the value with the highest cue part number. * **Tracking Distance**:\ The tracking distance sets how many cues a value should track. If the cell is empty, it tracks until changed. Read more about tracking distance in the [What is Tracking topic](/grandma3/2-3/cue_tracking/). * **Sync**:\ Synchronizes the fixtures of the phaser. For example, if fixtures join the already running phaser, they will be synchronized with the fixtures already running. Learn more about sync in the [Phaser topic](/grandma3/2-3/phaser/). * **Delay To Phase**:\ This property can be “Yes” or “No” (empty). When it is “Yes”, then the individual attribute delay times are transferred to when multistep phasers are triggered for the individual attributes. This might give a very different look than the original phaser. * **Morph**:\ If the property is enabled and the phase of the fixtures changes from one cue to the next, they will stay on track and morph into their new phase value. If the option is disabled, the fixtures will take the direct way to their new position in the phase. * **Transition**:\ This can be used to select a transition path for the fade. The different options are described in the [Cue Timing topic](/grandma3/2-3/cue_timing/). * **“Preset type” Fade**:\ Each preset type has columns called the name of the preset type followed by “Fade”. This uses the cue in fade as a default. It can be changed to give all values in the preset type a different fade time. All fixtures with new values in this preset type will use this timing for the attributes in the preset type. * **“Preset type” Delay**:\ Each preset type has columns called the name of the preset type followed by “Delay”. This uses the cue in delay as a default. It can be changed to give all values in the preset type a different delay time. All fixtures with new values in this preset type will use this timing. * **Command**:\ Commands (like the ones written in the command line input) can be written in the cues. When the cue is triggered, they are executed on the GlobalMaster, IdleMaster, or Standalone station if Command Enabled allows it. Editing the cell opens the **Command Editor**. Learn more about this editor in the [Create Macros topic](/grandma3/2-3/macro_create/). * **Command Enabled**:\ This can be toggled **Yes** or **No** if there is a command. If exclamation marks surround the option, then the [sequence settings](/grandma3/2-3/cue_sequence_settings/) overwrite the setting. The overwritten option can be seen in the header of the column. * **Command Delay**:\ This will add a delay between the triggering of the cue and the execution of the command. See **Command** just above. * **Note**:\ This is a multiline text field where a note can be added to the cue. Learn more in the [Notes topic](/grandma3/2-3/notes/). * **MIB Preference**:\ This defines whether the cue is good for the MIB function. Read more in the [Move In Black topic](/grandma3/2-3/cue_mib/). * **MIB Mode**:\ This sets the MIB mode. This can only be edited if MIB is possible. Read more in the [Move In Black topic](/grandma3/2-3/cue_mib/). * **MIB Target**:\ Defines a cue where the MIB should be performed if possible. This can only be edited if MIB is possible. Read more in the [Move In Black topic](/grandma3/2-3/cue_mib/). * **MIB MultiStep**:\ Defines what should happen with phasers in the MIB. This can only be edited if MIB is possible. Read more in the [Move In Black topic](/grandma3/2-3/cue_mib/). * **MIB Fade**:\ Sets the MIb fade time. This can only be edited if MIB is possible. Read more in the [Move In Black topic](/grandma3/2-3/cue_mib/). * **MIB Delay**:\ Sets the MIB delay time. This can only be edited if MIB is possible. Read more in the [Move In Black topic](/grandma3/2-3/cue_mib/). * **Indiv Fade**:\ This is “Individual Fade”. It displays the time for attributes that have individual stored fade times. This cell cannot be edited. * **Indiv Delay**:\ This is “Individual Delay”. It displays the time for attributes that have individual stored delay times. This cell cannot be edited. * **Indiv Duration**:\ This is “Individual Duration”. It displays the overall time for attributes that have individual stored fade and delay times. This cell cannot be edited. * **Speed Master**:\ A Speed Master can be assigned to the cue or cue part by editing this cell. The speed of the cue or cue part is only controlled by the assigned speed master. A speed master assigned to the sequence has a lower priority and does not influence a cue or cue part with a different assigned speed master.\ If no speed master is assigned to an attribute, but a speed master is set for the sequence or cue part, phasers in the cue apply the speed master depending on the cue part’s sync setting: * **Sync enabled for the cue part**:\ The phaser is synced to the common timeline. For example, if flash is tapped, it always begins at a different point of the phase. * **Sync disabled for the cue part**:\ The phaser is only using the speed of the speed master. For example, if flash is tapped, it always begins at the starting point of the phase. * **Speed Scale**:\ This can be used to scale the speed of the cue or cue part. A speed scale assigned to a cue or cue part has a higher priority than a speed scale assigned to the sequence. * **Appearance**:\ An Appearance can be assigned to the cue or cue part. It is connected with a sequence sheet setting called **CuePart Appearance**, which defines how the appearance is displayed. Read more [below](/grandma3/2-3/cue_sequence_sheet/#sequence_sheet_settings). * **Individual Timing**: This influences the prioritization of general cue timings (Cue Fade, Cue Delay) and individual timings (Indiv Fade, Indiv Delay). The options are: * **Default**:\ Individual timings are prioritized over general cue timings. * **Normalized**:\ General cue timings are set as the maximum time for individual timings. If individual timings have a range of values, these values will be scaled to the new maximum time set by the corresponding general cue timings. * **Tags**:\ Cues can have tags assigned. Learn more about tags in the [Tags topic](/grandma3/2-3/tags/). All cells with a light or dark gray background color can be edited, and the field’s value can be changed. Fields with a black background cannot be edited. ## []()Track Sheet Mode [Section titled “Track Sheet Mode”](#track-sheet-mode) The sequence sheet can be in **Track Sheet** mode. This can be changed in the window settings - and the setting can be a button in the title bar. 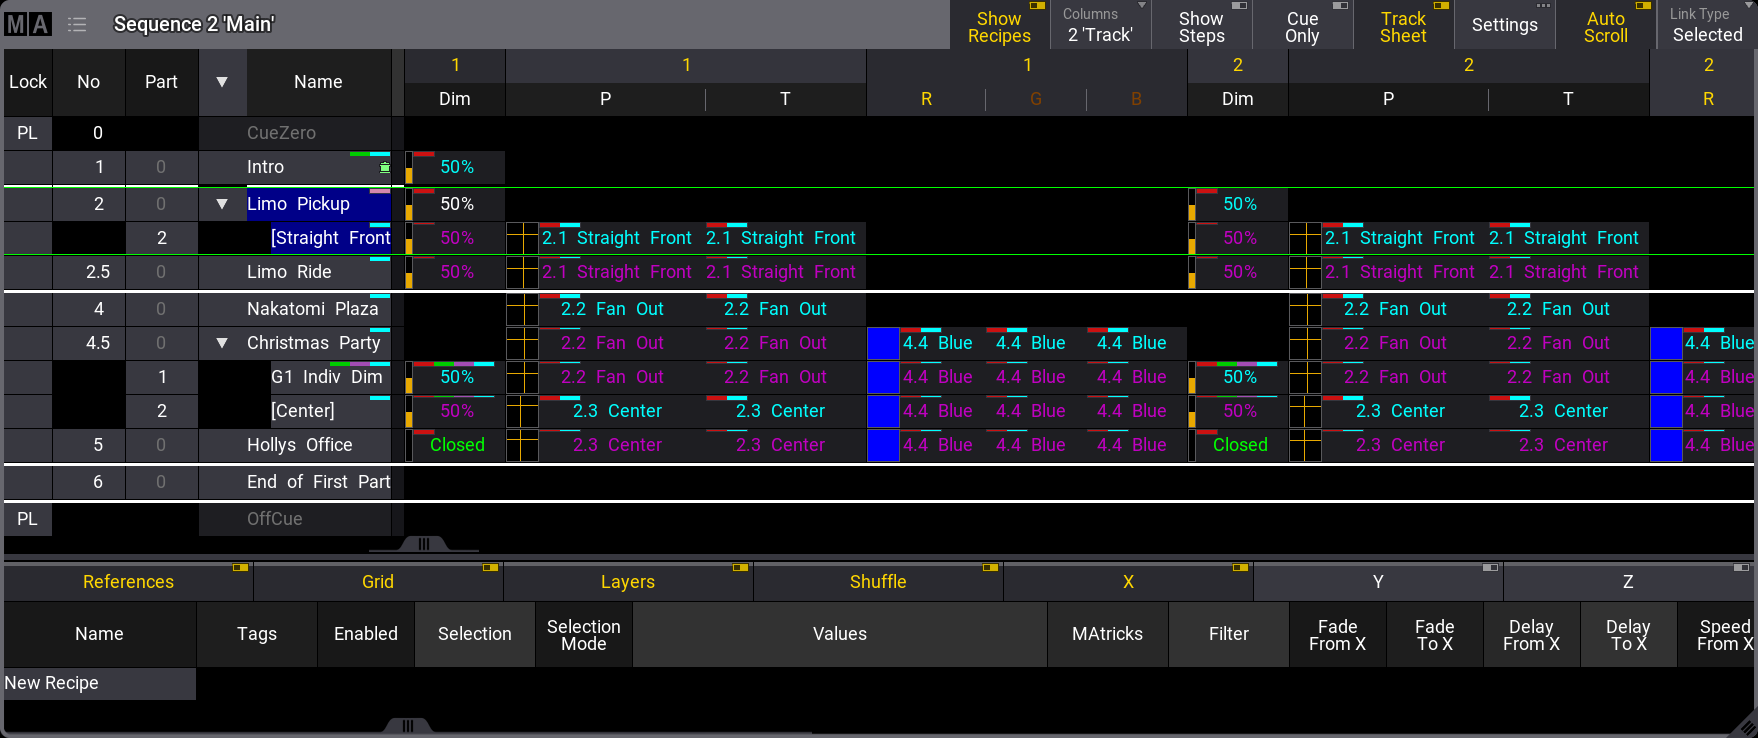 Sequence Sheet in Track Sheet mode This mode can use a different selection in the **Columns** setting in the sheet settings. The example image above also has the **Columns** setting in the title bar. The track mode shows attribute data in columns on the right side of the sheet. The attribute values and markers have different colors, indicating different statuses, like the tracking status. Read about the colors and markers in the [Colors topics](/grandma3/2-3/ws_colors/). Read about tracking in the [What is Tracking topic](/grandma3/2-3/cue_tracking/). The values can be edited in the sheet. The Cue Only setting can be activated in the settings, and it can be a button in the title bar that appears when **Track Sheet** is On. This makes edited values follow the [cue only rules](/grandma3/2-3/cue_store/). When cues with multiple parts are expanded to show all the parts, it is easy to see exactly what parts have stored which values. When the cues are collapsed to show only one row, the values from the parts are shown in this row with a small text in the lower right corner telling what part the values come from. 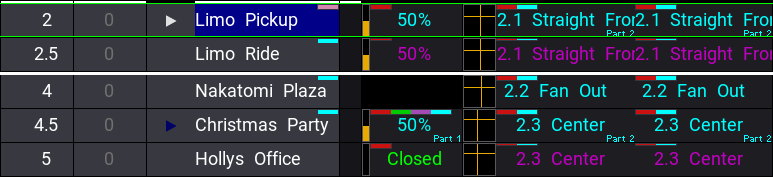 Collapsed cue with multiple parts This example is the same cue 2 and 4.5 as the image above. The only difference is that the cue is collapsed to show only one row. Notice the small text showing that the pan and tilt values are from part 2 and in cue 4.5 the dimmer is from part 1. The [Layer Toolbar](/grandma3/2-3/ws_eb_encoder_toolbar/) can be turned On in the settings. This can be useful when there is a desire to edit or look at values in other layers. The Mask Toolbar can be turned On in the settings. This shows the Mask Toolbar when the Track Sheet Mode is active. The mask buttons in the toolbar can be used to easily change between different masks that can hide elements in the sheet. Learn more in the [Sheet Masking topic](/grandma3/2-3/worldfilter_filter_rules/). Editing a value opens the Calculator, where a new value can be selected from Presets, Channel Sets, Specials, or simply typed. The [calculator](/grandma3/2-3/ws_calculator/#track_sheet_calculator) has some special functions in the track sheet that define what is changed, and there are special buttons that give access to block, unblock, and extract presets. Extract presets will remove the link to a preset and store the current preset values directly in the cue. ## Overwritten Cue Timing [Section titled “Overwritten Cue Timing”](#overwritten-cue-timing) The cue timing can be overwritten by the Executor Time or by a manual crossfade. When this happens, a yellow text appears in the header, and an exclamation mark is added next to the stored time. 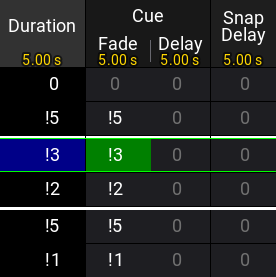 Example of an active Executor time. Learn more about the Executor time in the [Cue Timing topic](/grandma3/2-3/cue_timing/). ## []()Sequence Sheet Settings [Section titled “Sequence Sheet Settings”](#sequence-sheet-settings) The sheets have a lot of settings. They are accessed by tapping the MA logo in the upper left corner of the window. 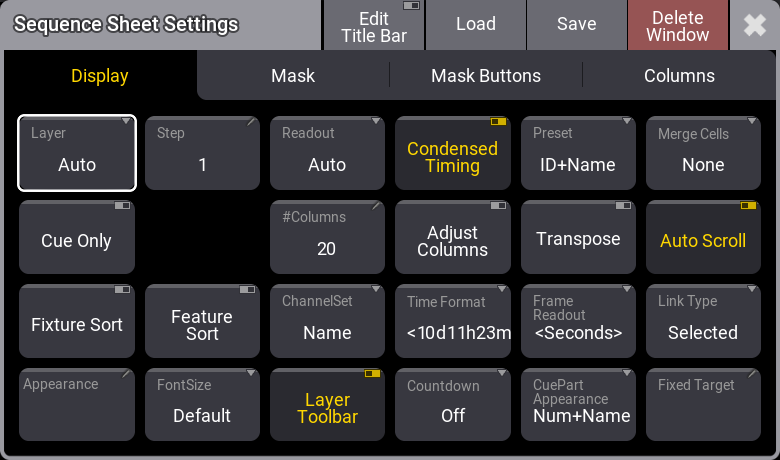 Sequence Sheet Settings - Display tab Some of them are general settings that are shared with other windows. Read about them in the [Window Settings topic](/grandma3/2-3/wvm_settings/). The settings have three tabs: **Display**, **Mask**, and **Columns**. This is a short description of the display settings in the sequence sheet. * **Layer**:\ It selects which layer is displayed in the window. It is a swipe button that opens a list of the layers. A special property is **Auto**. This property makes the window follow the selected layer in the [Encoder Bar](/grandma3/2-3/ws_encoder_bar/). * **Cue Only**:\ It defines if the cue only function is On/Off when editing values.[](/grandma3/2-3/cue_tracking/) * **Fixture Sort**:\ This On/Off button activates the sorting of fixtures. The fixtures are sorted in the selection order to the top or left hand side of the sheet showing the fixtures. * **Appearance**:\ Tapping this button opens a **Select Appearance** pop-up that lists all the defined appearances and the possibility of creating a new appearance. Selecting one will apply that appearance to the window. * **Step**:\ It selects which step to display. Steps are used with [Phasers](/grandma3/2-3/phaser/). It is a property input button that opens a calculator pop-up. * **Settings**:\ This is only visible when editing the Title Bar. This setting determines whether there is a Settings button in the title bar or if it is hidden.\ The actual Settings button can be tapped to open the settings for the object. For instance, tapping the Settings button in the title bar of the sequence sheet opens the settings for the sequence. * **Feature Sort**:\ This On/Off button activates feature sorting. The selected feature is moved before the other features in the sheets showing features. * **Font Size**:\ This selects the font size in the window. It is a swipe button that opens a list of sizes from 10 to 32. There is also a **Default** property. The default is the same as size 18. * **Readout**:\ This selects the value readout for fixture attributes. It is a swipe button that opens a list of readout types with the following options: * **Auto**:\ This makes the sheet follow the selected readout in the [Encoder Bar](/grandma3/2-3/ws_encoder_bar/). * **Natural**:\ Each attribute has a defined Natural readout. This is defined in the [Attribute Definition](/grandma3/2-3/patch_attribute_definitions/). Selecting this option will show the different readouts defined for the attributes. * **Percent**:\ This is a range from 0 to 100. * **PercentFine**:\ This is a range from 0.00 to 100.00. * **Physical**:\ This uses the physical range defined in the fixture type definition. * **Decimal8**:\ This is a decimal range from 0 to 255. * **Decimal16**:\ This is a decimal range from 0 to 65 535. * **Decimal24**:\ This is a decimal range from 0 to 16 777 215. * **Hex8**:\ This is a hexadecimal range from 00 to FF. * **Hex16**:\ This is a hexadecimal range from 0000 to FFFF. * **Hex24**:\ This is a hexadecimal range from 000000 to FFFFFF. * **#Columns**:\ This input button sets the number of columns a sheet should display (the settings **Transpose** and **Adjust Columns** must be switched On except in the DMX Sheet). The DMX Sheet shows all the DMX channels and their output values. Learn more in the [DMX Sheet topic](/grandma3/2-3/patch_dmx_sheet/). * **ChannelSet**:\ This setting defines the readout of values that are part of channel sets. It has three options: * **Value**:\ Displays only the value. * **Value + Name**:\ Displays the value and channel set name. * **Name**:\ Displays only the channel set name. * **Layer Toolbar**:\ This On/Off button shows or hides a [layer toolbar](/grandma3/2-3/ws_eb_encoder_toolbar/) at the bottom with the different Layers. * **Condensed Timing**:\ This toggles if the cue timing columns are displayed condensed or if all four cue timing columns are visible. * **Adjust Columns**:\ This On/Off button makes a sheet adjust the column width to match the window size and the number of columns. * **Time Format**:\ This defines the time format for the windows. This can be used to select a different format than the default set in the [user profile](/grandma3/2-3/user_settings/#time_frame_readout). * **Countdown**:\ A cue timing countdown can be displayed while the fade is running. This setting has three options: * **Off**:\ There is no countdown in any of the timing columns. They always display the set times. * **Duration**:\ The duration column displays a countdown while the cue transition is running. * **All**:\ The duration and cue timing columns display a countdown while the cue transition is running. * **Preset**:\ This defines how the preset information is displayed in the sheets. There are six properties which are different combinations of these three elements: * **ID**:\ Shows the ID number of the preset. * **Name**:\ Shows the name of the preset. * **Value**:\ Shows the values stored in the preset. * **Transpose**:\ This On/Off button flips the columns and rows in windows. * **Frame Readout**:\ This defines the frame readout for this window. It can be used to overwrite the default set in the [user profile](/grandma3/2-3/user_settings/#time_frame_readout). * **CuePart Appearance**:\ This defines how the cue part appearance is displayed in the sheet. The options are: * **Off**:\ Cue part appearance is not displayed. * **Number**:\ The appearance is only shown on the cue number column. * **Num+Name**:\ The appearance is displayed in the number and name columns. * **All**:\ The appearance is displayed on all columns. * **Merge Cells**:\ Cells can be merged to show a value only once if the adjacent cell has the same value and belongs to the same feature or feature group. For instance, if all red, green, and blue values are “100”, then “100” are only shown once. * **None**:\ Cells are not merged. * **Feature**:\ The values of a feature are merged to only be shown once if the two or more adjacent values are the same. * **Feature Group**:\ The values of a feature group are merged to only be shown once if the two or more adjacent values are the same. * **Auto Scroll**:\ This On/Off button activates the auto-scrolling function. This will keep the active object visible in the window by scrolling the sheet or grid. * **Link Type**:\ This setting defines which sequence is shown in the sheet. \ There are three different link types. The options are: * **Fixed**:\ The sheet displays the information from a specific sequence. The selection is made in the Sheet Settings. Read about the **Fixed Target** setting above. It can also be set using the [Assign](/grandma3/2-3/keyword_assign/) and [Sequence](/grandma3/2-3/keyword_sequence/) keywords and tapping the sheet’s title bar. * **Selected**:\ The sheet displays information from the selected sequence. * **LastGo**:\ This automatically shows the latest sequence to receive one of the trigger commands (<<<, >>>, Go+, Go-, Goto, Load, On, Select, Top, Temp, Flash, Toggle On, Pause). This includes if the sequence is triggered from a running timecode recording. A sequence can be excluded from LastGo by turning Off the **Include Link Last Go** setting in the [Sequence Settings](/grandma3/2-3/cue_sequence_settings/). LastGo only shows sequences triggered by the same user profile. * **Fixed Target**:\ This setting defines the sequence a sheet displays if the **Link Type** is **Fixed**. Tapping this setting opens an **Assignment Editor** pop-up where a sequence can be selected. *** The mask settings for the sequence sheets are: * **Color Mode**:\ This switches the color readout between Auto (following the User Profile setting), RGB and CMY. The default value is to follow the setting in the [User Profile](/grandma3/2-3/user_settings/#h2_989550839). The user profile setting is shown between ”<>”. * **Feature Graphic**:\ Shows or hides a small graphic next to each feature in the sheets showing the features. * **Line Height**:\ This defines the line height for the rows in the sheet. Valid options range from 1 to 12. There is also an **Auto** option, which selects the smallest height possible to show the content. * **Show Command Test**:\ This makes it possible to test a command stored in a cue without activating the cue. Toggling this setting On will display a play icon () in the command cells that contain commands. Tapping the play icon executes the command of the cue. * **Show Fixture Name:\ **It shows the name of the fixtures on the sheet. This setting is only relevant when the **Sheet Mode** is different than **Fixture** in the fixture sheet.**** In the sequence sheet this setting is only relevant when Track Sheet is enabled. * **Show Notes**:\ This On/Off button shows or hides the notes for the selected cue at the bottom of the sheet. Read more about it in the [Notes topic](/grandma3/2-3/notes/). * **Show Recipes**:\ This On/Off button shows or hides the cue recipes at the bottom of the sheet. Read more about it in the [Cue Recipes topic](/grandma3/2-3/cue_recipe/). * **Show Steps**:\ This On/Off button shows or hides the cue steps in the sheet. This is useful in a sequence sheet with **Track Sheet** On. * \*\*Track Sheet:\ \*\*This On/Off button shows or hides the values and tracking information for each attribute in the sheet. *** The **Mask Buttons** tab can be used to define the buttons in the **Mask Toolbar**. A Mask Toolbar button toggles whether the toolbar is displayed or hidden. Learn more about the mask buttons in the [Common Window Settings topic](/grandma3/2-3/wvm_settings/). Learn about the filter rules often used to mask elements in the sheet in the [Filter Rules topic](/grandma3/2-3/worldfilter_filter_rules/). Finally, there is a tab called **Columns**. This allows editing of the columns and column sets in the sequence sheet. Learn more about this in the [Adjustable Columns topic](/grandma3/2-3/ws_ui_adjustable_columns/). ## []()Sequence Edit Toolbar [Section titled “Sequence Edit Toolbar”](#sequence-edit-toolbar) The encoder toolbar changes when the sequence sheet has focus. The sheet can get focus by tapping the sheet.  Sequence Edit Toolbar - Basic Timing page There are several pages with many different settings for the cues. The pages can be changed using the swipe button in the upper left corner of the toolbar (see the image above). The top row in the toolbar gives access to select a cue. There are also playback controls that can be used to run cues. Read more in the [Play Back Cues topic](/grandma3/2-3/cue_playback/). Turning the two rings on the encoders changes the respective values for the selected cue in the sheet. The lower row is the outer ring of the dual encoder. The middle row is the inner ring of the dual encoders.
# Store Cues
> Storing a cue is the default Store action in grandMA3.
Storing a cue is the default [Store](/grandma3/2-3/keyword_store/) action in grandMA3. This means that if nothing else is defined and Please is pressed right after Store, a new cue is stored in the selected sequence. Or press Store, followed by pressing the executor button where the sequence, with the cue, should be stored. If active values are in the programmer, they are stored in the cue (with the default store settings), but programmer values are not needed to store cues. Of course, there are more details about storing cues, so please keep reading. ## Store a New Cue on an Empty Executor [Section titled “Store a New Cue on an Empty Executor”](#store-a-new-cue-on-an-empty-executor) If a cue is stored on an empty executor, the grandMA3 software automatically stores the cue in a new sequence and assigns this executor to control the sequence using the default settings. Returning to the second example at the top of this topic, just pressing the Store button and then an executor button on the empty executor is enough. The software assumes the desired action is storing a cue. This will automatically be cue number 1 - nothing else was specified. Storing cues obey [Worlds and Filters](/grandma3/2-3/worldfilter/), which enables control of what is stored. Worlds and filters can also be assigned to the sequence both as an input and also as an output filter - independently of each other. This will function as an input or output filter, allowing only the elements in the world or filter to be stored in or played back from the sequence. ## Store the Second Cue [Section titled “Store the Second Cue”](#store-the-second-cue) If the store function is used again on the same sequence - without adding cue number details - then the grandMA3 does not know what should happen, and a pop-up appears, giving different choices. 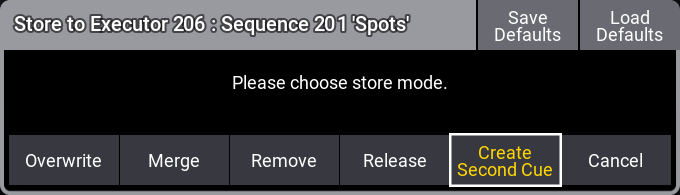 *Please choose store mode pop-up with “Create Second Cue” option* Tapping Create Second Cue will store a cue with the next whole number. **Overwrite** and **Merge** options are explained below. **Remove** and **Release** are described in the [What is Tracking topic](/grandma3/2-3/cue_tracking/). **Cancel** does not store anything. ## Cue Numbers [Section titled “Cue Numbers”](#cue-numbers) When a cue is stored, it is possible to specify a cue number. This is done using the following syntax: Store Cue \[Cue\_Number]. It is also possible to specify a sequence or an executor using the keys in the command section while storing:\ Store Cue \[Cue\_Number] Sequence \[“Sequence\_Name” or Sequence\_Number] or\ Store Cue \[Cue\_Number] Executor \[Executor\_Number]. Notice that the cues are stored in the sequence. Using the executor number will store the cue in the sequence the executor is controlling. Cue numbers have three decimal numbers. If all are zero, then they are not displayed. But cue number “42” is the same as cue number “42.000” - it is not “42 thousand”, it is “42 point 0 0 0”. The currently highest cue number that can be stored is “999 999.999”. The lowest number that can be stored is “0.001”. | | | | -------------------------------------------------- | ------------------------------------------------------------------------------------------------------------------------------------------------------------------------------------------------------------------------------------------ | |  | **Restriction:** | | | Storing nearly 1 billion cues will completely fill the memory and make the show file VERY big.The software will cancel the store process before the system crashes, but almost any operation after this will make the software shut down!! | The software hides the trailing decimal zeros, but they are still there. This means that cue “5.2” is after cue “5.11” because they are actually cues “5.200” and “5.110”. It is not limited to storing only a single cue number at a time. It can just as easily be a range of numbers - this means it is possible to use Thru, +, and - keys to create number ranges to store. Selecting the sequence can be a good idea if you are working with or adding a lot of cues to the same sequence. This can be done easily by pressing Select and then one of the buttons associated with the executor controlling the sequence or tapping the sequence in the sequence pool. The selected sequence is used if no sequence or executor is defined in the store command. ## Store Into Cues That are Not Empty [Section titled “Store Into Cues That are Not Empty”](#store-into-cues-that-are-not-empty) If the store operation is used to store into already existing cues, then a pop-up like this appears: 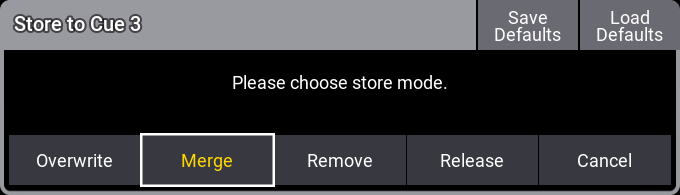 *Please choose store mode pop-up* or if there are cues following the cue stored into, it looks like this: 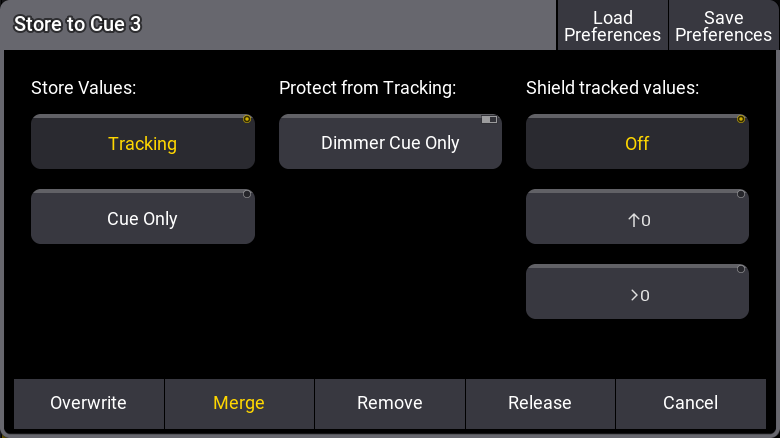 *Please choose store mode pop-up with following cues* The pop-up only appears if the store options do not specify what should happen. Look at the [Store Options and Defaults topic](/grandma3/2-3/cue_store_settings_preferences/) for information about specifying this while storing. **Cue Only** is described in the [Cue Only topic](/grandma3/2-3/cue_tracking_cue-only/). The shield tracking options are described in the [Tracking Shield topic](/grandma3/2-3/cue_tracking_shield/). **Remove**, **Release**, and other tracking information are described in detail in the [What is Tracking topic](/grandma3/2-3/cue_tracking/). The two remaining options are: * **Overwrite:**\ This will remove what is already stored in the cue and only store the new values using the tracking settings in the pop-up. * **Merge:**\ This will merge the new values into the existing values. New values have a higher priority and will overwrite existing values. ### Examples [Section titled “Examples”](#examples) In the following examples, we have a sequence with the following two cues: 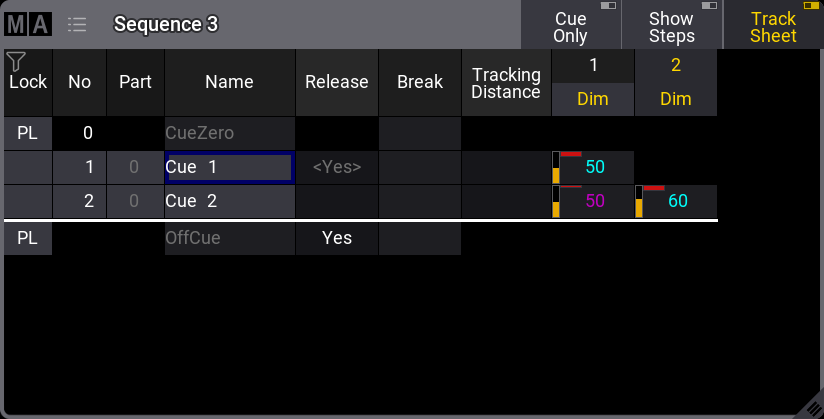 The magenta value for fixture 1 in cue 2 is a tracked value. Now we turn on fixture 3 at 100 % and store this into cue 2. This is the result if **Overwrite** is chosen: 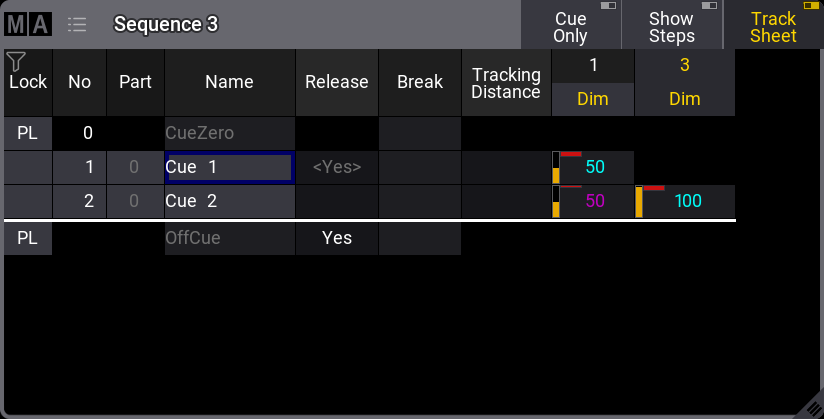 Now fixture 2 is gone. This is because it only had values stored in cue number 2. The dimmer value of fixture 1 is not affected because it is a tracked value. If we had chosen **Merge** instead, it would have looked like this:  Now, the value from fixture 3 is added to the existing values. ## Store Cues with Timings [Section titled “Store Cues with Timings”](#store-cues-with-timings) When storing a cue, it is possible also to store the different cue timings. This is described in detail in the [Cue Timings topic](/grandma3/2-3/cue_timing/), but here is the short version. The Time key will add different timing keywords to the command when storing. For instance, storing cue 4 with a fade time of 6 seconds and a delay of 1 second, the following keys can be pressed: Store Cue 4 Time 6 Time 1 Please This is the result in the command line feedback: | | | | ---- | ------------------------------------ | | OK : | Store Cue 4 CueFade “6” CueDelay “1” | Pressing the Time button repeatedly will change what timing keyword it adds. ## Adding and Using Cue Labels [Section titled “Adding and Using Cue Labels”](#adding-and-using-cue-labels) A cue can be given a name - using the [label keyword](/grandma3/2-3/keyword_label/) - while it is stored. This is the syntax: Store Cue \[Cue\_Number] “My Cue Name”. The keyboard is needed for writing this. The quotation marks are needed to tell the software that this is text - then, it is not interpreted as a command. Labels can also automatically be enumerated while storing. Have a look at this command: | | | | ------------------------------------------------------------------ | ------------------------------------------------ | |  | User name\[Fixture]>Store Cue 2 + 4 “BO Scene 1” | This will not label both cues 2 and 4 the same - it will add 1 to the number for each cue. The result is that cue 2 is called “BO Scene 1” and cue 4 is “BO Scene 2”. This enumeration only works if the number is the last part of the label and if there is a space between the last word and the number. Cue labels can be used when storing. This means that if there are several cues whose labels start with “BO”, it is possible to store into all these cues in one operation using BO plus an asterisk. The asterisk functions as a character wildcard and means that the cue name has to begin with “BO”, but then any remaining characters can be anything. See the following example. ### Example [Section titled “Example”](#example) This is the cue sequence and content before storing: 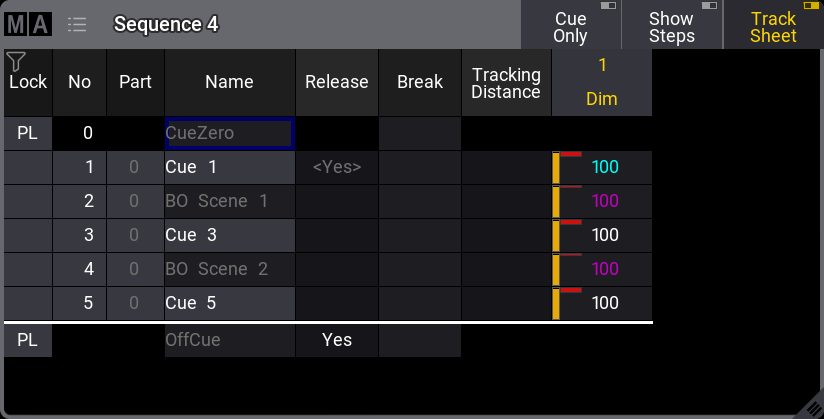 Notice that cues 3 and 5 are [blocked](/grandma3/2-3/keyword_block/). This means that 100% is stored in the cues even though it is currently not necessary. With an active value of 0% for fixture 1, use the keyboard to type the following command: | | | | ------------------------------------------------------------------ | ------------------------------------------- | |  | User name\[Fixture]>Store Cue “BO\*” /Merge | This is the result: 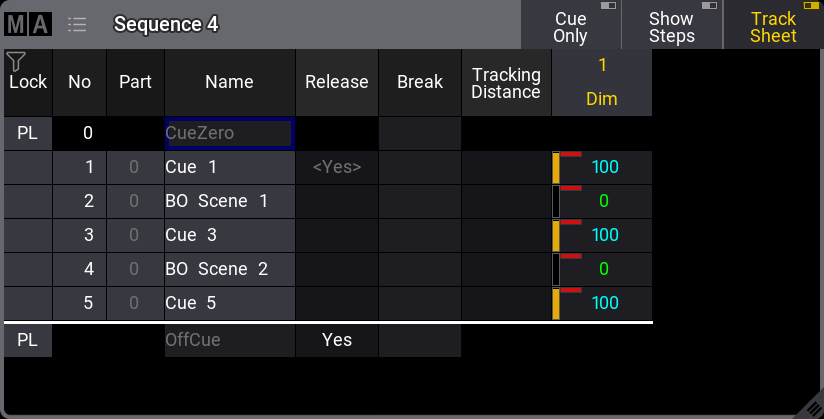 The two cues whose label begins with BO now got the new value. ## Store Cue Parts [Section titled “Store Cue Parts”](#store-cue-parts) Besides the many cues that could be stored in each sequence, it is also possible to store 256 **Cue Parts** to each cue. Values are always stored in a cue part, and often when we talk about a cue, we are actually talking about all the parts in a cue. Cue parts are a division of the cue. Cue part 0 is always created with the cue, and this part has all the values unless a different part is created or specified when storing. Have a look at this example: 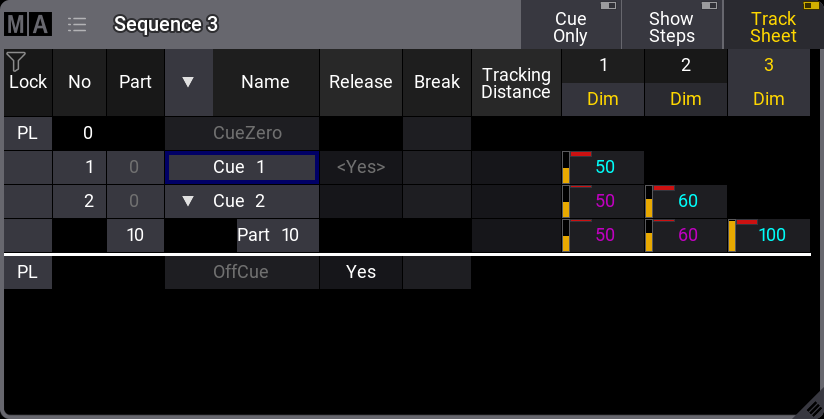 Notice that the value for fixture 3 is stored in cue 2, part 10. It does not have a value in cue 2, part 0. And the values from fixtures 1 and 2 are in part 0 and therefore do not have any value in cue 2, part 10. It appears as tracked values. Storing something in a part is almost as easy as storing the main cue. Using the example above, the keypresses would be: Store Cue 2 Cue 1 0 Please The second press on the cue key will result in the [Part keyword](/grandma3/2-3/keyword_part/), and the command line feedback looks like this: | | | | ---- | ------------------- | | OK : | Store Cue 2 Part 10 | As a default, it is only possible for an attribute to be stored in one cue part per cue. But this can be changed so an attribute can have values in multiple cue parts in the same cue. If **Allow Duplicates** is turned On for a cue then attributes can be stored in all parts of the cue. In this example, **Allow Duplicates** is set to Yes for cue 2, and fixture 1 has values in both part 0 and part 10: 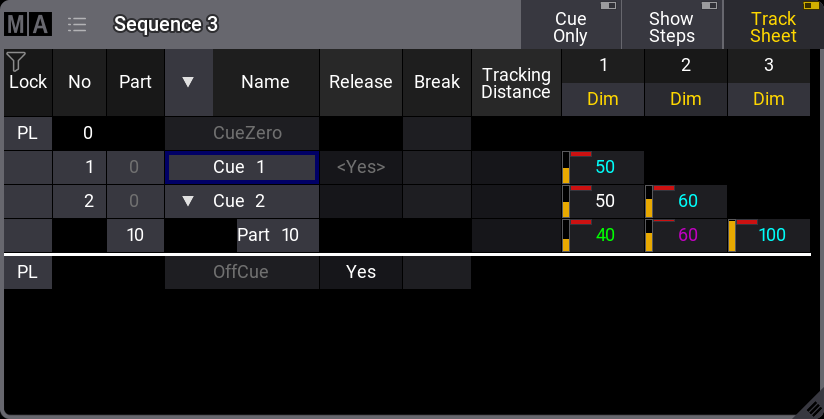 The cue part with the highest number takes precedence, and in the example above, fixture 1 will end at 40% output when cue 2 is triggered. **Allow Duplicate** is a column in the [Sequence Sheet](/grandma3/2-3/cue_sequence_sheet/). ## []() ## Store Cue Next and Previous [Section titled “Store Cue Next and Previous”](#store-cue-next-and-previous) The [Next](/grandma3/2-3/keyword_next/) and [Previous](/grandma3/2-3/keyword_previous/) keywords can be used when storing cues. This means that instead of storing a specific cue number (or name), a cue can be stored based on the currently active cue. For instance, if the currently active cue is number 4. Then, values can be stored in the next cue using a syntax like this: Store Cue Next /Merge. If the next cue does not exist, then a new cue is created using the next available whole number. It is the same that happens with Store Cue, so in this case the Next keyword is disregarded. The same method can be used to store into the previous cue using the Store Cue Previous /Merge syntax. A number can be added to count forward or backward. For instance, if there is a sequence with cues 1 to 5 and the currently active cue is 1, then values can be stored to cue 4 using this syntax: Store Cue Next 3 /Merge. | | | | ------------------------------------------ | --------------------------------------------------------------------------------------------------- | |  | **Hint:** | | | Next and Previous can be used for other cue actions than store. For instance, Update, Goto, and At. | ## Store Cue + and - [Section titled “Store Cue + and -”](#store-cue--and--) The [+](/grandma3/2-3/keyword_plus/) and [-](/grandma3/2-3/keyword_minus/) keywords can be used when storing cues. In the paragraphs just above, we look at storing using next and previous, but this only stores into the existing cues or adds a new cue at the end with the next available whole number. With + and -, there are some extended options. This can be used to create new cues in between existing cues. Let us explore this using an example. The base sequence has the following cues: 10, 20, and 30. Cue 20 is active. A new cue can be created between cues 20 and 30 using this syntax: Store Cue +. This creates cue 21. So the system creates the new cue with the next whole number when it is available. If the same syntax is used again (still with cue 20 active), then cue 20.1 is created because there are no more whole numbers available between 20 and 21. If the syntax is repeated, then cues 20.01 and 20.001 are created. If there is no available space for a new cue between the active cue (20.000) and the next cue (20.001), then the syntax will give an “Illegal index” error. The syntax Store Cue - creates cue 19, so it works the same, just backwards. Another option is to define the cue using a number. For example, a sequence exists with cues 1 to 5 (all whole numbers). The currently active cue is number 3. A fixture has some programmer values. This can be stored into cue 4 using the following syntax: Store Cue + 1 /Merge. It is important that there is a space between the + and the number. This creates the same result as Store Cue Next /Merge. If, instead, the wish is to store the values into a new cue between cues 3 and 4, and we want it to be cue 3.5, then the following syntax can be used: Store Cue + 0.5. This creates cue 3.5 with the values. This uses math to calculate the cue number based on the number of the active cue. Here is a slightly different example. The base is the same sequence with five cues and the active cue 3. Again, there are some values in the programmer, and the wish is to store these values into a cue just before the active cue. This can be done using the following syntax: Store Cue - 0.4. This creates cue 2.6 with the values (3.0 - 0.4 = 2.6). ## Using Command Line Input to Add More While Storing [Section titled “Using Command Line Input to Add More While Storing”](#using-command-line-input-to-add-more-while-storing) In the example using the cue labels to store, a command showed some of the other possibilities while storing cues. The command line gives access to all the store options in the GUI Store Options - read about them in the [Store Options and Defaults topic](/grandma3/2-3/cue_store_settings_preferences/). All the different elements are described in the [Store Keyword topic](/grandma3/2-3/keyword_store/). ### Examples [Section titled “Examples”](#examples-1) The following are just a few extra command line examples showing some of the possibilities while storing. | | | | ------------------------------------------------------------------ | -------------------------------------------- | |  | User name\[Fixture]>Store Cue 1.2 Sequence 4 | Stores cue number 1.2 in sequence 4. It does not matter if you write sequence or cue first. So this could also have been: | | | | ------------------------------------------------------------------ | -------------------------------------------- | |  | User name\[Fixture]>Store Sequence 4 Cue 1.2 | The commands can often be written shorter in the command line input. See some examples in the [General Syntax Rules topic](/grandma3/2-3/csk_syntax_rules/#use_command_line). Read the topics about each keyword to see the short version of the keyword. | | | | ------------------------------------------------------------------ | ------------------------------------------------------------------------------------ | |  | User name\[Fixture]>Store Cue 42 “Al Powell arrives at the Plaze” CueFade 6/3 /Merge | This will store the cue with a name, merged, and stored with an in-fade of six seconds and an out-fade of three seconds. Read more about the store options in the [Store options and defaults topic](/grandma3/2-3/cue_store_settings_preferences/). ## Store Remove [Section titled “Store Remove”](#store-remove) A version of storing is the **Store Remove**, where Remove is selected in the store pop-up (described above). This will remove the stored values for the attributes that currently have active values in the programmer. The actual values in the programmer are irrelevant in this case. They simply indicate what attributes should be removed from the cue.
# Store Settings and Store Preferences
> There are some settings used when storing objects like cues, presets, and groups.
There are some settings used when storing objects like cues, presets, and groups. Each user has their own preferred settings. During the store, it is also possible to add option commands that will use a specific set of store settings. In this topic, the settings regarding storing cues are described. Some of these settings will impact how other cues will respond. Elements regarding tracking are described in the [What is Tracking topic](/grandma3/2-3/cue_tracking/) and sub-topics. ## Temporary Store Settings [Section titled “Temporary Store Settings”](#temporary-store-settings) The store settings can be opened as a temporary version. This is done by pressing and holding the Store key for approximately one second. It appears as a pop-up on screen 1 (default location). 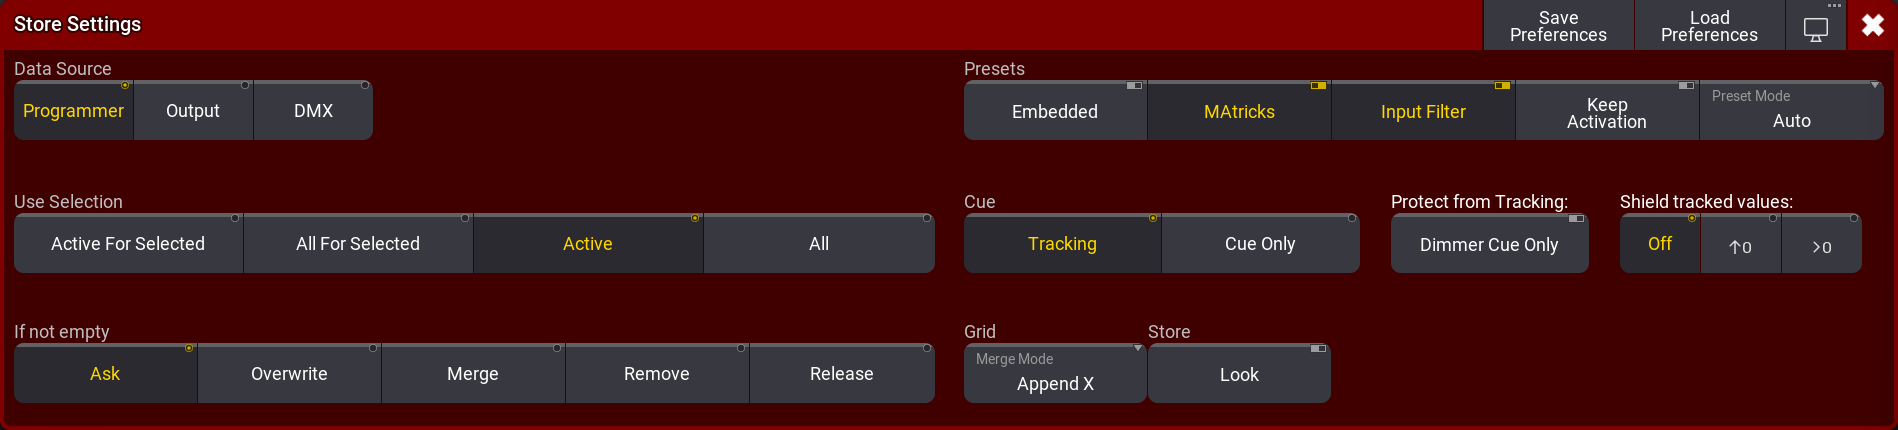 *Store Settings pop-up showing the current settings* There are different areas with different settings: Data Source, Use Selection, If not empty, Presets, Cue, Grid, and Store. In the title bar, there are three buttons. Tap Save Preferences to store the current settings as the new default user store preferences. Tap Load Preferences to load the stored user store preferences values into the store settings pop-up. The last button is used to [change the menu location](/grandma3/2-3/wvm_change_location/). ### Data Source [Section titled “Data Source”](#data-source) This defines the data source for what will be stored. There are three different sources: * **Programmer** (Default):\ This will use the values in the programmer as the source. It takes the **Use Selection** and **Store** settings into account (read below). * **Output**:\ Uses the status of the current output from the console as the source. The output can be affected by masters and DMX profiles. The [DMX sheet](/grandma3/2-3/patch_dmx_sheet/) shows what the output actually is. The **Use Selection** setting is limited to **All For Selected** or **All** (Default). * **DMX**:\ This uses incoming DMX values as the source. It is only valid for DMX channels that have fixtures patched. The **Use Selection** setting is limited to **All For Selected** or **All** (Default).\ When storing incoming DMX, only the values are stored that are not at the default of the fixture type. In addition, values that are at fixture type default will be stored into the sequence when the sequence contains already this attribute with a different value. ### Use Selection [Section titled “Use Selection”](#use-selection) This decides what values, from the source, will be used when storing. * **Active For Selected**:\ Stores all active attributes but only for the fixtures selected in the programmer. This is only available to the **Programmer** data source. * **All For Selected**:\ Stores all attributes of the selected fixtures. * **Active** - (default for programmer source):\ Stores the values that are active in the programmer. This is only available to the **Programmer** data source. * **All** - (default for Output and DMX source)**:**\ Stores all attributes for all fixtures. ### If Not Empty [Section titled “If Not Empty”](#if-not-empty) This defines the store method used if values are stored into an existing cue. * **Ask** - This is the factory default setting:\ This means that none of the other options below are used and a pop-up asks the user what to do. * **Overwrite**:\ All existing data is deleted and the current source and selection are used to store new values. * **Merge**:\ This will merge the new values into the existing values. New values have a higher priority and will overwrite existing values. * **Remove**:\ This will remove the stored values for the attributes using the current **Use Selection** setting. * **Release**:\ A special release value is stored. The actual values in the source are not relevant, but the selection is used to define where the release value is stored. ### Presets [Section titled “Presets”](#presets) These are the settings used when storing presets. They are described in the [Create Presets topic](/grandma3/2-3/presets_create/) or in the other [Preset topics](/grandma3/2-3/presets/). ### Cue [Section titled “Cue”](#cue) There are two radio buttons here: Tracking and Cue Only. Values can be stored using the tracking principles or as Cue Only. Learn more about **Tracking** in the [What is Tracking](/grandma3/2-3/cue_tracking/) topic. Learn more about **Cue Only** in the [Cue Only topic](/grandma3/2-3/cue_tracking_cue-only/). ##### Protect from Tracking [Section titled “Protect from Tracking”](#protect-from-tracking) This setting is called **Dimmer Cue Only**. It is relevant when the Cue mode is Tracking (see above). Toggling this setting On will store the dimmer values using Cue Only principles and other attributes as tracking (link about Cue Only and Tracking topics above). ##### Shield tracked values [Section titled “Shield tracked values”](#shield-tracked-values) The shield function can be used to protect tracked values in future cues. This setting is only relevant when the Cue mode is Tracking. The three options are explained in the [Tracking Shield topic](/grandma3/2-3/cue_tracking_shield/). ### Grid [Section titled “Grid”](#grid) There is one setting in this area. It is Merge Mode. This is relevant for all elements that store the fixture grid position - Learn more about the grid in the [Selection Grid topic](/grandma3/2-3/operate_selection/). The **Merge Mode** is used when an object (including fixture grid position) is merged into another object of the same type. For instance, a group merged into another group or a preset merged into another preset. There are two options that the button toggles between: * **Append X**:\ The fixtures are merged into an offset X position in the selection grid. The merged fixtures (source fixtures) are positioned after the last existing fixture (destination fixtures). They are appended to the existing fixture’s X position. * **Off**:\ The fixtures are merged into the grid positions where they are originally stored. ### Store [Section titled “Store”](#store) This area only has one toggle button: **Look**. This can be turned On or Off. When this is On, then all attributes for fixtures with a dimmer value above 0 are stored. If **Active For Selected** is selected and there are fixtures that have a dimmer level actively at 0% in the programmer, then only the dimmer value will be stored for these fixtures, even if other attributes are active in the programmer. This can be combined with various settings for **Data Source** and **Use Selection**. ## Cue Preferences [Section titled “Cue Preferences”](#cue-preferences) There is a set of timing preferences used when cues are created. They can be seen and edited in the Menu -> Preferences and Timings. Here are the general cue timings and the preset timings. Read more about these different timings and what they do in the [Cue Timing topic](/grandma3/2-3/cue_timing/).
# Cue Timing
> Each cue part has a lot of timing information.
Each cue part has a lot of timing information. The default times are used if nothing is defined on cue creation. The default can be changed. Read about the default times [below](/grandma3/2-3/cue_timing/#h2_1091955624). Any cue timings can be changed at any point using the command line or the GUI ([Sequence Sheet](/grandma3/2-3/cue_sequence_sheet/)). There are a lot of elements that affect how a fixture changes values, and they can be divided into different groups: * **General cue times** * **Feature Type Timing** * **Individual Attribute times** * **Executor Time at point of cue execution** * **Dynamic changed Rate** This is also the priority list from lowest to highest priority. There is also the [cue transition](/grandma3/2-3/cue_timing/#cue_transition) that defines how the values change from one to another. ## General Cue Times [Section titled “General Cue Times”](#general-cue-times) There are six different general cue timings. Each has its own column in the Sequence Sheet when condensed timing is turned off - read about it in the [Look at Cues and Sequences topic](/grandma3/2-3/cue_sequence_sheet/) : * **Cue In Fade**\ This is the fade time used for all intensity values changing from a lower value and going to a higher and any other attribute changing value. It starts when the cue is triggered and after the Cue In Delay has counted down. * **Cue In Delay**\ This is the delay before the fade. This defines a countdown time between the cue is triggered and when the fade should begin. The In Delay affects the In Fade. The default value is 0, meaning that there is no delay. * **Cue Out Fade**\ The out fade is used by intensity values fading from a higher value to a lower. It is executed after the Cue Out Delay. The default value is the in fade, meaning that it is the same as whatever the cue in fade is. * **Cue Out Delay**\ This is the delay time for the Out Fade. It can be used to delay when intensity values should start to fade down in value. The default value is in delay, meaning it is the same as the Cue In Delay value. * **Snap Delay**\ Some attributes are defined to Snap. This means that they do not fade from one value to another. They change values as fast as possible. This can make sense for attributes like gobos. This delay is used to delay when the snap is performed. It makes it possible to have the fixture fade out before snapping to a new gobo. This delay affects all snap attributes stored in the cue. It can be overwritten by individual attribute timing. * **Command Delay**\ This delays the execution of a command. This is the only place where this delay can be defined. There is no individual timing for this. These values can be changed using this syntax: Cue \[“Cue\_Name” or Cue\_Number] CueInFade \[New\_Cue\_Time] Just use the relevant keyword: [CueInFade](/grandma3/2-3/keyword_cueinfade/), [CueOutFade](/grandma3/2-3/keyword_cueoutfade/), [CueInDelay](/grandma3/2-3/keyword_cueindelay/), [CueOutDelay](/grandma3/2-3/keyword_cueoutdelay/), [SnapDelay](/grandma3/2-3/keyword_snapdelay/), or [CommandDelay](/grandma3/2-3/keyword_commanddelay/). There are two more options for setting the cue fade and delay. They are called [CueFade](/grandma3/2-3/keyword_cuefade/) and [CueDelay](/grandma3/2-3/keyword_cuedelay/). They can be used to set the four cue fade and delay times mentioned above. They are used to set the in and out time using just one keyword. The in and out time is separated by a slash. The time before the slash is the **In** time. The time after the slash is the **Out** time. It is not necessary to specify both in and out. The slash can be used to set just one of them. The desired time has to be on the correct side of the slash. If only one time is set without any slash, then the in time gets the actual value, and the out time is linked to the in time - it is technically set to time “None”. The result is that, for instance, the fade in and fade out will be the same. For example, setting the in fade to 5 seconds and the out fade to 8 seconds in cue 3 could be done with the following keystrokes: Cue 3 Time 5 / 8 Please The command line would read: | | | | ------------------------------------------------------------------ | ------------------------------------- | |  | User name\[Fixture]>Cue 3 CueFade 5/8 | If only one time is given, both in and out will use the time. For instance, | | | | ------------------------------------------------------------------ | ----------------------------------- | |  | User name\[Fixture]>Cue 4 CueFade 7 | This makes cue 4 use 7 seconds to both fade in and out. The CueFade and CueDelay commands can address only the in or out time by adding the slash and a number to the relevant side. For instance, setting the CueOutFade to 3 and the CueInDelay to 1 on the currently active cue: | | | | ------------------------------------------------------------------ | ------------------------------------------ | |  | User name\[Fixture]>CueFade /3 CueDelay 1/ | Both CueFade and CueDelay can be addressed using the [Time key](/grandma3/2-3/key_time/). Read more about delays by following the links above to the keywords. ## Feature Group Timings [Section titled “Feature Group Timings”](#feature-group-timings) Each feature group has its own fade and delay time, and the Sequence Sheet has columns for each. These times are used by all fixtures changing the values of that feature group. Overwriting the general cue timing for that feature group. | | | | ------------------------------------------------ | --------------------------------------------------------------------------------------------------------------------------------- | |  | **Important:** | | | Intensity values changing to a lower value are not affected by the “Dimmer Fade” time. They are controlled by the “Cue Out Fade”. | The feature group fade and delay default is general cue timing. This means they are the same as the time for the Cue In Fade and Cue In Delay. ## Individual Attribute Timing [Section titled “Individual Attribute Timing”](#individual-attribute-timing) Each individual attribute can have an individual fade and/or delay time. This is called individual time. These individual times are selected using the [programmer](/grandma3/2-3/operate_programmer/) and added to the cue when it is [stored](/grandma3/2-3/cue_store/). They can also be edited in the sequence sheet while in [tracking mode](/grandma3/2-3/cue_tracking/). There are two columns in the sequence sheet called **Indiv Fade** and **Indiv Delay**. They display the highest of the individual times. The **Indiv Duration** column shows the complete individual time (delay + fade). ## Executor Time [Section titled “Executor Time”](#executor-time) There is an **Executor Time** master fader. It can be seen and changed in the [Master Controls pop-up](/grandma3/2-3/ws_master_controls/). It can also be [assigned to physical controls or executors](/grandma3/2-3/executor_assign/). If this function is turned On, the set time will be used instead of the stored fade and delay timing. The **Executor Time** faders position is registered when the cue is triggered. The fader can be moved afterward without affecting the running cue fade. Read more in the [Time Control topic](/grandma3/2-3/masters_grand_time/). Sequences can be protected from this function by turning Off the **Use Executor Time** setting in [Sequence Setting](/grandma3/2-3/cue_sequence_settings/). ## Rate Time [Section titled “Rate Time”](#rate-time) The **Rate** allows the timings to be dynamically adjusted while the cue fade runs. It does not change the stored times. It simply adjusts the time to be faster or slower. Moving the fader up makes the fade faster, making the stored times appear smaller. Pulling the fader down makes it go slower, extending the stored times. Times affected by the rate has an asterisk (\*) in front of the time. If the rate is all the way down, the times will show **\*Stopped**. If the rate is all the way up, the times will show **\*0**. An executor with the rate function shows the rate as a percentage in the executor label. If the rate is exactly 100%, then the label shows **1:1**. If the rate is at maximum, the label shows **1:∞**. If the rate is at a minimum, the label shows **Stopped**. The rate can be reset using the [Rate1 keyword](/grandma3/2-3/keyword_rate/). ## Timing Masters [Section titled “Timing Masters”](#timing-masters) There are 50 timing masters. These can be set to a value from 0 to 10 seconds. The timing masters can be referenced as cue fade, cue delay, feature group fade, and feature group delay values. The cue will then use the value set at the timing master instead of a specific defined fade or delay value. Timing masters can be added to the following timings: * CueIn Fade * CueOut Fade * CueIn Delay * CueOut Delay * Feature Group Fade * Feature Group Delay They can be assigned using the command line and by editing cells in the Sequecne Sheet.
# What is Tracking
> Tracking is the principle of storing only the changes in the cues.
Tracking is the principle of storing only the **changes** in the cues. If a fixture is turned On in blue, it will stay like this until it is told to change. It does not matter how many cues there are between being told to turn On and the cue where it is told to turn Off. Tracking is the principle that once a parameter has a value, it stays there until it is told to go somewhere else or released from a sequence. The following example explores the basic tracking principles and describes some of the other basic related functions after the example. Four tracking principles have their own topics: [Cue Only](/grandma3/2-3/cue_tracking_cue-only/), [Tracking Distance](/grandma3/2-3/cue_tracking_distance/), [Tracking Shield](/grandma3/2-3/cue_tracking_shield/), and [Break](/grandma3/2-3/cue_tracking_break/). ### Example [Section titled “Example”](#example) Fixture number 1 is stored in blue color, at 100% dimmer value in cue number 1. If there are 6 cues and fixture number 1 does not get any new information, it will stay at 100% in blue color in all 6 cues. The best way to see this information is to turn the [Sequence Sheet](/grandma3/2-3/cue_sequence_sheet/) into tracking sheet mode. This can be activated using the Track Sheet setting either in the title bar or the window settings. 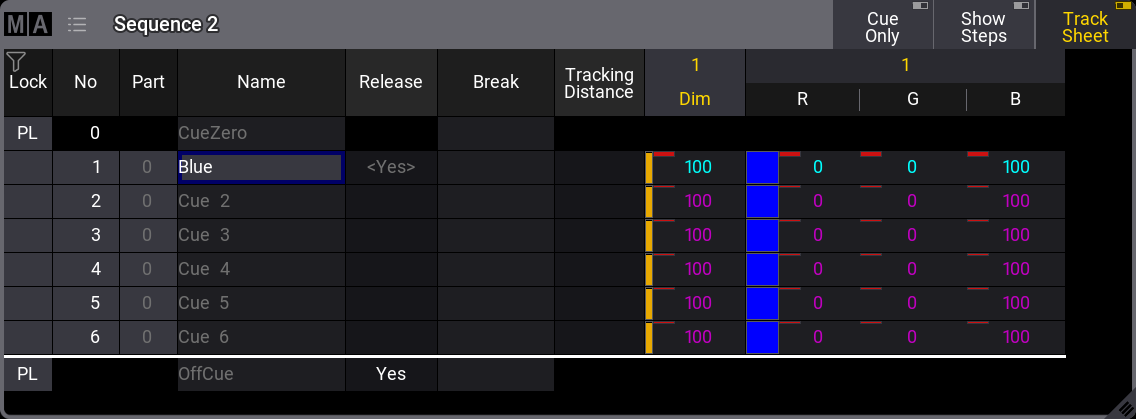 *A sequence with 6 cues - fixture 1 stored values in cue 1* Notice the difference in text color between the values in cue 1 and the others. The magenta text color indicates that the value is not stored in the cues but is a tracked value from a previous cue. Now, change the fixture’s color to red and set the dimmer to 100% again. Store this in cues 4 **and** 5 (using the Merge option). Now it looks like this: 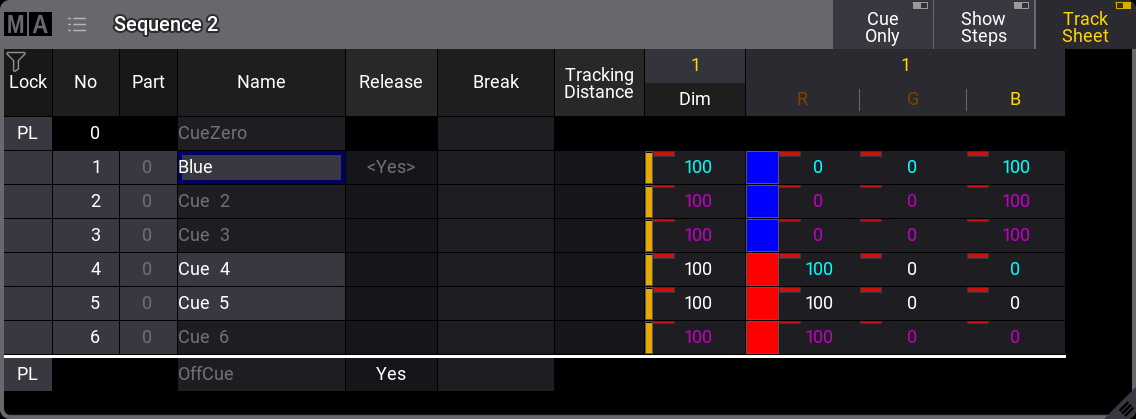 *A sequence with 6 cues - fixture 1 has a new color in cues 4 and 5 - blocked values* The text color of the dimmer value is now white in cues 4 and 5. All the color values are also white in cue 5. This indicates that the values are stored here, but are the same as the tracked value. These are called “Blocked” values. This means that if any value is changed in any previous cue, it would still be 100% in cue number 4. It blocks the tracked value from cue 1 (the same value), and the value stored in cue 5 is tracked to the end. Values can be edited directly in the tracking sheet. Edit the dimmer value in cue 3 by right-clicking with a mouse or the two-finger edit gesture on a touchscreen. This opens the [calculator](/grandma3/2-3/ws_calculator/). 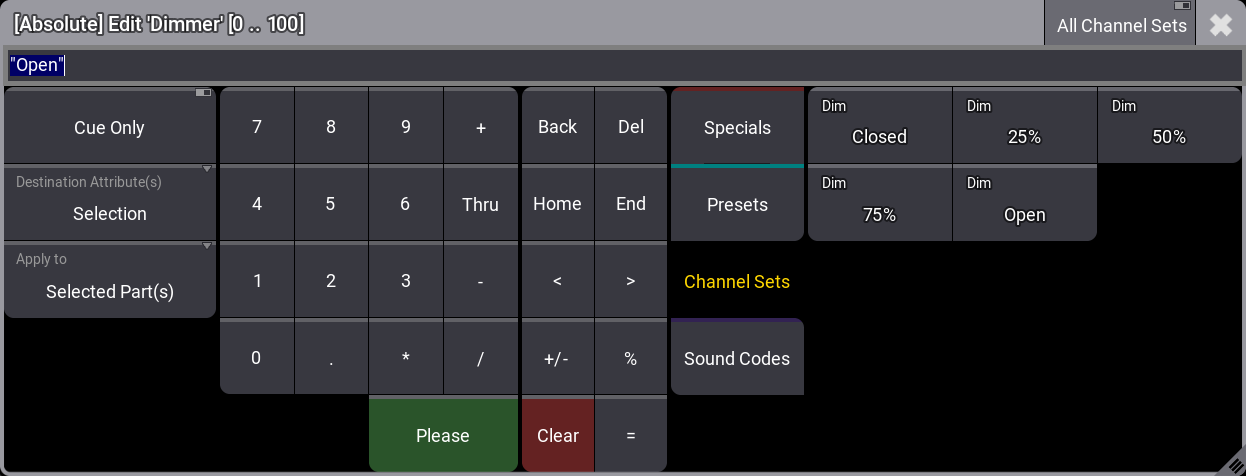 Calculator editor Select Channel Sets and tap Closed. This closes the calculator and changes the dimmer value to 0 in cue 3 in the sequence. 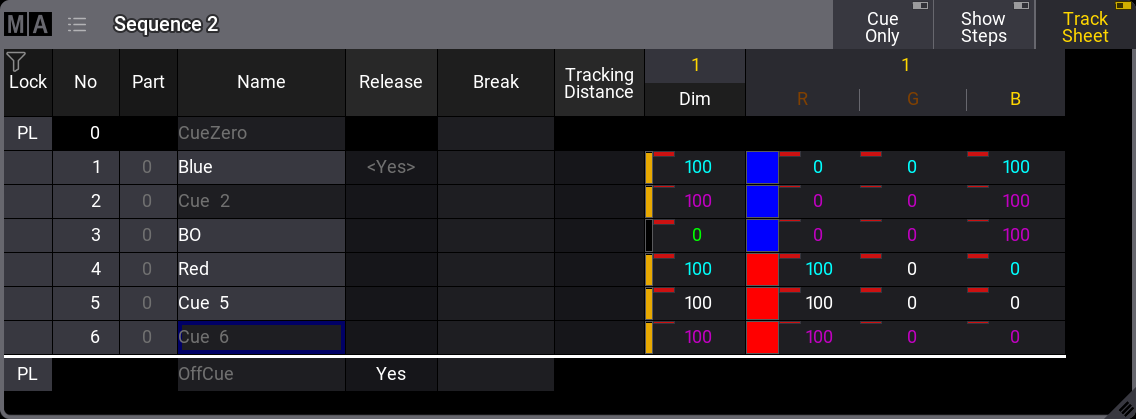 *A sequence with 6 cues - fixture 1 has a new dimmer value in cue 3* The dimmer value is now green in cue 3. This indicates that the dimmer value is now stored with a lower value than the previous cue. Only dimmer values show this green indication for a lower value. The dimmer value in cue 4 is now cyan, indicating a higher value than the previous cue. The redundantly stored values in cue 5 can be removed from the cue by removing the stored values - also called “unblocking”. 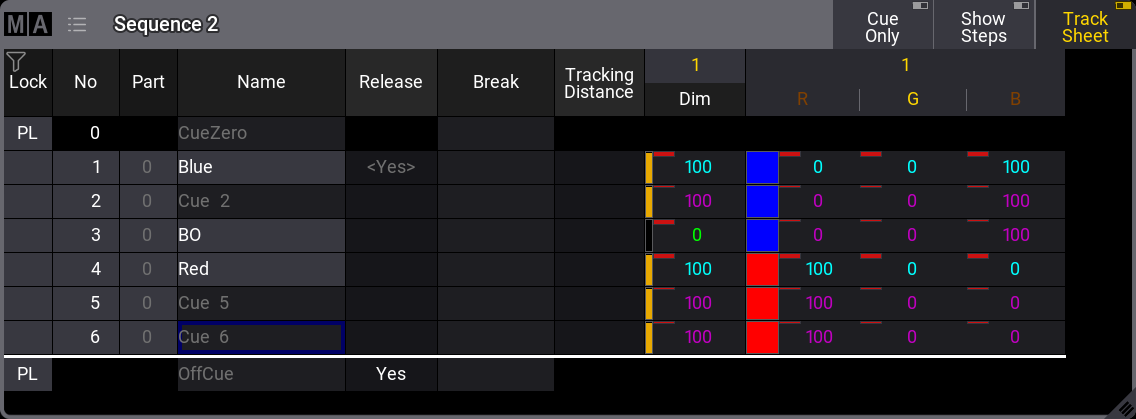 *A sequence with 6 cues - unblocked sequence* There are several ways to do this. One option is to have the values for fixture number 1 as active values in the programmer (it does not matter what the values are) and store cue 5 with the “Remove” option. This would remove the values from the cue. A second option is using a command like this: | | | | ------------------------------------------------------------------ | -------------------------------------- | |  | User name\[Fixture]>Unblock Sequence 2 | ## Subtopics [Section titled “Subtopics”](#subtopics) * [Cue Only](/grandma3/2-3/cue_tracking_cue-only/) * [Tracking Distance](/grandma3/2-3/cue_tracking_distance/) * [Tracking Shield](/grandma3/2-3/cue_tracking_shield/) * [Break](/grandma3/2-3/cue_tracking_break/)
# Break
> Tracking and common tracking functions are described in the What is Tracking topic.
Tracking and common tracking functions are described in the [What is Tracking topic](/grandma3/2-3/cue_tracking/). **Breaks** in cues are a filtered version of the **Release** function. Where the release stops all tracking values, the break will stop tracking of attributes based on a selected filter or world. The main difference between the release function and setting a break, filtering all attributes, is that the release will release currently tracked attributes from the sequence immediately when the release is activated. Setting a break does not affect existing stored and tracking values. An existing break can only affect tracking values added or changed that pass the cues where the break is already set - if the selected filter or world includes the attribute. Editing the **Break** cell in a cue opens an **Assignment Editor** pop-up. 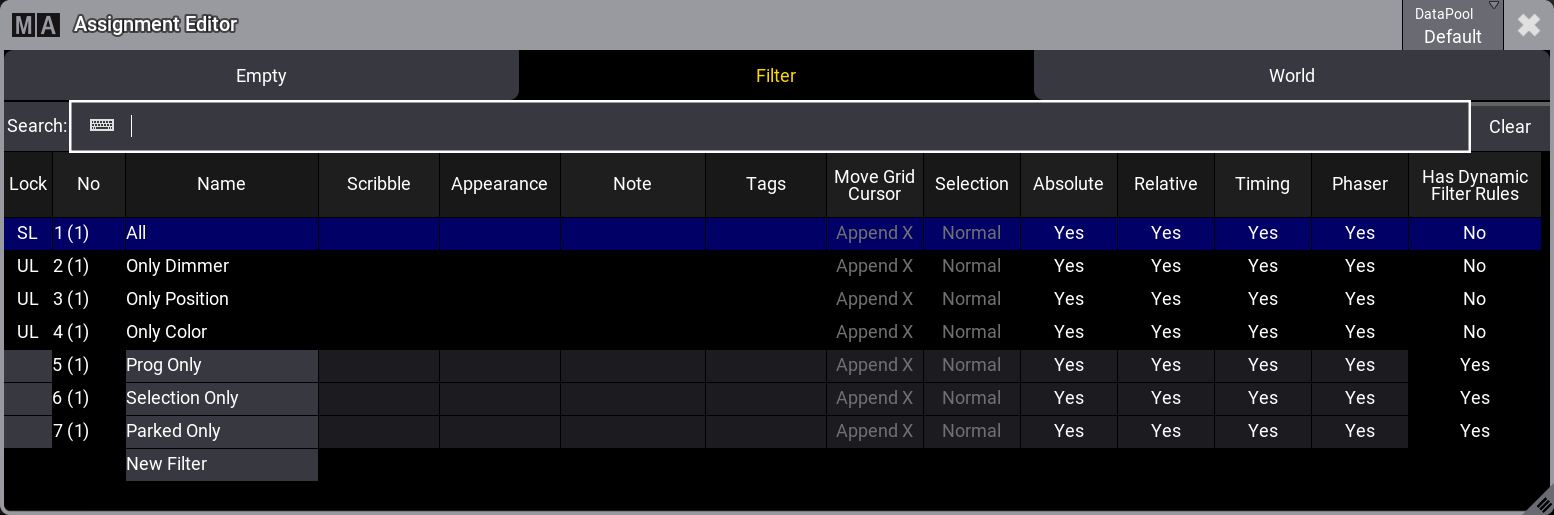 Assignment Editor pop-up This has three tabs: Empty, Filter, and World. Empty will remove any break setting. Filter and World allow the selection of an existing filter or world. Selecting one of these will stop tracking changes or additions, passing the cue where the break is set based on the content of the selected filter or world. Learn more about filters and worlds in the [Worlds and Filter section](/grandma3/2-3/worldfilter/). Follow the example below for a better understanding of the break function. ### Example [Section titled “Example”](#example) The base sequence for this example looks like this: 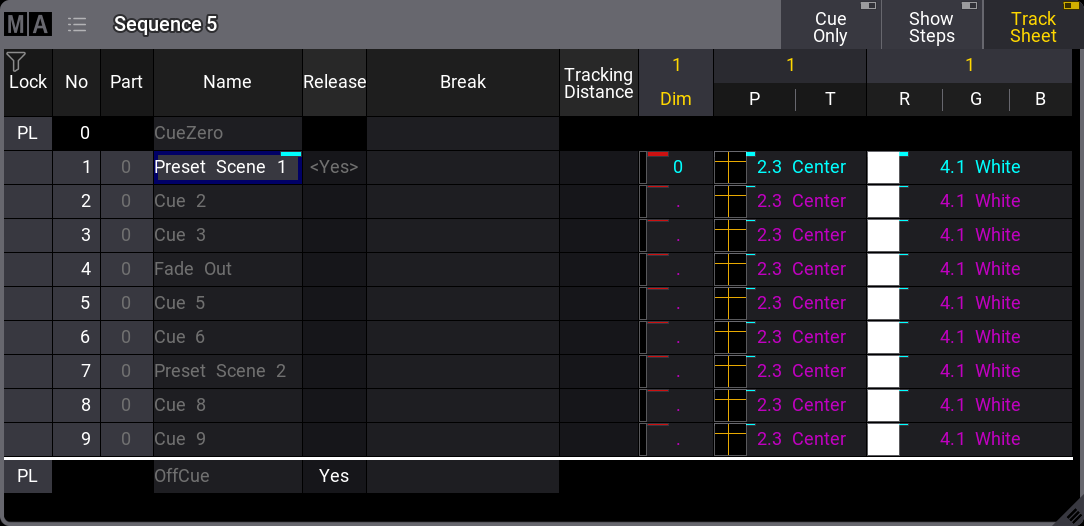 Base sequence for Break example Here, we have nine cues. Cue number 1 has some stored values (Dimmer, Position, and Color) for fixture 1. The values stored in cue number 1 are tracked from 1 to the end. The values are released in the **OffCue** because there is a **Yes** in the **Release** column. Two filters in the **Filters** pool will be used: “All” and “Only Dimmer”.  Filter pool with filter objects The filters are one filter that contains all attributes and layers and one that only contains the dimmer attributes and all layers. In this scenario, it is known that cue number 4 is a fade out to black, and cue number 7 is used to pre-set fixtures for the second scene in the show. The break function can protect these two cues from tracking value changes. Before moving any further with the example, let us explore the release function by editing the **Release** cell for cue 7, so it changes to “Yes”. 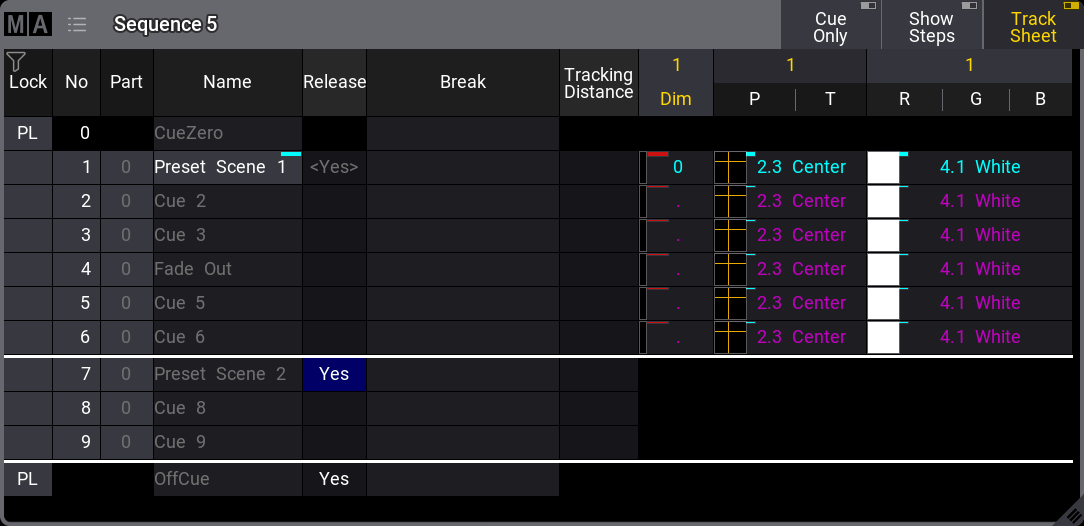 Release is out of the scope of this topic (It is explained more in the [What is Tracking topic](/grandma3/2-3/cue_tracking/)), but it is included here to show that a release stops all future and existing tracking. The tracking values are released from the sequence. Release is not the goal for cue 7. Remove the “Yes” in the **Release** column again. Editing the **Break** cell for cue number 7 opens the **Assignment Editor**. Select Filter and then tap All to select it. Now the sequence looks like this: 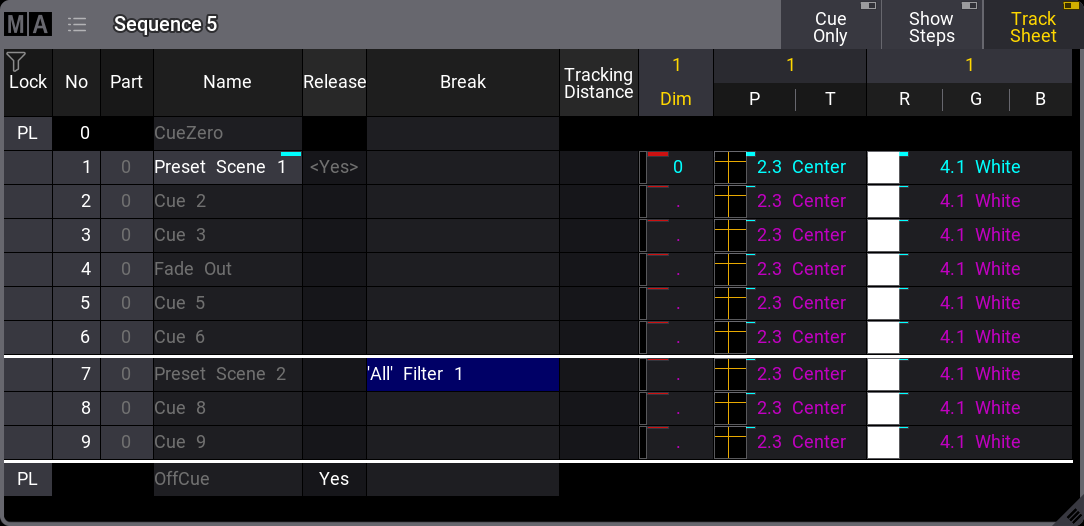 Break is set for cue 7 Notice the difference between this and the release. The existing tracking values are not released but are protected from future changes. A break adds a white line to indicate the tracking break. If the break affects all attributes - typically by using Filter 1 or world 1 - it will extend across the entire row (just like the release). Cue 4 is a fade out. The current dimmer value of 0% can be protected by adding a second break in cue 4, but this time using the “Only Dimmer” filter: 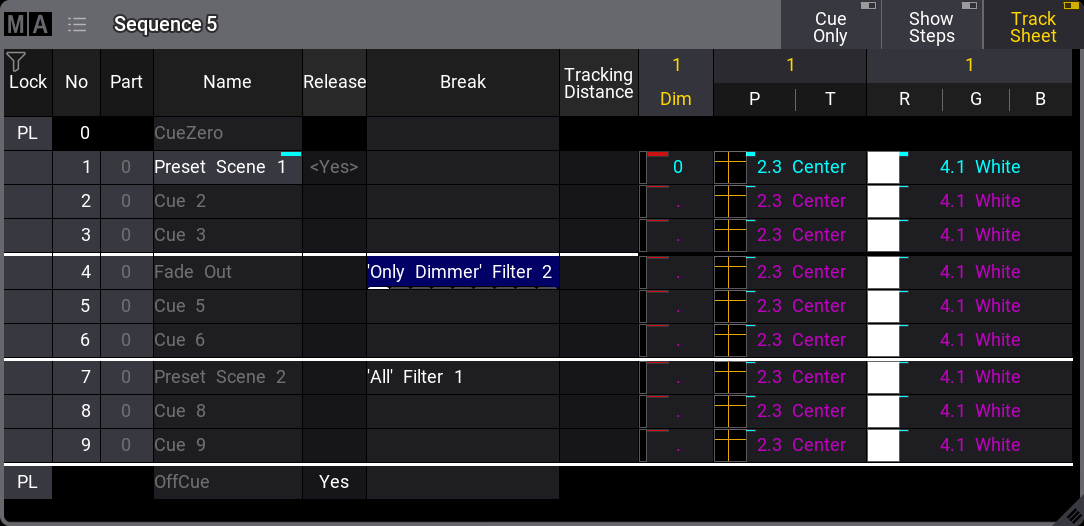 A break is set for cue 4 The break in cue 4 looks a bit different. The white line is black in the attribute columns. This indicates that some attributes are filtered. The Feature Group Indicator Bar is visible at the bottom of the break cell. It shows the features active in the filter. Now, all the breaks are set, and the values can be changed. A new dimmer, position, and color values for fixture 1 are stored in cue number 2. 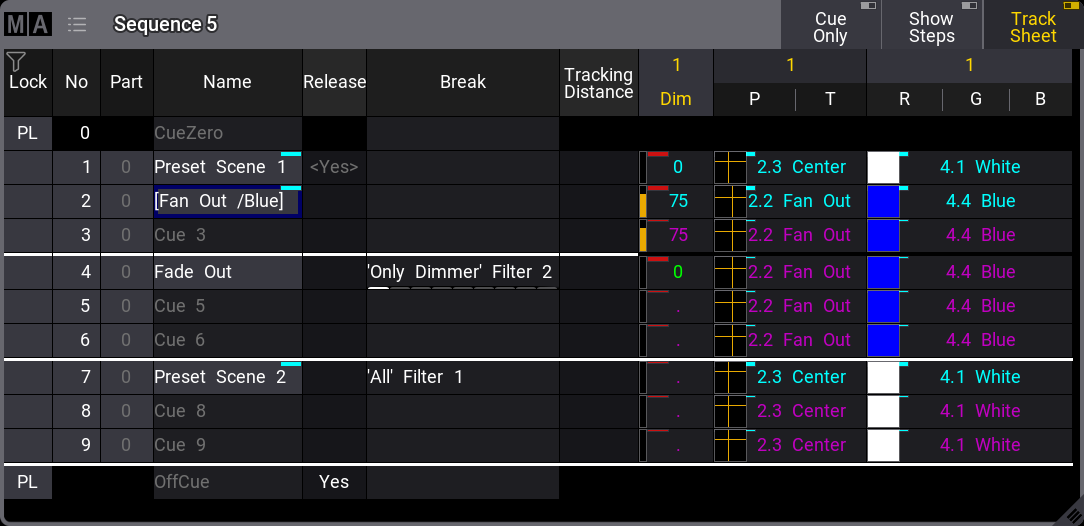 Result The result is that the dimmer, and only the dimmer, value is returned to 0% (the previous tracked value) in cue number 4 because the filter in the break stopped the newly added values from tracking past the cue. All the values in cue 7 were protected from changes by the filter in the break, and the old tracking values are added (if needed) in cue number 7.
# Cue Only
> Cue Only is a store option for cues. When stored in a cue with Cue Only, the tracked values will be blocked in the next cue or cue part to preserve the previous
Cue Only is a [store option](/grandma3/2-3/cue_store_settings_preferences/) for cues. When stored in a cue with Cue Only, the tracked values will be blocked in the next cue or cue part to preserve the previous look on stage. The programmer’s actual values will only be stored in the target cue or cue part. Cue Only can be used when storing into existing cues - except the last cue. There is no hard key for cue only, so it needs to be activated otherwise. These are the following options: * As command line option keyword [/CueOnly](/grandma3/2-3/ok_cueonly/) or /CO after the normal [Store keyword](/grandma3/2-3/keyword_store/). * In the store options: To open the store options, press and hold Store for at least 2 seconds. Then turn On cue only by tapping Cue Only. * In the **Store Cue pop-up**. When storing onto an existing cue, the Store Cue pop-up will appear and ask whether to Overwrite, Merge, Remove, Release, or Cancel the current store operation. It is also possible to decide if the cue is to be stored with active cue only within the pop-up. Remove and Release can be used for Cue Only. The pop-up only appears if the desired cue is not the last one in the sequence. When storing cue only, the grandMA3 software decides, based on the 3 following rules, which cue part will block the original values: 1. The default cue part is cue part 0. 2. If the next cue already contains a part with the same name as the cue part from which the original value is coming, the blocked value will be used in this part. 3. If the cue already contains attributes of the same feature group, the previous values will be blocked in this cue. If none of the rules are true for phaser values, a new cue part will be created where the previous values will be blocked. ### Example [Section titled “Example”](#example) In this example, we have a sequence with the following cues and values: Fixture 1 is at 80% in cue 1. Fixture 2 is stored at 100% in cue 2. Cues 4 and 5 exist, but they are empty. The values for fixtures 1 and 2 track into the other cues. 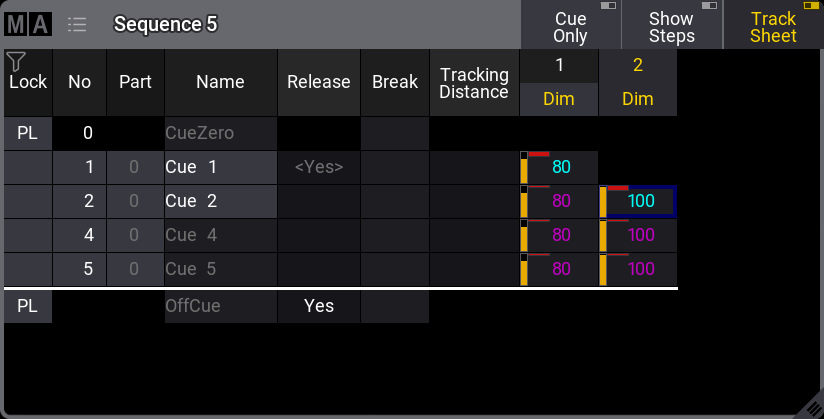 The starting sequence without cue 3. Now, fixture 1 gets an active dimmer value of 50%. This is stored into cue 3.
# Tracking Distance
> Tracking and common tracking functions are described in the What is Tracking topic.
Tracking and common tracking functions are described in the [What is Tracking topic](/grandma3/2-3/cue_tracking/). Tracking values can have a distance. This can be changed in the **Tracking Distance** column in a [Sequence Sheet](/grandma3/2-3/cue_sequence_sheet/). There are two types of tracking distances: Normal tracking tracks until a specific cue number. Delta tracks values to a cue number calculated by the cue number, where it is set, plus a number. Both types release the attribute when the tracking distance ends. This will return the attribute to a previously tracked value or release it from the sequence. See the examples below. A vertical white line next to the value displays the attributes affected and the number of cues the tracking distance is valid. A tracking distance affects all values stored in the cue where the distance is set. The tracking distance value does not consider cue parts where the distance ends. ## Tracking Using Cue Number [Section titled “Tracking Using Cue Number”](#tracking-using-cue-number) The tracking distance can be set to track to and include a specific cue number using the tracking distance with a normal number input. See the following example for an explanation. ### Example [Section titled “Example”](#example) The starting point for this example is a simple sequence with nine cues and two fixtures dimmer value set to 50% in the first cue: 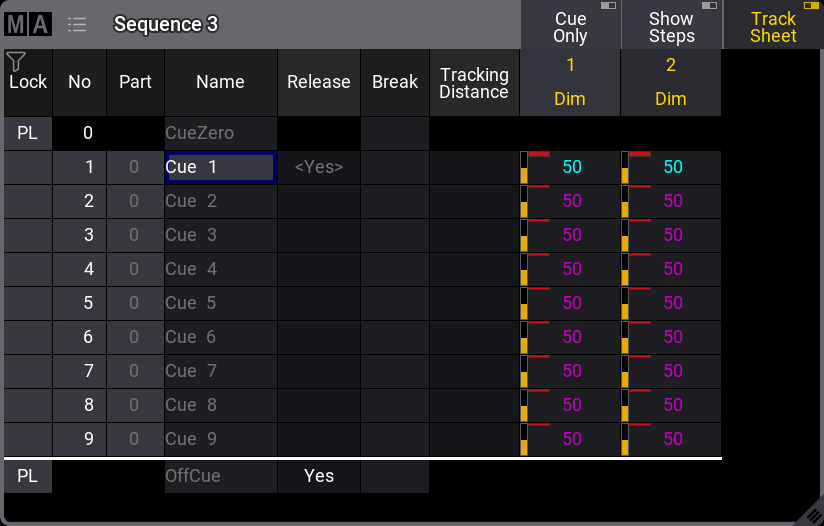 Base sequence for Tracking Distance using cue number Normal tracking rules dictate that the values in cue number 1 are tracked to the end where the **OffCue** releases the value - because **Release** is set to “Yes” A dimmer value of 70% for fixture 1 is added to cue number 3. 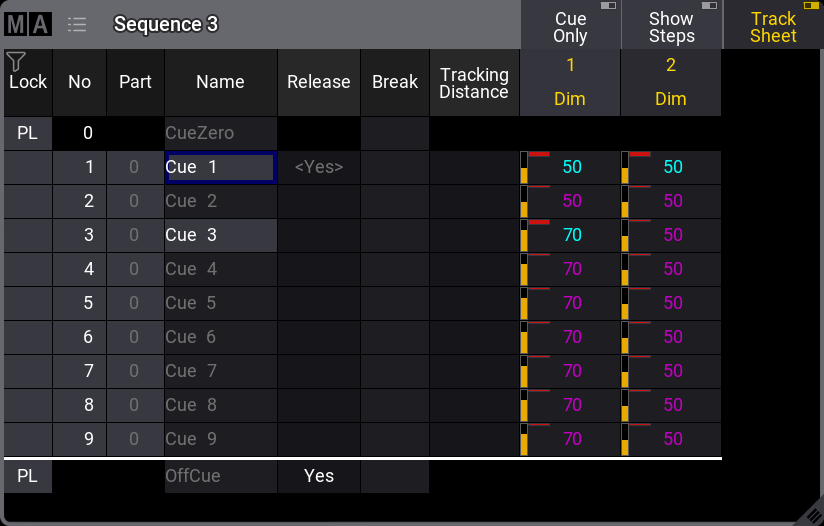 Value added to cue number 3 A tracking distance is set by editing the Tracking Distance cell for cue number 3. This opens the **Edit Cue Number** pop-up, where a number can be typed. 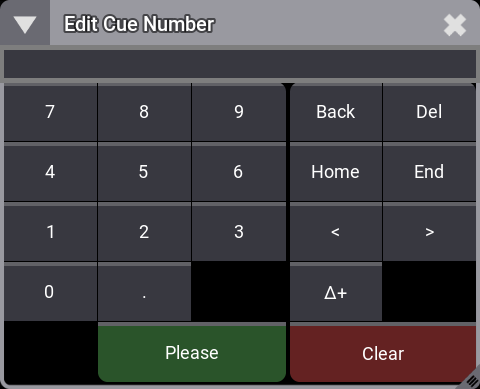 Edit Cue Number pop-up The number typed is the cue number, after which the tracking should stop. The cue does not need to exist. This is the result of the Tracking Distance set to a value of 5: 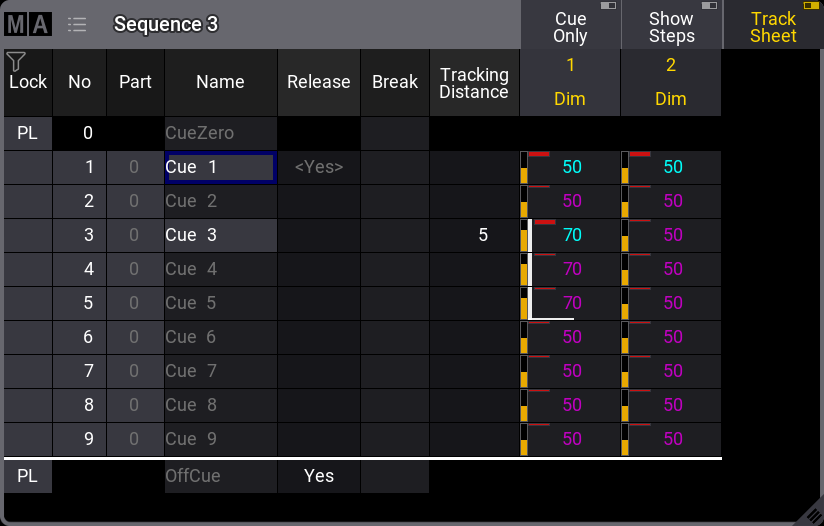 Tracking Distance set using a cue number The tracking stops between the existing cues numbers 5 and 6 - notice the white line indicating the tracking distance. It will track to and include cue number 5. The previous tracked value of 50% continues tracking after the distance. Adding or removing cues in between does not change that it tracks to and including cue 5. Renumbering cue number 3 also does not change the distance.  Tracking still ends after cue 5. Here, cue number 3 is renumbered to 2.5, and cue 4.5 is added. The tracking still ends after cue number 5. ## Tracking Delta Distance [Section titled “Tracking Delta Distance”](#tracking-delta-distance) Setting a tracking distance with a delta number will track the value to a cue number mathematically higher than the cue where it is set. See the following example for a better understanding. ### Example [Section titled “Example”](#example-1) The starting point for this example is the same sequence used in the previous example but cleaned up a bit:  Base sequence Now cue number 4 is updated with a dimmer value of 80% for fixture 2: 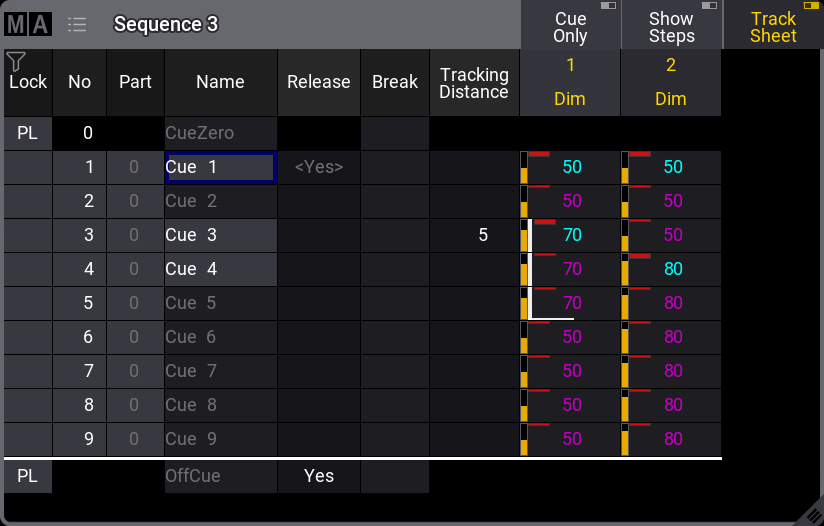 Updated cue number 4 When the Tracking Distance cell for cue number 4 is edited, the **Edit Cue Number** pop-up appears again. Notice the Δ+ button. Use this to tap Δ+ 2 . 5 Please. The result is that the value of 80% is tracked from cue number 4 and forward to and including cue number 6.5 (4 + 2.5 = 6.5). 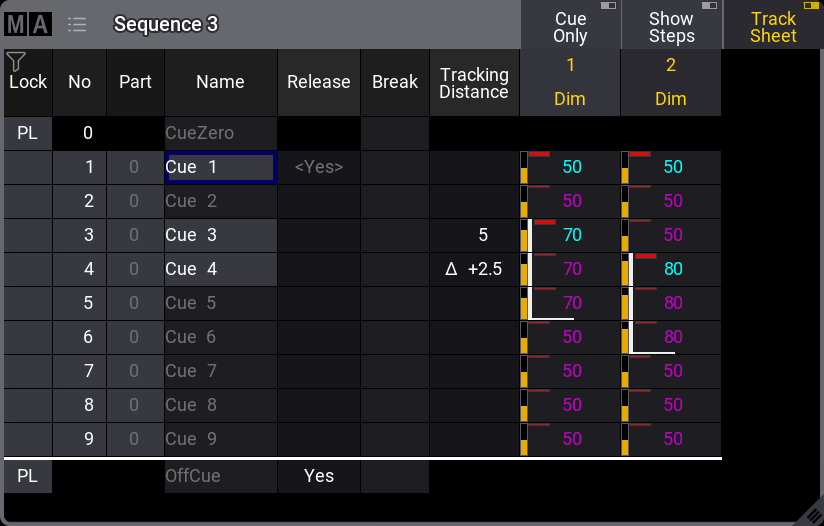 Delta Tracking Distance Cue number 6.5 does not exist, so the current last cue for the distance is cue number 6. Any cue added between cue number 3 and cue number 6.5 will have the 80% tracked value, but a cue number higher than 6.5 will have the 50% value. Make sure the programmer is empty and store empty cues number 6.5 and 6.6 in the sequence. 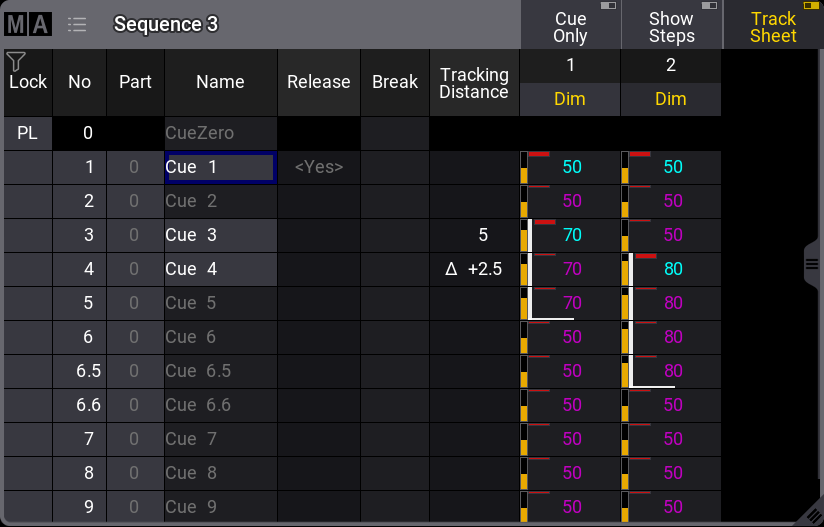 Added cues number 6.5 and 6.6 Now, it can be seen that the tracking stops between cues number 6.5 and 6.6. If cue number 4 is renumbered, this affects the distance. Renumber cue number 4 to number 3.1 by editing the cue number cell. 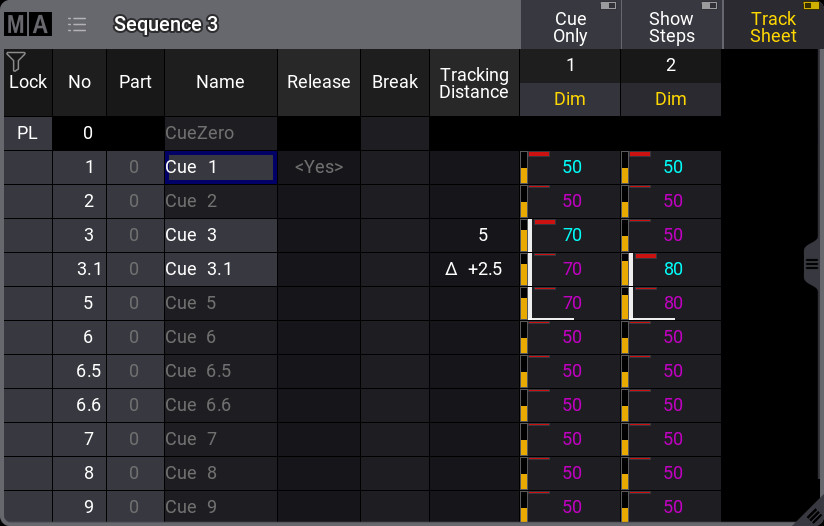 Updated cue number Now, the tracking stops between cues number 5 and 6. It tracks from cue number 3.1 and up to number 5.6 (3.1 + 2.5 = 5.6). The view might have to be recalled to show the change in tracking distance.
# Tracking Shield
> Tracking Shield is a system that can protect tracked attributes that are used in future cues. The function can be applied when storing or copying attribute valu
Tracking Shield is a system that can protect tracked attributes that are used in future cues. The function can be applied when storing or copying attribute values into cues. It is relevant if the new values will change the look of future cues. It uses the dimmer attribute to detect if the shield can be applied. The function can be applied when the new attribute values are stored or copied into cues. It is a store mode available in all the pop-ups related to store and copy functions. When the shield function is selected, there are two modes: * **↑0**:\ Protects attributes in the next cue where the dimmer value increases starting from zero. * **>0**:\ Protects attributes in the next cue where the dimmer value is above zero. ## Examples [Section titled “Examples”](#examples) ### Example 1 [Section titled “Example 1”](#example-1) The starting point for this example is a sequence with five cues. Fixture 1 is stored at 100% on a center position with a blue color in Cue 1. The fixture turns off in Cue 2 and On again in Cue 5. The position and color are not stored in Cue 5. They are tracked values, and the desire is that the fixture has the same position and color in Cue 5 as the currently tracked values. 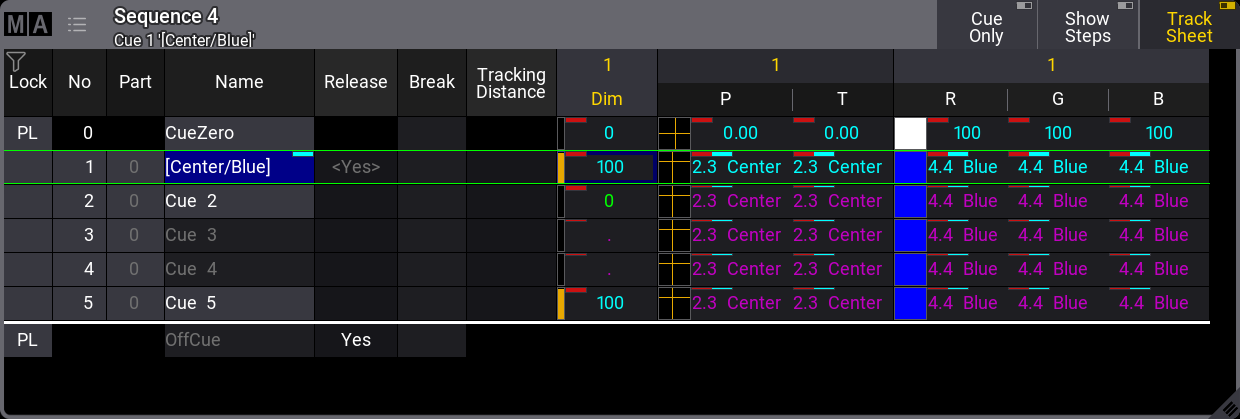 *Sequence Sheet showing the starting point, for example, 1* Now, the fixture is selected and given a new position, color, and dimmer value. These new attribute values are stored in cue 3. This opens a pop-up like this:  *Store Cue pop-up* Here, we have the “Shield tracked values” options. This is the result if the cue is stored using merge with “Off” selected: 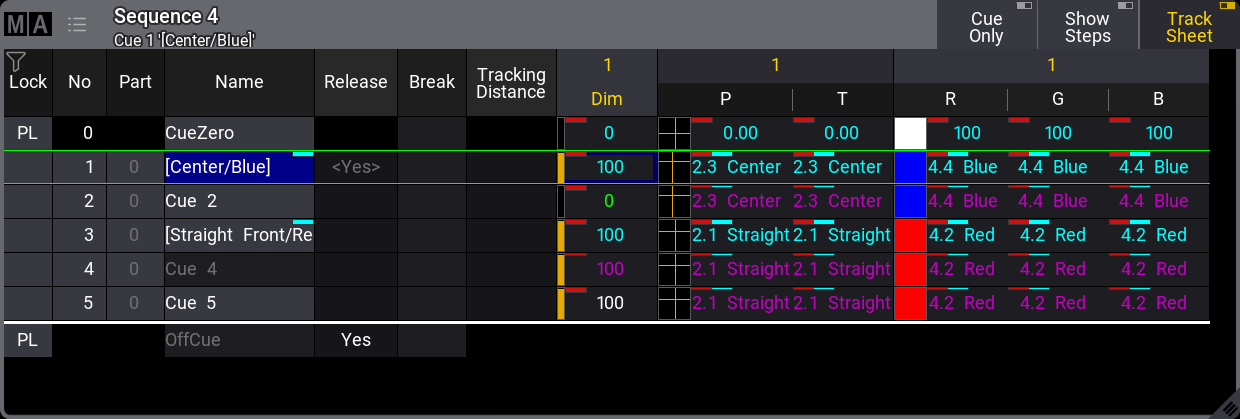 *Sequence Sheet showing result using normal Tracking* The new attribute values are tracked into Cue 5, and the result is that Cue 5 will look different. This is the result if the cue is stored using merge with the “↑0” selected: 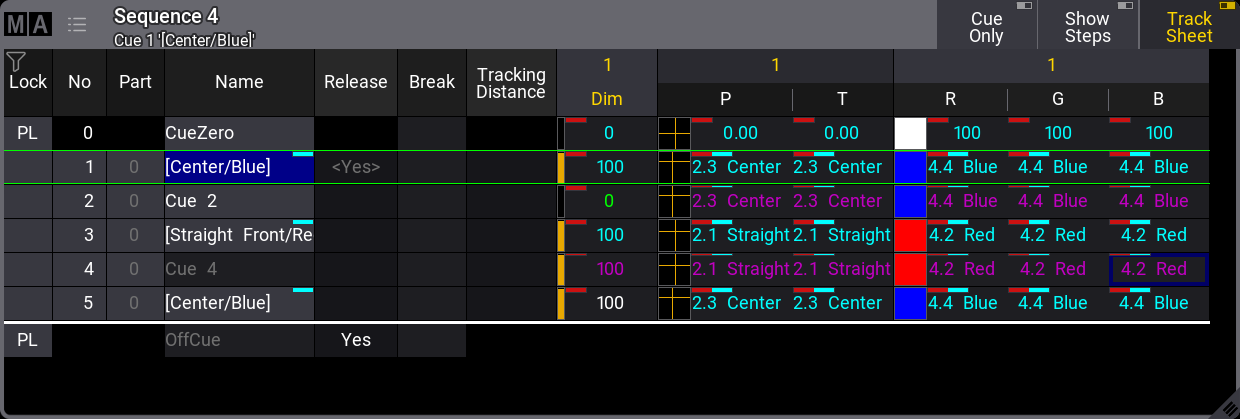 \_Sequence Sheet showing result using Tracking Shield in “↑0” mode\ \_ The Tracking Shield function saves the previously tracked attribute values in Cue 5, and the cue looks the way it should. The result in this example is the same if the “>0” option is selected. ### Example 2 [Section titled “ Example 2”](#example-2) This second example uses almost the same sequence as a starting point.  *Sequence Sheet showing the starting point for example 2* The difference is that the fixture is at 10% in Cue 2 instead of 0%. This example uses the same new attribute values as example 1, and the new attributes are also stored into Cue 3. This is the result if the cue is stored using merge with normal “Tracking” and the shield setting “Off”: 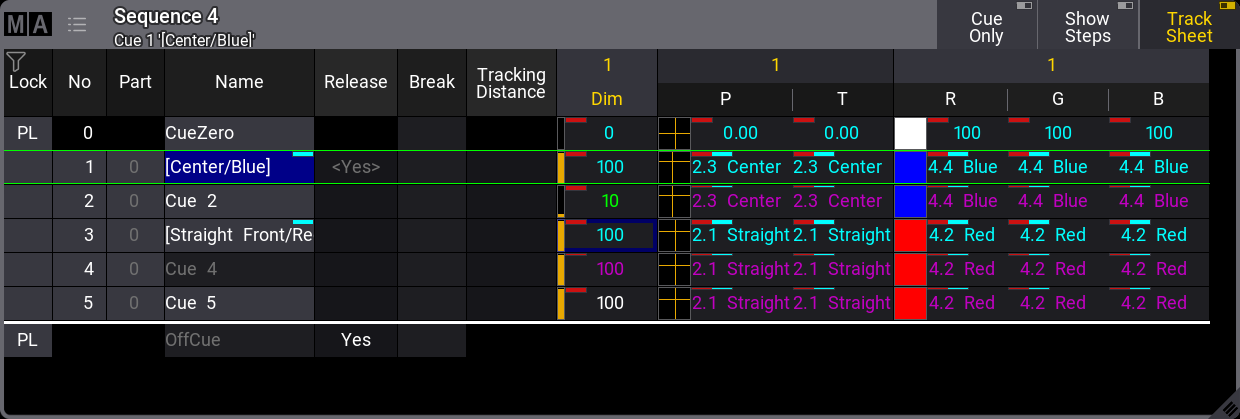 *Sequence Sheet showing result using normal Tracking* The new attribute values are tracked into Cue 5, and the result is that Cue 5 will look different. The result shown above is the same if the cue is stored using merge with the “↑0” mode. This mode is only effective when the dimmer attribute starts at 0% and increases to a value above 0%. However, this is the result if the cue is stored using merge with the “>0” mode: 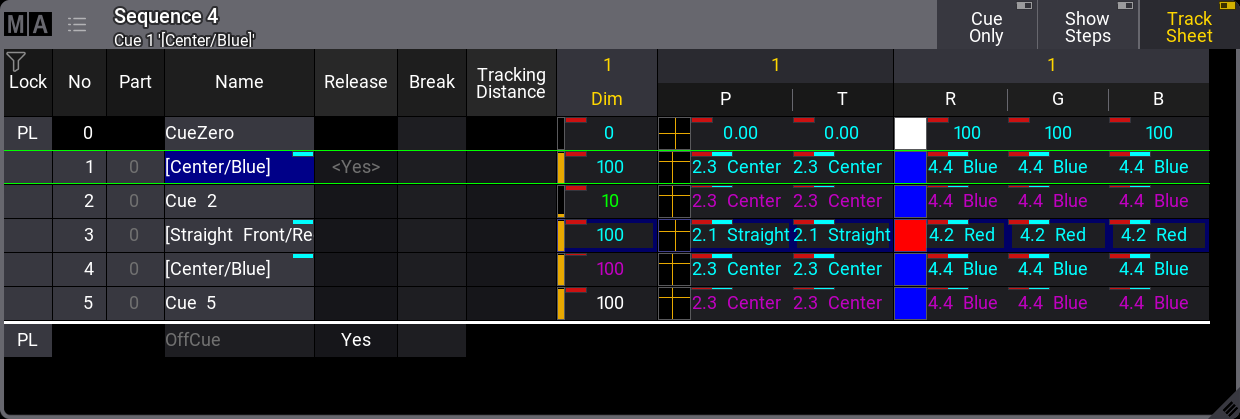 \_Sequence Sheet showing result using Tracking Shield in “>0” mode\ \_
# Update Cues
> The stored values in a cue can always be changed by storing new values in them.
The stored values in a cue can always be changed by storing new values in them. But if there are active cues and active values in the programmer, it is also possible to update the cue or cue part. The [Update key](/grandma3/2-3/keyword_update/) flashes when this scenario is valid. Pressing Update opens the **Update Menu**. 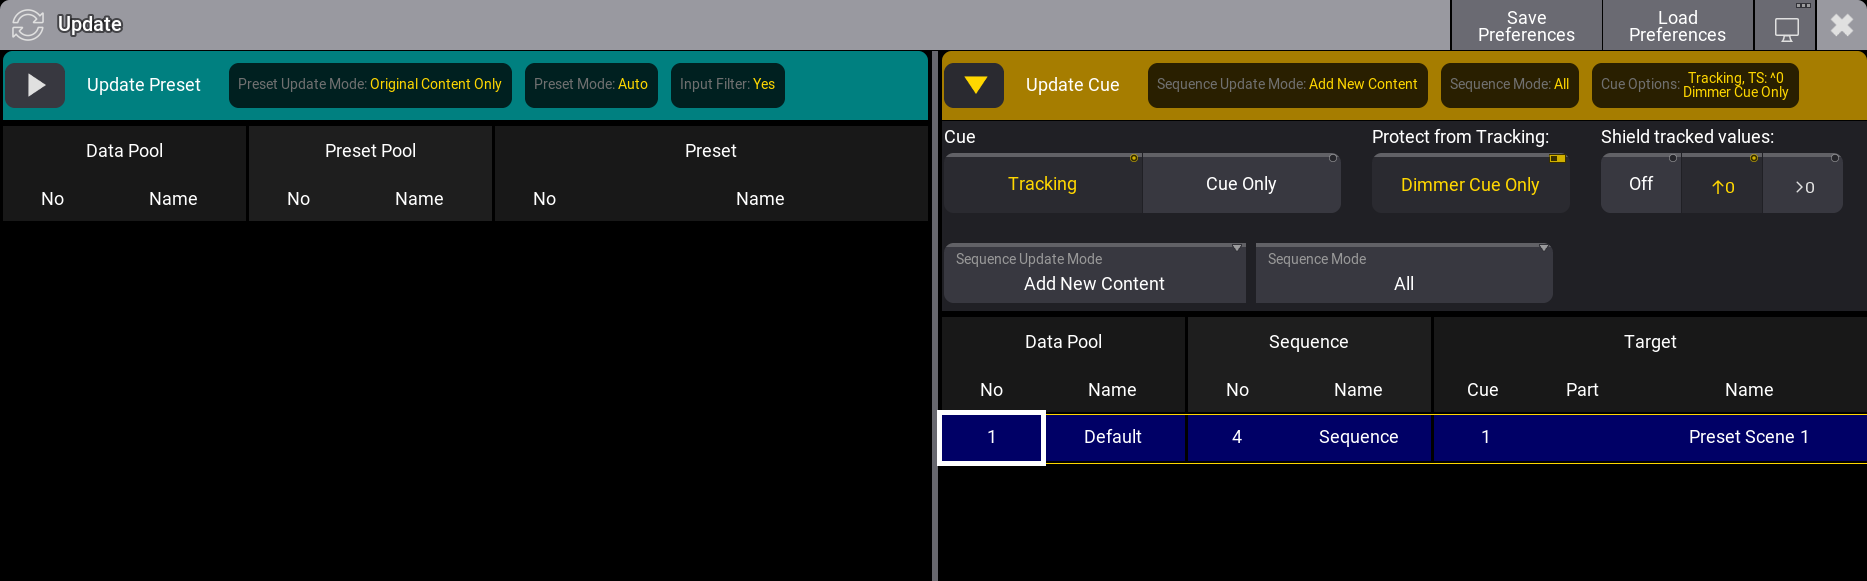 *The Update Menu with possible update locations.* The main update menu is split into a left and right section. The right side displays a list of possible cue update targets. If there are multiple data pools in the show, columns with the data pool information are shown. To update the cue part with the current settings, just tap the desired cue part on the list on the right side. This immediately updates the stored values in the selected location. Entire cues can also be selected as the update target. If values already exist in single parts and are updated with the **Sequence Update Mode** setting to **Add New Content**, the values will be updated in their respective parts. Some options are relevant to the cue update process. The current selected values for these options are displayed in the dark yellow area on the right side. These settings can be changed by tapping the right-pointing triangle (). This opens the settings - the example image above shows the settings for the cues. The top row of the cue settings are the tracking settings. These settings define how and if the updated values are tracked through the following cues. Learn more about these settings in the [What is Tracking topic](/grandma3/2-3/cue_tracking/) and its sub-topics. The two settings on the second row are **Sequence Update Mode** and **Sequence Mode**. **Sequence Update Mode:** The mode toggles between two options. **Original Content Only** updates the already existing values at their original location - possibly a previous cue. **Add New Content** updates the active cue with all the programmer values (filter and worlds are still respected), possibly adding new values and new content to the cue. **Sequence Mode:** The sequence mode is a filter that can be used to filter the list of possible cue parts. The options are: * **All**:\ This shows all possible cue parts from all active sequences. * **Selected**:\ This only shows the cue part from the selected sequence. * **Last Go**:\ This shows the latest cue to receive one of the trigger commands (<<<, >>>, Go+, Go-, Goto, Load, On, Select, Top, Temp, Flash, Toggle On, Pause). This includes if the cue is triggered from a running timecode recording. A sequence (and its cues) can be excluded from LastGo - read about the [Sequence Settings](/grandma3/2-3/cue_sequence_settings/). Last Go only shows cues triggered by the same [user profile](/grandma3/2-3/user/). *** The left side of the **Update Menu** is about presets. Learn more about presets in the [Preset section](/grandma3/2-3/presets/).
# Data Pools
> Much of the different data belonging to the show file are stored in pools. Many of these pools exist as children inside a Data Pool parent object.
Much of the different data belonging to the show file are stored in pools. Many of these pools exist as children inside a **Data Pool** parent object. A new show file creates a default **Data Pool**. The Data Pool object contains the other pools. New **Data Pool** objects can be created, giving an entirely new set of pools. This can be very useful if several shows or acts use the same patch; for instance, each song in an extensive band catalog can be in its own data pool. These are the pools inside the Data Pool objects: * [Bitmaps](/grandma3/2-3/bitmap/) * [Executor Configurations](/grandma3/2-3/executor_configurations/) * [Filters](/grandma3/2-3/worldfilter/) * [Generators - Random](/grandma3/2-3/generator/) * [Groups](/grandma3/2-3/group/) * [Layouts](/grandma3/2-3/layouts/) * [Macros](/grandma3/2-3/macros/) * [MAtricks](/grandma3/2-3/matricks/) * [Pages](/grandma3/2-3/executor/) * [Plugins](/grandma3/2-3/plugins/) * [PresetPools](/grandma3/2-3/presets/) * [Quickeys](/grandma3/2-3/quickeys/) * [Sequences](/grandma3/2-3/cue_sequence/) * [Timecodes](/grandma3/2-3/timecode/) * [Timers](/grandma3/2-3/timers/) * [Worlds](/grandma3/2-3/worldfilter/) Each window of pools can be linked to the selected data pool or a specific data pool. Learn more in the [Window Settings topic](/grandma3/2-3/wvm_settings/#pool_settings). ## Data Pools Window [Section titled “Data Pools Window”](#data-pools-window) The best way to see the different data pools is in the **Data Pools window**. This can be created like any other window - learn how in the [Add Windows topic](/grandma3/2-3/wvm_add_window/).  Data pools with some data pool objects The pool can be used to select the desired data pool by tapping it. Any of the different data pool operations mentioned below can be done using the appropriate keyword in combination with the pool window. But it can also be done using the command line and the [DataPool keyword](/grandma3/2-3/keyword_datapool/). The data pools can also be found in Menu / Settings / User Configuration / Pools. This is a list form of the data pools. ## Create a New Data Pool Object [Section titled “Create a New Data Pool Object”](#create-a-new-data-pool-object) Data pools need to be stored to be created. These are different ways to create a new Data Pool. * Press Store and then tap an empty pool object. * Open the swipey commands on an empty pool object and choose Store. * Using the command line: Store DataPool \[DataPool\_number] Performing an “edit” command on an empty pool object also creates the data pool object. ## Copy a Data Pool Object [Section titled “Copy a Data Pool Object”](#copy-a-data-pool-object) A data pool can be copied. This makes a copy of all the elements in the data pool. The copies are not linked, but objects inside the copy might be referencing objects in the source data pool. For instance, a copy of a sequence might contain links to presets in the source data pool - the presets are not copied automatically, and the references are not changed in the copy.\ Changing one of the copies after the copy action does not change the other. * Press Copy, tap the source pool object, and then an empty pool object. * Open the swipey commands on the source pool object, choose Copy, then tap an empty pool object. * Using the command line: Copy DataPool \[“DataPool\_Name” or DataPool\_Number] At \[“DataPool\_Name” or DataPool\_Number] | | | | ------------------------------------------ | -------------------------------------------------------------------------------------------------------------------------------------------------------------------------- | |  | **Hint:** | | | Objects inside a data pool can be copied from one pool to another using the normal [Copy](/grandma3/2-3/keyword_copy/) and [Paste](/grandma3/2-3/keyword_paste/) commands. | ## Edit a Data Pool Object [Section titled “Edit a Data Pool Object”](#edit-a-data-pool-object) Editing a data pool object opens an editor with a structured list of the elements in the data pool. Unfolding the elements in the list shows the settings for the elements. 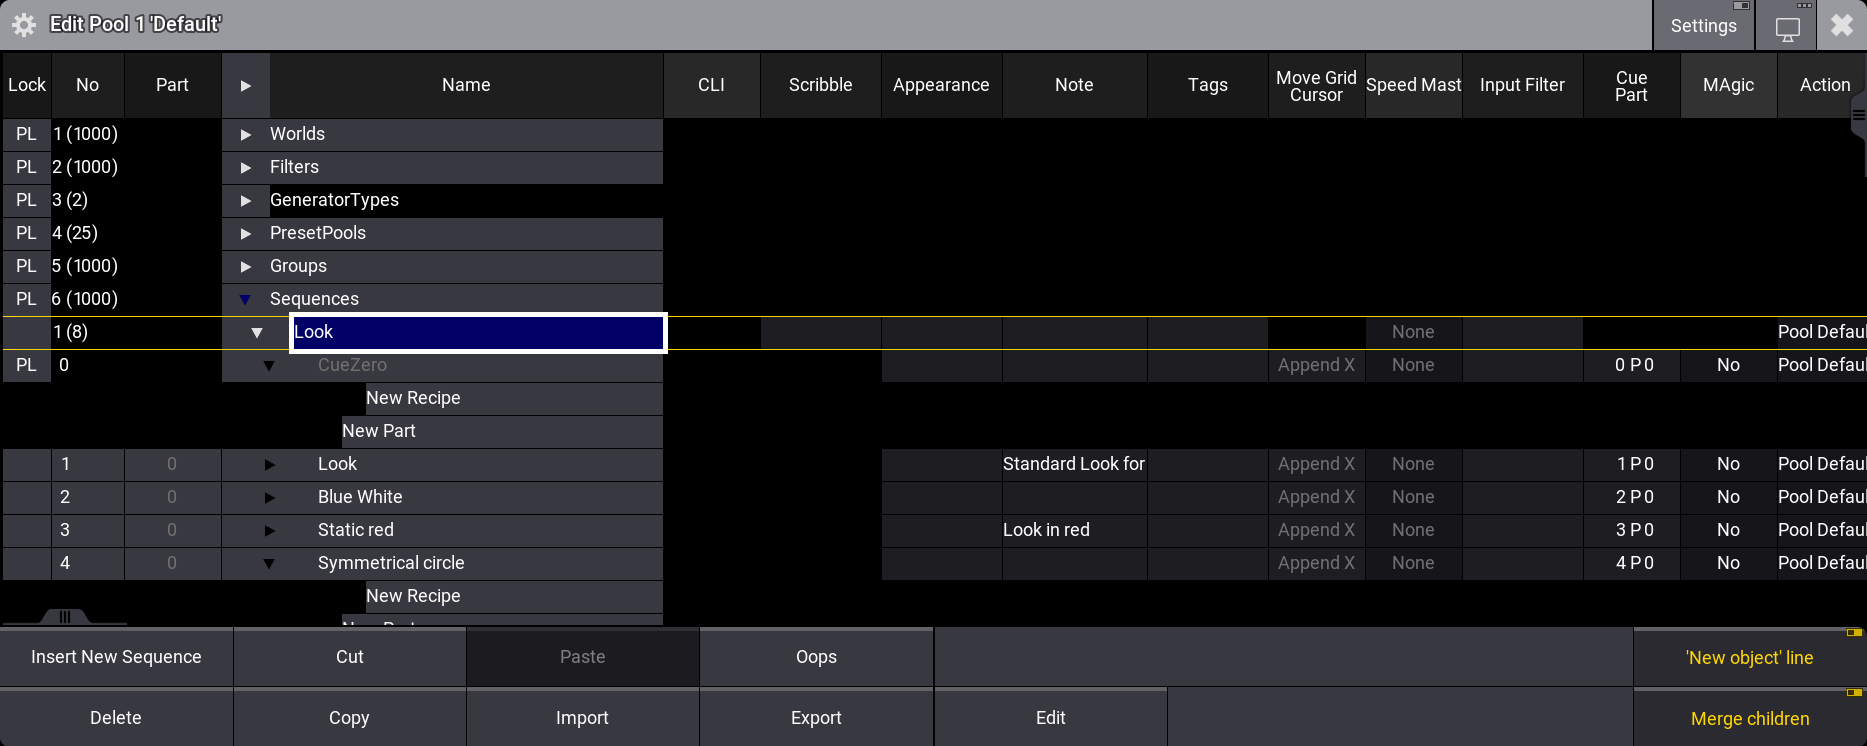 Data pool in edit mode - Sequence unfolded This is a deep look into the structure of the data. Changing a setting here changes the setting for the object. Edit a pool object using one of these methods: * Press Edit and then tap the desired pool object. * Open the swipey commands on the pool object and choose Edit. * Using the command line: Edit DataPool \[“DataPool\_Name” or DataPool\_Number]. ## Reference Data Pool Objects from a Different Data Pool [Section titled “Reference Data Pool Objects from a Different Data Pool”](#reference-data-pool-objects-from-a-different-data-pool) Other data pools can use a pool element inside a different data pool. For instance, imagine a repertoire theater. All default elements are stored in the data pool one, including a sequence that controls the house lights. Tonight’s show is programmed in data pool two. The sequence can be copied from data pool one, but if changes are made to it later, it would need to be copied again into the second data pool. Instead, the original sequence can be assigned to an executor in data pool two. The image of the edit menu above shows that the structure in the data pool is numbered. So sequence 2 in this data pool is data pool object 1.6.2. The first number is the data pool number. The second number specifies that it is a sequence. The third number specifies that it is sequence number 2. If this element needs to be assigned somewhere, the data pool object must be included in the assign command. This can be done using the data pool object number or simply by adding the data pool information before the object - see the example below. ### Example [Section titled “Example”](#example) Data pool 1 has sequence 2. This needs to be used in data pool 2 on (page 1) executor 201. Make sure data pool 2 is the selected pool. The example can be achieved using the command line: Assign DataPool 1 Sequence 2 At Page 1.201. Now the sequence in data pool 1 can be controlled by the executor in data pool 2. Some menus give access to select the data pool. In the title bar of the menus, there is a button called DataPool that can toggle between the different data pools. ## Delete a Data Pool Object [Section titled “Delete a Data Pool Object”](#delete-a-data-pool-object) | | | | ------------------------------------------------ | ------------------------------------------------------------------------- | |  | **Important:** | | | Deleting a data pool object also deletes everything inside the data pool! | Unlocked data pools can be deleted using any of the following methods: * Press Delete and then tap the pool object. * Open the swipey commands on the relevant pool object and choose Delete. * Using the command line: Delete DataPool \[“DataPool\_Name” or DataPool\_Number].
# [DE] Quick Manual I/O Nodes
## Subtopics [Section titled “Subtopics”](#subtopics) * [Verwendungszweck](/grandma3/2-3/key_i_o_node_intended_use-1/) * [Sicherheit](/grandma3/2-3/key_i_o_node_safety-1/) * [Support](/grandma3/2-3/key_i_o_node_support-1/) * [Transport](/grandma3/2-3/key_i_o_node_transport-1/) * [Betriebsgrenzen](/grandma3/2-3/key_grandma3_i_o_node-1/) * [Installation](/grandma3/2-3/key_io_node_installation-1/) * [Quick Start](/grandma3/2-3/key_io_node_quick_start-1/) * [Wartung](/grandma3/2-3/key_i_o_node_maintenance-1/) * [Entsorgung](/grandma3/2-3/key_i_o_node_disposal-3/) * [Technische Daten](/grandma3/2-3/key_i_o_node_technical_data-3/) * [Toleranzen](/grandma3/2-3/key_ionodes_instances/) * [Konformitätserklärung](/grandma3/2-3/key_i_o_node_conformity-1/)
# [DE] Quick Manual onPC command wing
## Subtopics [Section titled “Subtopics”](#subtopics) * [Verwendungszweck](/grandma3/2-3/key_onpc_command_wing_intended_use-1/) * [Sicherheit](/grandma3/2-3/key_onpc_command_wing_safety-3/) * [Support](/grandma3/2-3/key_onpc_command_wing_support-1/) * [Transport](/grandma3/2-3/key_onpc_command_wing_transport-1/) * [Betriebsgrenzen](/grandma3/2-3/key_onpc_command_wing_limitations-1/) * [Quick Start](/grandma3/2-3/key_onpc_command_wing_quick_start-1/) * [Wartung](/grandma3/2-3/key_onpc_command_wing_maintenance-3/) * [Entsorgung](/grandma3/2-3/key_onpc_command_wing_disposal-1/) * [Technische Daten](/grandma3/2-3/key_onpc_command_wing_technical_data-1/) * [Toleranzen](/grandma3/2-3/key_command_wing_instances/) * [Konformitätserklärung](/grandma3/2-3/key_onpc_command_wing_conformity-1/)
# [DE] Quick Manual onPC command wing XT
## Subtopics [Section titled “Subtopics”](#subtopics) * [Verwendungszweck](/grandma3/2-3/key_onpc_xt_intended_use-3/) * [Sicherheit](/grandma3/2-3/key_onpc_xt_safety-1/) * [Support](/grandma3/2-3/key_onpc_xt_support-3/) * [Transport](/grandma3/2-3/key_onpc_xt_transport-1/) * [Betriebsgrenzen](/grandma3/2-3/key_onpc_xt_limitations-1/) * [Quick Start](/grandma3/2-3/key_onpc_xt_quick_start-3/) * [Wartung](/grandma3/2-3/key_onpc_xt_maintenance-1/) * [Entsorgung](/grandma3/2-3/key_onpc_xt_disposal-3/) * [Technische Daten](/grandma3/2-3/key_onpc_xt_technical_data-1/) * [Toleranzen](/grandma3/2-3/key_commandwingxt_instances/) * [Konformitätserklärung](/grandma3/2-3/key_onpc_xt_conformity-1/)
# [DE] Quick Manual onPC fader wing
## Subtopics [Section titled “Subtopics”](#subtopics) * [Verwendungszweck](/grandma3/2-3/key_intended_use-1/) * [Sicherheit](/grandma3/2-3/key_safety-1-3/) * [Support](/grandma3/2-3/key_fader_wing_support-1/) * [Transport](/grandma3/2-3/key_fader_wing_transport-3/) * [Betriebsgrenzen](/grandma3/2-3/key_onpc_limitations-3/) * [Quick Start](/grandma3/2-3/key_fader_wing_quick_start-1/) * [Wartung](/grandma3/2-3/key_fader_wing_maintenance-1/) * [Entsorgung](/grandma3/2-3/key_fader_wing_disposal-1/) * [Technische Daten](/grandma3/2-3/key_fader_wing_technical_data-3/) * [Toleranzen](/grandma3/2-3/key_faderwing_instances/) * [Konformitätserklärung](/grandma3/2-3/key_fader_wing_conformity-1/)
# [DE] Quick Manual onPC rack-unit
## Subtopics [Section titled “Subtopics”](#subtopics) * [Verwendungszweck](/grandma3/2-3/key_grandma3_rack_unit_transport-1/) * [Sicherheit](/grandma3/2-3/key_rack_unit_safety-3/) * [Support](/grandma3/2-3/key_rack_unit_support-1/) * [Transport](/grandma3/2-3/key_rack_unit_transport-1/) * [Betriebsgrenzen](/grandma3/2-3/key_onpc_rack_unit_limitations-1/) * [Quick Start](/grandma3/2-3/key_rack_unit_quick_start-1/) * [Wartung](/grandma3/2-3/key_rack_unit_maintenance-1/) * [Entsorgung](/grandma3/2-3/key_rack_unit_disposal-1/) * [Technische Daten](/grandma3/2-3/key_rack_unit_technical_data-3/) * [Toleranzen](/grandma3/2-3/key_rackunit_instances/) * [Konformitätserklärung](/grandma3/2-3/key_grandma3_onpc-rack_unit-1/)
# [DE] Quick Manual viz-key
## Subtopics [Section titled “Subtopics”](#subtopics) * [Verwendungszweck](/grandma3/2-3/key_viz_key_intended_use-1/) * [Sicherheitshinweise](/grandma3/2-3/key_viz_key_safety-1/) * [Support](/grandma3/2-3/key_viz_key_support-1/) * [Transport](/grandma3/2-3/key_viz_key_transport-1/) * [Betriebsgrenzen](/grandma3/2-3/key_viz_key_limitations-1/) * [Quick Start](/grandma3/2-3/key_viz_key_quick_start-1/) * [Wartung](/grandma3/2-3/key_viz_key_maintenance-1/) * [Entsorgung](/grandma3/2-3/key_viz_key_disposal-1/) * [Technische Daten](/grandma3/2-3/key_viz_key_technical_data-1/) * [Toleranzen](/grandma3/2-3/key_vizkey_instances/) * [Konformitätserklärung](/grandma3/2-3/key_viz_key_conformity-1/)
# [DE] Quick Manual Node DIN-Rail
## Subtopics [Section titled “Subtopics”](#subtopics) * [Verwendungszweck](/grandma3/2-3/key_dinrail_intended_use-1/) * [Sicherheit](/grandma3/2-3/key_dinrail_safety-1/) * [Support](/grandma3/2-3/key_dinrail_support-1/) * [Transport](/grandma3/2-3/key_dinrail_transport-1/) * [Betriebsgrenzen](/grandma3/2-3/key_dinrail_limitations-1/) * [Installation](/grandma3/2-3/key_dinrail_installation-3/) * [Quick Start](/grandma3/2-3/key_dinrail_quick_start-1/) * [Wartung](/grandma3/2-3/key_dinrail_maintenance-3/) * [Entsorgung](/grandma3/2-3/key_dinrail_disposal-1/) * [Technische Daten](/grandma3/2-3/key_dinrail_technical_data-1/) * [Toleranzen](/grandma3/2-3/key_nodes_din_rail_instances/) * [Konformitätserklärung](/grandma3/2-3/key_dinrail_conformity-1/)
# [DE] Quick Manual Nodes
## Subtopics [Section titled “Subtopics”](#subtopics) * [Verwendungszweck](/grandma3/2-3/key_xport_nodes_intended_use-1/) * [Sicherheit](/grandma3/2-3/key_xport_nodes_safety-3/) * [Support](/grandma3/2-3/key_xport_nodes_support-3/) * [Transport](/grandma3/2-3/key_xport_nodes_transport-3/) * [Betriebsgrenzen](/grandma3/2-3/key_xport_nodes_limitations-1/) * [Quick Start](/grandma3/2-3/key_xport_node_quick_start-1/) * [Wartung](/grandma3/2-3/key_xport_node_maintenance-1/) * [Entsorgung](/grandma3/2-3/key_xport_nodes_disposal-1/) * [Technische Daten](/grandma3/2-3/key_xport_nodes_technical_data-1/) * [Toleranzen](/grandma3/2-3/key_nodes_instances/) * [Konformitätserklärung](/grandma3/2-3/key_xport_node_conformity-1/)
# [DE] Quick Manual processing units
## Subtopics [Section titled “Subtopics”](#subtopics) * [Verwendungszweck](/grandma3/2-3/key_pu_intended_use-3/) * [Sicherheit](/grandma3/2-3/key_pu_safety-1/) * [Support](/grandma3/2-3/key_pu_support-1/) * [Transport](/grandma3/2-3/key_pu_transport-1/) * [Betriebsgrenzen](/grandma3/2-3/key_pu_limitations-3/) * [Quick Start](/grandma3/2-3/key_pu_quick_start-1/) * [Wartung](/grandma3/2-3/key_pu_maintenance-1/) * [Entsorgung](/grandma3/2-3/key_pu_disposal-3/) * [Technische Daten](/grandma3/2-3/key_pu_technical_data-1/) * [Toleranzen](/grandma3/2-3/key_pu_instances/) * [Konformitätserklärung](/grandma3/2-3/key_pu_conformity-3/)
# Device Overview
> All MA Lighting devices are built for touring and installation purposes and meet international standards for electronic safety and protection. The Declaration o
All MA Lighting devices are built for touring and installation purposes and meet international standards for electronic safety and protection. The Declaration of Conformity and the Electromagnetic Compatibility regulation (EMC) can be found in the Quick Guide included with the product and available for download at [https://www.malighting.com.](https://www.malighting.com/) All MA Lighting devices have a wide input voltage range and can operate from 90V to 230V. The following chapters describe the different grandMA3 devices.
# DMX In and Out
> There are several ways to get DMX in and out of the grandMA3 system.
There are several ways to get DMX in and out of the grandMA3 system. DMX ports on stations can generate DMX as a standalone device. DMX ports on grandMA3 devices that are part of a session can also be DMX outputs and inputs. This is set up from the **Output Configuration** menu. Please read about it in the [DMX Port Configuration topic](/grandma3/2-3/dmx_port_config/). DMX can also be transferred using standard network protocols. This is [Ethernet DMX](/grandma3/2-3/dmx_ethernet/). There are different rules for the different kinds of DMX. Generally, each DMX port on a grandMA3 device can be an input or an output. ## DMX Refresh Rate [Section titled “DMX Refresh Rate”](#dmx-refresh-rate) The DMX standard used by the system (ANSI E1.11 - 2008 (R2018)) supports a wide range of refresh rates, and it is allowed only to send some of the DMX channels. The grandMA3 system implements DMX using the following rules: * The entire DMX universe is sent each time. * The maximum DMX rate is 30 Hz. * The minimum DMX rate is 1 Hz. * The default refresh rate is 30 Hz. * The refresh rate can drop down (not below the minimum) if there are no changes in the DMX values in a universe and the XLR port is to “RDM” or when DMX is output using Art-Net or sACN. DMX output can be XLR ports on compatible grandMA3 hardware or via Ethernet DMX. The XLR ports set to “Out” do not slow down the DMX refresh rate. The other methods can slow it down. * Universes can have different refresh rates. For instance, a universe without any changes can be at 1Hz, and a universe with a running phaser can be at 30Hz. See more about the used refresh rates in the sub-topics.\ \ Subtopics * [DMX Port Configuration](/grandma3/2-3/dmx_port_config/) * [Ethernet DMX](/grandma3/2-3/dmx_ethernet/)
# Ethernet DMX
> There are currently two supported protocols for sending and receiving DMX using the network: sACN and Art-Net.
There are currently two supported protocols for sending and receiving DMX using the network: sACN and Art-Net. It is the session master station that outputs the network DMX. The visual feedback regarding sending or receiving network DMX can look different on the stations in the session, so it should be viewed and changed on the master station to see the actual output/input status. Both are set up and changed in the **DMX Protocols** menu: 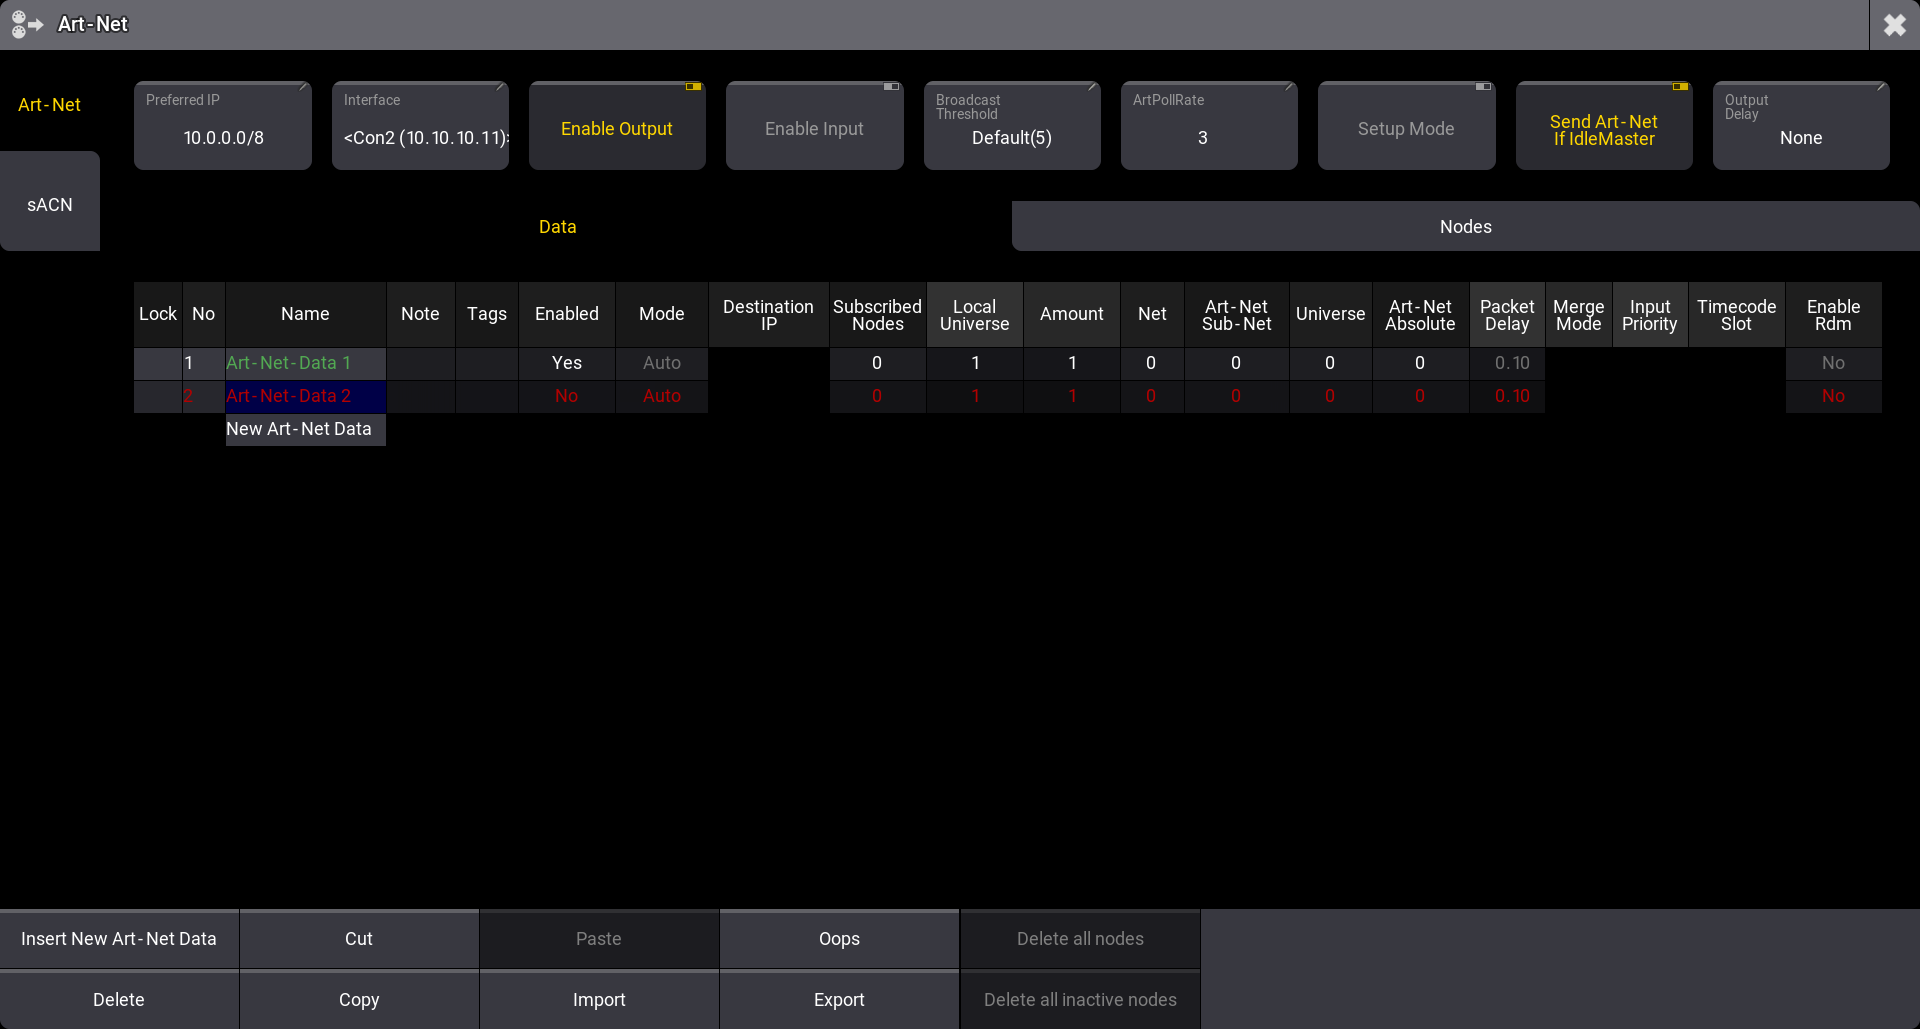 *DMX protocol configuration for Art-Net* Access the menu by pressing Menu and then tap DMX Protocols. Tapping the DMX Protocols button opens the menu for the first protocol. The example above is the Art-Net menu. The menus can also be opened using the command line: For Art-Net: | | | | ------------------------------------------------------------------ | --------------------------------- | |  | User name\[Fixture]>Menu “ArtNet” | [ Paste to Command Line](#ma_cmd?Menu%20%22ArtNet%22) For sACN: | | | | ------------------------------------------------------------------ | ------------------------------- | |  | User name\[Fixture]>Menu “sACN” | [ Paste to Command Line](#ma_cmd?Menu%20%22sACN%22) On the left side menu, there are two buttons, one for each menu. See the subtopics for information about the two protocols. Subtopics * [Art-Net Menu](/grandma3/2-3/dmx_ethernet_artnet/) * [sACN (streaming ACN) Menu](/grandma3/2-3/dmx_ethernet_sacn/) * [Transmit DMX Using Art-Net](/grandma3/2-3/dmx_ethernet_artnet_transmit/)
# Art-Net Menu
> Art-Net is a royalty-free protocol developed by Artistic Licence ().
Art-Net is a royalty-free protocol developed by Artistic Licence (). grandMA3 supports Art-Net 4. | | | | ------------------------------------------ | --------------------------------------------------------------------------------------------------------------------------------------------------- | |  | **Hint:** | | | The DMX output via Art-Net can vary in refresh rates. It follows the rules specified in the [DMX In and Out topic](/grandma3/2-3/dmx/#h2_49605550). | It is configured in the Art-Net menu:  *Art-Net configuration menu* See the [Ethernet DMX topic](/grandma3/2-3/dmx_ethernet/) for information on how to open this menu. See the [Transmit DMX using Art-Net topic](/grandma3/2-3/dmx_ethernet_artnet_transmit/) for an explanation of the steps needed to transmit Art-Net. ## Config Buttons [Section titled “Config Buttons”](#config-buttons) There are some buttons at the top of the menu: * **Preferred IP**:\ This is the preferred IP address or address range used by the Art-Net protocol. The Interface can be set to **Auto**, allowing this setting to select the interface that matches the preferred setting. Tap this input button to open a small number input pop-up. The preferred number has to be input as an IP address with the subnet mask written in CIDR notation. For instance, 10.0.0.0/8 tells the system that it prefers an IP address that starts with 10. The rest of the numbers do not matter (the “/8” is the same as the subnet mask 255.0.0.0). This setting is individual for each station. * **Interface**:\ Tap this button to open the Select Interface pop-up to select the desired network interface. This interface will be used for all Art-Net in and out. The **Auto** option can be used to allow the **Preferred IP** setting to select the interface. The interface is written inside ”<” and ”>” when it is selected by the preferred setting. This setting is individual for each station. * **Enable Output**:\ This On/Off button must be On for Art-Net to be transmitted. Data also needs to be configured for output - read more below. * **Enable Input**:\ This On/Off button must be On for Art-Net to be received. Data also needs to be configured for input - read more below. * **Broadcast Threshold**:\ This input button sets the amount of Art-Net receivers for a universe before the master starts to send the universe as broadcast. This is only valid if the mode is set to **Auto**. If the number of receivers is below the threshold, the universe is sent as Unicast. If it is above, then the universe is sent as Broadcast. * **ArtPollRate**:\ This input sets the time between each ArtPollRequest packet sent by the master station. * **Setup Mode**:\ This On/Off button is used to toggle the setup mode. This mode can be used to transmit and receive configuration data only. If the output and input are turned Off, only the configuration data is transmitted and received. * **Send Art-Net If IdleMaster**:\ This On/Off button defines if the station transmits Art-Net data when it is Idle Master. In a session, the Global master transmits the network DMX. If the station is not in a session with other devices, it is Idle Master. Turning this setting On will make the station output network DMX when it is Idle Master. This must be On if a single station is to output networked DMX. Learn more about standalone devices and networked devices in the [System Overview section](/grandma3/2-3/system/). This setting is individual for each station. * **Output Delay**:\ This can set an output delay between 0ms and 30ms. This delays the entire Art-Net output compared to the outputs coming from MA-Net devices. | | | | ------------------------------------------------ | ----------------------------------------------------------------------------------------------------------------------------------------- | |  | **Important:** | | | \* Enabling Setup Mode allows Art-Net configuration data to be sent and received even when **Enable Output** and **Enable Input** is Off. | * When Setup Mode is Off, and output is enabled, DMX and configuration data are transmitted. * When Setup Mode is Off, and input is enabled, DMX and configuration data are received. | There are two tabs below the buttons. They are **Data** and **Nodes**. Data is used to set up output and input. Nodes can be used to see the discovered nodes in the network. If the nodes support it, this can also be used to configure the ports on the node. ## Data Tab [Section titled “Data Tab”](#data-tab) The data tab is a grid of rows and columns. Each row is an Art-Net configuration. The text on the entire row is red if the row is not valid or not enabled. The name text is flashing green when data is transmitted. It can appear solid green if the output is constantly changing. The name text color is flashing orange when data is received. It can appear solid orange if the input is constantly changing. This is a short description of the columns: * **Lock**:\ The row can be locked to prevent changes. * **No**:\ This is the row number. * **Name**:\ Each row can have a name. This can be used as short info for the row. * **Note**:\ A note can be added to each row for information purposes. * **Tags**:\ A tag can be added to each row. Learn more about tags in the [Tags topic](/grandma3/2-3/tags/). * **Enabled**:\ This **Yes** or **No** field is used to enable the row transmitting or receiving Art-Net. No is the default. * **Mode**:\ The mode defines what the row is doing. There are four options: * **Broadcast**:\ This transmits Art-Net using broadcast. * **Unicast**:\ This transmits Art-Net using unicast. * **Auto**:\ This transmits Art-Net. It uses the **Broadcast Threshold** number to determine if universes should be transmitted using broadcast or unicast. If the number of universe subscribers (determined by ArtPollRequests) are below the threshold, then it is sent using unicast. Is it above the threshold, then it is broadcasted. * **Input**:\ The row receives Art-Net and merges it into the defined universe. | | | | -------------------------------------------------- | ----------------------------------------------------------------------- | |  | **Restriction:** | | | The total input count (Art-Net and sACN) must not exceed 128 Universes. | * **Destination IP**:\ This field is only active if the unicast mode is selected. This is the IPv4 address of the receiving device. * **Subscribed Nodes**:\ This field provides information about the number of subscribing devices. This is determined using ArtPollRequests. * **Local Universe**:\ This is the grandMA3 universe to be transmitted or the universe that should receive incoming Art-Net DMX. This is the first universe in the range if the amount is more than one. * **Amount**:\ This is the amount of grandMA3 universes to be transmitted or received. * **Net**:\ The net number is a value between 0 and 127. There are 128 different nets since Art-Net III. Each net is a complete group of **Sub-Nets** and **Universes**. This allows for addressing a total of 32 768 Art-Net universes. To be compatible with Art-Net I and Art-Net II devices, please use net 0. * **Art-Net Sub-Net**:\ There are 16 sub-nets in Art-Net. They can be input in decimal numbers from 0 to 15 or 0 to F in hex numbers. * **Universe**:\ There are 16 universes in each sub-net. They can be input in decimal numbers from 0 to 15 or 0 to F in hex numbers. * **Art-Net Absolute**:\ This is the absolute universe number. It is calculated based on the net, sub-net, and universe numbers. It can also work the other way. A universe number can be input here, and then the net, sub-net, and universe numbers are calculated based on the input. * **Packet Delay**:\ A delay can be set up between each transmitted universe. This can be helpful for older nodes with slower network cards. Sending many universes at once can flood the node. Adding a small delay helps. This setting is only available for outputting modes. * **Merge Mode**:\ The Merge Mode defines how incoming sACN merges into universes. When changing the Merge Mode for a configuration line, all universes defined by Local Universe and Amount are changed together. In the DMX Universes-tab of the Patch and Live Patch menu or by editing a universe in the universe pool, it is still possible to independently change the Merge Mode for single universes. As soon as two or more universes of a configuration line have different Merge Modes, the Merge Mode cell will display **…** to indicate this. The Merge Mode and Input Priority are described in the [DMX Port Configuration topic](/grandma3/2-3/dmx_port_config/). * **Input Priority**:\ This is the priority of the received Art-Net. This can only be changed when the mode is input. Follow the link above to learn more. * **Timecode Slot**:\ Any received ArtTimeCode is sent to the timecode slot number defined here. The mode does not need to be set to Input to receive the timecode, but Input needs to be enabled. This setting can only be changed when the mode is input. There are a total of 8 timecode slots. Read more about them in the [What are timecode slots topic](/grandma3/2-3/timecode_slots/). * **Enable RDM**:\ RDM via Art-Net can be enabled for the Art-Net universes specified in the row. ## Nodes Tab [Section titled “Nodes Tab”](#nodes-tab) Each node detected is a row. Each node has one or more sub-rows with “binds”. Each bind can only have 4 ports. If a device has more than 4 ports, then the device has multiple binds. * **Lock**:\ The row can be locked to prevent changes. * **No**:\ This is the row number. * **Name**:\ Each row gets a name from the device. The name can be edited if the device supports it. The name text turns red if a node has been online but is now inactive. * **IP**:\ The IP address of the device. The address can be edited if the device supports it. * **Net**:\ Each bind has a net number. The number can be edited if the device supports it. * **Sub-Net**:\ Each bind has a sub-net number. The number can be edited if the device supports it. * **Output Port**:\ This is the universe number of output ports on the device. The number can be edited if the device supports it. * **Input Port**:\ This is the universe number of input ports on the device. The number can be edited if the device supports it.
# Transmit DMX Using Art-Net
> This is a short example of setting up DMX transmission using Art-Net. Learn more about the Art-Net menu in the Art-Net Menu topic.
This is a short example of setting up DMX transmission using Art-Net. Learn more about the Art-Net menu in the [Art-Net Menu topic](/grandma3/2-3/dmx_ethernet_artnet/). The idea in this example is some lights are patched in universes one to five. The fixtures are connected to Art-Net nodes, and the nodes need to get the Art-Net data from the grandMA3. There is also a media server that uses a single universe. It is patched in universe 21 and needs to receive Art-Net universe 21 (hex number 1:5). The Art-Net nodes are set up to receive from Art-Net universe 11 (hex number 0:B), so the grandMA3 universe one needs to be sent to this Art-Net universe. The media server is a specific device with a defined Art-Net IP address, and this data can be sent using unicast. In this example, the media server IP address is set to 10.10.10.51. The example assumes a patched setup that matches the universes. This is not actually needed for demonstration purposes. If the grandMA3 onPC is used to try this example, then there might not be parameters to allow actual output. These are the steps needed: 1. Open the Art-Net menu by pressing Menu and then tap DMX Protocols. Make sure the Art-Net menu is visible by tapping Art-Net. 2. The first line is going to be universe one to five. Edit the following cells to match these options: 1. Enabled = Yes 2. Mode = Auto 3. Local Universe = 1 4. Amount = 5 5. Art-Net Absolute = 11 3. A second line is needed for the universe that needs to go to a specific destination. Tap New Art-Net-Data below line 1. 4. Tap Insert new Art-Net-Data in the button menu at the bottom of the screen. 5. Now, the line exists. Edit the new line to match these options: 1. Enabled = Yes 2. Mode = Unicast 3. Destination IP = 10.10.10.51 4. Local Universe = 21 5. Amount = 1 6. Art-Net Absolute = 21 (notice that this automatically calculates the correct Art-Net Sub-Net and Universe number) 6. Finally, tap the Enable Output until it is On to activate the transmission of DMX data via Art-Net That was it. It should look something like this: 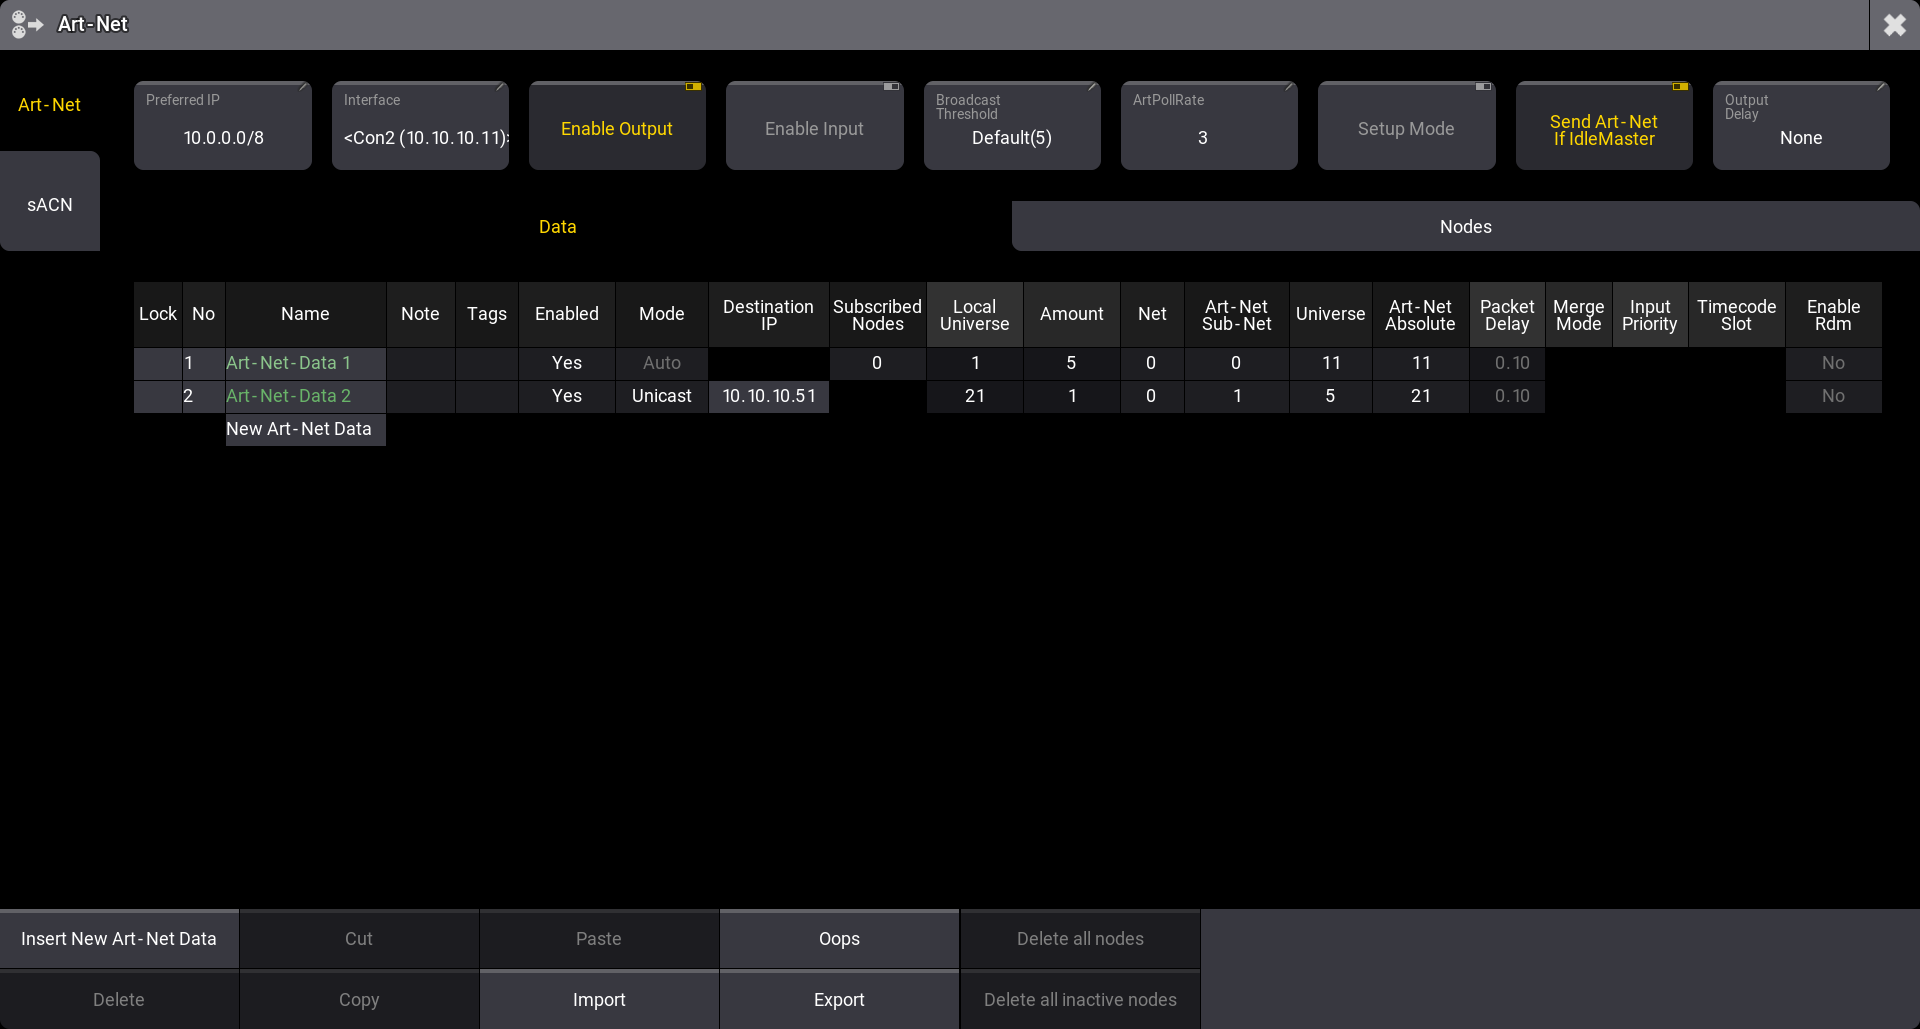 Final Art-Net example setup If the station is not connected to other stations or nodes in a session, it is **Idle Master**. If the station needs to output Art-Net in a setup like this, the **Send Art-Net if Idle Master** setting needs to be turned On. If the station is in a session with other stations, then it is the **Global Master** in the session that transmits the Art-Net data. The menu can be closed by tapping the cross () in the upper right corner.
# sACN (streaming ACN) Menu
> ACN (and streaming ACN) is an ANSI/ESTA international standard. Further readings: .
ACN (and streaming ACN) is an ANSI/ESTA international standard. Further readings: . ACN (Architecture for Control Networks) is a suite of protocols. It uses a lot of elements that are currently not supported by grandMA3. However, the ACN protocols also have a version that transports DMX data. It is called ‘Lightweight streaming protocol for transport of DMX512 using ACN’ or more popular “streaming ACN” or “sACN”. It is the international standard number E1.31. | | | | ------------------------------------------ | ------------------------------------------------------------------------------------------------------------------------------------------------ | |  | **Hint:** | | | The DMX output via sACN can vary in refresh rates. It follows the rules specified in the [DMX In and Out topic](/grandma3/2-3/dmx/#h2_49605550). | It is configured in the sACN menu: 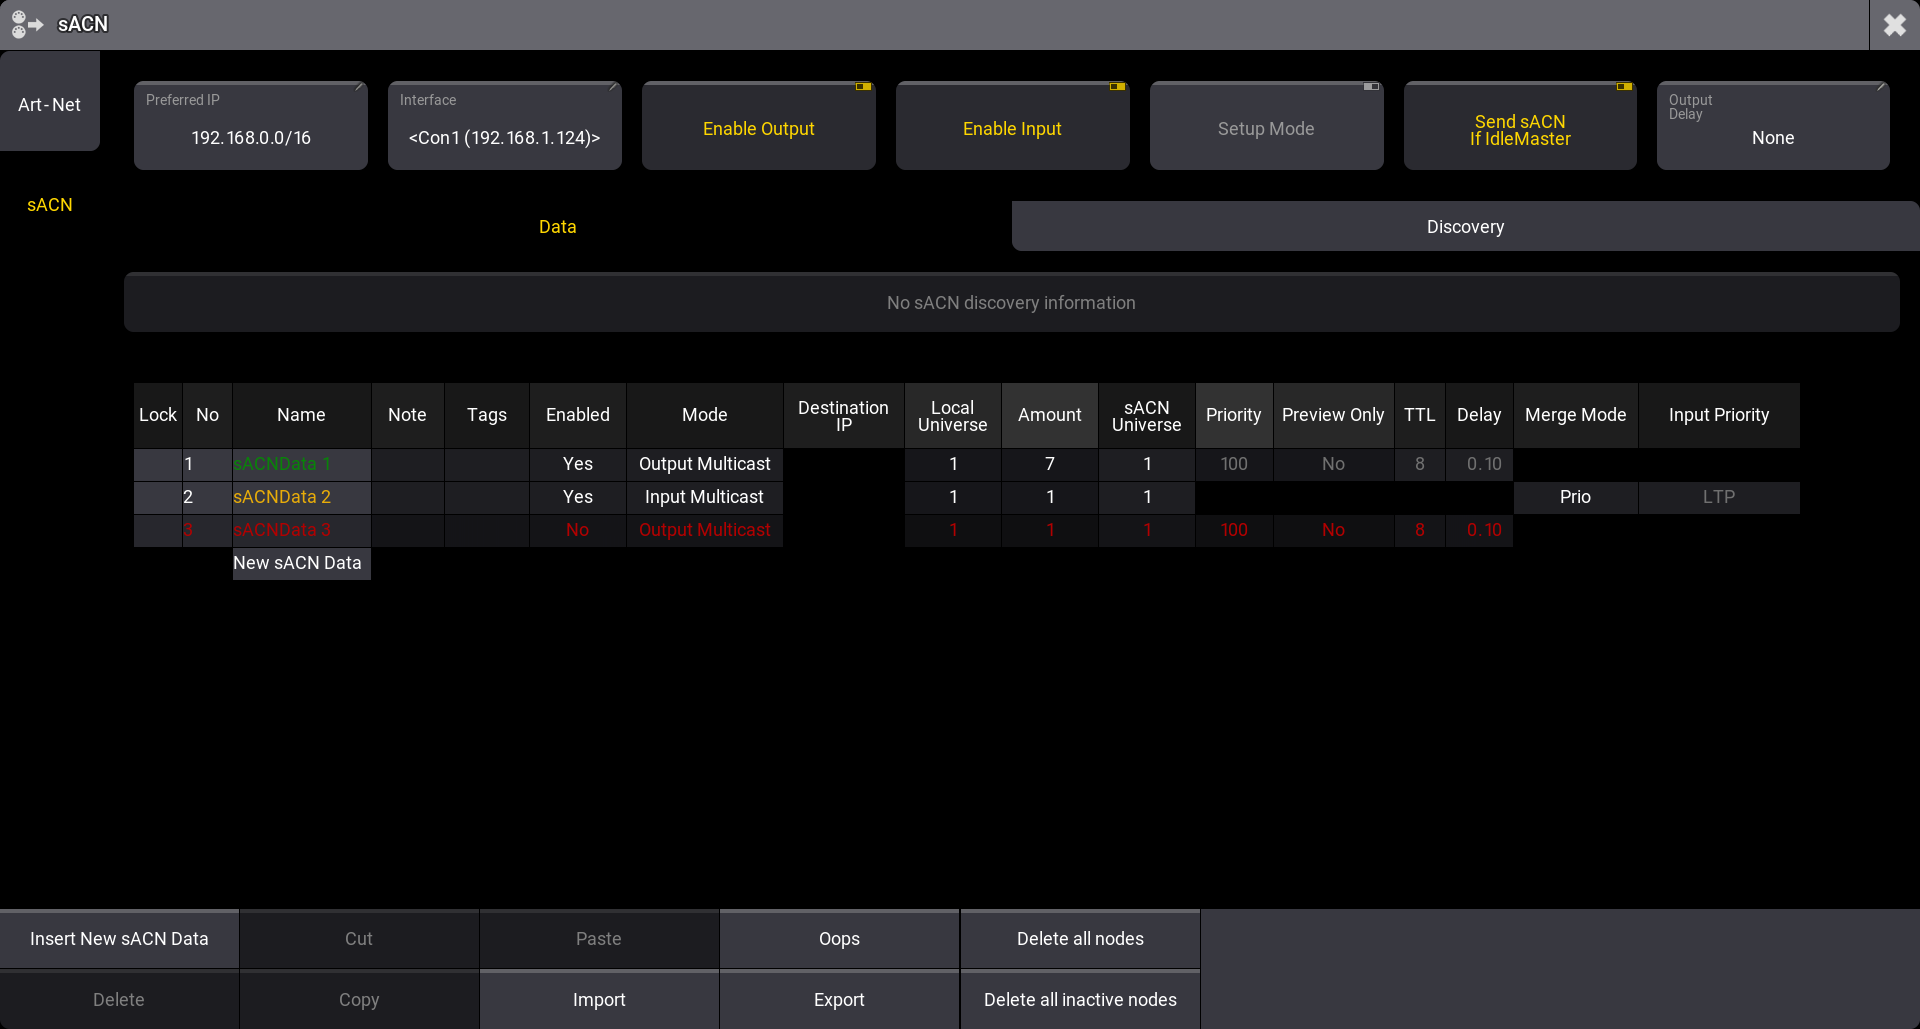 *sACN menu* See the [Ethernet DMX topic](/grandma3/2-3/dmx_ethernet/) for information on how to open this menu. ## Config Buttons [Section titled “Config Buttons”](#config-buttons) There are some buttons at the top of the menu: * **Preferred IP**:\ This is the preferred IP address or address range used by the sACN protocol. The Interface can be set to Auto, allowing this setting to select the interface that matches the preferred setting. Tap this input button to open a small number input pop-up. The preferred number has to be input as an IP address with the subnet mask written in CIDR notation. For instance, 192.168.1.0/24 tells the system that it prefers an IP address that starts with 192.168.1. The last number does not matter (the “/24” is the same as the subnet mask 255.255.255.0). This setting is individual for each station. * **Interface**:\ Tap this button to open the **Select Interface pop-up** to select the desired network interface. This interface will be used for all sACN in and out. The **Auto** option can be used to allow the **Preferred IP** setting to select the interface. The interface is written inside ”<” and ”>” when the preferred setting selects it. This setting is individual for each station. * **Enable Output**:\ This On/Off button must be On for the master to transmit sACN. Data also needs to be configured for output - read more below. * **Enable Input**:\ This On/Off button must be On for the master to receive sACN. Data also needs to be configured for input - read more below. * **Setup Mode**:\ This On/Off button is used to toggle the setup mode for nodes. This allows configuration data to set up the nodes without sending sACN DMX data into the network. * **Send sACN If Idle Master**:\ This On/Off button defines if the station transmits sACN data when it is Idle Master. In a session, the Global Master transmits the network DMX. If the station is not in a session with other devices, it is Idle Master. Turning this setting On will make the station output network DMX when it is Idle Master. This must be On if a single station is to output networked DMX. Learn more about standalone devices and networked devices in the [System Overview section](/grandma3/2-3/system/). This setting is individual for each station. * **Output Delay:**\ This can set an output delay between 0ms and 30ms. This delays the entire sACN output compared to the outputs coming from MA-Net devices. | | | | ------------------------------------------------ | -------------------------------------------------------------------------------------------------------------------------------------- | |  | **Important:** | | | \* Enabling Setup Mode allows sACN configuration data to be sent and received even when **Enable Output** and **Enable Input** is Off. | * When Setup Mode is Off and output is enabled, then DMX and configuration data are transmitted. * When Setup Mode is Off and input is enabled, then DMX and configuration data are received. | Below the buttons, there are two tabs: \*\*Data \*\*and **Discovery**. Data is used to set up output and input, while Discovery can be used to see the transmitting nodes in the network. ## Data Tab [Section titled “Data Tab”](#data-tab) The data tab is a grid of rows and columns. Each row is an sACN configuration. The text color of the name field indicates the status of the row. The text on the entire row is red if the row is not valid or not enabled. The name text is flashing green when data is transmitted. It can appear solid green if the output is constantly changing. The name text color is flashing orange when data is received. It can appear solid orange if the input is constantly changing. This is a short description of the columns: * **Lock**:\ The row can be locked to prevent changes. * **No**:\ This is the row number. * **Name**:\ Each row can have a name. This can be used as short info for the row. * **Note:**\ A note can be added to each row for multiline information. * **Tags**:\ Tags can be added to each row. Learn more about tags in the [Tags topic](/grandma3/2-3/tags/). * **Enabled**:\ This Yes or No field enables the row to transmit or receive sACN. Yes is the default. * **Mode**:\ The mode defines what the row is doing. There are four options: * **Output Multicast**:\ When choosing Output Multicast, sACN will be sent as multicast to the relevant multicast addresses. * **Output Unicast**:\ When choosing Output Unicast, a valid IP address has to be entered in the **Destination IP** column. Universes configured in this row will be sent as unicast to this IP address. * **Input Multicast**:\ Input Multicast will join the Multicast group of the relevant DMX Input Universe.\ Input Multicast is limited to max. 20 Universes. A warning pop-up appears if more than 20 rows are configured as Input Multicast, and all rows beyond multicast input row 20 will be invalid. * **Input Unicast**:\ Input Unicast is not limited and receives sACN data for the relevant universe without joining any multicast group. | | | | -------------------------------------------------- | ----------------------------------------------------------------------- | |  | **Restriction:** | | | The total input count (sACN and Art-Net) must not exceed 128 Universes. | * **Destination IP**:\ This field is only active if the output unicast mode is selected. This is the IPv4 address of the receiving device. * **Local Universe**:\ This is the grandMA3 universe to be transmitted or the universe that should receive incoming sACN DMX. If the amount is more than one, then this is the first universe in the range. * **Amount**:\ This is the amount of grandMA3 universes to be transmitted or received. * **sACN Universe**:\ This is the sACN universe number the grandMA3 universes is transmitted to or the universe number that is listened to if Input is selected. If the amount is more than one, then this is the first universe in the range. * **Priority**:\ The allowed value is 0 to 200. The highest number has the highest priority. The default value is 100. This priority is used for transmitted sACN. * **Preview Only**:\ sACN data can be sent as preview data. This can, for instance, be used to send DMX to visualizers. * **TTL** (Time To Live):\ Time To Live is a number used to tell routers and some switches how far through the network the sACN data should be transmitted. This is only relevant for output modes. The default value is 8 and this should usually not be changed. * **Delay**:\ A delay can be set up between each transmitted universe. This can be helpful for older nodes with slower network cards. Sending many universes at once can flood the node. Adding a small delay helps. * **Merge Mode**:\ The Merge Mode defines how incoming sACN merges into universes. When changing the Merge Mode for a configuration line, all universes defined by Local Universe and Amount are changed together. In the DMX Universes-tab of the Patch and Live Patch menu or by editing a universe in the universe pool, it is still possible to change the Merge Mode for single universes independently. As soon as two or more universes of a configuration line have different Merge Modes, the Merge Mode cell will display **…** to indicate this. The Merge Mode and Input Priority are described in the [DMX Port Configuration topic](/grandma3/2-3/dmx_port_config/). * **Input Priority**:\ This is the priority of the received sACN. sACN input of grandMA3 ignores sACN priorities and uses this priority instead. ## Discovery Tab [Section titled “Discovery Tab”](#discovery-tab) This tap displays the transmitting nodes in the network. Each node detected is a row, and each node has one or more sub-rows with “pages”. * **Lock**:\ The row can be locked to prevent changes. * **No**:\ This is the row number. * **Name**:\ Each row gets a name from the device. The name cannot be edited. * **Universe List**:\ This is a list of the universes the node transmits.
# DMX Port Configuration
> The DMX outputs and inputs are configured in the Output Configuration menu. They are labeled from A and alphabetically upwards.
The DMX outputs and inputs are configured in the **Output Configuration** menu. They are labeled from **A** and alphabetically upwards. There are many columns for SMPTE, MIDI, DC, and Ethernet interfaces, but these elements are not described in this topic. Please read about them in the [Timecode section](/grandma3/2-3/timecode/), [Remote In and Out topic](/grandma3/2-3/remote_inputs/), and [Ethernet DMX](/grandma3/2-3/dmx_ethernet/). 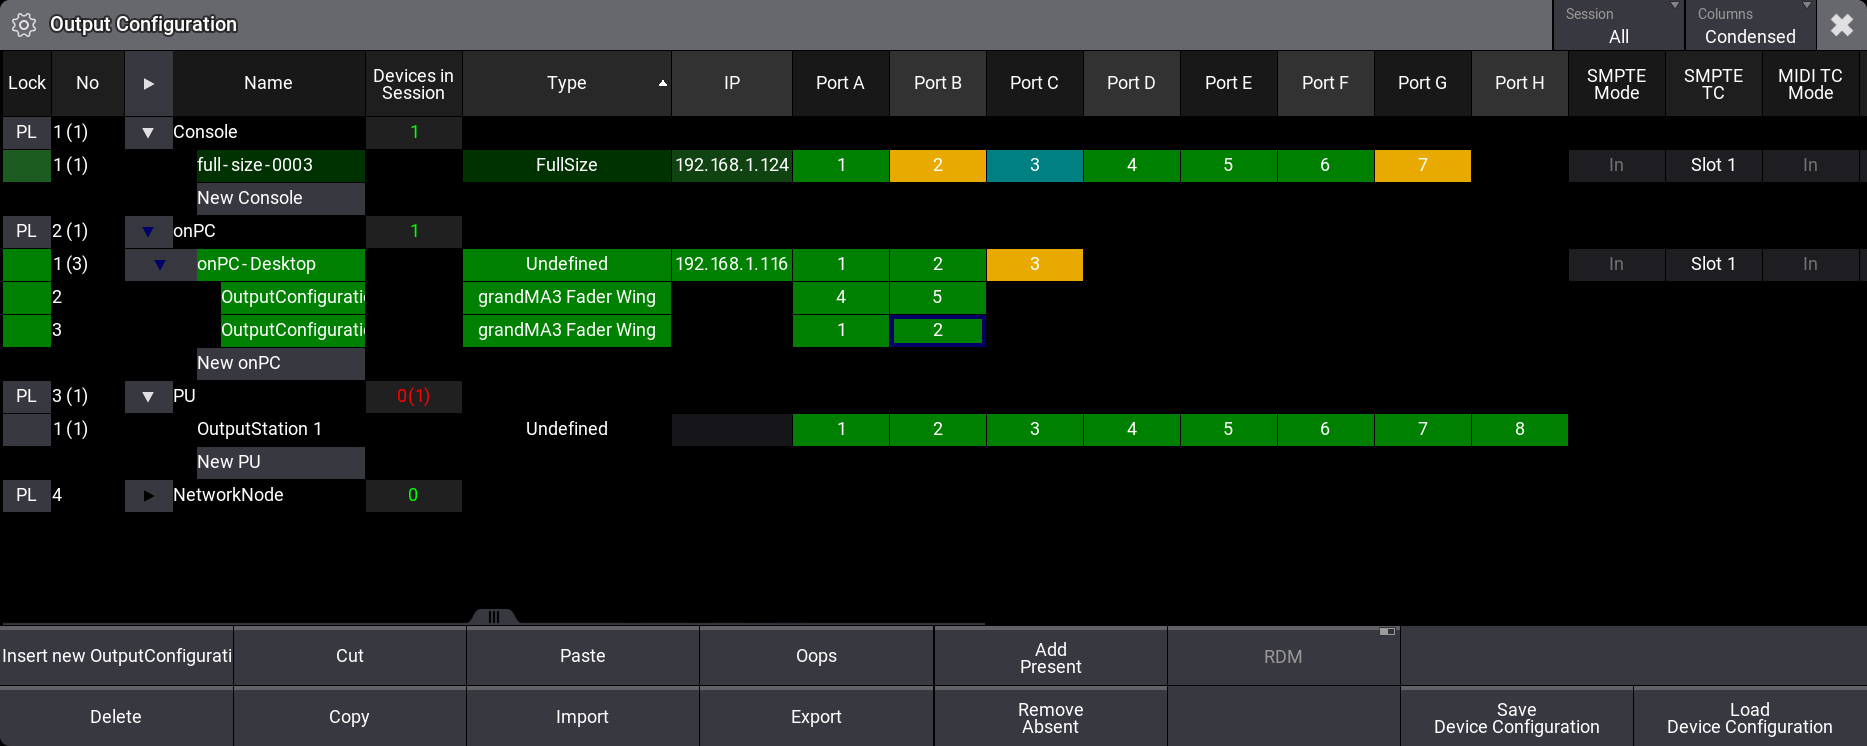 *Output configuration menu with console onPC and PU* Access the menu by pressing the Menu key and then tap Connector Configuration. -OR- Use the command line to open the menu: | | | | ------------------------------------------------------------------ | ------------------------------------------ | |  | User name\[Fixture]>Menu “ConnectorConfig” | [ Paste to Command Line](#ma_cmd?Menu%20%22ConnectorConfig%22) | | | | ------------------------------------------ | ----------------------------------------------------------------------------------------------- | |  | **Hint:** | | | See [Ethernet DMX](/grandma3/2-3/dmx_ethernet/) for how to send and receive DMX using Ethernet. | The menu lists grandMA3 devices. There is a button in the title bar called Session. This filters the list to show **All** devices in the network or only the ones **In Session**. The devices are organized in Console, onPC, PU, and NetworkNode sections that can be unfolded to see the devices in each category. Real hardware devices are matched to devices in this list by IP addresses. There is a **Devices in Session** column. It shows the number of each device type in session with the current device in green. If a device is missing, the number is red, and the expected number is in parentheses next to the actual number of devices. The menu has different modes for displaying columns. There is a button in the title bar called Columns. This has three modes: * **Full**:\ This shows all columns. * **Condensed**:\ This mode condenses the XLR columns to one for each port and displays all other columns. * **XLR Only**:\ This only shows the XLR ports in a condensed version. | | | | ------------------------------------------ | ------------------------------------------------------------------------------------------------------------------------------------------------------------------------------------------------------------------------------------------------------------------------------------------------------------------------------------------------------------------------------------------------------------------------------------------------------------------ | |  | **Hint:** | | | Read the [What are Timecode Slots topic](/grandma3/2-3/timecode_slots/) to learn about the SMPTE and MIDI settings.Read the [DC Remotes topic](/grandma3/2-3/remote_inputs_dc/) to learn about the DC Start setting.Read the [Ethernet DMX topics](/grandma3/2-3/dmx_ethernet/) to learn about the Art-Net and sACN settings.Read the [OSC topic](/grandma3/2-3/keyword_osc/) and the [PSN topic](/grandma3/2-3/remote_inputs_psn/) to learn about these settings. | ## DMX Ports [Section titled “DMX Ports”](#dmx-ports) Each DMX port has four different settings (only visible when in **Full** mode): **Mode:** Each port can have four different modes: * **Off** (gray background color in the cell):\ The port is turned Off. * **Out** (green background color in the cell):\ DMX is sent out without RDM traffic. The universe is defined in the XLR field. This is the default mode.\ DMX refresh rate is a constant at 30 Hz. DMX refresh rates define how many times a DMX universe is sent per second. Learn more about refresh rates in the [DMX In and Out Topic](/grandma3/2-3/dmx/#h2_49605550). * **RDM** (dark sea green background color in the cell):\ DMX is sent out, and RDM is active. The universe is defined in the XLR field.\ DMX refresh rate is variable and can change between 1 Hz to 30 Hz. DMX refresh rates define how many times a DMX universe is sent per second. Learn more about refresh rates in the [DMX In and Out Topic](/grandma3/2-3/dmx/#h2_49605550). * **In** (yellow background color in the cell):\ DMX is received and merged into the universe specified by the XLR number. The merge uses the priority defined in Prio. **Failure Mode:** This setting defines the failure behavior for the DMX port. A failure could be the software application crashing. A set of “Timeout” values can be chosen to select a predefined time for which the last calculated DMX output should be maintained. When the timeout runs out, then the DMX output will stop. A “Hold” value will hold the DMX output as long as there is power. **XLR:** This is a number that defines what universe the port relates to. Fixtures can be patched in universes 1 to 1 024. **Merge:** This option is only visible when the port mode is **In**. The options are: * **Off**:\ The incoming DMX is not merged. * **Prio**:\ The priority set in the **Prio** column is used. The highest priority wins. * **HTP**:\ The highest DMX value is used. * **LowTP**:\ The lowest DMX value is used. **Prio (Priority):** The priority is used for merging DMX inputs. It is only used and can only be edited when the port mode is **In**, and the merge is set to **Prio**. Editing this field opens a small select pop-up with the options. The options are (from highest priority to lowest): * **Super**:\ This priority is the LTP priority above any other playbacks and even above the programmer. * **Prog**:\ The Programmer priority is between Super and the other priorities. * **Highest**:\ Highest LTP priority - like LTP but higher than both LTP and High. * **High**:\ High LTP priority - like LTP but a higher priority than normal LTP. * **LTP (Latest Takes Precedence)**:\ This is the normal LTP priority. The newest attribute value is prioritized over the old value. * **Low**:\ Low LTP - This is a lower LTP priority. * **Lowest**:\ Lowest LTP - This is a lower priority than both LTP and Low. | | | | ------------------------------------------------ | ---------------------------------------------------------------------------------------------------------------------------------------------------------------------------------------------------- | |  | **Important:** | | | The port configuration is stored in each device where it is set. The device’s port configuration is retained when it connects to a session until it is changed while it is connected to a session. | *** ## Import and Export of Entire Device Configuration [Section titled “Import and Export of Entire Device Configuration”](#import-and-export-of-entire-device-configuration) The device configuration for all the devices in the list can be stored in a single configuration file. This configuration can then be loaded again to restore the settings based on the file. This makes storing and loading configurations for different shows or setups easy. | | | | ------------------------------------------ | ------------------------------------------------------------------------------------------------------------------------------------------------------ | |  | **Hint:** | | | The device configuration file includes the Output Configuration and the DMX Protocol ([Ethernet DMX](/grandma3/2-3/dmx_ethernet/) protocols) settings. | ### Save Device Configuration [Section titled “Save Device Configuration”](#save-device-configuration) 1. Make sure the configuration is as desired. 2. Tap Save Device Configuration. This opens the **Save Device Configuration as:** pop-up. 3. Type a name for the configuration and ensure the desired drive is selected in the title bar of the pop-up. 4. Tap Save. ### Load Device Configuration [Section titled “Load Device Configuration”](#load-device-configuration) 1. Tap Load Device Configuration. This opens the **Load DeviceConfiguration from:** pop-up. 2. Select the desired configuration file. 3. Tap Load. ## Import and Export of Output Configuration for Single Devices [Section titled “Import and Export of Output Configuration for Single Devices”](#import-and-export-of-output-configuration-for-single-devices) Each device keeps its own output configuration. The configuration of single devices can be exported to a file and then imported again. ### Export an Output Configuration [Section titled “Export an Output Configuration”](#export-an-output-configuration) 1. Select the devices that need to be exported. 2. Tap the Export button -> a file browser opens. 3. Select the desired drive. 4. Give the file a name and tap enter/please. A file can contain the configuration for one or multiple devices. It is just a matter of selecting one or several devices before the export. ### Import an Output Configuration [Section titled “Import an Output Configuration”](#import-an-output-configuration) 1. Select the desired devices. 2. Tap the Import button -> a file browser opens. 3. Select the desired drive. 4. Select the files that have a configuration for the selected devices. ## Add and Remove Devices [Section titled “Add and Remove Devices”](#add-and-remove-devices) The list of devices is automatically updated with new devices in the network. Tapping Add Present updates the list with new devices. Tapping Remove Absent removes devices from the list that are no longer in the network. Devices can be added without being present in the network. Unfold the desired device type in the list and tap the New \[device type] followed by Insert new \[device type]. The grandMA3 onPC’s can be expanded further by adding up to two grandMA3 Fader Wings to each grandMA3 onPC. ## []()Show Connectors [Section titled “Show Connectors”](#show-connectors) On the light and full-size consoles, there is a button called Show Connectors. This can be toggled On and shows an image with the relevant connectors on the letterbox screens. This indicates where the different connectors are located on the back of the console. The XLR ports are labeled DMX A to DMX G in this image.  Connector image on the right letterbox screen (grandMA3 full-size model) The image can also be toggled using the following command: | | | | ------------------------------------------------------------------ | ---------------------------------------- | |  | User name\[Fixture]>Menu “ConnectorView” |
# Connector Pin Assignment
> This page gives an overview of all connectors and their respective pinouts.
This page gives an overview of all connectors and their respective pinouts. *** ## ## []()XLR Connectors [Section titled “XLR Connectors”](#xlr-connectors)  For more information, see [Connect Desk Light](/grandma3/2-3/fs_connect_desk_light/). ###  [Section titled “ ”](#-) For more information, see [Connect DMX](/grandma3/2-3/fs_connect_dmx/). ###  [Section titled “”](#-1) For more information, see [Connect LTC](/grandma3/2-3/fs_connect_smpte_ltc/). \ For more information, see [Connect Audio In](/grandma3/2-3/fs_connect_audio_in/). ## []() [Section titled “”](#-2) *** ## D-Sub Connectors [Section titled “D-Sub Connectors”](#d-sub-connectors)  GPI for grandMA3 consoles, grandMA3 onPC command wing, command wing XT
# grandMA3 compact
> grandMA3 compact front panel
 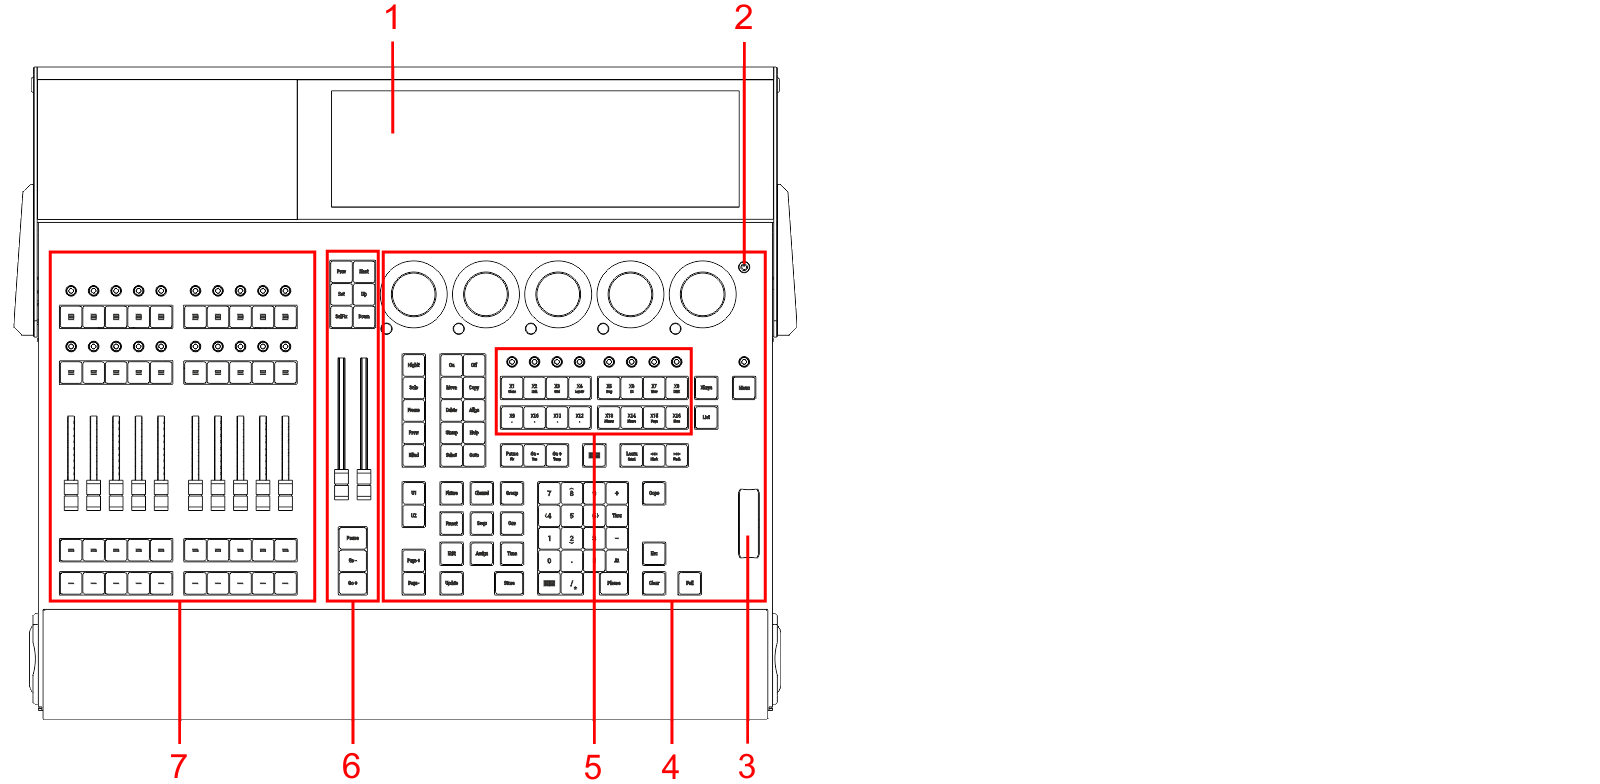 *grandMA3 compact front panel* 1. [Screen 1](/grandma3/2-3/do_screen_allocation/) 2. [Power key](/grandma3/2-3/key_power/) 3. [Level wheel](/grandma3/2-3/do_control_level/) 4. [Command section](/grandma3/2-3/do_control_command/) 5. [Xkeys](/grandma3/2-3/do_control_executor/) 6. [Master section](/grandma3/2-3/do_control_master/) 7. [Executor section](/grandma3/2-3/do_control_executor/)  grandMA3 compact rear panel 1. [](/grandma3/2-3/fs_connect_dmx/)[DMX-512-A A-F (5pin XLR female) + G (5pin XLR male)](/grandma3/2-3/fs_connect_dmx/) 2. [MIDI In+Out](/grandma3/2-3/remote_inputs/) 3. [LTC](/grandma3/2-3/fs_connect_smpte_ltc/) 4. [USB 2.0](/grandma3/2-3/fs_connect_usb/) 5. [Audio Remote In](/grandma3/2-3/fs_connect_audio_in/) 6. [S/PDIF In+Out](/grandma3/2-3/do_connector_pin_assignment/#RCA) 7. [DC Remote Control](/grandma3/2-3/fs_connect_dc_remote_in/) 8. [DisplayPort 1](/grandma3/2-3/fs_connect_external_screens/) 9. [USB 3.0](/grandma3/2-3/fs_connect_usb/) 10. [Ethernet 1-3](/grandma3/2-3/fs_connect_ethernet/) 11. [powerCON TRUE1](/grandma3/2-3/fs_connect_power/) 12. Power switch 13. [Desk light](/grandma3/2-3/fs_connect_desk_light/) For technical specifications, see [Technical Data](/grandma3/2-3/key_consoles_technical_data/) in the [grandMA3 Quick Manual consoles](/grandma3/2-3/grandma3_quick_manual_consoles/).
# grandMA3 compact XT
> grandMA3 compact XT front panel
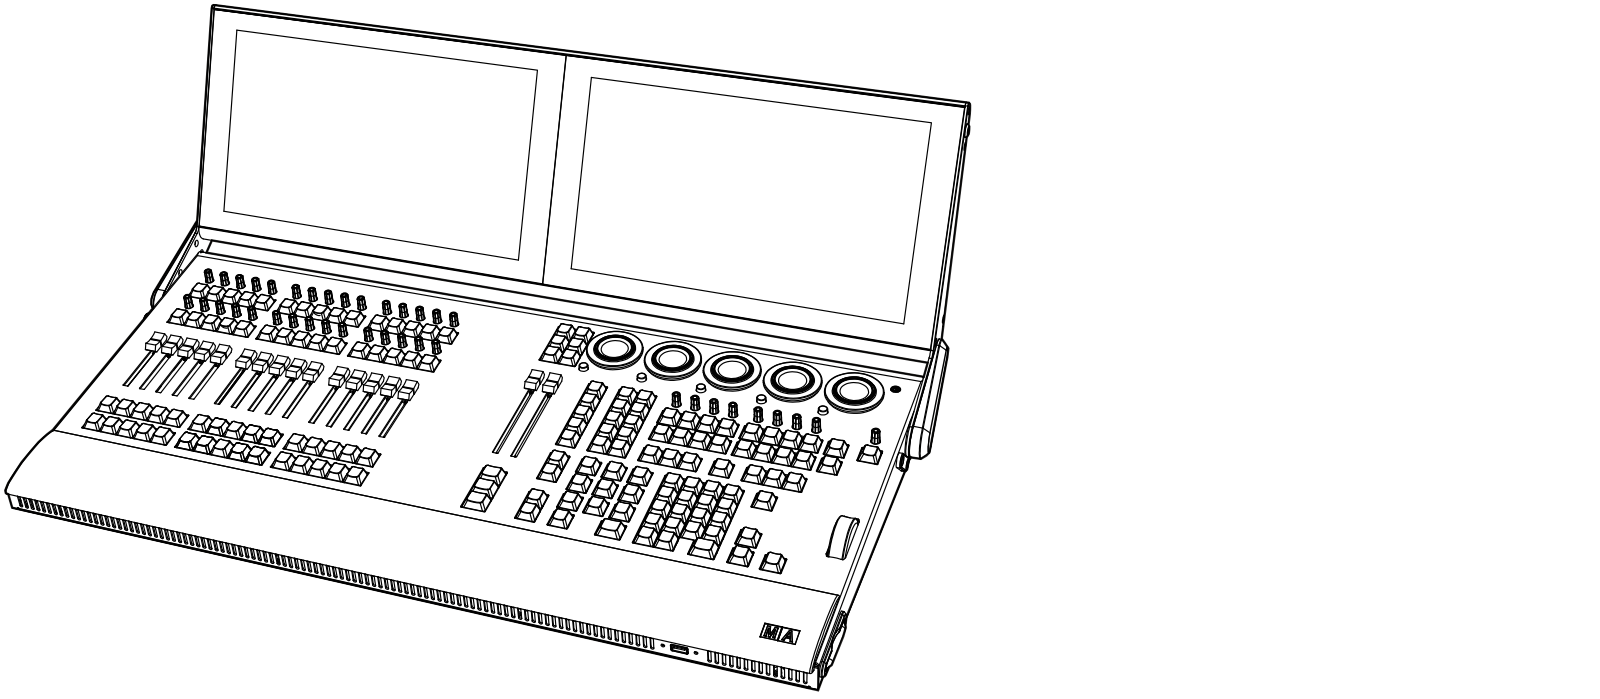 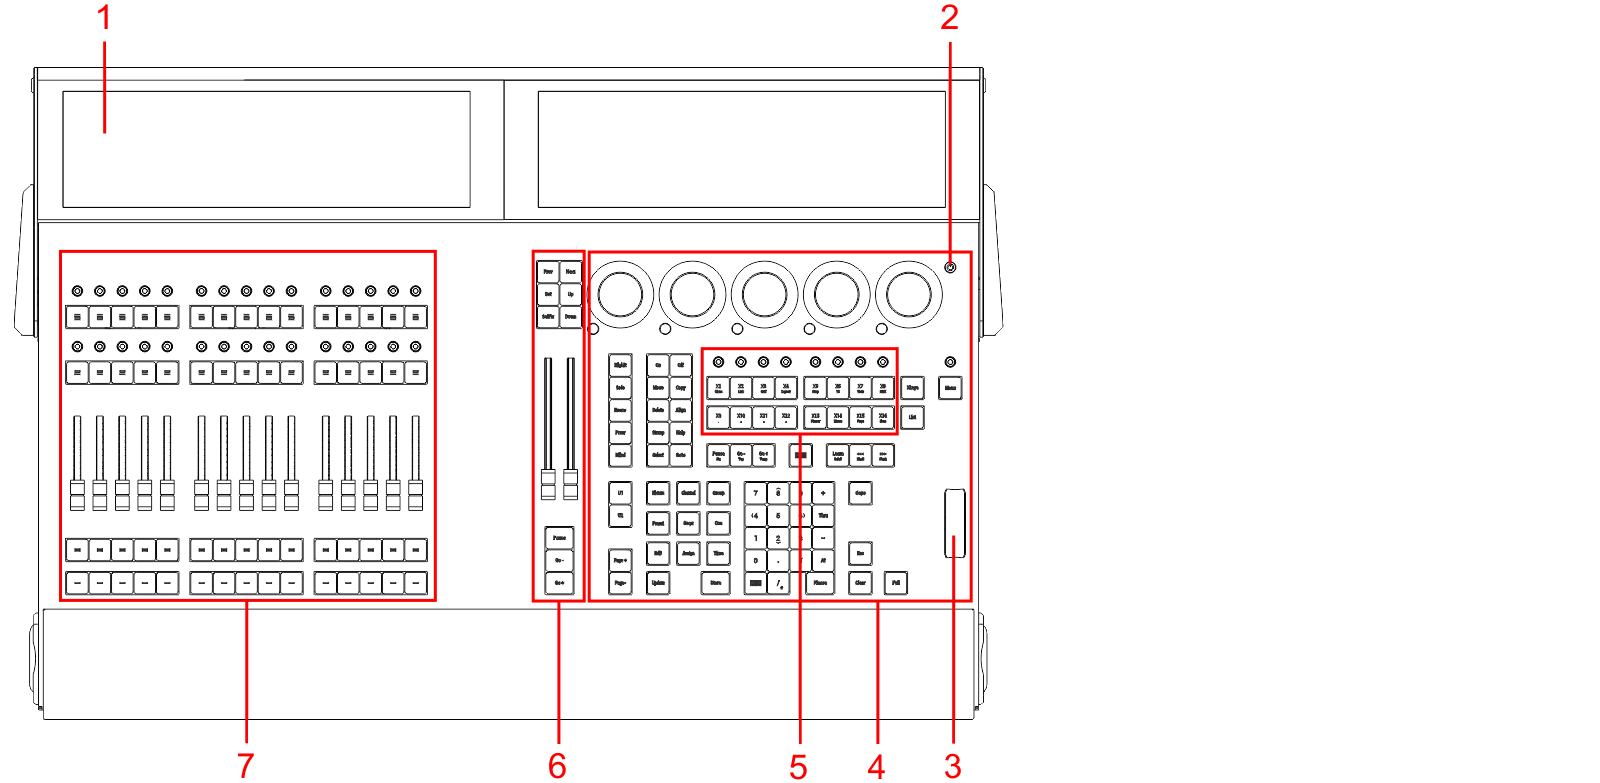 *grandMA3 compact XT front panel* 1. [Screens 1+2](/grandma3/2-3/do_screen_allocation/) 2. [Power key](/grandma3/2-3/key_power/) 3. [Level wheel](/grandma3/2-3/do_control_level/) 4. [Command section](/grandma3/2-3/do_control_command/) 5. [Xkeys](/grandma3/2-3/do_control_executor/) 6. [Master section](/grandma3/2-3/do_control_master/) 7. [Executor section](/grandma3/2-3/do_control_executor/)  grandMA3 compact XT rear panel 1. [](/grandma3/2-3/fs_connect_dmx/)[DMX-512-A A-F (5pin XLR female) + G (5pin XLR male)](/grandma3/2-3/fs_connect_dmx/) 2. [MIDI In+Out](/grandma3/2-3/remote_inputs/) 3. [LTC](/grandma3/2-3/fs_connect_smpte_ltc/) 4. [USB 2.0](/grandma3/2-3/fs_connect_usb/) 5. [Audio Remote In](/grandma3/2-3/fs_connect_audio_in/) 6. [S/PDIF In+Out](/grandma3/2-3/do_connector_pin_assignment/#RCA) 7. [DC Remote Control](/grandma3/2-3/fs_connect_dc_remote_in/) 8. [DisplayPort 1](/grandma3/2-3/fs_connect_external_screens/) 9. [USB 3.0](/grandma3/2-3/fs_connect_usb/) 10. [Ethernet 1-3](/grandma3/2-3/fs_connect_ethernet/) 11. [powerCON TRUE1](/grandma3/2-3/fs_connect_power/) 12. Power switch 13. [Desk light](/grandma3/2-3/fs_connect_desk_light/) For technical specifications, see [Technical Data](/grandma3/2-3/key_consoles_technical_data/) in the [grandMA3 Quick Manual consoles](/grandma3/2-3/grandma3_quick_manual_consoles/).
# grandMA3 full-size
> grandMA3 full-size front panel
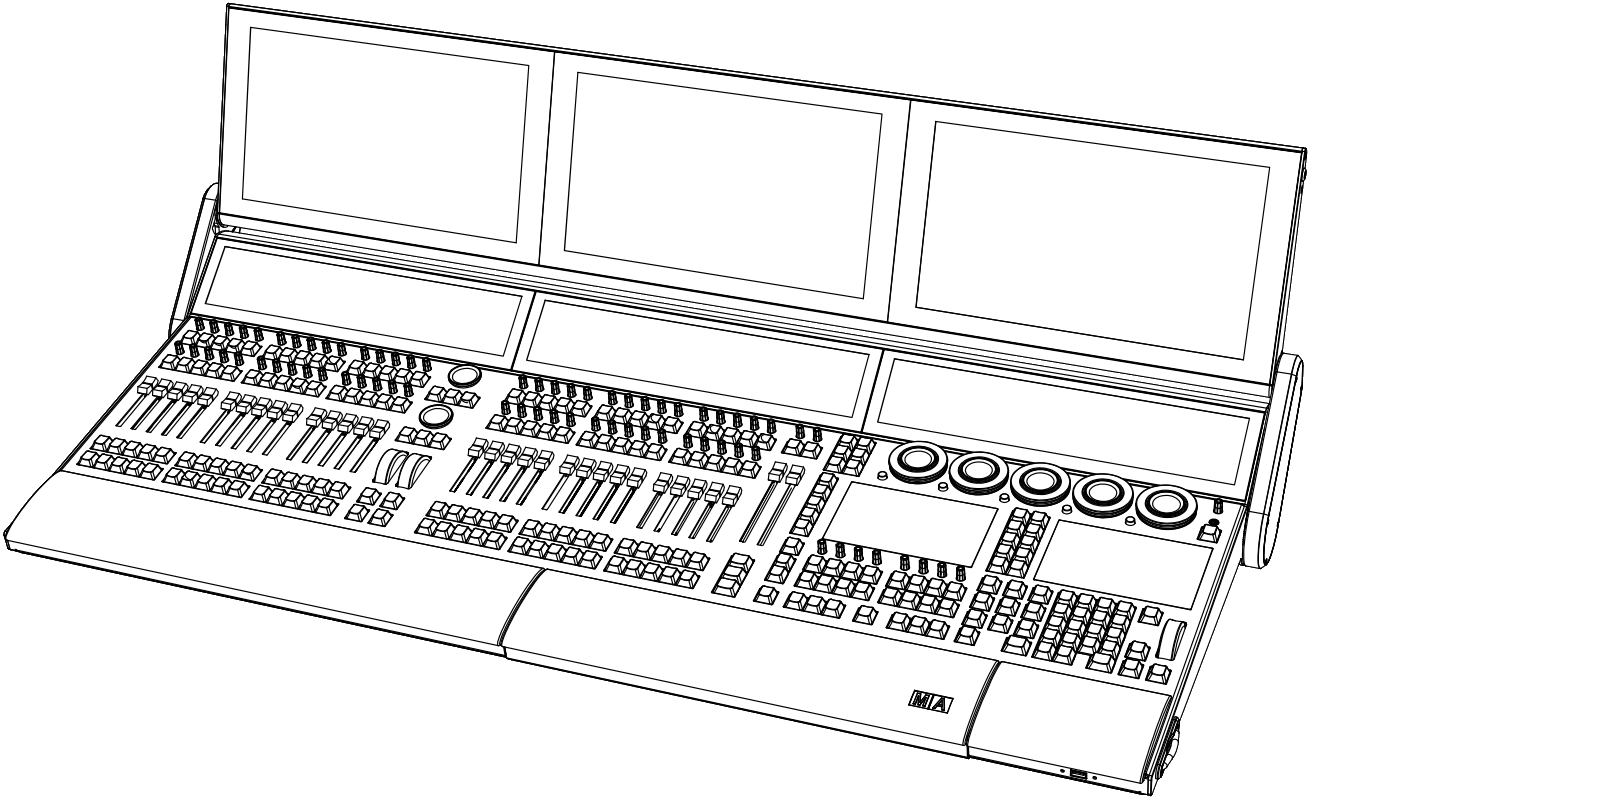 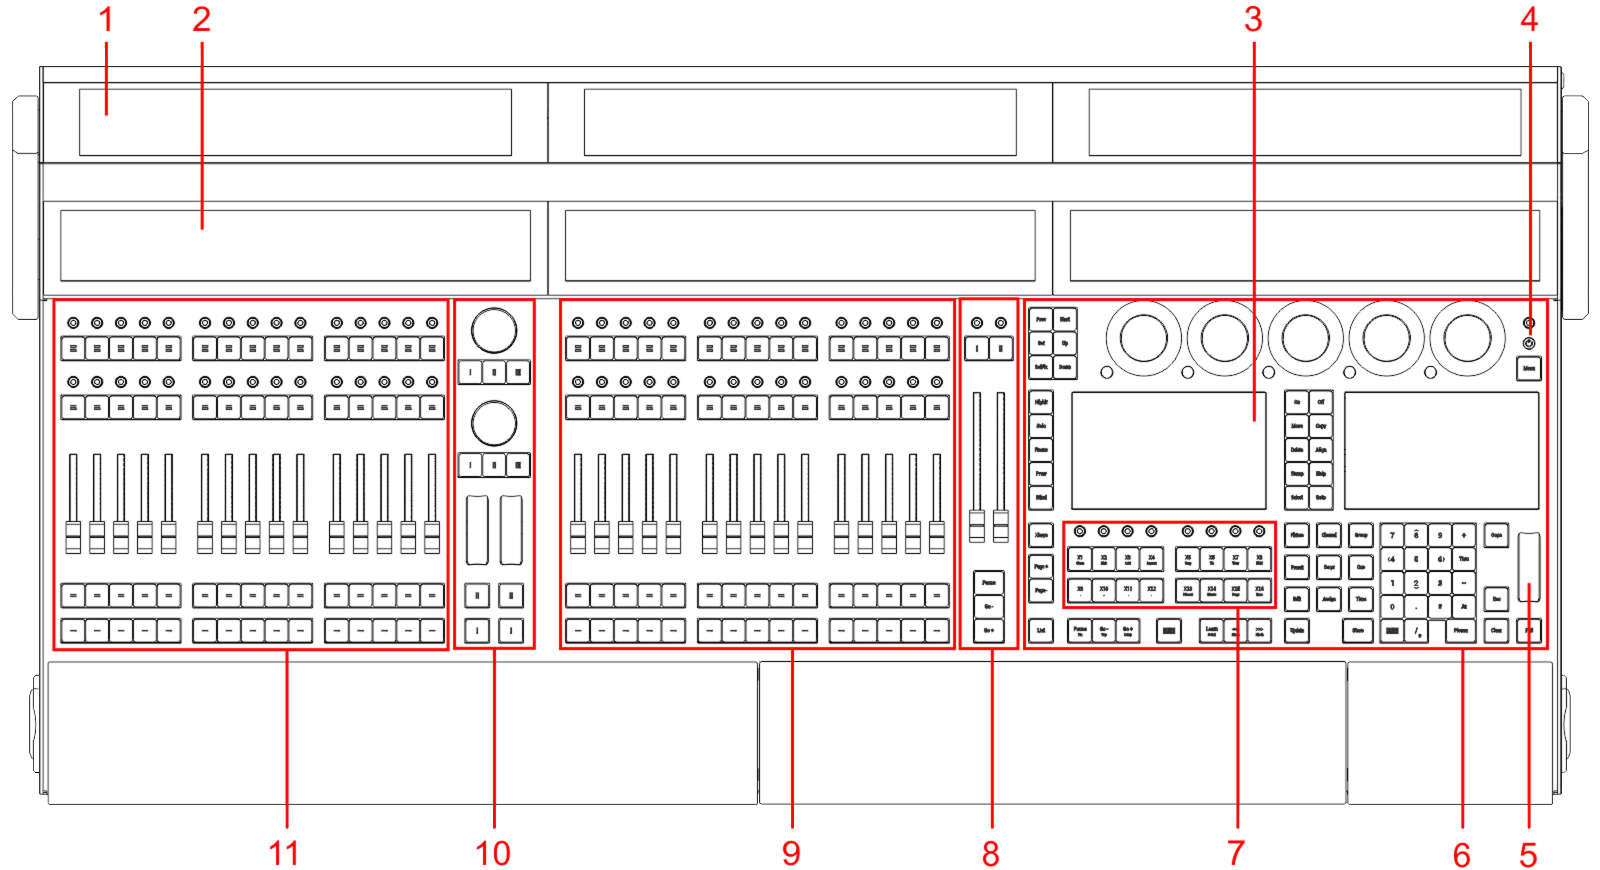 *grandMA3 full-size front panel* 1. [Screens 1-3](/grandma3/2-3/do_screen_allocation/) 2. [Letterbox screens 8-10](/grandma3/2-3/do_screen_allocation/) 3. [Command screens 6+7](/grandma3/2-3/do_screen_allocation/) 4. [Power key](/grandma3/2-3/key_power/) 5. [Level wheel](/grandma3/2-3/do_control_level/) 6. [Command area](/grandma3/2-3/do_control_command/) 7. [Xkeys section](/grandma3/2-3/do_control_executor/) 8. [Master area](/grandma3/2-3/do_control_master/) 9. [Right executor area with 3 executor sections](/grandma3/2-3/do_control_executor/) 10. [Custom area](/grandma3/2-3/do_console_fullsize/#custom_section) 11. [Left executor area with 3 executor sections](/grandma3/2-3/do_control_executor/)  *grandMA3 full-size rear panel* 1. [Desk light](/grandma3/2-3/fs_connect_desk_light/) 2. [powerCON TRUE1](/grandma3/2-3/fs_connect_power/) 3. Power switch 4. [DMX-512-A A-F (5pin XLR female) + G (5pin XLR male)](/grandma3/2-3/fs_connect_dmx/) 5. [DisplayPort 4+5](/grandma3/2-3/fs_connect_external_screens/) 6. [LTC](/grandma3/2-3/fs_connect_smpte_ltc/) 7. [USB 3.0](/grandma3/2-3/fs_connect_usb/) 8. [Audio Remote In](/grandma3/2-3/fs_connect_audio_in/) 9. [DC Remote Control](/grandma3/2-3/fs_connect_dc_remote_in/) 10. [Ethernet 1-3](/grandma3/2-3/fs_connect_ethernet/) 11. [S/PDIF In+Out](/grandma3/2-3/do_connector_pin_assignment/#RCA) 12. [USB 2.0](/grandma3/2-3/fs_connect_usb/) 13. [MIDI In+Out](/grandma3/2-3/remote_inputs/) | | | | ------------------------------------------ | --------------------------------------------------------------------------------------------------------------------------------------------------------------------------------------------------------- | |  | **Hint:** | | | For command line and graphical user interface access to an image showing the connectors on the back of the console, see the [DMX Port Configuration](/grandma3/2-3/dmx_port_config/#h2__474686261) topic. | For technical specifications, see [Technical Data](/grandma3/2-3/key_consoles_technical_data/) in the [grandMA3 Quick Manual consoles](/grandma3/2-3/grandma3_quick_manual_consoles/).
# grandMA3 full-size CRV
> grandMA3 full-size CRV front panel
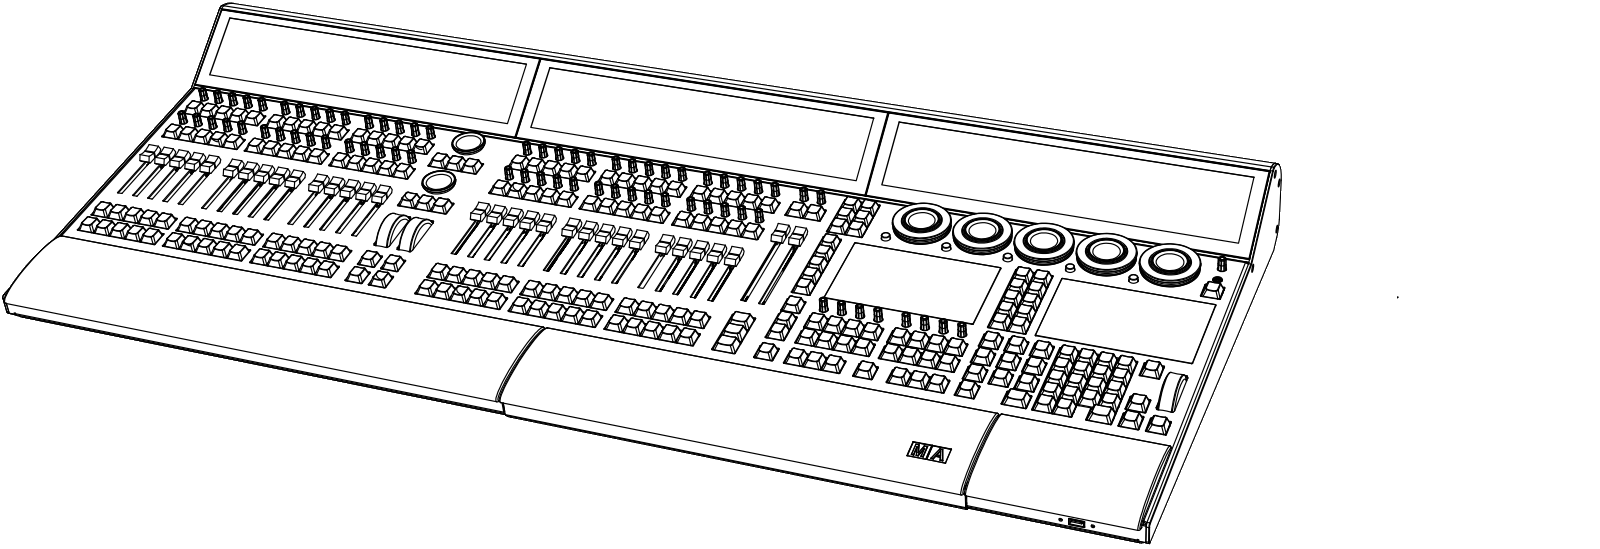 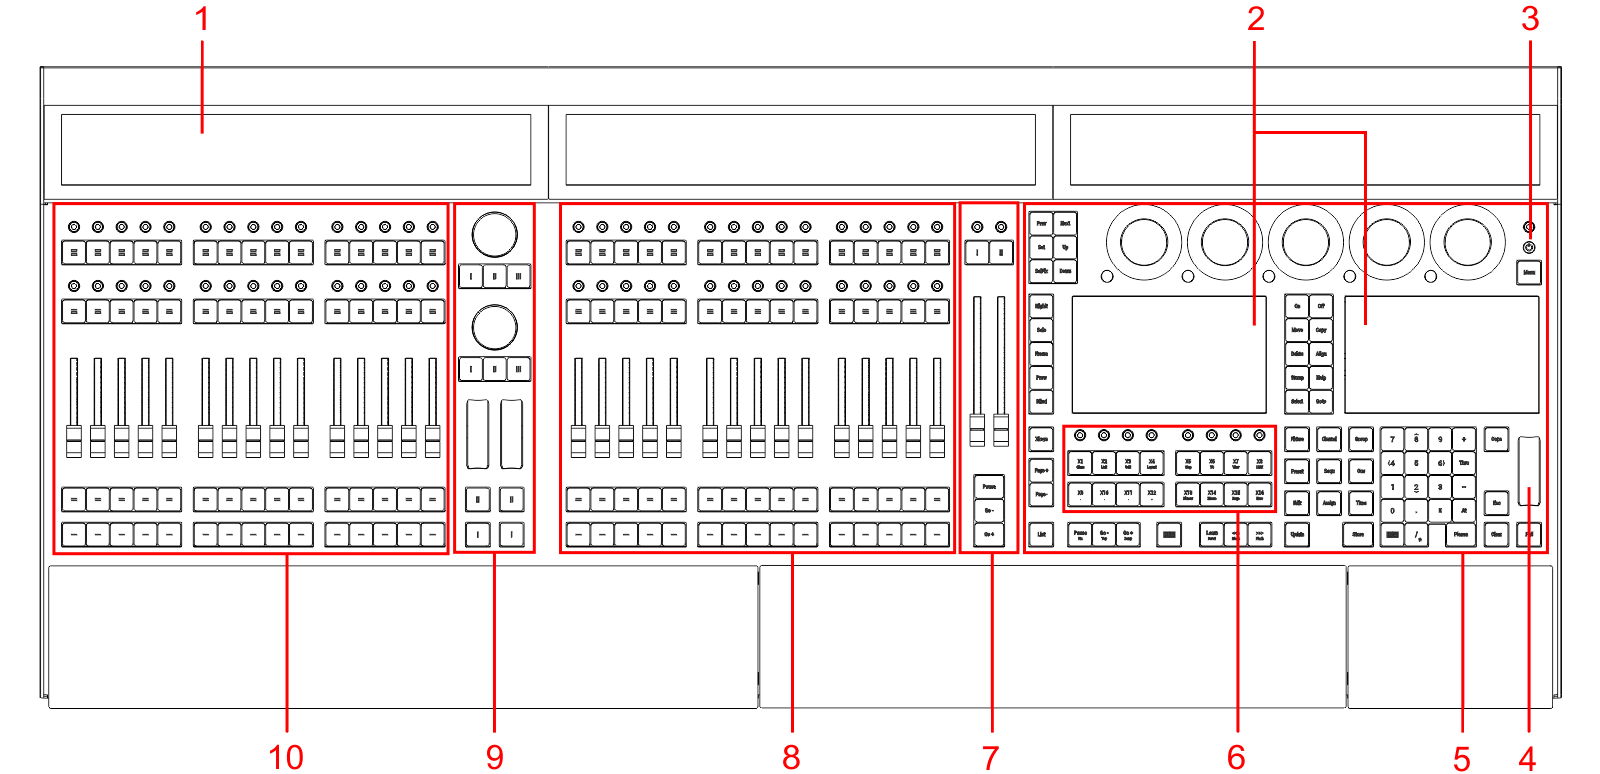 *grandMA3 full-size CRV front panel* 1. [Letterbox screens 8-10](/grandma3/2-3/do_screen_allocation/) 2. [Command screens 6+7](/grandma3/2-3/do_screen_allocation/) 3. [Power key](/grandma3/2-3/key_power/) 4. [Level wheel](/grandma3/2-3/do_control_level/) 5. [Command area](/grandma3/2-3/do_control_command/) 6. [Xkeys section](/grandma3/2-3/do_control_executor/) 7. [Master area](/grandma3/2-3/do_control_master/) 8. [Right executor area with 3 executor sections](/grandma3/2-3/do_control_executor/) 9. [Custom area](/grandma3/2-3/do_console_fullsize_crv/#custom_section) 10. [Left executor area with 3 executor sections](/grandma3/2-3/do_control_executor/)  *grandMA3 full-size CRV rear panel* 1. [Desk light](/grandma3/2-3/fs_connect_desk_light/) 2. [powerCON TRUE1](/grandma3/2-3/fs_connect_power/) 3. Power switch 4. [](/grandma3/2-3/fs_connect_dmx/)[DMX-512-A A-F (5pin XLR female) + G (5pin XLR male)](/grandma3/2-3/fs_connect_dmx/)[](/grandma3/2-3/fs_connect_dmx/) 5. [DisplayPort 1-5](/grandma3/2-3/fs_connect_external_screens/) 6. [LTC](/grandma3/2-3/fs_connect_smpte_ltc/) 7. [USB 3.0](/grandma3/2-3/fs_connect_usb/) 8. [Audio Remote In](/grandma3/2-3/fs_connect_audio_in/) 9. [DC Remote Control](/grandma3/2-3/fs_connect_dc_remote_in/) 10. [Ethernet 1-3](/grandma3/2-3/fs_connect_ethernet/) 11. [S/PDIF In+Out](/grandma3/2-3/do_connector_pin_assignment/#RCA) 12. [USB 2.0](/grandma3/2-3/fs_connect_usb/) 13. [MIDI In+Out](/grandma3/2-3/remote_inputs/) | | | | ------------------------------------------ | --------------------------------------------------------------------------------------------------------------------------------------------------------------------------------------------------------- | |  | **Hint:** | | | For command line and graphical user interface access to an image showing the connectors on the back of the console, see the [DMX Port Configuration](/grandma3/2-3/dmx_port_config/#h2__474686261) topic. | For technical specifications, see [Technical Data](/grandma3/2-3/key_consoles_technical_data/) in the [grandMA3 Quick Manual consoles](/grandma3/2-3/grandma3_quick_manual_consoles/).
# grandMA3 light
> grandMA3 light front panel
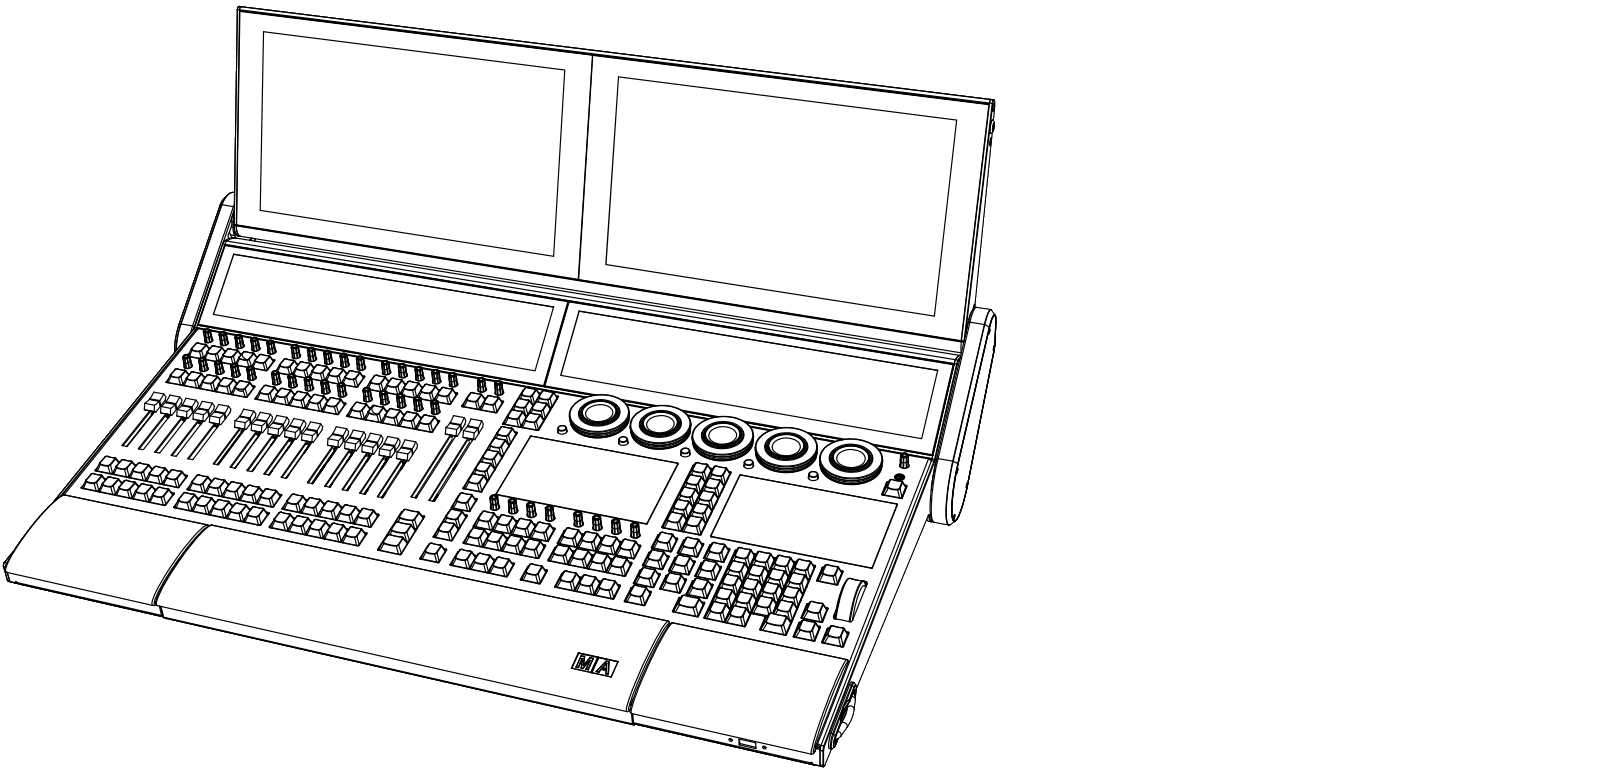 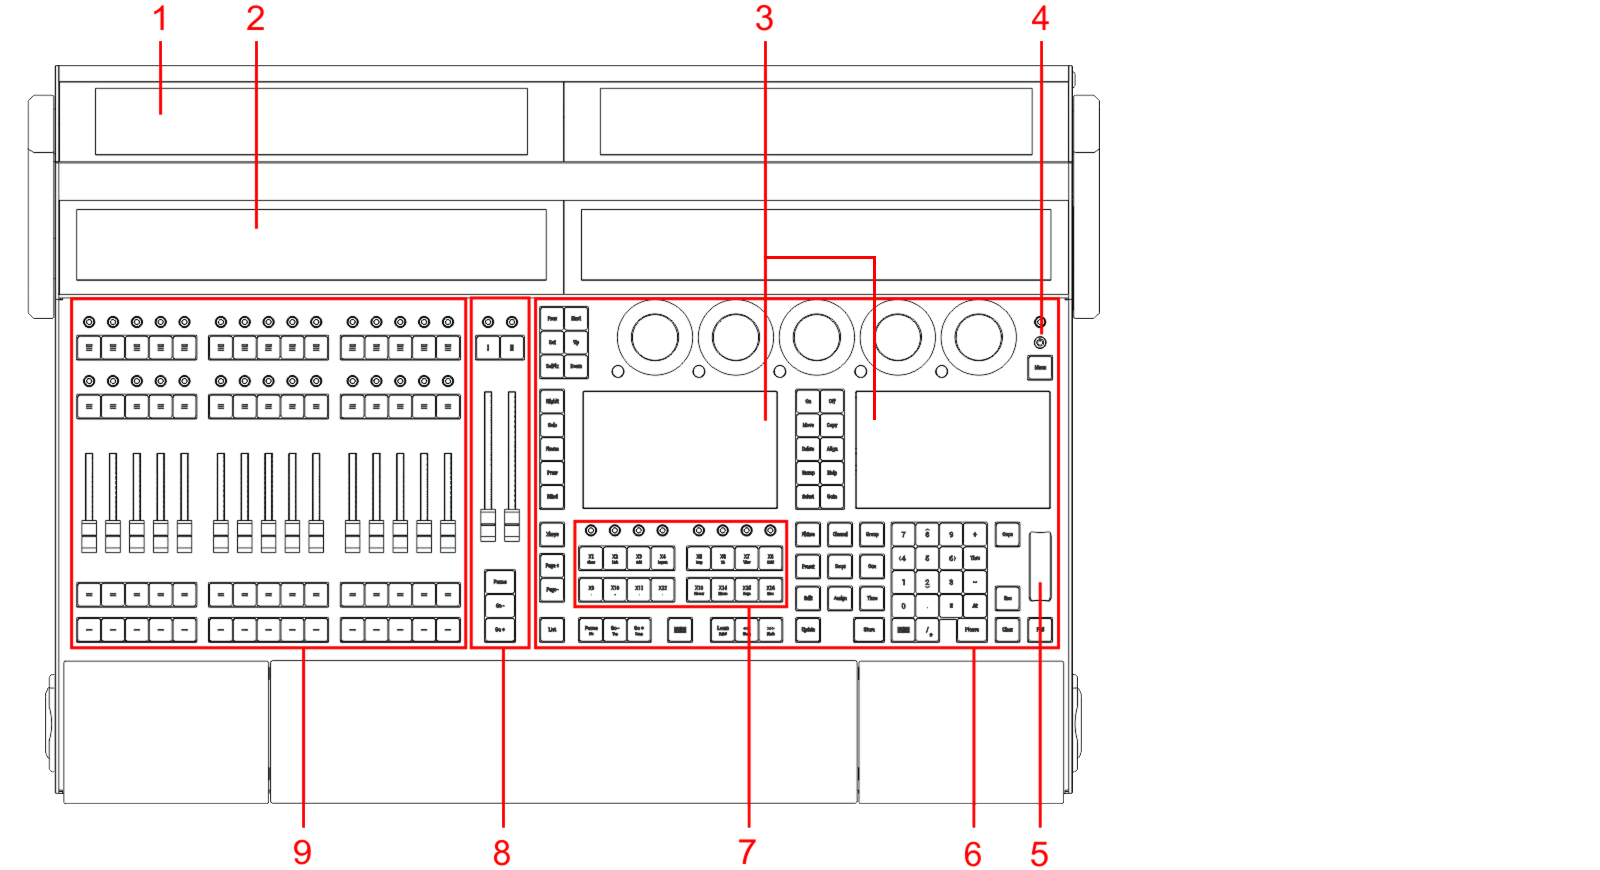 *grandMA3 light front panel* 1. [Screens 1+2](/grandma3/2-3/do_screen_allocation/) 2. [Letterbox screens 8+9](/grandma3/2-3/do_screen_allocation/) 3. [Command screens 6+7](/grandma3/2-3/do_screen_allocation/) 4. [Power key](/grandma3/2-3/key_power/) 5. [Level wheel](/grandma3/2-3/do_control_level/) 6. [Command area](/grandma3/2-3/do_control_command/) 7. [Xkeys section](/grandma3/2-3/do_control_executor/) 8. [Master area](/grandma3/2-3/do_control_master/) 9. [Executor area with 3 executor sections](/grandma3/2-3/do_control_executor/)  *grandMA3 light rear panel* 1. [Desk light](/grandma3/2-3/fs_connect_desk_light/) 2. [powerCON TRUE1](/grandma3/2-3/fs_connect_power/) 3. Power switch 4. [](/grandma3/2-3/fs_connect_dmx/)[DMX-512-A A-F (5pin XLR female) + G (5pin XLR male)](/grandma3/2-3/fs_connect_dmx/) 5. [DisplayPort 4+5](/grandma3/2-3/fs_connect_external_screens/) 6. [LTC](/grandma3/2-3/fs_connect_smpte_ltc/) 7. [USB 3.0](/grandma3/2-3/fs_connect_usb/) 8. [Audio Remote In](/grandma3/2-3/fs_connect_audio_in/) 9. [DC Remote Control](/grandma3/2-3/fs_connect_dc_remote_in/) 10. [Ethernet 1-3](/grandma3/2-3/fs_connect_ethernet/) 11. [S/PDIF In+Out](/grandma3/2-3/do_connector_pin_assignment/#RCA) 12. [USB 2.0](/grandma3/2-3/fs_connect_usb/) 13. [MIDI In+Out](/grandma3/2-3/remote_inputs/) | | | | ------------------------------------------ | --------------------------------------------------------------------------------------------------------------------------------------------------------------------------------------------------------- | |  | **Hint:** | | | For command line and graphical user interface access to an image showing the connectors on the back of the console, see the [DMX Port Configuration](/grandma3/2-3/dmx_port_config/#h2__474686261) topic. | For technical specifications, see [Technical Data](/grandma3/2-3/key_consoles_technical_data/) in the [grandMA3 Quick Manual consoles](/grandma3/2-3/grandma3_quick_manual_consoles/).
# grandMA3 light CRV
> grandMA3 light CRV front panel
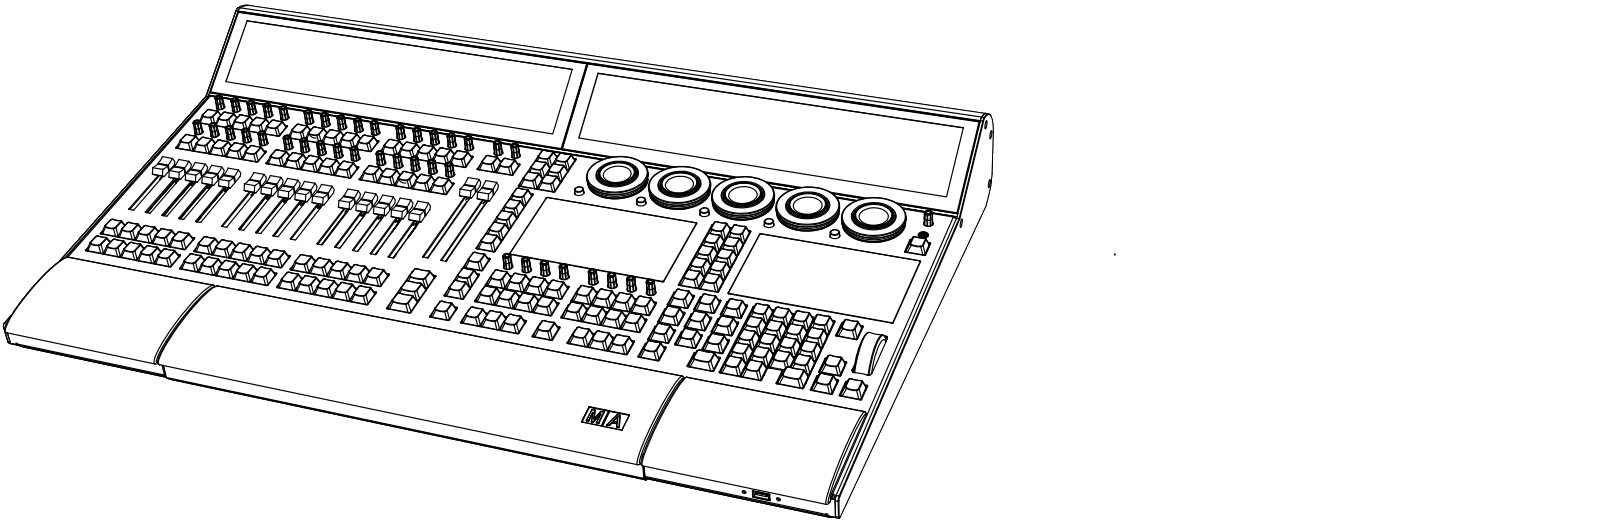 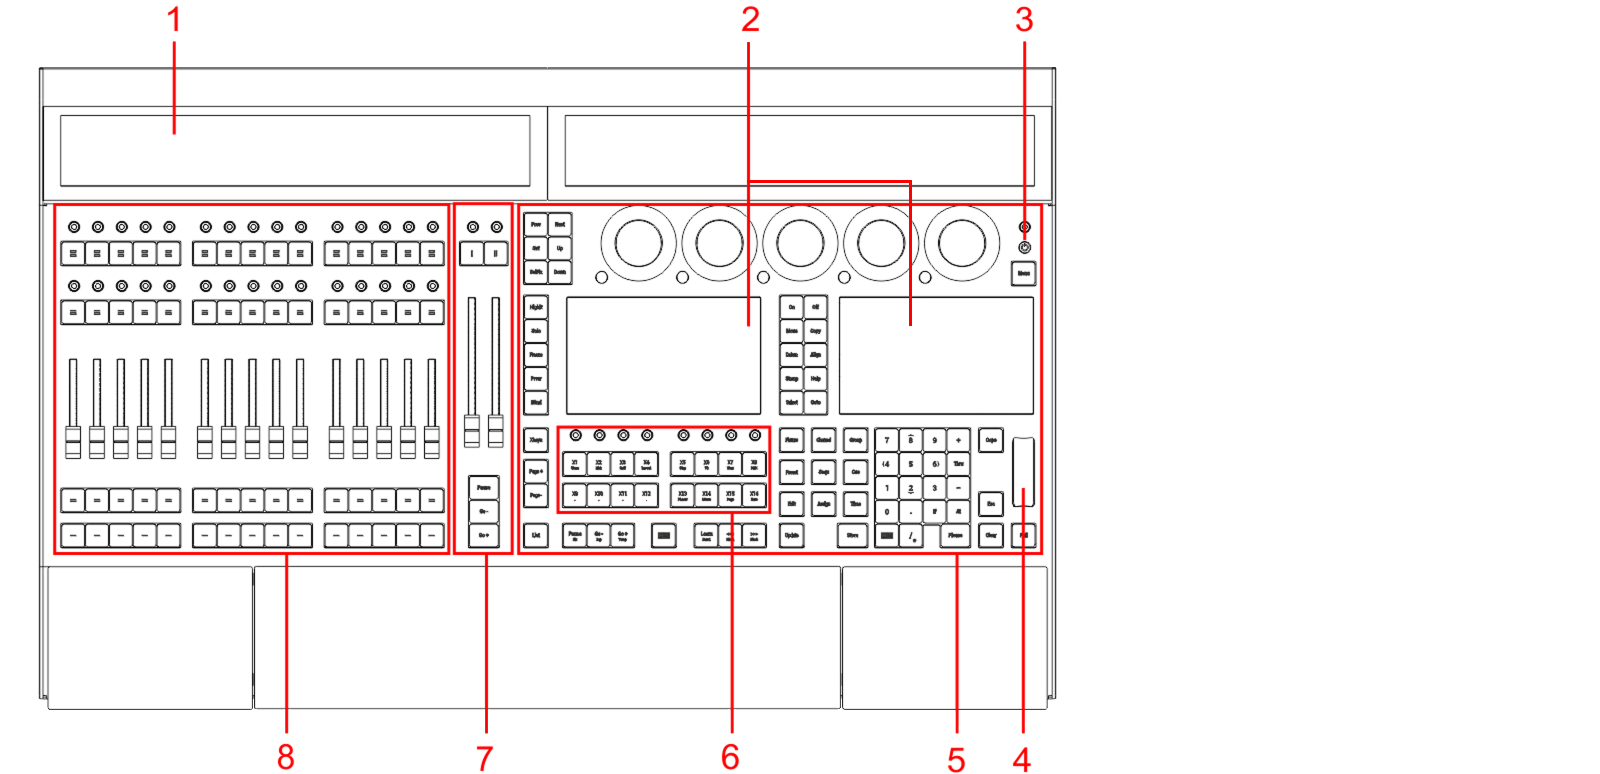 *grandMA3 light CRV front panel* 1. [Letterbox screens 8+9](/grandma3/2-3/do_screen_allocation/) 2. [Command screens 6+7](/grandma3/2-3/do_screen_allocation/) 3. [Power key](/grandma3/2-3/key_power/) 4. [Level wheel](/grandma3/2-3/do_control_level/) 5. [Command area](/grandma3/2-3/do_control_command/) 6. [Xkeys section](/grandma3/2-3/do_control_executor/) 7. [Master area](/grandma3/2-3/do_control_master/) 8. [Executor area with 3 executor sections](/grandma3/2-3/do_control_executor/) | | | | ------------------------------------------ | --------------------------------------------------------------------------------------------------------------------------------------------------------------------------------------------------------- | |  | **Hint:** | | | For command line and graphical user interface access to an image showing the connectors on the back of the console, see the [DMX Port Configuration](/grandma3/2-3/dmx_port_config/#h2__474686261) topic. |  grandMA3 light CRV rear panel 1. [Desk light](/grandma3/2-3/fs_connect_desk_light/) 2. [powerCON TRUE1](/grandma3/2-3/fs_connect_power/) 3. Power switch 4. [](/grandma3/2-3/fs_connect_dmx/)[](/grandma3/2-3/fs_connect_dmx/)[DMX-512-A A-F (5pin XLR female) + G (5pin XLR male)](/grandma3/2-3/fs_connect_dmx/) 5. [DisplayPort 1+2+4+5](/grandma3/2-3/fs_connect_external_screens/) 6. [LTC](/grandma3/2-3/fs_connect_smpte_ltc/) 7. [USB 3.0](/grandma3/2-3/fs_connect_usb/) 8. [Audio Remote In](/grandma3/2-3/fs_connect_audio_in/) 9. [DC Remote Control](/grandma3/2-3/fs_connect_dc_remote_in/) 10. [Ethernet 1-3](/grandma3/2-3/fs_connect_ethernet/) 11. [S/PDIF In+Out](/grandma3/2-3/do_connector_pin_assignment/#RCA) 12. [USB 2.0](/grandma3/2-3/fs_connect_usb/) 13. [MIDI In+Out](/grandma3/2-3/remote_inputs/) For technical specifications, see [Technical Data](/grandma3/2-3/key_consoles_technical_data/) in the [grandMA3 Quick Manual consoles](/grandma3/2-3/grandma3_quick_manual_consoles/).
# grandMA3 consoles
> The grandMA3 consoles control all kinds of lighting genres such as conventional lights, moving lights, LEDs, video, and media via DMX signal or within a network
The grandMA3 consoles control all kinds of lighting genres such as conventional lights, moving lights, LEDs, video, and media via DMX signal or within a network environment. All grandMA3 components, despite different hardware solutions, use the same software. For a general overview of grandMA3 hardware, see . All components are fully integrable into the network environment. This topic describes the different sections of the grandMA3 consoles. These sections vary from model to model. The flagship of the grandMA3 range is the full-size or full-size CRV, respectively. The control room version (CRV) of full-size and light are models without the monitor wing, but come with additional external monitor ports. The grandMA3 light console or the light CRV are the work-horses of the range. The compact and compact XT models offer the full system benefits in a compact and lightweight format. The grandMA3 consoles number their screens in a specific order, for more information see [Screen Allocation](/grandma3/2-3/do_screen_allocation/). You can connect several external touch screens with a console, see [Connect External Screens](/grandma3/2-3/fs_connect_external_screens/). The display elements of the screens can be modified, see [Configuration of Displays](/grandma3/2-3/ws_ui_display_configuration/). For technical specifications, see [Technical Data](/grandma3/2-3/key_consoles_technical_data/) in the [grandMA3 Quick Manual consoles](/grandma3/2-3/grandma3_quick_manual_consoles/). ## Subtopics [Section titled “Subtopics”](#subtopics) * [grandMA3 full-size](/grandma3/2-3/do_console_fullsize/) * [grandMA3 full-size CRV](/grandma3/2-3/do_console_fullsize_crv/) * [grandMA3 light](/grandma3/2-3/do_console_light/) * [grandMA3 light CRV](/grandma3/2-3/do_console_light_crv/) * [grandMA3 compact XT](/grandma3/2-3/do_console_compact_xt/) * [grandMA3 compact](/grandma3/2-3/do_console_compact/)
# Command Area
> Command area of grandMA3 full-size (CRV) and grandMA3 light (CRV)
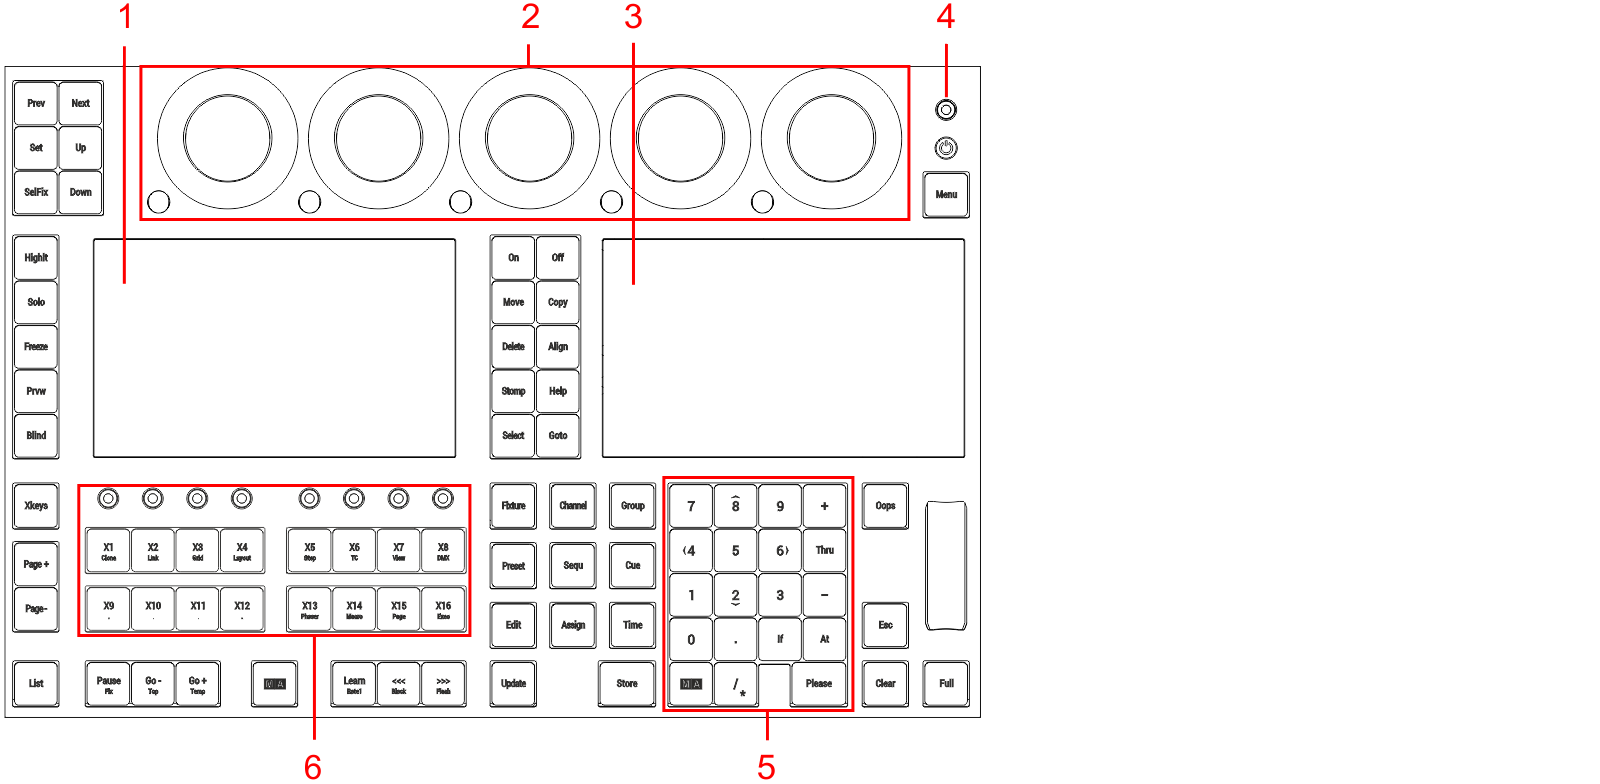 Command area of *grandMA3 full-size (CRV) and grandMA3 light (CRV)* 1. Left command screen 2. [Dual encoder section](/grandma3/2-3/do_control_encoder/) 3. Right command screen 4. [Grand master](/grandma3/2-3/do_control_grand/) 5. Number pad 6. [Xkeys section](/grandma3/2-3/do_control_executor/)
# Custom Area
# Control Elements
> The following chapters describe the different control elements of the grandMA3 devices.
The following chapters describe the different control elements of the grandMA3 devices. Each chapter uses drawings of the grandMA3 product for visualization. Control elements described in the chapters are marked in red. Subtopics * [Command Area](/grandma3/2-3/do_control_command/) * [Master Area](/grandma3/2-3/do_control_master/) * [Custom Area](/grandma3/2-3/do_control_custom/) * [Dual Encoders](/grandma3/2-3/do_control_encoder/) * [Level Wheel](/grandma3/2-3/do_control_level/) * [Grand Master](/grandma3/2-3/do_control_grand/) * [Executor Elements](/grandma3/2-3/do_control_executor/)
# Dual Encoders
> The five dual encoders are used to adjust the different attributes of the fixtures. There are four different actions on the encoders:
The five dual encoders are used to adjust the different attributes of the fixtures. There are four different actions on the encoders: * Turn the inner ring to adjust the attribute “Coarse”. * Turn the outer ring to adjust the attribute “Fine”. * Press the inner ring to open a calculator to type in the value. * Press and turn the inner ring to adjust the attribute “Coarse” with a higher speed. * Press the dual encoder key to open a calculator to type in the value. The dual encoder key replaces the press function of the outer ring. | | | | ------------------------------------------ | ---------------------------------------------------------------------------------------------------------------------------------------------------------------------------------------------------------------- | |  | **Hint:** | | | For more information on the Readout and Resolution of the encoders, see [Readout Keyword](/grandma3/2-3/keyword_readout/) and [Encoder Resolution](/grandma3/2-3/operate_encoder_resolution_multiplier/) topics. | These encoders are placed above the command section. You can define a customized encoder bar in the grandMA3 software. For more information, see [Encoder Bar Pool](/grandma3/2-3/ws_eb_encoder_pool/). 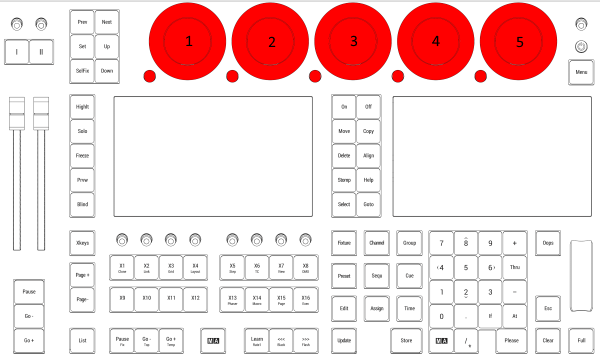 *Location on grandMA3 full-size and grandMA3 light consoles* 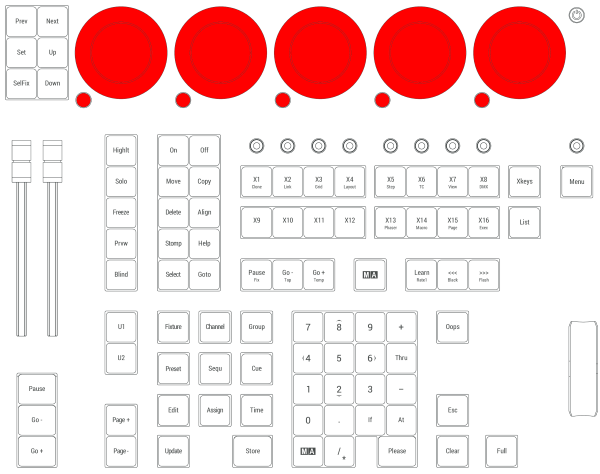 *Location on grandMA3 compact consoles and grandMA3 onPC command wing and command wing XT* Each of the dual encoders is numbered 1 to 5 from left to right. There are three elements in each encoder: The inner ring  The outer ring  The dual encoder key 
# Executor Elements
> Executors are used to playback and control elements of a show file in an accessible way. For example, they can be used to control a sequence.
Executors are used to playback and control elements of a show file in an accessible way. For example, they can be used to control a sequence. For more information about executors, see the [Executors topic](/grandma3/2-3/executor/). Objects can be assigned to executors via the user interface of the grandMA3 software. The following menu/window gives access to the executor: * To open the Playbacks window, in the [Add Window pop-up](/grandma3/2-3/wvm_add_window/) tap Common and Playbacks. * To open the Playbacks menu, press F5 on the keyboard or tap  in the control bar. Depending on the hardware: * The number of physical executors depends on the console type. * The executors are handles to control objects in the show file. The executors are located on the left part of the console. 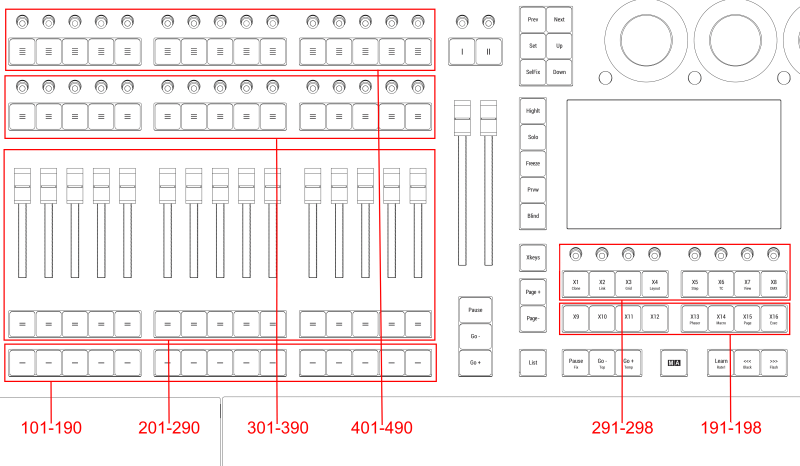 *Executor location on large consoles* *** ## Executor 101 thru 190 [Section titled “Executor 101 thru 190”](#executor-101-thru-190) The executors 101 thru 190 are located as the lower buttons in the executor section. On the hardware keys, these have labeled one horizontal line on top of them. In the Playback Control overlay or the Playback window, they are named by their number. *** ## Executor 191 thru 198 [Section titled “Executor 191 thru 198”](#executor-191-thru-198) The executors 191 thru 198 are located as the lower row of Xkeys (X9 to X16 | Exec). For more information see [Keys](/grandma3/2-3/keys/). *** ## Executor 201 thru 290 [Section titled “Executor 201 thru 290”](#executor-201-thru-290) The executors 201 thru 290 are located as the second lower buttons and the faders in the executor section. One button and the above fader is one executor. On the hardware keys, these have labeled two horizontal lines on top of them. In the Playback Control overlay or the Playback window, they are named by their number. *** ## Executor 291 thru 298 [Section titled “Executor 291 thru 298”](#executor-291-thru-298) The executors 291 thru 298 are located as the upper row of Xkeys (X1 | Clone to X8 | DMX). For more information see [Keys](/grandma3/2-3/keys/). *** ## Executor 301 thru 390 [Section titled “Executor 301 thru 390”](#executor-301-thru-390) The executors 301 thru 390 are located as the second upper buttons and knobs in the executor section. One button and one knob is one executor. On the hardware keys, these have labeled three horizontal line on top of them. In the Playback Control overlay or the Playback window, they are named by their number. *** ## Executor 401 thru 490 [Section titled “Executor 401 thru 490”](#executor-401-thru-490) The executor 401 thru 490 are located as the upper buttons and knobs in the executor section. One button and one knob is one executor. On the hardware keys, these have labeled four horizontal line on top of them. In the Playback Control overlay or the Playback window, they are named by their number.
# Grand Master
> The Grand Master is used to limit the output of the intensity of all the fixtures patched in the show.
The Grand Master is used to limit the output of the intensity of all the fixtures patched in the show. | | | | ------------------------------------------ | ----------------------------------------------------------------------------------------------------------------------------------------------------------------------------------------------------------- | |  | **Hint:** | | | Fixtures can be excluded from the grand master, for example, by setting **Master React** to None in the patch menu. For more information, see [Add Fixtures to the Show](/grandma3/2-3/patch_add_fixtures/) | By default, turning the knob adjusts intensity. This can be changed in the Special Executor Configuration menu. To access the Special Executor Configuration menu: 1. Press Assign. 2. Press the Grand Master knob. The special executor configuration menu opens. This menu can also be opened using the SpecialExecutor keyword in the command line. For more information about SpecialExecutor, see the [SpecialExecutor keyword](/grandma3/2-3/keyword_specialexecutor/) topic. To read more about Executor Configuration, see the [Executor Configuration](/grandma3/2-3/executor_configurations/) topic. The Grand Master is also displayed on the right side of the encoder bar on screen 1: 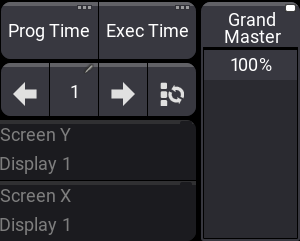 *Grand Master in the encoder bar* The Grand Master level can be set by the fader. To enable or disable the Grand Master function, see [Master Modes](/grandma3/2-3/masters/). The Grand Master can also be assigned to any executor. See the [Assign object to an Executor](/grandma3/2-3/executor_assign/) topic. | | | | ------------------------------------------ | --------------------------------------------------------------------------------------------------------------------------------------------------------------------------------------------------------------------------------------------------------------------------------------------------------------------------------- | |  | **Hint:** | | | The Output layer and the DMX layer in both the [Fixture Sheet](/grandma3/2-3/operate_fixture_sheet/) and the [Layout view](/grandma3/2-3/layout_view_settings/) as well as the [DMX Sheet](/grandma3/2-3/patch_dmx_sheet/) and the [3D window](/grandma3/2-3/patch_3d_viewer/) all display values as adjusted by the Grand Master | *** The Grand Master is located on the right side of the console. 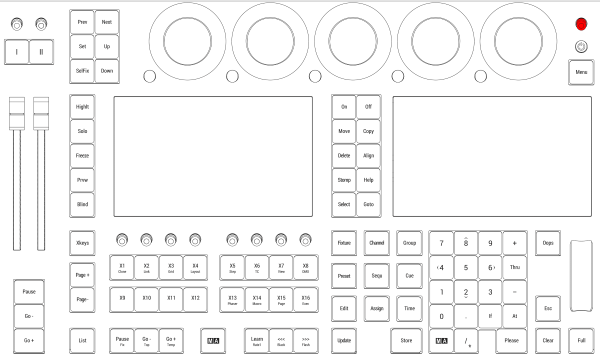 *Location on grandMA3 full-size and grandMA3 light consoles* ***  *Location on grandMA3 compact consoles and grandMA3 onPC command wing*
# Level Wheel
> The level wheel is used to adjust the intensity of the selected fixtures.
The level wheel is used to adjust the intensity of the selected fixtures. The level wheel is placed on the right side of the numeric keys. * To adjust the wheel, see Wheel Mode and Wheel Resolution in the [User settings](/grandma3/2-3/user_settings/).  *Location on grandMA3 full-size and grandMA3 light consoles*  *Location on grandMA3 compact consoles and grandMA3 onPC command wing/command wing XT*
# Master Area
# grandMA3 extension
> grandMA3 extension front panel
  *grandMA3 extension front panel* 1. [Letterbox screen 10](/grandma3/2-3/do_screen_allocation/) 2. [Custom section](/grandma3/2-3/do_extension/#custom_section) 3. [Executor section](/grandma3/2-3/do_control_executor/)  *grandMA3 extension rear panel* 1. [Desk light](/grandma3/2-3/fs_connect_desk_light/) 2. [powerCON TRUE1 connector](/grandma3/2-3/fs_connect_power/) 3. Power switch 4. [Ethernet](/grandma3/2-3/fs_connect_ethernet/) For more information, see the topics [First steps](/grandma3/2-3/first_steps/), [Connect grandMA3 extension](/grandma3/2-3/fs_connect_extension/). For technical specifications, see [Technical Data](/grandma3/2-3/key_consoles_technical_data/) in the [grandMA3 Quick Manual consoles](/grandma3/2-3/grandma3_quick_manual_consoles/).
# grandMA3 I/O Node
# grandMA3 I/O Node DIN-Rail
# grandMA3 Nodes
# grandMA3 Nodes DIN-Rail
# grandMA3 onPC command wing
> grandMA3 onPC command wing front panel
 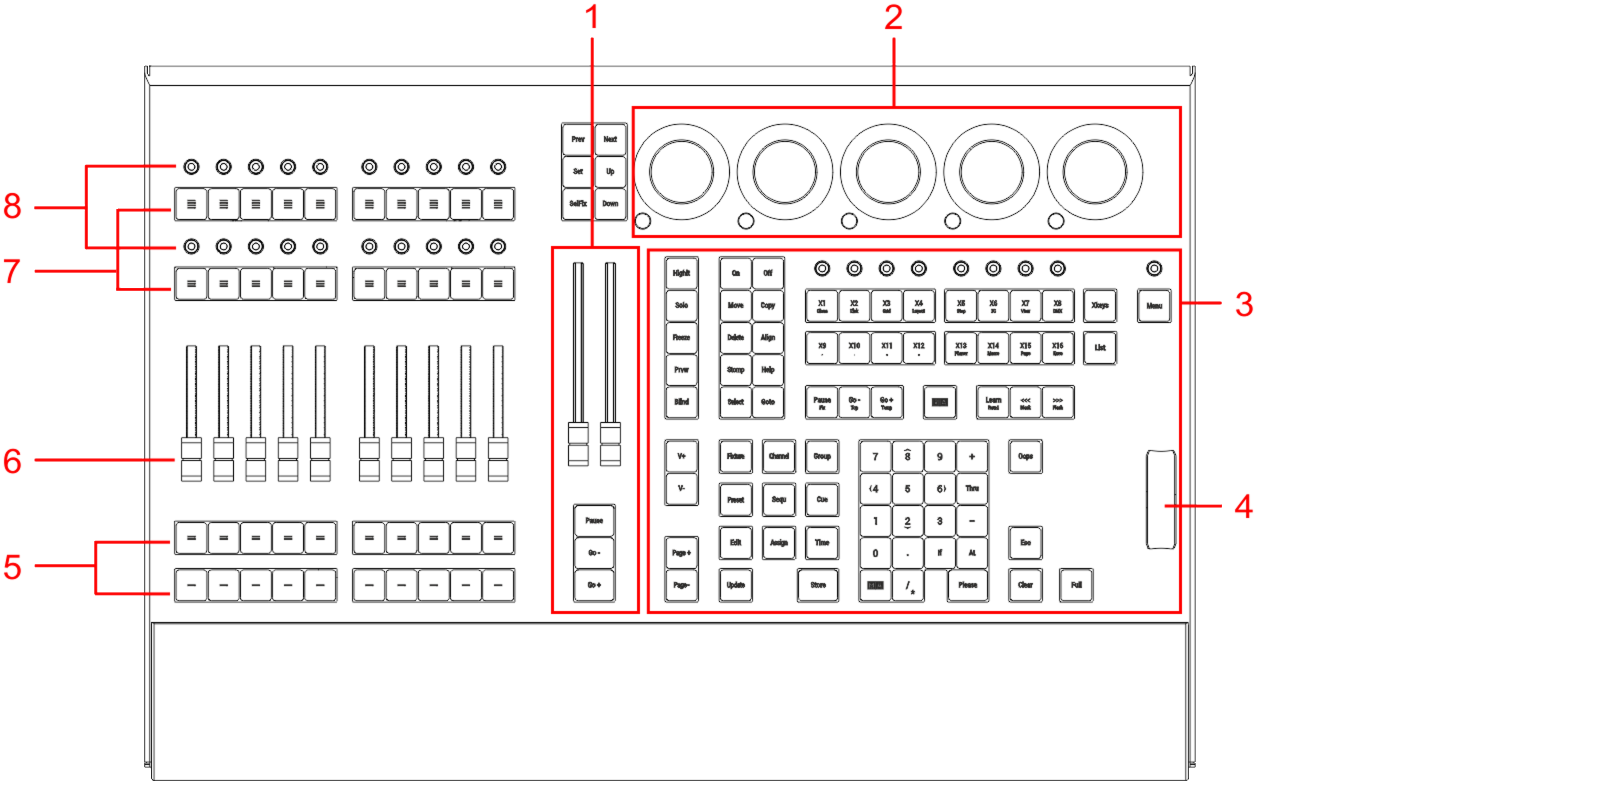 *grandMA3 onPC command wing front panel* 1. [Master area](/grandma3/2-3/do_control_master/) 2. [Dual encoder section](/grandma3/2-3/do_consoles/#dual_encoder_section) 3. [Command area](/grandma3/2-3/do_control_command/) 4. [Level wheel](/grandma3/2-3/do_control_level/) 5. Executor buttons 101-110 + 201-210 6. Executor faders 201-210 7. Executor buttons 301-310 + 401-410 8. Executor knobs 301-310 + 401-410 For more information about executors, see [Executor elements](/grandma3/2-3/do_control_executor/). 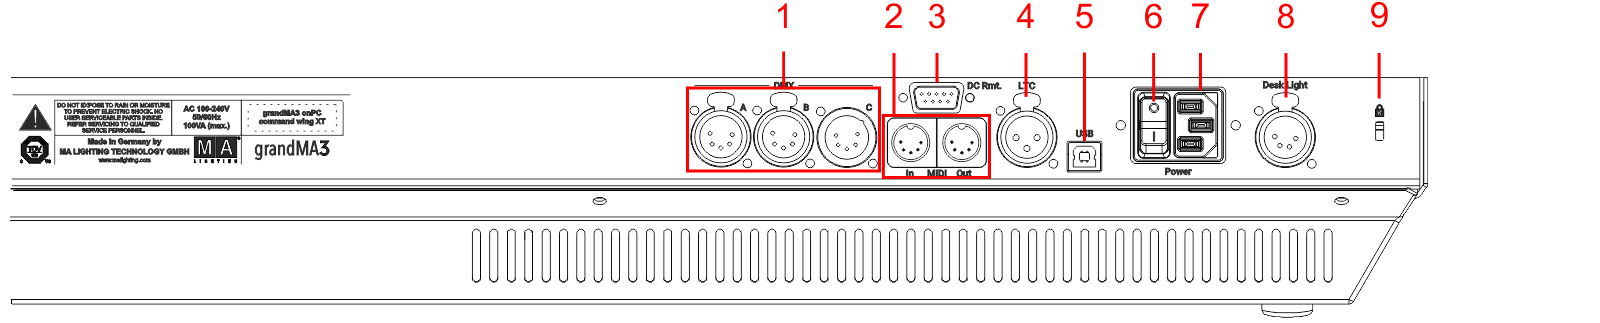 *grandMA3 onPC command wing rear panel* 1. [DMX-512-A A-B (5pin XLR female) + C (5pin XLR male) ](/grandma3/2-3/fs_connect_dmx/) 2. [MIDI In+Out](/grandma3/2-3/remote_inputs/) 3. [DC Remote Control](/grandma3/2-3/fs_connect_dc_remote_in/) 4. [LTC](/grandma3/2-3/fs_connect_smpte_ltc/) 5. USB 6. Power switch 7. [IEC connector](/grandma3/2-3/fs_connect_power/) 8. [Desk light](/grandma3/2-3/fs_connect_desk_light/) 9. Kensington lock For technical specifications see [Technical Data](/grandma3/2-3/key_onpc_command_wing_technical_data/) in the [grandMA3 Quick Manual onPC command wing](/grandma3/2-3/grandma3_quick_manual_onpc_command_wing/).
# grandMA3 onPC command wing XT
> grandMA3 onPC command wing XT front panel
 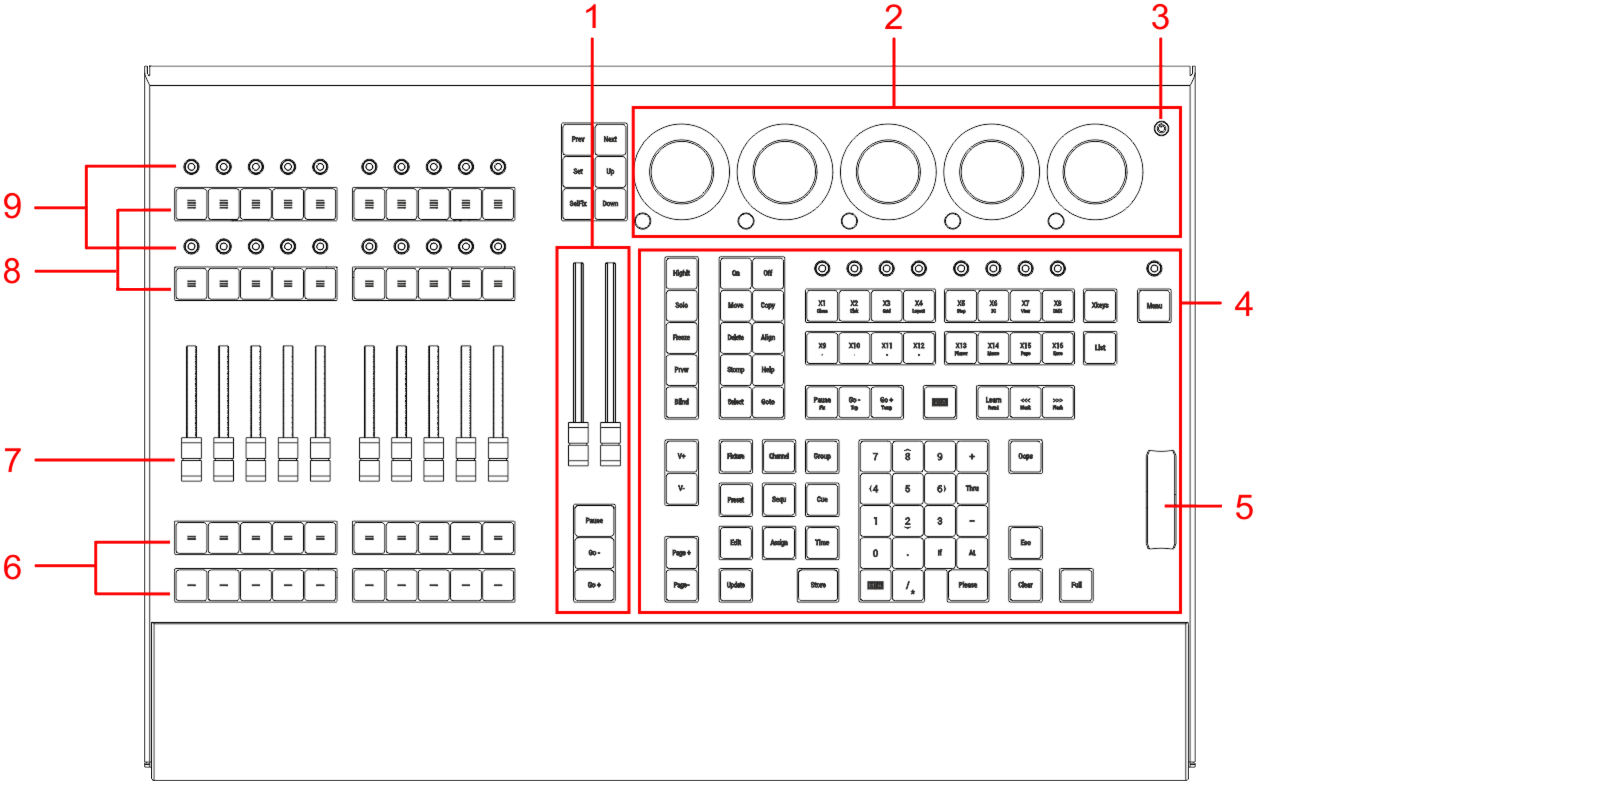 *grandMA3 onPC command wing XT front panel* 1. [Master area](/grandma3/2-3/do_control_master/) 2. [Dual encoder section](/grandma3/2-3/do_control_encoder/) 3. [Power key](/grandma3/2-3/key_power/) 4. [Command area](/grandma3/2-3/do_control_command/) 5. [Level wheel](/grandma3/2-3/do_control_level/) 6. Executor buttons 101-110 + 201-210 7. Executor faders 201-210 8. Executor buttons 301-310 + 401-410 9. Executor knobs 301-310 + 401-410 For more information about executors, see [Executor elements](/grandma3/2-3/do_control_executor/). 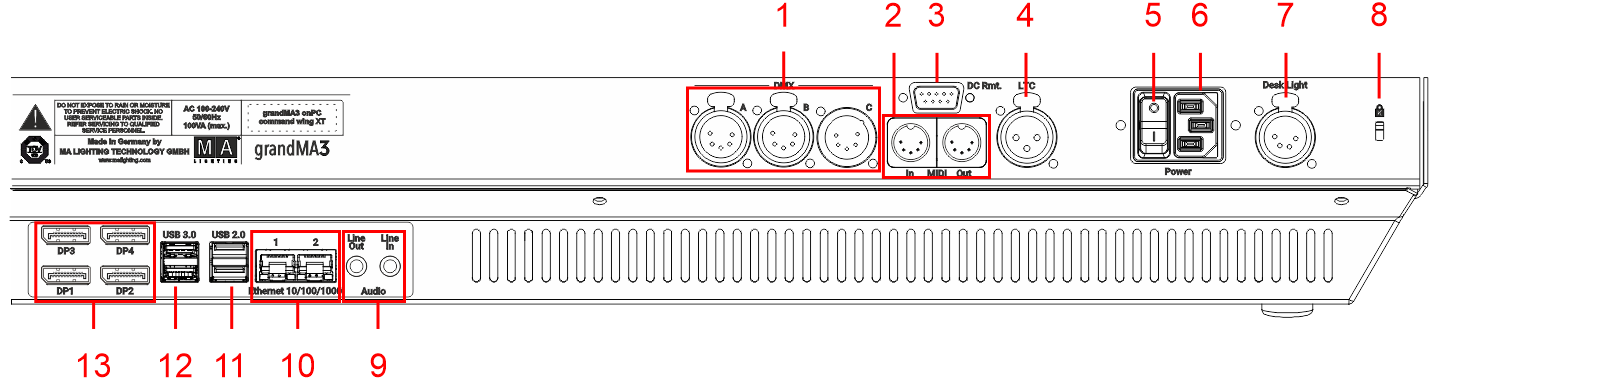 *grandMA3 onPC command wing XT rear panel* 1. [DMX-512-A A-B (5pin XLR female) + C (5pin XLR male)](/grandma3/2-3/fs_connect_dmx/) 2. [MIDI In+Out](/grandma3/2-3/remote_inputs/) 3. [DC Remote Control](/grandma3/2-3/fs_connect_dc_remote_in/) 4. [LTC](/grandma3/2-3/fs_connect_smpte_ltc/) 5. Power switch 6. [IEC connector](/grandma3/2-3/fs_connect_power/) 7. [Desk light](/grandma3/2-3/fs_connect_desk_light/) 8. Kensington lock 9. [Line In+Out](/grandma3/2-3/do_connector_pin_assignment/#Jack) 10. [Ethernet 1+2](/grandma3/2-3/fs_connect_ethernet/) 11. [USB 2.0](/grandma3/2-3/fs_connect_usb/) 12. [USB 3.0](/grandma3/2-3/fs_connect_usb/) 13. [DisplayPort 1-4](/grandma3/2-3/fs_connect_external_screens/) For technical specifications see [Technical Data](/grandma3/2-3/key_onpc_xt_technical_data/) in the [grandMA3 Quick Manual onPC command wing XT](/grandma3/2-3/grandma3_quick_manual_onpc_command_wing_xt/).
# grandMA3 onPC fader wing
# grandMA3 onPC rack-unit
# grandMA3 replay unit
# grandMA3 processing units
# Screen Allocation
> grandMA3 consoles number their screens in a specific order. Different consoles within the range have different amounts of internal screens and connections for e
## Numerical Order of Screens [Section titled “Numerical Order of Screens”](#numerical-order-of-screens) grandMA3 consoles number their screens in a specific order. Different consoles within the range have different amounts of internal screens and connections for external monitors. This topic covers those physical differences as well as the numbering system applied to those screens. ### grandMA3 full-size and light [Section titled “grandMA3 full-size and light”](#grandma3-full-size-and-light) 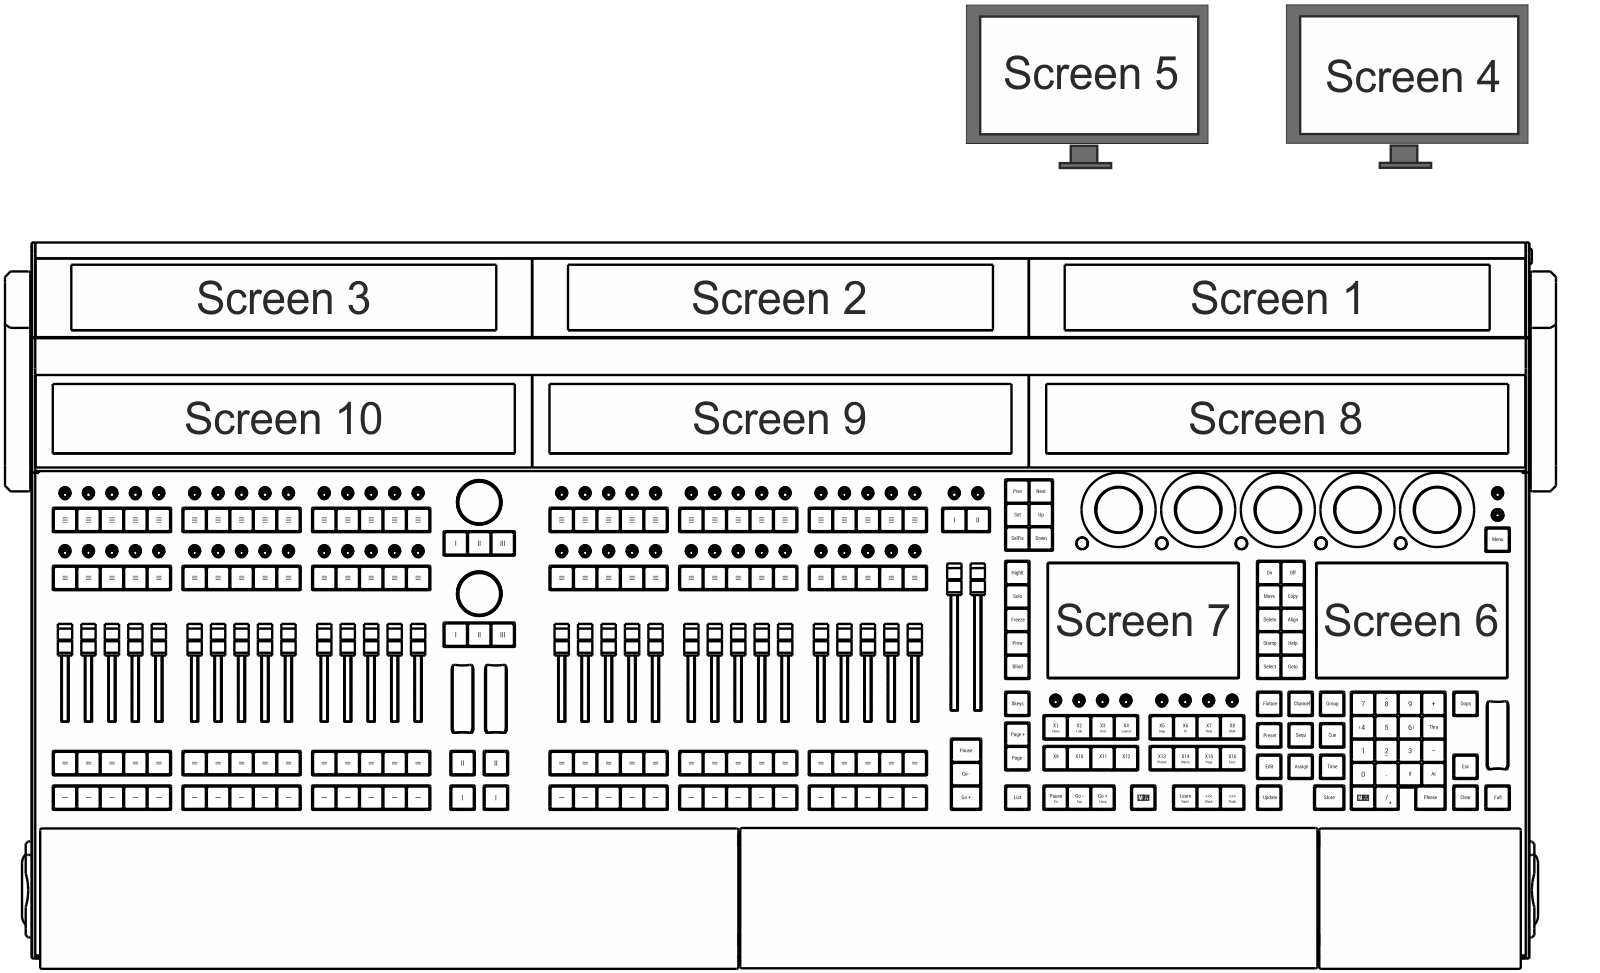 grandMA3 full-size with all screens numbered The grandMA3 full-size includes three internal 15.6-inch screens mounted in a double-hinged monitor wing, three internal 14.9-inch letterbox screens, two internal 7-inch screens, and two connections for optional external monitors. The grandMA3 light includes two internal 15.6-inch screens mounted in a double-hinged monitor wing, two internal 14.9-inch letterbox screens, two internal 7-inch screens, and two connections for optional external monitors. The numbering of these screens is detailed in the following table: | Screen number | Display Size | Resolution | Remark | | ------------- | ------------ | ------------- | ----------------------------------------------------------------------------------------------------------------------------------------- | | Screen 1 | 15.6-inch | 1,920 x 1,080 | | | Screen 2 | 15.6-inch | 1,920 x 1,080 | | | Screen 3 | 15.6-inch | 1,920 x 1,080 | Only on grandMA3 full-size | | Screen 4 | | 1,920 x 1,080 | External screen | | Screen 5 | | 1,920 x 1,080 | External screen | | Screen 6 | 7-inch | 800 x 480 | Right command screen | | Screen 7 | 7-inch | 800 x 480 | Left command screen | | Screen 8 | 14.9-inch | 1,280 x 242 | Letterbox encoder screen | | Screen 9 | 14.9-inch | 1,280 x 242 | Right letterbox executor screen | | Screen 10 | 14.9-inch | 1,280 x 242 | Left letterbox executor screen, on grandMA3 full-size or first grandMA3 extension connected to grandMA3 light | | Screen 11 | 14.9-inch | 1,280 x 242 | Letterbox executor screen, on grandMA3 extension connected to grandMA3 full-size or second grandMA3 extension connected to grandMA3 light | *** ### grandMA3 full-size CRV and light CRV [Section titled “grandMA3 full-size CRV and light CRV”](#grandma3-full-size-crv-and-light-crv) 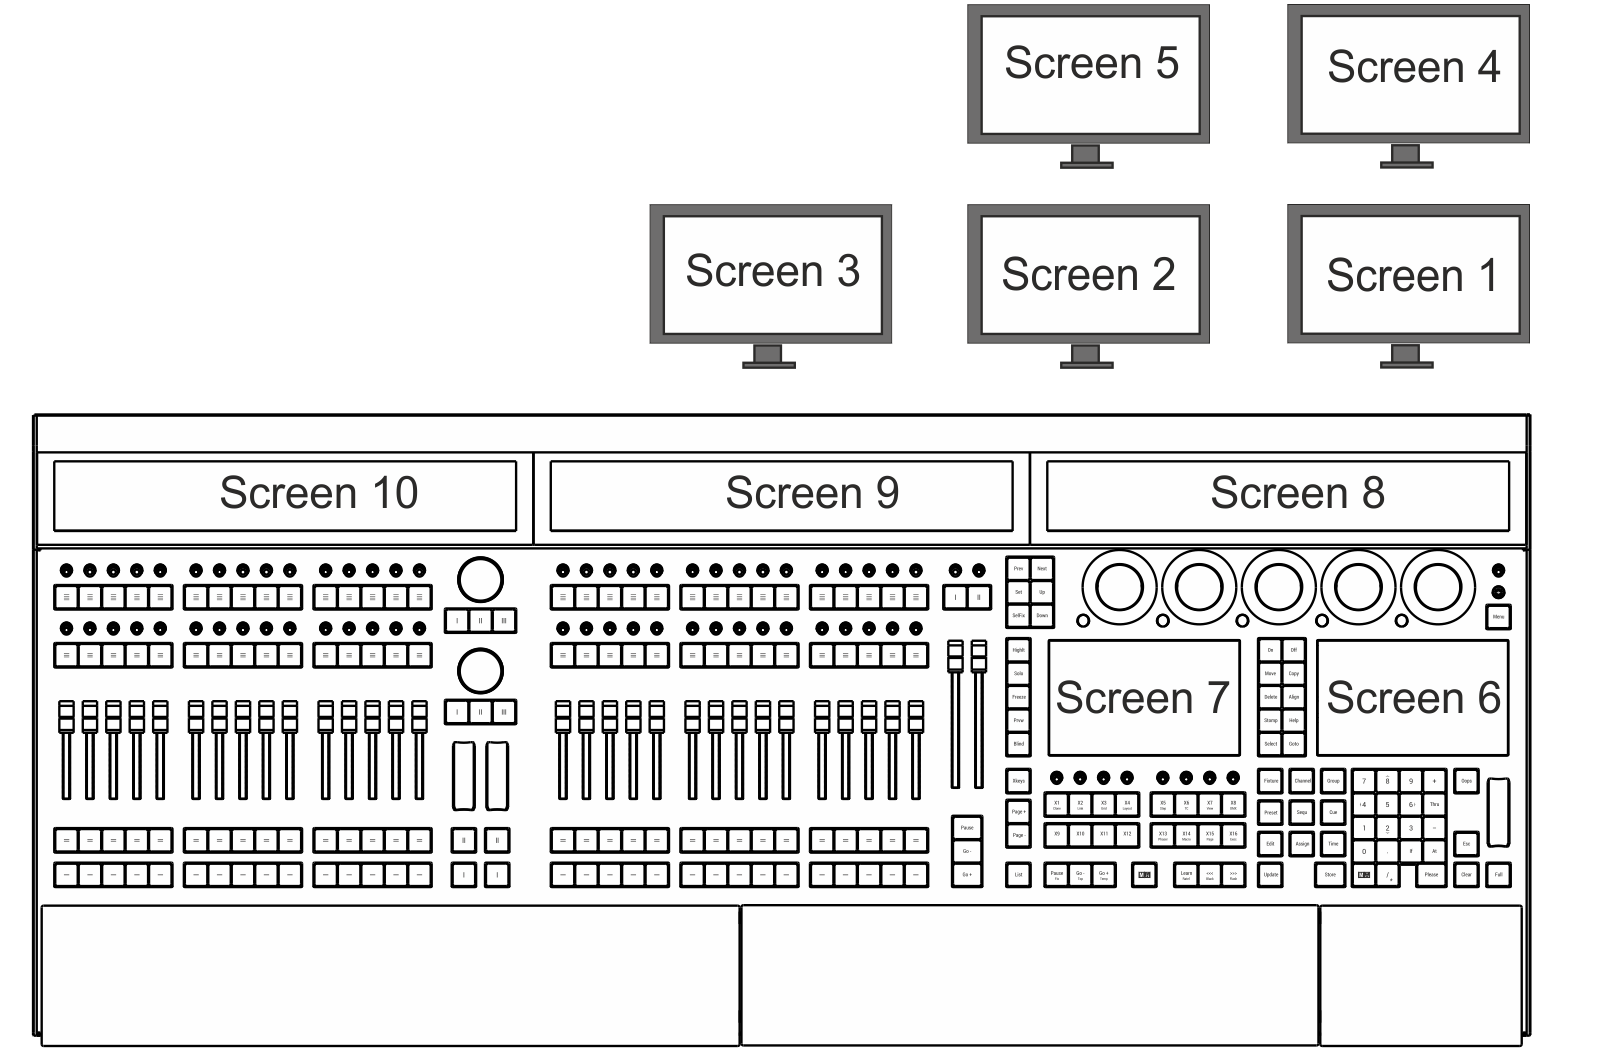 grandMA3 full-size CRV with all screens numbered The grandMA3 full-size CRV includes three internal 14.9-inch letterbox screens, two internal 7-inch screens, and five connections for optional external monitors. The grandMA3 light CRV includes two internal 14.9-inch letterbox screens, two internal 7-inch screens, and four connections for optional external monitors. The numbering of these screens is detailed in the following table: | Screen number | Display Size | Resolution | Remark | | ------------- | ------------ | ------------- | ------------------------------------------------------------------------------------------------------------------------------------------------- | | Screen 1 | | 1,920 x 1,080 | External screen | | Screen 2 | | 1,920 x 1,080 | External screen | | Screen 3 | | 1,920 x 1,080 | External screen (only grandMA3 full-size CRV) | | Screen 4 | | 1,920 x 1,080 | External screen | | Screen 5 | | 1,920 x 1,080 | External screen | | Screen 6 | 7-inch | 800 x 480 | Right command screen | | Screen 7 | 7-inch | 800 x 480 | Left command screen | | Screen 8 | 14.9-inch | 1,280 x 242 | Letterbox encoder screen | | Screen 9 | 14.9-inch | 1,280 x 242 | Right letterbox executor screen | | Screen 10 | 14.9-inch | 1,280 x 242 | Left letterbox executor screen, on grandMA3 full-size CRV or grandMA3 extension connected to grandMA3 light CRV | | Screen 11 | 14.9-inch | 1,280 x 242 | Letterbox executor screen, on grandMA3 extension connected to grandMA3 full-size CRV or second grandMA3 extension connected to grandMA3 light CRV | | | | | | *** ### grandMA3 compact XT and compact [Section titled “grandMA3 compact XT and compact”](#grandma3-compact-xt-and-compact) 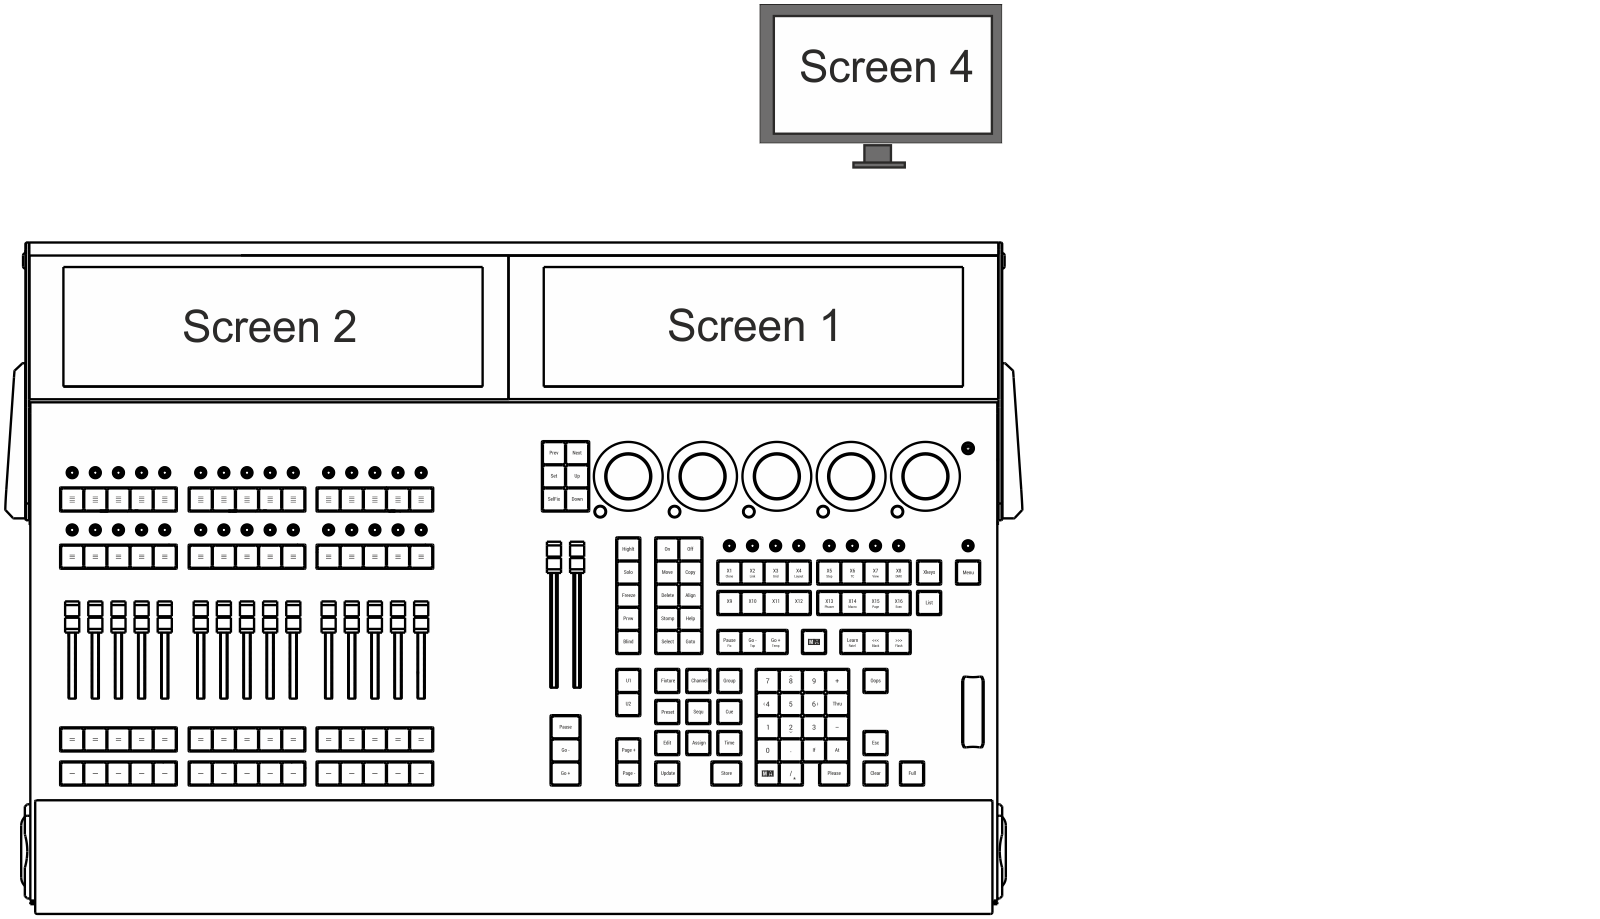 grandMA3 compact XT with all screens numbered The grandMA3 compact XT includes two internal 15.6-inch screens mounted in a hinged monitor wing and one connection for an optional external monitor. The grandMA3 compact includes one internal 15.6-inch screen mounted in a hinged monitor wing and one connection for an optional external monitor. The numbering of these screens is detailed in the following table: | Screen number | Display Size | Resolution | Remark | | ------------- | ------------ | ------------- | --------------------------- | | Screen 1 | 15.6-inch | 1,920 x 1,080 | | | Screen 2 | 15.6-inch | 1,920 x 1,080 | Only on grandMA3 compact XT | | Screen 4 | | 1,920 x 1,080 | External screen | *** ### grandMA3 replay unit [Section titled “grandMA3 replay unit”](#grandma3-replay-unit)  grandMA3 replay unit with all screens numbered The grandMA3 replay unit includes two connections for optional external monitors. The numbering of these screens is detailed in the following table: | Screen number | Display Size | Resolution | Remark | | ------------- | ------------ | ------------- | ---------------------------------------------------------------------------------------- | | Screen 1 | 5-inch | 800 x 480 | Internal command multi-touch screen | | Screen 4 | | 1,920 x 1,080 | External screen | | Screen 5 | | 1,920 x 1,080 | External screen | | Screen 10 | 14.9-inch | 1,280 x 242 | Letterbox executor screen on first grandMA3 extension connected to grandMA3 replay unit | | Screen 11 | 14.9-inch | 1,280 x 242 | Letterbox executor screen on second grandMA3 extension connected to grandMA3 replay unit | | Screen 12 | 14.9-inch | 1,280 x 242 | Letterbox executor screen on third grandMA3 extension connected to grandMA3 replay unit | For more information on connecting external screens, see the [Connect External Screens](/grandma3/2-3/fs_connect_external_screens/) topic. *** ### grandMA3 onPC rack-unit and grandMA3 onPC command wing XT [Section titled “grandMA3 onPC rack-unit and grandMA3 onPC command wing XT”](#grandma3-onpc-rack-unit-and-grandma3-onpc-command-wing-xt) For onPC stations, the single windows for each display can be freely arranged. The grandMA3 onPC rack-unit does include a 5-inch screen. For more information, see the [Displays in grandMA3 onPC](/grandma3/2-3/ws_onpc_displays/) topic.
# Shortcuts
> The following topics describe the use of shortcuts in the grandMA3 software.
The following topics describe the use of shortcuts in the grandMA3 software. ## Subtopics [Section titled “Subtopics”](#subtopics) * [Keyboard Shortcuts](/grandma3/2-3/do_shortcuts_keyboard/) * [Framework Shortcuts](/grandma3/2-3/do_shortcuts_framework/)
# Framework Shortcuts
> The framework of the grandMA3 software uses the following keyboard shortcuts for user interface related grids, for example, in the Patch menu or the Fixture Bui
The framework of the grandMA3 software uses the following keyboard shortcuts for user interface related grids, for example, in the Patch menu or the Fixture Builder. | Press key | Command | Description | | ------------------------- | --------------------------------- | --------------------------------------------------------- | | Insert | Insert UIGridSelection | Executing a user interface (UI) related insert function. | | Ctrl + Insert | Store UIGridSelection | Executing a UI related store function. | | Delete | Delete UIGridSelection | Executing a UI related delete function. | | Ctrl + C | Copy UIGridSelection | Copying from a UI grid. | | Ctrl + V | Paste UIGridSelection | Pasting into a UI grid. | | Ctrl + X | Cut UIGridSelection | Cutting from a UI grid. | | Ctrl + N | - | Toggles, for example, the “New Object Line” in a UI grid. | | Ctrl + M | - | Toggles Merge children. | | Ctrl + Enter | Edit UIGridSelection | Opens the edit pop-up for a selected cell. | | Ctrl + Alt + D | | Resets the color theme. | | F1 | Menu “At Filter” | Opens the At Filter. | | F2 | Menu “MenuSelector” | Opens the menu. | | F3 | Menu “CommandControl” | Opens the command section menu. | | F4 | Menu “MasterControl” | Opens the master controls menu. | | F5 | Menu “MasterControl” | Opens the playback menu. | | F7 | Menu “CustomMasterSectionOverlay” | Opens the custom master section menu. | | F8 | Menu “EncoderBarControl” | Opens the encoder bar menu. | | F9 | Menu “DeskLock” | Enables desk lock | | F10 | - | Enables shortcuts | | F8 during reboot | - | Opens the boot menu. | | Shift + ShCuts (enabled) | | Toggles the MA keys in the command section menu. |
# Keyboard Shortcuts
> Keyboard shortcuts allow fast operation of the console and onPC command wings via the (internal) keyboard.
Keyboard shortcuts allow fast operation of the console and onPC command wings via the (internal) keyboard. Some of these user-editable shortcuts are for general use and override other commands. Others are related to specific windows and pop-ups. The [KeyboardShortcut keyword](/grandma3/2-3/keyword_keyboardshortcut/) is used to edit and list the keyboard shortcuts. Keyboard Shortcuts are part of the user profile. This makes it possible for every user/user profile to use their own shortcut definitions within a show file. *** ## Turn the Keyboard Shortcuts on [Section titled “Turn the Keyboard Shortcuts on”](#turn-the-keyboard-shortcuts-on) * Tap ShCuts next to the command line or press F10\*\*\*\* on your keyboard.  *Keyboard shortcuts enabled* The keyboard shortcuts are turned on (yellow text). *** ## Turn the Keyboard Shortcuts off [Section titled “Turn the Keyboard Shortcuts off”](#turn-the-keyboard-shortcuts-off) * Tap ShCuts next to the command line or press F10\*\*\*\* on your keyboard.  *Keyboard shortcuts disabled* The keyboard shortcuts are turned off (white text). | | | | ------------------------------------------ | ------------------------------------------------------------------------------------------------------------------------------------------------ | |  | **Hint:** | | | In certain menus and pop-ups where the shortcuts are not relevant, they are switched off and back on automatically. The shortcut icon turns red. | *** ### Shortcut Examples [Section titled “Shortcut Examples”](#shortcut-examples) The images are showing the activated shortcut menu. The menu color can be changed in the [color theme](/grandma3/2-3/ws_colors_color_theme/). The lavender text in the images shows the keyboard shortcuts when ShCuts is enabled. *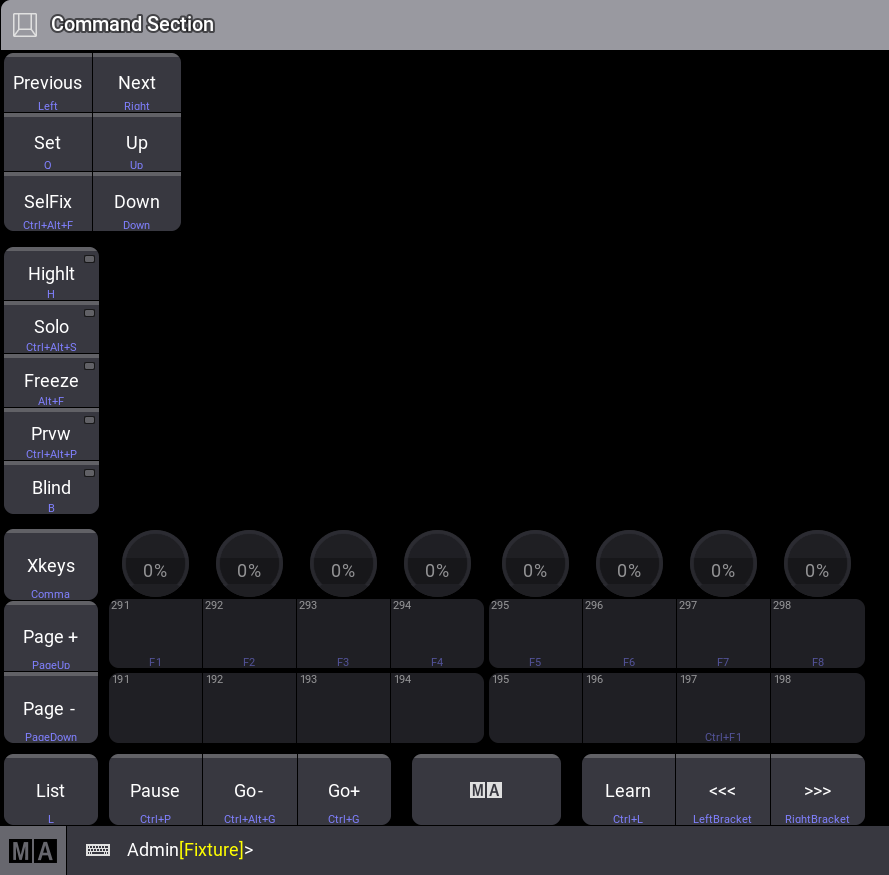*Command section window left*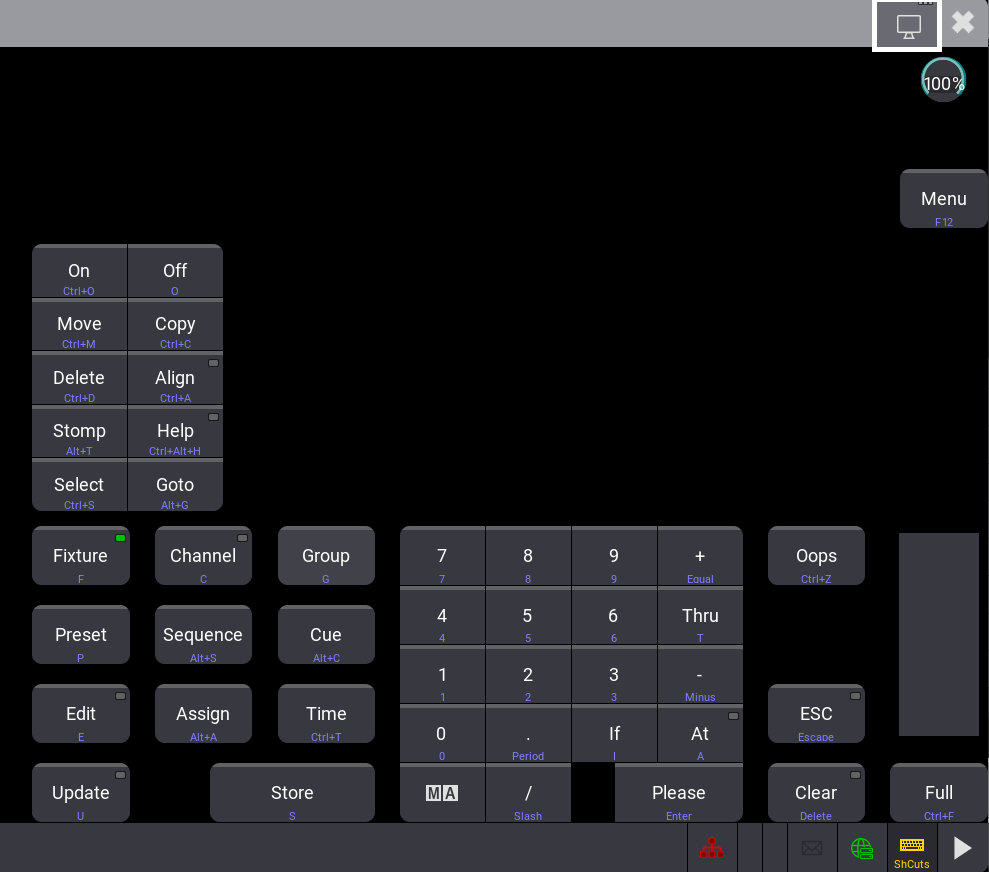*Command section window right**Playback controls window** *** ### Keyboard Shortcuts Window [Section titled “Keyboard Shortcuts Window”](#keyboard-shortcuts-window) 1. To edit the shortcuts, open the Preferences and Timings window. 2. Tap Keyboard Shortcuts. The Keyboard Shortcuts window opens: 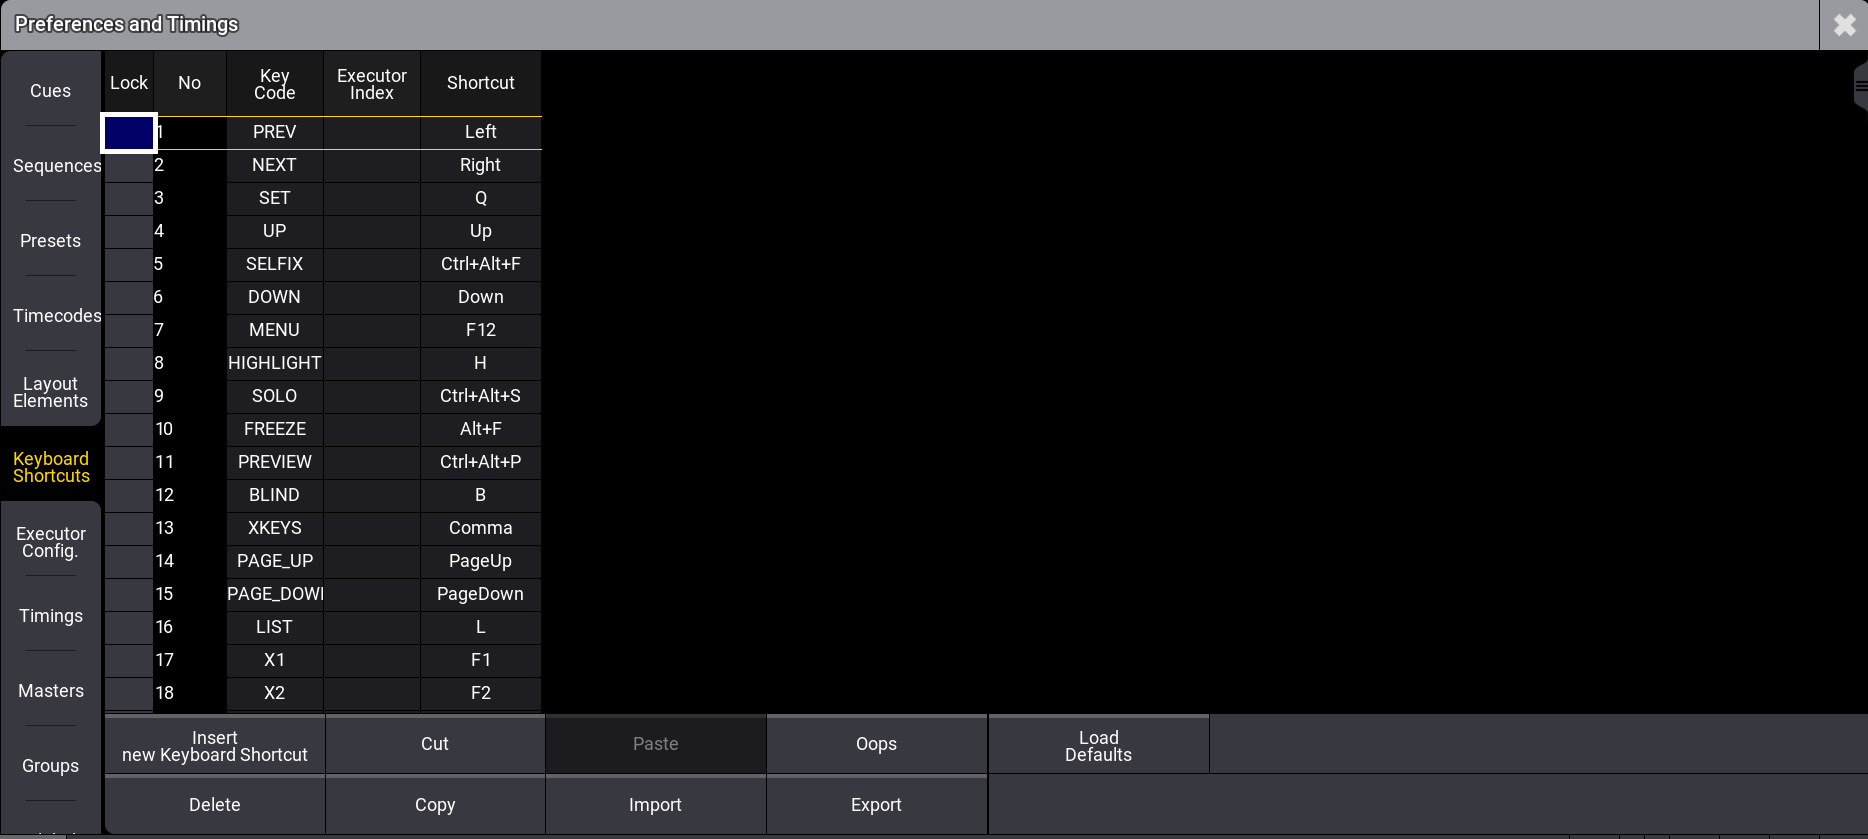 *Edit Keyboard Shortcuts window* Add Keyboard Shortcuts 1. To add a new keyboard shortcut at the end of the list, scroll down, tap New KeyboardShortcut, and then tap Insert new Keyboard Shortcut. A new empty cell is generated at the end of the list. 2. Tap and hold or right-click on the empty cell. The **Select Key Code** pop-up opens. 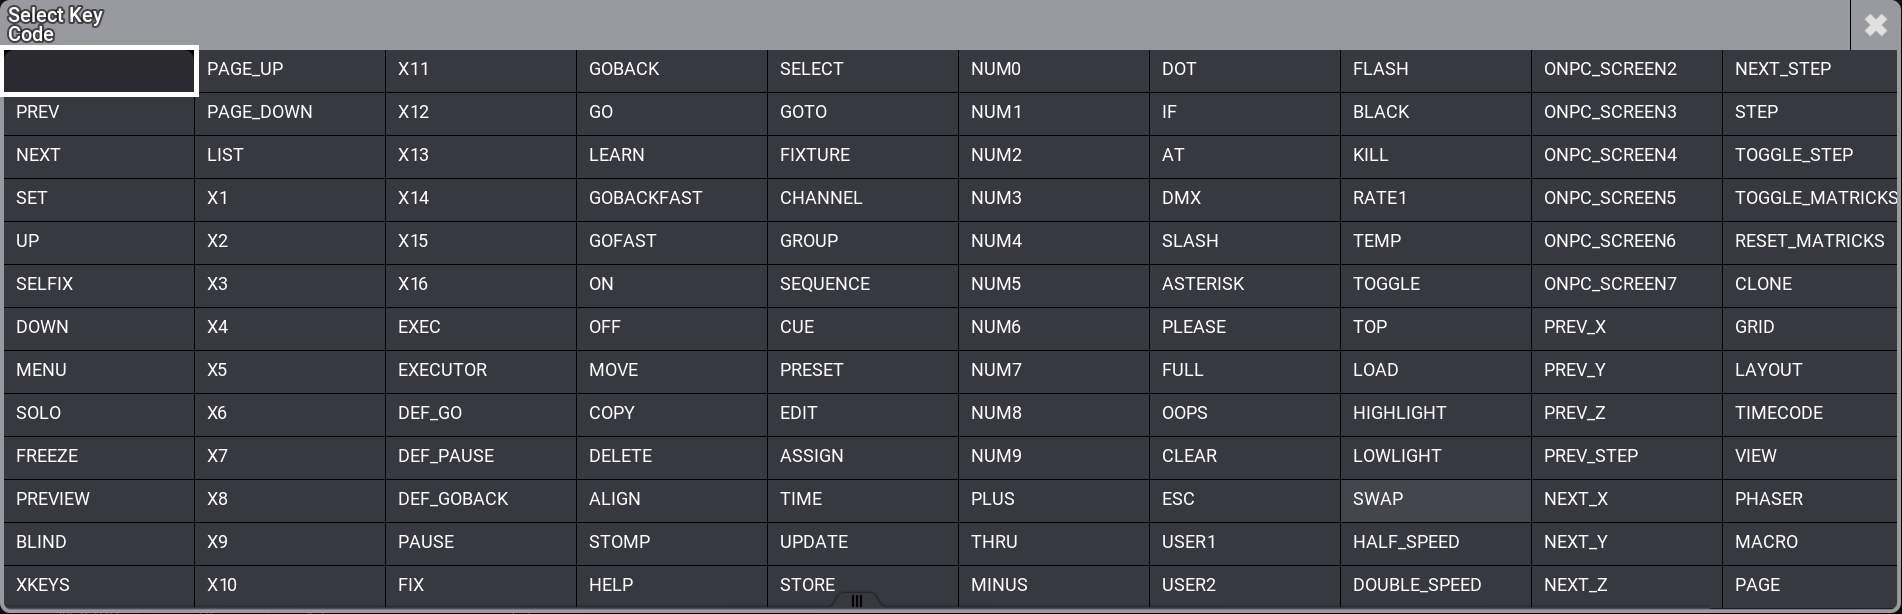 *Select key code window* 3. Select the desired key code from the pop-up list. The pop-up closes. 4. To open the Edit Keyboard Shortcut pop-up, tap and hold or right click on the empty cell in the Shortcut row.\ \ *Edit Keyboard shortcut pop-up* 5. To enter the desired shortcut, press the relevant keys. The pop-up closes. As Enter can also be used as a shortcut, it is not possible to close the Edit keyboard shortcut pop-up with Enter. * To confirm the shortcut tap Ok. * To clear the shortcut, tap None. * To cancel the edit, tap X. 6. If a keyboard shortcut already exists, a warning pop-up appears. Tap Yes to save the new shortcut.  *Warning pop-up* 7. The new shortcut is added to the list. 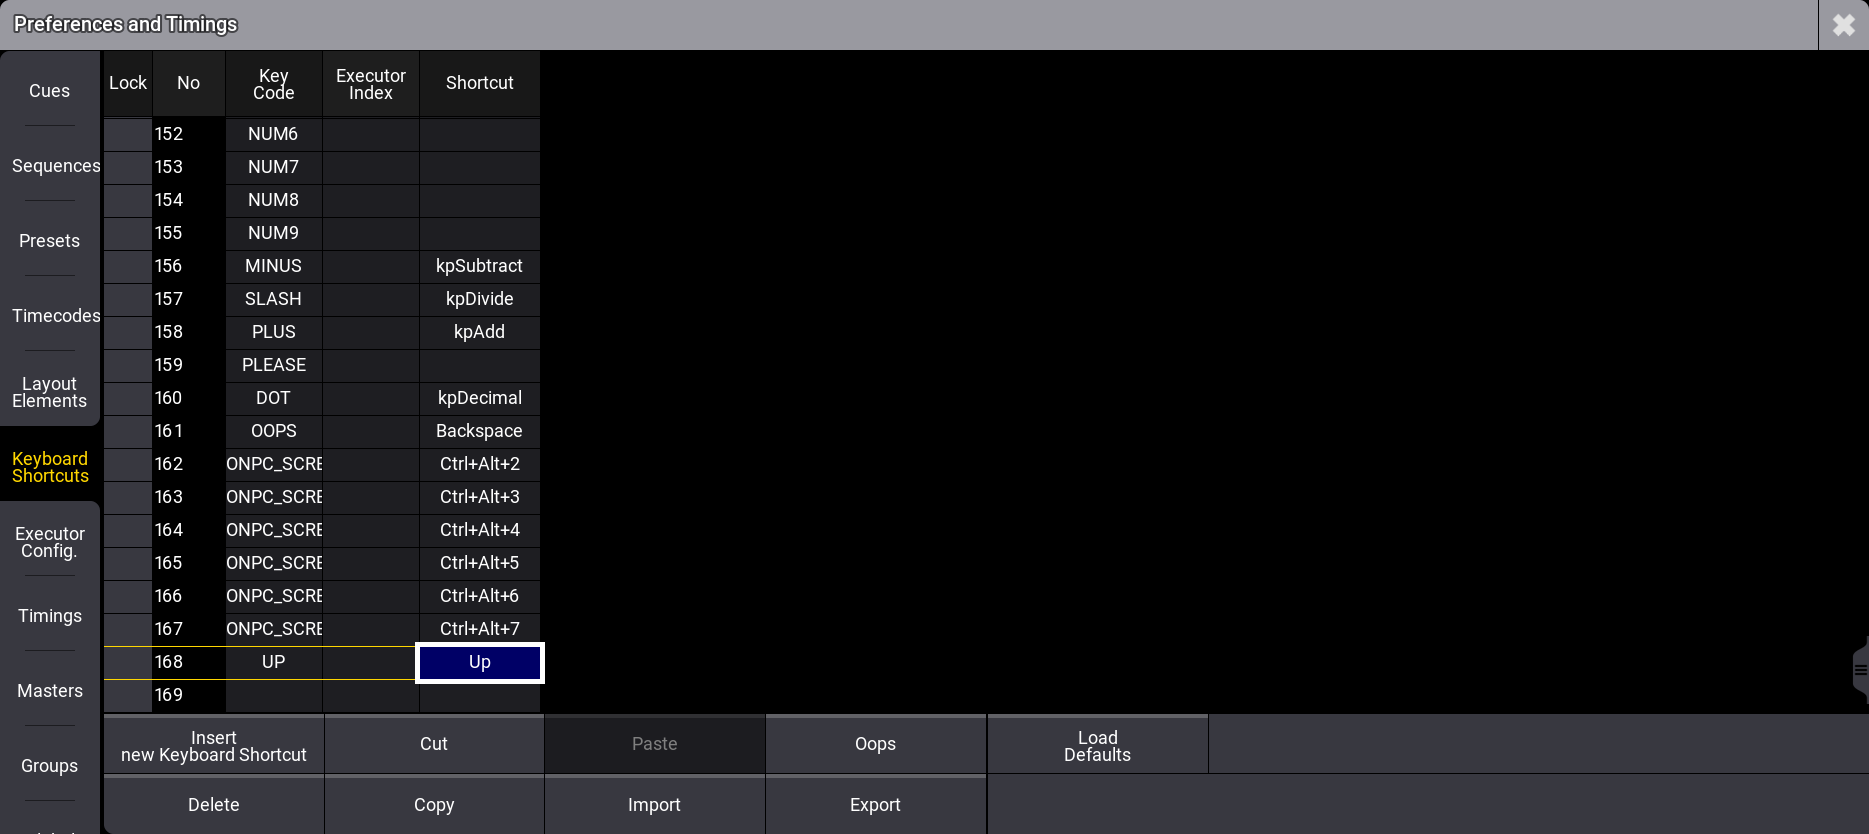 *New shortcut is added* ### Add Executor Index [Section titled “Add Executor Index”](#add-executor-index) The **Executor Index** column defines the executor that is triggered when executing the corresponding shortcut. The executor will have its shortcut displayed in lavender color in the playbacks control window when ShCuts is enabled. 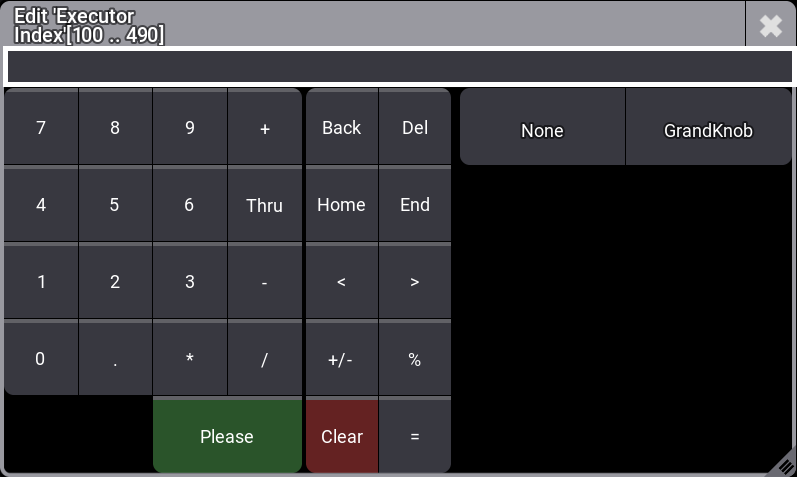 Executor Index - Calculator ## Edit Existing Keyboard Shortcut [Section titled “Edit Existing Keyboard Shortcut”](#edit-existing-keyboard-shortcut) 1. To edit an existing shortcut definition, tap and hold the Keyboard Shortcut you want to edit. The Edit keyboard shortcut pop-up opens:  *Edit keyboard shortcut pop-up* 2. Enter the new shortcut. ## Delete Keyboard Shortcuts [Section titled “Delete Keyboard Shortcuts”](#delete-keyboard-shortcuts) 1. To select the keyboard shortcut to be deleted, tap the desired shortcut. 2. Tap Delete. 3. The keyboard shortcut is deleted. To undo a deletion, tap Oops. ## Reset Keyboard Shortcuts to Defaults [Section titled “Reset Keyboard Shortcuts to Defaults”](#reset-keyboard-shortcuts-to-defaults) * To reset the keyboard shortcuts to their defaults, tap Load Defaults. The keyboard shortcuts are reset to their defaults. | | | | ------------------------------------------ | --------------------------------------------------------------------------- | |  | **Hint:** | | | The Shift keys on the keyboard correspond with the MA keys on the console. | ## Import / Export Keyboard Shortcuts [Section titled “Import / Export Keyboard Shortcuts”](#import--export-keyboard-shortcuts) * To import or export the keyboard shortcuts, tap Import or Export. By default, files will be exported to the relevant folder within the library folder structure, either on the local drive of the console or onPC station, or on a selected USB drive. For more information about this folder structure, see the [Folder Structure](/grandma3/2-3/fm_folder_structure/) topic. For information about exporting and importing show data using command line syntax without the use of these menus, see the [Export keyword](/grandma3/2-3/keyword_export/) and [Import keyword](/grandma3/2-3/keyword_import/) topics. ####
# UPS Battery
> The grandMA3 full-size, grandMA3 light, and their CRV versions have a rechargeable lithium-ion battery for an uninterrupted power supply (UPS).
The grandMA3 full-size, grandMA3 light, and their CRV versions have a rechargeable lithium-ion battery for an uninterrupted power supply (UPS). The purpose of the battery is to enable to save the show file and shut down the console in case of a power loss. | | | | -------------------------------------------------- | ------------------------------------------------------------------------------------------------------------------- | |  | **Restriction:** | | | Do not use the battery to bypass the console for a longer period! Do not move the console around while in UPS mode! | In case of a power loss: * A Power Loss pop-up appears on every screen and command screen, depending on the console type. * The power status icon in the command line turns red. *** ## Power Status [Section titled “Power Status”](#power-status) There is an indicator of the power status on the right side of the command line and in the [Message Center](/grandma3/2-3/system_message_center/). Status indications include the following states:  Power is connected and the battery is full.  Power is connected and the battery is not full (and recharging).  (Pulsating) Power is disconnected and the battery is discharging.  Indicates a power disconnection for a station in a session. For example, when a grandMA3 onPC station is connected to a console and the console has a loss of power, the icon turns yellow on the grandMA3 onPC station.  The battery icon is crossed when the station has no battery, for example, grandMA3 onPC. ### Battery Status Pop-Up [Section titled “Battery Status Pop-Up”](#battery-status-pop-up) Tap the power status indicator to open the Battery status pop-up. The pop-up could look like this: 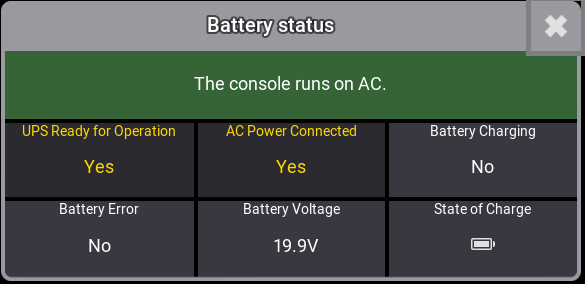 Battery status pop-up The Battery status pop-up displays multiple relevant metrics about the battery as well as A/C power. *** ## Power Loss Pop-up [Section titled “Power Loss Pop-up”](#power-loss-pop-up) While this pop-up is open, the percentage in the parentheses (X%) continuously decreases. The percentage in the parentheses is linked to the power status of the battery. In the pop-up window, three commands are available to tap: **Save and Shut Down:** Saves the current show file and shuts down the console properly. **Shut Down:** Properly shuts down the console without saving the show file. **Continue**: The console continues running on battery power. Further Power Loss pop-ups appear during the battery discharge process. When continued, the console will automatically shut down reaching (0%). The console reboots automatically when power supply is back.  Power Loss - Pop-up.
# Fixture Types Editor
> With the fixture types editor, you can build new fixture types and modify existing ones.
With the fixture types editor, you can build new fixture types and modify existing ones. To access the editor: * Press Menu and tap Patch. The patch menu opens. * Tap Fixture Types on the left side of the window: 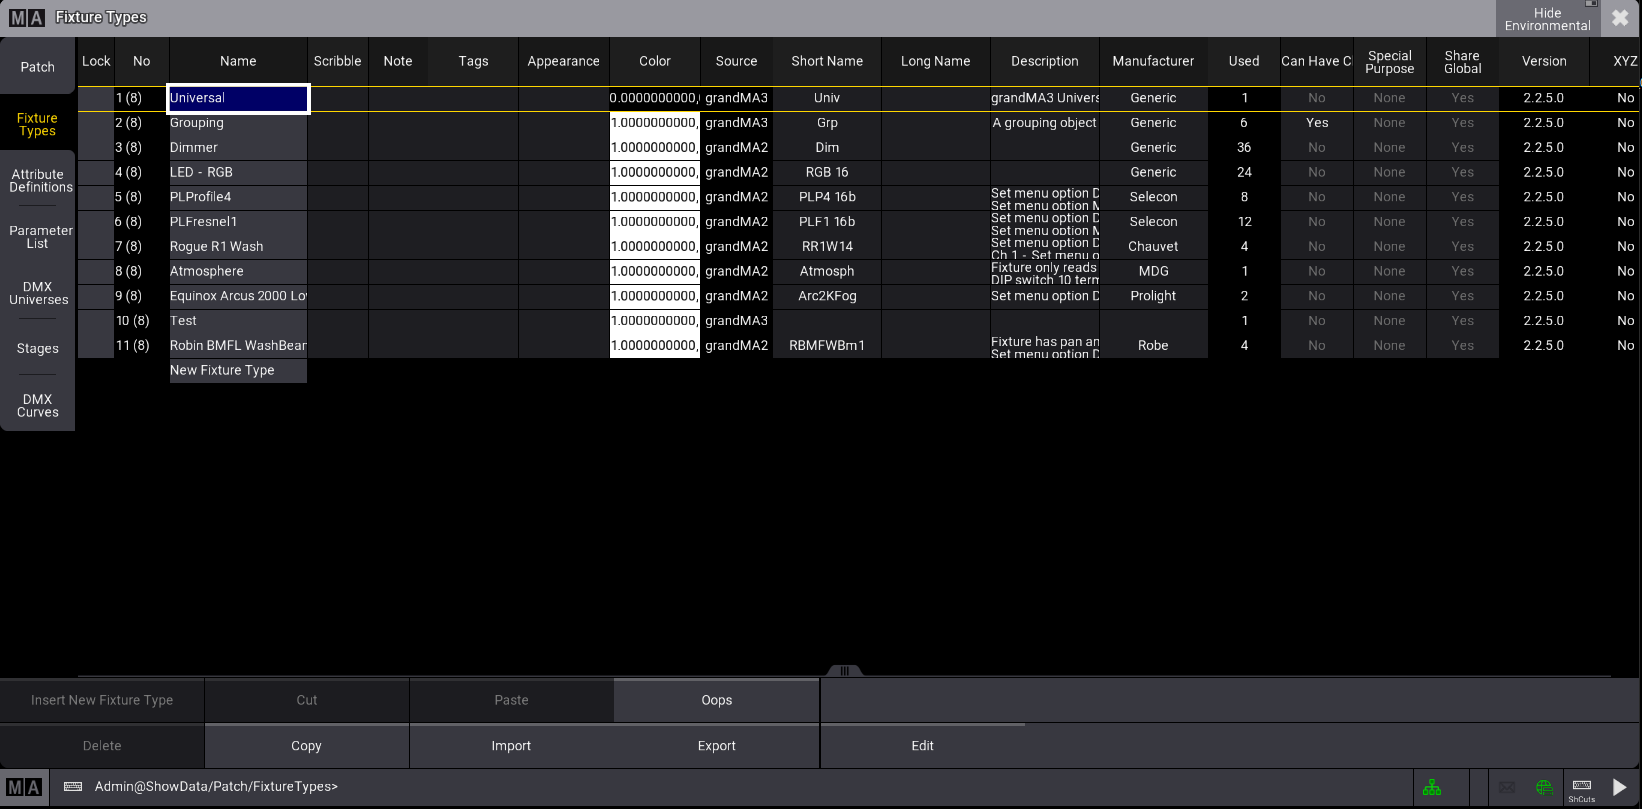\ *Fixture type menu* To edit an existing fixture type, follow the steps below: 1. Import some fixtures. See [Import Fixture Types](/grandma3/2-3/ft_import/). 2. Select the fixture type you want to edit and tap Edit at the bottom of the window. The Fixture type editor opens: 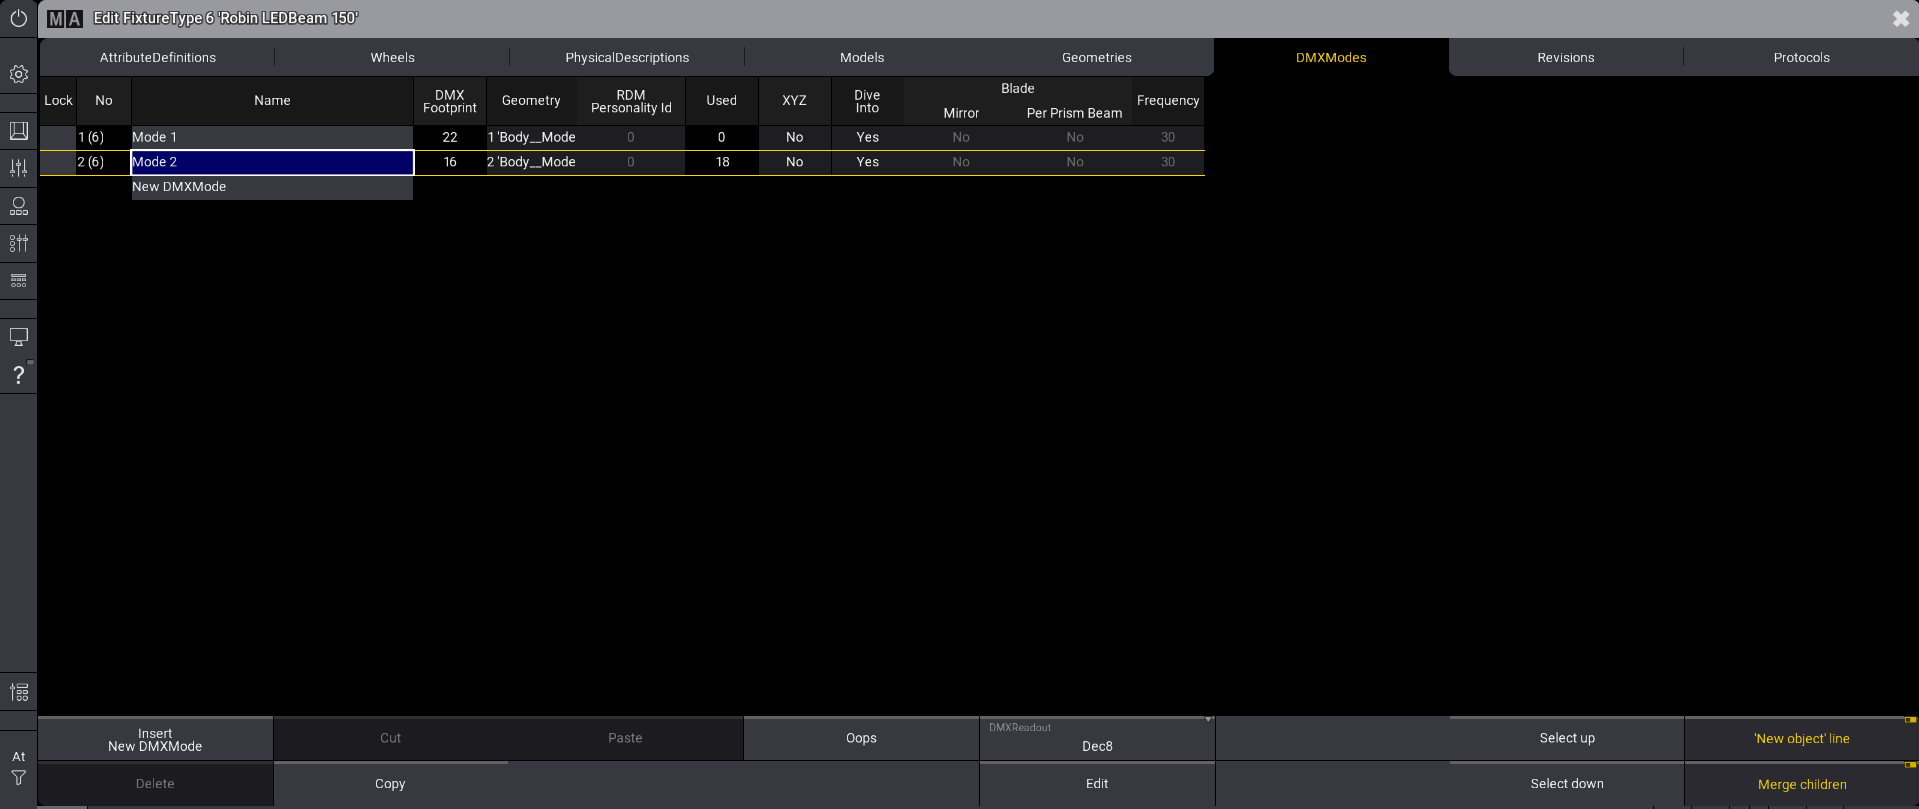\ *Fixture type editor* 1. Tap DMXModes at the top of the window. 2. Select the fixture type mode you want to edit and tap Edit at the bottom of the window. The editor displays the DMXChanels for the selected fixture type. 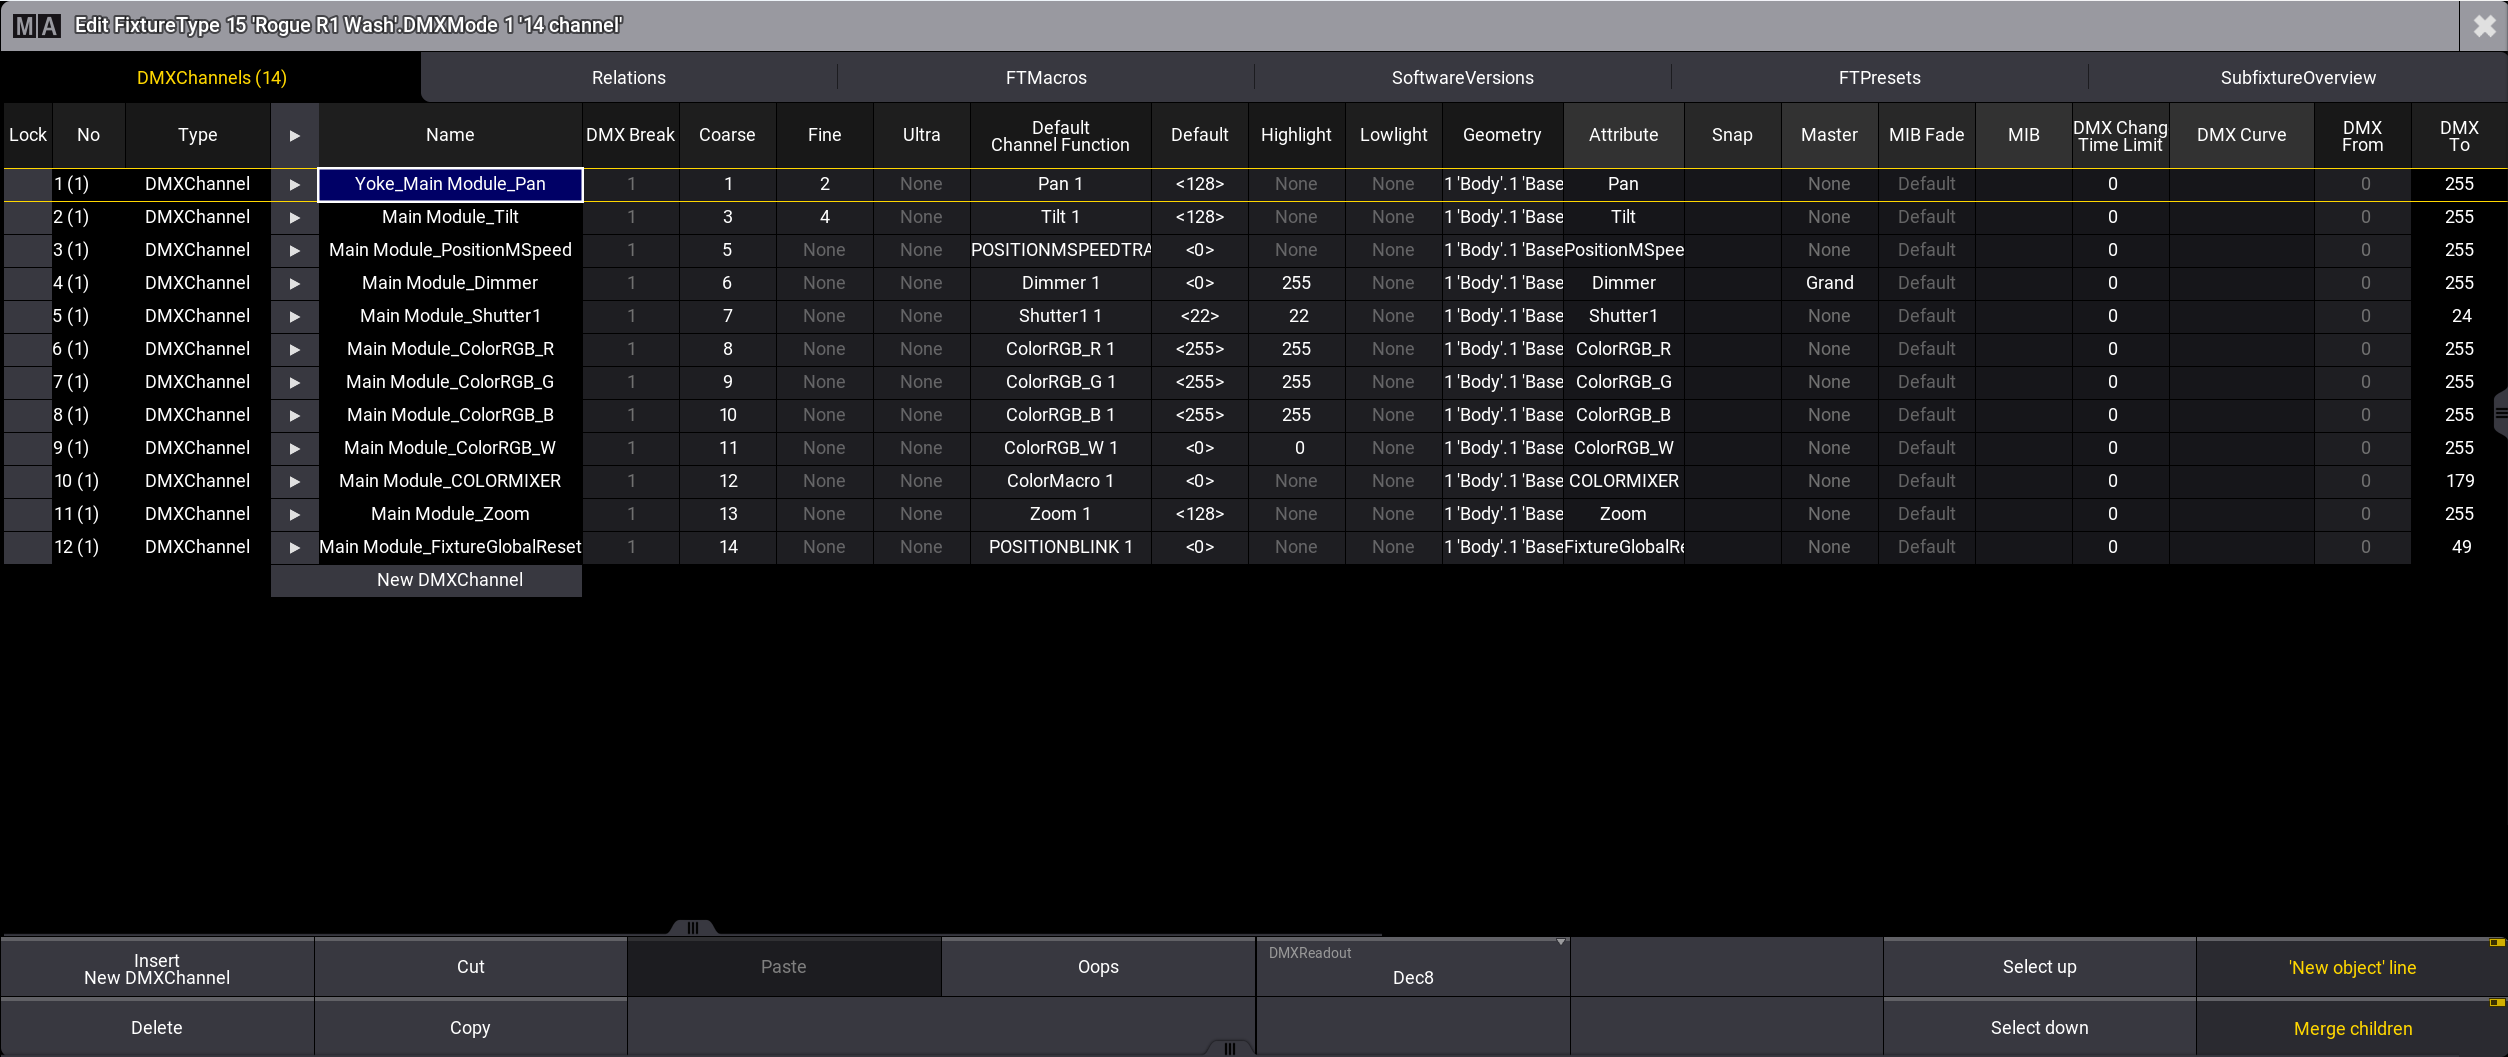 The DMX footprint for the selected fixture type is displayed in brackets in the DMXChannels tab. When you are done with the modifications, close the window. Changes will be saved when you exit the patch menu. The following topics will guide you on how to build a new fixture type.
# [EN] Quick Manual I/O Nodes
## Subtopics [Section titled “Subtopics”](#subtopics) * [Intended Use](/grandma3/2-3/key_i_o_node_intended_use/) * [Safety](/grandma3/2-3/key_i_o_node_safety/) * [Support](/grandma3/2-3/key_i_o_node_support/) * [Transport](/grandma3/2-3/key_i_o_node_transport/) * [Limitations](/grandma3/2-3/key_grandma3_i_o_node/) * [Installation](/grandma3/2-3/key_io_node_installation/) * [Quick Start](/grandma3/2-3/key_io_node_quick_start/) * [Maintenance](/grandma3/2-3/key_i_o_node_maintenance/) * [Disposal](/grandma3/2-3/key_i_o_node_disposal/) * [Technical Data](/grandma3/2-3/key_i_o_node_technical_data/) * [Hardware\_related Instances](/grandma3/2-3/key_pixel_faults_io_nodes/) * [Declaration of Conformity](/grandma3/2-3/key_i_o_node_conformity/)
# [EN] Quick Manual onPC command wing
## Subtopics [Section titled “Subtopics”](#subtopics) * [Intended Use](/grandma3/2-3/key_onpc_command_wing_intended_use/) * [Safety](/grandma3/2-3/key_onpc_command_wing_safety/) * [Support](/grandma3/2-3/key_onpc_command_wing_support/) * [Transport](/grandma3/2-3/key_onpc_command_wing_transport/) * [Limitations](/grandma3/2-3/key_onpc_command_wing_limitations/) * [Quick Start](/grandma3/2-3/key_onpc_command_wing_quick_start/) * [Maintenance](/grandma3/2-3/key_onpc_command_wing_maintenance/) * [Disposal](/grandma3/2-3/key_onpc_command_wing_disposal/) * [Technical Data](/grandma3/2-3/key_onpc_command_wing_technical_data/) * [Hardware-Related Instances](/grandma3/2-3/key_pixel_faults_command_wing/) * [Declaration of Conformity](/grandma3/2-3/key_onpc_command_wing_conformity/)
# [EN] Quick Manual onPC command wing XT
## Subtopics [Section titled “Subtopics”](#subtopics) * [Intended Use](/grandma3/2-3/key_onpc_xt_intended_use/) * [Safety](/grandma3/2-3/key_onpc_xt_safety/) * [Support](/grandma3/2-3/key_onpc_xt_support/) * [Transport](/grandma3/2-3/key_onpc_xt_transport/) * [Limitations](/grandma3/2-3/key_onpc_xt_limitations/) * [Quick Start](/grandma3/2-3/key_onpc_xt_quick_start/) * [Maintenance](/grandma3/2-3/key_onpc_xt_maintenance/) * [Disposal](/grandma3/2-3/key_onpc_xt_disposal/) * [Technical Data](/grandma3/2-3/key_onpc_xt_technical_data/) * [Hardware-related Instances](/grandma3/2-3/key_pixel_faults_command_wing_xt/) * [Declaration of Conformity](/grandma3/2-3/key_onpc_xt_conformity/)
# [EN] Quick Manual onPC fader wing
## Subtopics [Section titled “Subtopics”](#subtopics) * [Intended Use](/grandma3/2-3/key_intended_use/) * [Safety](/grandma3/2-3/key_safety/) * [Support](/grandma3/2-3/key_fader_wing_support/) * [Transport](/grandma3/2-3/key_fader_wing_transport/) * [Limitations](/grandma3/2-3/key_onpc_limitations/) * [Quick Start](/grandma3/2-3/key_fader_wing_quick_start/) * [Maintenance](/grandma3/2-3/key_fader_wing_maintenance/) * [Disposal](/grandma3/2-3/key_fader_wing_disposal/) * [Technical Data](/grandma3/2-3/key_fader_wing_technical_data/) * [Hardware-related Instances](/grandma3/2-3/key_pixel_faults_fader_wing/) * [Declaration of Conformity](/grandma3/2-3/key_fader_wing_conformity/)
# [EN] Quick Manual onPC rack-unit
## Subtopics [Section titled “Subtopics”](#subtopics) * [Intended Use](/grandma3/2-3/key_grandma3_rack_unit_transport/) * [Safety](/grandma3/2-3/key_rack_unit_safety/) * [Support](/grandma3/2-3/key_rack_unit_support/) * [Transport](/grandma3/2-3/key_rack_unit_transport/) * [Limitations](/grandma3/2-3/key_onpc_rack_unit_limitations/) * [Quick Start](/grandma3/2-3/key_rack_unit_quick_start/) * [Maintenance](/grandma3/2-3/key_rack_unit_maintenance/) * [Disposal](/grandma3/2-3/key_rack_unit_disposal/) * [Technical Data](/grandma3/2-3/key_rack_unit_technical_data/) * [Hardware-related Instances](/grandma3/2-3/key_pixel_faults_rack_unit/) * [Declaration of Conformity](/grandma3/2-3/key_grandma3_onpc-rack_unit/)
# [EN] Quick Manual viz-key
## Subtopics [Section titled “Subtopics”](#subtopics) * [Intended Use](/grandma3/2-3/key_viz_key_intended_use/) * [Safety](/grandma3/2-3/key_viz_key_safety/) * [Support](/grandma3/2-3/key_viz_key_support/) * [Transport](/grandma3/2-3/key_viz_key_transport/) * [Limitations](/grandma3/2-3/key_viz_key_limitations/) * [Quick Start](/grandma3/2-3/key_viz_key_quick_start/) * [Maintenance](/grandma3/2-3/key_viz_key_maintenance/) * [Disposal](/grandma3/2-3/key_viz_key_disposal/) * [Technical Data](/grandma3/2-3/key_viz_key_technical_data/) * [Hardware-related Instances](/grandma3/2-3/key_viz_key_processing_unit/) * [Declaration of Conformity](/grandma3/2-3/key_viz_key_conformity/)
# [EN] Quick Manual Node DIN-Rail
## Subtopics [Section titled “Subtopics”](#subtopics) * [Intended Use](/grandma3/2-3/key_dinrail_intended_use/) * [Safety](/grandma3/2-3/key_dinrail_safety/) * [Support](/grandma3/2-3/key_dinrail_support/) * [Transport](/grandma3/2-3/key_dinrail_transport/) * [Limitations](/grandma3/2-3/key_dinrail_limitations/) * [Installation](/grandma3/2-3/key_dinrail_installation/) * [Quick Start](/grandma3/2-3/key_dinrail_quick_start/) * [Maintenance](/grandma3/2-3/key_dinrail_maintenance/) * [Disposal](/grandma3/2-3/key_dinrail_disposal/) * [Technical Data](/grandma3/2-3/key_dinrail_technical_data/) * [Hardware-related Instances](/grandma3/2-3/key_pixel_faults_nodes_din/) * [Declaration of Conformity](/grandma3/2-3/key_dinrail_conformity/)
# [EN] Quick Manual consoles
## Subtopics [Section titled “Subtopics”](#subtopics) * [Intended Use](/grandma3/2-3/key_consoles_intended_use/) * [Safety](/grandma3/2-3/key_consoles_safety/) * [Support](/grandma3/2-3/key_consoles_support/) * [Transport](/grandma3/2-3/key_transport/) * [Limitations](/grandma3/2-3/key_consoles_limitations/) * [Quick Start](/grandma3/2-3/key_console_quick_start/) * [Maintenance](/grandma3/2-3/key_consoles_maintenance/) * [Disposal](/grandma3/2-3/key_consoles_disposal/) * [Technical Data](/grandma3/2-3/key_consoles_technical_data/) * [Hardware-related Instances](/grandma3/2-3/key_pixel_faults/) * [Declaration of Conformity](/grandma3/2-3/key_conformity/)
# [EN] Quick Manual Nodes
## Subtopics [Section titled “Subtopics”](#subtopics) * [Intended Use](/grandma3/2-3/key_xport_nodes_intended_use/) * [Safety](/grandma3/2-3/key_xport_nodes_safety/) * [Support](/grandma3/2-3/key_xport_nodes_support/) * [Transport](/grandma3/2-3/key_xport_nodes_transport/) * [Limitations](/grandma3/2-3/key_xport_nodes_limitations/) * [Quick Start](/grandma3/2-3/key_xport_node_quick_start/) * [Maintenance](/grandma3/2-3/key_xport_node_maintenance/) * [Disposal](/grandma3/2-3/key_xport_nodes_disposal/) * [Technical Data](/grandma3/2-3/key_xport_nodes_technical_data/) * [Hardware-related Instances](/grandma3/2-3/key_pixel_faults_nodes/) * [Declaration of Conformity](/grandma3/2-3/key_xport_node_conformity/)
# [EN] Quick Manual processing units
## Subtopics [Section titled “Subtopics”](#subtopics) * [Intended Use](/grandma3/2-3/key_pu_intended_use/) * [Safety](/grandma3/2-3/key_pu_safety/) * [Support](/grandma3/2-3/key_pu_support/) * [Transport](/grandma3/2-3/key_pu_transport/) * [Limitations](/grandma3/2-3/key_pu_limitations/) * [Quick Start](/grandma3/2-3/key_pu_quick_start/) * [Maintenance](/grandma3/2-3/key_pu_maintenance/) * [Disposal](/grandma3/2-3/key_pu_disposal/) * [Technical Data](/grandma3/2-3/key_pu_technical_data/) * [Hardware-related Instances](/grandma3/2-3/key_pixel_faults_pu/) * [Declaration of Conformity](/grandma3/2-3/key_pu_conformity/)
# Executors
> The executors are handles and controls to other objects.
The executors are handles and controls to other objects. They are often used to control sequences, but they can control other objects. The idea is that an object (for instance, a sequence) is assigned to the executor. The executor can then control the object. Several executors can control the same object. A sequence assigned to an executor is running cues from the sequence pool. In essence, the executor is manipulating or sending commands to the sequence in the pool. Executors are physical keys (executor buttons), knobs (executor knobs), and faders (executor faders) on the grandMA3 hardware. They can also be represented as on-screen virtual executors - these can be viewed and operated in the [Playback Window](/grandma3/2-3/executor/#playback_window) (see below). Read more about the physical executor hardware in the [Executor Elements topic](/grandma3/2-3/do_control_executor/). There are 4 rows of executors. The bottom row is numbered from 101 up to 190. This row only has a single executor button. The row above is numbered from 201 up to 290. This row has an executor button and an executor fader. The next row is from 301 up to 390. This row has an executor button and a rotating executor knob. The top row is from 401 up to 490. This row also has an executor button and a rotating executor knob. The Xkeys are also executors. The executor buttons labeled X1 | Clone to X8 | DMX are executor 291 to 298. The executor buttons labeled X9 to X16 | Exec are executors 191 to 198. Executors are organized in wings. There are vertically 15 columns of executors on a wing. The columns are organized in sections of 5. There are 60 (15 columns x 4 rows) executors on a wing. There are 6 wings for a total of 360 (6 wings x 60 executors) executors plus the 16 from the Xkeys - the total is 376. The physical device might have fewer executors than the software’s amount. For instance, the grandMA3 compact console has 2 x 5 columns of executors. The executors can also be used from the command line using the [Executor keyword](/grandma3/2-3/keyword_executor/). ## []()Executor Pages [Section titled “Executor Pages”](#executor-pages) The 376 executors are just on one page. It is possible to create up to 9 999 executor pages in each [Data Pool](/grandma3/2-3/datapool/). Each page has its own setup of executors. Executors that are active on one page are still active when the selected page is changed to another. The executor pages can be seen and labeled in the **Page Pool** - it can be [created as a window](/grandma3/2-3/wvm_add_window/).  *Page pool with page 1 selected.* The page pool is also available as a pop-up that can be opened by tapping the middle part of the page selector.  *Tap the middle part of the page selector to open the page pool pop-up* There are no functional differences between the pool as a pop-up or window. Pages are automatically created when the Page+ and Page- keys are used to change through the pages. The up and down arrows in the page selector can also be used to change the page, just like the physical keys. A page can also be created using the following syntax: Store Page \[Page\_Number] (\[“Page\_Name”]) The page name is optional in the syntax above. Read more in the[ Page keyword](/grandma3/2-3/keyword_page/) topic. ## Executor Labels [Section titled “Executor Labels”](#executor-labels) The letterbox screens above the executors show the labels for the executors. The bottom of the left command screen shows the labels for the Xkeys. 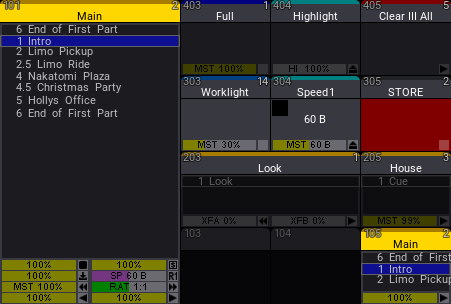 *Example of the playback bar for the first section of 5 x 4 executors* The executor labels above the executors are a part of the Playback Bar. Read more bout them in the [Playback bar topic](/grandma3/2-3/ws_playback_bar/). The labels display how the encoders are grouped, what object they control, and what handle function each executor has. Read more about how to change all these things in the [Assign Object to an Executor topic](/grandma3/2-3/executor_assign/). The labels take appearance and scribbles from the object assigned. For example, if a sequence has a special appearance, this appearance is also displayed in the playback bar. ## []()Playback Window [Section titled “Playback Window”](#playback-window) The Playback window is a virtual representation of the physical executors. 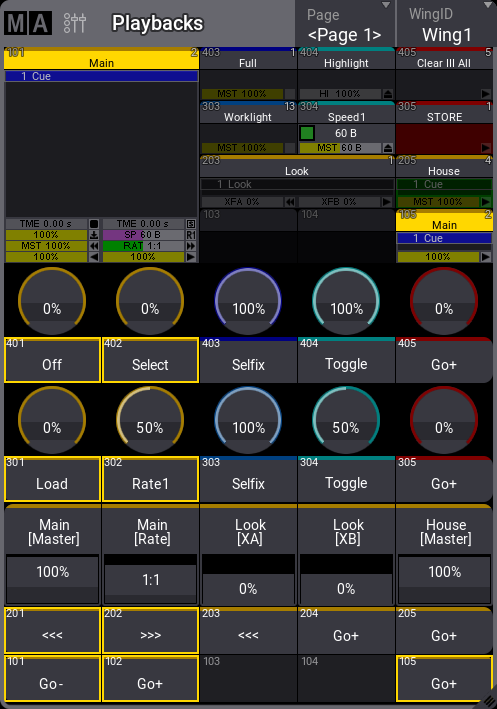 *Playback window showing all four rows and both labels and executor handles* The window can automatically adjust the number of visible executors based on the window’s width and the selected number of sections. This means that a window can minimum have 5 x 4 executors and a maximum of 15 x 4 (one wing). The window’s minimum size to display a section of 15 executors is 10 squares wide on a screen. The virtual executors can be operated on the screen. ### Playback Window Settings [Section titled “Playback Window Settings”](#playback-window-settings) The settings allow for customization of the window. The settings can be accessed by tapping the MA logo in the upper left corner. 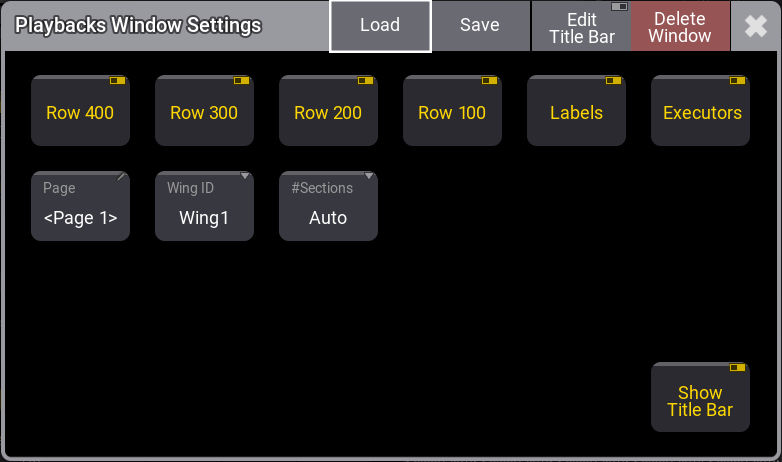 Playback window settings There are toggle buttons that can show or hide the four executor rows. There are also settings to show or hide the labels and the executor handles. This makes it very flexible. For instance, it could just show the labels for the 200 row of executors or just the executor handles for the 100 row executors. The Page and WingID settings are also described in the [Window Settings](/grandma3/2-3/wvm_settings/) topic. The Executors setting toggles the displayed on-screen copies of the relevant faders, knobs, and keys. In additon, Labels shows or hides the executor or Xkeys labels. The #Sections setting selects how many sections of five columns the window should display. The properties are: * **Auto**:\ The window displays as many sections as possible based on the width of the window and a minimum width of each column. * **1**:\ The window only shows the first section of executors - 5 columns. * **2**:\ The window shows the first and second sections of executors - 10 columns. * **3**:\ The window shows all three sections of executors in the wing - 15 columns. The properties with a specified number of sections will always show the selected amount, even when the window width makes it hard to use. Subtopics * [Executor Configurations](/grandma3/2-3/executor_configurations/) * [Assign Object to an Executor](/grandma3/2-3/executor_assign/) * [Running Playbacks](/grandma3/2-3/executor_running_playbacks/) * [Special Executors](/grandma3/2-3/executor_special/)
# Assign Object to an Executor
> Many objects can be assigned to an executor. The executor is a physical key, fader, or encoder that controls the assigned object. The physical devices can also
Many objects can be assigned to an executor. The executor is a physical key, fader, or encoder that controls the assigned object. The physical devices can also be represented as on-screen controllers. | | | | ------------------------------------------ | ---------------- | |  | **Quick Steps:** | | | 1. Press Assign. | 2. Tap what should be assigned or press the relevant keys. 3. Press the executor where it should be.These are the simplest steps to assign something to an executor - read below for details. | ## Assigning Objects Using Keys and Pools [Section titled “Assigning Objects Using Keys and Pools”](#assigning-objects-using-keys-and-pools) It is easy to assign something to an executor. Press Assign followed by the desired object and then the executor to which it should be assigned. Here are three variations on how it works. The examples use sequences, but it can be any of the allowed types: #### Example 1 [Section titled “Example 1”](#example-1) Using only the keys to assign sequence 3 at executor number 105 on the current page, type: Assign Sequ 3 At MA + X16 | Exec 1 0 5 Please #### Example 2 [Section titled “Example 2”](#example-2) It is also possible to use a combination of keys and pools. Having a pool visible on one of the screens makes it possible to combine key presses with pool selection. 1. Tap and swipe out of the sequence pool object that should be assigned. 2. Swipe to the Assign option and release the screen. 3. Press one of the keys associated with the desired executor. #### Example 3 [Section titled “Example 3”](#example-3) Pressing the keys puts keywords into the command line. This means it can also be typed as a command line input. | | | | ------------------------------------------------------------------ | --------------------------------------------------- | |  | User name\[Fixture]>Assign Sequence 4 At Page 2.301 | This command will assign sequence 4 to executor 301 on executor page 2. The page keyword needs to be used when addressing executors on specific pages. The page needs to exist before it can be addressed. | | | | ------------------------------------------ | --------------------------------------------------------------------------------------------------------- | |  | **Hint:** | | | The process for assigning special executors and Xkeys is the same as the process described for executors. | *** ## Assign Objects Using the Assign Menu [Section titled “Assign Objects Using the Assign Menu”](#assign-objects-using-the-assign-menu) The **Assign** menu offers a visual approach to assigning something to the executors. Use the assign menu by selecting the executor first and then selecting the object. There are three main ways to open the Assign Menu: * Press Assign followed by any of the keys associated with the desired executor. * Tap the executor label in the [Mini Executor Bar](/grandma3/2-3/ws_playback_bar/) (do not do a long press - it opens the editor instead). * Tap on the desired executor in the the Playbacks Window or the [Playback Controls](/grandma3/2-3/ws_playback_controls/) menu. This is the Assign menu:  *Assign Menu - Object tab* The title bar has a toggle button called Lock Executor. This can be used to lock the executor from changes. It does not lock the executor from playing back or performing other functions normally; the lock only prevents making changes to the executor. This is the **Object** page of the Assign menu. This page is selected by tapping Object on the right side. The top has several tabs. One for each object type that can be assigned to the executor and a special one used to select an **Empty** object. The other tabs open a selection list. The list will contain the possible objects of that type. The different types are: * [Sequence](/grandma3/2-3/cue_sequence/) * [Master](/grandma3/2-3/masters/) * [Group](/grandma3/2-3/group/) * [Macro](/grandma3/2-3/macros/) * [Quickey](/grandma3/2-3/quickeys/) * [Preset](/grandma3/2-3/presets/) * [Sound](/grandma3/2-3/sound/) * [World](/grandma3/2-3/worldfilter/) * [View](/grandma3/2-3/wvm/) * [User](/grandma3/2-3/user/) * [UserPlugin](/grandma3/2-3/plugins/) * [ScreenConfig](/grandma3/2-3/wvm/) * [Timer](/grandma3/2-3/timers/) Tap Sequence to open the list of possible sequences. It could look like this: 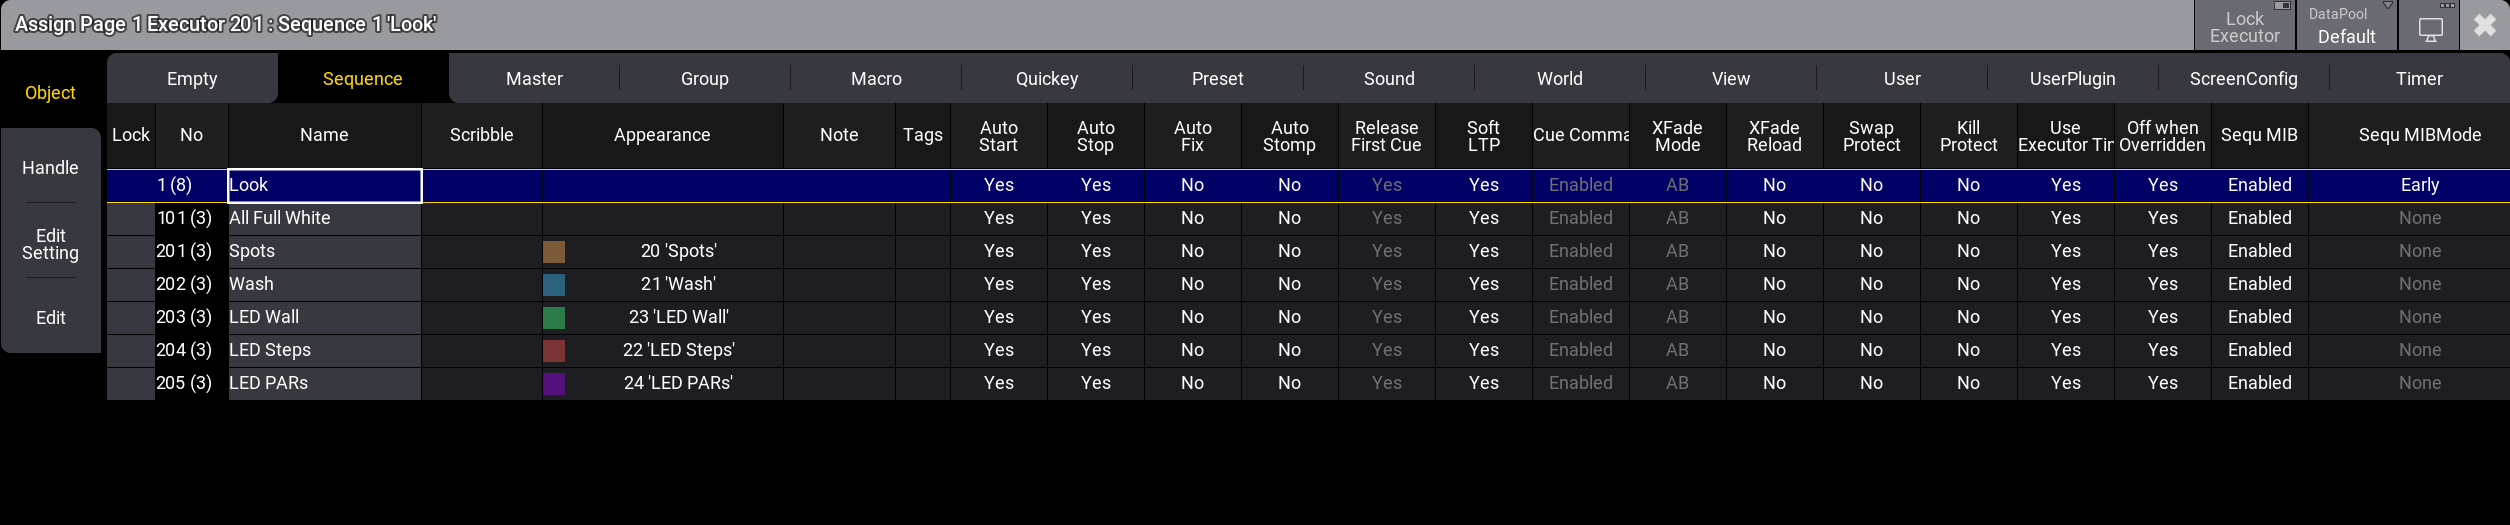 *Assign menu in the sequence object tab with Sequence 1 ‘Look’ selected* Each allowed type that can be assigned to an executor provides a list of the available objects. The DataPool in the title bar makes selecting an object from a different data pool easy. Select the desired object by tapping it. The default [Executor Configuration](/grandma3/2-3/executor_configurations/) for the object type is applied to the executor when assigning an object to an empty executor. When there is already an object assigned, the executor configuration is not recalled, when assigning a different object to the executor. This, including executor expansion, can be defined in the handle tab. *** ## Change Key Function and Executor Size Using the Handle Tab [Section titled “Change Key Function and Executor Size Using the Handle Tab”](#change-key-function-and-executor-size-using-the-handle-tab) When the executor, special executor, or Xkey has something assigned, changing the functions assigned to the executor keys, faders, and encoders is possible. It is also possible to assign functions using keys or commands. For more information, read [below](/grandma3/2-3/executor_assign/#h2_1870226992). If continuing to work in the Assign menu, tap Handle on the left side. It could look like this:  *Assign menu on the Handle tab with Sequence 1 ‘Look’ and the key executor 201 selected* The handle tab of the assign menu is split up in two sides. On the left hand side of the menu a table represents the executors of of the same section. The assign menu of the special executors displays all special executors. The right side of the menu is designed to set different options for the selected executor. The executor section is displayed on the left. The selected executor button is indicated by a yellow frame and is brighter compared to executors that are not selected. The title bar is blinking in red. The name of the assigned object is displayed in the middle of title bar. The starting number of the executor is on the left and the number of the assigned pool object on the right. The example image above shows executor 201 with space above and to the right. The size of the selected executor can be extended using any of the four resize corners (). Executors can be expanded if there are empty executors next to them. Depending on whether the resizing or moving of an executor was successful or not, the border of the executor will shortly flash green or red. To move the entire executor, tap, hold, and drag in the executor’s title bar. Tapping an executor with a less saturated appearance will select this executor. The elements (key, fader, or encoder) of the selected executor are indicated by icons in the upper left corner. The selected function, except fader functions, with the corresponding icon is displayed in the center. The color of the bar at the top of the executor button indicates the assigned object category (Sequence, Master, Group, etc.). The rest of the button will be the same color as the appearance color of the object if the button is not selected. If a button has more than one trigger option assigned to it, the button will split to display the multiple options. If executors have multiple functions assigned, and the assigned objects have individual appearances, then it could look like this: 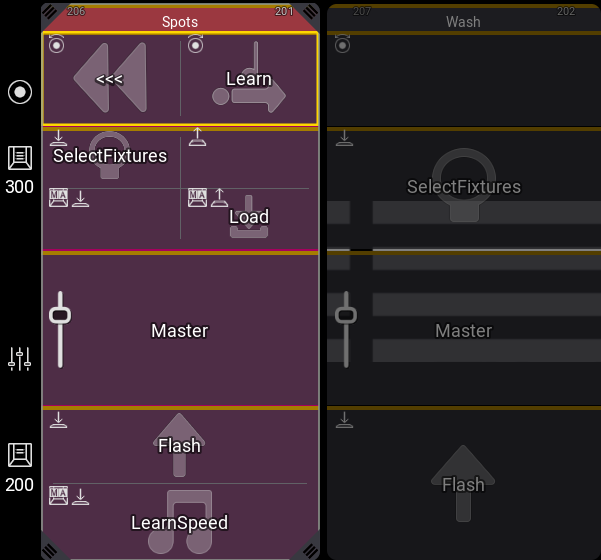 *Two executors with executor 206 ‘Spots’ selected* *** The keys, faders, and encoders have different functions. The available functions depend on the object assigned to the executor and the executor itself. Different functions are available when using a key, fader, or encoder. Set different options for the selected executor, on the right side of the handle tab. Depending on whether a key, fader or encoder is selected, the menu on the right changes. At the top, choose how to trigger the key, fader, or encoder. A key can have up to four different trigger options: * : Press the key to trigger the selected function. * : Release the key to trigger the selected function. * : Press and hold MA and press the key to trigger the selected function. * : Release MA and the key to trigger the selected function. An encoder has six different trigger options: * : Rotate the encoder to the left to trigger the selected function. * : Rotate the encoder to the left to decrease the value of the selected function and to the right to increase the value. * : Rotate the encoder to the right to trigger the selected function. * : Press and hold MA and rotate the encoder to the left to trigger the selected function. * : Press and hold MA and rotate the encoder to the left to decrease the value of the selected function and to the right to increase the value. * : Press and hold MA and rotate the encoder to the right to trigger the selected function. A fader has one trigger option: * : Move the fader up or down to use the selected function.
# Executor Configurations
> Executor key and fader configurations can be saved and reused. Read the Assign Object to an Executor topic for information on changing the assignment.
Executor key and fader configurations can be saved and reused. Read the [Assign Object to an Executor topic](/grandma3/2-3/executor_assign/) for information on changing the assignment. The configurations are stored in an Executor Configuration pool. This can be created as any other window. Read the [Add Window topic](/grandma3/2-3/wvm_add_window/) to learn how. 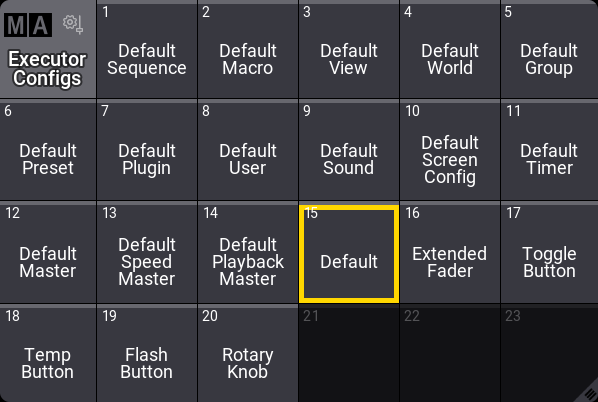 *Executor Configuration pool with a selected configuration* Each object type that can be assigned to an executor has a default executor configuration used if nothing changes. This is described below. The selected pool object is used as the default for sequences. This configuration can be changed in the **Assign Menu.** The Assign Menu can be opened by pressing Assign and then an executor button. The menu is used to set up executors. Learn more in the [Assign Object to an Executor topic](/grandma3/2-3/executor_assign/). 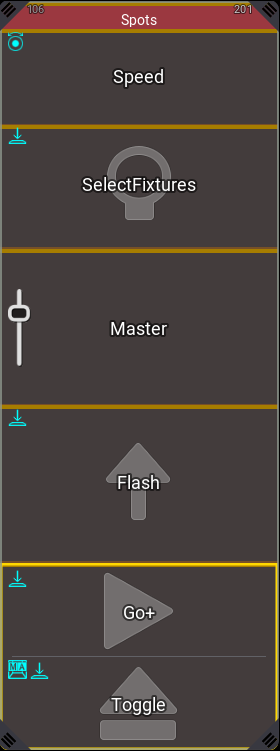 *Key and Fader configurations* In the example above, there are several Keys and Encoders that have a different assignment than the original saved configuration. The different assignments are marked with a cyan color bar. In the title bar of the assign menu, is Executor Config. button.  *Title bar of the assign menu* Executor Config. shows the currently selected configuration, and tapping it opens a small select pop-up where any existing executor configurations can be selected or a new one can be created. Load is used to load the selected configuration onto the keys, encoders, and faders. Save can be used to save the currently assigned functions to the selected configuration. For more information on the pop-up and creating and editing executor configurations in the handle tab of the assign menu, read [Assign Object to an Executor](/grandma3/2-3/executor_assign/#h2_420566424). *** Editing the configuration pool object opens an editor like this: 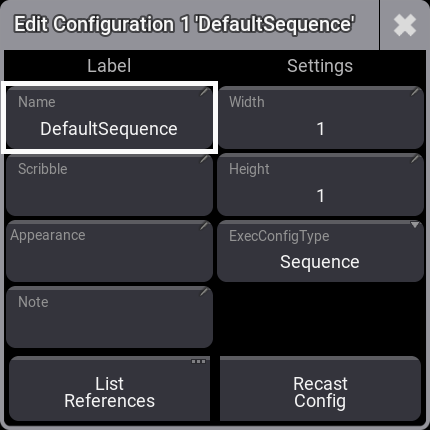 *Edit configuration pop-up for the first pool object* Here it is possible to change the name of the executor configuration. This is also where the executor configuration’s width and height are set. It is not shown here, but the configuration also knows the starting row for the configuration. This means that a configuration of 1x1 can be different for each of the four rows. The ExecConfigType defines what type of object the setting is relevant for. Tapping the button opens a small pop-up with all the possible objects. The executor configuration can also have an appearance and scribble assigned. This is only visible in the pool. A note can be added to the executor configuration. Tapping List References opens an info pop-up showing the objects that reference the configuration and what other objects this configuration might depend on. Recast Config is used when a configuration has been saved with changes, and these changes should also be applied to the other executors that use this configuration. Saving a change to a configuration does not automatically apply the changes to other executors. Pressing Recast Config applies the changes to all the executors using the configuration. The recast can also be applied using the [Recast keyword](/grandma3/2-3/keyword_recast/). *** ## []()Executor Configuration Preferences [Section titled “Executor Configuration Preferences”](#executor-configuration-preferences) The default executor configuration for each object is stored in the Preference and Timing. This is accessed by pressing Menu / and then Preference and Timings, and finally Executor Config. 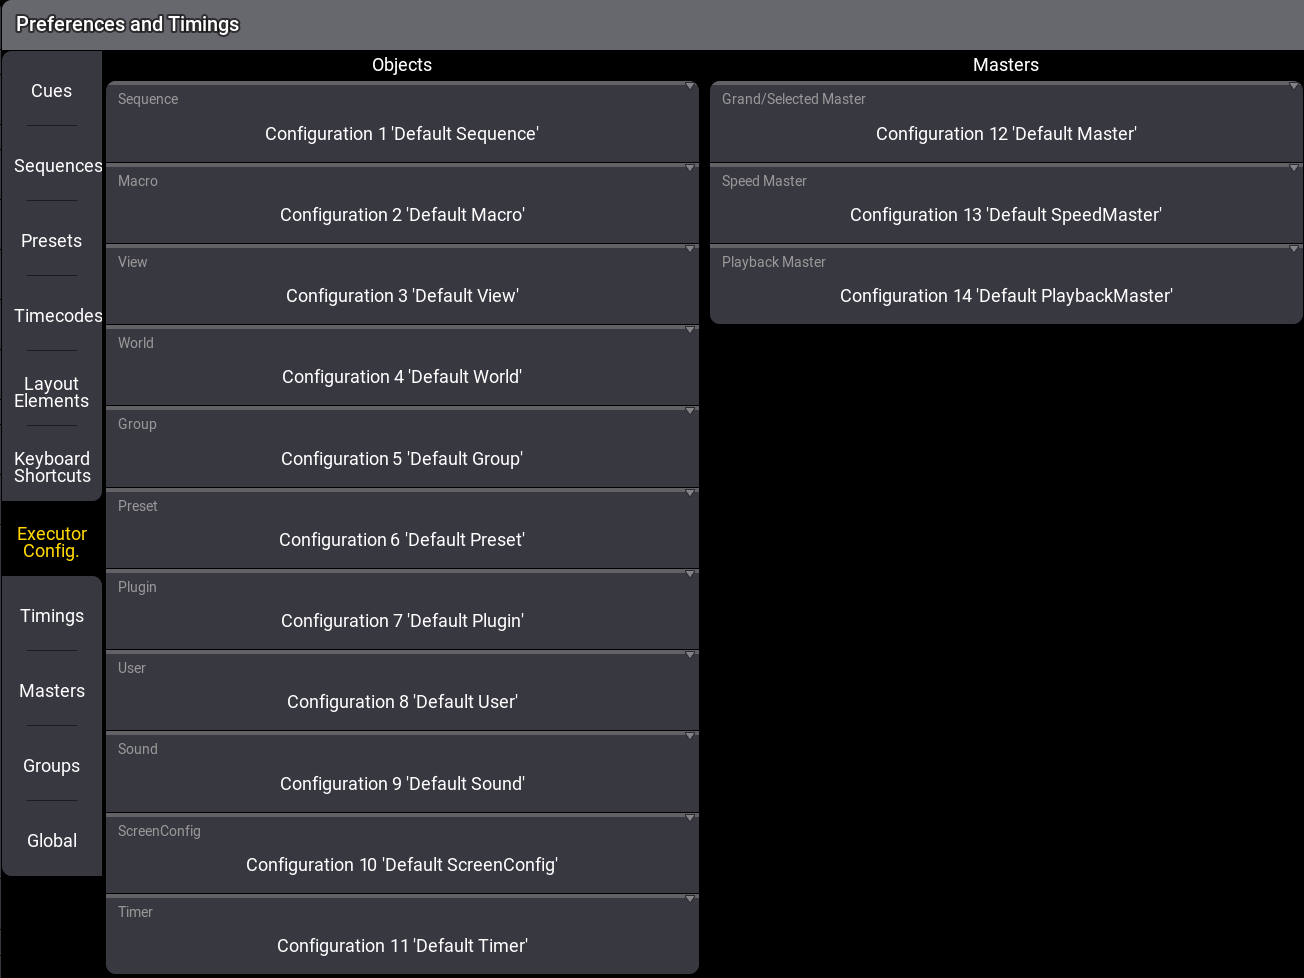 Preferences and Timings - Executor Config menu This menu has a setting for each object type that can be assigned to an executor. Tapping each of these settings opens a small select pop-up where any of the executor configurations can be selected as the default settings for the object type.
# Running Playbacks
> There are two ways to see the different running playbacks. This can be useful when trying to find out what is running and also to quickly turn off different pla
There are two ways to see the different running playbacks. This can be useful when trying to find out what is running and also to quickly turn off different playbacks. ## []()Running Playback Window [Section titled “Running Playback Window”](#running-playback-window) It can be a window on a screen. This is called **Running Playbacks** and can be [created like any other window](/grandma3/2-3/wvm_add_window/). It is in the “More” tab.  \_Running playback window \_ Each running object is displayed as a pool object and can be interacted with like any other pool object. For instance, it is possible to use the [Off keyword](/grandma3/2-3/keyword_off/) to turn off an object by pressing Off and then tapping the object in the window. This window can show different types of objects: Sequences, Macros, Timecodes, Presets, Timers, SoundFiles, and Generators. Toggle between them by tapping the Sequence, Macros, Timecodes, Presets, Timers, or SoundFiles tabs or select All to see all the different types. The title bar has a button that can activate the “Off Mode”. With this On, objects are immediately turned off when tapped in the window. Tap Off Mode to toggle between the On and Off states. After Hold List is enabled, playbacks that are switched off will be grayed out. This stops the **Running Playbacks** window from constantly updating the list of running playbacks, especially when many sequences are flashing. It is possible to filter the objects in the window to display only the playbacks started by a specific user by changing the Started by setting in the title bar or in the window settings. This can be overridden to only show playback triggered by the user currently logged in on the station, by tapping My Playbacks Only in the title bar. Disabling My Playbacks Only again resets Started by to its previous value. The number in the lower right corner of each tab indicates how many playbacks of its object type are currently running. As soon as My Playbacks Only is active, or Started by is set to something else than **\** , or SelectedDataPool in the Window Settings\*\* \*\*is set to something else than **All DataPools,** two numbers will be displayed: **x** / **y**. * **x**: Represents the number of running playbacks based on the made settings. * **y**: Represents the number of all running playbacks. The title bar also has a Sheet Style button. This turns the sheet style On or Off for this window. The default style is pool style, like the image above. Sheet style could look like this:  *Running playbacks window in sheet style - one sequence and one timer started by Guest* This mode shows more details and displays all the extra information available on pool objects. For example, the **Trigger** column indicates which object started the playback. Selecting a specific data pool and changing the font size are the only other options for the **Running Playbacks** window. All settings can be found in the **Running Playback Settings**, which can be opened by tapping the MA logo in the upper left corner of the title bar. ## []()Off Menu [Section titled “Off Menu”](#off-menu) The other way to see running playbacks is to open a temporary version of the window. This is called the **Off Menu**. It is opened by pressing Off twice:  *Off Menu in \ mode*
# Special Executors
> Special executors include the grand master knob as well as the keys, knobs, faders, encoders, and wheels found in the custom area and master area. By default, t
Special executors include the grand master knob as well as the keys, knobs, faders, encoders, and wheels found in the custom area and master area. By default, they are assigned to control a useful assortment of masters. As with other executors, changing the assignment of special executors allows control of many types of objects, including sequences, masters, plugins, groups, macros, worlds, and views. The different areas containing special executors are always displayed to the right of the relevant letterbox screens corresponding to the hardware below the screens. The **Custom Master Section** window displays the current assignment and status of the special executors in the two custom areas, the master area and the grand master knob. This window can also include on-screen versions of the special executor encoders, wheels, knobs, and keys; as well as the Go+, Go-, and Pause keys for the selected sequence. Tap the  icon in the control bar to open the **Custom Master Section** temporarily. The **Custom Master Section** window is available under the More and All tabs in the **Add Window** pop-up.  Custom/Master Section window The Custom/Master Section window contains three main areas: * Custom area encoders and wheels are displayed on the left side of the window when all sections are visible. * Master area, including the Go+, Go-, and Pause buttons for the selected executor, is displayed in the center of the window when all areas are visible. * Grand master area, displayed on the right side of the window when all sections are visible. These three main areas can include labels and a visualization of the associated hardware. When both labels and hardware are visible, the label for each special master appears directly above the associated hardware. In addition, page navigation buttons can be shown along the window’s right edge. Tap MA in the upper left corner of the window to open the Window Settings pop-up. 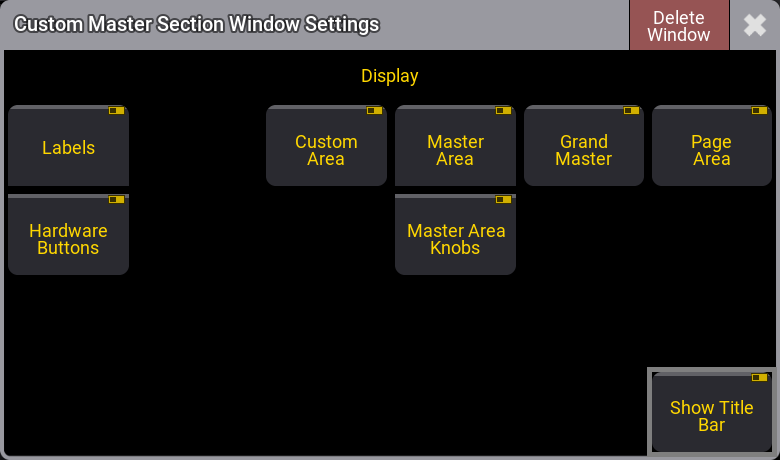 Custom/Master Section Window Settings pop-up Tap Labels to show or hide the labels for all visible sections. Tap Hardware Buttons to show or hide the hardware visualizations for all visible sections. Tap Custom Area, Master Area, Grand Master, Page Area, and Master Area Knobs to show or hide the corresponding area of special executors or page navigation controls. Tap Show Title Bar to show or hide the title bar of the window. | | | | ------------------------------------------ | ------------------------------------------------------------------------------------------------------------------------------ | |  | **Hint:** | | | The Hardware Buttons and Master Area settings must all be enabled in order for the **Default Playback** buttons to be visible. | | | | | ------------------------------------------ | --------------------------------------------------------------------------------------------------------------------------- | |  | **Hint:** | | | As elements are hidden, the remaining visible elements automatically rescale to fill the available space within the window. | Tap the label of the **Default Playback** area to open the **Edit Sequence** for the selected sequence. Tap the label of any special executor to open the **Assign Menu** for that special executor. The options available in the **Assign Menu** for a special executor are the same as the options for any other executor. For more information on the assignment process, see the [Assign Object to an Executor](/grandma3/2-3/executor_assign/) topic. *** ## Special Executor 5 and the Grand Master [Section titled “Special Executor 5 and the Grand Master”](#special-executor-5-and-the-grand-master) By default, the grand master is assigned to special executor 5. Press Assign, then press the special executor 5 knob to open the **Assign Menu** for special executor 5. Use the **Assign Menu** to assign any desired object to special executor 5. | | | | ------------------------------------------ | ------------------------------------------------------------------------------------------------------------------------------------------------------------------------------ | |  | **Hint:** | | | Since the hardware associated with special executor 5 consists of only a knob with no additional key, it is possible to assign a normal key function to the press of the knob. | When any object other than the grand master is assigned to special executor 5, the area of the encoder bar that normally shows the grand master adjusts to show both the grand master and a label for the object assigned to special master 5.  Encoder bar showing both sequence 1, assigned to special master 5, and the grand master.
# Extended Command Line Syntax Options
> To control the input in the command line use the List keyword any time.
To control the input in the command line use the [List keyword](/grandma3/2-3/keyword_list/) any time. For more information about the command line and the Command Line History, read the [command line topic](/grandma3/2-3/ws_ui_command_line/). To list all available subfolders, type: | | | | ------------------------------------------------------------------ | ------------------------- | |  | User name\[Fixture]> List |  List view in Command Line History
# Supported File Formats
> Make sure to use one of the following formats in the grandMA3 software.
Make sure to use one of the following formats in the grandMA3 software. ### Sound File Format [Section titled “Sound File Format”](#sound-file-format) | Format and File Name Extension | | ------------------------------ | | Vorbis (.ogg) | | | | | ------------------------------------------ | ---------------------------------------------------------------------- | |  | **Hint:** | | | A bit rate of 192 kbps and a sample rate of 44.1 kHz are recommended. | *** ### Video File Formats [Section titled “Video File Formats”](#video-file-formats) | Format and File Name Extension | Licensing | | ------------------------------ | ------------- | | VP8 (.webm) | Not necessary | | VP9 (.webm) | Not necessary | | | | | ------------------------------------------ | -------------------------------------------------------------------------------------------------------------------------------------------------------------------------------------------------------------------------------------------------------------- | |  | **Hint:** | | | With VP8, the video size will be larger, but the CPU will not be used as much as with VP9. Use VP8 when you need better performance, such as when you need to stream multiple videos at the same time. If your goal is to use less memory for videos, use VP9. |
# File Management
> In addition to saving and loading complete show files, the grandMA3 software supports the exchange and portability of smaller portions of show data; for example
In addition to saving and loading complete show files, the grandMA3 software supports the exchange and portability of smaller portions of show data; for example, a collection of macros or even a single preset. To maintain a predictable organizational structure, the software uses well-defined sets of folders within the hard drive of the console, the hard drive of a computer running grandMA3 onPC, and any USB drive connected to either a console or an onPC station. The following topics cover data transfer between a client and the console, as well as the default folder structure created and utilized by the software. For more information about the handling of complete show files, see the [Show File Handling](/grandma3/2-3/show_file_management/) topic. | | | | ------------------------------------------------ | ----------------------------------------------------------------------------------- | |  | **Important:** | | | The file name must not contain the following characters: \ ” $ \* ? ^ \| / : < > \` | ## Subtopics [Section titled “Subtopics”](#subtopics) * [SFTP Connection to a Console](/grandma3/2-3/fm_sftp/) * [Folder Structure](/grandma3/2-3/fm_folder_structure/)
# First Steps
> This chapter describes how to prepare the grandMA3 consoles and the grandMA3 onPC for operation, from unpacking the device to turning it on for the first time.
This chapter describes how to prepare the grandMA3 consoles and the grandMA3 onPC for operation, from unpacking the device to turning it on for the first time. ## Subtopics [Section titled “Subtopics”](#subtopics) * [Unpack the Device](/grandma3/2-3/fs_unpack_device/) * [Check Scope of Delivery](/grandma3/2-3/fs_scope_delivery/) * [Position the Device](/grandma3/2-3/fs_postition_device/) * [Connect Power](/grandma3/2-3/fs_connect_power/) * [Connect Desk Light](/grandma3/2-3/fs_connect_desk_light/) * [Connect External Screens](/grandma3/2-3/fs_connect_external_screens/) * [Connect USB Devices](/grandma3/2-3/fs_connect_usb/) * [Connect DMX](/grandma3/2-3/fs_connect_dmx/) * [Connect Audio In](/grandma3/2-3/fs_connect_audio_in/) * [Connect MIDI](/grandma3/2-3/fs_connect_midi/) * [Connect Sound Out](/grandma3/2-3/fs_connect_sound/) * [Connect LTC](/grandma3/2-3/fs_connect_smpte_ltc/) * [Connect Ethernet](/grandma3/2-3/fs_connect_ethernet/) * [Connect DC Remote In](/grandma3/2-3/fs_connect_dc_remote_in/) * [Connect grandMA3 extension](/grandma3/2-3/fs_connect_extension/) * [Connect grandMA3 fader wing](/grandma3/2-3/fs_connect_fader_wing/) * [Connect grandMA3 viz-key](/grandma3/2-3/fs_connect_viz_key/) * [Turn on the device for the first time](/grandma3/2-3/fs_turn_on_the_device/) * [Shut Down the System](/grandma3/2-3/shutdown_the_system/)
# Fixture Types
> Fixture types are used to visualize and control real-life fixtures on stage.
Fixture types are used to visualize and control real-life fixtures on stage. A fixture type is a footprint of an actual fixture, smoke machine, laser, media server, dimmer, or anything to be controlled and visualized with a grandMA3 console. A fixture type is described with the following parameters: * modes * channels * physical properties You can find many fixture types and manufacturers in the grandMA3 library. Fixture types are also available for download from MA Fixture Share and GDTF Share webpages. Beyond that, it is possible to build a fixture from scratch with its parameters and attributes using the fixture builder! The grandMA3 software includes its fixture builder.\ Using the GDTF Builder is also an option. *** ## Links [Section titled “Links”](#links) For more information on Fixture Share, see . For more information on GDTF Share, see . For more information on GDTF Builder, see . ## Subtopics [Section titled “Subtopics”](#subtopics) * [Import Fixture Types](/grandma3/2-3/ft_import/) * [Fixture Types Editor](/grandma3/2-3/edit-fixture-types/) * [Build Fixture Types](/grandma3/2-3/ft_build/) * [Export Fixture Types](/grandma3/2-3/ft_export/)
# Programmer Layers
> Values for the selected layer can be displayed in the Sequence Sheet, the Content Sheet, and the Fixture Sheet.
Values for the selected layer can be displayed in the [Sequence Sheet](/grandma3/2-3/cue_sequence_sheet/), the [Content Sheet](/grandma3/2-3/cue_content_sheet/), and the [Fixture Sheet](/grandma3/2-3/operate_fixture_sheet/). Layers can be set from the Encoder Bar, the Layer Toolbar, or by typing the corresponding layer keyword. For more information, see [General Keywords](/grandma3/2-3/csk_general_keywords/). To enable the **Layer Toolbar** in the fixture sheet, see [Fixture Sheet Settings](/grandma3/2-3/fixture-sheet-settings/). \ *Fixture sheet layer toolbar* The CueAbs layer displays each attribute’s sequence, cue, and part numbers with an absolute value originating from a running playback. The displayed information refers to the playback that defines the current output value for the attribute. For more information, see [CueAbsolute](/grandma3/2-3/keyword_cueabsolute/) keyword. Typical values, such as a selected static position, are displayed in the **absolute** value layer. The CueRel layer displays each attribute’s sequence, cue, and part numbers with a relative value originating from a running playback. The displayed information refers to the playback that defines the current output value for the attribute. For more information, see [CueRelative](/grandma3/2-3/keyword_cuerelative/) keyword. A mauve marker indicates relative values. The\*\* Fade\*\* layer can be used to adjust and see individual fade times. Individual fade times are indicated with a green marker. The **Delay** layer can be used to adjust and see individual delay times indicated by an orange marker. The [Sequence Sheet]() in Track Sheet mode best looks at these values. Learn more about [Individual Attribute Timing](/grandma3/2-3/cue_timing/) in the [Cues and Sequences](/grandma3/2-3/cue_sequence/) topic. The fixture sheet DMX layer provides valuable information. Open a fixture sheet and tap DMX in the Layer Toolbar. For more information, see [Fixture Sheet Settings](/grandma3/2-3/fixture-sheet-settings/). The fixture name cells for fixtures/attributes with active values from the DMX tester are displayed with a white marker in the fixture sheet. For more information, see the [DMX Sheet](/grandma3/2-3/patch_dmx_sheet/). The DMX values are indicated by the same color as the DMX tester background color. 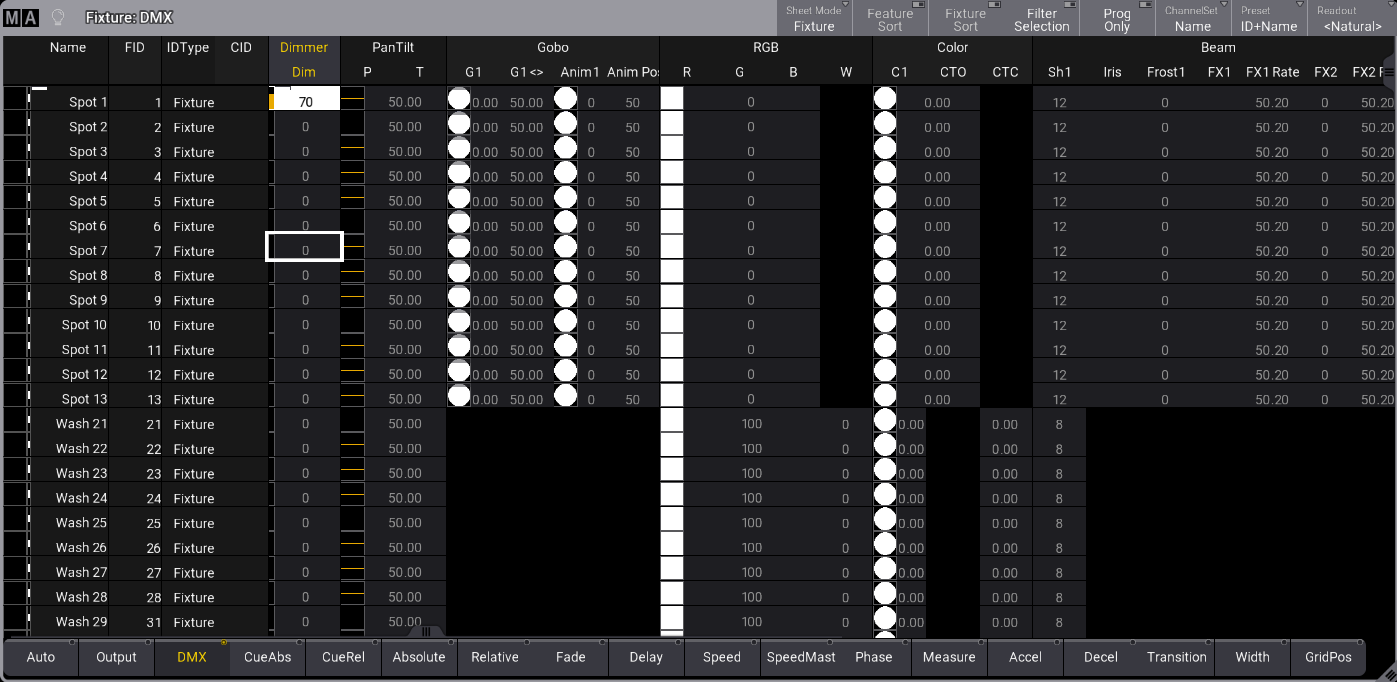\ *Fixture sheet with DMX layer selected* ## Subtopics [Section titled “Subtopics”](#subtopics) * [Sheet Masking](/grandma3/2-3/worldfilter_filter_rules/) * [Fixture Sheet Settings](/grandma3/2-3/fixture-sheet-settings/)
# Fixture Sheet Modes
> There are four fixture sheet modes:
There are four fixture sheet modes: * **Fixture** * **Channel** * **Dimmer+** * **Sheet Filter** ## Subtopics [Section titled “Subtopics”](#subtopics) * [Common Window Settings](/grandma3/2-3/wvm_settings/) * [Graphics](/grandma3/2-3/operate_fixture_graphic/)
# Fixture Sheet Settings
> To open the Fixture Sheet Settings menu, tap the MA logo in the title bar of the Fixture Sheet:
To open the Fixture Sheet Settings menu, tap the MA logo in the title bar of the **Fixture Sheet**: ## Subtopics [Section titled “Subtopics”](#subtopics) * [Title Bar Configuration](/grandma3/2-3/wvm_title_bar_configuration/)
# Folder Structure
> The grandMA3 software uses a default set of folders to help maintain a predictable structure when saving data to any internal or external drives.
The grandMA3 software uses a default set of folders to help maintain a predictable structure when saving data to any internal or external drives. | | | | ------------------------------------------ | -------------------------------------------------------------------------------------------------------------------------------------------------------------------------------------------------------------------------------------------------------------------------- | |  | **Hint:** | | | This topic, and other topics in the manual, lists a particular folder name as **gma3\_x.y.z**. In this name, the “x.y.z” portion takes the place of the actual installed version number. If the installed version is v1.4.2.1, the name of this folder is **gma3\_1.4.2**. | ## Main Folder [Section titled “Main Folder”](#main-folder) The main folder where all grandMA3 user data is stored by default appears using different labels depending upon the type of drive. This folder can be found under the following names and locations: ### On USB Drives: [Section titled “On USB Drives:”](#on-usb-drives) The main folder on any USB drive connected to either a console or a computer running grandMA3 onPC appears at the root of the drive with the name **grandMA3**. The full folder structure is created once the drive is connected to the station and selected in the system. There are many ways to select the drive, including the Backup menu, any menu allowing import or export, or the **Select Drive \[Drive Number]** command. For more information on the **Drive** keyword, see the [Drive keyword](/grandma3/2-3/keyword_drive/) topic. ### On Internal Drives of Computers Running grandMA3 onPC: [Section titled “On Internal Drives of Computers Running grandMA3 onPC:”](#on-internal-drives-of-computers-running-grandma3-onpc) The full folder structure is created as part of the software installation process. The main folder on the internal drive of any computer running grandMA3 onPC appears with the name **MALightingTechnology**. On computers running macOS, the main folder is found at the following location:\ **\[System HD]/Users/\[User Name]/MALightingTechnology** On computers running Windows, the main folder is found at the following location:\ **C:\ProgramData\MALightingTechnology** ### On the Internal Drive of the Console: [Section titled “On the Internal Drive of the Console:”](#on-the-internal-drive-of-the-console) When logged into the console via SFTP, the console presents the main grandMA3 folder as the root directory, using the name **/**. For more information about SFTP, see the [SFTP Connection](/grandma3/2-3/fm_sftp/) topic. *** ## Shows and Backups [Section titled “Shows and Backups”](#shows-and-backups) Show files and backup show files are saved in dedicated folders, which appear in the following locations: ### On USB Drives: [Section titled “On USB Drives:”](#on-usb-drives-1) **grandMA3/shared/shows\ grandMA3/shared/backups** ### On Internal Drives of Computers Running grandMA3 onPC: [Section titled “On Internal Drives of Computers Running grandMA3 onPC:”](#on-internal-drives-of-computers-running-grandma3-onpc-1) **MALightingTechnology/gma3\_x.y.z/shared/shows\ MALightingTechnology/gma3\_x.y.z/shared/backups** ### On the Internal Drive of the Console: [Section titled “On the Internal Drive of the Console:”](#on-the-internal-drive-of-the-console-1) **/actual/shared/shows\ /actual/shared/backups** | | | | ----------------------------------------- | -------------------------------------------------------------------------------------------------------------------------------------------------------------------------------------------------------------------------------------------------------------- | |  | **Warning:** Moving, altering, or deleting any files other than show files or backup show files within the **gma3\_x.y.z** folder of an onPC station or the **actual** folder of a console may make the software unstable or render the system unable to boot. | *** ## Library [Section titled “Library”](#library) When exporting smaller portions of data from the show file (including objects such as fixture profiles, user profiles, and macros), these files are saved into the **gma3\_library** folder of the selected drive unless an alternate destination is specified during the export. Most object types have dedicated default sub-folders within the library. The complete list of automatically generated library folders and sub-folders includes: * agendas * appearances * certificates * colorthemes * datapools * executorconfigurations * executorpages * filters * groups * layouts * macros * matricks * plugins * presets * sequences * timecodes * worlds * fixturetyperesources * gobos * meshes * fixturetypes * inout * artnet * dcremotes * dmxremotes * midiremotes * osc * outputconfigurations * sacn * media * images * sounds * symbols * videos * mvr * netkeys * patch * dmxcurves * stages * scribbles * userprofiles * cameras * renderqualities * screenconfigurations * viewbuttons * views * users ### Exceptions to the Default Library Structure [Section titled “Exceptions to the Default Library Structure”](#exceptions-to-the-default-library-structure) Exporting any objects, that do not have a dedicated sub-folder within the gma3\_library, saves the files directly to the **gma3\_library** folder unless an alternate destination is specified during the export. Exporting either the parent of multiple objects, which each have their dedicated folders, (for example, exporting DMXProtocols as one file rather than separate exports of Art-Net and sACN) or children of objects where those children do not have their dedicated folder (for example, exporting one or more cues rather than a whole sequence), automatically adds a descriptive sub-extension to the file name while saving the file to the most appropriate folder. *** ## Automatic Folder Structure Migration [Section titled “Automatic Folder Structure Migration”](#automatic-folder-structure-migration) The default folder structure used by version 1.5 and later of the grandMA3 software is different than the structure used in previous versions. When the software recognizes a USB drive, which includes the older structure but not the newer structure, the software presents a pop-up with options for automatically migrating the existing data to the new structure.  Old folder structure pop-up Options in the pop-up include: * Yes, But Keep Old: Tap to copy files to the new structure while also maintaining copies in the old structure. This allows both older and newer software versions to continue using the drive. * Yes, And Delete Old: Tap to move files to the new structure and delete the old structure. * Not Now: Tap to make no changes to the current structure. The next time the USB drive is recognized by the software, the same pop-up will appear. * No And Don’t Ask Again: Tap to make no changes to the current structure. The software will not present this pop-up when the USB drive is recognized in the future.
# SFTP Connection to a Console
> The consoles can be accessed using an SFTP client program.
The consoles can be accessed using an SFTP client program. One such program could be FileZilla Client from the FileZilla Project ([external link to internet webpage](https://filezilla-project.org/)). The SFTP client needs to be installed on a computer in the same network as the console. To access the folder structure of the console, the **IP address** of the device is needed. A username and password are also required. SFTP uses TCP port **22**. To access the grandMA3 area of the console’s hard drive, please use **madata** as both username and password. | | | | ------------------------------------------ | -------------------------------------------------------------------------------------------------------------------------------------------------- | |  | **Hint:** | | | The grandMA2 area of the grandMA3 consoles can also be accessed using SFTP. Please use **data** as both username and password to access this part. | | | | | ----------------------------------------- | --------------------------------------------------------------------------------------------------------------------------------------------------------------------- | |  | Be very careful about making any changes in the folders or files. This is direct access to the device. Deleting or moving files may cause serious harm to the device. | Once the connection is made, it is possible to browse through the folders inside the device. The first level of folders has three folders. The “actual” folder gives access to the current software version. The “gma3\_library” folder contains exported objects, including screenshots. The “installation\_packages” contains zip files with the necessary installation files. Learn more about the folder structure in the [Folder Structure topic](/grandma3/2-3/fm_folder_structure/). Read more about screenshots in the [Screenshots topic](/grandma3/2-3/screenshot/).
# [FR] Quick Manual I/O Nodes
## Subtopics [Section titled “Subtopics”](#subtopics) * [Usage Prévu](/grandma3/2-3/key_i_o_node_intended_use-1-2/) * [Sécurité](/grandma3/2-3/key_i_o_node_safety-1-2/) * [Support technique](/grandma3/2-3/key_i_o_node_support-1-2/) * [Transport](/grandma3/2-3/key_i_o_node_transport-1-2/) * [Limitations](/grandma3/2-3/key_grandma3_i_o_node-1-2/) * [Installation](/grandma3/2-3/key_io_node_installation-1-2/) * [Guide De Démarrage](/grandma3/2-3/key_io_node_quick_start-1-2/) * [Entretient](/grandma3/2-3/key_i_o_node_maintenance-1-2/) * [Élimination](/grandma3/2-3/key_i_o_node_disposal-2/) * [Données Techniques](/grandma3/2-3/key_i_o_node_technical_data-2/) * [Événements](/grandma3/2-3/key_ionodes_instances-2/) * [Déclaration de conformité](/grandma3/2-3/key_i_o_node_conformity-1-2/)
# [FR] Quick Manual Node DIN-Rail
## Subtopics [Section titled “Subtopics”](#subtopics) * [Usage Prévu](/grandma3/2-3/key_dinrail_intended_use-1-2/) * [Sécurité](/grandma3/2-3/key_dinrail_safety-1-2/) * [Support technique](/grandma3/2-3/key_dinrail_support-1-2/) * [Transport](/grandma3/2-3/key_dinrail_transport-1-2/) * [Limitations](/grandma3/2-3/key_dinrail_limitations-1-2/) * [Installation](/grandma3/2-3/key_dinrail_installation-2/) * [Guide De Démarrage](/grandma3/2-3/key_dinrail_quick_start-1-2/) * [Entretient](/grandma3/2-3/key_dinrail_maintenance-2/) * [Élimination](/grandma3/2-3/key_dinrail_disposal-1-2/) * [Données Techniques](/grandma3/2-3/key_dinrail_technical_data-1-2/) * [Événements](/grandma3/2-3/key_nodes_din_rail_instances-2/) * [Déclaration de conformité](/grandma3/2-3/key_dinrail_conformity-1-2/)
# [FR] Quick Manual Nodes
## Subtopics [Section titled “Subtopics”](#subtopics) * [Usage Prévu](/grandma3/2-3/key_xport_nodes_intended_use-1-2/) * [Sécurité](/grandma3/2-3/key_xport_nodes_safety-2/) * [Support technique](/grandma3/2-3/key_xport_nodes_support-2/) * [Transport](/grandma3/2-3/key_xport_nodes_transport-2/) * [Limitations](/grandma3/2-3/key_xport_nodes_limitations-1-2/) * [Guide De Démarrage](/grandma3/2-3/key_xport_node_quick_start-1-2/) * [Entretient](/grandma3/2-3/key_xport_node_maintenance-1-2/) * [Élimination](/grandma3/2-3/key_xport_nodes_disposal-1-2/) * [Données Techniques](/grandma3/2-3/key_xport_nodes_technical_data-1-2/) * [Événements](/grandma3/2-3/key_nodes_instances-2/) * [Déclaration de conformité](/grandma3/2-3/key_xport_node_conformity-1-2/)
# [FR] Quick Manual onPC command wing
## Subtopics [Section titled “Subtopics”](#subtopics) * [Usage Prévu](/grandma3/2-3/key_onpc_command_wing_intended_use-1-2/) * [Sécurité](/grandma3/2-3/key_onpc_command_wing_safety-2/) * [Support technique](/grandma3/2-3/key_onpc_command_wing_support-1-2/) * [Transport](/grandma3/2-3/key_onpc_command_wing_transport-1-2/) * [Limitations](/grandma3/2-3/key_onpc_command_wing_limitations-1-2/) * [Guide De Démarrage](/grandma3/2-3/key_onpc_command_wing_quick_start-1-2/) * [Entretient](/grandma3/2-3/key_onpc_command_wing_maintenance-2/) * [Élimination](/grandma3/2-3/key_onpc_command_wing_disposal-1-2/) * [Données Techniques](/grandma3/2-3/key_onpc_command_wing_technical_data-1-2/) * [Événements](/grandma3/2-3/key_command_wing_instances-2/) * [Déclaration de conformité](/grandma3/2-3/key_onpc_command_wing_conformity-1-2/)
# [FR] Quick Manual onPC command wing XT
## Subtopics [Section titled “Subtopics”](#subtopics) * [Usage Prévu](/grandma3/2-3/key_onpc_xt_intended_use-2/) * [Sécurité](/grandma3/2-3/key_onpc_xt_safety-1-2/) * [Support technique](/grandma3/2-3/key_onpc_xt_support-2/) * [Transport](/grandma3/2-3/key_onpc_xt_transport-1-2/) * [Limitations](/grandma3/2-3/key_onpc_xt_limitations-1-2/) * [Guide De Démarrage](/grandma3/2-3/key_onpc_xt_quick_start-2/) * [Entretient](/grandma3/2-3/key_onpc_xt_maintenance-1-2/) * [Élimination](/grandma3/2-3/key_onpc_xt_disposal-2/) * [Données Techniques](/grandma3/2-3/key_onpc_xt_technical_data-1-2/) * [Événements](/grandma3/2-3/key_commandwingxt_instances-2/) * [Déclaration de conformité](/grandma3/2-3/key_onpc_xt_conformity-1-2/)
# [FR] Quick Manual onPC fader wing
## Subtopics [Section titled “Subtopics”](#subtopics) * [Usage Prévu](/grandma3/2-3/key_intended_use-1-2/) * [Sécurité](/grandma3/2-3/key_safety-1-2/) * [Support technique](/grandma3/2-3/key_fader_wing_support-1-2/) * [Transport](/grandma3/2-3/key_fader_wing_transport-2/) * [Limitations](/grandma3/2-3/key_onpc_limitations-2/) * [Guide De Démarrage](/grandma3/2-3/key_fader_wing_quick_start-1-2/) * [Entretient](/grandma3/2-3/key_fader_wing_maintenance-1-2/) * [Élimination](/grandma3/2-3/key_fader_wing_disposal-1-2/) * [Données Techniques](/grandma3/2-3/key_fader_wing_technical_data-2/) * [Événements](/grandma3/2-3/key_faderwing_instances-2/) * [Déclaration de conformité](/grandma3/2-3/key_fader_wing_conformity-1-2/)
# [FR] Quick Manual onPC rack-unit
## Subtopics [Section titled “Subtopics”](#subtopics) * [Usage Prévu](/grandma3/2-3/key_grandma3_rack_unit_transport-1-2/) * [Sécurité](/grandma3/2-3/key_rack_unit_safety-2/) * [Support technique](/grandma3/2-3/key_rack_unit_support-1-2/) * [Transport](/grandma3/2-3/key_rack_unit_transport-1-2/) * [Limitations](/grandma3/2-3/key_onpc_rack_unit_limitations-1-2/) * [Guide De Démarrage](/grandma3/2-3/key_rack_unit_quick_start-1-2/) * [Entretient](/grandma3/2-3/key_rack_unit_maintenance-1-2/) * [Élimination](/grandma3/2-3/key_rack_unit_disposal-1-2/) * [Données Techniques](/grandma3/2-3/key_rack_unit_technical_data-2/) * [Événements](/grandma3/2-3/key_rackunit_instances-2/) * [Déclaration de conformité](/grandma3/2-3/key_grandma3_onpc-rack_unit-1-2/)
# [FR] Quick Manual viz-key
## Subtopics [Section titled “Subtopics”](#subtopics) * [Usage Prévu](/grandma3/2-3/key_viz_key_intended_use-1-2/) * [Sécurité](/grandma3/2-3/key_viz_key_safety-1-2/) * [Support technique](/grandma3/2-3/key_viz_key_support-1-2/) * [Transport](/grandma3/2-3/key_viz_key_transport-1-2/) * [Limitations](/grandma3/2-3/key_viz_key_limitations-1-2/) * [Guide De Démarrage](/grandma3/2-3/key_viz_key_quick_start-1-2/) * [Entretient](/grandma3/2-3/key_viz_key_maintenance-1-2/) * [Élimination](/grandma3/2-3/key_viz_key_disposal-1-2/) * [Données Techniques](/grandma3/2-3/key_viz_key_technical_data-1-2/) * [Événements](/grandma3/2-3/key_vizkey_instances-2/) * [Déclaration de conformité](/grandma3/2-3/key_viz_key_conformity-1-2/)
# [FR] Quick Manual consoles
## Subtopics [Section titled “Subtopics”](#subtopics) * [Usage Prévu](/grandma3/2-3/key_consoles_intended_use-1-2/) * [Sécurité](/grandma3/2-3/key_consoles_safety-1-2/) * [Support technique](/grandma3/2-3/key_consoles_support-1-2/) * [Transport](/grandma3/2-3/key_transport-1-2/) * [Limitations](/grandma3/2-3/key_consoles_limitations-1-2/) * [Guide De Démarrage](/grandma3/2-3/key_console_quick_start-2/) * [Entretient](/grandma3/2-3/key_consoles_maintenance-1-2/) * [Élimination](/grandma3/2-3/key_consoles_disposal-1-2/) * [Données Techniques](/grandma3/2-3/key_consoles_technical_data-1-2/) * [Événements](/grandma3/2-3/key_pixel_faults-1-2/) * [Déclaration de conformité](/grandma3/2-3/key_conformity-1-2/)
# [FR] Quick Manual processing units
## Subtopics [Section titled “Subtopics”](#subtopics) * [Usage Prévu](/grandma3/2-3/key_pu_intended_use-2/) * [Sécurité](/grandma3/2-3/key_pu_safety-1-2/) * [Support technique](/grandma3/2-3/key_pu_support-1-2/) * [Transport](/grandma3/2-3/key_pu_transport-1-2/) * [Limitations](/grandma3/2-3/key_pu_limitations-2/) * [Guide De Démarrage](/grandma3/2-3/key_pu_quick_start-1-2/) * [Entretient](/grandma3/2-3/key_pu_maintenance-1-2/) * [Élimination](/grandma3/2-3/key_pu_disposal-2/) * [Données Techniques](/grandma3/2-3/key_pu_technical_data-1-2/) * [Événements](/grandma3/2-3/key_pu_instances-2/) * [Déclaration de conformité](/grandma3/2-3/key_pu_conformity-2/)
# Connect Audio In
> To use a sound trigger or BPM, connect a sound source to the grandMA3 device. For more information about sound, see the Sound topic.
To use a sound trigger or BPM, connect a sound source to the grandMA3 device. For more information about sound, see the [Sound](/grandma3/2-3/sound/) topic. | | | | ------------------------------------------ | ------------------------------------------------- | |  | **Hint:** | | | The signal strength should be a minimum of 50 mV. | Connect the 3pin XLR sound source cable to the [Audio Remote In connector](/grandma3/2-3/do_connector_pin_assignment/#XLR) on the rear panel.  *grandMA3 full-size rear panel – Audio Remote In*  *grandMA3 compact (XT) rear panel – Audio Remote In*  grandMA3 replay unit - Audio Remote In To view the pinout of the XLR connector, refer to the topic [Connector Pin Assignment](/grandma3/2-3/do_connector_pin_assignment/#XLR).
# Connect DC Remote In
> To use the DC Remote In with grandMA3 consoles, onPC command wings, and I/O Nodes connect a contact closure switch, for example, a light barrier or a push butto
To use the DC Remote In with grandMA3 consoles, onPC command wings, and I/O Nodes connect a contact closure switch, for example, a light barrier or a push button. For further information, see the topics [Remote keyword](/grandma3/2-3/keyword_remote/), [Remote In and Out](/grandma3/2-3/remote_inputs/), and [Output configuration](/grandma3/2-3/dmx_port_config/). Up to 64 input channels can be used within a session. | | | | ------------------------------------------ | -------------------------------------------------------------------------------------------------------------------------------------------------------------------------------------------------------------------- | |  | **Hint:** | | | It is possible to move faders analog, for example, the Master Fader by using a grandMA3 console or I/O Node connected with a potentiometer (0 to +10V DC). The onPC products can switch on and off, but do not fade. | * Generate a switch or connect an external source that sends up to +10V DC to pin 1 for the console to react to analog input number 1. * The recommended resistance is 5 kohms to 10 kohms. * To use the DC Remote, feed a voltage signal (maximum +10V DC) into the corresponding input pin. For more information see the pinout image below. To connect a switch: * Take +10V DC voltage in pin 5 for the grandMA3 console or I/O Node -or- * +5V DC voltage for grandMA3 onPC command wing and command wing XT -or- * Take an external voltage source (+10V DC in grandMA3 consoles or I/O Nodes and +5V DC in grandMA3 onPC command wing and command wing XT), connect its ground to the common ground pin of the device. Connect the +10V DC voltage source to one input pin 1-4 or 6-8 with a potential-free contact (switch, buzzer, motion detector, or any other switching device) in between. Circuit examples: * Potentiometer +10V DC in grandMA3 consoles or I/O Nodes  *Potentiometer +10V DC* * Switch +10 DC in grandMA3 consoles or I/O Nodes 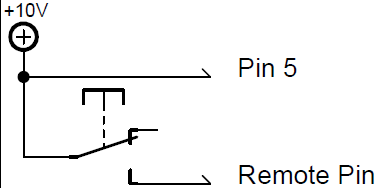 *Switch +10V DC* * Switch +5V DC in grandMA3 onPC command wing and command wing XT 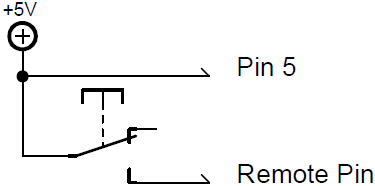 *Switch +5V DC*
# Connect Desk Light
> The grandMA3 comes with one or two desk lights, depending on the model. For more information see, delivery contents.
The grandMA3 comes with one or two desk lights, depending on the model. For more information see, [delivery contents](/grandma3/2-3/fs_scope_delivery/). Connect the 4 pin XLR connector to the desk light connectors on the rear panel. The desk lights are connected. To adjust the light level, see the [Desk Lights](/grandma3/2-3/si_desklights/) topic. 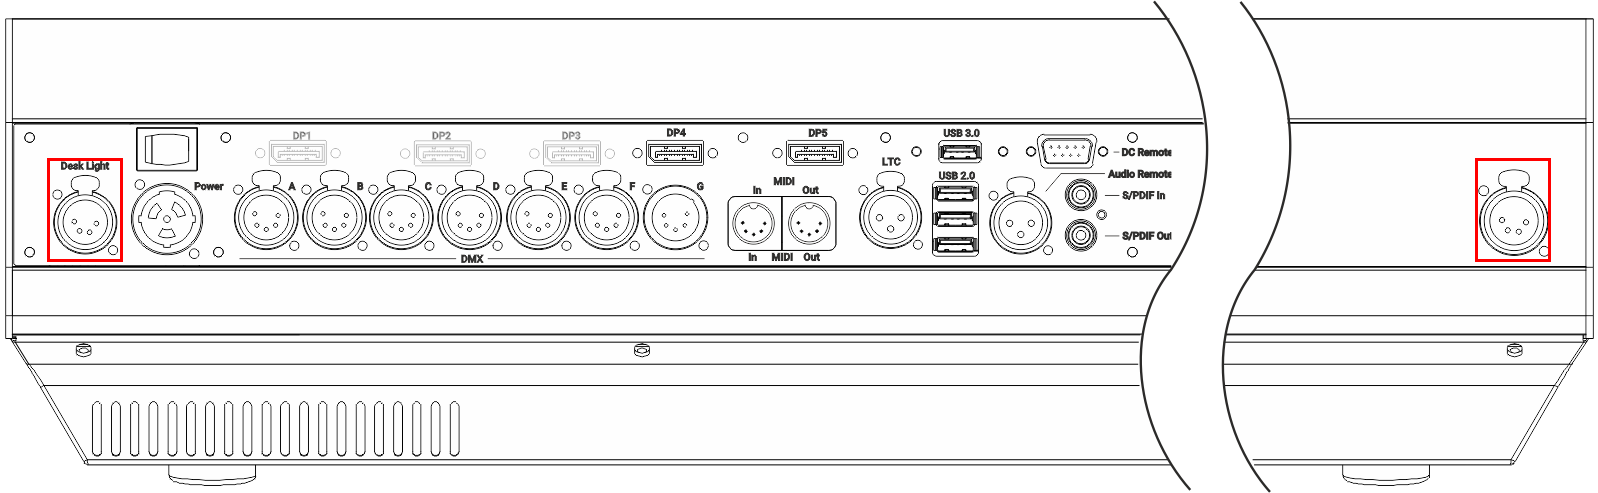 *grandMA3 full-size (CRV) and light (CRV) rear panel – desk light*  *grandMA3 compact (XT) rear panel – desk light*  *grandMA3 onPC command wing (XT) rear panel – desk light*  *grandMA3 *fader wing* rear panel – desk light*  *grandMA3 *extension* rear panel – desk light* To view the pinout of the XLR connector, refer to the topic [Connector Pin Assignment](/grandma3/2-3/do_connector_pin_assignment/#XLR).
# Connect DMX
> You can connect DMX devices to the grandMA3 devices.
You can connect DMX devices to the grandMA3 devices. Depending on the type of the grandMA3 device there are up to eight DMX Out ports (for example, the grandMA3 8 port node) and one DMX In port (for example, the grandMA3 onPC command wing XT). No matter which physical direction the connector has, it can be configured in the software and is therefore capable for both directions: in and out. To adjust the DMX Remote settings, read the [In and Out topic](/grandma3/2-3/remote_inputs/). To configure the DMX ports (Off, Out, RDM, In), read the [DMX Port Configuration topic](/grandma3/2-3/dmx_port_config/). * Connect the 5pin XLR DMX cable to a DMX connector on the console and a DMX device. The DMX device is connected to the [XLR connector](/grandma3/2-3/do_connector_pin_assignment/#XLR).  *grandMA3 full-size (CRV) and light (CRV) rear panel – DMX*  *grandMA3 compact (XT) rear panel – DMX*  *grandMA3 onPC command wing (XT) rear panel – DMX*  *grandMA3 onPC *fader wing* rear panel – DMX*  grandMA3 8Port Node\_ rear panel – DMX\_ 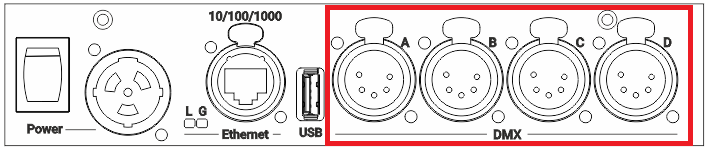 grandMA3 4Port Node\_ rear panel – DMX\_ 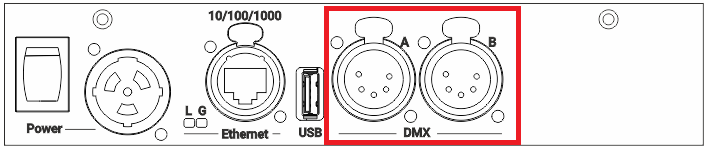 grandMA3 2Port Node\_ rear panel – DMX\_ To view the pinout of the XLR connector, refer to the topic [Connector Pin Assignment](/grandma3/2-3/do_connector_pin_assignment/#XLR).
# Connect Ethernet
> Depending on the type of grandMA3 device, there are up to three Ethernet ports on the rear panel. To set the IP addresses for the ethernet ports, see Interfaces
Depending on the type of grandMA3 device, there are up to three Ethernet ports on the rear panel. To set the IP addresses for the ethernet ports, see [Interfaces and IP](/grandma3/2-3/network_interface/).  \_grandMA3 full-size (CRV) and light (CRV) rear panel – \_Ethernet  \_grandMA3 compact (XT) rear panel – \_Ethernet 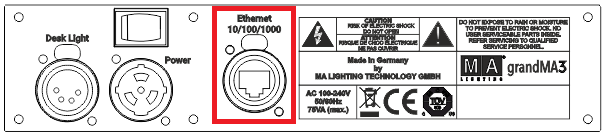 \_grandMA3 *extension* rear panel – \_Ethernet 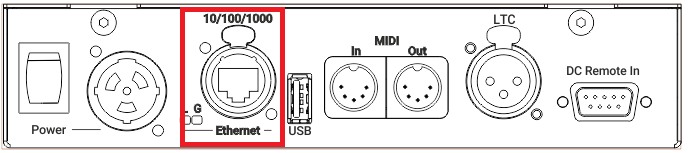 \_grandMA3 *I/O Node* rear panel – \_Ethernet 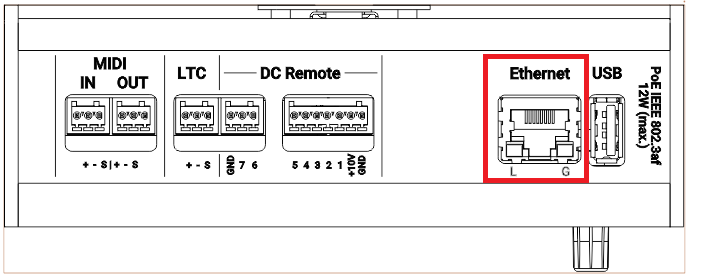 \_grandMA3 *I/O Node DIN-Rail* rear panel – \_Ethernet | | | | - | -------------------------------------------------------------------------------------------------------------------------------------------------------------------------------------------------------------------- | | | **Hint:** | | | The naming of the Ethernet ports is individual, for example, Con1, Con2, and Con3 in the console. In the onPC software, the Ethernet ports are named by the operating system, for example Ethernet, Ethernet 2, etc. |
# Connect grandMA3 extension
> The grandMA3 extension allows to extend the amount of physical executor handles for a grandMA3 full-size (CRV), grandMA3 light (CRV), or grandMA3 replay unit.
The grandMA3 extension allows to extend the amount of physical executor handles for a grandMA3 full-size (CRV), grandMA3 light (CRV), or grandMA3 replay unit. For more information about this device, please refer to [grandMA3 extension](/grandma3/2-3/do_extension/) in the Device Overview section. The number of grandMA3 extensions connected to a grandMA3 console depends on the console type: | Device | Number of grandMA3 extensions | | ---------------------------------- | ----------------------------- | | grandMA3 full-size / full-size CRV | 1 | | grandMA3 light / light CRV | 2 | | grandMA3 replay unit | 3 | **Requirements:** * The grandMA3 extension needs to be in the same IP subnet as the console. For more information about the network, see [Networking](/grandma3/2-3/network/). * The grandMA3 extension software version must match the console software version. *** To display the software version on an extension: * Boot the extension. The software version is displayed in the lower-left corner. To display the extension software version on a console: 1. Tap Menu and Network. The Network window opens. 2. Tap on the arrow  next to Extension. The flip-menu opens. 3. The software version is shown under Version Big in the grandMA3 extension column. 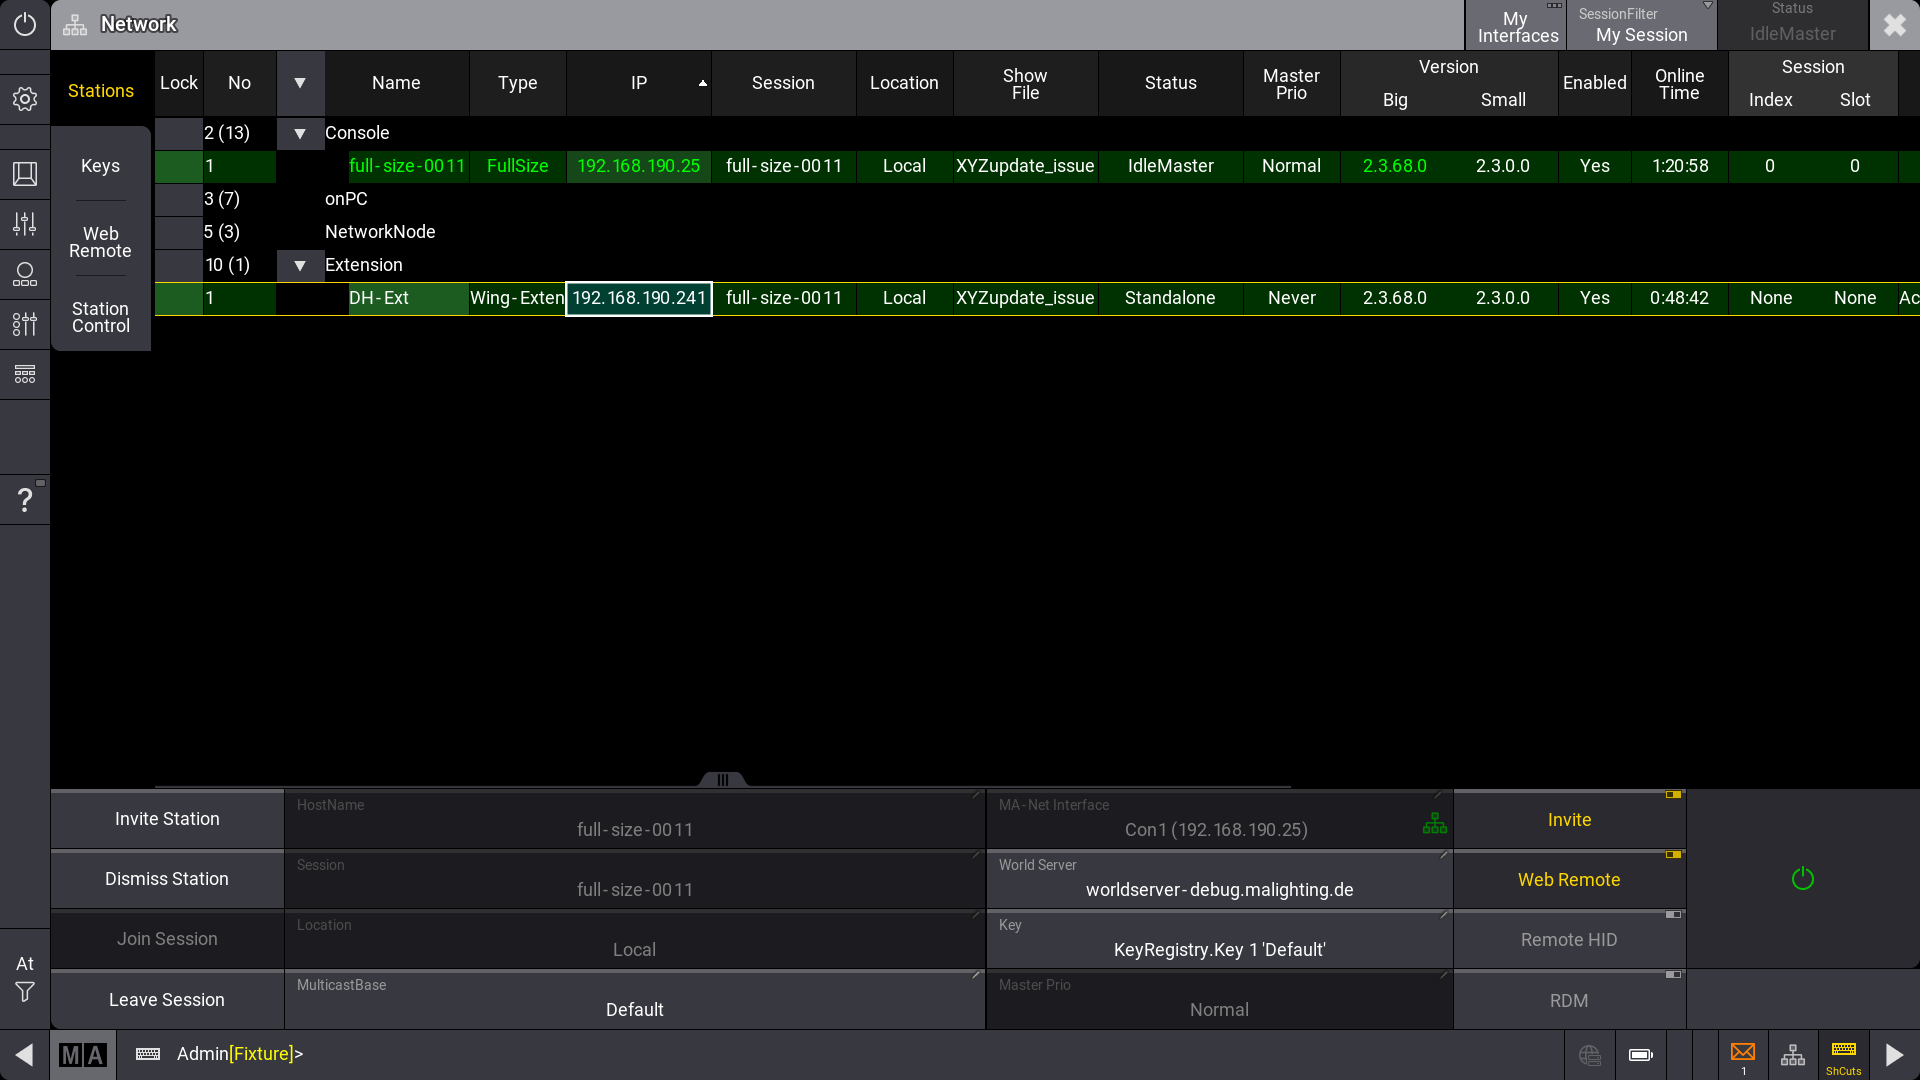 Network menu *** | | | | ------------------------------------------ | -------------------------------------------------------------------------------- | |  | **Hint:** | | | An extension only connects to a specific console. It is not a standalone device. | | | | | ------------------------------------------------ | ------------------------------------------------------------------------------------------------------------------------- | |  | **Important:** | | | To establish a connection with an extension, the IP address of the extension must be in the same IP range as the console. | To change the extensions IP address remotely from a console or onPC station: 1. Tap Menu and Network. The network window opens. 2. Select the grandMA3 extension entry and click IP address / tap and hold IP address. 3. Use the pop-up window to change the IP settings. To change the IP address on the extension: 1. Turn on the extension. 2. Tap the gear icon  to open the Network Interface. A network interface pop-up opens. 3. Tap on the IP address. The IP editor opens.  Gear icon on the grandMA3 extension  Network Interfaces on the grandMA3 extension To establish a connection between a console and an extension: 1. Select the extension in the network menu on the console, 2. Tap Invite Station. The connection will be initiated. | | | | ------------------------------------------------ | -------------------------------------------------------------------------------------------------------------------- | |  | **Important:** | | | It is not possible to invite the extension to a second console, when it is already connected to a different console. | To disconnect the extension from a console, cancel the connection on the console the extension is connected to at the moment: 1. Select the extension in the network menu on the console. 2. Tap Dismiss Station. The connection will be disconnected. It can be connected to a different console now. *** The column Remote IP in the network menu displays to which console the extensions are connected at the moment.\ When an extension is successfully connected with a console, it will display the first wing of executors by default. To display a different executor wing: * Tap Menu - Settings - Extension Configuration. Within the Extension Configuration menu, it is only possible to change the WingID for the connected extension.  Extension Configuration menu There are 2 column modes: Condensed (default) and Full. 1. The condensed mode only displays information about the connection state, IP, and WingID. 2. The full mode also displays the columns Connected Count and Device Type. * Connection State: Can be Yes or No. This cell cannot be edited by the user and displays if the extension is connected with the console or not. * IP: Displays the IP address of the extension. This cell also cannot be edited by the user. * Wing ID: Displays the ID of the executor wing the extension controls. This property can be changed by the user. * Connected Count: The higher the number the more often the extension tried to connect to the console. In a faulty network environment, the number can increase fast due to reconnection. This value cannot be edited by the user. * Device Type: This column displays the device type of the extension. Typically it is grandMA3 Fader Module Encoder (MFE). This cell also cannot be edited. The desk light of an extension is controlled together with the desk lights of the console. The custom section of an extension can mirror the [custom section of the console](/grandma3/2-3/do_control_custom/) or can be independent of the console, depending on the user settings. To learn more about user settings, read the [User settings topic](/grandma3/2-3/user_settings/).
# Connect External Screens
> You can connect up to five external touch screens with a grandMA3 full-size CRV (= Control Room Version). For more information about the amount of DisplayPort c
You can connect up to five external touch screens with a grandMA3 full-size CRV (= Control Room Version). For more information about the amount of DisplayPort connectors of each model, see the [Quick Manual Consoles - Technical Data](/grandma3/2-3/key_consoles_technical_data/) or the relevant device overview topic. | | | | ------------------------------------------------ | ------------------------------------------------------------------------------------ | |  | **Important:** | | | The grandMA3 series supports only native DisplayPort connectors on external screens. | | | | | ------------------------------------------------ | ------------------------------------------------------------------------------------------ | |  | **Important:** | | | In grandMA3 CRV versions, use at least one Full HD display and a touch display or a mouse. |
# Connect grandMA3 fader wing
> The grandMA3 onPC fader wing expands the onPC system with additional playback capabilities.
The grandMA3 onPC fader wing expands the onPC system with additional playback capabilities. For more information about this device, please refer to [grandMA3 onPC fader wing](/grandma3/2-3/do_grandma3_onpc_fader_wing/) in the Device Overview section. | | | | ------------------------------------------------ | -------------------------------------------------------------------------------------------------------------------------------------- | |  | **Important:** | | | It is only possible to connect fader wings to grandMA3 onPC systems. A maximum of two fader wings and a command wing can be connected. | | | | | ------------------------------------------------ | --------------------------------------------------------------------------------------------------------------------------------------------------------------------------------------------------------------------------------------------- | |  | **Important:** | | | Regardless of the number of devices connected to the grandMA3 onPC software, the maximum number of parameters is limited to 4 096. For more information, see [Expand the Amount of Parameters topic](/grandma3/2-3/system_parameter_expand/). | *** ### Connect the grandMA3 onPC fader wing [Section titled “Connect the grandMA3 onPC fader wing”](#connect-the-grandma3-onpc-fader-wing) 1. Connect the grandMA3 onPC fader wing with: * command wing XT * PC * Laptop 2. Start the grandMA3 command wing XT, PC, or laptop. 3. Switch on the grandMA3 onPC fader wing. ### \_ Expanding the Number of Executors\_ [Section titled “\_ Expanding the Number of Executors\_”](#_expanding-the-number-of-executors_) To connect a grandMA3 onPC fader wing in combination with a grandMA3 onPC command wing to expand the number of executors, the wing configuration has to be changed: * To check the USB setting, tap Settings, USB Configuration, MA3Modules.  USB Configuration setting ### Adjust the Wing ID [Section titled “Adjust the Wing ID”](#adjust-the-wing-id) 1. To adjust the wing ID of the command wing, tap or right-click WingID. A pop-up window opens. 2. To change the WingID to 2, tap Wing2.
# Connect MIDI
> MIDI connectors can be used for MIDI input or output. For example, to send the MIDI timecode signal to the sound engineer.
MIDI connectors can be used for MIDI input or output. For example, to send the MIDI timecode signal to the sound engineer. ## Location of MIDI Connectors on Different Products [Section titled “Location of MIDI Connectors on Different Products”](#location-of-midi-connectors-on-different-products)  *grandMA3 full-size (CRV) and light (CRV) rear panel – MIDI*  *grandMA3 compact (XT) rear panel – MIDI*  *grandMA3 onPC command wing (XT) rear panel – MIDI*  *grandMA3 *I/O Node* rear panel – MIDI*  *grandMA3 *I/O Node DIN-Rail* top panel – MIDI* | | | | ------------------------------------------ | --------------------------------------------------------------------------------------------------------------------------------------- | |  | **Hint:** | | | For more information on DIN and Euroblock connector pinout, see [Connector Pin Assignment](/grandma3/2-3/do_connector_pin_assignment/). |
# Connect Power
> 1. Insert the powerCON TRUE1 connector or powerCON TRUE1 TOP connector in the powerCON TRUE1 plug or powerCON TRUE1 TOP plug and twist it to lock clockwise.
### Devices with powerCON Connector or powerCON TRUE1 TOP Connector [Section titled “Devices with powerCON Connector or powerCON TRUE1 TOP Connector”](#devices-with-powercon-connector-or-powercon-true1-top-connector) | | | | ----------------------------------------- | ---------------------------------------------------------------------------------------------------------------------------------------------------------------------------------------------------------------------------------------------------------------------- | |  | **Warning:** If only the powerCON TRUE1 connector or powerCON TRUE1 TOP connector is provided, connect a suitable cable to the connector. To connect a suitable cable to the powerCON TRUE 1 connector or powerCON TRUE1 TOP connector, contact the local distributor. | 1. Insert the powerCON TRUE1 connector or powerCON TRUE1 TOP connector in the powerCON TRUE1 plug or powerCON TRUE1 TOP plug and twist it to lock clockwise.\ An audible click is heard. 2. Connect the other end of the cable to a suitable power source. ### Devices with IEC Connector [Section titled “Devices with IEC Connector”](#devices-with-iec-connector) 1. Insert the IEC connector into the corresponding jack. 2. Connect the power plug. The device is connected to power.  *grandMA3 full-size (CRV) and light (CRV) rear panel – power*  *grandMA3 compact (XT) rear panel – power*  *grandMA3 onPC command wing (XT) rear panel – power*  *grandMA3 *fader wing* rear panel – power*  *grandMA3 *extension* rear panel – power*  \_grandMA3 *I/O Node* rear panel – \_power
# Connect LTC
> The LTC connector can be used for timecode input or for timecode output, e.g. to send the timecode signal to the sound engineer.
The LTC connector can be used for timecode input or for timecode output, e.g. to send the timecode signal to the sound engineer. The LTC port direction can be configured in the [Output Configuration](/grandma3/2-3/dmx_port_config/). To synchronize the console with an SMPTE timecode source, connect an SMPTE source to the LTC port. | | | | ------------------------------------------ | -------------------------------------------------------------------------------------------------------------------------------- | |  | **Information:** | | | The supported time formats are: - 24 fps - 25 fps - 30 fps If you send 29.97 or 30 drop frame, it will be interpreted as 30 fps. | **Sound and timecode signal levels** | Min. level | Max. level | Recom. level | | ---------- | ---------- | ------------ | | -11 dBu | +15 dBu | 0 dBu | | 0.2 Veff | 4.4 Veff | 0.8 Veff | | | | | ------------------------------------------ | ------------------------------------------------------------------------------------------------- | |  | **Information:** | | | The signal strength should be a minimum of 200 mV. Pin 1: Ground Pin 2: - (minus) Pin 3: + (plus) | * Connect the SMPTE source to the LTC connector on the rear panel of the console. The SMPTE source is connected to the LTC connector.  *grandMA3 full-size (CRV) and light (CRV) rear panel – LTC*  *grandMA3 compact (XT) rear panel – LTC*  *grandMA3 onPC command wing (XT) rear panel – LTC* 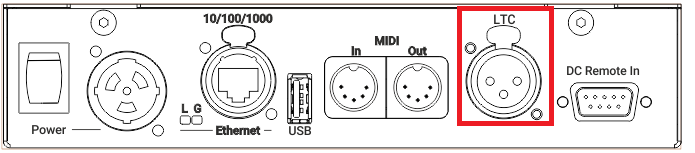 *grandMA3 *I/O Node* rear panel – LTC* 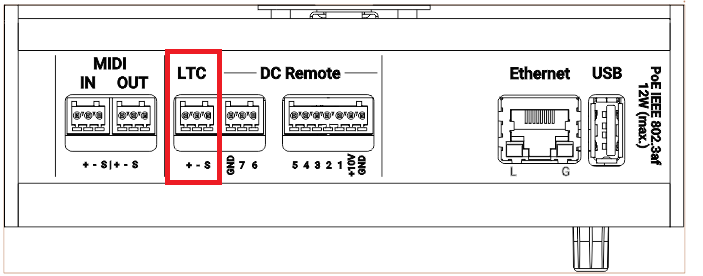 *grandMA3 *I/O Node DIN-Rail* rear panel – LTC* To view the pinout of the XLR and Euroblock connector, refer to the topic [Connector Pin Assignment](/grandma3/2-3/do_connector_pin_assignment/#XLR).
# Connect Sound Out
> The following grandMA3 products have a S/PDIF (Sony/Philips Digital Interface) connectors on the rear panel to output sound. For more information on sounds, see
The following grandMA3 products have a S/PDIF (Sony/Philips Digital Interface) connectors on the rear panel to output sound. For more information on sounds, see the [Sounds Pool](/grandma3/2-3/sound_pool/) topic.  *grandMA3 full-size (CRV) and light (CRV) rear panel - S/PDIF Out*  *grandMA3 compact XT rear panel - S/PDIF Out* ## Subtopics [Section titled “Subtopics”](#subtopics) * [Local Settings](/grandma3/2-3/local_settings/) * [Sound](/grandma3/2-3/sound/)
# Connect USB Devices
> You can connect an external USB flash drive, an USB hard drive, USB mouse, an external USB keyboard, or an external touch screen to the grandMA3 device using th
You can connect an external USB flash drive, an USB hard drive, USB mouse, an external USB keyboard, or an external touch screen to the grandMA3 device using the USB ports. Depending on the type of the grandMA3 device there are up to 6 USB connectors: * 1x USB 3.0 at the front on the right of the console * 1x USB 3.0 inside the keyboard drawer * 3x USB 2.0 and 1x USB 3.0 on the rear panel 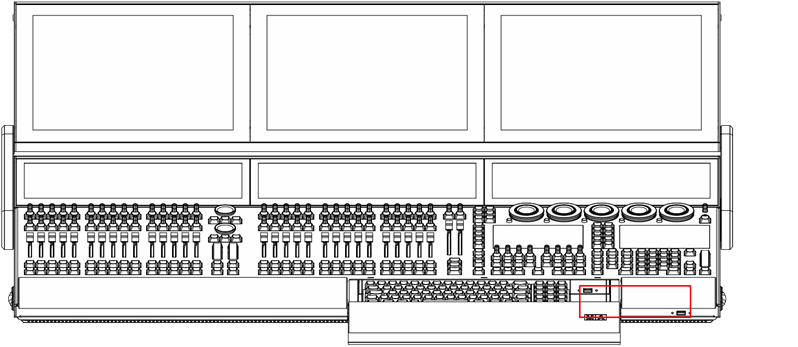 *grandMA3 full-size USB 3.0* (type A)\_ inside keyboard drawer and on the right\_  \_grandMA3 full-size (CRV) rear panel USB 2.0 \_(type A)  *grandMA3 full-size rear panel USB 3.0* (type A)  \_grandMA3 compact (XT) rear panel USB 3.0 \_(type A) To connect a grandMA3 onPC device with the computer or laptop, use the USB connector (type B): 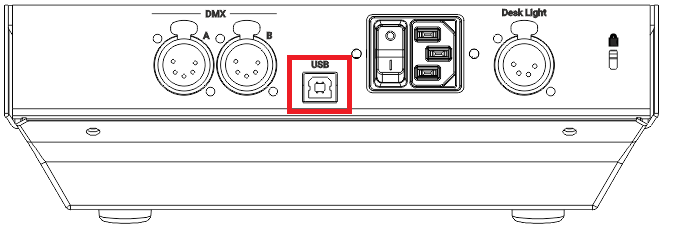 *grandMA3 onPC fader wing rear panel USB* 2.0 (type B)  *grandMA3 onPC command wing rear panel USB* 2.0 (type B)
# Connect grandMA3 viz-key
> The grandMA3 viz-key is needed to:
The grandMA3 viz-key is needed to: * Establish a connection between a grandMA3 software and a third party visualizer with an unlimited number of virtual parameters. * Output 512 parameters via network. If the correct version of grandMA3 onPC is installed on the visualizer workstation, no further download or installation is required. When sufficient parameters are already available in a session, then the grandMA3 viz-key hardware is not required. To establish a session between a visualizer on which no grandMA3 onPC is running and a grandMA3 system, the matching grandMA3 viz-key software must be installed on the visualizer. This software is essential for establishing a connection between the visualizer and the grandMA3 system, so even if no viz-key is required, the software must be installed on the visualizer.\ \ For more information, see [Update grandMA3 viz-key](/grandma3/2-3/update_viz_key/).
# Position the Device
> Follow the instructions below:
Follow the instructions below: * Do not place the device in a humid area. * Place the device on a stable, flat, dry surface. * Do not cover the ventilation holes. * Do not expose the device to direct sunlight. * Maintain a minimum distance of 15 cm (5.91 inches) between the multi-touch screen surface and radio intercom systems. Going below the minimum distance may cause unexpected behavior, such as unwanted multi-touch actions or mouse movements.
# Check Scope of Delivery
> The list below shows the scope of delivery. If anything is missing, contact your local distributor.
The list below shows the scope of delivery. If anything is missing, contact your local distributor. ### grandMA3 full-size [Section titled “grandMA3 full-size”](#grandma3-full-size) * 2 x LED desk light grandMA3 * 1 x Dust cover grandMA3 full-size * 2 x Magnetic plate for easy labeling of 15 faders * 1 x grandMA3 Quick Manual consoles ### grandMA3 full-size CRV [Section titled “grandMA3 full-size CRV”](#grandma3-full-size-crv) * 2 x LED desk light grandMA3 * 1 x Dust cover grandMA3 full-size CRV * 2 x Magnetic plate for easy labeling of 15 faders * 1 x grandMA3 Quick Manual consoles ### grandMA3 light [Section titled “grandMA3 light”](#grandma3-light) * 2 x LED desk light grandMA3 * 1 x Dust cover grandMA3 light * 1 x Magnetic plate for easy labeling of 15 faders * 1 x grandMA3 Quick Manual consoles ### grandMA3 light CRV [Section titled “grandMA3 light CRV”](#grandma3-light-crv) * 2 x LED desk light grandMA3 * 1 x Dust cover grandMA3 light CRV * 1 x Magnetic plate for easy labeling of 15 faders * 1 x grandMA3 Quick Manual consoles ### grandMA3 compact XT [Section titled “grandMA3 compact XT”](#grandma3-compact-xt) * 1 x LED desk light grandMA3 * 1 x Dust cover grandMA3 compact XT * 1 x Magnetic plate for easy labeling of 15 faders * 1 x grandMA3 Quick Manual consoles ### grandMA3 compact [Section titled “grandMA3 compact”](#grandma3-compact) * 1 x LED desk light grandMA3 * 1 x Dust cover grandMA3 compact * 1 x Magnetic plate for easy labeling of 10 faders * 1 x grandMA3 Quick Manual consoles ### grandMA3 extension [Section titled “grandMA3 extension”](#grandma3-extension) * 1 x LED desk light grandMA3 * 1 x Dust cover * 1x Magnetic plate for easy labeling of 15 faders * 1 x grandMA3 Quick Manual consoles ### grandMA3 replay unit [Section titled “grandMA3 replay unit”](#grandma3-replay-unit) * 1x grandMA3 Quick Manual consoles ### grandMA3 processing units [Section titled “grandMA3 processing units”](#grandma3-processing-units) * 1x grandMA3 Quick Manual processing unit ### grandMA3 xPort Nodes [Section titled “grandMA3 xPort Nodes”](#grandma3-xport-nodes) * 1x grandMA3 Quick Manual Nodes ### grandMA3 Nodes DIN-Rail [Section titled “grandMA3 Nodes DIN-Rail”](#grandma3-nodes-din-rail) * 1x grandMA3 Quick Manual Nodes DIN-Rail ### grandMA3 I/O Nodes [Section titled “grandMA3 I/O Nodes”](#grandma3-io-nodes) * 1x grandMA3 Quick Manual I/O Nodes ### grandMA3 I/O Nodes DIN-Rail [Section titled “grandMA3 I/O Nodes DIN-Rail”](#grandma3-io-nodes-din-rail) * 1x grandMA3 Quick Manual I/O Nodes ### grandMA3 onPC command wing [Section titled “grandMA3 onPC command wing”](#grandma3-onpc-command-wing) * 1 x Dust cover * 1 x Magnetic plate for easy labeling of 10 faders * 1 x USB cable * 1 x grandMA3 Quick Manual onPC command wing ### grandMA3 onPC command wing XT [Section titled “grandMA3 onPC command wing XT”](#grandma3-onpc-command-wing-xt) * 1 x Dust cover * 1 x Magnetic plate for easy labeling of 10 faders * 1 x grandMA3 Quick Manual onPC command wing XT ### grandMA3 onPC fader wing [Section titled “grandMA3 onPC fader wing”](#grandma3-onpc-fader-wing) * 1x Dust cover * 1x USB cable * 1x Magnetic plate for easy labeling of 10 faders * 1x grandMA3 Quick Manual onPC fader wing ### grandMA3 rack-unit [Section titled “ grandMA3 rack-unit”](#grandma3-rack-unit) * 1x grandMA3 Quick Manual onPC rack-unit ### grandMA3 viz-key [Section titled “grandMA3 viz-key”](#grandma3-viz-key) * 1x USB cable (C/C) * 1x USB cable (C/A) * 1x grandMA3 Quick Manual viz-key
# Turn on the device for the first time
# Unpack the Device
* Unpack the device. Remove all packing material, strips and protection films. * Keep the packing material for transport. | | | | ------------------------------------------ | --------------------------------------------------------- | |  | **Hint:** | | | The device was tested for proper function at the factory. |
# Build Fixture Types
> grandMA3 allows building fixture types. Therefore, the grandMA3 software benefits from using a fixture-type editor. In this editor, it is possible to set up a c
grandMA3 allows building fixture types. Therefore, the grandMA3 software benefits from using a fixture-type editor. In this editor, it is possible to set up a custom-made fixture type using different inputs. For example: * Wheels * Physical Descriptions * Models * Geometries * DMX Modes 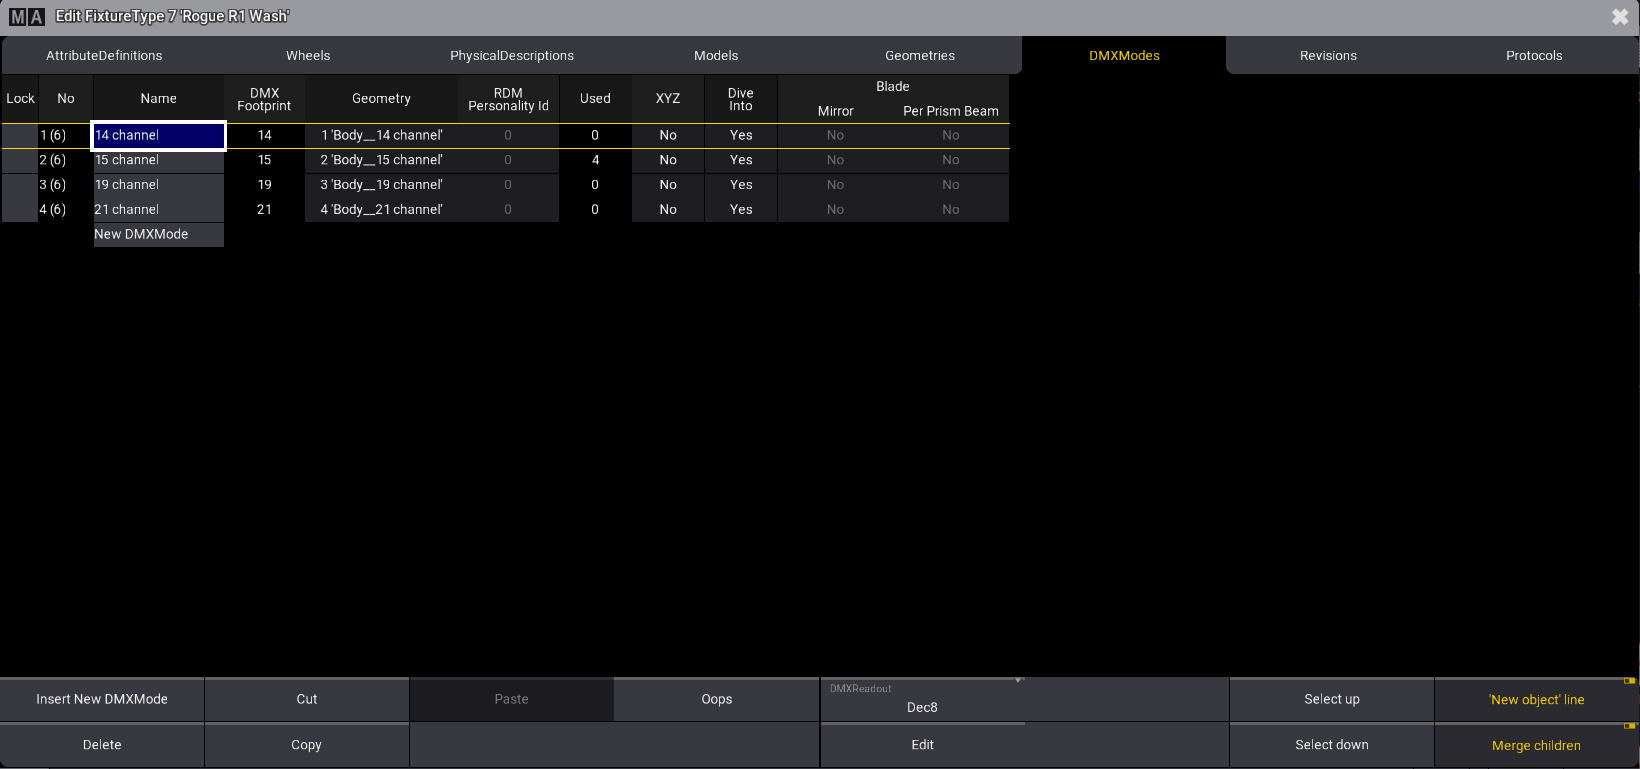\ *Fixture type editor showing DMX modes for the selected fixture type*  The following topics demonstrate how to use the Fixture Type Editor and provide a simple example of what a standard fixture type can look like. | | | | ------------------------------------------------ | --------------------------------------------------------------------------------------------------- | |  | **Important:** | | | Creating fixture types can be necessary to project real-life fixtures that have not been built yet. | | | | | ------------------------------------------------ | ---------------------------------------------------------------------------------------------------------------------------- | |  | **Important:** | | | Instead of creating a new fixture type, it can be easier and faster to take an existing one and adjust only the differences! | | | | | ------------------------------------------ | ----------------------------------------------------------------------------------------------------------------------------------------------------------------- | |  | **Hint:** | | | It is also possible to build fixtures using the GDTF Builder and import them to grandMA3. For more information, see [Import GDTF](/grandma3/2-3/ft_import_gdtf/). | ## Subtopics [Section titled “Subtopics”](#subtopics) * [Insert Fixture Types](/grandma3/2-3/ft_insert_fixture_types/) * [Insert Geometries](/grandma3/2-3/ft_insert_geometries/) * [Insert Models](/grandma3/2-3/ft_insert_models/) * [Link Models to Geometries](/grandma3/2-3/ft_link_models_geometries/) * [Insert DMX Modes and DMX Channels](/grandma3/2-3/ft_insert_dmx/) * [Environmental Fixture Types](/grandma3/2-3/ft_environmental_fixture_types/)
# Conflicts in Fixture Types
> Importing or editing fixture types from the library could lead to conflicts, for example, if the fixture type has wrong information in it or if a DMX channel is
Importing or editing fixture types from the library could lead to conflicts, for example, if the fixture type has wrong information in it or if a DMX channel is overlapped by another. Conflicts are displayed by specific font colors in the Patch. ### Fixture Type with Orange Font Color [Section titled “Fixture Type with Orange Font Color”](#fixture-type-with-orange-font-color) * Orange font colors in the patch indicate a warning. Fixture types with an orange font color are accessible, but may not function properly.
# Environmental Fixture Types
> A way to make a stage more realistic is to use environmental fixture types. These fixture types are anything other than lighting fixtures, such as stages, truss
A way to make a stage more realistic is to use environmental fixture types. These fixture types are anything other than lighting fixtures, such as stages, trusses, seating, or scenery. Environmental fixture types are part of the fixture library in the patch menu. To list some basic environmental fixtures: 1. Press Menu. The menu opens. 2. Tap Patch. The patch menu opens. 3. Tap Insert New Fixture. 4. Search for **Set** in the library. (All the provided environmental fixture types are using the manufacturer ‘Set’.) All fixtures types that have Set in their name or manufacturer name are listed.
# Export Fixture Types
> It is possible to export the fixture types to the following locations:
It is possible to export the fixture types to the following locations: * Internal drive * External USB drive It is possible to export the fixture types as the following file formats: * grandMA3 format * GDTF **Requirement:** Open the Patch. 1. Tap Fixture Types in the bar on the left of the patch dialog.\ The **Fixture Types** menu opens. 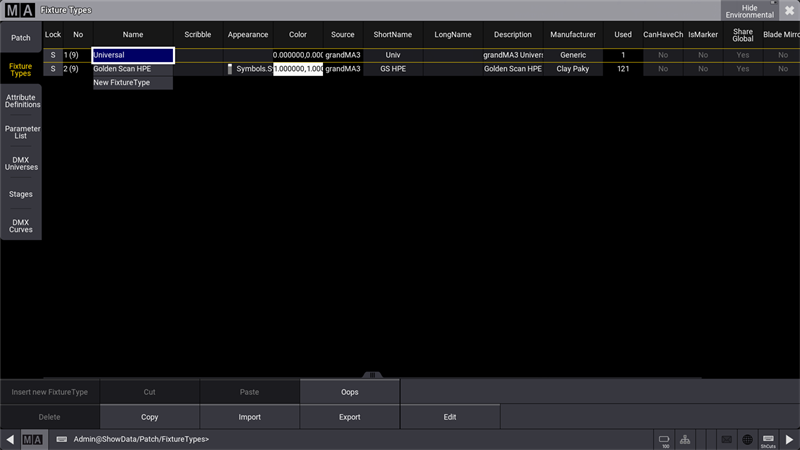 *Open Fixture Types* 2. Tap at the to be exported fixture type in the list. 3. Tap Export.\ The **Export Fixture Type** pop-up opens. 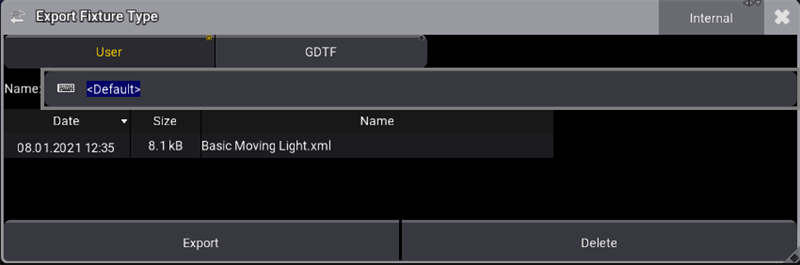 *Export a fixture type* 4. To select the destination drive, tap at Internal in the title bar.\ If an USB stick is inserted, the USB stick can be chosen. 5. To export the fixture type as grandMA3 format for only grandMA3 use case, tap at User.\ To export the fixture type as GDTF to use the fixture type within different programs that can read GDTF, tap at GDTF. 6. Enter a name. | | | | ------------------------------------------ | --------------------------------------------------------------------------------------------------------------------- | |  | **Hint:** | | | If no name is entered, the fixture type file will be exported as or . | 7. Tap Export. The selected fixture type is exported to the selected drive. When the selected drive is internal, the fixture type is exported to the computer’s local drive **(C:)\ProgramData\MALightingTechnology\gma3\_library\fixturetypes**. When the selected drive is external, the fixture type is exported to the external USB Drive **(E:)\grandMA3\library\fixturetypes.**
# Import Fixture Types
> Fixture Types is used to import fixtures for later use.
Fixture Types is used to import fixtures for later use. It is possible to import fixture types from these libraries: * **grandMA3** fixtures * Converted **grandMA2** fixtures * Fixtures using **GDTF** format ## Fixture Types Menu [Section titled “Fixture Types Menu”](#fixture-types-menu) 1. To access the Patch menu, press Menu and then tap Patch. | | | | ------------------------------------------ | ---------------------------------------------------------------------------------------------------------------------------------------------------------------------------------------------------------------------------------------------------------------------- | |  | **Hint:** | | | When creating a new show, the Insert New Fixtures window opens. It’s a good habit to import new Fixture Types from the Fixture Types menu. Tap on the top right corner of the Insert New Fixtures window to close it. | ## Subtopics [Section titled “Subtopics”](#subtopics) * [Import GDTF](/grandma3/2-3/ft_import_gdtf/) * [Conflicts in Fixture Types](/grandma3/2-3/ft_conflicts_in_fixture_types/)
# Import GDTF
> Import a GDTF file (General Device Type Format) containing a fixture type description. GDTF provides a fixture's digital footprint. Visit https://gdtf-share.com
Import a GDTF file (General Device Type Format) containing a fixture type description. GDTF provides a fixture’s digital footprint. Visit [https://gdtf-share.com](https://gdtf-share.com/) for more information. The GDTF file is a zip file containing: * Description * Geometry data * Gobo images For a detailed description of GDTF, see the DIN specification 15800:2022 (). ## Import GDTF from the Console or Directly from the World Server [Section titled “Import GDTF from the Console or Directly from the World Server”](#import-gdtf-from-the-console-or-directly-from-the-world-server) Access **grandMA3 fixture share** and **GDTF** libraries directly when there is an active connection to a World Server (for more information, see [World server](/grandma3/2-3/system_world/)), 1. Open the patch menu by pressing Menu. 2. Tap Patch. 3. On the left side of the window, tap Fixture Types. 4. Tap Import at the bottom of the window. The Select Fixture Type to Import pop-up opens. 5. Enable the share button  to list all fixture types sourced from the GDTF shared library. 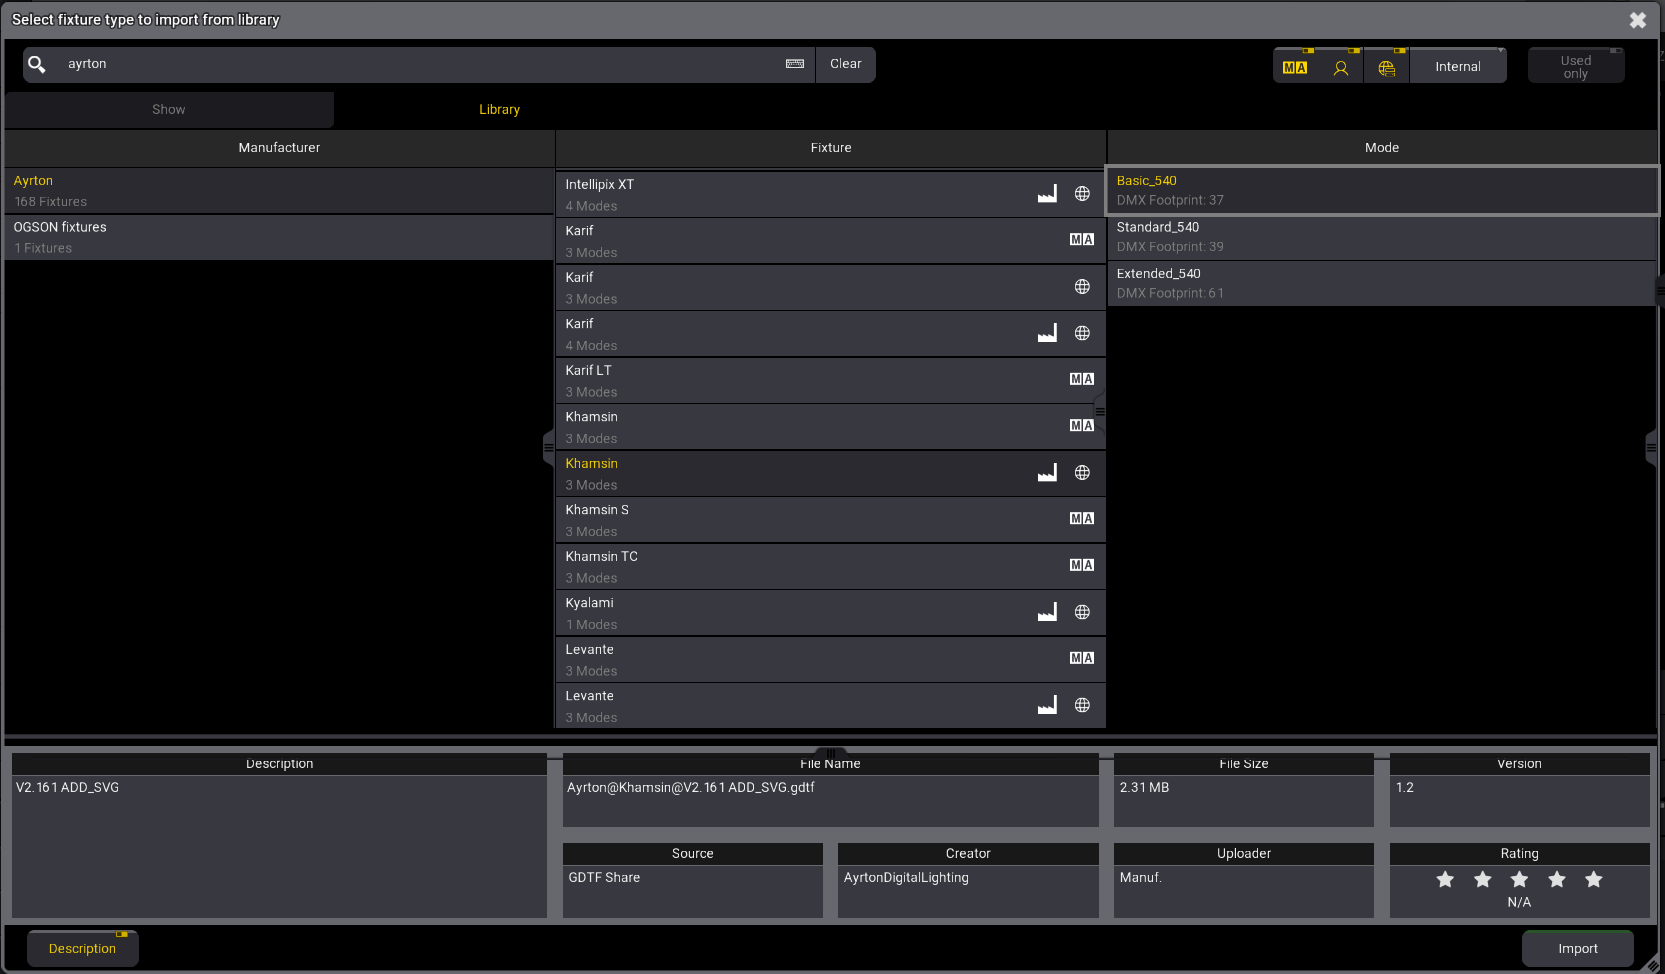 Select Fixture to Import from Library pop-up
# Insert DMX Modes and DMX Channels
> The next step is to insert DMX modes and channels and link them to the geometries.
The next step is to insert DMX modes and channels and link them to the geometries. Specific functions and attributes can only be executed by specific physical parts of a fixture. The pan movement, for example, is executed by the yoke of the basic moving head. Therefore, you have to link DMX channels with their specific functions and attributes to the corresponding geometrical parts of the fixture type.
# Insert Fixture Types
> The following topics provide a step-by-step guide to building a fixture type of a basic moving head.
The following topics provide a step-by-step guide to building a fixture type of a basic moving head. First of all, a fixture type has to be inserted. | | | | ------------------------------------------------ | -------------------------------------------------------------------------------------------------------------------------------------------------------------------------------------------------------------------------------------------------------------------------------------------------------------------------------------------------------------------------------------------------------------------------------------------------------------------------------------------------------------------------- | |  | **Important:** | | | Always make sure to save the settings you made; otherwise, they will get lost. How to save settings in Fixture Types: 1. Leave the Patch. 2. The **pop-up Leaving the patch** appears. 3. Tap Ok. 4. Save the show file. For more information, see [SaveShow Keyword](/grandma3/2-3/keyword_saveshow/).To back up data during or after the build of fixture types, leave the Fixture Type Editor and tap Export in the Fixture Types menu. An .xml file is exported. It is possible to import this file into a show file. | 1. Open the Fixture Types tab in the Patch menu. To exit the Fixture Types tab, see [Import fixture types](/grandma3/2-3/ft_import/) topic. 2. In the **Name** column\*\*, \*\*tap New Fixture Type. 3. Tap Insert New Fixture Type in the bottom left corner. A new fixture-type row is inserted into the sheet. In the example below, FixtureType 2.  Fixture Types tab with the newly inserted FixtureType 2. 4. To edit or enter the basic data of the fixture type, fill out the following cells by right-clicking or tapping and holding the cell: * Name * Scribble * Appearance * ShortName * Description * Manufacturer | | | | ------------------------------------------ | --------------------------------------------------------------------------------------------------------------------------------- | |  | **Hint:** | | | To see a detailed description of every cell in the Fixture Types tab, see [Import Fixture Types](/grandma3/2-3/ft_import/) topic. | The next step is to create individual geometries for your fixture type: [Insert Geometries](/grandma3/2-3/ft_insert_geometries/).
# Insert Geometries
> The geometry of a fixture is the physical description of parts of the device.
The geometry of a fixture is the physical description of parts of the device. This example of a basic moving head consists of four components: 1. Base 2. Yoke 3. Head 4. Beam All fixture parts must be set up to link them to a specific DMX function later. **Requirement:** * [Insert Fixture Types](/grandma3/2-3/ft_insert_fixture_types/). 1. Tap Fixture Types, then select FixtureType 2.  Select the fixture type you want to edit 2. To open the Fixture Type Editor, tap Edit. The window **Edit Fixture Type** opens. 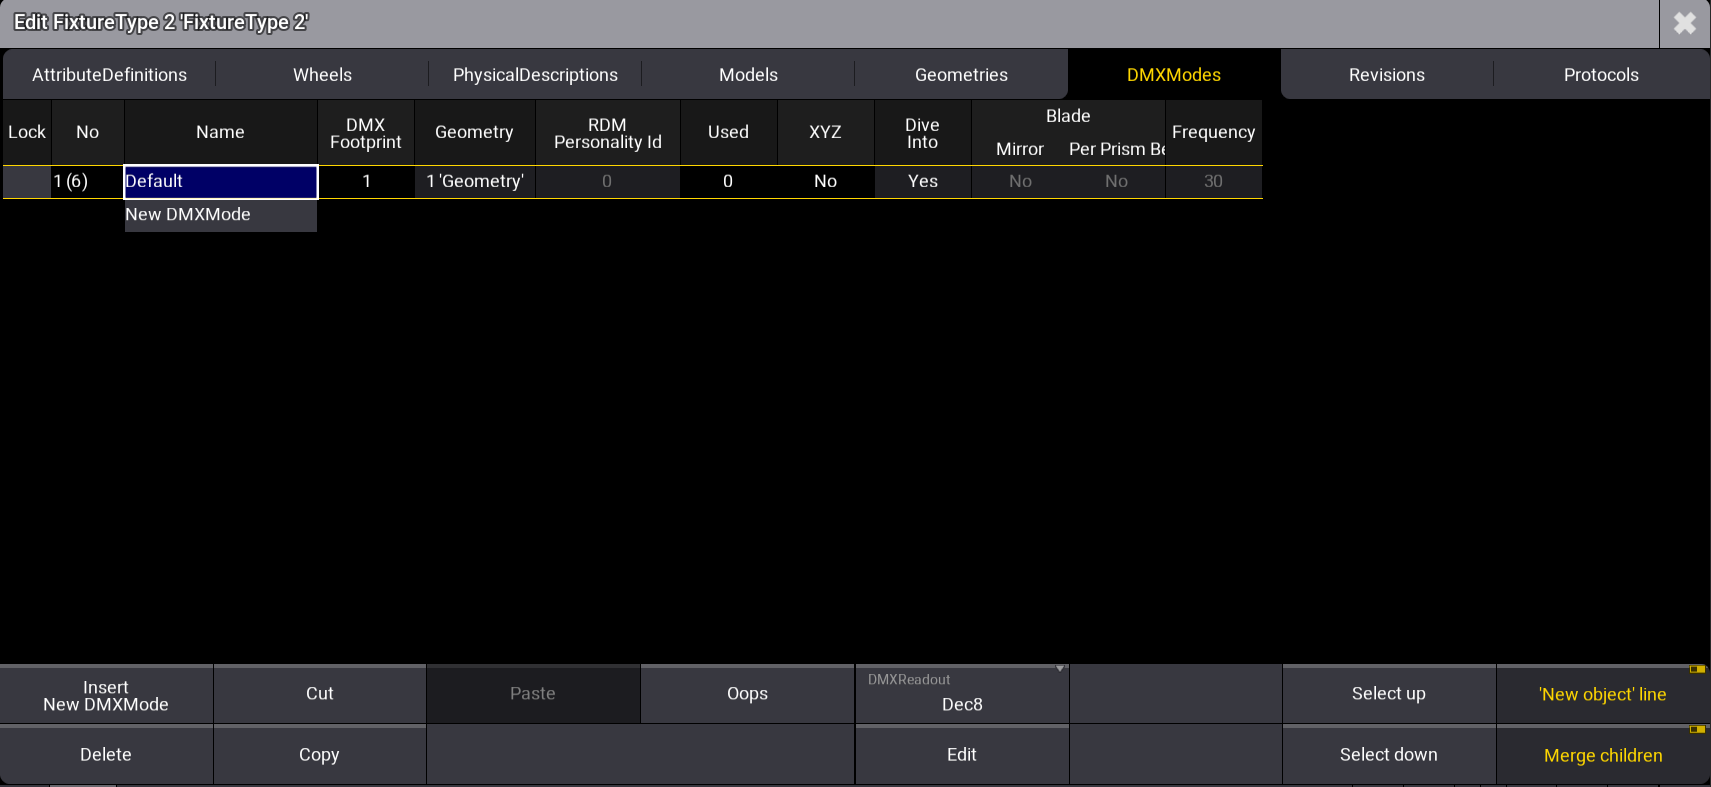 Fixture Type Editor 3. Tap Geometries. 4. The Geometries window opens. 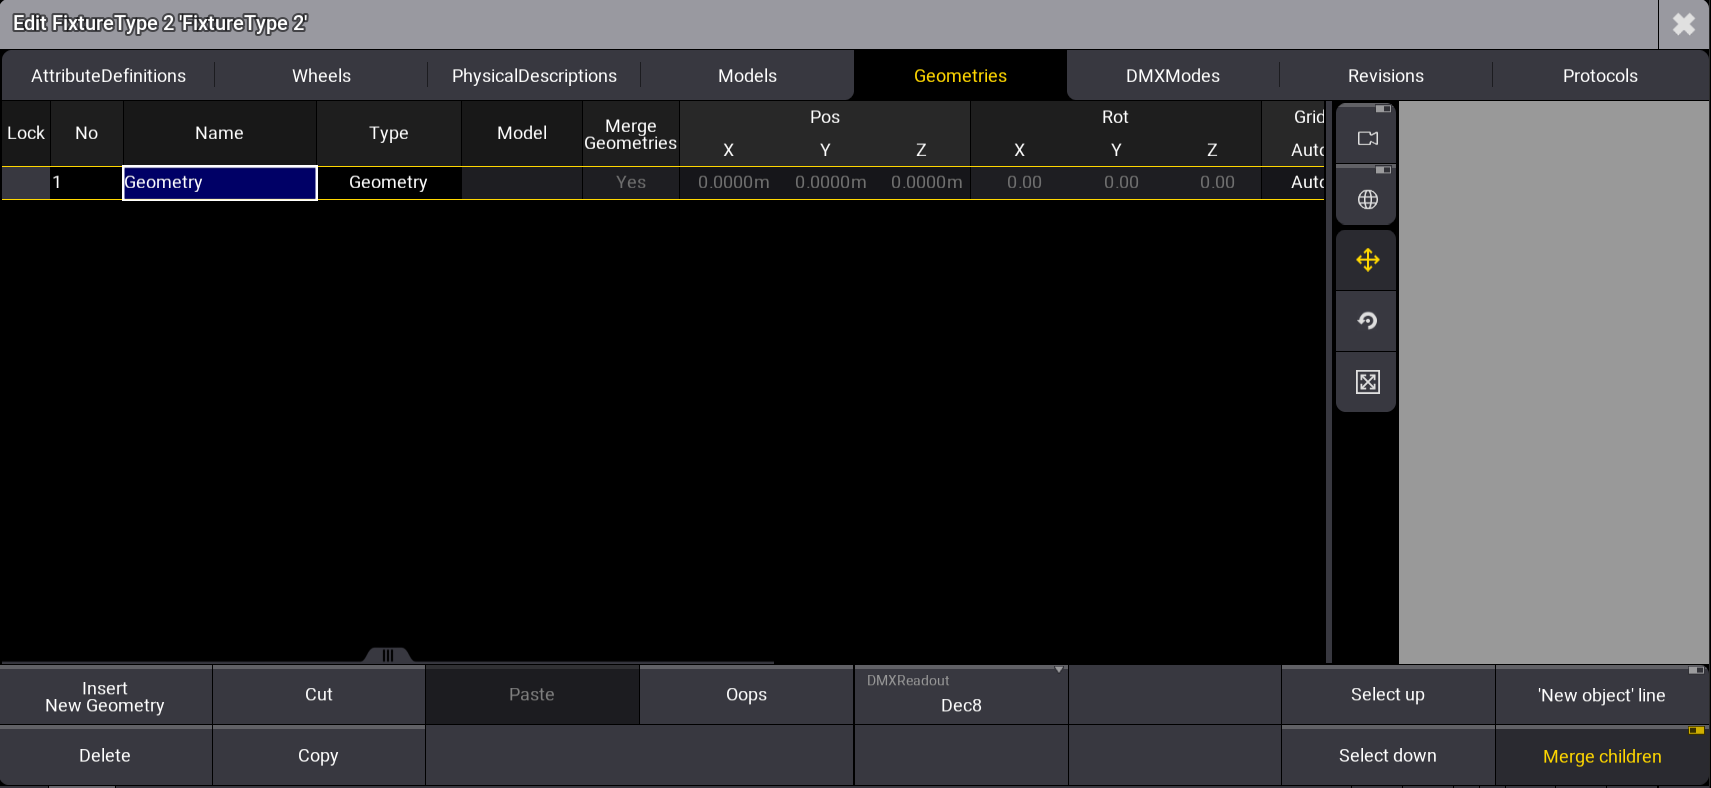\ FixtureType Editor Geometries window with the [Geometry Viewer](/grandma3/2-3/ft_link_models_geometries/#h2__139560060) on the right side Under the Name column, tap and hold Geometry and rename it Base. 5. At the bottom right of the window, tap ‘New object’ line. 6. Expand the Base tab by tapping , then select **New Geometry**. 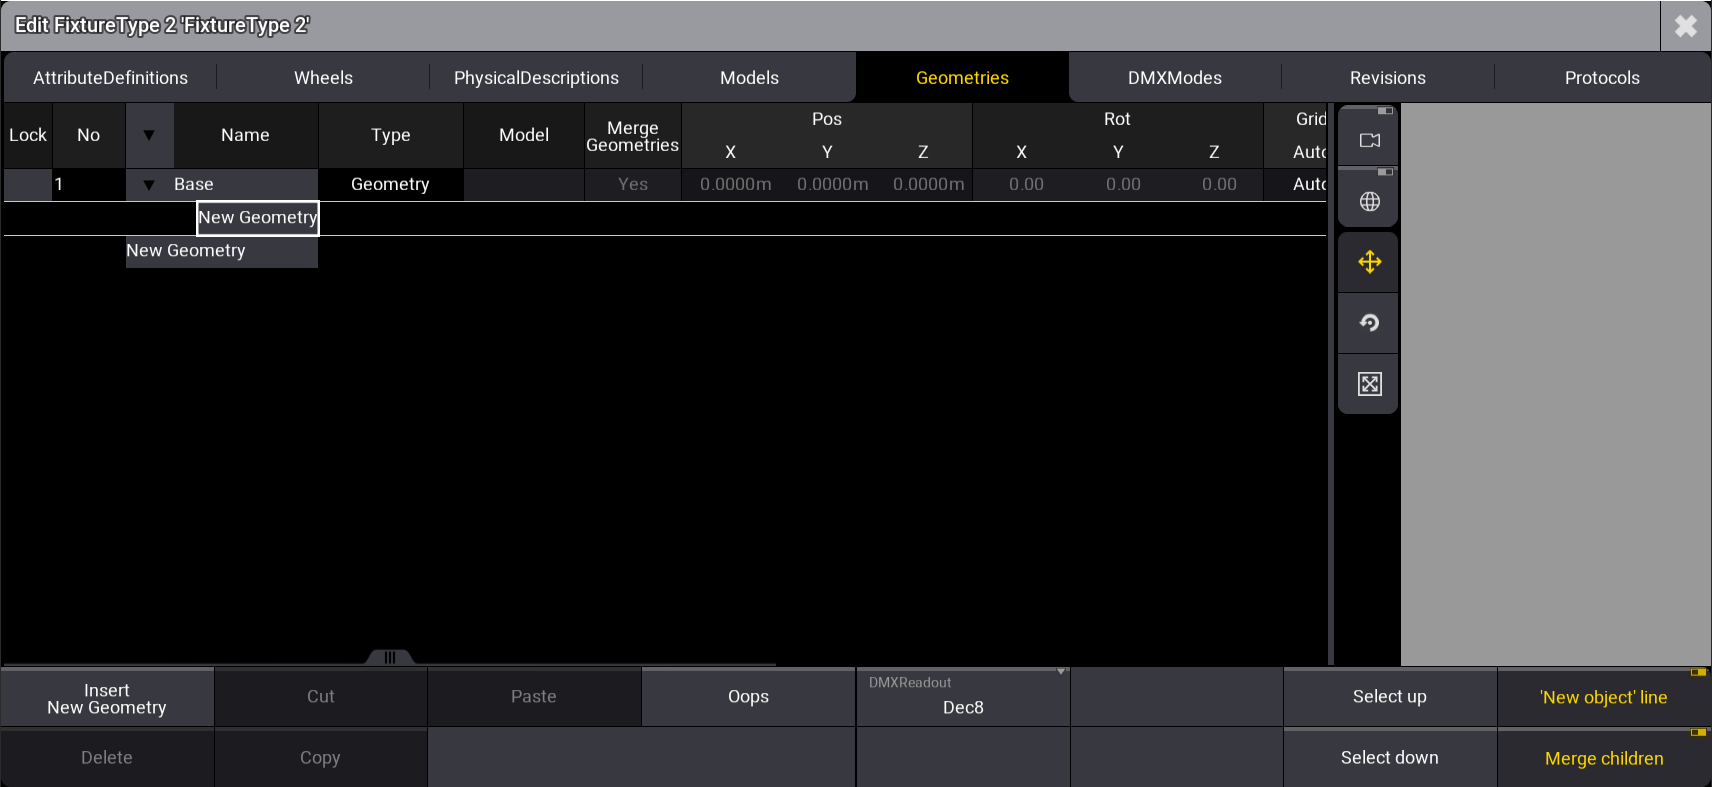\ *Insert new geometry* 1. Tap Insert New Geometry. 2. The pop-up Select type of the object opens. 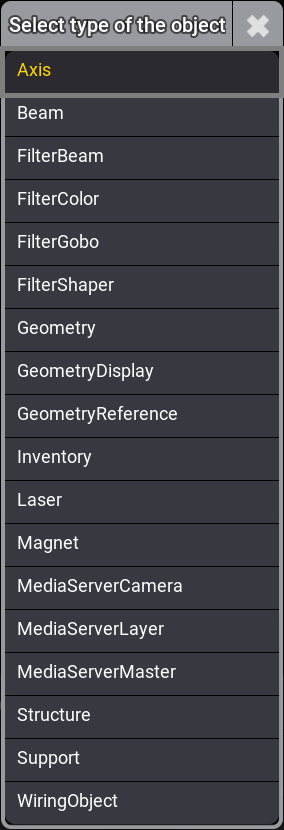 *Select type* * Select **Axis**. * Axis is now displayed in the column Type. In the column Name, rename Axis to Yoke. 3. * Press Edit and tap Axis, or press and hold Axis. * The virtual keyboard opens. * Enter Yoke. Expand the cell, Yoke. 4. * Yoke’s child New Geometry opens. * Repeat steps [6 to 8](/grandma3/2-3/ft_insert_geometries/#insert_rename) and rename Axis to Head. Expand the cell Head. * Head’s child New Geometry opens. * Repeat steps [6 to 8](/grandma3/2-3/ft_insert_geometries/#insert_rename), selecting Beam. Geometries are inserted, as shown in the image below: 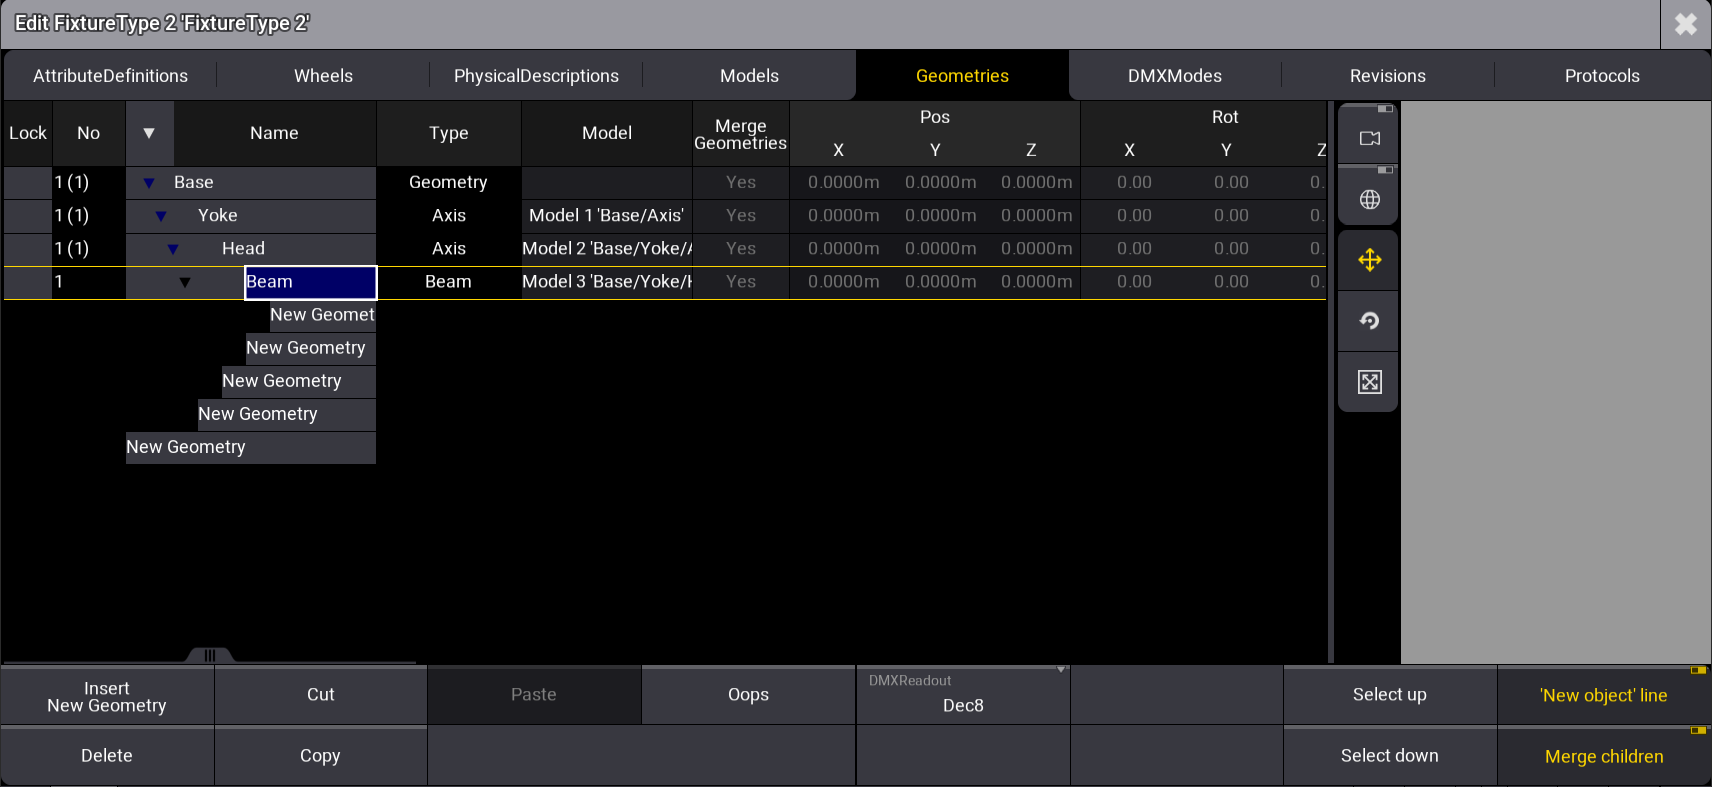 Inserted geometry and its children *** ### Sub-Fixtures Grid Position [Section titled “Sub-Fixtures Grid Position”](#sub-fixtures-grid-position) The grid position of sub-fixtures can be modified manually under the **Grid** columns of the **Geometry** tab: * **Grid Auto**: The positions are determined automatically by the position on the geometries (default value). When set to Manual, the user can define the grid positions independently using the following properties: * **Grid Swap XY**: Interchanges the grid positions between the X and Y axes. * **Grid Inv X**: Inverts the grid positions on the X-axis. * **Grid Inv Y**: Inverts the grid positions on the Y-axis. * **Grid Inv Z**: Inverts the grid positions on the Z-axis. * **Grid X**: Defines the position of the geometry on the X-axis. * **Grid Y**: Defines the position of the geometry on the Y-axis. * **Grid Z**: Defines the position of the geometry on the Z-axis. To better understand sub-fixture grid positioning, follow the steps below: 1. Import the Martin Professional Mac Aura PXL fixture type and select it. For more information, see [Import Fixture Types](/grandma3/2-3/ft_import/). 2. Tap Edit at the bottom of the fixture type menu. The fixture type editor opens. 3. Tap Geometries at the top of the window. 4. Click the arrow on top of the window to expand all the lines. 5. Select BeamLED 1. The edit fixture type menu looks like this: 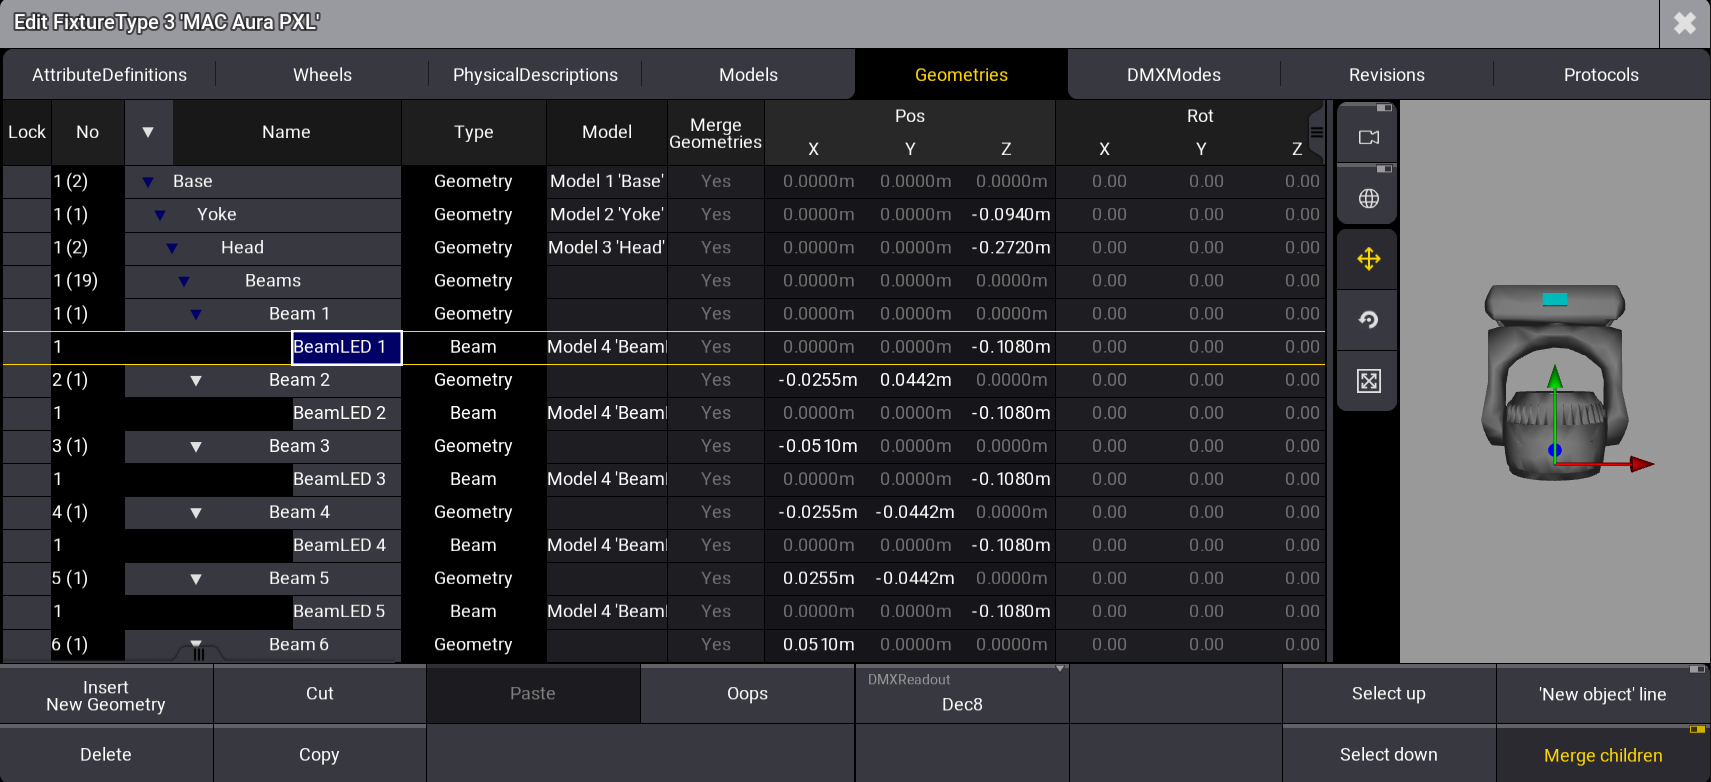 In the [3D area](/grandma3/2-3/ft_link_models_geometries/#h2__139560060) on the right side, colored indicators are displayed on the selected geometry. If the selected geometry is visible in the 3D model, the object itself is displayed in yellow. The values entered for Grid X, Grid Y, and Grid Z define the geometry position for all axes. Grid settings per fixture are possible if, for example, the same fixture type is used for fixtures that are hung and on the floor. This is set in the patch menu: Open the patch menu, press Menu, and tap Patch: 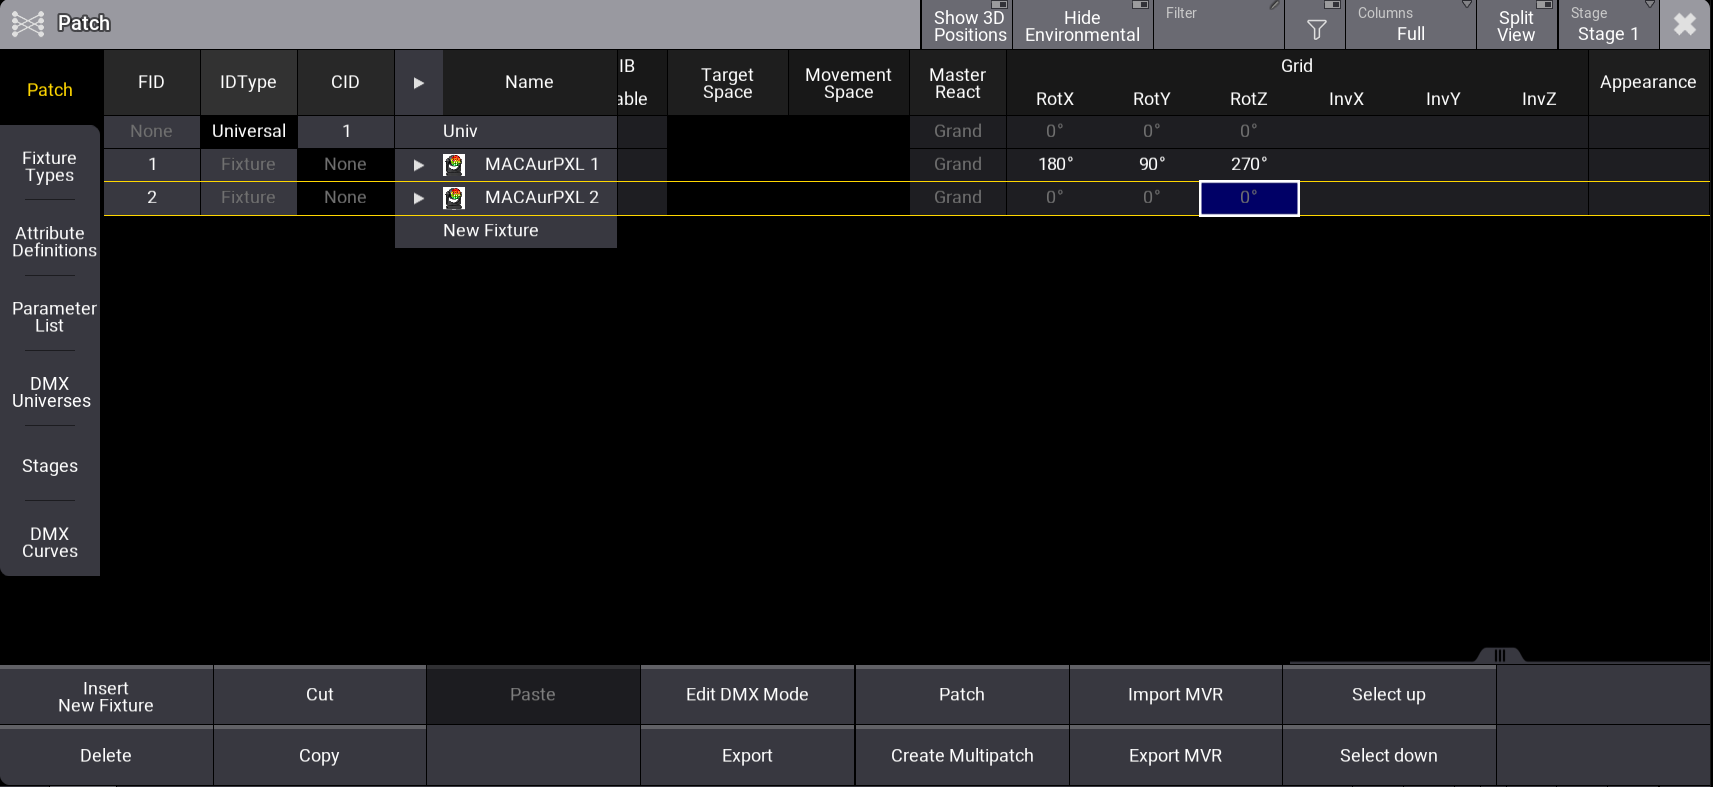 1. Select a fixture. 2. Set RotX, RotY, RotZ, InvX, InvY, and InvZ in the grid column. After inserting the fixture type’s geometries, the next step is to create models as a physical foundation for the fixture’s different parts: [Insert Models](/grandma3/2-3/ft_insert_models/).
# Insert Models
> Each geometry has a separate description of a model.
Each geometry has a separate description of a model. Every model needs a mesh. Meshes are 3D models that represent objects in a virtual environment. A mesh is a .3ds file (the 3D image format used by Autodesk 3D Studio) or a .gltf/.glb file (the open standard 3D image format). Meshes are stored in the Meshes pool after they have been imported to the show. * For more information about importing meshes, see [Meshes](/grandma3/2-3/meshes/).
# Link Models to Geometries
> To correctly display the models in the 3D Viewer, the next thing to do is to link models to geometries.
To correctly display the models in the 3D Viewer, the next thing to do is to link models to geometries. **Requirement:** * [Insert Geometries](/grandma3/2-3/ft_insert_geometries/) and [Insert Models](/grandma3/2-3/ft_insert_models/). 1. Tap the tab Geometries. 2. To link the model Base to geometries, tap, and hold the cell in the column Model. * Pop-up Select Model opens. * Select Base. 3. Set the offset of position in single geometries. * In Base, leave the default value of Pos Z. * In Yoke, set Pos Z to -0.265 m. * In Head, set Pos Z to -0.100 m. * In Beam, set Pos Z to -0.150 m. | | | | ------------------------------------------ | ---------------------------------------------------------------------- | |  | **Hint:** | | | The offset of the position depends on the measurements of the models. | | | | | ------------------------------------------ | ------------------------------------------------------------------------------------------------------------------- | |  | **Hint:** | | | These cells can also be edited using the [Geometry Viewer](/grandma3/2-3/ft_link_models_geometries/#h2__139560060). | 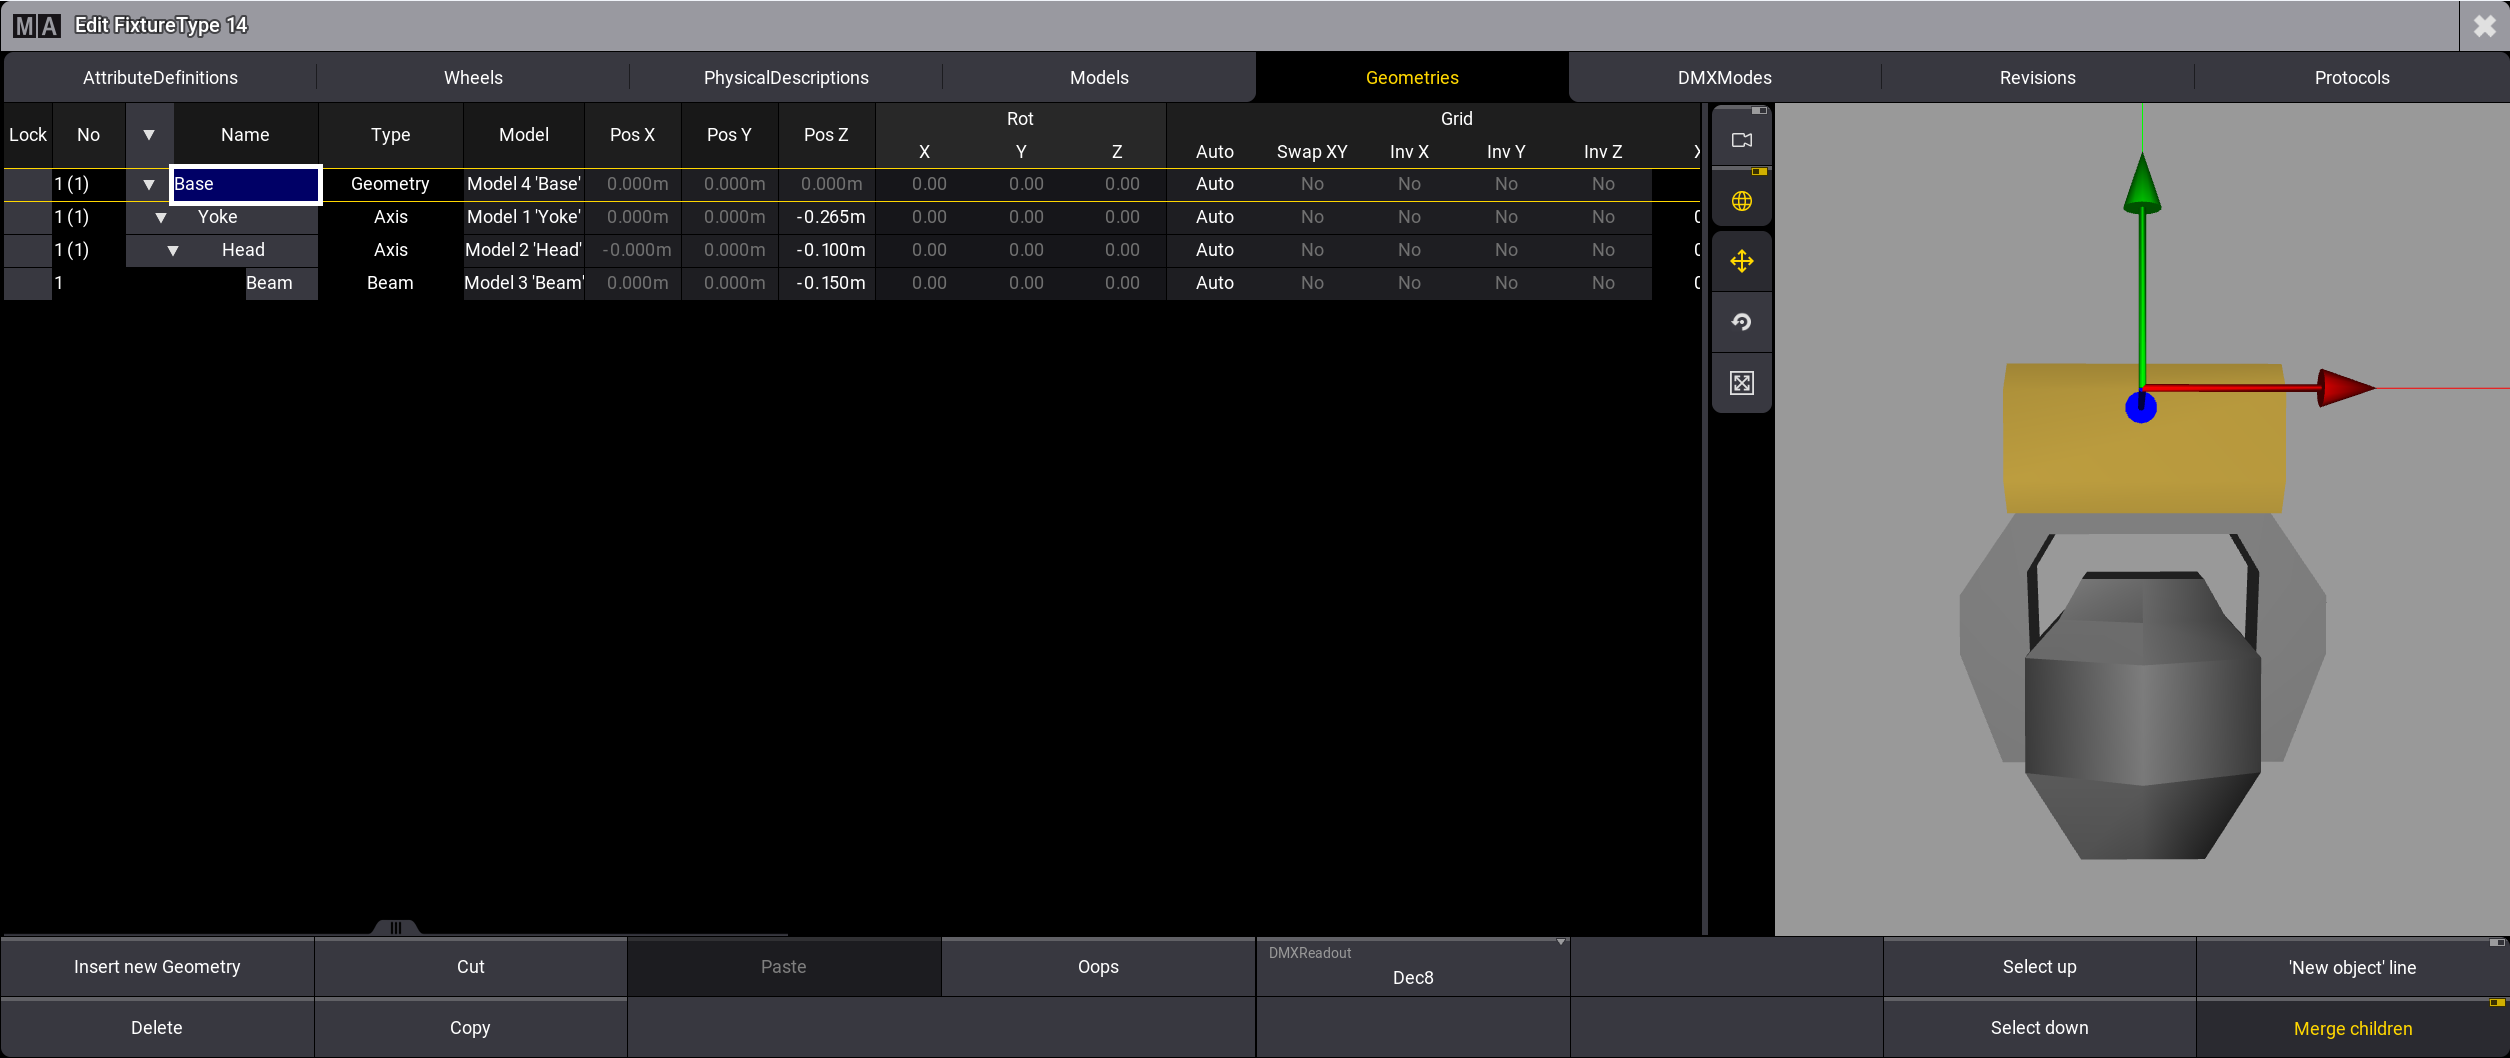 Set the offset of Pos Z This is the result in the 3D window.  Basic moving head displayed in wireframe in the 3D window | | | | ------------------------------------------ | --------------------------------------------------------------------------------------------------------------- | |  | **Hint:** | | | To display the basic moving head in wireframe in the 3D window, see [3D](/grandma3/2-3/patch_3d_viewer/) topic. |  Basic moving head rendered in the 3D window *** ## Geometry Viewer [Section titled “Geometry Viewer”](#geometry-viewer) The geometry viewer on the right side of the window displays a real time 3D visualization of the selected geometry tree. It allows you to view and to edit the geometries of the fixtures. | | | | ------------------------------------------ | ------------------------------------------------------------------------------------------------------------------------------------------- | |  | **Hint:** | | | To display the geometries in the geometry viewer, add meshes in the models tab first. See [Insert Models](/grandma3/2-3/ft_insert_models/). | To edit the geometries: 1. Tap on the part of the fixture you want to edit or select a geometry in the table.\ This part is now selected and is displayed with a yellow color in the 3D area. 2. Tap and hold one of the colored indicators to move, scale or rotate the geometries.\ The corresponding cells change accordingly.  Geometry Editor with the selected geometry Base in rotation mode and camera focus enabled  (Camera focus):\ If this button is enabled, the selected geometry is displayed in the center of the 3D area.\ If this button is disabled, the center of the whole fixture is pinned to the center of the 3D area.  (World model transformation):\ If this button is enabled, the axis follows the world.\ If this button is disabled, the axis follows the selected geometry.  (Translation mode):\ Lets you move the selected geometry.\ Tap and hold the arrow of the selected axis and move it. When the geometry is in the desired position, release your finger.  (Rotation mode):\ Lets you rotate the selected geometry.\ Tap and hold one of the colored rings and move it. When the geometry is in the desired position, release your finger.\ While you rotate the geometry along its own axis, the degree value of the rotation is displayed in the top left corner of the 3D area. Additionally, a colored disc shows a visual representation of the angle by which the geometry is rotated.  (Scale mode):\ Lets you scale the selected geometry.\ Tap and hold one of the axis indicators and move it. When the geometry has the desired size, release your finger.\ To scale all three axes at the same time, tap and move the block in the center of the axis indicators. | | | | ------------------------------------------ | ----------------------------------------------------------------------------------------- | |  | **Hint:** | | | Scaling the geometries changes the values for length, width, and hight in the Models tab. | | | | | ------------------------------------------ | ------------------------------------------------------------------------------------------------------------ | |  | **Hint:** | | | If you scale a geometry whose model is also linked to other geometries, those geometries are scaled as well. | The last step of building a basic moving head, is inserting DMX modes and channels and linking them to specific geometries: [Insert DMX Modes](/grandma3/2-3/ft_insert_dmx/). This is important for fully and accurately managing your fixture type. ####
# Generator - Random
> Generators are objects that allow a dynamic absolute value generation for special purposes, like randomization of absolute values on attributes.
Generators are objects that allow a dynamic absolute value generation for special purposes, like randomization of absolute values on attributes. # Random [Section titled “Random”](#random) The generator type **Random** allows the randomization of absolute values of attributes in different ways. Randoms are organized in the **Generator** pool. The **Generator** pool is part of the data pools. To address the generator pool objects, use the [Generator keyword](/grandma3/2-3/keyword_generator/).  Generator pool The key to randoms are the different **variance** values. Without the variance, it would be a very simple phaser, but the variance allows the different values to vary between each “loop” of the random. Randoms are called into the programmer and affect the defined attributes for the selected fixtures. This programmer information can be stored in presets or cues. Randoms can only affect the values on the absolute layer. The random generators have a lot of different settings that affect how the attribute output is randomized. This is a short description of all the different settings: * **Attribute**:\ This is the attribute affected by the random generator. * **Speed Master**:\ One of the 15 speed masters or the BPM master can be assigned as a speed controller. * **Speed**:\ Defines the speed at which the attribute values are randomized. * **Speed Variance**:\ Defines how big the **Speed** value may differ through the selection. * **Phase**:\ Sets the phase of the random between 0° and 360°. * **Phase Variance**: Defines the size of variance of the **Phase** value. If the selected fixtures use the random feature and this value is not 0%, their behavior will change. * **Low**:\ Defines the lowest value the random can reach. * **Low Variance**: Defines the degree of variation of the **Low** value. This adds some variation through the selected fixtures for the Low value. This variance acts only on the positive side of the Low value. * **High**:\ Defines the highest value the random can reach. * **High Variance**: Defines the size of value variance of the **High** value. This adds some variation through the selected fixtures for the High value. This variance acts only on the negative side of the High value. * **Attack**: Defines the size of the linear transition towards the **High** value. * **Decay**: Defines the size of the linear transition towards the **Low** value. * **Ratio**:\ Defines the ratio of how long fixtures will use the **Low** or **High** value. * **Ratio Variance**:\ Defines the amount of variance in the **Ratio** value. * **Speed Once**: When **Speed Once** is set to No, speed changes are applied immediately to the running random. When it is set to Yes, the random must be called again to see the change. * **Phase Once**: When **Phase Once** is set to No, changes to the phase parameters are applied immediately. By default, this setting is set to Yes. * **Random Start**: When **Random Start** is set to No, the random will always start the same every time the Random gets started. This might be useful for environments that need a predictable start. When Random Start is set to Yes, the Random will start differently every time it will be started. These settings are applied to a **Random Channel**. A Random can have multiple Random Channels. ## Create a Random Generator [Section titled “Create a Random Generator”](#create-a-random-generator) Randoms can be created by editing an empty pool object. This opens the **Generator Random Editor**. 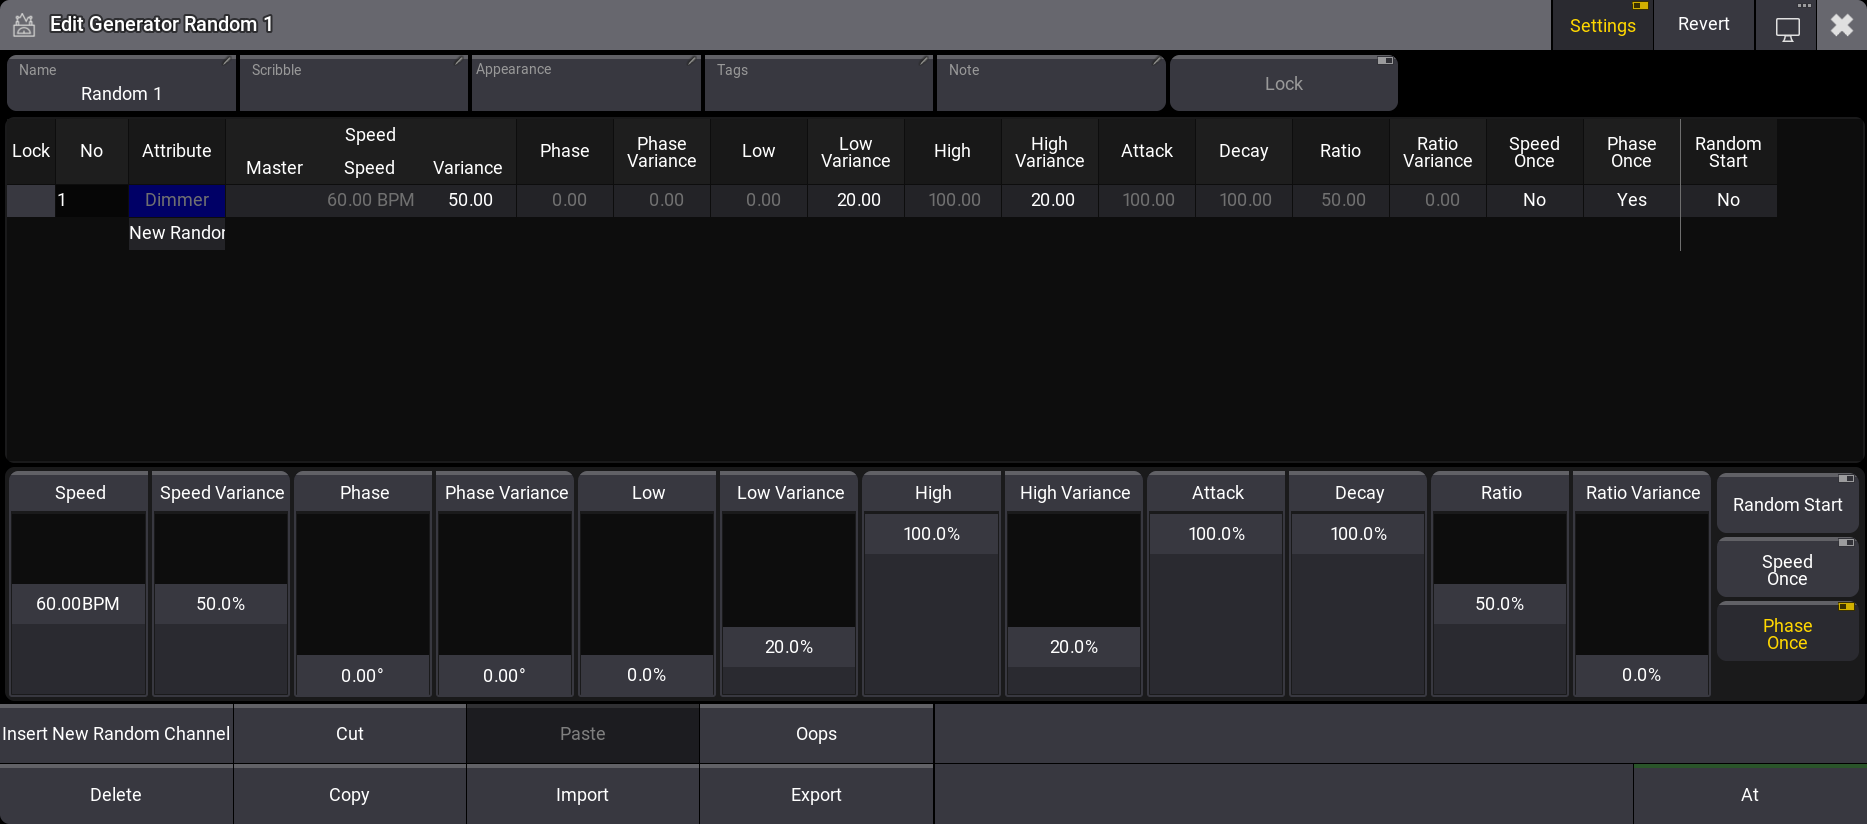 Generator Random Editor The top part of the editor contains a sheet area where the Random Channels are rows, and the different settings are columns. The bottom part has on-screen faders that can be used to edit the selected rows. The values can be edited on the sheet and fader parts. There are buttons at the bottom for normal actions like Cut, Copy, Paste, etc. This includes an At button, which can be used to apply the random values to the current selection. There is a special encoder bar when the editor has focus.  Generator Random Encoderbar This encoder bar also allows editing the generator values. The editor’s title bar has a button called Revert. Tapping this discards all current changes to the valid values when the Generator editor was opened. ## Using a Random [Section titled “Using a Random”](#using-a-random) Random Generators are not dependent on specific fixtures. They affect attributes. Having a fixture selection and tapping a Random pool object applies the Random objects values to the attributes of the fixtures on the absolute layer. These are programmer values that can be stored or used as live playback. The [Generator keyword](/grandma3/2-3/keyword_generator/) can also be used to apply Random Generators.
# Glossary
> The following collection of abbreviations, acronyms and fundamental lighting terms can be found in the grandMA3 user manual.
The following collection of abbreviations, acronyms and fundamental lighting terms can be found in the grandMA3 user manual. To open the glossary in the grandMA3 software: 1. Press Help and enter Glossary into the command line. 2. Press Please. The Glossary opens. ## A [Section titled “A”](#a) **[]()ACN** -\*\*\*\* Architecture for Control Networks\ Is a suite protocol. It uses a lot of elements that are currently not supported by grandMA3. But the ACN protocols also have a version for transporting DMX data. For more information on ACN, see [sACN menu](/grandma3/2-3/dmx_ethernet_sacn/). **ANSI** -\*\*\*\* American National Standards Institute **Art-Net**\ Art-Net 4 Ethernet communication standard is developed by Artistic Licence. For information about Art-Net in the grandMA3 software, see [Art-Net menu](/grandma3/2-3/dmx_ethernet_artnet/). **Attributes**\ Attributes are the building blocks of fixture types. For more information, see [Attribute definitions](/grandma3/2-3/patch_attribute_definitions/). ## B [Section titled “B”](#b) **bit** -\*\*\*\* binary digit **bpm** -\*\*\*\* beats per minute ## C [Section titled “C”](#c) **CIE** - Commission internationale de l’éclairage **CLI** - Command-line interaction **Command**\ A command is a phrase in the syntax that can be entered into the command line to perform a specific action. **Command Line**\ The syntax to control the console can be entered in the Command Line. For more information, see [Command Line](/grandma3/2-3/ws_ui_command_line/). **Conventional lights**\ Lighting device with dimmer only. **CPU** -\*\*\*\* Central Processing Unit **Cue**\ Cues can contain fixture values, references to presets, and recipes. Cues are organized in a sequence. For more information, see [Cues and Sequences](/grandma3/2-3/cue_sequence/). ## D [Section titled “D”](#d) **dBu** -\*\*\*\* decibel unloaded **DC** -\*\*\*\* Direct Current **DHCP** -\*\*\*\* Dynamic Host Control Protocol\ Is a system where IP addresses are distributed from a DHCP server. For more information on how to set IP addresses, see [Interfaces and IP](/grandma3/2-3/network_interface/). **[]()DMX** -\*\*\*\* Digital Multiplex\ Communication protocol to send a digital signal from a controller to a receiver. A single DMX cable can transmit one Universe. **DMX Channel**\ A single DMX Channel has a value between 0 and 255. **DMX Universe**\ A DMX Universe contains 512 DMX channels. **Dual Encoder**\ The five dual encoders on a console or a command wing are used to adjust the different attributes of the fixtures or other functions. For more information, see [Dual Encoders](/grandma3/2-3/do_control_encoder/). ## E [Section titled “E”](#e) **Encoder Bar**\ Displays the attributes or functions linked to the encoders and includes shortcuts for quick access to a selection of user profile settings and programming tools. For more information, see [Encoder Bar](/grandma3/2-3/ws_encoder_bar/). **Executors**\ Executors (Exec) are physical keys, knobs, and faders on the grandMA3 hardware. They can also be represented as on-screen virtual executors. For more information, see [Executors](/grandma3/2-3/executor/). **Extension**\ Allows to extend the amount of physical executor handles for specific grandMA3 products. For more information, see [Connect grandMA3 extension](/grandma3/2-3/fs_connect_extension/). ## F [Section titled “F”](#f) **Fader Wing**\ An additional fader for the grandMA3 onPC system. For more information, see [grandMA3 onPC fader wing](/grandma3/2-3/do_grandma3_onpc_fader_wing/). **Fixture**\ A complete lighting unit including at least a housing and a lamp. **Fixture Type**\ Fixture types are used to visualize and control real-life fixtures on stage. For more information, see [Fixture Types](/grandma3/2-3/fixture_types/). **fps** - frames per second ## G [Section titled “G”](#g) **GB** - Gigabyte **GDTF** - General Device Type Format\ Is a file format used to describe devices. For information about GDTF, see GDTF Share. **GlobalMaster**\ This is the session master station in all networked systems. For more information, see [Locally Networked Devices](/grandma3/2-3/system_local/). **GPI** - General Purpose Interface **Grand Master**\ Is used to limit the output of the intensity of all the fixtures patched in a show. For more information, see [Grand Master](/grandma3/2-3/do_control_grand/). **Groups**\ Groups contain a selection of fixtures. This includes the order and grid position of the selection. This can be used as a programming tool, where it is a fast way to select the fixtures. For more information about Groups, see [Groups](/grandma3/2-3/group/). ## H [Section titled “H”](#h) **Hex** - Hexadecimal **Highlt** - Highlight\ See [Highlt key](/grandma3/2-3/key_highlt/). **HTP** - Highest Takes Precedence\ The highest value will be output, mostly used with Dimmer. For more information about priorities, see [LTP](/grandma3/2-3/glossary/#LTP2). **Hz** - Hertz ## I [Section titled “I”](#i) **IdleMaster**\ When a console is ready to be connected to another station, the console is in IdleMaster mode. For more Information, see [Standalone Device](/grandma3/2-3/system_standalone/). **IEC** - International Electrotechnical Commission **IP** - Internet Protocol ## K [Section titled “K”](#k) **Keywords**\ Defined word in the software with a specific usage. ## L [Section titled “L”](#l) **LED** - Light Ermitting Diode\ An intelligent light with a LED source. **Level Wheel**\ The level wheel on the right side of a console or command wing is always assigned to dimmer attributes. **log** - logarithm **Lua**\ Lua is a scripting language designed to support general procedural programming. For more information, see [What is Lua](/grandma3/2-3/lua/). **LTC** - Linear Time Code **[]()****LTP****** - Latest Takes Precedence\ Most recent value will be output, mostly used for all attributes besides Dimmer. For more information about priorities, see [DMX port configuration](/grandma3/2-3/dmx_port_config/). ## M [Section titled “M”](#m) **mA** - milliampere **Macro**\ Macros are commands stored in a pool object. For more information, see [Macros](/grandma3/2-3/macros/). **Master**\ Masters are physical representations of various timing and level overrides that exist in the software. For more information, see [Masters](/grandma3/2-3/masters/). **MB** - Megabyte **MIB** - Move In Black\ For more information, see [Move In Black](/grandma3/2-3/cue_mib/). **MIDI** - Musical Instrument Digital Interface\ A standard communication protocol. For more information about MIDI, see [MIDI](/grandma3/2-3/remote_inputs_midi/). **Moving Light**\ Lighting instrument with additional attributes other than dimmer. It is possible to control the position of a Moving Light from a console. **MSC** - MIDI Show Control\ Sends functions via MIDI signal from an executor to another device, for example a console or MIDI sequencer. **Multi-Instance Fixture**\ A lighting instrument with multiple individually controllable sections. **MVR** - My Virtual Rig\ MVR is a file format that is used to share data for a patch. For more information, see [MVR](/grandma3/2-3/patch_mvr/). ## O [Section titled “O”](#o) **OS** -\*\* \*\*Operating System **OSC** - Open Sound Control\ OSC is a client and server system that defines a message address pattern used to address elements in the receiving server. For more information, see [OSC](/grandma3/2-3/remote_inputs_osc/). ## P [Section titled “P”](#p) **Pan**\ Horizontal movement axis of a fixture. **Parameters**\ A parameter can use several DMX channels. For more information, see [Parameters](/grandma3/2-3/system_parameter/). **Patch**\ In the Patch, the DMX universes, addresses and modes for the fixture types are defined. **Phasers**\ Dynamically changes the output for attributes using a set of information in two or more steps. For more information, see [Phasers](/grandma3/2-3/phaser/). **PoE** - Power over Ethernet **Playback**\ Recalling stored information physically (for example, fader) or graphically (user interface) on a console. A preset, a sequence with cues, or a timecode show can be played back. For more information, see [Playback Window](/grandma3/2-3/executor/). **Presets**\ Presets are containers for values. For example, when the same values are used in different cues several times. For more information, see [Presets](/grandma3/2-3/presets/). **Prev** - Previous\ See [Prev key](/grandma3/2-3/key_prev/). **Programmer**\ The programmer is a temporary memory, where the active values are placed. The values can then be stored or released. For more information, see [Programmer](/grandma3/2-3/operate_fixtures/). **Prvw** - Preview\ See [Prvw key](/grandma3/2-3/key_prvw/). **PSN** - PosiStageNet\ grandMA3 stations can receive PSN data. For more information, see [PSN](/grandma3/2-3/remote_inputs_psn/). **PSR** - Partial Show Read\ PSR transfers objects of show files. For more information, see [PSR](/grandma3/2-3/sc_psr/). **PWM** - Pulse Width Modulation ## R [Section titled “R”](#r) **RAM** - Random Access Memory **RCA** - Radio Corporation of America **RDM** - Remote Device Management\ Permits intelligent bidirectional communication between devices from multiple manufacturers using a modified DMX512 data link. For more information, see [RDM](/grandma3/2-3/rdm/). **RPM** - Rounds per Minute ## S [Section titled “S”](#s) **S/PDIF** - Sony/Philips Digital Interface **sACN** - Streaming Architecture for Control Networks\ For more information, see [ACN](/grandma3/2-3/glossary/#ACN). **SelFix** - SelectFixture\ See [SelFix key](/grandma3/2-3/key_selfix/). **Sequence**\ A sequence contains cues that can be played back in a defined order. For more information, see [Cues and Sequences](/grandma3/2-3/cue_sequence/). **SMPTE** - Society of Motion Picture and Television Engineers **SSD** - Solid-State Drive **SSE** - Streaming SIMD Extensions **STP** - Shielded Twisted Pair **Syntax**\ The command line syntax is used to create valid commands. For more information, see [Syntax](/grandma3/2-3/csk_general_keywords/). ## T [Section titled “T”](#t) **TC** - Timecode\ Timecode is a time signal used to let off the recordings of a playback or trigger cues. For more information, see [Timecode](/grandma3/2-3/timecode/). **TCP** - Transmission Control Protocol **Tilt**\ Vertical movement axis of a fixture. **Tracking**\ Tracking is the principle to store only the changes in the cues. For more information, see [Tracking](/grandma3/2-3/cue_tracking/). ## U [Section titled “U”](#u) **UDP** - User Datagram Protocol **UI** - User Interface\ See [User Interface](/grandma3/2-3/ws_user_interface/). **UUID** - Universally Unique Identifier ## V [Section titled “V”](#v) \*\*Variable\ \*\*Variables are used to store values and recall them at a later point. For more information, see [Variables](/grandma3/2-3/macro_variables/). **V** - Volt **VRAM** -\*\*\*\* Video Random Access Memory ## W [Section titled “W”](#w) **Web remote**\ See [Web remote](/grandma3/2-3/network_webremote/). ## X [Section titled “X”](#x) **XFade** - Crossfade\ For more information, see [Assign object to an executor](/grandma3/2-3/executor_assign/). **XLR** - External Line Return **XML** - Extensible Markup Language
# Gobos
> Gobos are stored in the Gobo Pool. Gobos 1 thru 4 are locked and can not be edited.
Gobos are stored in the Gobo\*\* Pool\*\*. Gobos 1 thru 4 are locked and can not be edited. When fixtures are patched in the show file, the images of the gobos used by these fixtures are stored in the **Gobo Pool**. Open a **Gobo Pool** window. For information, see the [Add window](/grandma3/2-3/wvm_add_window/) topic. In the **Add Window** pop-up, tap Pools and Gobos in the **Media** column.  Gobo pool Edit a gobo pool object using one of two options: * Press Edit and then tap the desired pool object. * Open the swipey commands on the pool object and choose Edit. *** ### Assign Gobo to Appearances [Section titled “Assign Gobo to Appearances”](#assign-gobo-to-appearances) To assign a gobo to an appearance: 1. Open an Appearance Pool window. 2. Open the swipey command on the pool object, select Edit or press Edit, and tap an appearance pool object. The **Edit Appearance** pop-up opens. 3. Tap Image. The **Select Image** pop-up opens. 4. From the title bar, tap and hold ImageSource and select **Gobos**. The Select Image pop-up opens. 5. Select an image and close the pop-up. 6. Continue editing the new appearance if needed and close the **Edit Appearance** pop-up. A new appearance is created. Tap the video below to see the example. [Vimeo video](https://player.vimeo.com/video/936269645?title=0\&byline=0\&portrait=0\&color=ffeb0f)
# Quick Manual grandMA3 consoles
## Subtopics [Section titled “Subtopics”](#subtopics) * [EN Quick Manual consoles](/grandma3/2-3/english-quick-manual-consoles/) * [DE Quick Manual Konsolen](/grandma3/2-3/deutsch-quick-manual-konsolen/) * [FR Quick Manual consoles](/grandma3/2-3/francais-quick-manual-consoles/)
# Quick Manual grandMA3 I/O Node
## Subtopics [Section titled “Subtopics”](#subtopics) * [EN Quick Manual I/O Nodes](/grandma3/2-3/en-quick-manual-i-o-nodes/) * [DE Quick Manual I/O Nodes](/grandma3/2-3/de-quick-manual-i-o-nodes/) * [FR Quick Manual I/O Nodes](/grandma3/2-3/fr-quick-manual-i-o-nodes/)
# Quick Manual grandMA3 Nodes
## Subtopics [Section titled “Subtopics”](#subtopics) * [EN Quick Manual Nodes](/grandma3/2-3/english-quick-manual-nodes/) * [DE Quick Manual Nodes](/grandma3/2-3/deutsch-quick-manual-nodes/) * [FR Quick Manual Nodes](/grandma3/2-3/fr-quick-manual-nodes/)
# Quick Manual grandMA3 Node DIN-Rail
## Subtopics [Section titled “Subtopics”](#subtopics) * [EN Quick Manual Node DIN-Rail](/grandma3/2-3/en-quick-manuals-node-din-rail/) * [DE Quick Manual Node DIN-Rail](/grandma3/2-3/de-quick-manuals-node-din-rail/) * [FR Quick Manual Node DIN-Rail](/grandma3/2-3/fr-quick-manual-node-din-rail/)
# Quick Manual grandMA3 onPC command wing
## Subtopics [Section titled “Subtopics”](#subtopics) * [EN Quick Manual onPC command wing](/grandma3/2-3/en-quick-manual-onpc-command-wing/) * [DE Quick Manual onPC command wing](/grandma3/2-3/de-quick-manual-onpc-command-wing/) * [FR Quick Manual onPC command wing](/grandma3/2-3/fr-quick-manual-onpc-command-wing/)
# Quick Manual grandMA3 onPC command wing XT
## Subtopics [Section titled “Subtopics”](#subtopics) * [EN Quick Manual onPC command wing XT](/grandma3/2-3/en-quick-manual-onpc-command-wing-xt/) * [DE Quick Manual onPC command wing XT](/grandma3/2-3/de-quick-manual-onpc-command-wing-xt/) * [FR Quick Manual onPC command wing XT](/grandma3/2-3/fr-quick-manual-onpc-command-wing-xt/)
# Quick Manual grandMA3 onPC fader wing
## Subtopics [Section titled “Subtopics”](#subtopics) * [EN Quick Manual onPC fader wing](/grandma3/2-3/en-quick-manual-onpc-fader-wing/) * [DE Quick Manual onPC fader wing](/grandma3/2-3/de-quick-manual-onpc-fader-wing/) * [FR Quick Manual onPC fader wing](/grandma3/2-3/fr-quick-manual-onpc-fader-wing/)
# Quick Manual grandMA3 onPC rack-unit
## Subtopics [Section titled “Subtopics”](#subtopics) * [EN Quick Manual onPC rack-unit](/grandma3/2-3/en-quick-manual-onpc-rack-unit/) * [DE Quick Manual onPC rack-unit](/grandma3/2-3/de-quick-manual-onpc-rack-unit/) * [FR Quick Manual onPC rack-unit](/grandma3/2-3/fr-quick-manual-onpc-rack-unit/)
# Quick Manual grandMA3 processing units
## Subtopics [Section titled “Subtopics”](#subtopics) * [EN Quick Manual processing units](/grandma3/2-3/english-quick-manual-processing-units/) * [DE Quick Manual processing units](/grandma3/2-3/deutsch-quick-manual-processing-units/) * [FR Quick Manual processing units](/grandma3/2-3/francois-quick-manual-processing-units/)
# Quick Manual grandMA3 viz-key
## Subtopics [Section titled “Subtopics”](#subtopics) * [EN Quick Manual viz-key](/grandma3/2-3/en-quick-manual-viz-key/) * [DE Quick Manual viz-key](/grandma3/2-3/de-quick-manual-viz-key/) * [FR Quick Manual viz-key](/grandma3/2-3/fr-quick-manual-viz-key/)
# GridStore Function
> The fixture types imported and patched in your show file may have been built with the right sub-fixture arrangement.
The fixture types imported and patched in your show file may have been built with the right sub-fixture arrangement. For example, Martin Professional Mac Aura PXL: 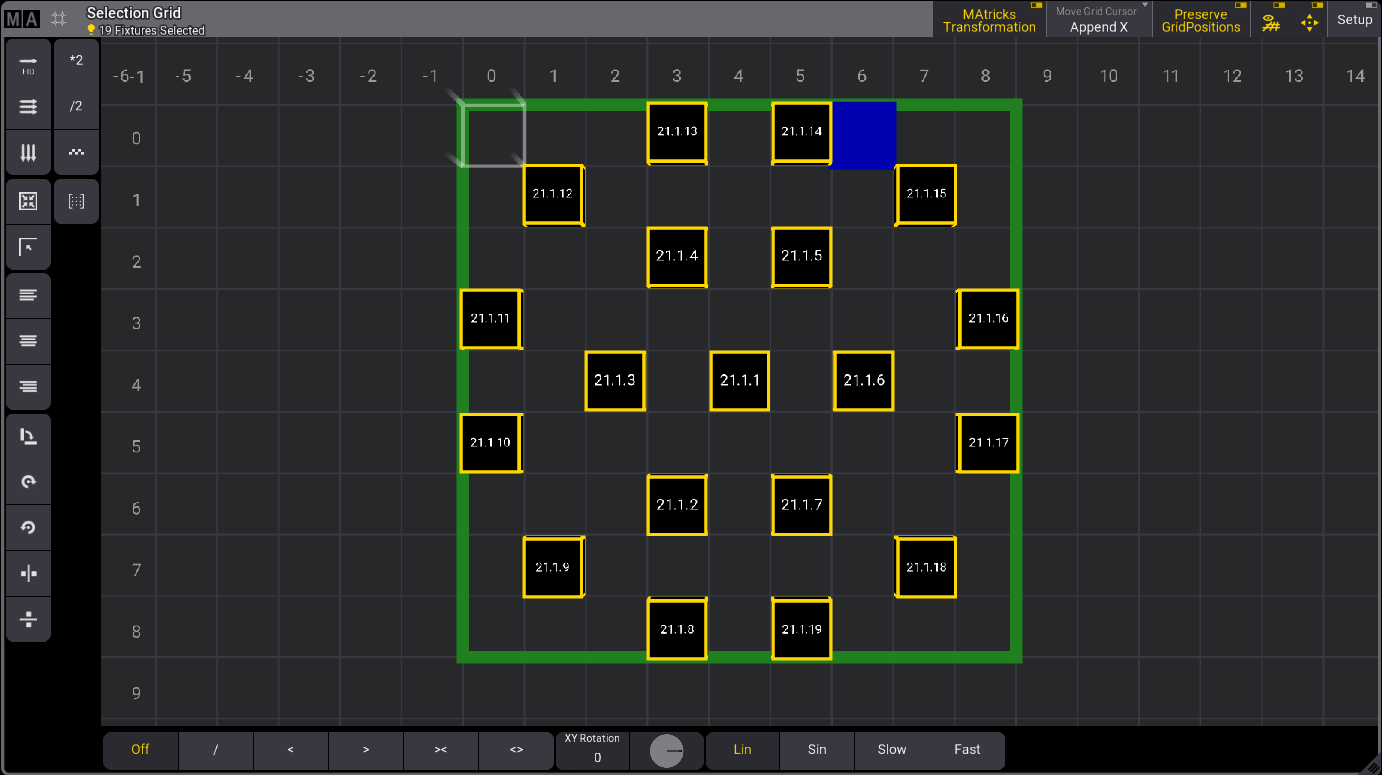 The fixture type editor sets the grid position of the sub-fixtures. For more information, see [Build Fixture Types](/grandma3/2-3/ft_build/) and [Insert Geometries](/grandma3/2-3/ft_insert_geometries/). The grid position of sub-fixtures can also be transferred to fixture types using the [GridStore](/grandma3/2-3/keyword_gridstore/) keyword. Requirements for the following example: * One patched GLP JDC2 IP set to M4 - Segment 12-24 mode. See [Patch and Fixture Setup](/grandma3/2-3/patch/). * Set FID to 1. * An open selection grid window. Workflow: 1. Select fixture 1.3 and press Down. The selection grid looks like this: 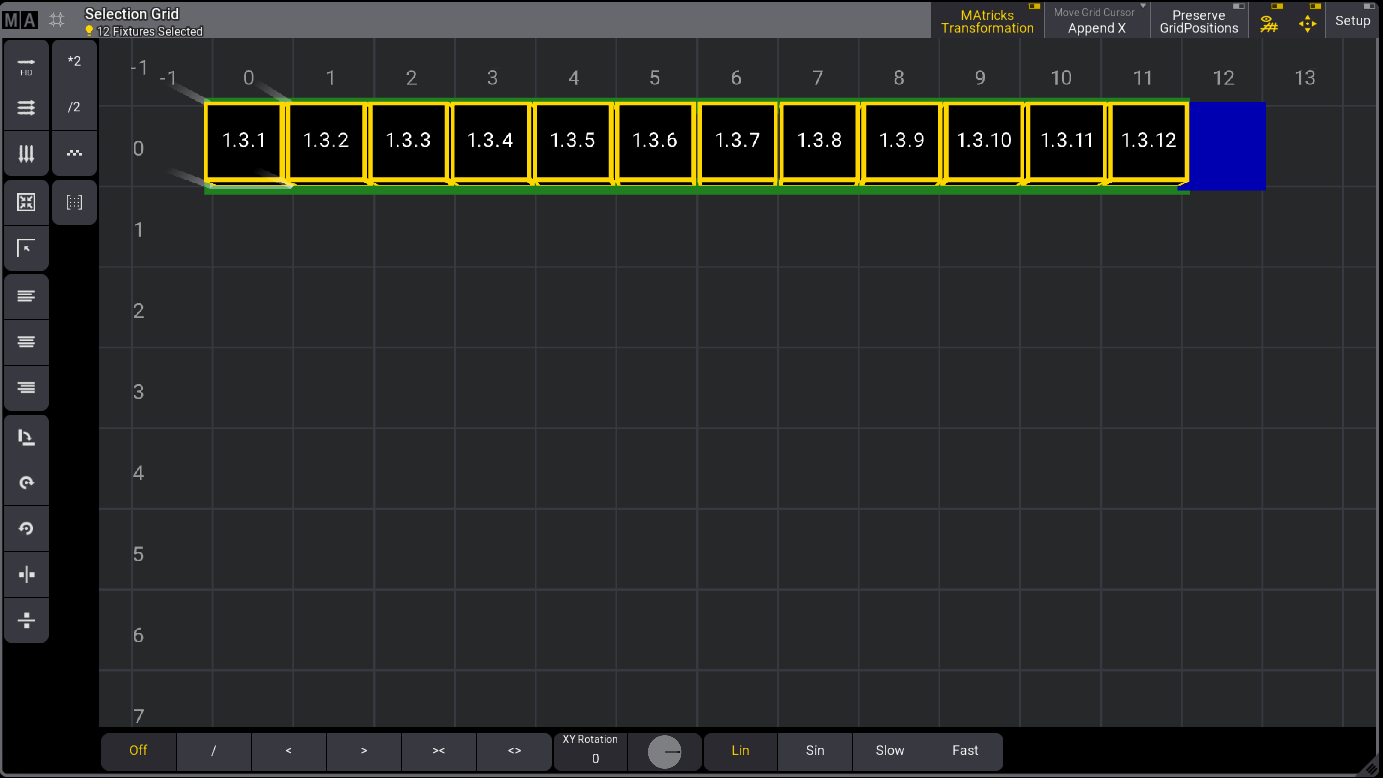 1. Tap Setup to enter setup mode. 2. Position the sub-fixtures and exit setup. For more information, see [Selection Grid Setup Mode](/grandma3/2-3/selection-grid-window-settings/). The selection grid could look like this: 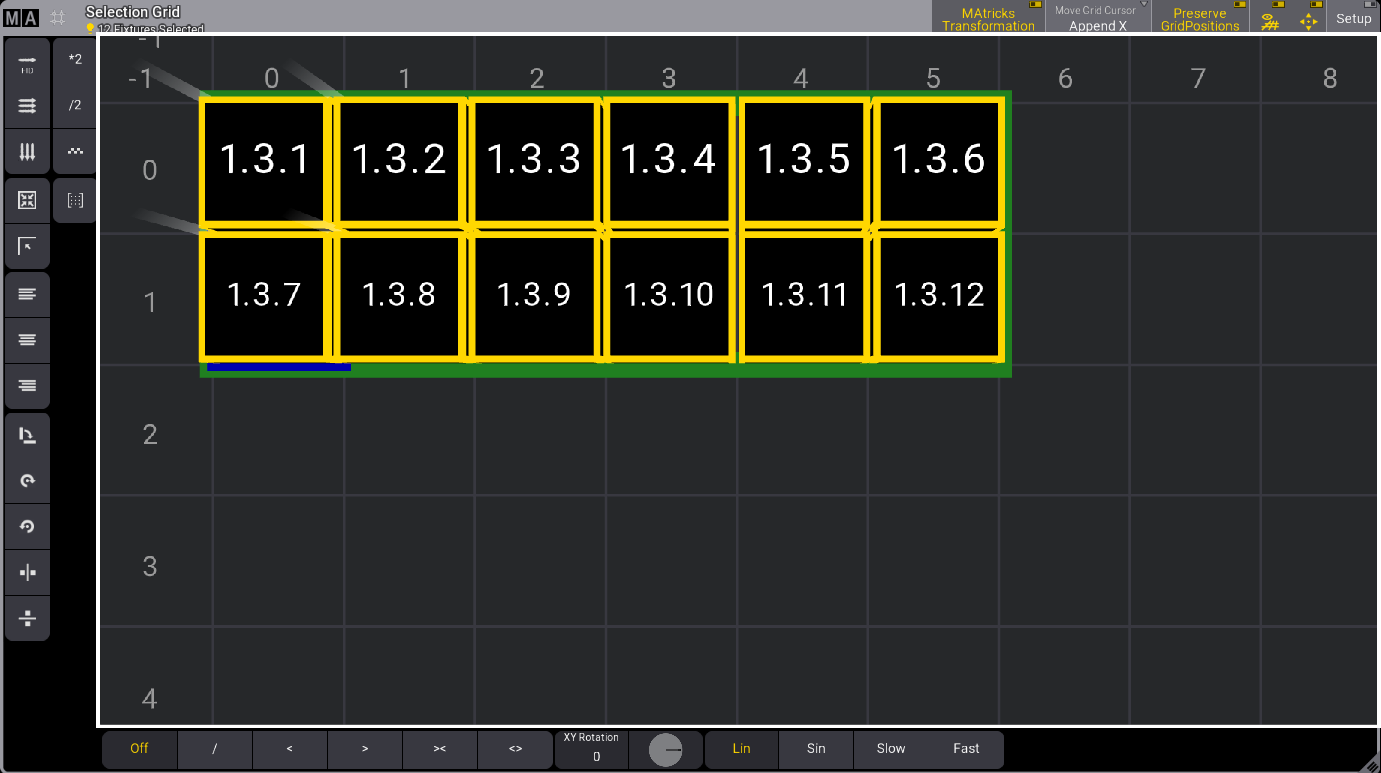 1. Type the keyword **GridStore** in the command line and press Please. The sub-fixtures grid positions are transferred to the fixture type in the show file. The arrangement for the selected fixtures will apply to other fixtures of the same type. You can use the grid settings per fixture when the same fixture type is used, for example, hung and in a floor position on stage. For more information, see [Add Fixtures to the Show](/grandma3/2-3/patch_add_fixtures/#h2_127376776).
# Groups
> Groups contain a selection of fixtures. A group can include one or many fixtures.
Groups contain a selection of fixtures. A group can include one or many fixtures. The fixtures’ selection order and grid position are also stored in a group. For more information, see [Selection Grid](/grandma3/2-3/operate_selection/). Using groups is a fast way to select the fixtures. Groups can also be used as masters. There are four different types of group masters. Read more in the [Group Master topic](/grandma3/2-3/group_master/). Groups are organized in a **Groups Pool** - read more about pools in the [Pool Windows topic](/grandma3/2-3/wvm_pool/).  *Groups pool example* Cues and presets do not store a reference to or information about the groups; only the values applied to the fixtures are stored in them. Recipes can store a reference to groups. The following topics explore the creation, editing, and deletion of groups, as well as information about group masters. ## Subtopics [Section titled “Subtopics”](#subtopics) * [Create New Groups](/grandma3/2-3/group_create/) * [Edit Groups](/grandma3/2-3/group_edit/) * [Delete Groups](/grandma3/2-3/group_delete/) * [Group Masters](/grandma3/2-3/group_master/)
# Create New Groups
> Groups are created by storing them in the Group Pool with a selection of fixtures.
Groups are created by storing them in the [Group Pool](/grandma3/2-3/group/) with a selection of fixtures. The groups store the fixture selection, the grid information, and the fixtures’ selection order (this is also a grid). Grid information is 3D position information indicating the position relationship between the fixtures. It is not the location on the 3D stage. For more information, see [Selection Grid topic](/grandma3/2-3/operate_selection/). The order and grid information are essential for ranged value input or when creating [Phasers](/grandma3/2-3/phaser/). | | | | ------------------------------------------------ | -------------------------------------------------------------------------- | |  | **Important:** | | | Groups do not store values! - Only the fixture selection, order, and grid. | Use one of the following methods to store a group: Please make sure the correct fixtures are selected and in the correct order. 1. Store the group using a syntax like this: Store Group \[my\_group\_number]. The two needed keywords are [Store](/grandma3/2-3/keyword_store/) and [Group](/grandma3/2-3/keyword_group/). To store group 3, for example: 1. Press Store Group 3 Please When storing to an existing group, the store mode pop-up opens:  Store mode pop-up. When Grid Merge Mode is set to **Append X** (the default setting), the selected fixtures will be added to the next available X coordinate. Read the [Selection Grid topic](/grandma3/2-3/operate_selection/) for information about positioning the fixtures in a grid before storing the group. Existing groups can be edited using the [Edit Group pop-up](/grandma3/2-3/group_edit/). Labeling the group is not required, but it is a good idea. You can do this using any method described in [Label pool objects](/grandma3/2-3/wvm_pool_label/) or the Edit Group pop-up.
# Delete Groups
> Delete a Group Pool object using one of the following methods:
Delete a Group Pool object using one of the following methods: * Using the [Delete](/grandma3/2-3/keyword_delete/) Keyword: | | | | ------------------------------------------------------------------ | ---------------------------------- | |  | User name\[Fixture]>Delete Group 1 |
# Edit Groups
> To edit a group, use one of the following methods:
To edit a group, use one of the following methods: * The [EditSetting keyword](/grandma3/2-3/keyword_editsetting/). * Press Edit twice and then tap a group pool object. * Open the swipey commands on the pool object and choose Edit Setting. The Edit Group pop-up opens. 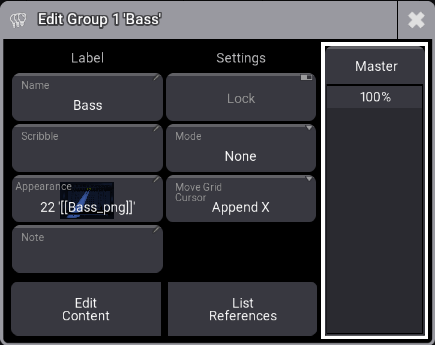 Edit group pop-up. The editor has two columns, **Label** and **Settings**. Use the **Master** fader on the right to control one of the four group master types. Read more in the [Group Masters](/grandma3/2-3/group_master/) topic. Here is a description of the left buttons under the **Label** column: **Name:**\ The group name. To change a group name, use the **Label** command. For more information, see [Label keyword](/grandma3/2-3/keyword_label/). **Scribble** and **Appearance:**\ Can be assigned using these two buttons. For more information, see [Scribble](/grandma3/2-3/scribbles/) and [Appearances](/grandma3/2-3/appear/). **Note:**\ For more information, see [Notes](/grandma3/2-3/notes/). **Lock:**\ When toggled on, Name, Scribble, Appearance, Mode, and Move Grid Cursor are disabled. **Mode:**\ Tap to select one of the four group master modes. For more information, see [Group Masters](/grandma3/2-3/group_master/). \*\*Move Grid Cursor:\ \*\*For more information, see [Selection Grid](/grandma3/2-3/operate_selection/) and [User Settings](/grandma3/2-3/user_settings/).
# Group Masters
> Groups can be masters of the fixtures in the group. For more information, see Masters.
Groups can be masters of the fixtures in the group. For more information, see [Masters](/grandma3/2-3/masters/). If the value is adjusted often, assigning the group to an executor can be advantageous. Learn how in the [Assign Object to an Executor topic](/grandma3/2-3/executor_assign/). There are four different kinds of group masters: * **Positive** - This is an HTP group master, indicated by  icon in the upper right corner of the pool object. The output of the fixtures is reduced depending on the value of the group master. * **Negative** - This is a LoTP group master, indicated by  icon in the upper right corner of the pool object. The output of the fixtures is reduced depending on the values of the group master. * **Scaling** - This scales the intensity output. Scaling is indicated by  icon in the upper right corner of the pool object. For example, if the fixture is at 50% and the group master is at 50%, then the output is 25%. * **Additive** - This master does not limit output but adds output as HTP merges with values from the programmer and playbacks. A small circle icon in the upper right corner of the pool object indicates it. ## ## Difference Between Positive, Negative, and Scaling [Section titled “Difference Between Positive, Negative, and Scaling”](#difference-between-positive-negative-and-scaling) The difference between the positive and negative masters is relevant when several groups contain the exact or overlapping fixtures. A negative master has priority over a positive. For example, if two groups include a fixture with 100% output, and if one group is a positive master at 80% and the other group is a negative master at 60%, then the output is 60% (limited by the negative master). If the negative master is turned up, the output stops at 80% when the positive master becomes valid. If you switch both groups to Scaling, the output will be 48% since the fixture output of 100% is multiplied by 60% and 80% of the second group master. 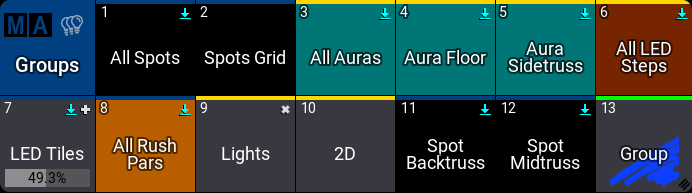 *Group pool with masters* Groups with a mode assigned have a horizontal bar that displays the master level if it is relevant. The master mode can be selected using the **Edit Group pop-up**. Read more about the pop-up in the [Edit Groups topic](/grandma3/2-3/group_edit/). The mode can also be assigned using the [Set keyword](/grandma3/2-3/keyword_set/). ### Example [Section titled “Example”](#example) Using the command line to set the master mode of group 4 to positive: | | | | ------------------------------------------------------------------ | ---------------------------------------------------------- | |  | User name\[Fixture]>Set Group 4 Property “Mode” “Positive” | The mode type is capital sensitive. Writing “positive” fails, but “Positive” works. | | | | ------------------------------------------ | ----------------------------------------------------------------------------------------- | |  | **Hint:** | | | A pop-up appears if the mode is not specified, allowing you to choose a mode from a list. | ## Delete a Group Master [Section titled “Delete a Group Master”](#delete-a-group-master) Deleting a group assigned to an executor does not delete the group from the pool. If a group is deleted from the group pool, it is deleted from the show. | | | | ------------------------------------------ | ------------------------------------------------------------------------------------------------------------------------------------------------------------------------------------------------- | |  | **Hint:** | | | Deleting a group from an executor keeps the fixtures limited, as the group still exists in the pool. When deleting a group directly, the fixtures return to their non group master limited value. |
# Images
> Imported images are in the Image Pool. For more information, see Pool Windows.
Imported images are in the **Image Pool**. For more information, see [Pool Windows](/grandma3/2-3/wvm_pool/). | | | | ------------------------------------------------ | ---------------------------------------------------------- | |  | **Important:** | | | The overall size of the media pool is a maximum of 300 MB. | We advise that you keep the image pool as small as possible. For example, keep the maximum image size below 64 MB, and do not exceed a resolution of 1 920 x 1 080. Images can be used for appearances. Read more in the [Create Appearances](/grandma3/2-3/appear_create/) topic.  *Example of the images pool* Edit an image pool object using one of two options: 1. Press Edit and then tap the desired pool object. 2. Open the swipey commands on the pool object and choose Edit. The Edit Images pop-up opens: 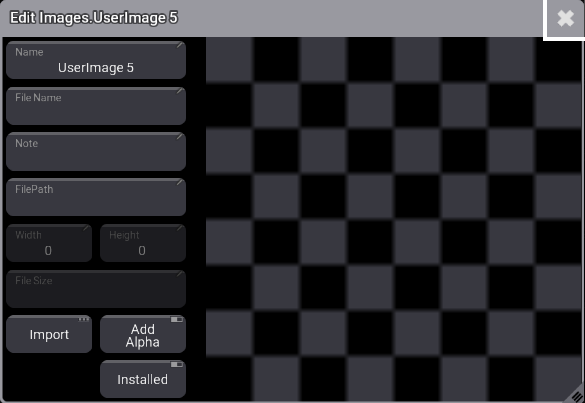\ *Edit Images pop-up window* *** ### Import Images Using the Image Pool [Section titled “Import Images Using the Image Pool”](#import-images-using-the-image-pool) Workflow: 1. Edit an empty pool object. 2. Tap the Import button. 3. Tap Internal in the top-right of the title bar to change the drive to the desired source. 4. Select the desired image. 5. Tap Import. 6. Close the **Edit Image** pop-up. 7. Before closing the Edit Image pop-up, it is possible to edit the name. Tap the video below to see the example:
# Import / Export
> The Import / Export menus present a graphical workflow for exporting objects from the current show file as a smaller file with minimal additional show data.
The **Import / Export** menus present a graphical workflow for exporting objects from the current show file as a smaller file with minimal additional show data. | | | | ------------------------------------------ | ------------------------------------------------------------------------------------------------------------------------------------------------------------------------------------------------------------------------------------------------------ | |  | **Hint:** | | | When exporting objects that reference other objects in the show, the referenced objects are automatically included in the export. For example, when exporting a macro with a defined appearance, the exported file includes the referenced appearance. | The **Import** menu also allows objects from these smaller files to be imported into the current show file. For example, this menu provides an easy way to copy a user profile or a selection of macros from one show file to another. Tap the video below to see the example. [Vimeo video](https://player.vimeo.com/video/990958540?title=0\&byline=0\&portrait=0\&color=ffeb0f) Open the **Import / Export** menus using the following steps: 1. Press the Menu key or tap  near the top of the **Control Bar**. 2. Tap Show Creator. The Show Creator menu opens. Tap the Import or Export tab in the upper-left corner to access the desired interface. 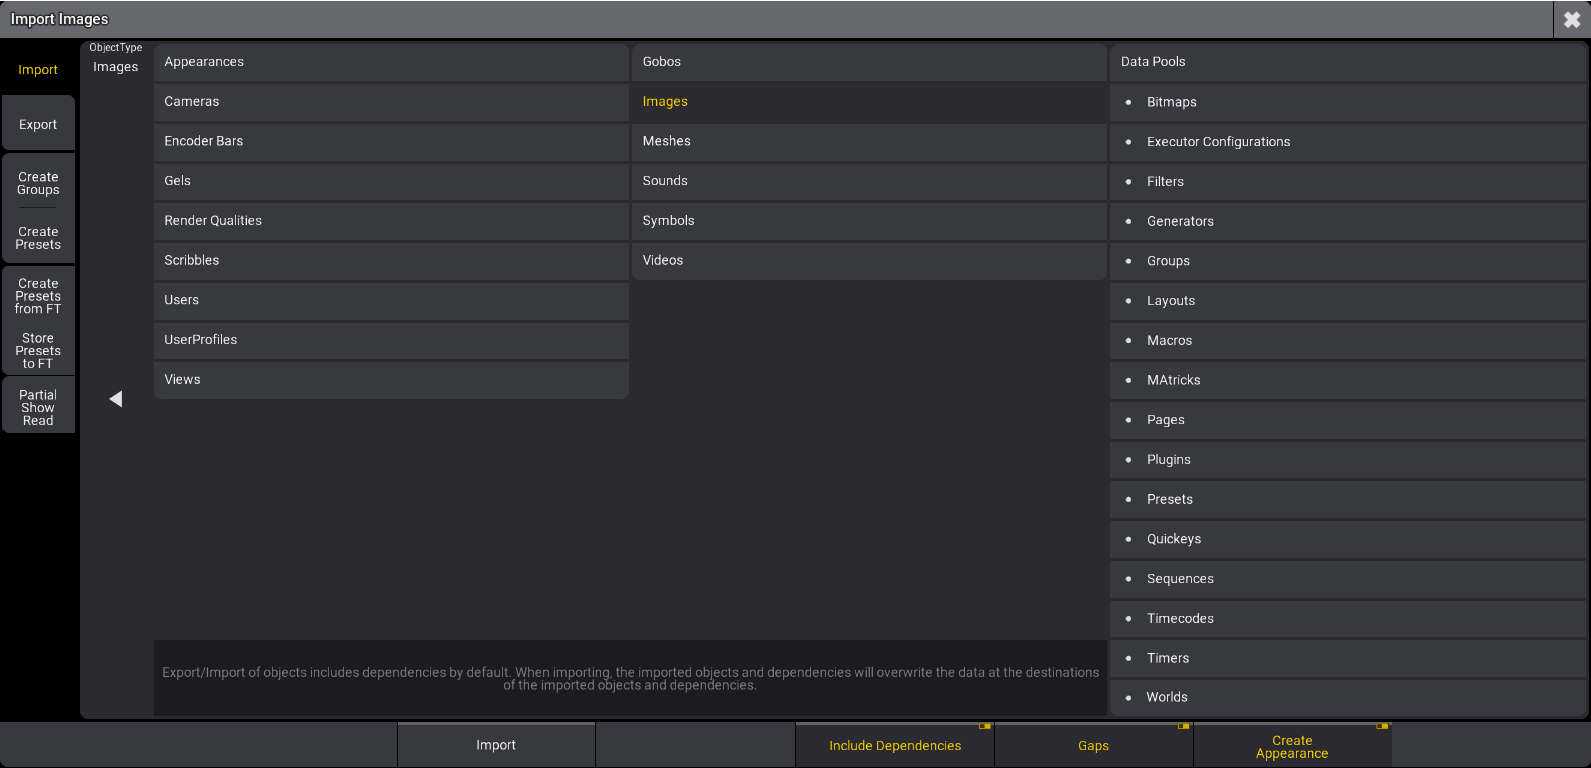 Import menu ## Object Types [Section titled “Object Types”](#object-types) These menus allow for importing and exporting a wide variety of object types. Tap ObjectType on the left side of the main area to open or close the full list of available object types: * [Appearances](/grandma3/2-3/appear/) * [Bitmaps](/grandma3/2-3/bitmap/) * [Cameras](/grandma3/2-3/patch_3d_camera/) * [Data Pools](/grandma3/2-3/datapool/) * [Encoder Bars](/grandma3/2-3/ws_eb_encoder_pool/) * [Executor Configurations](/grandma3/2-3/executor_configurations/) * [Filters](/grandma3/2-3/worldfilter_filter_create/) * [Gels](/grandma3/2-3/keyword_gel/) * [Generators](/grandma3/2-3/generator/) * [Gobos](/grandma3/2-3/gobos/) * [Groups](/grandma3/2-3/group/) * [Images](/grandma3/2-3/images/) * [Layouts](/grandma3/2-3/layouts/) * [Macros](/grandma3/2-3/macros/) * [MAtricks](/grandma3/2-3/matricks/) * [Meshes](/grandma3/2-3/meshes/) * [Pages](/grandma3/2-3/keyword_page/) * [Plugins](/grandma3/2-3/plugins/) * [Presets](/grandma3/2-3/presets_pools/) * [Quickeys](/grandma3/2-3/quickeys/) * [Render Qualities](/grandma3/2-3/patch_render_quality/) * [Scribbles](/grandma3/2-3/scribbles/) * [Sequences](/grandma3/2-3/cue_sequence/) * [Sounds](/grandma3/2-3/sound_pool/) * [Symbols](/grandma3/2-3/symbols/) * [Timecodes](/grandma3/2-3/timecode/) * [Timers](/grandma3/2-3/timers/) * [Users](/grandma3/2-3/user_create/) * [UserProfiles](/grandma3/2-3/user_settings/) * [Views](/grandma3/2-3/wvm/) * [Videos](/grandma3/2-3/videos/) * [Worlds](/grandma3/2-3/worldfilter_world_create/) 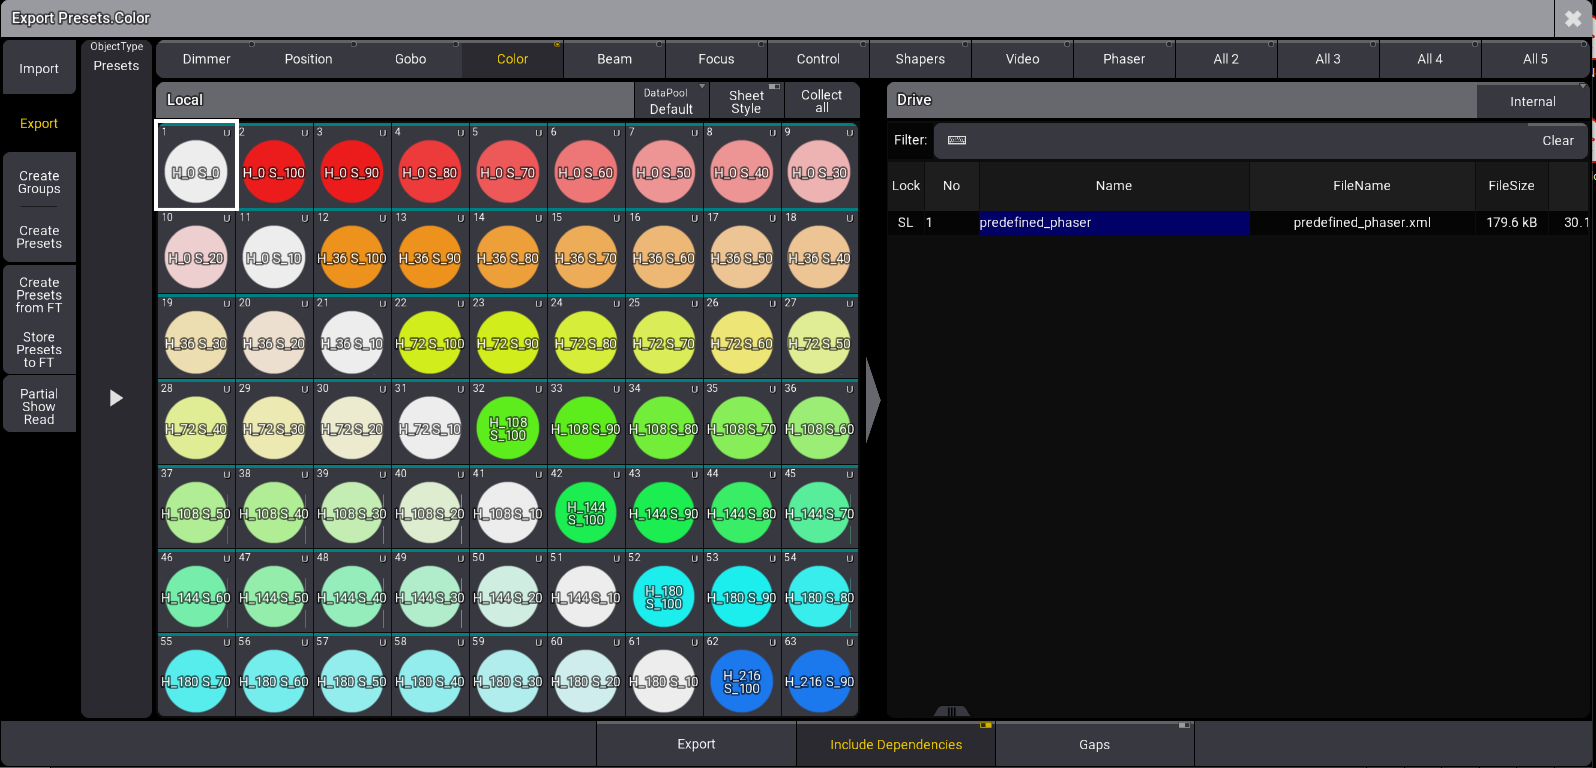 Export menu prepared to export color presets The main area of both the **Import** and **Export** menus shows the data source on the left and the destination on the right. Therefore, the **Export** menu displays the specified object types from the current show file in the area on the left, titled **Local**, and the contents of the relevant folder of the selected drive on the right, titled **Drive**. In the **Import** menu, these two areas appear on opposite sides. * An enabled Gaps button imports or exports the gaps of the XML file. For more information, see [/Gaps Option Keyword](/grandma3/2-3/ok_gaps/). * Enabeling Include Dependencies will import and export dependencies. For more information, see [/NoDependencies keyword](/grandma3/2-3/ok_nodependencies/). ## Drive Selection [Section titled “Drive Selection”](#drive-selection) To choose a different destination drive for the exported data, tap the Internal button at the right side of the title bar of the **Drive** section or swipe to open a list of available drives. In the **Import** menu, this drive setting defines which drive the console uses as the data source. ## Local Section Title Bar Tools [Section titled “Local Section Title Bar Tools”](#local-section-title-bar-tools) The title bar of the **Local** section includes a few buttons with helpful tools. * Tap DataPool to cycle through available data pools within the current show file or swipe to open a list of data pools. This option is only available when importing or exporting an **ObjectType,** which is incorporated into a **DataPool** within the show file. These **ObjectTypes** are listed below DataPools in the right column of the ObjectType section. * Tap Sheet Style to display objects in the **Local** section as a sheet with relevant details for each object. Tap Sheet Style again to view objects as they appear in their pools. Some objects, like UserProfiles, never appear in pools. Therefore, they will always appear in the sheet format regardless of the state of the Sheet Style button. * Tap Collect all to select all objects of the current type for export. Once tapped, this button changes to read Uncollect all. Tap this button to deselect all objects. These functions do not appear in the **Import** menu. * Tap Clear Collection to reset the collection of objects. This option is only available in the **Import** menu. ## Object Sub-Types [Section titled “Object Sub-Types”](#object-sub-types) Some entries in the ObjectType selection include several collections of objects, which appear as different pools. These include: * Presets: The **Import **and** Export** menus handle and display each preset pool individually. * Gels: The **Import** and **Export** menus handle and display each gel book as an individual pool. With the Presets or Gels ObjectType selected, a row of radio buttons appears across the top of the main area, showing all relevant object sub-types. Tap one of these buttons to display the desired pool below. ## Multiple Object Selection [Section titled “Multiple Object Selection”](#multiple-object-selection) Tap any object in the displayed pool to select it for export. A brown border appears around each selected object. To select multiple objects in a pool, tap each desired object. Tap any selected object to deselect it. When Sheet Style is enabled, select multiple adjacent objects by drawing a lasso of overall desired objects. To select just one object, tap only the desired object. To toggle selection for any objects in the sheet without changing the selection status of any other objects, hold Ctrl on the keyboard while tapping the desired objects. ## Export Workflow [Section titled “Export Workflow”](#export-workflow) 1. Tap the Export tab in the upper-left corner. 2. Set the desired ObjectType. 3. Set the desired destination drive. 4. Select all of the desired objects to export from the **Local** area. 5. Enter the desired file name in the Name field of the **Drive** area. 6. Tap Export at the bottom of the menu. ## Import Workflow [Section titled “Import Workflow”](#import-workflow) 1. Tap the Import tab in the upper-left corner. 2. Set the desired ObjectType. 3. Set the desired source drive. 4. Select all of the desired files to import from the **Drive** area. 5. Select the desired destination in the pool in the **Local** area. 6. Tap Import at the bottom of the menu. | | | | ------------------------------------------ | ----------------------------------------------------------------------------------------------------------------------------------------------------------------------------------------------------------------------------------------------------------------------------- | |  | **Hint:** | | | Certain object types (including **Gobos**, **Images**, **Symbols**, and **Videos**) can be included in **Appearances**. To automatically create new **Appearances** based on these objects as they are importing, toggle the Create Appearances option before tapping Import. | ## Import and Export Using Command Line Syntax [Section titled “Import and Export Using Command Line Syntax”](#import-and-export-using-command-line-syntax) See the Export keyword and Import keyword topics for information about exporting and importing show data using command-line syntax without using these menus. ####
# Align
> Pressing Align toggles between 6 different Align modes.
Pressing Align toggles between 6 different Align modes. By default, the Align mode is disabled. Pressing MA + Align toggles between four different transition modes. By default, the transition mode is linear. The Align mode is displayed in the default encoder bar. 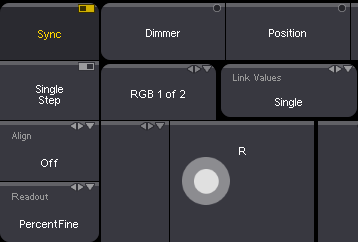 *Default encoder bar* The align mode will be disabled when changing the value of a different attribute and the transition mode becomes linear. Pressing and holding Align resets the align mode. Pressing and holding MA + Align resets the transition mode. For more information see [Align](/grandma3/2-3/operate_align/). ## Location [Section titled “Location”](#location) Align is located in the command section.  *Location on grandMA3 full-size and grandMA3 light consoles* ***  *Location on grandMA3 compact consoles and grandMA3 onPC command wing*
# Assign
> Pressing Assign enters the Assign keyword into the command line.
Pressing Assign enters the Assign keyword into the command line. | | | | ------------------------------------------------------------------ | -------------------------- | |  | User name\[Fixture]>Assign | For more information about Assign, see [Assign keyword](/grandma3/2-3/keyword_assign/). ## ## Label [Section titled “Label”](#label) Pressing Assign Assign enters the Label keyword into the command line. | | | | ------------------------------------------------------------------ | ------------------------- | |  | User name\[Fixture]>Label | For more information about Label, see [Label keyword](/grandma3/2-3/keyword_label/). Set Pressing MA + Assign enters the Set keyword into the command line. | | | | ------------------------------------------------------------------ | ----------------------- | |  | User name\[Fixture]>Set | For more information about Set, see [Set keyword](/grandma3/2-3/keyword_set/). ## Location [Section titled “Location”](#location) Assign is located in the command section.  *Location on grandMA3 full-size and grandMA3 light consoles* ***  *Location on grandMA3 compact consoles and grandMA3 onPC command wing*
# At
> Pressing At enters the At keyword into the command line.
Pressing At enters the At keyword into the command line. | | | | ------------------------------------------------------------------ | ------------------------------------ | |  | User name\[Fixture]>Fixture 17 At 30 | For more information about At, see the [At keyword](/grandma3/2-3/keyword_at/). ## ## Normal [Section titled “Normal”](#normal) Pressing At At executes the **Normal keyword** in the command line in the selected fixtures. | | | | ---- | ------ | | OK : | Normal | For more information see the [Normal keyword](/grandma3/2-3/keyword_normal/). ## Integrate [Section titled “Integrate”](#integrate) Pressing and holding MA + At enters the Integrate keyword into the command line. | | | | ------------------------------------------------------------------ | ----------------------------- | |  | User name\[Fixture]>Integrate | For more information about Integrate, see the [Integrate keyword](/grandma3/2-3/keyword_integrate/). ## Extract [Section titled “Extract”](#extract) Pressing and holding MA + At + At enters the Extract keyword into the command line. | | | | ------------------------------------------------------------------ | --------------------------- | |  | User name\[Fixture]>Extract | For more information about Extract, see the [Extract keyword](/grandma3/2-3/keyword_extract/). ## [Section titled “”](#-1) ## At Filter Menu [Section titled “At Filter Menu”](#at-filter-menu) Pressing and holding At opens the At Filter menu. ## [Section titled “”](#-2) ## Location [Section titled “Location”](#location) At is located in the numeric keys section.  *Location on grandMA3 full-size and grandMA3 light consoles* ***  *Location on grandMA3 compact consoles and grandMA3 onPC command wing*
# Blind
> Pressing Blind toggles the Blind function.
Pressing Blind toggles the Blind function. | | | | ---- | ----- | | OK : | Blind | For more information about Blind, see the [Blind keyword](/grandma3/2-3/keyword_blind/). ## Location [Section titled “Location”](#location) Blind is located in the Command Section.  *Location on grandMA3 full-size and grandMA3 light consoles* ***  *Location on grandMA3 compact consoles and grandMA3 onPC command wing*
# Channel
> Pressing Channel enters the Channel keyword in the command line.
Pressing Channel enters the Channel keyword in the command line. | | | | ------------------------------------------------------------------ | --------------------------- | |  | User name\[Fixture]>Channel | For more information, see the [Channel keyword](/grandma3/2-3/keyword_channel/). ## ## Universal [Section titled “Universal”](#universal) Pressing Channel Channel enters the Universal keyword in the command line. | | | | ------------------------------------------------------------------ | ----------------------------- | |  | User name\[Fixture]>Universal | For more information, see the [Universal keyword](/grandma3/2-3/keyword_universal/). ## [Section titled “”](#-1) ## ID Types [Section titled “ID Types”](#id-types) Pressing Channel repeatedly switches through Channel, Universal, and ID types in use. ID types where no patched fixtures are assigned are not showing in the command line. For more information, see the [Add Fixtures to the Show](/grandma3/2-3/patch_add_fixtures/). ## Location [Section titled “Location”](#location) Channel is located in the command section.  *Location on grandMA3 full-size and grandMA3 light consoles* *** 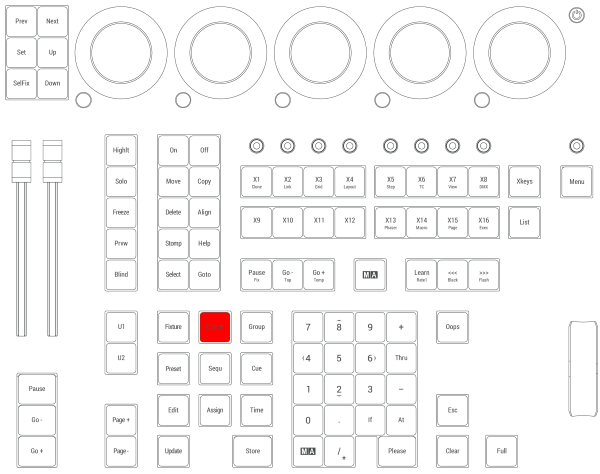 *Location on grandMA3 compact consoles and grandMA3 onPC command wing*
# Clear
> If there are values in the programmer, Clear behaves like this:
If there are values in the programmer, Clear behaves like this: * Pressing Clear executes the [ClearSelection keyword](/grandma3/2-3/keyword_clear_selection/). * Pressing Clear Clear executes the [ClearActive keyword](/grandma3/2-3/keyword_clear_active/). * Pressing Clear Clear Clear executes the [ClearAll keyword](/grandma3/2-3/keyword_clear_all/). If there are no values in the programmer, pressing Clear deletes unexecuted commands in the command line and executes the ClearActive keyword Pressing and holding Clear executes the ClearAll keyword. Pressing Clear, no matter how often, always displays a Clear in the Command Line Feedback. For more information about Clear, see the [Clear keyword](/grandma3/2-3/keyword_clear/). ## Location [Section titled “Location”](#location) Clear is located in the command section. 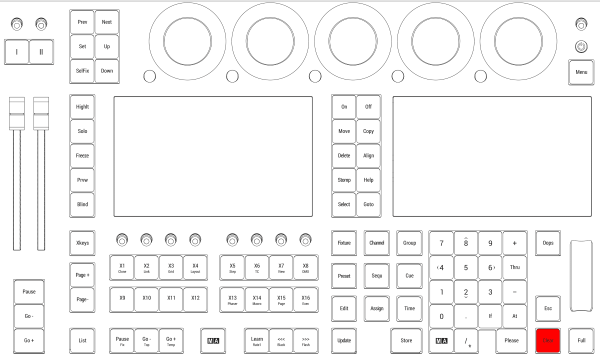 *Location on grandMA3 full-size and grandMA3 light consoles* *** 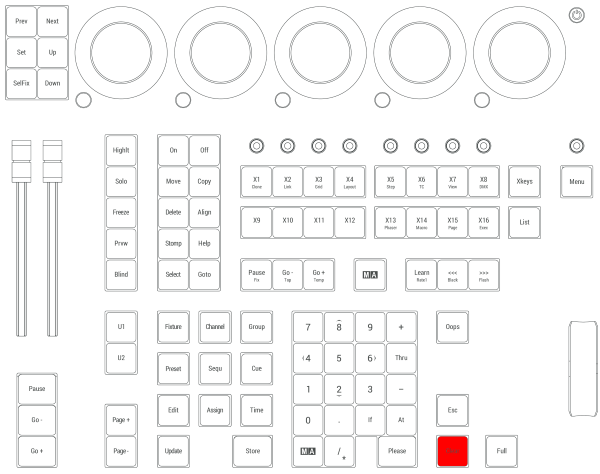 *Location on grandMA3 compact consoles and grandMA3 onPC command wing*
# Toleranzen
> Die folgenden Punkte sind keine Mängel oder Fehlfunktionen. Es handelt sich lediglich um Gegebenheiten, die während des Herstellungsprozesses auftreten können:
# ## Gerätespezifische Gegebenheiten [Section titled “Gerätespezifische Gegebenheiten”](#gerätespezifische-gegebenheiten) Die folgenden Punkte sind keine Mängel oder Fehlfunktionen. Es handelt sich lediglich um Gegebenheiten, die während des Herstellungsprozesses auftreten können: 1. Bei der Herstellung von LCD-Bildschirmen kann es zu Backlight-Bleeding kommen. 2. Farbtemperaturabweichungen bei der Herstellung von LCD-Bildschirmen unterliegen technischen Toleranzen. 3. Gerätespezifische Farbabweichungen, beispielsweise im Bildschirmgehäuse, sowie in der Oberflächenbeschaffenheit, etwa bei Polstern, unterliegen technischen Toleranzen bei der Herstellung solcher Materialien. ## Pixelfehler [Section titled “Pixelfehler”](#pixelfehler) Die Bildschirme der grandMA3 Serie orientieren sich an der Pixelfehlerklasse II (ISO 9241-307). Die folgende Tabelle zeigt die maximale Anzahl zulässiger Fehler pro 1 Million Pixel. | Pixelfehler | Maximale Anzahl von Fehlern pro 1 Million Pixel | | ------------------------------------------------ | ----------------------------------------------- | | Ständig leuchtendes Pixel (immer an, Farbe weiß) | 2 | | 2 angrenzende ständig leuchtende Pixel | 1 | | Ständig schwarzes Pixel (immer aus) | 5 | | 2 angrenzende ständig schwarze Pixel | 1 | | Defekte Subpixel (ständig leuchtend) | 5 | | Defekte Subpixel (ständig schwarz) | 5 | Aus technischen Gründen können die Bildschirme leichte Kratzer haben.
# Événements
> La liste suivante ne décrit ni les défauts ni les dysfonctionnements. Elle indique simplement les cas qui peuvent se manifester au cours du processus de fabrica
# ## Événements liés au matériel [Section titled “Événements liés au matériel”](#événements-liés-au-matériel) La liste suivante ne décrit ni les défauts ni les dysfonctionnements. Elle indique simplement les cas qui peuvent se manifester au cours du processus de fabrication. 1. Une fuite du rétroéclairage peut se produire lors de la fabrication des écrans LCD. 2. Des différences de température peuvent entraîner des différences de couleur dans les écrans LCD. 3. Les déviations de couleur dans le matériel, par exemple dans le boîtier de l’écran, et les déviations dans la texture de la surface, par exemple dans les coussinets de repose-mains, sont soumises à des tolérances techniques lors de la fabrication de ces matériaux. ## Défaut de pixel [Section titled “Défaut de pixel”](#défaut-de-pixel) Les écrans de la série grandMA3 sont soumis à la classe de défaut de pixel II (ISO 9241-307). Le tableau ci-dessous indique le nombre maximum de défauts autorisés par million de pixels. | Défaut de pixel | Nombre maximal de défauts par million de pixels | | ----------------------------------------------------------------- | ----------------------------------------------- | | Pixel actif permanent (toujours allumé, étant de couleur blanche) | 2 | | 2 pixels actifs permanents qui sont adjacents | 1 | | Pixel inactif permanent (toujours éteint, c’est-à-dire noir) | 5 | | 2 pixels inactifs permanents qui sont adjacents | 1 | | Sous-pixel défectueux (toujours actif) | 5 | | Sous-pixel défectueux (toujours inactif) | 5 | Pour des raisons techniques, il peut y avoir de légères rayures sur les écrans.
# Declaration of Conformity
> Manufacturer:
## CE and FCC Standards and Approvals [Section titled “CE and FCC Standards and Approvals”](#ce-and-fcc-standards-and-approvals) **Manufacturer:** MA Lighting Technology GmbH\ \ Dachdeckerstraße 16\ 97297 Waldbüttelbrunn\ GERMANY *** *declares that the products* *** **Name of product:** * grandMA3 full-size * grandMA3 full-size CRV * grandMA3 light * grandMA3 light CRV * grandMA3 compact XT * grandMA3 compact * grandMA3 replay unit * grandMA3 extension *** *are conform to the following directives and harmonized standards* *** \*\*Safety: \*\* **2014/35/EU (Low Voltage Directive)** * IEC/EN/UL 62368-1:2014 * CAN/CSA-C22. No. 62368-1:2014 *** **EMC – Electromagnetic Compatibility:** **FCC** * 47 CFR, Part 15, Subpart B: 2019 (Class A) **2014/30/EU** * EN55032:2016-02 (Class A) * EN61000-3-2 * EN55035:2018-04 *** **RoHS:** **2011/65/EU (RoHS II)** * EN50581:2012 * WEEE-Reg.-NR. DE 14150988 *** **Additional information:** All data lines and signal lines must be shielded and the shielding must be connected to the grounding or the housing of the connector. Waldbüttelbrunn, November 01, 2019 Dipl.-Ing. Michael Adenau (CEO) 
# Konformitätserklärung
> Hersteller:
# ## CE und FCC Normen und Zulassungen [Section titled “CE und FCC Normen und Zulassungen”](#ce-und-fcc-normen-und-zulassungen) **Hersteller:** MA Lighting Technology GmbH\ \ Dachdeckerstraße 16\ 97297 Waldbüttelbrunn\ Deutschland *** *erklärt, dass die Produkte* *** **Produktnamen:** * grandMA3 full-size * grandMA3 full-size CRV * grandMA3 light * grandMA3 light CRV * grandMA3 compact XT * grandMA3 compact * grandMA3 replay unit * grandMA3 extension *** *den folgenden Richtlinien sowie harmonisierten Normen entsprechen* *** \*\*Sicherheit: \*\* **2014/35/EU (Niederspannungsrichtlinie)** * IEC/EN/UL 62368-1:2014 * CAN/CSA-C22. No. 62368-1:2014 *** **EMV (Elektromagnetische Verträglichkeit):** **FCC** * 47 CFR, Part 15, Subpart B: 2019 (Class A) **2014/30/EU** * EN55032:2016-02 (Class A) * EN61000-3-2 * EN55035:2018-04 *** **RoHS:** **2011/65/EU (RoHS II)** * EN50581:2012 * WEEE-Reg.-NR. DE 14150988 *** **Zusätzliche Informationen:** Alle Daten- und Signalleitungen müssen geschirmt sein und der Schirm muss mit der Masse bzw. dem Gehäuse des entsprechenden Steckers verbunden sein. Waldbüttelbrunn, 1. November 2019 Dipl.-Ing. Michael Adenau (Geschäftsführer) 
# Déclaration de conformité
> Fabricant :
# Déclaration de conformité [Section titled “Déclaration de conformité”](#déclaration-de-conformité) ## Normes et approbations CE et FCC [Section titled “Normes et approbations CE et FCC”](#normes-et-approbations-ce-et-fcc) **Fabricant :** MA Lighting Technology GmbH\ \ Dachdeckerstraße 16\ 97297 Waldbüttelbrunn\ ALLEMAGNE *** *déclare que les produits* *** **Nom du produit:** * grandMA3 full-size * grandMA3 full-size CRV * grandMA3 light * grandMA3 light CRV * grandMA3 compact XT * grandMA3 compact * grandMA3 replay unit * grandMA3 extension *** *sont conformes aux directives et normes harmonisées suivantes* *** \*\*Sécurité : \*\* **2014/35/UE (Directive Basse Tension**\*\*)\*\* * IEC/EN/UL 62368-1:2014 * CAN/CSA-C22. No. 62368-1:2014 *** **CEM - Compatibilité électromagnétique :** **FCC** * 47 CFR, Part 15, Subpart B: 2019 (Class A) **2014/30/UE** * EN55032:2016-02 (Class A) * EN61000-3-2 * EN55035:2018-04 *** **RoHS:** **2011/65/UE (RoHS II)** * EN50581:2012 * WEEE-Reg.-NR. DE 14150988 *** **Informations complémentaires :** Toutes les lignes de données et de signaux doivent être blindées et le blindage doit être relié à la terre ou au boîtier du connecteur. Waldbüttelbrunn, 01 novembre 2019 Dipl.-Ing. Michael Adenau (PDG) 
# Quick Start
> 1. Screens 1-3
 1. [Screens 1-3](/grandma3/2-3/do_screen_allocation/) 2. [Letterbox screens 8-10](/grandma3/2-3/do_screen_allocation/) 3. [Command screens 6+7](/grandma3/2-3/do_screen_allocation/) 4. [Power key](/grandma3/2-3/key_power/) 5. [Level wheel](/grandma3/2-3/do_control_level/) 6. [Command area](/grandma3/2-3/do_control_command/) 7. [Xkeys section](/grandma3/2-3/do_control_executor/) 8. [Master area](/grandma3/2-3/do_control_master/) 9. [Right executor area with 3 executor sections](/grandma3/2-3/do_control_executor/) 10. [Custom area](/grandma3/2-3/key_console_quick_start/#custom_section) 11. [Left executor area with 3 executor sections](/grandma3/2-3/do_control_executor/)  *grandMA3 full-size CRV rear panel* 1. [Desk light](/grandma3/2-3/fs_connect_desk_light/) 2. [powerCON TRUE1](/grandma3/2-3/fs_connect_power/) 3. Power switch 4. [DMX A-G](/grandma3/2-3/fs_connect_dmx/) 5. [DisplayPort 1-5](/grandma3/2-3/fs_connect_external_screens/) 6. [LTC](/grandma3/2-3/fs_connect_smpte_ltc/) 7. [USB 3.0](/grandma3/2-3/fs_connect_usb/) 8. [Audio Remote In](/grandma3/2-3/fs_connect_audio_in/) 9. [DC Remote Control](/grandma3/2-3/fs_connect_dc_remote_in/) 10. [Ethernet 1-3](/grandma3/2-3/fs_connect_ethernet/) 11. [S/PDIF In+Out](/grandma3/2-3/do_connector_pin_assignment/#RCA) 12. [USB 2.0](/grandma3/2-3/fs_connect_usb/) 13. [MIDI In+Out](/grandma3/2-3/remote_inputs/)
# Guide De Démarrage
> 1. Screens 1-3
#  1. [Screens 1-3](/grandma3/2-3/do_screen_allocation/) 2. [Letterbox screens 8-10](/grandma3/2-3/do_screen_allocation/) 3. [Command screens 6+7](/grandma3/2-3/do_screen_allocation/) 4. [Touche Marche/Arrêt](/grandma3/2-3/key_power/) 5. [Level wheel](/grandma3/2-3/do_control_level/) 6. [Aire Command](/grandma3/2-3/ws_command_area/) 7. [Section Xkeys](/grandma3/2-3/do_control_executor/) 8. [Aire Master](/grandma3/2-3/do_control_master/) 9. [Aire Executor à droite avec 3 sections Executor](/grandma3/2-3/do_control_executor/) 10. [Aire Custom](/grandma3/2-3/key_console_quick_start-2/#custom_section) 11. [Aire Executor à gauche avec 3 sections Executor](/grandma3/2-3/do_control_executor/)  \_grandMA3 full-size CRV \_panneau arrière 1. [Lumière d’appoint](/grandma3/2-3/si_desklights/) 2. [powerCON TRUE1](/grandma3/2-3/fs_connect_power/) 3. Interrupteur d’alimentation 4. [DMX A-G](/grandma3/2-3/fs_connect_dmx/) 5. [DisplayPort 1-5](/grandma3/2-3/fs_connect_external_screens/) 6. [LTC](/grandma3/2-3/fs_connect_smpte_ltc/) 7. [USB 3.0](/grandma3/2-3/fs_connect_usb/) 8. [Audio Remote In](/grandma3/2-3/fs_connect_audio_in/) 9. [DC Remote Control](/grandma3/2-3/fs_connect_dc_remote_in/) 10. [Ethernet 1-3](/grandma3/2-3/fs_connect_ethernet/) 11. [S/PDIF In+Out](/grandma3/2-3/do_connector_pin_assignment/) 12. [USB 2.0](/grandma3/2-3/fs_connect_usb/) 13. [MIDI In+Out](/grandma3/2-3/remote_inputs/) | | | | ------------------------------------------ | --------------------------------------------------------------------------------------------- | |  | **Hint:** Pour afficher les connecteurs du panneau arrière dans les écrans letterbox, écrire: | | | | | ------------------------------------------------------------------ | ---------------------------------------- | |  | User name\[Fixture]>Menu “Connectorview” | ### Allumer la console [Section titled “Allumer la console”](#allumer-la-console) 1. Déballer l’appareil. 2. Enlever le matériel de protection et la couverture anti-poussière. 3. Placer l’appareil à l’intérieur sur une surface stable. 4. Connecter les moniteurs externes à la console à l’aide d’un connecteur DisplayPort natif. 5. Démarrer la console grandMA3:\ -Insérer le connecteur powerCON TRUE1 au branchement correspondant. \ -Brancher la prise principale de courant.\ -Allumer l’interrupteur de courant (mettre en position **I**) sur le panneau arrière.\ -L’interrupteur s’illumine en rouge.\ -Appuyer sur la touche Marche/Arrêt sur le panneau avant.\ -L’appareil se met en marche.\ -Le dialogue de **sélection du mode** apparaît:\ \ -Toucher pour sélectionner un mode. ### Éteindre la console [Section titled “Éteindre la console”](#éteindre-la-console) 1. Appuyer sur la touche Marche/Arrêt sur le panneau avant. Un pop-up d’avertissement apparaît:  2. Appuyer sur OK. La console grandMA3 s’éteint. 3. Metter l’interrupteur en position **O**. Pour plus d’information, voir la section [Shut down the System](/grandma3/2-3/shutdown_the_system/) dans le [Mode d’emploi](https://help.malighting.com/grandMA3/2.3/HTML/help.html).Software update 1. Pour mettre à jour un appareil grandMA3, télécharger le logiciel grandMA3 sur [www.malighting.com](http://www.malighting.com/).\ Le programme d’installation requis s’appelle grandMA3 Software x.x.x.x. 2. Extrayer le fichier zip “grandMA3\_stick\_v.x.x.x.x.zip” et copier les dossiers EFI, ma, et le fichier update.scr dans le répertoire racine de votre clé USB. 3. Allumez l’intérrupteur d’allimentation sur le panneau arrière. 4. Insérer la clé USB dans un port USB. 5. Pour les appareils sans clavier interne (par exemple, la console compact grandMA3), connecter un clavier externe avec un port USB. 6. Appuyez sur la touche Marche/Arrêt du panneau avant. L’appareil grandMA3 démarre. 7. Appuyer plusieurs fois sur la touche 8/F8 du clavier intégré ou du clavier externe. Le gestionnaire de démarrage s’ouvre. 8. Faire défiler la liste jusqu’à EFI USB Device à l’aide des touches fléchées. 9. Appuyer sur la touche Enter du clavier (externe).\ La console commence à démarrer. 10. Suivre les instructions à l’écran pendant le processus de mise à jour. | | | | ------------------------------------------------ | ------------------------------------------------------------------------------------------------------------------------------------------------------------------------------------------------------------------------------------------------------------------------------------------------------------------------------------------------------------------------------------------------------------------------------------------------ | |  | **Important:** Pour configurer l’appareil ou pour faire un update ou downdate, utiliser la console grandMA3 ou le logiciel grandMA3 onPC. Pour plus d’information, voir les sections [Control Other MA Devices](/grandma3/2-3/control_other_ma_devices/) et [Update the Software](/grandma3/2-3/update/) via [Network Update](/grandma3/2-3/update_network/) dans le [Mode d’emploi](https://help.malighting.com/grandMA3/2.3/HTML/help.html). |
# Quick Start
> 1. Monitore 1-3
# 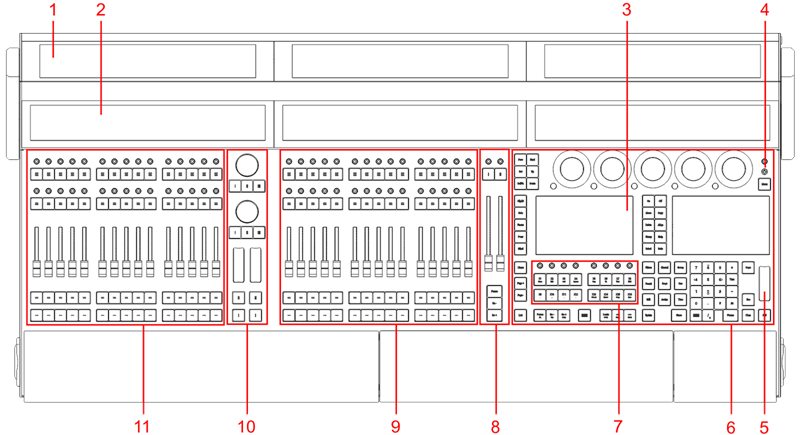 1. [Monitore 1-3](/grandma3/2-3/do_screen_allocation/) 2. [Letterbox Monitore 8-10](/grandma3/2-3/do_screen_allocation/) 3. [Kommando Monitore 6+7](/grandma3/2-3/do_screen_allocation/) 4. [Ein/Aus-Taster](/grandma3/2-3/key_power/) 5. [Level Wheel](/grandma3/2-3/do_control_level/) 6. [Kommando Bereich](/grandma3/2-3/do_control_command/) 7. [Xkeys Sektion](/grandma3/2-3/do_control_executor/) 8. [Master Bereich](/grandma3/2-3/do_control_master/) 9. [Rechter Executor Bereich mit 3 Executor Sektionen](/grandma3/2-3/do_control_executor/) 10. [Benutzer Bereich](/grandma3/2-3/do_control_custom/#custom_section) 11. [Linker Executor Bereich mit 3 Executor Sektionen](/grandma3/2-3/do_control_executor/)  *grandMA3 full-size CRV Rückseite* 1. [Desk light](/grandma3/2-3/fs_connect_desk_light/) 2. [powerCON TRUE1](/grandma3/2-3/fs_connect_power/) 3. Power switch 4. [DMX A-G](/grandma3/2-3/fs_connect_dmx/) 5. [DisplayPort 1-5](/grandma3/2-3/fs_connect_external_screens/) 6. [LTC](/grandma3/2-3/fs_connect_smpte_ltc/) 7. [USB 3.0](/grandma3/2-3/fs_connect_usb/) 8. [Audio Remote In](/grandma3/2-3/fs_connect_audio_in/) 9. [DC Remote Control](/grandma3/2-3/fs_connect_dc_remote_in/) 10. [Ethernet 1-3](/grandma3/2-3/fs_connect_ethernet/) 11. [S/PDIF In+Out](/grandma3/2-3/do_connector_pin_assignment/) 12. [USB 2.0](/grandma3/2-3/fs_connect_usb/) 13. [MIDI In+Out](/grandma3/2-3/remote_inputs/) | | | | ------------------------------------------ | ------------------------------------------------------------------------------------- | |  | **Hinweis:** Um die Anschlüsse auf der Rückseite in den Letterbox Screens anzuzeigen: | | | | | ------------------------------------------------------------------ | ---------------------------------------- | |  | User name\[Fixture]>Menu “Connectorview” | ### grandMA3 Konsole anschalten [Section titled “grandMA3 Konsole anschalten”](#grandma3-konsole-anschalten) 1. Gerät auspacken. 2. Verpackungsmaterial und Staubschutzhülle entfernen. 3. Gerät in einem geschlossenen Raum auf eine stabile Fläche stellen. 4. Externe Monitore mit DisplayPort Anschluss an die Konsole anschließen. 5. grandMA3 Konsole einschalten. 6. powerCON TRUE1 mit der dafür vorgesehenen Buchse verbinden. 7. Hauptstecker an die Steckdose anschließen. 8. Auf der Rückseite Netzschalter auf **I** stellen.Netzschalter leuchtet rot. 9. Auf der Vorderseite der Konsole die Ein/Aus-Taste drücken.\ Das Gerät fährt hoch.\ Der **Mode Selection** Dialog erscheint:\  10. Den gewünschten Modus durch Tippen des jeweiligen Icons auswählen. ### grandMA3 Konsole ausschalten [Section titled “grandMA3 Konsole ausschalten”](#grandma3-konsole-ausschalten) 1. Die Ein/Aus-Taste auf der Vorderseite der Konsole drücken.\ Eine Warnmeldung erscheint:\  2. OK tippen.\ Die grandMA3 Konsole fährt runter. 3. Netzschalter auf **O** stellen. Für weitere Informationen siehe Abschnitt [Shut down the System](/grandma3/2-3/shutdown_the_system/) im [grandMA3 Online Benutzerhandbuch](https://help.malighting.com/grandMA3/2.3/HTML/help.html) unter [www.malighting.com.](https://www.malighting.com/) ### Software aktualisieren [Section titled “Software aktualisieren”](#software-aktualisieren) 1. Besuchen Sie [www.malighting.com](https://www.malighting.com/), um die aktuellste Software herunterzuladen. Der benötigte Installer heißt grandMA3 Software x.x.x.x. 2. Die Zip-Datei “grandMA3\_stick\_v.x.x.x.x.zip” entpacken und die Ordner EFI und ma sowie die Datei update.scr in das Root-Verzeichnis Ihres USB-Sticks kopieren. 3. Den Netzschalter des grandMA3 Geräts auf **I** stellen. 4. Den USB-Stick in einen USB-Anschluss stecken. 5. Bei grandMA3 Geräten ohne integrierte Tastatur (z. B. grandMA3 compact Konsole) eine externe Tastatur an einen USB-Anschluss anschließen. 6. Das grandMA3 Gerät am Ein/Aus-Taster einschalten. 7. Auf der internen oder externen Tastatur mehrfach die Taste 8/F8 drücken.\ Der **Boot Manager** öffnet sich. 8. Mit den Pfeiltasten bis EFI USB Device scrollen. 9. Die Taste Enter auf der (externen) Tastatur drücken.\ Die Konsole bootet. 10. Den Bildschirmanweisungen während des Update-Vorgangs folgen. | | | | ------------------------------------------------ | ---------------------------------------------------------------------------------------------------------------------------------------------------------------------------------------------------------------------------------------------------------------------------------------------------------------------------------------------------------------------------------------------------------------------------------------------------------------------------------------------------------------------------------------------------------------------------------------- | |  | **Wichtig:** Um das Gerät zu konfigurieren oder ein Update oder Downdate durchzuführen, verwenden Sie eine andere grandMA3 Konsole im Netzwerk oder Ihren PC oder Ihr Laptop mit grandMA3 onPC Software. Für weitere Informationen siehe die Abschnitte [Control Other MA Devices](/grandma3/2-3/control_other_ma_devices/) und [Update the Software](/grandma3/2-3/update/) via [Network Update](/grandma3/2-3/update_network/) im [grandMA3 Online Benutzerhandbuch](https://help.malighting.com/grandMA3/2.3/HTML/help.html) unter [www.malighting.com.](https://www.malighting.com/) | ### [Section titled “”](#-1) [](https://www.malighting.com/)
# Disposal
> According to the directive 2011/65 EU (RoHS) the device was produced in the European Union, and is hence to be disposed of as stated in the directive.
According to the directive 2011/65 EU (RoHS) the device was produced in the European Union, and is hence to be disposed of as stated in the directive. If the device is used within the European Union, follow the directive WEEE 2012/19/EU. If the device is used outside the European Union, the corresponding country´s waste disposal regulations apply.
# Entsorgung
> Das Gerät ist gemäß der Richtlinie 2011/65/EU (RoHS) der Europäischen Gemeinschaft hergestellt und muss dementsprechend
# Das Gerät ist gemäß der Richtlinie 2011/65/EU (RoHS) der Europäischen Gemeinschaft hergestellt und muss dementsprechend\ entsorgt werden. Falls das Gerät innerhalb der Europäischen Union betrieben wird, ist die WEEE 2012/19/EU zu beachten. Falls das Gerät außerhalb der Europäischen Union betrieben wird, sind die nationalen Entsorgungsvorschriften im jeweiligen\ Verwenderland zu beachten.
# Élimination
> Selon la directive 2011/65 UE (RoHS), l'appareil a été fabriqué dans l'Union européenne et doit donc être éliminé conformément à la directive.
# Selon la directive 2011/65 UE (RoHS), l’appareil a été fabriqué dans l’Union européenne et doit donc être éliminé conformément à la directive. Si l’appareil est utilisé dans l’Union européenne, suivre la directive WEEE 2012/19/EU. Si l’appareil est utilisé en dehors de l’Union européenne, les règlements d’élimination des déchets du pays correspondant s’appliquent.
# Intended Use
> This grandMA3 console controls all kinds of lighting genres, such as conventional, moving lights, LEDs, video, and media, via DMX signal or within a network env
This grandMA3 console controls all kinds of lighting genres, such as conventional, moving lights, LEDs, video, and media, via DMX signal or within a network environment. All grandMA3 components, despite different hardware solutions, use the same industrial software. All components are fully integrable into the network environment. All grandMA3 devices have to be operated by professionally trained personnel only. Use all grandMA3 devices for professional purposes only. Use all grandMA3 components and accessories within closed rooms and in the permissible environmental conditions only. Installation and connection of the devices are explicitly to be carried out by trained personnel in compliance with all safety regulations.
# Verwendungszweck
> Die grandMA3 Konsolen steuern alle Arten von Lichttechnik wie konventionelles Licht, intelligentes Licht, LED, Video und ähnliche Medien mit Hilfe von DMX-Signa
Die grandMA3 Konsolen steuern alle Arten von Lichttechnik wie konventionelles Licht, intelligentes Licht, LED, Video und ähnliche Medien mit Hilfe von DMX-Signalen oder in einer Netzwerkumgebung. Alle grandMA3 Komponenten verwenden die gleiche Software, ungeachtet unterschiedlicher Hardware. Sämtliche Komponenten können komplett ins Netzwerk integriert werden. Alle grandMA3 Komponenten und Zubehör dürfen ausschließlich in geschlossenen Räumen und innerhalb zulässiger\ Umgebungsbedingungen verwendet werden. Installation und Anschluss von Geräten dürfen nur vom geschulten Personal, unter Einhaltung aller Sicherheitsvorschriften, durchgeführt werden.
# Usage Prévu
> Les consoles grandMA3 contrôlent tous genres de projecteurs tels que les projecteurs conventionnels, les motorisées, les LEDs, la vidéo et les média, en utilisa
# Les consoles grandMA3 contrôlent tous genres de projecteurs tels que les projecteurs conventionnels, les motorisées, les LEDs, la vidéo et les média, en utilisant le signal DMX ou dans un environnement réseau. Toutes les composantes grandMA3, malgré des solutions matérielles différentes, utilisent le même logiciel. Tous les composants sont entièrement intégrables dans l’environnement du réseau. Utilisez tous les composants et accessoires de grandMA3 uniquement dans des locaux fermés et dans les conditions environnementales autorisées. L’installation et le raccordement des appareils doivent être effectués explicitement par un personnel qualifié, en conformité avec toutes les règles de sécurité.
# Limitations
> Operation: 0 °C up to 40 °C / 32 °F up to 104 °F
### **Temperature** [Section titled “Temperature”](#temperature) Operation: 0 °C up to 40 °C / 32 °F up to 104 °F
# Betriebsgrenzen
> Betrieb: 0 °C bis 40 °C / 32 °F bis 104 °F
# ### **Temperatur** [Section titled “Temperatur”](#temperatur) Betrieb: 0 °C bis 40 °C / 32 °F bis 104 °F | | | | ----------------------------------------- | ------------------------------------------------------------------------------------------------------------------------------------------------------------------------------------------------------------------------------------------------------------------------------------------------------- | |  | **Warnung:** - Temperaturen, die den in dieser Kurzanleitung angegebenen Bereich über- oder unterschreiten, können zu Fehlfunktionen am Display oder anderen Komponenten führen. - Hohe Temperaturen können das Kühlsystem des Gerätes überfordern und zum Ausfall von elektrischen Komponenten führen. | Lagerung / Transport: -10 °C bis +50 °C / 14 °F bis 122 °F ### **Luftfeuchte** [Section titled “Luftfeuchte”](#luftfeuchte) Betrieb: 20 % bis 90 % relative Luftfeuchte (nicht kondensierend) Lagerung / Transport: 10 % bis 90 % relative Luftfeuchte (nicht kondensierend) ### **Umgebung** [Section titled “Umgebung”](#umgebung) * Alle Sicherheitshinweise beachten. * Das Gerät innerhalb der Betriebsgrenzen betreiben. * Das Gerät nur in geschlossenen Räumen betreiben. * Die Umgebungsluft muss staubfrei und frei von gefährlichen und explosiven Stoffen sein. * Erschütterungen vermeiden. * Das Gerät ist nicht gegen Spritzwasser geschützt. Nicht in der Nähe von Wasser benutzen. * Das Gerät nicht in der Nähe von Regen oder Nebel betreiben. * Das Gerät nicht an einem Ort platzieren, an dem es in Kontakt mit korrosiven Gasen oder salzhaltiger Luft gelangen könnte. Dadurch kann es zu Fehlfunktionen kommen.
# Limitations
> Fonctionnement: 0 °C jusqu'à 40 °C / 32 °F jusqu'à 104 °F
# ### **Température** [Section titled “Température”](#température) Fonctionnement: 0 °C jusqu’à 40 °C / 32 °F jusqu’à 104 °F | | | | ----------------------------------------- | ------------------------------------------------------------------------------------------------------------------------------------------------------------------------------------------------------------------------------------------------------------------------------------------------------------------------ | |  | **Attention :** -Des températures supérieures ou inférieures à celles indiquées dans ce guide rapide peuvent entraîner un mauvais fonctionnement des écrans et d’autres composants. -Des températures plus élevées peuvent solliciter le système de refroidissement de l’appareil et détruire des composants matériels. | Stockage / Transport: -10 °C jusqu’à +50 °C / 14 °F jusqu’à 122 °F ### **Humidité** [Section titled “Humidité”](#humidité) Fonctionnement: 20 % jusqu’à 90 % d’humidité relative (sans condensation) Stockage / Transport: 10 % jusqu’à 90 % d’humidité relative (sans condensation) ### **Environnement** [Section titled “Environnement”](#environnement) * Suivez toutes les consignes de sécurité ; * N’utilisez l’appareil que dans ses limites de fonctionnement ; * N’utilisez l’appareil qu’à l’intérieur ; * L’air doit être dépourvu de poussière et de toute substance dangereuse ou explosive ; * Évitez les secousses ; * Cet appareil n’est pas protégé contre les éclaboussures d’eau. Ne l’utilisez pas à proximité de l’eau ; * N’utilisez pas l’appareil sous la pluie ou l’humidité ; * Ne placez pas l’appareil à un endroit où il peut entrer en contact avec des gaz corrosifs ou de l’air salin car cela peut provoquer un mauvais fonctionnement.
# Maintenance
| | | | ----------------------------------------- | ------------------------------------------------------------------------------------------------------------------------------------------------------------------------------------------------------------------------------- | |  | **Warning:** All repair and service work has to be exclusively performed by qualified service technicians as live parts may be exposed when opening and / or removing coverings. Touching live parts may cause electric shock. | | | | | ----------------------------------------- | ------------------------------------------------------------------------------------------------------------------------------------------------------------------------------------- | |  | **Warning:** The grandMA3 full-size, the grandMA3 light, and their CRV versions have an air intake filter on the back. Do not wash the filter. Clean it using a vacuum cleaner only. | | | | | ------------------------------------------------ | ---------------------------------------------------------------------------------------------------------------------- | |  | **Important:** | | | The intervals between maintenance may differ depending on the frequency of transport and the operational environment. | * Disconnect power supply before cleaning; * Clean the surface using dry cloth only; * Clean the wrist rest using a damp cloth only; * Do not use liquid cleanser or compressed air; * Do not use solvent; * Check if the ventilation holes are blocked; * Depending on the environment, we recommend to professionally clean the device once a year.
# Wartung
# | | | | ----------------------------------------- | ------------------------------------------------------------------------------------------------------------------------------------------------------------------------------------------------------------------------------------------------------------------------------------------ | |  | **Warnung:** Sämtliche Reparatur- und Wartungsarbeiten dürfen ausschließlich vom geschulten Personal durchgeführt werden, da beim Öffnen von Abdeckungen spannungsführende Teile freigelegt werden können. Spannungsführende Teile nicht berühren, da die Gefahr von Stromschlag besteht! | | | | | ----------------------------------------- | -------------------------------------------------------------------------------------------------------------------------------------------------------------------------------------------------------------------- | |  | **Warnung:** Die grandMA3 full-size, die grandMA3 light und die CRV-Versionen haben einen eingebauten Luftansaugfilter auf der Rückseite. Den Filter nicht waschen. Reinigung ausschließlich mit einem Staubsauger. | | | | | ------------------------------------------------ | ----------------------------------------------------------------------------------------------- | |  | **Wichtig:** Die Wartungsintervalle variieren je nach Transportfrequenz und Betriebsumgebung. | * Vor dem Reinigen das Gerät spannungsfrei schalten. * Die Oberflächen mit einem trockenen Tuch reinigen. * Handauflage nur mit einem feuchtem Tuch reinigen. * Keine flüssigen Reinigungsmittel oder Druckluft zum Reinigen verwenden. * Kein Lösungsmittel verwenden. * Überprüfen ob die Belüftungsöffnungen frei sind. * Je nach Umgebungsbedingung, empfehlen wir das Gerät alle 2 bis 5 Jahre durch einen Servicetechniker professionell zu reinigen.
# Entretient
| | | | ----------------------------------------- | ----------------------------------------------------------------------------------------------------------------------------------------------------------------------------------------------------------------------------------------------------------------------------------------------------------------------- | |  | **Avertissement:** Tous les travaux de réparation et d’entretien doivent être effectués exclusivement par des techniciens qualifiés, car les pièces sous tension peuvent être exposées lors de l’ouverture et/ou du retrait des couvercles. Le contact avec des pièces sous tension peut provoquer un choc électrique. | | | | | ----------------------------------------- | -------------------------------------------------------------------------------------------------------------------------------------------------------------------------------------------------------- | |  | **Avertissement:** La grandMA3 full-size, la grandMA3 light et leurs versions CRV ont un filtre d’admission d’air à l’arrière. Ne lavez pas le filtre. Nettoyez-le uniquement à l’aide d’un aspirateur. | | | | | ------------------------------------------------ | --------------------------------------------------------------------------------------------------------------------------------------------------- | |  | **Important:** Les intervalles entre les entretiens peuvent varier en fonction de la fréquence des transports et de l’environnement opérationnel. | * Débranchez l’alimentation électrique avant le nettoyage; * Nettoyez la surface à l’aide d’un chiffon sec uniquement; * Nettoyez le repose-poignet à l’aide d’un chiffon humide uniquement; * N’utilisez pas de nettoyant liquide ou d’air comprimé; * N’utilisez pas de solvant; * Vérifiez si les orifices de ventilation sont obstrués; * En fonction de l’environnement, nous recommandons de nettoyer l’appareil professionnellement une fois par an.
# Safety
> Warning – Danger area
## Symbols and Warning Labels [Section titled “Symbols and Warning Labels”](#symbols-and-warning-labels)  **Warning** – Danger area ***  **Caution**– Risk of electric shock *** ## Risk of Electric Shock [Section titled “Risk of Electric Shock”](#risk-of-electric-shock) The device is to be serviced by qualified personnel only as live parts may be exposed when opening and/or removing coverings. Touching live parts may cause electric shock.  ***  Dispose of as hazardous waste. Follow the applicable regulations. For more information see [Disposal](/grandma3/2-3/key_consoles_disposal/). ***  Recycle the battery ***  Declaration of conformity. For more information see [Conformity](/grandma3/2-3/key_conformity/). ***  Operating voltage ON/OFF *** ## Lithium-Ion-Battery [Section titled “Lithium-Ion-Battery”](#lithium-ion-battery)  \*\*Warning \*\* Safety instructions for the built-in lithium-ion battery: * The grandMA3 full-size, grandMA3 light, and their CRV versions have a rechargeable lithium-ion battery (LiFePo4) for an uninterrupted power supply (UPS); * All grandMA3 consoles have a memory battery on the MA Central Computer Board. * Only use batteries approved by MA Lighting Technology GmbH; * Misuse or improper handling of the battery can cause it to explode or the fluid inside the battery to discharge. Note the following instructions in order to avoid injuries: * Do not open or disassemble the battery; * Do not drill holes into the battery or damage it in any other different manner; * Do not short-circuit the battery; * Protect the battery against moisture and humidity; * Protect the battery against fire; * Keep the battery away from children; * Do not use the battery if it is defective; * Do not try to exchange the built-in battery. The exchange of the battery must be performed by a service technician or a repair center approved by MA Lighting Technology GmbH. **We recommend charging the UPS battery at least once a year in order to avoid deep discharge. To do so, switch on the console, boot it up, and mind the status bar of the UPS battery.** \*\*Note the transportation regulations UN 38.3. – UN Recommendations on the Transport of Dangerous Goods, 6th edition, section 38.3. \*\* For more information see [Transport](/grandma3/2-3/key_transport/). | | | | ----------------------------------------- | --------------------------------------------------------------------------------------------------------------------------------------------------------------------------------------------------------------------------------- | |  | **Warning:** The device has to be grounded. Do not ignore the safety purpose of the grounding-type plug. A grounding-type plug has two blades and a third grounding connection. The third connection is provided for your safety. | *** Read all the instructions in this Quick Manual thoroughly, especially the [General Safety Instructions](/grandma3/2-3/key_consoles_safety/#general_safety_instructions) further down and the [Limitations](/grandma3/2-3/key_consoles_limitations/). Follow the instructions and keep this Quick Manual for future use. Follow all cautions and warnings stated in this Quick Manual and indicated on the device. | | | | ------------------------------------------------ | --------------------------------------------------------------------------------------------- | |  | **Important:** | | | All repair and service work has to be exclusively performed by qualified service technicians. | * This device is state-of-the-art technology; * However, residual risks cannot be ruled out; * To avoid risks, follow the safety instructions; * This device is intended for professional use only and is not suitable for residential use. MA Lighting Technology GmbH does not bear the damage which may occur due to the inobservance of the safety instructions. | | | | ----------------------------------------- | --------------------------------------------------------------------------------------------------------------------------------------------------------------------------- | |  | **Warning:** Changes or modifications to these devices not expressly approved by the party responsible for the compliance could void the user’s authority to operate them. | | | | | ------------------------------------------------ | ---------------------------------------------------------------------------------------------------------------------------------------------------------------------------------------------------------------------------------------------------------------------------------------------------------------------------------------------------------------------------------------------------------------------------------------------------------------------------------------------------------------------------------------------------------------------------------------------------------------------------------------------------------------------------------------------- | |  | **Note:** These devices have been tested and found to comply with the limits of a Class A digital device, pursuant to Part 15 of the FCC Rules and the CE Standards. These limits are designed to provide reasonable protection against possible interference when the devices are operated in a commercial environment. These generate, use, and can radiate radio frequency energy and, if not installed and used in accordance with this Quick Manual, may possibly cause interference to radio communications. Operation of these devices in a residential area is likely to cause interference in which case the user will be required to correct the interference at their own expense. | | | | ## Avoid Risks Caused by Electric Current [Section titled “Avoid Risks Caused by Electric Current”](#avoid-risks-caused-by-electric-current) A defective device or defective power cable can cause severe or fatal injury due to electrical shock. Follow the safety instructions to avoid the risks caused by electric current. * Do not use a defective power cable; * Do not open screwed down covers from the housing; * Use the device only if it is in a technically impeccable condition; * Do not repair the device on your own; * Do not reverse engineer the device, and make any changes to its components, and accessories; * Do not expose the device to rain or moisture; * Do not submerge the device in water. ## []()General Safety Instructions [Section titled “General Safety Instructions”](#general-safety-instructions) To avoid injury or damage to the device: * To avoid damage to the displays, do not carry or lift the device by the monitor wing; * To avoid torsion, do not open the monitor wing lifting it up at one edge. When lifting up use both of your hands; * Do not put your hands inside the device during operation; * Device and power cable must be kept away from children under the age of 8; * Children are not allowed to play with the device; * Unplug the power plug to disconnect the power supply from electric voltage during thunderstorms; * Switch off the console via the power switch if it is unattended for a longer period of time; * Shut down the console via the Power key and switch it off via the power switch before cleaning the device; * Do not use any liquid or spray cleaner. Use a dry cloth only; * Do not use the device in the vicinity of water; * Do not expose it to a humid environment; * Do not pour any liquids over the device. * Do not block or cover any ventilation holes in the housing. These are essential for the airflow within the device and protect the device from overheating; * Do not insert any objects into the ventilation holes of the device as these could get in contact with live parts or could cause short circuits, fire and/or an electric shock; * Do not place any objects on the power cable. Protect it from being walked on or pinched, particularly at the connector and where the cables exit the device; * When using an extension cable, make sure the rated output of all devices connected in series does not exceed the maximum rated output of the extension cable; * Do not support yourself on the device; * Do not place any heavy objects on top of the device; * Do not use excessive force on keys, buttons, faders, knobs, switches, connectors, or monitor wing; * If the power cable or the main power plug is defective, let a qualified technician replace it immediately; * Place the device on stable surfaces only. If it is placed on unstable surfaces, it may fall and break. * Only use power cables which are safety-marked; * Do not use high-power radio devices or cell phones near the device; * The device is provided with a safety plug. This plug can only be used with safety outlets; * As with all industrially manufactured goods, the use of substances that induce an allergic reaction such as aluminum cannot be generally excluded. If you develop an allergic reaction (such as rash, frequent sneezing, red eyes or respiratory difficulties), consult a physician immediately to determine the cause. **If one of the following conditions occurs, disconnect the main power plug and call your local distributor or the technical support!** * Power cable or the main power plug is damaged or worn; * Ingress of liquids; * The device was exposed to rain or high ambient humidity; * The device does not function properly, even if you followed all the instructions of this Quick Manual. Only operate the controls as stated in the Quick Manual. Incorrect control settings may damage the device; * The device fell damaging the housing.
# Sicherheit
> Warnung – Gefahrenbereich
# ## Symbole und Warnzeichen [Section titled “Symbole und Warnzeichen”](#symbole-und-warnzeichen)  **Warnung** – Gefahrenbereich ***  \*\*Vorsicht \*\*– Stromschlaggefahr *** ## Stromschlaggefahr [Section titled “Stromschlaggefahr”](#stromschlaggefahr) Die Wartung des Gerätes darf ausschließlich von geschultem Personal durchgeführt werden, da beim Öffnen und/oder Entfernen von Abdeckungen spannungsführende Teile freigelegt werden könnten. Spannungsführende Teile nicht berühren – Gefahr von Stromschlag.  ***  Das Gerät ist als Sonderabfall zu entsorgen. Die örtlichen Vorschriften beachten. Für weitere Informationen siehe [Entsorgung](/grandma3/2-3/key_consoles_disposal-1/). ***  Batterie recyceln ***  Konformitätserklärung. Für weitere Informationen siehe [Konformität](/grandma3/2-3/key_conformity-1/). ***  Betriebsspannung AN/AUS *** ## Lithium-Ionen-Batterie [Section titled “Lithium-Ionen-Batterie”](#lithium-ionen-batterie)  \*\*Warnung \*\* Hinweise zur integrierten Batterie: * Die grandMA3 full-size, grandMA3 light und die entsprechenden CRV-Versionen enthalten eine wiederaufladbare Lithium-Ionen-Batterie (LiFePo4) für den USV-Betrieb (unterbrechungsfreie Stromversorgung). * Alle Konsolen enthalten eine BIOS-Batterie auf der Hauptplatine (MA central computer board). * Nur von MA Lighting Technology GmbH zugelassene Batterien verwenden. * Nicht bestimmungsgemäße Verwendung der Batterie oder ein fehlerhafter Umgang damit kann zu einer Explosion der Batterie oder einem Flüssigkeitsaustritt aus der Batterie führen. Folgende Punkte beachten, um Verletzungen zu vermeiden: * Die Batterie nicht öffnen oder zerlegen. * Die Batterie nicht anbohren und in keiner anderen Weise beschädigen. * Die Batterie nicht kurzschließen. * Die Batterie vor Nässe und Feuchtigkeit schützen. * Die Batterie vor Feuer schützen. * Die Batterie von Kindern fernhalten. * Falls die Batterie beschädigt sein sollte, nicht verwenden. * Die integrierte Batterie nicht auszutauschen. Der Austausch der Batterie muss durch eine von MA Lighting Technology GmbH zertifizierte Reparaturwerkstatt oder Fachkraft durchgeführt werden. **Es wird empfohlen, den Akku der USV mindestens einmal pro Jahr aufzuladen, um eine Tiefenentladung zu verhindern. Zum Aufladen die Konsole anschalten, hochfahren und die Statusleiste der USV beachten.** \*\*Bitte beachten: UN-Transportvorschrift 38.3. – Empfehlung der UN für die Beförderung gefährlicher Güter, Ausgabe 6, Abschnitt 38.3. \*\* Für mehr Informationen siehe [Transport](/grandma3/2-3/key_onpc_command_wing_transport/). | | | | ----------------------------------------- | ------------------------------------------------------------------------------------------------------------------------------------------------------------------------------------------------------------------------------------------------ | |  | **Warnung:** Das Gerät muss geerdet sein. Nicht den Sicherheitszweck eines Schutzkontaktsteckers ignorieren. Ein Schutzkontaktstecker hat zwei Stromkontakte und einen dritten Erdungskontakt. Der dritte Erdungskontakt dient Ihrer Sicherheit. | *** Alle Anweisungen in diesem Quick Manual aufmerksam lesen und befolgen, vor allem die [Allgemeinen Sicherheitsanweisungen](/grandma3/2-3/key_consoles_safety-1/#general_safety_instructions) weiter unten in diesem Kapitel und die [Betriebsgrenzen](/grandma3/2-3/key_consoles_limitations-1/). Das Quick Manual für den späteren Gebrauch aufbewahren. Alle Vorsichtsmaßnahmen und Warnhinweise befolgen, die in diesem Quick Manual und dem Gerät selbst vermerkt sind. | | | | ------------------------------------------------ | ------------------------------------------------------------------------------------------------------------------------- | |  | **Wichtig:** Sämtliche Reparatur- und Wartungsarbeiten dürfen ausschließlich von geschultem Personal durchgeführt werden. | * Dieses Gerät entspricht dem neuesten Stand der Technik, trotzdem kann ein Restrisiko nicht komplett ausgeschlossen werden. * Alle Sicherheitsanweisungen befolgen um dieses Restrisiko zu vermeiden. * Dieses Gerät ist nur für den professionellen Gebrauch bestimmt und nicht für den privaten Gebrauch geeignet. MA Lighting Technology GmbH haftet nicht für Schäden, die durch Nichtbeachtung der Sicherheitsanweisungen verursacht wurden. | | | | ----------------------------------------- | --------------------------------------------------------------------------------------------------------------------------------------------------------------------------------------------------------------------------- | |  | **Warnung:** Durch den Nutzer herbeigeführte Modifikationen an diesen Geräten, die nicht ausdrücklich von der für die Übereinstimmung verantwortlichen Stelle genehmigt wurden, führen zum Verbot der Benutzung der Geräte. | | | | | ------------------------------------------------ | ----------------------------------------------------------------------------------------------------------------------------------------------------------------------------------------------------------------------------------------------------------------------------------------------------------------------------------------------------------------------------------------------------------------------------------------------------------------------------------------------------------------------------------------------------------------------------------------------------------------------------------------- | |  | **Wichtig:** Diese Geräte wurden getestet und entsprechen den Grenzwerten eines digitalen Geräts der Klasse A gemäß der FCC-Bestimmungen Teil 15 und der CE-Regularien. Diese Grenzwerte bieten im professionellen Betrieb einen angemessenen Schutz gegen störende Interferenzen. Die Geräte erzeugen, verwenden und strahlen möglicherweise Funkwellen aus. Wenn sie nicht gemäß dieser Anleitung installiert und verwendet werden, können sie den Funkverkehr stören. Der Betrieb dieser Geräte im privaten, häuslichen Bereich kann u. U. Funkstörungen verursachen. In diesem Fall muss der Benutzer die Störungen selbst beheben. | ## Vermeiden von Stromschlag [Section titled “Vermeiden von Stromschlag”](#vermeiden-von-stromschlag) Ein beschädigtes Gerät oder Netzkabel kann schwere oder tödliche Verletzungen verursachen. Befolgen Sie die Sicherheitsanweisungen, um Verletzungen, die durch elektrischen Strom verursacht werden können, zu verhindern. * Kein beschädigtes Netzkabel nutzen. * Keine festgeschraubten Abdeckungen am Gehäuse öffnen. * Gerät nur im technisch einwandfreien Zustand nutzen. * Gerät niemals selbst reparieren. * Gerät nicht modifizieren und keine Änderungen an dessen Komponenten und Zubehör vornehmen. * Gerät nicht Regen oder Feuchtigkeit aussetzen. * Gerät nicht in Wasser tauchen. ## []()Allgemeine Sicherheitsanweisungen [Section titled “Allgemeine Sicherheitsanweisungen”](#allgemeine-sicherheitsanweisungen) Um Verletzungen vorzubeugen oder Schäden am Gerät zu vermeiden: * Um die Bildschirme nicht zu beschädigen, das Gerät nicht am Monitor Wing tragen oder hochheben. * Um Verwindung zu vermeiden, den Monitor Wing mit beiden Händen, jeweils links und rechts, öffnen. * Beim Bedienen nicht in das Gerät hineingreifen. * Gerät und Netzkabel von Kindern unter 8 Jahren fernhalten. * Kinder nicht mit dem Gerät spielen lassen. * Bei Gewitter das Gerät vom Netz trennen (Netzstecker ziehen). * Bei längerer Nichtverwendung das Gerät über den Netzschalter ausschalten. * Vor dem Reinigen die Konsole herunterfahren und über den Netzschalter ausschalten. * Keine flüssigen Reinigungsmittel oder Sprühreiniger verwenden. * Nur mit einem trockenen Tuch reinigen. * Gerät nicht in der Nähe von Wasser nutzen. * Gerät nicht einer feuchten Umgebung aussetzen. * Keine Flüssigkeiten auf das Gerät schütten. * Belüftungsöffnungen im Gehäuse nicht blockieren – diese sind für den Luftstrom innerhalb des Gerätes wichtig und schützen es vor Überhitzung. * Keine Fremdkörper in die Belüftungsöffnungen stecken, da diese mit spannungsführenden Teilen in Kontakt kommen und Kurzschlüsse, Feuer und/oder Stromschlag verursachen können. * Keine Gegenstände auf das Netzkabel stellen; Nicht auf das Netzkabel treten oder zusammendrücken, besonders am Stecker und an Stellen, an denen die Kabel das Gehäuse verlassen. * Wird ein Verlängerungskabel genutzt, muss sichergestellt werden, dass die Summe der Nennleistungen der an das Kabel angeschlossenen Geräte die Nennleistung des Verlängerungskabels nicht überschreitet. * Sich nicht mit dem Körpergewicht auf dem Gerät abstützen. * Keine schweren Gegenstände auf dem Gerät abstellen. * Keine übermäßige Gewalt auf Tasten, Knöpfe, Fader, Drehknöpfe, Schalter, Verbinder oder Monitor Wing ausüben. * Ist das Netzkabel oder der Stecker beschädigt, müssen diese umgehend von einer Fachkraft ausgetauscht werden. * Gerät nur auf stabilen Oberflächen platzieren; wird es auf instabilen Oberflächen platziert, kann das Gerät herunterfallen und stark beschädigt werden. * Nur Netzkabel mit Sicherheitsprüfzeichen nutzen. * Keine leistungsstarken Funkgeräte oder Mobiltelefone in der Nähe des Gerätes verwenden. * Das Gerät hat einen Schutzkontaktstecker, der nur in Verbindung mit einer Schutzkontaktsteckdose verwendet werden darf. * Wie bei allen industriell gefertigten Gütern kann die Verwendung von Stoffen, die Allergien hervorrufen können, wie z.B. Aluminium, nicht gänzlich ausgeschlossen werden. Sollten allergische Reaktionen (wie z.B. Hautausschlag, ständiges Niesen, gerötete Augen oder Atemwegsbeschwerden) auftreten, ist umgehend ein Arzt zur Ursachenklärung aufzusuchen. **Sollte einer der folgenden Punkte zutreffen, das Gerät vom Netz trennen (Netzstecker ziehen) und den Kundendienst kontaktieren!** * Netzkabel oder -Stecker sind beschädigt, spröde oder brüchig. * Eintritt von Wasser. * Gerät wurde Regen oder hoher Luftfeuchtigkeit ausgesetzt. * Gerät funktioniert bei Einhaltung von Bedienungsanweisungen, die im Quick Manual stehen, nicht einwandfrei. Steuerelemente so einstellen wie im Quick Manual beschrieben, da eine falsche Einstellung das Gerät beschädigen könnte. * Gerät ist heruntergefallen und dabei wurde das Gehäuse beschädigt.
# Sécurité
> Avertissement – Zone de danger
# ### Symboles et consignes de sécurité [Section titled “Symboles et consignes de sécurité”](#symboles-et-consignes-de-sécurité)  \*\*Avertissement \*\*– Zone de danger ***  **Attention** – Risque de choc électrique *** ## Risque de choc électrique [Section titled “Risque de choc électrique”](#risque-de-choc-électrique) L’appareil ne doit être entretenu que par du personnel qualifié, des parties sous tension risquant d’être exposées lors de l’ouverture et / ou du retrait des couvercles. Le contact avec des pièces sous tension peut provoquer un choc électrique.  ***  Éliminer comme déchets dangereux. Respecter la réglementation en vigueur. Pour plus d’informations, voir [Élimination](/grandma3/2-3/key_consoles_disposal-1-2/). ***  Recycler la batterie ***  Déclaration de conformité. Pour plus d’informations, voir [Conformité](/grandma3/2-3/key_conformity-1-2/). ***  Tension de service Marche / Arrêt *** ## Batterie lithium-ion [Section titled “ Batterie lithium-ion”](#batterie-lithium-ion) \ **Avertissement** Consignes de sécurité concernant la batterie lithium-ion intégrée : * Les grandMA3 full-size, grandMA3 light et leurs versions CRV disposent d’une batterie rechargeable au lithium-ion (LiFePo4) pour une alimentation sans interruption (UPS) ; * Utilisez uniquement des batteries approuvées par MA Lighting Technology GmbH ; * Une mauvaise utilisation ou une manipulation incorrecte de la batterie peut provoquer son explosion ou l’écoulement du liquide à l’intérieur de la batterie. Suivez les instructions suivantes pour éviter les blessures : * Ne pas ouvrir ni démonter la batterie ; * Ne percez pas de trous dans la batterie et ne l’endommagez pas de toute autre manière ; * Ne court-circuitez pas la batterie ; * Protégez la batterie contre l’humidité ; * Protégez la batterie contre le feu ; * Gardez la batterie hors de portée des enfants ; * N’utilisez pas la batterie si elle est défectueuse ; * N’essayez pas d’échanger la batterie intégrée. Le remplacement de la batterie doit être effectué par un technicien de service ou un centre de réparation agréé par MA Lighting Technology GmbH. **Nous vous recommandons de charger la batterie au moins une fois par an afin d’éviter une décharge profonde.** **Respecter les règles de transport UN 38.3. - Recommandations de l’UN sur le transport des marchandises dangereuses, 6e édition, section 38.3.** Pour plus d’informations, voir [Transport](/grandma3/2-3/key_transport-1-2/). | | | | ----------------------------------------- | -------------------------------------------------------------------------------------------------------------------------------------------------------------------------------------------------------------------------------------------------------------- | |  | **Avertissement :** L’appareil doit être mis à la terre. Ne pas ignorer la fonction de sécurité d’une prise avec terre. Une prise avec terre a deux contacts électriques et un troisième contact de terre. Le troisième contact est prévu pour votre sécurité. | *** Lisez attentivement toutes les instructions de ce guide rapide, en particulier les [consignes générales de sécurité](/grandma3/2-3/key_consoles_safety-1-2/#general_safety_instructions) ci-dessous et les [limitations d’usages](/grandma3/2-3/key_consoles_limitations-1-2/). Suivez les instructions et conservez ce guide rapide pour une utilisation ultérieure. Respectez toutes les mises en garde et tous les avertissements mentionnés dans ce guide rapide et indiqués sur l’appareil. | | | | ------------------------------------------------ | -------------------------------------------------------------------------------------------------------------------------------------------- | |  | **Important :** Tous les travaux de réparation et d’entretien doivent être effectués exclusivement par des techniciens de service qualifiés. | * Cet appareil est à la pointe de la technologie ; * Cependant, des risques résiduels ne peuvent être exclus ; * Pour éviter les risques, suivez les consignes de sécurité ; * Cet appareil est destiné uniquement à un usage professionnel et ne convient pas à un usage résidentiel. MA Lighting Technology GmbH ne prend pas en charge d’éventuels dommages pouvant survenir en cas de non-respect des consignes de sécurité. | | | | ----------------------------------------- | ------------------------------------------------------------------------------------------------------------------------------------------------------------------------------------------------------------- | |  | **Avertissement :** Des changements ou des modifications à ces appareils non expressément approuvés par la partie responsable de la conformité pourraient annuler le droit de l’utilisateur de les utiliser. | | | | | ------------------------------------------------ | ------------------------------------------------------------------------------------------------------------------------------------------------------------------------------------------------------------------------------------------------------------------------------------------------------------------------------------------------------------------------------------------------------------------------------------------------------------------------------------------------------------------------------------------------------------------------------------------------------------------------------------------------------------------------------------------------------------------------------------------------------------------------------------------ | |  | **Note :** Ces appareils ont été testés et jugés conformes aux limites d’un appareil numérique de classe A, conformément à la partie 15 des règles de la FCC et aux normes CE. Ces limites sont conçues pour fournir une protection raisonnable contre de possibles interférences lorsque les appareils sont utilisés dans un environnement commercial. Ceux-ci génèrent, utilisent et peuvent émettre de l’énergie radiofréquence et, s’ils ne sont pas installés et utilisés conformément à ce guide rapide, peuvent éventuellement causer des interférences aux communications radio. L’utilisation de ces appareils dans une zone résidentielle est susceptible de causer des interférences, auquel cas l’utilisateur devra corriger ces interférences à ses propres frais. \*\* \*\* | ## Dangers causés par le courant électrique [Section titled “Dangers causés par le courant électrique”](#dangers-causés-par-le-courant-électrique) Un appareil ou un câble d’alimentation défectueux présente un risque de blessures graves ou mortelles dues à un choc électrique. Suivez les consignes de sécurité pour éviter les risques liés au courant électrique. * N’utilisez pas de câble d’alimentation défectueux ; * Ne pas ouvrir les couvercles vissés de l’appareil ; * N’utilisez l’appareil que s’il est dans un état technique impeccable ; * Ne réparez pas l’appareil par vos propres moyens ; * N’effectuez pas d’ingénierie inverse sur l’appareil et n’apporter aucune modification à ses composants et accessoires ; * N’exposez pas l’appareil à la pluie ou à l’humidité ; * Ne pas plonger l’appareil dans l’eau. ## []()Consignes de sécurité générales [Section titled “Consignes de sécurité générales”](#consignes-de-sécurité-générales) Pour éviter des blessures ou des dommages à l’appareil : * Pour éviter d’endommager les écrans, ne transportez pas ou ne soulevez pas l’appareil par le panneau d’écran ; * Pour éviter toute torsion, n’ouvrez pas le panneau d’écran en le soulevant d’un seul côté. Lorsque vous le soulevez, utilisez vos deux mains ; * Ne mettez pas vos mains à l’intérieur de l’appareil pendant le fonctionnement ; * L’appareil et le câble d’alimentation doivent être tenus à l’écart des enfants de moins de 8 ans ; * Les enfants ne sont pas autorisés à jouer avec l’appareil ; * Débranchez l’alimentation électrique du réseau pendant les orages ; * Débranchez l’alimentation électrique du réseau si l’appareil est laissé sans surveillance pendant une longue période ; * Débranchez l’alimentation électrique avant de nettoyer l’appareil ; * N’utilisez pas de nettoyant liquide ou en aérosol. Utilisez uniquement un chiffon sec ; * Ne pas utiliser l’appareil à proximité de l’eau ; * Ne l’exposez pas à un environnement humide ; * Ne versez aucun liquide sur l’appareil ; * Ne bouchez pas ou ne couvrez pas les trous de ventilation de l’appareil. Ceux-ci sont essentiels à la circulation de l’air à l’intérieur de l’appareil et protègent l’appareil contre la surchauffe ; * N’insérez aucun objet dans les trous de ventilation de l’appareil car ceux-ci pourraient entrer en contact avec des pièces sous tension ou provoquer des courts-circuits, un incendie et / ou un choc électrique ; * Ne placez aucun objet sur le câble d’alimentation. Protégez-le contre tout risque de piétinement ou de pincement, en particulier au niveau du connecteur et à l’endroit où les câbles sortent de l’appareil ; * Lors de l’utilisation d’un cable de rallonge, assurez-vous que la puissance nominale de tous les appareils connectés en série ne dépasse pas la puissance nominale maximale du cable de rallonge ; * Ne vous appuyez pas sur l’appareil ; * Ne placez aucun objet lourd sur l’appareil ; * N’utilisez pas de force excessive sur les touches, les boutons, les potentiomètres, les interrupteurs, les connecteurs ou sur les écrans ; * Si le câble d’alimentation ou la fiche d’alimentation principale sont défectueux, faites-les remplacer immédiatement par un technicien qualifié ; * Placez l’appareil uniquement sur des surfaces stables. S’il est placé sur des surfaces instables, il peut tomber et se casser ; * N’utilisez que des câbles d’alimentation homologués avec marquage ; * N’utilisez pas de talkie-walkie puissant ou de téléphone portable à proximité de l’appareil ; * L’appareil est équipé d’une fiche de sécurité. Cette fiche ne peut être utilisé qu’avec des prises de sécurité compatible ; * Comme pour tous les produits fabriqués industriellement, l’utilisation de substances induisant une réaction allergique telle que l’aluminium ne peut généralement pas être exclue. Si vous développez une réaction allergique (éruption cutanée, éternuements fréquents, yeux rouges ou difficultés respiratoires), consultez immédiatement un médecin pour en déterminer la cause. **Si l’une des conditions suivantes se produit, débranchez la fiche d’alimentation principale et appelez votre distributeur local ou le support technique !** * Le câble d’alimentation ou la fiche principale est endommagé ou usé ; * Pénétration de liquides ; * L’appareil a été exposé à la pluie ou à une forte humidité ambiante ; * L’appareil ne fonctionne pas correctement, même si vous avez suivi toutes les instructions de ce guide rapide. N’utilisez les commandes que comme indiquées dans le guide rapide. Des paramètres incorrects peuvent endommager l’appareil ; * L’appareil est tombé et le boitier est endommagé.
# Support
> MA Lighting and its extensive distributor network offer unparalleled technical support. Call on our expertise for help with any problem, no matter if it is abou
MA Lighting and its extensive distributor network offer unparalleled technical support. Call on our expertise for help with any problem, no matter if it is about the operation, software features, software installations, or troubleshooting. ### Help Pages [Section titled “Help Pages”](#help-pages) The help pages are included in every software installer package and are automatically loaded into the software. To access and read the help pages, press Help + Please. The help pop-up opens on the main screen. To jump directly into a special help topic, use the context-sensitive help: * Press and hold Help and tap the desired user interface element (UI element) to open the corresponding help topic. * Tap  in the control bar and tap a UI element to open the corresponding help topic. ### Online Manuals [Section titled “Online Manuals”](#online-manuals) All MA product-related manuals are available as online versions. Just select your MA product and click on the respective link. All further documents can be found in our download area. Go to [https://www.malighting.com/training-support/online-manuals.](https://www.malighting.com/training-support/online-manuals) ### Video Tutorials [Section titled “Video Tutorials”](#video-tutorials) Get tips and tricks from our MA experts on your MA product. MA offers a whole range of videos on how to use your MA product in the best possible way. Just select your series and click on the links to watch the videos on our YouTube channel. Go to [https://www.malighting.com/training-support/video-tutorials.](https://www.malighting.com/training-support/video-tutorials) ### Community [Section titled “Community”](#community) Share your knowledge and get help from other MA users. A community can be stronger and better than the individual. Be part of the MA community! Go to [https://www.malighting.com/training-support/community.](https://www.malighting.com/training-support/community) ### Fixture Shares [Section titled “Fixture Shares”](#fixture-shares) In our MA Fixture Share you will find a comprehensive database of different fixture types for grandMA3, grandMA2, and dot2. You can also find the grandMA2 GDTF Converter there. Simply upload the GDTF file and it will be converted into a grandMA2 Fixture Profile.\ \ The GTDF Share contains a comprehensive library of all available GDTF files with all relevant modes and firmware versions. Like the MA Fixture Share, this database is continuously updated. For more information see: ### Local Support [Section titled “Local Support”](#local-support) If you have a question regarding your MA Lighting product, please first of all contact your local MA product specialists. ### Central Support [Section titled “Central Support”](#central-support) If you are in need of further assistance or manufacturer support, please fill out an email request on [www.malighting.com in](http://www.malighting.com%C2%A0in) Training and Support. Your request will automatically be sent to\*\* \*\*(in English or German). This email service is monitored during MA Lighting’s regular business hours in Germany from 8.30 am until 5 pm, Monday through Friday. ### Emergency Hotline [Section titled “Emergency Hotline”](#emergency-hotline) In any case of a show critical emergency please contact the MA Lighting support hotline. Phone +49 5251 68 88 65 99 Please note that this 24/7 hotline is strictly for emergency cases. ### Intellectual Property [Section titled “Intellectual Property”](#intellectual-property) MA Lighting Technology has registered multiple patents, trademarks, design patents, and utility models for its products.\ We will take legal action against the violation of this intellectual property. For more information see:
# Support
> MA Lighting bietet mit dem angeschlossenen umfassenden Distributionsnetzwerk einen einmaligen technischen Support. Sollten wider Erwarten Probleme auftreten, st
# MA Lighting bietet mit dem angeschlossenen umfassenden Distributionsnetzwerk einen einmaligen technischen Support. Sollten wider Erwarten Probleme auftreten, stehen wir Ihnen mit unserem Know-how zur Seite, ganz gleich worum es sich handelt – Bedienung, Software-Features, Software-Installation oder Fehlerbeseitigung. ### Offline Hilfe [Section titled “Offline Hilfe”](#offline-hilfe) Die Offline Hilfe ist in jedem Software Installer enthalten und wird automatisch in die Software geladen. Zum Aufrufen der Hilfe die Tasten Help + Please drücken. Das Hilfe Fenster öffnet sich auf dem Hauptmonitor. Um ein spezielles Hilfethema direkt anzuspringen, die Kontextsensitive Hilfe verwenden. Um das entsprechende Hilfethema zu öffnen: * Taste Help drücken und halten und das gewünschte Bedienelement antippen. * Das  in der Kontrollleiste und das gewünschte Bedienelement antippen. ### Online Manuals [Section titled “Online Manuals”](#online-manuals) Alle Benutzerhandbücher der MA Produkte sind als Online-Versionen verfügbar. Einfach auswählen, für welches MA Produkt Sie eine Bedienungsanleitung benötigen. Gehe zu . ### Video Tutorials [Section titled “Video Tutorials”](#video-tutorials) Tipps und Tricks von unseren MA Experten für Ihr MA Produkt. MA Lighting bietet eine große Anzahl an Tutorial-Videos an, um Ihr MA Produkt bestmöglich nutzen können. Eine Serie auswählen und alle Videos dazu auf unserem YouTube Kanal ansehen. Gehe zu . ### Community [Section titled “Community”](#community) Teilen Sie Ihr Wissen mit anderen MA Usern. In der Gemeinschaft ist man effektiver. Werden Sie Mitglied der MA Community! Gehe zu [https://www.malighting.com/de/training-support/community](https://www.malighting.com/de/training-support/community/). ### Fixture Shares [Section titled “Fixture Shares”](#fixture-shares) Das MA Fixture Share ist eine umfassende Bibliothek der unterschiedlichsten Fixture Typen für alle grandMA3, grandMA2 und dot2 Serien. Im GTDF Share findet sich eine umfassende Bibliothek aller verfügbaren GDTF Files mit allen relevanten Modi und Firmware Versionen. Diese Datenbank wird wie das MA Fixture Share kontinuierlich aktualisiert. Mehr Info unter . ### Lokaler Support [Section titled “Lokaler Support”](#lokaler-support) Bei Fragen zu Ihren MA Lighting Produkten wenden Sie sich bitte als erstes an Ihre MA Produktspezialisten vor Ort. ### Zentraler Support [Section titled “Zentraler Support”](#zentraler-support) Für weitere Hilfe oder Herstellerunterstützung bitte das E-Mail-Formular unter , Training und Support ausfüllen. Diese Anfrage wird automatisch an \*\* \*\*(in Englisch oder Deutsch) gesendet. Dieser E-Mail-Service ist während der regulären Geschäftszeiten von MA Lighting von 8.30 Uhr bis 17 Uhr von Montag bis Freitag erreichbar. ### Notfall-Hotline [Section titled “Notfall-Hotline”](#notfall-hotline) In show-kritischen Situationen bitte Kontakt zur MA Lighting Support-Hotline aufnehmen. Tel. +49 5251.68 88 65 99 Diese Hotline ist 24 Stunden am Tag und 7 Tage in der Woche besetzt. Sie ist nur für Notfälle. ### Intellectual Property [Section titled “Intellectual Property”](#intellectual-property) MA Lighting Technology hat für seine Produkte zahlreiche Patente, Marken, Geschmacksmuster und Gebrauchsmuster angemeldet. Im Falle der Verletzung dieses geistigen Eigentums werden wir rechtliche Schritte einleiten. Mehr Info unter .
# Support technique
> Contactez-nous pour toute question concernant votre produit MA.
# Contactez-nous pour toute question concernant votre produit MA. MA Lighting et son vaste réseau de distributeurs offrent un support technique incomparable. Faites appel à notre expertise pour tout problème, qu’il s’agisse de fonctionnement, de fonctionnalités logicielles, d’installations logicielles ou de dépannage. ### Pages d’aide [Section titled “Pages d’aide”](#pages-daide) Les pages d’aide sont incluses dans chaque logiciel d’installation et sont automatiquement chargées dans le logiciel. Pour accéder et lire les pages d’aide, appuyez sur Help + Please. La fenêtre contextuelle d’aide s’ouvre sur l’écran principal. Pour accéder directement à une rubrique d’aide spéciale, utilisez l’aide contextuelle : * Appuyez et maintenez enfoncé le bouton Help et touchez l’élément d’interface utilisateur (élément IU) souhaité pour ouvrir la rubrique d’aide correspondante. * Tapez sur  dans la barre de contrôle et appuyez sur un élément de l’IU pour ouvrir le sujet d’aide correspondant. ### Guides en ligne [Section titled “Guides en ligne”](#guides-en-ligne) Tous les guides relatifs aux produits MA sont disponibles en ligne. Choisissez simplement votre produit MA et cliquez sur le lien correspondant. Tous les autres documents sont disponibles dans notre espace de téléchargement. Visitez . ### Tutoriels vidéo [Section titled “Tutoriels vidéo”](#tutoriels-vidéo) Obtenez des conseils et astuces de nos experts MA sur votre produit MA. MA vous propose toute une gamme de vidéos sur la meilleure façon d’utiliser votre produit MA. Sélectionnez simplement votre série et cliquez sur les liens pour regarder les vidéos sur notre chaîne YouTube. Visitez . ### Communauté [Section titled “Communauté”](#communauté) Partagez vos connaissances et obtenez l’aide d’autres utilisateurs de MA. Une communauté peut être plus forte et meilleure que l’individu. Faites partie de la communauté MA ! Visitez . ### Fixture Shares [Section titled “Fixture Shares”](#fixture-shares) Dans notre MA Fixture Share, vous trouverez une base de données complète des différents types de luminaires pour grandMA3, grandMA2 et dot2. Le partage GTDF contient une bibliothèque complète de tous les fichiers GDTF disponibles avec tous les modes et versions de micrologiciel pertinents. Tout comme MA Fixture Share, cette base de données est continuellement mise à jour. Pour plus d’informations, voir: ### Support local [Section titled “Support local”](#support-local) Si vous avez une question concernant votre produit MA Lighting, veuillez tout d’abord contacter votre spécialiste MA local. ### Support central [Section titled “Support central”](#support-central) Si vous avez besoin de plus d’aide ou d’assistance de la part du fabricant, veuillez remplir une demande par e-mail à [www.malighting.com](https://www.malighting.com/) sous Training and Support. Votre demande sera automatiquement envoyée à **** (en anglais ou en allemand). Ce service de messagerie électronique est surveillé pendant les heures d’ouverture habituelles de MA Lighting en Allemagne, de 8h30 à 17h, du lundi au vendredi. ### Hotline d’urgence [Section titled “Hotline d’urgence”](#hotline-durgence) En cas d’urgence, veuillez contacter le support technique de MA Lighting. Téléphone +49 5251 68 88 65 99 Veuillez prendre note que cette ligne d’assistance 24 heures sur 24 et 7 jours sur 7 est strictement réservée aux cas d’urgence. ### Propriété intellectuelle [Section titled “Propriété intellectuelle”](#propriété-intellectuelle) MA Lighting Technology a déposé plusieurs brevets, marques de commerce, brevets de conception et modèles d’utilité pour ses produits. Nous intenterons une action en justice contre la violation de cette propriété intellectuelle. Pour plus d’informations, voir:
# Technical Data
> grandMA3 full-size – rear panel
| | | | ------------------------------------------------ | -------------------------------------------------------------------------------------------------------------------------------------------------------------------------------------------------------------- | |  | **Important:** The grandMA3 full-size, grandMA3 light and their CRV versions have a built-in uninterruptible power supply (UPS). For more information on UPS see [Safety](/grandma3/2-3/key_consoles_safety/). | | | | | ------------------------------------------------ | --------------------------------------------------------------------------------------------------------------------------------------------------------------------------------------------------------------------------------------------------------------------------------------------------------------------------------------- | |  | **Important:** Only use adequately protected power cables (min. Ø = 3 x 1.0 mm²). The required power cable must meet the country’s standards. **Only qualified personnel is allowed to perform work on the power cable!** Only use monitors with a native DisplayPort connector. Do not use adapters, for example DP to VGA or similar. | | | | | ------------------------------------------------ | -------------------------------------------------------------------------- | |  | **Important:** Power cable and connector are not included in the delivery. | * DMX: max. length of the cable 350 m (in ideal conditions). * Use CAT-5e Ethernet cable or higher. Max. length of the cable 75 m. *** ### grandMA3 full-size [Section titled “grandMA3 full-size”](#grandma3-full-size)  | Technical Data | | | ---------------------------------------------------------- | ------------------------------------------------------------------------------------ | | Parameters | 20 480 | | Operating voltage | 100-240 V AC, 50/60 Hz | | Net weight | 44 kg / 98 lbs | | Power | max. 300 VA | | Dimensions (folded and closed keyboard drawer) | 1 256 x 539 x 181 mm / 50 x 22 x 8 in (width x depth x height) | | Dimensions (unfolded for operation) | 1 256 x 584 x 409 (max. 450) mm / 50 x 23 x 17 (max. 18) in (width x depth x height) | | Dimensions (maximally unfolded and opened keyboard drawer) | 1 256 x 871 x 255 mm / 50 x 35 x 10 in (width x depth x height) | ### Outputs grandMA3 full-size [Section titled “Outputs grandMA3 full-size”](#outputs-grandma3-full-size)  *grandMA3 full-size – rear panel* | Number | Connector | | ------ | --------------------------------------------------------------- | | 1 x | powerCON TRUE1\* | | 3 x | etherCON/RJ45 | | 6 x | DMX512-A Out (5pin XLR female) | | 1 x | DMX512-A In (5pin XLR male) | | 1 x | MIDI In (5pin DIN female) | | 1 x | MIDI Out (5pin DIN female) | | 1 x | LTC – Linear Time Code (3pin XLR female) | | 1 x | Audio In (3pin XLR female) | | 1 x | GPI – General Purpose Input (D-SUB DE9 female – remote control) | | 2 x | DisplayPort 1.2 (external screens) | | 2 x | S/PDIF In and Out | | 3 x | USB 2.0 (type A) max. 500 mA | | 3 x | USB 3.0 (type A) (2 on the front panel) max. 900 mA | | 2 x | Desk light (4pin XLR female) | \*registered trademark of Neutrik AG, Liechtenstein *** ### grandMA3 full-size CRV [Section titled “grandMA3 full-size CRV”](#grandma3-full-size-crv)  | Technical Data | | | ----------------------------------- | -------------------------------------------------------------- | | Parameters | 20 480 | | Operating voltage | 100-240 V AC, 50/60 Hz | | Net weight | 33 kg / 73 lbs | | Power | max. 300 VA | | Dimensions (closed keyboard drawer) | 1 213 x 539 x 169 mm / 48 x 22 x 7 in (width x depth x height) | | Dimensions (opened keyboard drawer) | 1 213 x 644 x 169 mm / 48 x 26 x 7 in (width x depth x height) | ### Outputs grandMA3 full-size CRV [Section titled “Outputs grandMA3 full-size CRV”](#outputs-grandma3-full-size-crv)  *grandMA3 full-size CRV – rear panel* | Number | Connector | | ------ | --------------------------------------------------------------- | | 1 x | powerCON TRUE1\* | | 3 x | etherCON/RJ45 | | 6 x | DMX512-A Out (5pin XLR female) | | 1 x | DMX512-A In (5pin XLR male) | | 1 x | MIDI In (5pin DIN female) | | 1 x | MIDI Out (5pin DIN female) | | 1 x | LTC – Linear Time Code (3pin XLR female) | | 1 x | Audio In (3pin XLR female) | | 1 x | GPI – General Purpose Input (D-SUB DE9 female – remote control) | | 5 x | DisplayPort 1.2 (external screens) | | 2 x | S/PDIF In and Out | | 3 x | USB 2.0 (type A) max. 500 mA | | 3 x | USB 3.0 (type A) (2 on the front panel) max. 900 mA | | 2 x | Desk light (4pin XLR female) | \*registered Trademark of Neutrik AG, Liechtenstein *** ### grandMA3 light [Section titled “grandMA3 light”](#grandma3-light)  | Technical Data | | | ---------------------------------------------------------- | ---------------------------------------------------------------------------------- | | Parameters | 16 384 | | Operating voltage | 100-240 V AC, 50/60 Hz | | Net weight | 33 kg / 73 lbs | | Power | max. 300 VA | | Dimensions (folded and closed keyboard drawer) | 854 x 539 x 181 mm / 34 x 22 x 8 in (width x depth x height) | | Dimensions (unfolded for operation) | 854 x 584 x 409 (max. 450) mm / 34 x 23 x 17 (max. 18) in (width x depth x height) | | Dimensions (maximally unfolded and opened keyboard drawer) | 854 x 871 x 255 mm / 34 x 35 x 10 in (width x depth x height) | ### Outputs grandMA3 light [Section titled “Outputs grandMA3 light”](#outputs-grandma3-light)  *grandMA3 light – rear panel* | Number | Connector | | ------ | --------------------------------------------------------------- | | 1 x | powerCON TRUE1\* | | 3 x | etherCON/RJ45 | | 6 x | DMX-512-A Out (5pin XLR female) | | 1 x | DMX-512-A In (5pin XLR male) | | 1 x | MIDI In (5pin DIN female) | | 1 x | MIDI Out (5pin DIN female) | | 1 x | LTC – Linear Time Code (3pin XLR female) | | 1 x | Audio In (3pin XLR female) | | 1 x | GPI – General Purpose Input (D-SUB DE9 female – remote control) | | 2 x | DisplayPort 1.2 (external screens) | | 2 x | S/PDIF In and Out | | 3 x | USB 2.0 (type A) max. 500 mA | | 3 x | USB 3.0 (type A) (2 on the front panel) max. 900 mA | | 2 x | Desk light (4pin XLR female) | \*registered Trademark of Neutrik AG, Liechtenstein *** ### grandMA3 light CRV [Section titled “grandMA3 light CRV”](#grandma3-light-crv)  | Technical Data | | | ----------------------------------- | ------------------------------------------------------------ | | Parameters | 16 384 | | Operating voltage | 100-240 V AC, 50/60 Hz | | Net weight | 25 kg / 56 lbs | | Power | max. 300 VA | | Dimensions (closed keyboard drawer) | 811 x 539 x 169 mm / 32 x 22 x 7 in (width x depth x height) | | Dimensions (opened keyboard drawer) | 811 x 644 x 169 mm / 32 x 26 x 7 in (width x depth x height) | ### Outputs grandMA3 light CRV [Section titled “Outputs grandMA3 light CRV”](#outputs-grandma3-light-crv)  *grandMA3 light CRV – rear panel* | Number | Connector | | ------ | --------------------------------------------------------------- | | 1 x | powerCON TRUE1\* | | 3 x | etherCON/RJ45 | | 6 x | DMX-512-A Out (5pin XLR female) | | 1 x | DMX-512-A In (5pin XLR male) | | 1 x | MIDI In (5pin DIN female) | | 1 x | MIDI Out (5pin DIN female) | | 1 x | LTC – Linear Time Code (3pin XLR female) | | 1 x | Audio In (3pin XLR female) | | 1 x | GPI – General Purpose Input (D-SUB DE9 female – remote control) | | 4 x | DisplayPort 1.2 (external screens) | | 2 x | S/PDIF In and Out | | 3 x | USB 2.0 (type A) max. 500 mA | | 3 x | USB 3.0 (type A) (2 on the front panel) max. 900 mA | | 2 x | Desk light (4pin XLR female) | \*registered Trademark of Neutrik AG, Liechtenstein *** ### grandMA3 compact XT [Section titled “grandMA3 compact XT”](#grandma3-compact-xt)  | Technical Data | | | --------------------- | ---------------------------------------------------------------------------------- | | Parameters | 8 192 | | Operating voltage | 100-240 V AC, 50/60 Hz | | Net weight | 20 kg / 45 lbs | | Power | max. 250 VA | | Dimensions (folded) | 845 x 429 x 160 mm / 34 x 17 x 7 in (width x depth x height) | | Dimensions (unfolded) | 845 x 563 x 325 (max. 410) mm / 34 x 23 x 13 (max. 17) in (width x depth x height) | ### Outputs grandMA3 compact XT [Section titled “Outputs grandMA3 compact XT”](#outputs-grandma3-compact-xt)  *grandMA3 compact XT – rear panel* | Number | Connector | | ------ | --------------------------------------------------------------- | | 1 x | powerCON TRUE1\* | | 3 x | etherCON/RJ45 | | 6 x | DMX-512-A Out (5pin XLR female) | | 1 x | DMX-512-A In (5pin XLR male) | | 1 x | MIDI In (5pin DIN female) | | 1 x | MIDI Out (5pin DIN female) | | 1 x | LTC – Linear Time Code (3pin XLR female) | | 1 x | Audio In (3pin XLR female) | | 1 x | GPI – General Purpose Input (D-SUB DE9 female – remote control) | | 1 x | DisplayPort 1.2 (external screen) | | 2 x | S/PDIF In and Out | | 3 x | USB 2.0 (type A) max. 500 mA | | 2 x | USB 3.0 (type A) (1 on the front panel) max. 900 mA | | 1 x | Desk light (4pin XLR female) | \*registered Trademark of Neutrik AG, Liechtenstein *** ### grandMA3 compact [Section titled “grandMA3 compact”](#grandma3-compact)  | Technical Data | | | --------------------- | ---------------------------------------------------------------------------------- | | Parameters | 8 192 | | Operating voltage | 100-240 V AC, 50/60 Hz | | Net weight | 16 kg / 36 lbs | | Power | max. 250 VA | | Dimensions (folded) | 661 x 429 x 160 mm / 26 x 17 x 7 in (width x depth x height) | | Dimensions (unfolded) | 661 x 563 x 325 (max. 410) mm / 26 x 23 x 13 (max. 17) in (width x depth x height) | ### Outputs grandMA3 compact [Section titled “Outputs grandMA3 compact”](#outputs-grandma3-compact)  *grandMA3 compact – rear panel* | Number | Connector | | ------ | --------------------------------------------------------------- | | 1 x | powerCON TRUE1\* | | 3 x | etherCON/RJ45 | | 6 x | DMX-512-A Out (5pin XLR female) | | 1 x | DMX-512-A In (5pin XLR male) | | 1 x | MIDI In (5pin DIN female) | | 1 x | MIDI Out (5pin DIN female) | | 1 x | LTC – Linear Time Code (3pin XLR female) | | 1 x | Audio In (3pin XLR female) | | 1 x | GPI – General Purpose Input (D-SUB DE9 female – remote control) | | 1 x | DisplayPort 1.2 (external screen) | | 2 x | S/PDIF In and Out | | 3 x | USB 2.0 (type A) max. 500 mA | | 2 x | USB 3.0 (type A) (1 on the front panel) max. 900 mA | | 1 x | Desk light (4pin XLR female) | \*registered Trademark of Neutrik AG, Liechtenstein *** ### grandMA3 replay unit [Section titled “grandMA3 replay unit”](#grandma3-replay-unit)  | Technical Data | | | ----------------- | ----------------------------------------------------------- | | Parameters | 8 192 | | Operating voltage | 100-240 V AC, 50/60 Hz | | Net weight | 6 kg / 14 lbs | | Power | max. 200 VA | | Dimensions | 482 x 372 x 87 mm / 19 x 15 x 4 in (width x depth x height) | ### Outputs grandMA3 replay unit [Section titled “Outputs grandMA3 replay unit”](#outputs-grandma3-replay-unit)  *grandMA3 replay unit – rear panel* | Number | Connector | | ------ | --------------------------------------------------------------- | | 1 x | powerCON TRUE1\* | | 3 x | etherCON/RJ45 | | 6 x | DMX512-A Out (5pin XLR female) | | 1 x | DMX512-A In (5pin XLR male) | | 1 x | MIDI In (5pin DIN female) | | 1 x | MIDI Out (5pin DIN female) | | 1 x | LTC – Linear Time Code (3pin XLR female) | | 1 x | Audio In (3pin XLR female) | | 1 x | GPI – General Purpose Input (D-SUB DE9 female – remote control) | | 2 x | DisplayPort 1.2 (external screens) | | 2 x | S/PDIF In and Out | | 5 x | USB 2.0 (type A) (2 on the front panel) max. 500 mA | \*registered Trademark of Neutrik AG, Liechtenstein *** ### grandMA3 extension [Section titled “grandMA3 extension”](#grandma3-extension)  | Technical Data | | | ----------------- | ------------------------------------------------------------ | | Parameters | None | | Operating voltage | 100-240 V AC, 50/60 Hz | | Net weight | 11 kg / 25 lbs | | Power | max. 75 VA | | Dimensions | 409 x 537 x 169 mm / 17 x 22 x 7 in (width x depth x height) | ### Outputs grandMA3 extension [Section titled “Outputs grandMA3 extension”](#outputs-grandma3-extension)  *grandMA3 extension - rear panel* | Number | Connector | | ------ | ---------------------------- | | 1 x | powerCON TRUE1\* | | 1 x | etherCON/RJ45 | | 1 x | Desk light (4pin XLR female) | \*registered Trademark of Neutrik AG, Liechtenstein
# Technische Daten
> grandMA3 full-size – Rückseite
# | | | | ------------------------------------------------ | ------------------------------------------------------------------------------------------------------------------------------------------------------------------------------------------------------------------------------------------------------- | |  | **Wichtig:** Die grandMA3 full-size, grandMA3 light und die entsprechenden CRV-Versionen haben eine eingebaute unterbrechungsfreie Stromversorgung (USV). Für weitere Informationen zu USV, siehe [Sicherheit](/grandma3/2-3/key_consoles_safety-1/). | | | | | ------------------------------------------------ | ---------------------------------------------------------------------------------------------------------------------------------------------------------------------------------------------------------------------------------------------------------------------------------------------------------------------------------------------------------------------------------------- | |  | **Wichtig:** Ausreichend isolierte und geschützte Netzkabel verwenden (min. Ø = 3 x 1,0 mm²). Das Netzkabel muss den Standards des Landes entsprechen. **Arbeiten am Netzkabel dürfen ausschließlich von qualifiziertem Personal durchgeführt werden!** Ausschließlich Monitore mit einem nativen DisplayPort-Stecker verwenden. Keine Adapter verwenden, wie DP zu VGA oder ähnliches. | | | | | ------------------------------------------------ | ------------------------------------------------------------------------------- | |  | **Wichtig:** Netzkabel und Steckverbinder sind im Lieferumfang nicht enthalten. | * DMX: die maximale Kabellänge beträgt 350 m (unter idealen Bedingungen). * CAT-5e Ethernet-Kabel oder höher verwenden; die maximale Kabellänge beträgt 75 m. *** ### grandMA3 full-size [Section titled “grandMA3 full-size”](#grandma3-full-size) 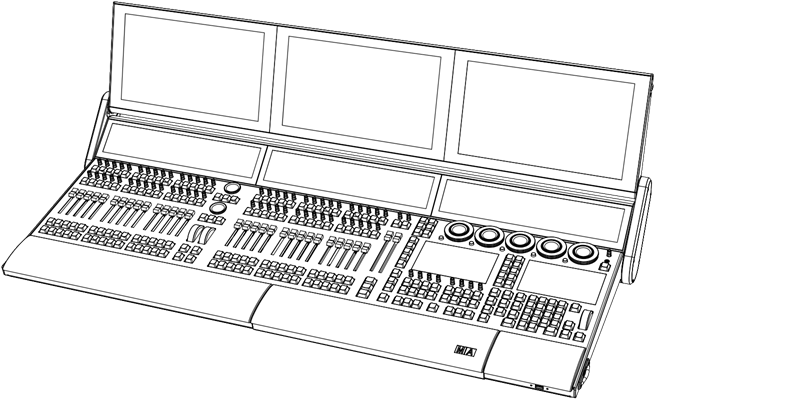 | Technische Daten | | | -------------------------------------------------------- | ------------------------------------------------------------------- | | Parameter | 20 480 | | Betriebsspannung | 100-240 V AC, 50/60 Hz | | Gewicht (ohne Verpackung) | 44 kg / 98 lbs | | Anschlussleistung | max. 300 VA | | Maße (zugeklappt mit geschlossener Tastatur) | 1 256 x 539 x 181 mm / 50 x 22 x 8 in (Breite x Tiefe x Höhe) | | Maße (Monitor Wing auf Bedienhöhe) | 1 256 x 584 x 409 (max. 450) mm / 50 x 23 x 17 (max. 18) in (BxTxH) | | Maße (maximal aufgeklappt und geöffneter Tastaturauszug) | 1 256 x 871 x 255 mm / 50 x 35 x 10 in (Breite x Tiefe x Höhe) | ### Steckverbinder grandMA3 full-size [Section titled “Steckverbinder grandMA3 full-size”](#steckverbinder-grandma3-full-size)  *grandMA3 full-size – Rückseite* | Anzahl | Steckverbinder | | ------ | --------------------------------------------------------------- | | 1 x | powerCON TRUE1\* | | 3 x | etherCON/RJ45 | | 6 x | DMX512-A Out (5-polig XLR weiblich) | | 1 x | DMX512-A In (5-polig XLR männlich) | | 1 x | MIDI In (5-polig DIN weiblich) | | 1 x | MIDI Out (5-polig DIN weiblich) | | 1 x | LTC – Linear Time Code (3-polig XLR weiblich) | | 1 x | Audio In (3-polig XLR weiblich) | | 1 x | GPI – General Purpose Input (D-SUB DE9 weiblich– Fernsteuerung) | | 2 x | DisplayPort (externe Bildschirme) | | 2 x | S/PDIF In und Out | | 3 x | USB 2.0 (Typ A) | | 3 x | USB 3.0 (Typ A) (2 auf der Vorderseite) | | 2 x | Pultleuchte (4-polig XLR weiblich) | \*eingetragene Marke der Neutrik AG, Liechtenstein *** ### grandMA3 full-size CRV [Section titled “grandMA3 full-size CRV”](#grandma3-full-size-crv) 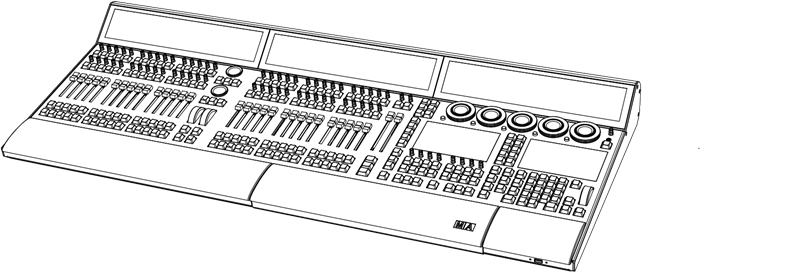 | Technische Daten | | | ----------------------------------- | ------------------------------------------------------------- | | Parameter | 20 480 | | Betriebsspannung | 100-240 V AC, 50/60 Hz | | Gewicht (ohne Verpackung) | 33 kg / 73 lbs | | Anschlussleistung | max. 300 VA | | Maße (geschlossener Tastaturauszug) | 1 213 x 539 x 169 mm / 48 x 22 x 7 in (Breite x Tiefe x Höhe) | | Maße (geöffneter Tastaturauszug) | 1 213 x 644 x 169 mm /48 x 26 x 7 in (Breite x Tiefe x Höhe) | ### Steckverbinder grandMA3 full-size CRV [Section titled “Steckverbinder grandMA3 full-size CRV”](#steckverbinder-grandma3-full-size-crv)  *grandMA3 full-size CRV – Rückseite* | Anzahl | Steckverbinder | | ------ | --------------------------------------------------------------- | | 1 x | powerCON TRUE1\* | | 3 x | etherCON/RJ45 | | 6 x | DMX512-A Out (5-polig XLR weiblich) | | 1 x | DMX512-A In (5-polig XLR männlich) | | 1 x | MIDI In (5-polig DIN weiblich) | | 1 x | MIDI Out (5-polig DIN weiblich) | | 1 x | LTC – Linear Time Code (3-polig XLR weiblich) | | 1 x | Audio In (3-polig XLR weiblich) | | 1 x | GPI – General Purpose Input (D-SUB DE9 weiblich– Fernsteuerung) | | 5 x | DisplayPort (externe Bildschirme) | | 2 x | S/PDIF In und Out | | 3 x | USB 2.0 (Typ A) | | 3 x | USB 3.0 (Typ A) (2 auf der Vorderseite) | | 2 x | Pultleuchte (4-polig XLR weiblich) | \*eingetragene Marke der Neutrik AG, Liechtenstein *** ### grandMA3 light [Section titled “grandMA3 light”](#grandma3-light) 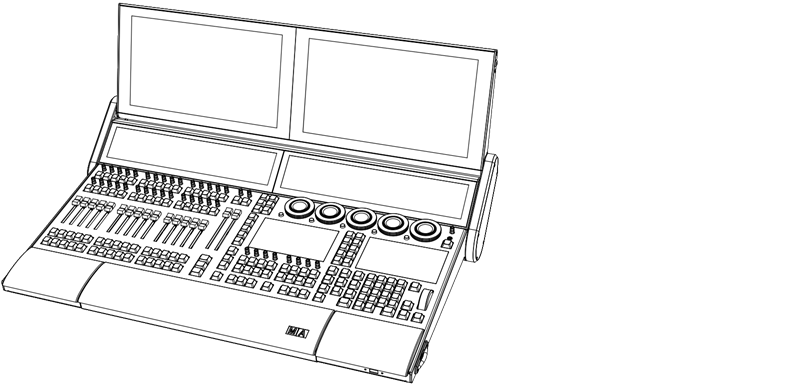 | Technische Daten | | | -------------------------------------------------- | ----------------------------------------------------------------- | | Parameter | 16 384 | | Betriebsspannung | 100-240 V AC, 50/60 Hz | | Gewicht (ohne Verpackung) | 33 kg / 73 lbs | | Anschlussleistung | max. 300 VA | | Maße (Maße (zugeklappt mit geschlossener Tastatur) | 854 x 539 x 181 mm / 34 x 22 x 8 in (BxTxH) | | Maße (Monitor Wing auf Bedienhöhe) | 854 x 584 x 409 (max. 450) mm / 34 x 23 x 17 (max. 18) in (BxTxH) | | Maße (aufgeklappt mit geöffneter Tastatur) | 854 x 871 x 255 mm / 34 x 35 x 10 in (BxTxH) | ### Steckverbinder grandMA3 light [Section titled “Steckverbinder grandMA3 light”](#steckverbinder-grandma3-light)  *grandMA3 light – Rückseite* | Anzahl | Steckverbinder | | ------ | --------------------------------------------------------------- | | 1 x | powerCON TRUE1\* | | 3 x | etherCON/RJ45 | | 6 x | DMX-512-A Out (5-polig XLR weiblich) | | 1 x | DMX-512-A In (5-polig XLR männlich) | | 1 x | MIDI In (5-polig DIN weiblich) | | 1 x | MIDI Out (5-polig DIN weiblich) | | 1 x | LTC – Linear Time Code (3-polig XLR weiblich) | | 1 x | Audio In (3-polig XLR weiblich) | | 1 x | GPI – General Purpose Input (D-SUB DE9 weiblich– Fernsteuerung) | | 2 x | DisplayPort (externe Bildschirme) | | 2 x | S/PDIF In und Out | | 3 x | USB 2.0 (Typ A) | | 3 x | USB 3.0 (Typ A) (2 auf der Vorderseite) | | 2 x | Pultleuchte (4-polig XLR weiblich) | \*eingetragene Marke der Neutrik AG, Liechtenstein *** ### grandMA3 light CRV [Section titled “grandMA3 light CRV”](#grandma3-light-crv)  | Technische Daten | | | ----------------------------------- | ----------------------------------------------------------- | | Parameter | 16 384 | | Betriebsspannung | 100-240 V AC, 50/60 Hz | | Gewicht (ohne Verpackung) | 25 kg / 56 lb | | Anschlussleistung | max. 300 VA | | Maße (geschlossener Tastaturauszug) | 811 x 539 x 169 mm / 32 x 22 x 7 in (Breite x Tiefe x Höhe) | | Maße (geöffneter Tastaturauszug) | 811 x 644 x 169 mm / 32 x 26 x 7 in (Breite x Tiefe x Höhe) | ### Outputs grandMA3 light CRV [Section titled “Outputs grandMA3 light CRV”](#outputs-grandma3-light-crv)  *grandMA3 light CRV – Rückseite* | Anzahl | Steckverbinder | | ------ | ---------------------------------------------------------------- | | 1 x | powerCON TRUE1\* | | 3 x | etherCON/RJ45 | | 6 x | DMX-512-A Out (5-polig XLR weiblich) | | 1 x | DMX-512-A In (5-polig XLR männlich) | | 1 x | MIDI In (5-polig DIN weiblich) | | 1 x | MIDI Out (5-polig DIN weiblich) | | 1 x | LTC – Linear Time Code (3-polig XLR weiblich) | | 1 x | Audio In (3-polig XLR weiblich) | | 1 x | GPI – General Purpose Input (D-SUB DE9 weiblich – Fernsteuerung) | | 4 x | DisplayPort (externe Bildschirme) | | 2 x | S/PDIF In und Out | | 3 x | USB 2.0 (Typ A) | | 3 x | USB 3.0 (Typ A) (2 auf der Vorderseite) | | 2 x | Pultleuchte (4-polig XLR weiblich) | \*eingetragene Marke der Neutrik AG, Liechtenstein *** ### grandMA3 compact XT [Section titled “grandMA3 compact XT”](#grandma3-compact-xt)  | Technische Daten | | | ------------------------- | --------------------------------------------------------------------------------- | | Parameter | 8 192 | | Betriebsspannung | 100-240 V AC, 50/60 Hz | | Gewicht (ohne Verpackung) | 20 kg / 45 lbs | | Anschlussleistung | max. 250 VA | | Maße (zusammengeklappt) | 845 x 429 x 160 mm / 34 x 17 x 7 in (Breite x Tiefe x Höhe) | | Maße (aufgeklappt) | 845 x 563 x 325 (max. 410) mm / 34 x 23 x 13 (max. 17) in (Breite x Tiefe x Höhe) | ### Outputs grandMA3 compact XT [Section titled “Outputs grandMA3 compact XT”](#outputs-grandma3-compact-xt)  *grandMA3 compact XT – Rückseite* | Anzahl | Steckverbinder | | ------ | --------------------------------------------------------------- | | 1 x | powerCON TRUE1\* | | 3 x | etherCON/RJ45 | | 6 x | DMX-512-A Out (5-polig XLR weiblich) | | 1 x | DMX-512-A In (5-polig XLR männlich) | | 1 x | MIDI In (5-polig DIN weiblich) | | 1 x | MIDI Out (5-polig DIN weiblich) | | 1 x | LTC – Linear Time Code (3-polig XLR weiblich) | | 1 x | Audio In (3-polig XLR weiblich) | | 1 x | GPI – General Purpose Input (D-SUB DE9 weiblich– Fernsteuerung) | | 1 x | DisplayPort (externe Bildschirme) | | 2 x | S/PDIF In und Out | | 3 x | USB 2.0 (Typ A) | | 2 x | USB 3.0 (Typ A) (1 auf der Vorderseite) | | 1 x | Pultleuchte (4-polig XLR weiblich) | \*eingetragene Marke der Neutrik AG, Liechtenstein *** ### grandMA3 compact [Section titled “grandMA3 compact”](#grandma3-compact)  | Technische Daten | | | ------------------------- | -------------------------------------------------------------------------------- | | Parameter | 8 192 | | Betriebsspannung | 100-240 V AC, 50/60 Hz | | Gewicht (ohne Verpackung) | 16 kg / 36 lbs | | Anschlussleistung | max. 250 VA | | Maße (zusammengeklappt) | 661 x 429 x 160 mm / 26 x 17 x 7 in (Breite x Tiefe x Höhe) | | Maße (aufgeklappt) | 661 x 563 x 325 (max. 410 mm / 26 x 23 x 13 (max. 17) in (Breite x Tiefe x Höhe) | ### Steckverbinder grandMA3 compact [Section titled “Steckverbinder grandMA3 compact”](#steckverbinder-grandma3-compact)  *grandMA3 compact – Rückseite* | Anzahl | Steckverbinder | | ------ | --------------------------------------------------------------- | | 1 x | powerCON TRUE1\* | | 3 x | etherCON/RJ45 | | 6 x | DMX-512-A Out (5-polig XLR weiblich) | | 1 x | DMX-512-A In (5-polig XLR männlich) | | 1 x | MIDI In (5-polig DIN weiblich) | | 1 x | MIDI Out (5-polig DIN weiblich) | | 1 x | LTC – Linear Time Code (3-polig XLR weiblich) | | 1 x | Audio In (3-polig XLR weiblich) | | 1 x | GPI – General Purpose Input (D-SUB DE9 weiblich– Fernsteuerung) | | 1 x | DisplayPort (externe Bildschirme) | | 2 x | S/PDIF In und Out | | 3 x | USB 2.0 (Typ A) | | 2 x | USB 3.0 (Typ A) (1 auf der Vorderseite) | | 1 x | Pultleuchte (4-polig XLR weiblich) | \*eingetragene Marke der Neutrik AG, Liechtenstein *** ### grandMA3 replay unit [Section titled “grandMA3 replay unit”](#grandma3-replay-unit)  | Technische Daten | | | ------------------------- | ---------------------------------------------------------- | | Parameter | 8 192 | | Betriebsspannung | 100-240 V AC, 50/60 Hz | | Gewicht (ohne Verpackung) | 6 kg / 14 lbs | | Anschlussleistung | max. 200 VA | | Maße | 482 x 372 x 87 mm / 19 x 15 x 4 in (Breite x Tiefe x Höhe) | ### Steckverbinder grandMA3 replay unit [Section titled “Steckverbinder grandMA3 replay unit”](#steckverbinder-grandma3-replay-unit)  *grandMA3 replay unit – Rückseite* | Anzahl | Steckverbinder | | ------ | --------------------------------------------------------------- | | 1 x | powerCON TRUE1\* | | 3 x | etherCON/RJ45 | | 6 x | DMX512-A Out (5-polig XLR weiblich) | | 1 x | DMX512-A In (5-polig XLR männlich) | | 1 x | MIDI In (5-polig DIN weiblich) | | 1 x | MIDI Out (5-polig DIN weiblich) | | 1 x | LTC – Linear Time Code (3-polig XLR weiblich) | | 1 x | Audio In (3-polig XLR weiblich) | | 1 x | GPI – General Purpose Input (D-SUB DE9 weiblich– Fernsteuerung) | | 2 x | DisplayPort (externe Bildschirme) | | 2 x | S/PDIF In und Out | | 5 x | USB 2.0 (Typ A) (2 auf der Vorderseite) | \*eingetragene Marke der Neutrik AG, Liechtenstein *** ### grandMA3 extension [Section titled “grandMA3 extension”](#grandma3-extension)  | Technische Daten | | | ------------------------- | ----------------------------------- | | Parameter | Keine | | Betriebsspannung | 100-240 V AC, 50/60 Hz | | Gewicht (ohne Verpackung) | 11 kg / 25 lbs | | Anschlussleistung | max. 75 VA | | Maße | 409 x 537 x 169 mm / 17 x 22 x 7 in | | | | ### Steckverbinder grandMA3 extension [Section titled “Steckverbinder grandMA3 extension”](#steckverbinder-grandma3-extension)  *grandMA3 extension – Rückseite* | Anzahl | Steckverbinder | | ------ | ---------------------------------- | | 1 x | powerCON TRUE1\* | | 1 x | etherCON/RJ45 | | 1 x | Pultleuchte (4-polig XLR weiblich) | \*eingetragene Marke der Neutrik AG, Liechtenstein
# Données Techniques
> grandMA3 full-size – panneau arrière
# | | | | ------------------------------------------------ | ---------------------------------------------------------------------------------------------------------------------------------------------------------------------------------------------------------------------------------------------------------------------------------------------------------- | |  | **Important:** Le grandMA3 grandeur nature, le grandMA3 light et leurs versions CRV sont équipés d’une alimentation sans coupure (UPS) intégrée. Pour plus d’informations sur l’UPS, voir [Sécurité](https://malighting.clickhelp.co/smart/project-waduc_qa_grandma3-user-manual/key_consoles_safety-1-2). | | | | | ------------------------------------------------ | --------------------------------------------------------------------------------------------------------------------------------------------------------------------------------------------------------------------------------------------------------------------------------------------------------------------------------------------------------------------------------------------------- | |  | **Important:** Utiliser des câbles protégés adéquatement (min. Ø = 3 x 1.0 mm²). Le câble de courant requis pour le branchement doit être conforme au standard du pays. **Seul une personne qualifiée est autorisée à travailler sur le câble de courant!** N’utilisez que des moniteurs dotés d’un connecteur DisplayPort natif. N’utilisez pas d’adaptateurs, par exemple DP à VGA ou similaires. | | | | | ------------------------------------------------ | -------------------------------------------------------------------------------------------------- | |  | \*\*Important: \*\*Le câble d’alimentation et le connecteur ne sont pas inclus dans la livraison. | * DMX: la longueur maximale du câble ne doit pas excéder 350 m (dans des conditions idéal). * Utiliser un câble Ethernet de type CAT-5e ou supérieur. La longueur maximale du câble est de 75 m. *** ### grandMA3 full-size [Section titled “grandMA3 full-size”](#grandma3-full-size)  | Données Techniques | | | ------------------------------------------- | ----------------------------------------------------------------------- | | Paramètres | 20 480 | | Tension de fonctionnement | 100-240 V AC, 50/60 Hz | | Poids net | 44 kg / 98 lbs | | Puissance | max. 300 VA | | Dimensions (tiroir à clavier plié et fermé) | 1 256 x 539 x 181 mm / 50 x 22 x 8 in (largeur x profondeur x hauteur) | | Dimensions (déplié pour le fonctionnement) | 1 256 x 584 x 409 (max. 450) mm / 50 x 23 x 17 (max. 18) in (l x p x h) | | Dimensions (clavier déplié et ouvert) | 1 256 x 871 x 255 mm / 50 x 35 x 10 in (largeur x profondeur x hauteur) | ### Sorties grandMA3 full-size [Section titled “Sorties grandMA3 full-size”](#sorties-grandma3-full-size)  *grandMA3 full-size – panneau arrière* | Nombre | Connecteur | | ------ | --------------------------------------------------------------- | | 1 x | powerCON TRUE1\* | | 3 x | etherCON/RJ45 | | 6 x | DMX512-A Out (5pin XLR female) | | 1 x | DMX512-A In (5pin XLR male) | | 1 x | MIDI In (5pin DIN female) | | 1 x | MIDI Out (5pin DIN female) | | 1 x | LTC – Linear Time Code (3pin XLR female) | | 1 x | Audio In (3pin XLR female) | | 1 x | GPI – General Purpose Input (D-SUB DE9 female – remote control) | | 2 x | DisplayPort 1.2 (external screens) | | 2 x | S/PDIF In and Out | | 3 x | USB 2.0 (type A) max. 500 mA | | 3 x | USB 3.0 (type A) (2 sur le panneau avant) max. 900 mA | | 2 x | Lumière d’appoint (4pin XLR female) | \*marque déposée de Neutrik AG, Liechtenstein *** ### grandMA3 full-size CRV [Section titled “grandMA3 full-size CRV”](#grandma3-full-size-crv)  | Données Techniques | | | --------------------------------------------------------- | ----------------------------------------------------------------------- | | Paramètres | 20 480 | | Tension de fonctionnement | 100-240 V AC, 50/60 Hz | | Poids net | 33 kg / 73 lbs | | Puissance | max. 300 VA | | Dimensions (tiroir à clavier plié et fermé) | 1 213 x 539 x 169 mm / 48 x 22 x 7 in (largeur x profondeur x hauteur) | | Dimensions (tiroir à clavier déplié et ouvert au maximum) | 1 213 x 644 x 169 mm / 48 x 26 x 7 in (largeur x profondeur x hauteur) | ### Sorties grandMA3 full-size CRV [Section titled “Sorties grandMA3 full-size CRV”](#sorties-grandma3-full-size-crv)  *grandMA3 full-size CRV – panneau arrière* | Nombre | Connecteur | | ------ | --------------------------------------------------------------- | | 1 x | powerCON TRUE1\* | | 3 x | etherCON/RJ45 | | 6 x | DMX512-A Out (5pin XLR female) | | 1 x | DMX512-A In (5pin XLR male) | | 1 x | MIDI In (5pin DIN female) | | 1 x | MIDI Out (5pin DIN female) | | 1 x | LTC – Linear Time Code (3pin XLR female) | | 1 x | Audio In (3pin XLR female) | | 1 x | GPI – General Purpose Input (D-SUB DE9 female – remote control) | | 5 x | DisplayPort 1.2 (external screens) | | 2 x | S/PDIF In and Out | | 3 x | USB 2.0 (type A) max. 500 mA | | 3 x | USB 3.0 (type A) (2 on the front panel) max. 900 mA | | 2 x | Lumière d’appoint (4pin XLR female) | \*marque déposée de Neutrik AG, Liechtenstein *** ### grandMA3 light [Section titled “grandMA3 light”](#grandma3-light)  | Données Techniques | | | --------------------------------------------------------- | ------------------------------------------------------------------------------------------- | | Paramètres | 16 384 | | Tension de fonctionnement | 100-240 V AC, 50/60 Hz | | Poids net | 33 kg / 73 lbs | | Puissance | max. 300 VA | | Dimensions (tiroir à clavier plié et fermé) | 854 x 539 x 181 mm / 34 x 22 x 8 in (largeur x profondeur x hauteur) | | Dimensions (déplié pour le fonctionnement) | 854 x 584 x 409 (max. 450) mm / 34 x 23 x 17 (max. 18) in (largeur x profondeur x hauteur) | | Dimensions (tiroir à clavier déplié et ouvert au maximum) | 854 x 871 x 255 mm / 34 x 35 x 10 in (largeur x profondeur x hauteur) | ### Sorties grandMA3 light [Section titled “Sorties grandMA3 light”](#sorties-grandma3-light)  *grandMA3 light – panneau arrière* | Nombre | Connecteur | | ------ | --------------------------------------------------------------- | | 1 x | powerCON TRUE1\* | | 3 x | etherCON/RJ45 | | 6 x | DMX-512-A Out (5pin XLR female) | | 1 x | DMX-512-A In (5pin XLR male) | | 1 x | MIDI In (5pin DIN female) | | 1 x | MIDI Out (5pin DIN female) | | 1 x | LTC – Linear Time Code (3pin XLR female) | | 1 x | Audio In (3pin XLR female) | | 1 x | GPI – General Purpose Input (D-SUB DE9 female – remote control) | | 2 x | DisplayPort 1.2 (external screens) | | 2 x | S/PDIF In and Out | | 3 x | USB 2.0 (type A) max. 500 mA | | 3 x | USB 3.0 (type A) (2 on the front panel) max. 900 mA | | 2 x | Lumière d’appoint (4pin XLR female) | \*marque déposée de Neutrik AG, Liechtenstein *** ### grandMA3 light CRV [Section titled “grandMA3 light CRV”](#grandma3-light-crv)  | Données Techniques | | | --------------------------------------------------------- | -------------------------------------------------------------------- | | Paramètres | 16 384 | | Tension de fonctionnement | 100-240 V AC, 50/60 Hz | | Poids net | 25Kg / 56lbs | | Puissance | max. 300 VA | | Dimensions (tiroir à clavier plié et fermé) | 811 x 539 x 169 mm / 32 x 22 x 7 in (largeur x profondeur x hauteur) | | Dimensions (tiroir à clavier déplié et ouvert au maximum) | 811 x 644 x 169 mm / 32 x 26 x 7 in (largeur x profondeur x hauteur) | ### Sorties grandMA3 light CRV [Section titled “Sorties grandMA3 light CRV”](#sorties-grandma3-light-crv)  *grandMA3 light CRV – panneau arrière* | Nombre | Connecteur | | ------ | --------------------------------------------------------------- | | 1 x | powerCON TRUE1\* | | 3 x | etherCON/RJ45 | | 6 x | DMX-512-A Out (5pin XLR female) | | 1 x | DMX-512-A In (5pin XLR male) | | 1 x | MIDI In (5pin DIN female) | | 1 x | MIDI Out (5pin DIN female) | | 1 x | LTC – Linear Time Code (3pin XLR female) | | 1 x | Audio In (3pin XLR female) | | 1 x | GPI – General Purpose Input (D-SUB DE9 female – remote control) | | 4 x | DisplayPort 1.2 (external screens) | | 2 x | S/PDIF In and Out | | 3 x | USB 2.0 (type A) max. 500 mA | | 3 x | USB 3.0 (type A) (2 on the front panel) max. 900 mA | | 2 x | Lumière d’appoint (4pin XLR female) | \*marque déposée de Neutrik AG, Liechtenstein *** ### grandMA3 compact XT [Section titled “grandMA3 compact XT”](#grandma3-compact-xt) 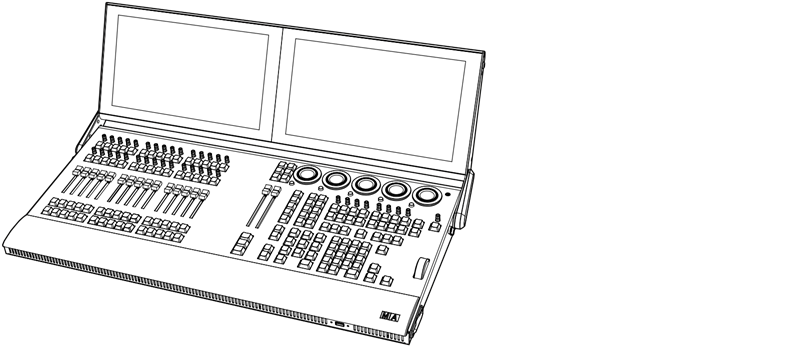 | Données Techniques | | | --------------------------------------------------------- | --------------------------------------------------------------------- | | Paramètres | 8 192 | | Tension de fonctionnement | 100-240 V AC, 50/60 Hz | | Poids net | 20Kg / 45lbs | | Puissance | max. 250 VA | | Dimensions (tiroir à clavier plié et fermé) | 845 x 429 x 160 mm / 34 x 17 x 7 in (largeur x profondeur x hauteur) | | Dimensions (tiroir à clavier déplié et ouvert au maximum) | 845 x 563 x 325 mm / 34 x 23 x 13 in (largeur x profondeur x hauteur) | ### Sorties grandMA3 compact XT [Section titled “Sorties grandMA3 compact XT”](#sorties-grandma3-compact-xt)  *grandMA3 compact XT – panneau arrière* | Nombre | Connecteurs | | ------ | --------------------------------------------------------------- | | 1 x | powerCON TRUE1\* | | 3 x | etherCON/RJ45 | | 6 x | DMX-512-A Out (5pin XLR female) | | 1 x | DMX-512-A In (5pin XLR male) | | 1 x | MIDI In (5pin DIN female) | | 1 x | MIDI Out (5pin DIN female) | | 1 x | LTC – Linear Time Code (3pin XLR female) | | 1 x | Audio In (3pin XLR female) | | 1 x | GPI – General Purpose Input (D-SUB DE9 female – remote control) | | 1 x | DisplayPort 1.2 (external screen) | | 2 x | S/PDIF In and Out | | 3 x | USB 2.0 (type A) max. 500 mA | | 2 x | USB 3.0 (type A) (1 on the front panel) max. 900 mA | | 1 x | Lumière d’appoint (4pin XLR female) | \*marque déposée de Neutrik AG, Liechtenstein *** ### grandMA3 compact [Section titled “grandMA3 compact”](#grandma3-compact)  | Données Techniques | | | --------------------------------------------------------- | ----------------------------------------------------------------------- | | Paramètres | 8 192 | | Tension de fonctionnement | 100-240 V AC, 50/60 Hz | | Poids net | 16Kg / 36lbs | | Puissance | max. 250 VA | | Dimensions (tiroir à clavier plié et fermé) | 661 x 429 x 160 mm / 26 x 17 x 7 in (largeur x profondeur x hauteur) | | Dimensions (tiroir à clavier déplié et ouvert au maximum) | 661 x 563 x 325 mm / 26 x 23 x 13 in (largeur x profondeur x hauteur) | ### Sorties grandMA3 compact [Section titled “Sorties grandMA3 compact”](#sorties-grandma3-compact)  *grandMA3 compact – panneau arrière* | Number | Connector | | ------ | --------------------------------------------------------------- | | 1 x | powerCON TRUE1\* | | 3 x | etherCON/RJ45 | | 6 x | DMX-512-A Out (5pin XLR female) | | 1 x | DMX-512-A In (5pin XLR male) | | 1 x | MIDI In (5pin DIN female) | | 1 x | MIDI Out (5pin DIN female) | | 1 x | LTC – Linear Time Code (3pin XLR female) | | 1 x | Audio In (3pin XLR female) | | 1 x | GPI – General Purpose Input (D-SUB DE9 female – remote control) | | 1 x | DisplayPort 1.2 (external screen) | | 2 x | S/PDIF In and Out | | 3 x | USB 2.0 (type A) max. 500 mA | | 2 x | USB 3.0 (type A) (1 on the front panel) max. 900 mA | | 1 x | Lumière d’appoint (4pin XLR female) | \*marque déposée de Neutrik AG, Liechtenstein *** ### grandMA3 replay unit [Section titled “grandMA3 replay unit”](#grandma3-replay-unit)  | Données Techniques | | | ------------------------- | ------------------------------------------------------------------- | | Paramètres | 8 192 | | Tension de fonctionnement | 100-240 V AC, 50/60 Hz | | Poids net | 6 kg / 14 lbs | | Puissance | max. 200 VA | | Dimensions | 482 x 372 x 87 mm / 19 x 15 x 4 in (largeur x profondeur x hauteur) | ### Sorties grandMA3 replay unit [Section titled “Sorties grandMA3 replay unit”](#sorties-grandma3-replay-unit)  *grandMA3 replay unit – panneau arrière* | Nombre | Connecteur | | ------ | --------------------------------------------------------------- | | 1 x | powerCON TRUE1\* | | 3 x | etherCON/RJ45 | | 6 x | DMX512-A Out (5pin XLR female) | | 1 x | DMX512-A In (5pin XLR male) | | 1 x | MIDI In (5pin DIN female) | | 1 x | MIDI Out (5pin DIN female) | | 1 x | LTC – Linear Time Code (3pin XLR female) | | 1 x | Audio In (3pin XLR female) | | 1 x | GPI – General Purpose Input (D-SUB DE9 female – remote control) | | 2 x | DisplayPort 1.2 (external screens) | | 2 x | S/PDIF In and Out | | 5 x | USB 2.0 (type A) (2 on the front panel) max. 500 mA | \*marque déposée de Neutrik AG, Liechtenstein *** ### grandMA3 extension [Section titled “grandMA3 extension”](#grandma3-extension)  | Données Techniques | | | ------------------------- | -------------------------------------------------------------------- | | Paramètres | Aucun | | Tension de fonctionnement | 100-240 V AC, 50/60 Hz | | Poids net | 11 kg / 25 lbs | | Puisance | max. 75 VA | | Dimensions | 409 x 537 x 169 mm / 17 x 22 x 7 in (largeur x profondeur x hauteur) | | | | ### Sortie grandMA3 extension [Section titled “Sortie grandMA3 extension”](#sortie-grandma3-extension)  *grandMA3 extension – panneau arriere* | Nombre | Connecteur | | ------ | ----------------------------------- | | 1 x | powerCON TRUE1\* | | 1 x | etherCON/RJ45 | | 1 x | Lumière d’appoint (4pin XLR female) | \*marque déposée de Neutrik AG, Liechtenstein
# Copy
> Pressing Copy enters the copy keyword into the command line.
Pressing Copy enters the copy keyword into the command line. | | | | ------------------------------------------------------------------ | ------------------------ | |  | User name\[Fixture]>Copy | For more information about Copy, see the [Copy keyword](/grandma3/2-3/keyword_copy/). ## Paste [Section titled “Paste”](#paste) Pressing Copy Copy enters the Paste keyword into the command line. | | | | ------------------------------------------------------------------ | ------------------------- | |  | User name\[Fixture]>Paste | For more information about Paste, see the [Paste keyword](/grandma3/2-3/keyword_paste/). ## Insert [Section titled “Insert”](#insert) Pressing Copy Copy Copy enters the Insert keyword into the command line. | | | | ------------------------------------------------------------------ | -------------------------- | |  | User name\[Fixture]>Insert | For more information about Insert, see the [Insert keyword](/grandma3/2-3/keyword_insert/). ## Cut [Section titled “Cut”](#cut) Pressing MA Copy enters the Cut keyword into the command line. | | | | ------------------------------------------------------------------ | ----------------------- | |  | User name\[Fixture]>Cut | For more information about Cut, see the [Cut keyword](/grandma3/2-3/keyword_cut/). Location Copy is located in the command section. 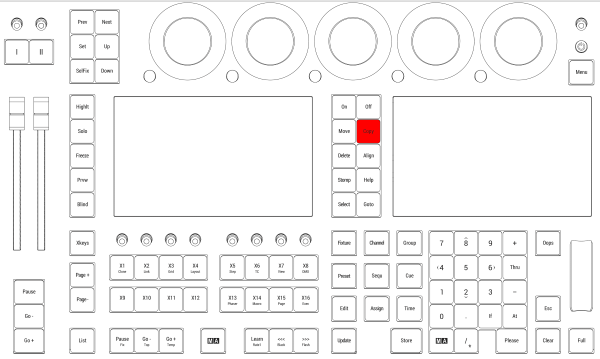 *Location on grandMA3 full-size and grandMA3 light consoles* *** 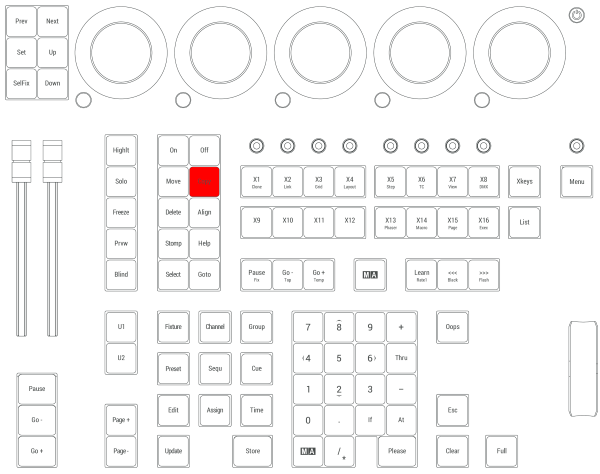 *Location on grandMA3 compact consoles and grandMA3 onPC command wing*
# Ctrl
> To select multiple cells in a sheet, hold Ctrl and tap or click each cell.
## Multi Select [Section titled “Multi Select”](#multi-select) To select multiple cells in a sheet, hold Ctrl and tap or click each cell. ## ## Clean Start [Section titled “Clean Start”](#clean-start) To perform a clean start, hold Ctrl when the mode selection pop-up appears during the boot or reboot process and tap the desired mode. For more information about clean start, see [Clean Start](/grandma3/2-3/ts_clean_start/). ## Location [Section titled “Location”](#location) Ctrl is located in two places on the bottom row of the alpha-numeric keyboard. 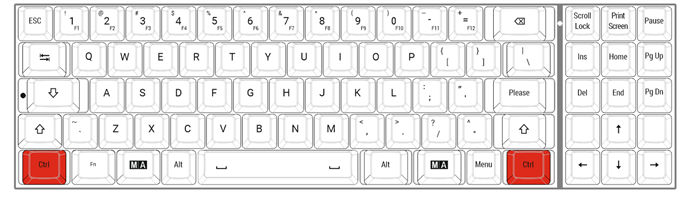 Location on grandMA3 full-size and grandMA3 light console
# Cue
> Pressing Cue enters the Cue keyword into the command line.
Pressing Cue enters the Cue keyword into the command line. | | | | ------------------------------------------------------------------ | ----------------------- | |  | User name\[Fixture]>Cue | For more information about Cue, see the [Cue keyword](/grandma3/2-3/keyword_cue/). ## Part [Section titled “Part”](#part) Pressing Cue Cue enters the Part keyword into the command line. | | | | ------------------------------------------------------------------ | ------------------------ | |  | User name\[Fixture]>Part | For more information about Part, see the [Part keyword](/grandma3/2-3/keyword_part/). | | | | ------------------------------------------------ | ------------------------------------------------------------------------------------------------------------------------------------------ | |  | **Important:** | | | If there is already **Cue** in the command line right in front of the cursor, pressing Cue once will display **Part** in the command line. | ## Programmer [Section titled “Programmer”](#programmer) Pressing MA +Cue enters the Programmer keyword into the command line. | | | | ------------------------------------------------------------------ | ------------------------------ | |  | User name\[Fixture]>Programmer | For more information about Programmer, see the [Programmer keyword](/grandma3/2-3/keyword_programmer/). ## Location [Section titled “Location”](#location) Cue is located in the command section. 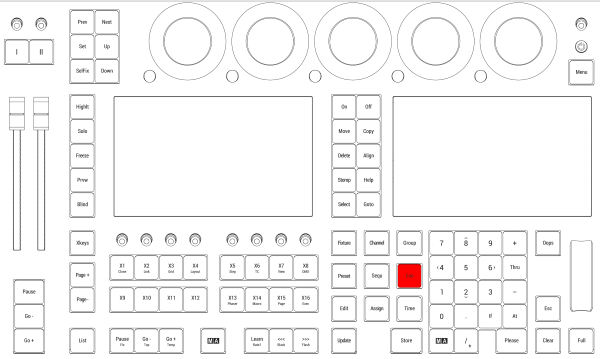 *Location on grandMA3 full-size and grandMA3 light consoles* ***  *Location on grandMA3 compact consoles and grandMA3 onPC command wing*
# Delete
> Pressing Delete enters the Delete keyword into the command line.
Pressing Delete enters the Delete keyword into the command line. | | | | ------------------------------------------------------------------ | -------------------------- | |  | User name\[Fixture]>Delete | For more information about Delete, see the [Delete keyword](/grandma3/2-3/keyword_delete/). ## Remove [Section titled “Remove”](#remove) Pressing Delete Delete enters the Remove keyword into the command line. | | | | ------------------------------------------------------------------ | ------------------------------------ | |  | User name\[Fixture]>Remove Selection | For more information about Remove, see the [Remove keyword](/grandma3/2-3/keyword_remove/). ## Release [Section titled “Release”](#release) Pressing Delete Delete Delete enters the Release keyword into the command line. | | | | ------------------------------------------------------------------ | -------------------------------------- | |  | User name\[Fixture]>Release Fixture 37 | For more information about Release, see the [Release keyword](/grandma3/2-3/keyword_release/). ## Location [Section titled “Location”](#location) Delete is located in the command section.  *Location on grandMA3 full-size and grandMA3 light consoles* ***  *Location on grandMA3 compact consoles and grandMA3 onPC command wing*
# Declaration of Conformity
> Manufacturer:
## CE and FCC Standards and Approvals [Section titled “CE and FCC Standards and Approvals ”](#ce-and-fcc-standards-and-approvals) **Manufacturer:** MA Lighting Technology GmbH\ Dachdeckerstraße 16\ 97297 Waldbüttelbrunn\ GERMANY *** *declares that the products* *** **Name of products:** * grandMA3 2Port Node DIN-Rail, grandMA3 4Port Node DIN-Rail, grandMA3 8Port Node DIN-Rail * grandMA3 onPC 2Port Node DIN-Rail 2k, grandMA3 onPC 4Port Node DIN-Rail 4k, grandMA3 onPC 8Port Node DIN-Rail 4k *** *are conform to the following directives and harmonized standards* *** \*\*Safety: \*\* **2014/35/EU (Low Voltage Directive)** * IEC/EN/UL 62368-1:2014 * CAN/CSA-C22. No. 62368-1:2014 *** **EMC – Electromagnetic Compatibility:** **FCC** * 47 CFR, Part 15, Subpart B: 2019 (Class A) \*\*2014/30/EU \*\* * EN55032:2016-02 (Class A) * EN61000-3-2 * EN55035:2018-04 *** **RoHS:** **2011/65/EU (RoHS II)** * EN50581:2012 * WEEE-Reg.-NR. DE 14150988 *** **Additional information:** All data lines and signal lines must be shielded and the shielding must be connected to the grounding or the housing of the connector. The device has to be grounded (connected with PE). Waldbüttelbrunn, November 01, 2019 Dipl.-Ing. Michael Adenau (CEO) 
# Konformitätserklärung
> Hersteller:
# ## CE und FCC Normen und Zulassungen [Section titled “CE und FCC Normen und Zulassungen”](#ce-und-fcc-normen-und-zulassungen) **Hersteller:** MA Lighting Technology GmbH\ Dachdeckerstraße 16\ 97297 Waldbüttelbrunn\ Deutschland *** *erklärt, dass die Produkte* *** **Produktnamen:** * grandMA3 2Port Node DIN-Rail, grandMA3 4Port Node DIN-Rail, grandMA3 8Port Node DIN-Rail * grandMA3 onPC 2Port Node DIN-Rail 2k, grandMA3 onPC 4Port Node DIN-Rail 4k, grandMA3 onPC 8Port Node DIN-Rail 4k *** *den folgenden Richtlinien sowie harmonisierten Normen entsprechen* *** \*\*Sicherheit: \*\* **2014/35/EU (Niederspannungsrichtlinie)** * IEC/EN/UL 62368-1:2014 * CAN/CSA-C22. No. 62368-1:2014 *** **EMV (Elektromagnetische Verträglichkeit):** **FCC** * 47 CFR, Part 15, Subpart B: 2019 (Class A) **2014/30/EU** * EN55032:2016-02 (Class A) * EN61000-3-2 * EN55035:2018-04 *** **RoHS:** **2011/65/EU (RoHS II)** * EN50581:2012 * WEEE-Reg.-NR. DE 14150988 **Zusätzliche Informationen:** Alle Daten- und Signalleitungen müssen geschirmt sein und der Schirm muss mit der Masse bzw. dem Gehäuse des entsprechenden Steckers verbunden sein. Das Gerät muss geerdet (mit PE verbunden) sein. Waldbüttelbrunn, 1. November 2019 Dipl.-Ing. Michael Adenau (Geschäftsführer) 
# Déclaration de conformité
> Fabricant :
# ## Normes et approbations CE et FCC [Section titled “Normes et approbations CE et FCC”](#normes-et-approbations-ce-et-fcc) **Fabricant :** MA Lighting Technology GmbH\ Dachdeckerstraße 16\ 97297 Waldbüttelbrunn\ ALLEMAGNE *** *déclare que les produits* *** ****Nom de produit :**** * grandMA3 2Port Node DIN-Rail, grandMA3 4Port Node DIN-Rail, grandMA3 8Port Node DIN-Rail * grandMA3 onPC 2Port Node DIN-Rail 2k, grandMA3 onPC 4Port Node DIN-Rail 4k, grandMA3 onPC 8Port Node DIN-Rail 4k *** *sont conformes aux directives et normes harmonisées suivantes* *** \*\*Sécurité: \*\* **2014/35/UE (Directive Basse Tension)** * IEC/EN/UL 62368-1:2014 * CAN/CSA-C22. No. 62368-1:2014 *** \*\*CEM - Compatibilité électromagnétique \*\* **FCC** * 47 CFR, Part 15, Subpart B: 2019 (Class A) **2014/30/UE** * EN55032:2016-02 (Class A) * EN61000-3-2 * EN55035:2018-04 *** **RoHS:** **2011/65/UE (RoHS II)** * EN50581:2012 * WEEE-Reg.-NR. DE 14150988 *** **Informations complémentaires :** Toutes les lignes de données et de signaux doivent être blindées et le blindage doit être relié à la terre ou au boîtier du connecteur. Waldbüttelbrunn, 01 novembre 2019 Dipl.-Ing. Michael Adenau (PDG) 
# Disposal
> According to the directive 2011/65 EU (RoHS) the device was produced in the European Union, and is hence to be disposed of as stated in the directive.
According to the directive 2011/65 EU (RoHS) the device was produced in the European Union, and is hence to be disposed of as stated in the directive. If the device is used within the European Union, follow the directive WEEE 2012/19/EU. If the device is used outside the European Union, the corresponding country´s waste disposal regulations apply.
# Entsorgung
> Das Gerät ist gemäß der Richtlinie 2011/65/EU (RoHS) der Europäischen Gemeinschaft hergestellt und muss dementsprechend entsorgt werden.
# Das Gerät ist gemäß der Richtlinie 2011/65/EU (RoHS) der Europäischen Gemeinschaft hergestellt und muss dementsprechend entsorgt werden. Falls das Gerät innerhalb der Europäischen Union betrieben wird, ist die WEEE 2012/19/EU zu beachten. Falls das Gerät außerhalb der Europäischen Union betrieben wird, sind die nationalen Entsorgungsvorschriften im jeweiligen Verwenderland zu beachten.
# Élimination
> Selon la directive 2011/65 UE (RoHS), l'appareil a été fabriqué dans l'Union européenne et doit donc être éliminé conformément à la directive.
# Élimination [Section titled “Élimination”](#élimination) Selon la directive 2011/65 UE (RoHS), l’appareil a été fabriqué dans l’Union européenne et doit donc être éliminé conformément à la directive. Si l’appareil est utilisé dans l’Union européenne, suivre la directive WEEE 2012/19/EU. Si l’appareil est utilisé en dehors de l’Union européenne, les règlements d’élimination des déchets du pays correspondant s’appliquent.
# Installation
| | | | ------------------------------------------ | --------------------------------------------------------------------------------------- | |  | **Hint:** Install the grandMA3 xPort Node DIN-Rail on the rail following DIN EN 60715. | | | | | ------------------------------------------------ | ----------------------------------------------------------------------------------------------------------------------------------------------------- | |  | **Important:** Install the grandMA3 xPort Node DIN-Rail horizontally so that the input terminal is located at the bottom and the DMX terminal on top. |
# Installation
> Installer la Node xPort DIN-Rail grandMA3 sur le rail.
# | | | | ------------------------------------------ | ---------------------------------------------------------------------------------------------- | |  | **Indice:** Installer la xPort Node DIN-Rail grandMA3 sur le rail selon la norme DIN EN 60715. | | | | | ------------------------------------------------ | --------------------------------------------------------------------------------------------------------------------------------------------------------- | |  | **Important:** Installer la xPort Node DIN-Rail grandMA3 horizontalement de sorte que le terminal d’entrée soit situé en bas et le terminal DMX en haut. | | | | | ----------------------------------------- | -------------------------------------------------------------------------------------------------------------------------------------------------------------------------- | |  | **Avertissement:** Pour que le dispositif puisse dissiper la chaleur, respecter une distance minimale de 30 mm au-dessus et au-dessous de la Node xPort DIN-Rail grandMA3. | Installer la Node xPort DIN-Rail grandMA3 sur le rail.  *Placer la xPort Node DIN-Rail grandMA3 sur le rail*  *La mettre en place* 1. Monter la xPort Node DIN-Rail dans le tableau de distribution. *** ## Connections [Section titled “Connections”](#connections)  Se connecter au grid électrique -ou-  Se connecter via le PoE | Power | | | --------------------------- | -------------------------------------------------------------------- | | Connecteur | MC 1.5/ 3-ST1-5.08 | | Câbles rigides | 0.75 mm² - 1.5 mm² (18-16 AWG) | | Câbles souples | 0.75 mm² - 1.5 mm² (18-16 AWG) Les embouts de câbles sont autorisés. | | Longueur de dénudage du fil | 7 mm | | Couple de serrage | 0.22 Nm - 0.25 Nm | | DMX | | | --------------------------- | -------------------------------------------------------------------- | | Connecteur | FK-MC 0.5/ 3-ST-2.5 | | Câbles rigides | 0.14 mm² - 0.5 mm² (26-20 AWG) | | Câbles souples | 0.14 mm² - 0.5 mm² (26-20 AWG) Les embouts de câbles sont autorisés. | | Longueur de dénudage du fil | 8 mm | ## [Section titled “”](#-1)
# Installation
> 1. Installieren Sie den grandMA3 xPort Node DIN-Rail auf der Schiene.
# | | | | ------------------------------------------ | ------------------------------------------------------------------------------------------------- | |  | **Hinweis:** Installieren Sie den grandMA3 xPort Node DIN-Rail auf einer DIN EN 60715 Hutschiene. | | | | | ------------------------------------------------ | ------------------------------------------------------------------------------------------------------------------------------------------------------- | |  | **Wichtig:** Installieren Sie den grandMA3 xPort Node DIN-Rail horizontal, sodass die Eingangsbuchse sich unten und der DMX-Anschluss oben befindet. | | | | | ----------------------------------------- | ------------------------------------------------------------------------------------------------------------------------------------------------------- | |  | **Warnung:** Halten Sie für optimale Wärmeabführung einen Mindestabstand von 30 mm (ca. 2 Zoll) zwischen den grandMA3 xPort Node DIN-Rail Geräten ein. | 1. Installieren Sie den grandMA3 xPort Node DIN-Rail auf der Schiene.  *Setzen Sie den grandMA3 xPort Node DIN-Rail auf der Schiene auf.*  *Lassen Sie das Gerät einrasten.* 2. Installieren Sie den xPort Node DIN-Rail im Schaltschrank. *** ## Anschlüsse [Section titled “Anschlüsse”](#anschlüsse)  *Netzanschluss* -oder-  *Anschluss über PoE* | Netzanschluss | | | -------------- | ----------------------------------------------------------- | | Anschluss | MC 1,5/ 3-ST1-5,08 | | Starre Kabel | 0,75 mm² - 1,5 mm² (18-16 AWG) | | Flexible Kabel | 0,75 mm² - 1,5 mm² (18-16 AWG) Aderendhülsen sind zulässig. | | Abisolierlänge | 7 mm | | Drehmoment | 0,22 Nm - 0,25 Nm | | DMX | | | -------------- | ------------------------------------------------------------ | | Anschluss | FK-MC 0,5/ 3-ST-2,5 | | Starre Kabel | 0,14 mm² - 0,5 mm² (26-20 AWG) | | Flexible Kabel | 0,14 mm² - 0,5 mm² (26-20 AWG) Aderendhülsen sind zulässig. | | Abisolierlänge | 8 mm | ## [Section titled “”](#-1)
# Intended Use
> The grandMA3 nodes DIN-Rail – 8Port Node DIN-Rail, 4Port Node DIN-Rail, 2Port Node DIN-Rail – and grandMA3 onPC nodes DIN-Rail – onPC 8Port Node DIN-Rail 4k, on
The grandMA3 nodes DIN-Rail – **8Port Node DIN-Rail, 4Port Node DIN-Rail, 2Port Node DIN-Rail** – and grandMA3 onPC nodes DIN-Rail – **onPC 8Port Node DIN-Rail 4k, onPC 4Port Node DIN-Rail 4k, onPC 2Port Node DIN-Rail 2k –** control all kinds of lighting genres such as conventional, moving lights, LEDs, video, and media via DMX signal or within a network environment. All grandMA3 components, despite different hardware solutions, use the same software. All components are fully integrable into the network environment. Use all grandMA3 components and accessories within closed rooms and in the permissible environmental conditions only. Installation and connection of the devices are explicitly to be carried out by trained personnel in compliance with all safety regulations.
# Verwendungszweck
> Die grandMA3 xPort Nodes DIN-Rail und die grandMA3 onPC xPort Nodes DIN-Rail steuern alle Arten von Lichttechnik wie konventionelles Licht, intelligentes Licht,
## Bestimmungsgemäße Verwendung [Section titled “Bestimmungsgemäße Verwendung”](#bestimmungsgemäße-verwendung) Die grandMA3 xPort Nodes DIN-Rail und die grandMA3 onPC xPort Nodes DIN-Rail steuern alle Arten von Lichttechnik wie konventionelles Licht, intelligentes Licht, LED, Video und ähnliche Medien mit Hilfe von DMX-Signalen oder in einer Netzwerkumgebung. Alle grandMA3 Komponenten verwenden die gleiche Software, ungeachtet unterschiedlicher Hardware. Sämtliche Komponenten können komplett ins Netzwerk integriert werden. Alle grandMA3 Komponenten und Zubehör dürfen ausschließlich in geschlossenen Räumen und innerhalb zulässiger Umgebungsbedingungen verwendet werden. Installation und Anschluss von Geräten dürfen nur vom geschulten Personal, unter Einhaltung aller Sicherheitsvorschriften, durchgeführt werden.
# Usage Prévu
> Les xPort Nodes DIN-Rail grandMA3 et les xPort Nodes DIN-Rail grandMA3 onPC contrôlent tous genres de projecteurs tels que les projecteurs conventionnels, les m
# Usage Prévu [Section titled “Usage Prévu”](#usage-prévu) Les xPort Nodes DIN-Rail grandMA3 et les xPort Nodes DIN-Rail grandMA3 onPC contrôlent tous genres de projecteurs tels que les projecteurs conventionnels, les motorisées, les LEDs, la vidéo et les média, en utilisant le signal DMX ou dans un environnement réseau. Toutes les composantes grandMA3, malgré des solutions matérielles différentes, utilisent le même logiciel. Tous les composants sont entièrement intégrables dans l’environnement du réseau. Utilisez tous les composants et accessoires de grandMA3 uniquement dans des locaux fermés et dans les conditions environnementales autorisées. L’installation et le raccordement des appareils doivent être effectués explicitement par un personnel qualifié, en conformité avec toutes les règles de sécurité.
# Limitations
> Operation:
## **Temperature** [Section titled “Temperature”](#temperature) Operation: -10 °C up to +50 °C / 14 °F up to 122 °F
# Betriebsgrenzen
> Betrieb:
# ## **Temperatur** [Section titled “Temperatur”](#temperatur) Betrieb: -10 °C bis +50 °C / 14 °F bis 122 °F | | | | ----------------------------------------- | --------------------------------------------------------------------------------------------------------------------------------- | |  | **Achtung:** Hohe Temperaturen können das Kühlsystem des Gerätes überfordern und zum Ausfall von elektrischen Komponenten führen. | Lagerung / Transport: -10 °C bis +50 °C / 14 °F bis 122 °F ## [Section titled “”](#-1) ## **Luftfeuchte** [Section titled “Luftfeuchte”](#luftfeuchte) Betrieb: 20 % bis 90 % relative Luftfeuchtigkeit (nicht kondensierend) Lagerung / Transport: 10 % bis 90 % relative Luftfeuchtigkeit (nicht kondensierend) ## **Umgebung** [Section titled “Umgebung”](#umgebung) * Alle Sicherheitshinweise beachten; * Das Gerät innerhalb der Betriebsgrenzen betreiben; * Des Gerät nur in geschlossenen Räumen betreiben; * Die Umgebungsluft muss staubfrei und frei von gefährlichen und explosiven Stoffen sein; * Erschütterungen vermeiden; * Das Gerät ist nicht gegen Spritzwasser geschützt. Nicht in der Nähe von Wasser benutzen; * Das Gerät nicht in der Nähe von Regen oder Nebel betreiben. * Das Gerät nicht an einem Ort platzieren, an dem es in Kontakt mit korrosiven Gasen oder salzhaltiger Luft gelangen könnte. Dadurch kann es zu Fehlfunktionen kommen.
# Limitations
> Fonctionnement :
# ## **Température** [Section titled “Température”](#température) Fonctionnement : -10 °C jusqu’à +50 °C / 14 °F jusqu’à 122 °F | | | | ----------------------------------------- | --------------------------------------------------------------------------------------------------------------------------------------------------- | |  | **Attention :** Des températures plus élevées peuvent solliciter le système de refroidissement de l’appareil et détruire des composants matériels. | Stockage / Transport : -10 °C jusqu’à +50 °C / 14 °F jusqu’à 122 °F ## **Humidité** [Section titled “Humidité”](#humidité) Fonctionnement : 20 % jusqu’à 90 % d’humidité relative (sans condensation) Stockage / Transport : 10 % jusqu’à 90 % d’humidité relative (sans condensation) ## [Section titled “”](#-1) ## **Environnement** [Section titled “Environnement”](#environnement) Suivez toutes les consignes de sécurité ; * N’utilisez l’appareil que dans ses limites de fonctionnement ; * N’utilisez l’appareil qu’à l’intérieur ; * L’air doit être dépourvu de poussière et de toute substance dangereuse ou explosive ; * Évitez les secousses ; * Cet appareil n’est pas protégé contre les éclaboussures d’eau. Ne l’utilisez pas à proximité de l’eau ; * N’utilisez pas l’appareil sous la pluie ou l’humidité ; * Ne placez pas l’appareil à un endroit où il peut entrer en contact avec des gaz corrosifs ou de l’air salin car cela peut provoquer un mauvais fonctionnement.
# Maintenance
| | | | ----------------------------------------- | ---------------------------------------------------------------------------------------------------------------------------------------------------------------------------------------------------------------------------- | |  | **Warning:** All repair and service work has to be exclusively performed by qualified service technicians as live parts may be exposed when opening and/or removing coverings. Touching live parts may cause electric shock. |
# Entretient
| | | | ----------------------------------------- | ---------------------------------------------------------------------------------------------------------------------------------------------------------------------------------------------------------------------------------------------------------------------------------------------------------------------- | |  | **Avertissement:** Tous les travaux de réparation et d’entretien doivent être effectués exclusivement par des techniciens qualifiés, car les pièces sous tension peuvent être exposées lors de l’ouverture et/ou du retrait des couvercles. Le contact avec des pièces sous tension peut provoquer un choc électrique. | * Débranchez l’alimentation électrique avant le nettoyage; * Nettoyez la surface à l’aide d’un chiffon sec uniquement; * N’utilisez pas de nettoyant liquide ou d’air comprimé; * N’utilisez pas de solvant; * En fonction de l’environnement, nous recommandons de nettoyer l’appareil professionnellement une fois par an.
# Wartung
| | | | ----------------------------------------- | ----------------------------------------------------------------------------------------------------------------------------------------------------------------------------------------------------------------------------------------------------------------------------------------- | |  | **Warnung:** Sämtliche Reparatur- und Wartungsarbeiten dürfen ausschließlich von geschultem Personal durchgeführt werden, da beim Öffnen von Abdeckungen spannungsführende Teile freigelegt werden können. Spannungsführende Teile nicht berühren, da die Gefahr von Stromschlag besteht! | * Vor dem Reinigen das Gerät spannungsfrei schalten. * Die Oberflächen nur mit einem trockenen Tuch reinigen. * Keine flüssigen Reinigungsmittel oder Druckluft zum Reinigen verwenden. * Kein Lösungsmittel verwenden. * Je nach Umgebungsbedingung ist es ratsam, das Gerät alle 2 bis 5 Jahre durch einen Servicetechniker professionell reinigen zu lassen.
# Quick Start
> grandMA3 8Port Node DIN-Rail front panel
 *grandMA3 8Port Node DIN-Rail* front panel 1. [Terminal block](/grandma3/2-3/do_connector_pin_assignment/) 2. Rotary knob  *grandMA3 8Port Node DIN-Rail* rear panel 1. [DMX](/grandma3/2-3/fs_connect_dmx/) 2. [Ethernet with L (link) and G (gigabit) LEDs](/grandma3/2-3/fs_connect_ethernet/) 3. [USB 2.0](/grandma3/2-3/fs_connect_usb/)  *grandMA3 4Port Node DIN-Rail* rear panel  *grandMA3 2Port Node DIN-Rail* rear panel ### Start-up [Section titled “Start-up”](#start-up) 1. Unpack the device. 2. Remove the packaging and cushioning material. 3. Install the device on a rail. For more information see [Installation](/grandma3/2-3/key_dinrail_installation/). 4. Connect the grandMA3 xPort Node DIN-Rail with your PC, laptop, or a grandMA3 console using the RJ45 connector. 5. Connect the grandMA3 xPort Node DIN-Rail with the electrical grid using a terminal block connector, a PoE switch, or a PoE injector. 6. The device starts booting. 7. To make basic settings, turn the rotary knob on the front panel of the device. 8. To turn off the grandMA3 xPort Node DIN-Rail, disconnect the RJ45 connector or the terminal block connector. ### Update the software [Section titled “Update the software”](#update-the-software) 1. To update a grandMA3 device, download the latest software version from [www.malighting.com](http://www.malighting.com). 2. The required installer is called grandMA3 Software x.x.x.x. 3. Extract the zip file “grandMA3\_stick\_v.x.x.x.x.zip” and copy the folders EFI, ma, and the update.scr file into the root directory of your USB flash drive. 4. Insert the USB flash drive in the device’s USB port. 5. Turn off the grandMA3 device. 6. Turn on the grandMA3 device. \ The grandMA3 device starts to boot. 7. Follow the onscreen instructions during the update process. ## Subtopics [Section titled “Subtopics”](#subtopics) * [Control other MA Devices](/grandma3/2-3/comad_xport_nodes/) * [Update the Software](/grandma3/2-3/update/) * [Network Update](/grandma3/2-3/update_network/)
# Quick Start
> grandMA3 8Port Node DIN-Rail Vorderseite
#  *grandMA3 8Port Node DIN-Rail Vorderseite* 1. [Klemmleiste für Netzanschluss](/grandma3/2-3/do_connector_pin_assignment/) 2. Drehregler  *grandMA3 8Port Node DIN-Rail Rückseite* 1. [DMX](/grandma3/2-3/fs_connect_dmx/) 2. [Ethernet mit L (link) und G (gigabit) LEDs](/grandma3/2-3/fs_connect_ethernet/) 3. [USB-Anschluss](/grandma3/2-3/fs_connect_usb/)  *grandMA3 4Port Node DIN-Rail Rückseite*  *grandMA3 2Port Node DIN-Rail Rückseite* ### Inbetriebnahme [Section titled “Inbetriebnahme”](#inbetriebnahme) 1. Gerät auspacken. 2. Verpackungsmaterial entfernen. 3. Das Gerät auf der Hutschiene installieren. Mehr Information unter [Installation](/grandma3/2-3/key_io_node_installation/). 4. Den grandMA3 xPort Node DIN-Rail mit dem PC, Laptop oder einer grandMA3 Konsole über die RJ45-Stecker verbinden.\ Den grandMA3 xPort Node DIN-Rail direkt über die Klemmleiste, einen PoE Switch oder PoE Injector ans Netz anschließen.\ Das Gerät fährt hoch und der Drehregler beginnt zu blinken. 5. Um Grundeinstellungen vorzunehmen, den Drehregler an der Frontblende bedienen. 6. Um den grandMA3 xPort Node DIN-Rail auszuschalten, das Gerät von der Stromversorgung trennen. ### Software aktualisieren [Section titled “Software aktualisieren”](#software-aktualisieren) 1. Besuchen Sie [www.malighting.com](http://www.malighting.com/), um die aktuellste Software herunterzuladen.\ Der benötigte Installer heißt grandMA3 Software x.x.x.x. 2. Die Zip-Datei “grandMA3\_stick\_v.x.x.x.x.zip” entpacken und die Ordner EFI und ma sowie die Datei update.scr in das Root-Verzeichnis Ihres USB-Sticks kopieren. 3. Den USB-Stick in den USB-Anschluss am Gerät stecken. 4. Das grandMA3 Gerät ausschalten. 5. Das grandMA3 Gerät wieder einschalten.\ Das grandMA3 Gerät bootet. 6. Den Bildschirmanweisungen während des Update-Vorgangs folgen. | | | | ------------------------------------------------ | ---------------------------------------------------------------------------------------------------------------------------------------------------------------------------------------------------------------------------------------------------------------------------------------------------------------------------------------------------------------------------------------------------------------------------------------------------------------------------------------------------------------------------------------------------------------------- | |  | **Wichtig:** Um das Gerät zu konfigurieren oder ein Update oder Downdate durchzuführen, verwenden Sie eine grandMA3 Konsole oder Ihren PC oder Ihr Laptop mit grandMA3 onPC Software. Für weitere Informationen siehe die Abschnitte [Control Other MA Devices](/grandma3/2-3/control_other_ma_devices/) und [Update the Software](/grandma3/2-3/update/) via [Network Update](/grandma3/2-3/update_network/) im [grandMA3 Online Benutzerhandbuch](https://help.malighting.com/grandMA3/2.3/HTML/help.html) unter [www.malighting.com.](https://www.malighting.com/) |
# Guide De Démarrage
> 8Port Node DIN-Rail grandMA3 panneau avant
#  \_8Port Node DIN-Rail grandMA3 \_panneau avant 1. [Bornier](/grandma3/2-3/do_connector_pin_assignment/) 2. Bouton rotatif 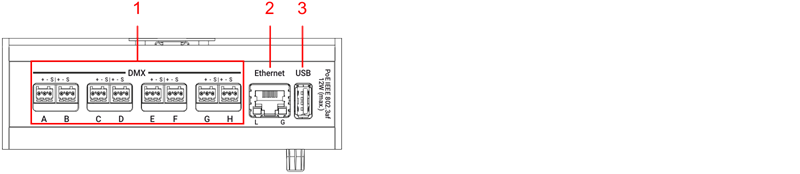 *8Port Node DIN-Rail grandMA3* panneau arrière 1. [DMX](/grandma3/2-3/fs_connect_dmx/) 2. [Ethernet avec L (link) and G (gigabit) LEDs](/grandma3/2-3/fs_connect_ethernet/) 3. [USB 2.0](/grandma3/2-3/fs_connect_usb/)  *4Port Node DIN-Rail grandMA3* panneau arrière  *2Port Node DIN-Rail grandMA3* panneau arrière ### Mise en service [Section titled “Mise en service”](#mise-en-service) 1. Déballer l’appareil. 2. Elever le matériel de protection. 3. Installer l’appareil sur un rail. Pour plus d’informations, voir [Installation](/grandma3/2-3/key_dinrail_installation-2/). 4. Brancher la xPort Node DIN-Rail grandMA3 à votre PC ou laptop ou une console en utilisant un connecteur etherCON/RJ45. 5. Connecter la xPort Node DIN-Rail grandMA3 au réseau électrique à l’aide d’un connecteur de bornier, d’un commutateur PoE ou d’un injecteur PoE. 6. L’appareil se met en marche. 7. Pour faire des ajustements de base, tourner le bouton rotatif en avant de l’appareil. 8. Pour éteindre la xPort Node DIN-Rail grandMA3, débrancher le connecteur RJ45 ou le connecteur du bornier. ### Software update [Section titled “Software update”](#software-update) 1. Pour mettre à jour un appareil grandMA3, télécharger le logiciel grandMA3 sur [www.malighting.com](http://www.malighting.com/). L’installateur requis est appelé grandMA3 Software x.x.x.x. 2. Extrayer le fichier zip “grandMA3\_stick\_v.x.x.x.x.zip” et copier les dossiers EFI, ma, et le fichier update.scr dans le répertoire racine de votre clé USB. 3. Insérer la clé USB dans un port USB. 4. Éteigner l’appareil grandMA3. 5. Allumer l’appareil grandMA3.\ L’appareil grandMA3 commence à démarrer. 6. Suivre les instructions à l’écran pendant le processus de mise à jour. | | | | ------------------------------------------------ | --------------------------------------------------------------------------------------------------------------------------------------------------------------------------------------------------------------------------------------------------------------------------------------------------------------------------------------------------------------------------------------------------------------------------------------------- | |  | **Important:** Pour configurer l’appareil ou pour faire un update ou downdate, utilisé la console grandMA3 ou le logiciel grandMA3 onPC. Pour plus d’information, voir les sections [Control Other MA Devices](/grandma3/2-3/control_other_ma_devices/) et [Update the Software](/grandma3/2-3/update/) via [Network Update](/grandma3/2-3/update_network/) dans le [Mode d’emploi](https://help.malighting.com/grandMA3/2.3/HTML/help.html). |
# Safety
## Symbols and Warning Labels [Section titled “Symbols and Warning Labels”](#symbols-and-warning-labels)
# Sicherheit
> Warnung – Gefahrenbereich
## Symbole und Warnzeichen [Section titled “Symbole und Warnzeichen”](#symbole-und-warnzeichen) | | | | ----------------------------------------- | ------------------------------------------------------------------------------------------------------------------------------------------------------------------------------------------------------------------------------------------ | |  | **Warnung:** Die Installation, Inbetriebnahme und Bedienung des xPort Node DIN-Rails dürfen ausschließlich von geschultem Personal durchgeführt werden. Die Sicherheits- und Unfallverhütungsvorschriften Ihres Landes unbedingt beachten. |  \*\*Warnung \*\*– Gefahrenbereich ***  **Vorsicht**– Stromschlaggefahr *** ## Stromschlaggefahr [Section titled “Stromschlaggefahr”](#stromschlaggefahr) Die Wartung des Gerätes darf ausschließlich von geschultem Personal durchgeführt werden, da beim Öffnen und / oder Entfernen von Abdeckungen spannungsführende Teile freigelegt werden könnten. Spannungsführende Teile nicht berühren – Gefahr von Stromschlag!  ***  Das Gerät ist als Sonderabfall zu entsorgen. Die örtlichen Vorschriften beachten! Für weitere Informationen siehe [Entsorgung](/grandma3/2-3/key_dinrail_disposal-1/). ***  Konformitätserklärung. Für weitere Informationen siehe [Konformität](/grandma3/2-3/key_dinrail_conformity-1/). *** | | | | ----------------------------------------- | ----------------------------------------------------------------------------------------------------------------------------------------------------- | |  | **Warnung:** Das Gerät muss über die Hutschiene geerdet sein. Vergewissern Sie sich, dass alle Kabel ausreichend dimensioniert und abgesichert sind. | Alle Anweisungen in diesem Quick Manual aufmerksam durchlesen und befolgen, vor allem die [Allgemeinen Sicherheitsanweisungen](/grandma3/2-3/key_dinrail_safety-1/) weiter unten in diesem Kapitel und die [Betriebsgrenzen](/grandma3/2-3/key_dinrail_limitations-1/). Das Quick Manual für den späteren Gebrauch aufbewahren. Alle Vorsichtsmaßnahmen und Warnhinweise befolgen die in diesem Quick Manual und auf dem Gerät selbst vermerkt sind. | | | | ------------------------------------------------ | ----------------------------------------------------------------------------------------------------------------------------------------------------------------------------------------------------------- | |  | **Wichtig:** Sämtliche Reparatur- und Wartungsarbeiten dürfen ausschließlich von geschultem Personal des Herstellers durchgeführt werden. Schicken Sie das Gerät im Reparaturfall an den Hersteller zurück. | * Dieses Gerät entspricht dem neusten Stand der Technik. * Trotzdem kann ein Restrisiko nicht komplett ausgeschlossen werden. * Um Risiken zu vermeiden, die Sicherheitsanweisungen befolgen. * Dieses Gerät nur als Festinstallation im Schaltschrank oder in einem anderen, geschlossenen Gehäuse verwenden. * Dieses Gerät ist nur für den professionellen Gebrauch bestimmt und nicht für den privaten Gebrauch geeignet. MA Lighting Technology GmbH kommt nicht für Schäden auf, die aufgrund Nichtbeachtung der Sicherheitsanweisungen entstehen könnten. | | | | ----------------------------------------- | --------------------------------------------------------------------------------------------------------------------------------------------------------------------------------------------------------------------------- | |  | **Warnung:** Durch den Nutzer herbeigeführte Modifikationen an diesen Geräten, die nicht ausdrücklich von der für die Übereinstimmung verantwortlichen Stelle genehmigt wurden, führen zum Verbot der Benutzung der Geräte. | | | | | ------------------------------------------------ | --------------------------------------------------------------------------------------------------------------------------------------------------------------------------------------------------------------------------------------------------------------------------------------------------------------------------------------------------------------------------------------------------------------------------------------------------------------------------------------------------------------------------------------------------------------------------------------------------------------------------------------- | |  | **Wichtig:** Diese Geräte wurden getestet und entsprechen den Grenzwerten eines digitalen Geräts der Klasse A gemäß der FCC-Bestimmungen Teil 15 und der CE-Regularien. Diese Grenzwerte bieten im professionellen Betrieb einen angemessenen Schutz gegen störende Interferenzen. Die Geräte erzeugen, verwenden und strahlen möglicherweise Funkwellen aus. Wenn sie nicht gemäß dieser Anleitung installiert und verwendet werden, können sie den Funkverkehr stören. Der Betrieb dieser Geräte im privaten, häuslichen Bereich kann u. U. Funkstörungen verursachen. In diesem Fall muss der Benutzer die Störungen selbst beheben. | ## Vermeiden von Stromschlag [Section titled “Vermeiden von Stromschlag”](#vermeiden-von-stromschlag) Ein beschädigtes Gerät oder Netzkabel kann schwere oder tödliche Verletzungen verursachen. Die Sicherheitsanweisungen befolgen um die Verletzungen, die durch elektrischen Strom verursacht werden können, zu vermeiden. * Vor der Installation Gerät vom Netz trennen und vor unbeabsichtigtem Wiedereinschalten schützen. * Das Gerät über eine Sicherung abgesichern. * Die Anschlussklemmen abdecken, um den Kontakt mit stromführenden Teilen zu verhindern. * Kein beschädigtes Netzkabel nutzen. * Keine festgeschraubten Abdeckungen am Gehäuse öffnen. * Gerät nur im technisch einwandfreien Zustand nutzen. * Gerät niemals selbst reparieren. * Gerät nicht modifizieren und keine Änderungen an dessen Komponenten und Zubehör vornehmen. * Gerät nicht Regen oder Feuchtigkeit aussetzen. * Gerät nicht in Wasser tauchen. ## []()Allgemeine Sicherheitsanweisungen [Section titled “Allgemeine Sicherheitsanweisungen”](#allgemeine-sicherheitsanweisungen) Um Verletzungen vorzubeugen oder Schaden am Gerät zu vermeiden: * Beim Bedienen nicht in das Gerät hineingreifen. * Gerät und Netzkabel von Kindern unter 8 Jahren fernhalten. * Kinder nicht mit dem Gerät spielen lassen. * Bei Gewitter das Gerät vom Netz trennen (Netzstecker ziehen). * Bei längerer Nichtverwendung das Gerät über den Netzschalter ausschalten. * Vor dem Reinigen das Gerät über den Netzschalter ausschalten. * Keine flüssigen Reinigungsmittel oder Sprühreiniger verwenden. * Nur mit trockenem Tuch reinigen. * Gerät nicht in der Nähe von Wasser nutzen. * Gerät nicht einer feuchten Umgebung aussetzen. * Keine Flüssigkeiten auf das Gerät schütten. * Belüftungsöffnungen im Gehäuse nicht blockieren – diese sind für den Luftstrom innerhalb des Gerätes wichtig und schützen es vor Überhitzung. * Keine Fremdkörper in die Belüftungsöffnungen stecken, da diese mit spannungsführenden Teilen in Kontakt kommen und Kurzschlüsse, Feuer und / oder Stromschlag verursachen können. * Keine Gegenstände auf das Netzkabel stellen; Nicht auf das Netzkabel treten oder zusammendrücken, besonders am Stecker und an Stellen, an denen die Kabel das Gehäuse verlassen. * Wird ein Verlängerungskabel genutzt, muss sichergestellt werden, dass die Summe der Nennleistungen der an das Kabel angeschlossenen Geräte die Nennleistung des Verlängerungskabels nicht überschreitet. * Sich nicht mit dem Körpergewicht auf dem Gerät abstützen. * Keine schweren Gegenstände auf dem Gerät abstellen. * Keine übermäßige Gewalt auf Tasten, Knöpfe, Schalter, Verbindung oder Drehknopf ausüben. * Ist das Netzkabel oder der Stecker beschädigt, müssen diese umgehend von einer Fachkraft ausgetauscht werden. * Gerät nur auf stabilen Oberflächen platzieren; Wird es auf instabilen Oberflächen platziert, kann das Gerät herunterfallen und stark beschädigt werden. * Nur Netzkabel mit Sicherheitsprüfzeichen nutzen. * Keine leistungsstarken Funkgeräte oder Mobiltelefone in der Nähe des Gerätes verwenden. * Das Gerät darf nur in Verbindung mit einer Schutzkontaktsteckdose genutzt werden kann. * Nicht den Sicherheitszweck einer Schutzkontaktsteckdose ignorieren. Eine Schutzkontaktsteckdose hat zwei Stromkontakte und einen dritten Erdungskontakt. Der dritte Erdungskontakt dient Ihrer Sicherheit. * Wie bei allen industriell gefertigten Gütern kann die Verwendung von Stoffen, die Allergien hervorrufen können, wie z.B. Aluminium, nicht gänzlich ausgeschlossen werden. Sollten allergische Reaktionen (wie z.B. Hautausschlag, ständiges Niesen, gerötete Augen oder Atemwegsbeschwerden) auftreten, ist umgehend ein Arzt zur Ursachenklärung aufzusuchen. **Sollte einer der folgenden Punkte zutreffen, das Gerät vom Strom nehmen und den Kundendienst kontaktieren!** * Netzkabel oder Verbindung ist / sind beschädigt, spröde oder brüchig. * Eintritt von Wasser. * Gerät wurde Regen oder hoher Luftfeuchtigkeit ausgesetzt. * Gerät funktioniert bei Einhaltung von Bedienungsanweisungen, die im Quick Manual stehen, nicht einwandfrei. Steuerelemente so einstellen wie im Quick Manual beschrieben, da eine falsche Einstellung das Gerät beschädigen könnte. * Gerät ist heruntergefallen und dabei wurde das Gehäuse beschädigt.
# Sécurité
> Avertissement – Zone de danger
## Symboles et consignes de sécurité [Section titled “Symboles et consignes de sécurité”](#symboles-et-consignes-de-sécurité) | | | | ----------------------------------------- | ---------------------------------------------------------------------------------------------------------------------------------------------------------------------------------------------------------------------------- | |  | **Avertissement :** Seul du personnel entraîné est autorisé à installer, mettre sous tension et faire fonctionner le xPort Node DIN-Rail. Respectez les consignes de sécurité et de prévention des accidents de votre pays. |  **Avertissement** – Zone de danger ***  **Attention** – Risque de choc électrique *** ## Risque de choc électrique [Section titled “Risque de choc électrique”](#risque-de-choc-électrique) L’appareil ne doit être entretenu que par du personnel qualifié, des parties sous tension risquant d’être exposées lors de l’ouverture et / ou du retrait des couvercles. Le contact avec des pièces sous tension peut provoquer un choc électrique.  ***  Éliminer comme déchets dangereux. Respecter la réglementation en vigueur. Pour plus d’informations, voir [Élimination](/grandma3/2-3/key_dinrail_disposal-1-2/). ***  Déclaration de conformité Pour plus d’informations, voir [Conformité](/grandma3/2-3/key_dinrail_conformity-1-2/). *** | | | | ----------------------------------------- | ------------------------------------------------------------------------------------------------------------------------------------------------------------- | |  | **Avertissement :** Le profilé de l’appareil doit être mis à la terre. Assurez-vous que tous les câbles sont suffisamment dimensionnés et munis de fusibles. | Lisez attentivement toutes les instructions de ce guide rapide, en particulier les [consignes générales de sécurité](/grandma3/2-3/key_dinrail_safety-1-2/#general_safety_instructions) ci-dessous et les [limitations d’usages](/grandma3/2-3/key_dinrail_limitations-1-2/). Suivez les instructions et conservez ce guide rapide pour une utilisation ultérieure. Respectez toutes les mises en garde et tous les avertissements mentionnés dans ce guide rapide et indiqués sur l’appareil. | | | | ------------------------------------------------ | ------------------------------------------------------------------------------------------------------------------------------------------------------------------------------------------------------- | |  | **Important :** Tous les travaux de réparation et d’entretien doivent être effectués exclusivement par des techniciens de service internes qualifiés. Envoyer l’appareil au fabricant pour inspection. | * Cet appareil est à la pointe de la technologie ; * Cependant, des risques résiduels ne peuvent être exclus ; * Pour éviter les risques, suivez les consignes de sécurité ; * Cet appareil est destiné uniquement à un usage professionnel et ne convient pas à un usage résidentiel ; * N’utilisez cet appareil que pour une installation fixe dans des armoires électriques ou d’autres armoires d’installation fermées. MA Lighting Technology GmbH ne prend pas en charge d’éventuels dommages pouvant survenir en cas de non-respect des consignes de sécurité. | | | | ----------------------------------------- | ------------------------------------------------------------------------------------------------------------------------------------------------------------------------------------------------------------- | |  | **Avertissement :** Des changements ou des modifications à ces appareils non expressément approuvés par la partie responsable de la conformité pourraient annuler le droit de l’utilisateur de les utiliser. | | | | | ------------------------------------------------ | -------------------------------------------------------------------------------------------------------------------------------------------------------------------------------------------------------------------------------------------------------------------------------------------------------------------------------------------------------------------------------------------------------------------------------------------------------------------------------------------------------------------------------------------------------------------------------------------------------------------------------------------------------------------------------------------------------------------------------------------------------------------------------- | |  | **Note :** Ces appareils ont été testés et jugés conformes aux limites d’un appareil numérique de classe A, conformément à la partie 15 des règles de la FCC et aux normes CE. Ces limites sont conçues pour fournir une protection raisonnable contre de possibles interférences lorsque les appareils sont utilisés dans un environnement commercial. Ceux-ci génèrent, utilisent et peuvent émettre de l’énergie radiofréquence et, s’ils ne sont pas installés et utilisés conformément à ce guide rapide, peuvent éventuellement causer des interférences aux communications radio. L’utilisation de ces appareils dans une zone résidentielle est susceptible de causer des interférences, auquel cas l’utilisateur devra corriger ces interférences à ses propres frais. | ## Dangers causés par le courant électrique [Section titled “Dangers causés par le courant électrique”](#dangers-causés-par-le-courant-électrique) Un appareil ou un câble d’alimentation défectueux présente un risque de blessures graves ou mortelles dues à un choc électrique. Suivez les consignes de sécurité pour éviter les risques liés au courant électrique. * Avant d’installer l’appareil, couper la tension d’entrée et protéger l’appareil contre une mise sous tension involontaire ; * Assurez-vous que l’appareil peut être désactivé à l’aide d’un fusible préliminaire ; * Pour éviter tout contact avec des pièces sous tension, dissimuler la zone du raccord ; * N’utilisez pas de câble d’alimentation défectueux ; * Ne pas ouvrir les couvercles vissés de l’appareil ; * N’utilisez l’appareil que s’il est dans un état technique impeccable ; * Ne réparez pas l’appareil par vos propres moyens ; * N’effectuez pas d’ingénierie inverse sur l’appareil et n’apporter aucune modification à ses composants et accessoires ; * N’exposez pas l’appareil à la pluie ou à l’humidité ; * Ne pas plonger l’appareil dans l’eau. ## []()Consignes de sécurité générales [Section titled “Consignes de sécurité générales”](#consignes-de-sécurité-générales) Pour éviter des blessures ou des dommages à l’appareil : * Ne mettez pas vos mains à l’intérieur de l’appareil pendant le fonctionnement ; * L’appareil et le câble d’alimentation doivent être tenus à l’écart des enfants de moins de 8 ans ; * Les enfants ne sont pas autorisés à jouer avec l’appareil ; * Débranchez l’alimentation électrique du réseau pendant les orages ; * Débranchez l’alimentation électrique du réseau si l’appareil est laissé sans surveillance pendant une longue période ; * Débranchez l’alimentation électrique avant de nettoyer l’appareil ; * N’utilisez pas de nettoyant liquide ou en aérosol. Utilisez uniquement un chiffon sec ; * Ne pas utiliser l’appareil à proximité de l’eau ; * Ne l’exposez pas à un environnement humide ; * Ne versez aucun liquide sur l’appareil ; * Ne bouchez pas ou ne couvrez pas les trous de ventilation de l’appareil. Ceux-ci sont essentiels à la circulation de l’air à l’intérieur de l’appareil et protègent l’appareil contre la surchauffe ; * N’insérez aucun objet dans les trous de ventilation de l’appareil car ceux-ci pourraient entrer en contact avec des pièces sous tension ou provoquer des courts-circuits, un incendie et / ou un choc électrique ; * Ne placez aucun objet sur le câble d’alimentation. Protégez-le contre tout risque de piétinement ou de pincement, en particulier au niveau du connecteur et à l’endroit où les câbles sortent de l’appareil ; * Lors de l’utilisation d’un cable de rallonge, assurez-vous que la puissance nominale de tous les appareils connectés en série ne dépasse pas la puissance nominale maximale du cable de rallonge ; * Ne vous appuyez pas sur l’appareil ; * Ne placez aucun objet lourd sur l’appareil ; * N’utilisez pas de force excessive sur les touches, les boutons, les interrupteurs, les connecteurs ou sur le bouton tournant ; * Si le câble d’alimentation ou la fiche d’alimentation principale sont défectueux, faites-les remplacer immédiatement par un technicien qualifié ; * Placez l’appareil uniquement sur des surfaces stables. S’il est placé sur des surfaces instables, il peut tomber et se casser ; * N’utilisez que des câbles d’alimentation homologués avec marquage ; * N’utilisez pas de talkie-walkie puissant ou de téléphone portable à proximité de l’appareil ; * L’appareil ne doit être utilisé qu’avec des prises de sécurité ; * Comme pour tous les produits fabriqués industriellement, l’utilisation de substances induisant une réaction allergique telle que l’aluminium ne peut généralement pas être exclue. Si vous développez une réaction allergique (éruption cutanée, éternuements fréquents, yeux rouges ou difficultés respiratoires), consultez immédiatement un médecin pour en déterminer la cause. \*\*Si l’une des conditions suivantes se produit, débranchez la fiche d’alimentation principale et appelez votre distributeur local ou le \*\***support technique !** * Le câble d’alimentation ou la fiche principale est endommagé ou usé ; * Pénétration de liquides ; * L’appareil a été exposé à la pluie ou à une forte humidité ambiante ; * L’appareil ne fonctionne pas correctement, même si vous avez suivi toutes les instructions de ce guide rapide. N’utilisez les commandes que comme indiquées dans le guide rapide. Des paramètres incorrects peuvent endommager l’appareil ; * L’appareil est tombé et le boitier est endommagé.
# Support
> Contact us for any questions about your MA product.
Contact us for any questions about your MA product. MA Lighting and its extensive distributor network offer unparalleled technical support. Call on our expertise for help with any problem, no matter if it is about the operation, software features, software installations, or troubleshooting. ### Help Pages [Section titled “Help Pages”](#help-pages) The help pages are included in every software installer package and are automatically loaded into the software. To access and read the help pages, press Help + Please. The help pop-up opens on the main screen. To jump directly into a special help topic, use the context-sensitive help: * Press and hold Help and tap the desired user interface element (UI element) to open the corresponding help topic. * Tap  in the control bar and tap a UI element to open the corresponding help topic. ### Online Manuals [Section titled “Online Manuals”](#online-manuals) All MA product-related manuals are available as online versions. Just select your MA product and click on the respective link. All further documents can be found in our download area. Go to [https://www.malighting.com/training-support/online-manuals.](https://www.malighting.com/training-support/online-manuals) ### Video Tutorials [Section titled “Video Tutorials”](#video-tutorials) Get tips and tricks from our MA experts on your MA product. MA offers a whole range of videos on how to use your MA product in the best possible way. Just select your series and click on the links to watch the videos on our YouTube channel. Go to [https://www.malighting.com/training-support/video-tutorials.](https://www.malighting.com/training-support/video-tutorials) ### Community [Section titled “Community”](#community) Share your knowledge and get help from other MA users. A community can be stronger and better than the individual. Be part of the MA community! Go to [https://www.malighting.com/training-support/community.](https://www.malighting.com/training-support/community) ### Fixture Shares [Section titled “Fixture Shares”](#fixture-shares) In our MA Fixture Share you will find a comprehensive database of different fixture types for grandMA3, grandMA2, and dot2. You can also find the grandMA2 GDTF Converter there. Simply upload the GDTF file and it will be converted into a grandMA2 Fixture Profile.\ \ The GTDF Share contains a comprehensive library of all available GDTF files with all relevant modes and firmware versions. Like the MA Fixture Share, this database is continuously updated. For more information see: ### Local Support [Section titled “Local Support”](#local-support) If you have a question regarding your MA Lighting product, please first of all contact your local MA product specialists. ### Central Support [Section titled “Central Support”](#central-support) If you are in need of further assistance or manufacturer support, please fill out an email request on [www.malighting.com in](http://www.malighting.com%C2%A0in) Training and Support. Your request will automatically be sent to\*\* \*\*(in English or German). This email service is monitored during MA Lighting’s regular business hours in Germany from 8.30 am until 5 pm, Monday through Friday. ### Emergency Hotline [Section titled “Emergency Hotline”](#emergency-hotline) In any case of a show critical emergency please contact the MA Lighting support hotline. Phone +49 5251 68 88 65 99 Please note that this 24/7 hotline is strictly for emergency cases. ### Intellectual Property [Section titled “Intellectual Property”](#intellectual-property) MA Lighting Technology has registered multiple patents, trademarks, design patents, and utility models for its products.\ We will take legal action against the violation of this intellectual property. For more information see:
# Support
> Bei Fragen zu Ihren MA Produkten wenden Sie sich bitte an uns.
Bei Fragen zu Ihren MA Produkten wenden Sie sich bitte an uns. MA Lighting bietet mit dem angeschlossenen umfassenden Distributionsnetzwerk einen einmaligen technischen Support. Sollten wider Erwarten Probleme auftreten, stehen wir Ihnen mit unserem Know-how zur Seite, ganz gleich worum es sich handelt – Bedienung, Software-Features, Software-Installation oder Fehlerbeseitigung. ### Offline Hilfe [Section titled “Offline Hilfe”](#offline-hilfe) Die Offline Hilfe ist in jedem Software Installer enthalten und wird automatisch in die Software geladen. Zum Aufrufen der Hilfe die Tasten Help + Please drücken. Das Hilfe Fenster öffnet sich auf dem Hauptmonitor. Um ein spezielles Hilfethema direkt anzuspringen, die Kontextsensitive Hilfe verwenden. Um das entsprechende Hilfethema zu öffnen: * Taste Help drücken und halten und das gewünschte Bedienelement antippen. * Das  in der Kontrollleiste und das gewünschte Bedienelement antippen. ### Online Manuals [Section titled “Online Manuals”](#online-manuals) Alle Benutzerhandbücher der MA Produkte sind als Online-Versionen verfügbar. Einfach auswählen, für welches MA Produkt Sie eine Bedienungsanleitung benötigen. Gehe zu . ### Video Tutorials [Section titled “Video Tutorials”](#video-tutorials) Hier erhalten Sie Tipps und Tricks von unseren MA Experten für Ihr MA Produkt. MA Lighting bietet eine große Anzahl an Tutorial-Videos an, damit Sie Ihr MA Produkt bestmöglich nutzen können. Wählen Sie dafür einfach eine Serie aus und sehen Sie alle Videos dazu auf unserem YouTube Kanal. Gehe zu . ### Community [Section titled “Community”](#community) Teilen Sie Ihr Wissen mit anderen MA Usern. In der Gemeinschaft ist man effektiver. Werden Sie Mitglied der MA Community! Gehe zu [https://www.malighting.com/de/training-support/community](https://www.malighting.com/de/training-support/community/). ### Fixture Shares [Section titled “Fixture Shares”](#fixture-shares) Im MA Fixture Share finden Sie eine umfassende Bibliothek der unterschiedlichsten Fixture Typen für alle grandMA3, grandMA2 und dot2 Serien. Im GTDF Share finden Sie eine umfassende Bibliothek aller verfügbaren GDTF Files mit allen relevanten Modi und Firmware Versionen. Diese Datenbank wird, wie das MA Fixture Share kontinuierlich aktualisiert. Mehr Info unter . ### Lokaler Support [Section titled “Lokaler Support”](#lokaler-support) Bei Fragen zu Ihren MA Lighting Produkten wenden Sie sich bitte als erstes an Ihre MA Produktspezialisten vor Ort. ### Zentraler Support [Section titled “Zentraler Support”](#zentraler-support) Wenn Sie weitere Hilfe oder Herstellerunterstützung benötigen, schicken Sie uns bitte ein [ausgefülltes E-Mail-Formular](https://www.malighting.com/de/training-support/support-anfrage) unter , Training und Support. Diese Anfrage wird automatisch an \*\* \*\*(in Englisch oder Deutsch) gesendet. Dieser E-Mail-Service ist während der regulären Geschäftszeiten von MA Lighting von 8.30 Uhr bis 17 Uhr von Montag bis Freitag erreichbar. ### Notfall-Hotline [Section titled “Notfall-Hotline”](#notfall-hotline) In show-kritischen Situationen nehmen Sie bitte Kontakt zur MA Lighting Support-Hotline auf. Tel. +49 5251.68 88 65 99 Diese Hotline ist 24 Stunden am Tag und 7 Tage in der Woche besetzt. Sie ist nur für Notfälle. ### Intellectual Property [Section titled “Intellectual Property”](#intellectual-property) MA Lighting Technology hat für seine Produkte zahlreiche Patente, Marken, Geschmacksmuster und Gebrauchsmuster angemeldet. Im Falle der Verletzung dieses geistigen Eigentums werden wir rechtliche Schritte einleiten. Mehr Info unter .
# Support technique
> Contactez-nous pour toute question concernant votre produit MA.
# Contactez-nous pour toute question concernant votre produit MA. MA Lighting et son vaste réseau de distributeurs offrent un support technique incomparable. Faites appel à notre expertise pour tout problème, qu’il s’agisse de fonctionnement, de fonctionnalités logicielles, d’installations logicielles ou de dépannage. ### Pages d’aide [Section titled “Pages d’aide”](#pages-daide) Les pages d’aide sont incluses dans chaque logiciel d’installation et sont automatiquement chargées dans le logiciel. Pour accéder et lire les pages d’aide, appuyez sur Help + Please. La fenêtre contextuelle d’aide s’ouvre sur l’écran principal. Pour accéder directement à une rubrique d’aide spéciale, utilisez l’aide contextuelle : * Appuyez et maintenez enfoncé le bouton Help et touchez l’élément d’interface utilisateur (élément IU) souhaité pour ouvrir la rubrique d’aide correspondante. * Tapez sur  dans la barre de contrôle et appuyez sur un élément de l’IU pour ouvrir le sujet d’aide correspondant. ### Guides en ligne [Section titled “Guides en ligne”](#guides-en-ligne) Tous les guides relatifs aux produits MA sont disponibles en ligne. Choisissez simplement votre produit MA et cliquez sur le lien correspondant. Tous les autres documents sont disponibles dans notre espace de téléchargement. Visitez . ### Tutoriels vidéo [Section titled “Tutoriels vidéo”](#tutoriels-vidéo) Obtenez des conseils et astuces de nos experts MA sur votre produit MA. MA vous propose toute une gamme de vidéos sur la meilleure façon d’utiliser votre produit MA. Sélectionnez simplement votre série et cliquez sur les liens pour regarder les vidéos sur notre chaîne YouTube. Visitez . ### Communauté [Section titled “Communauté”](#communauté) Partagez vos connaissances et obtenez l’aide d’autres utilisateurs de MA. Une communauté peut être plus forte et meilleure que l’individu. Faites partie de la communauté MA ! Visitez . ### Fixture Shares [Section titled “Fixture Shares”](#fixture-shares) Dans notre MA Fixture Share, vous trouverez une base de données complète des différents types de luminaires pour grandMA3, grandMA2 et dot2. Le partage GTDF contient une bibliothèque complète de tous les fichiers GDTF disponibles avec tous les modes et versions de micrologiciel pertinents. Tout comme MA Fixture Share, cette base de données est continuellement mise à jour. Pour plus d’informations, voir: ### Support local [Section titled “Support local”](#support-local) Si vous avez une question concernant votre produit MA Lighting, veuillez tout d’abord contacter votre spécialiste MA local. ### Support central [Section titled “Support central”](#support-central) Si vous avez besoin de plus d’aide ou d’assistance de la part du fabricant, veuillez remplir une demande par e-mail à [www.malighting.com](https://www.malighting.com/) sous Training and Support. Votre demande sera automatiquement envoyée à **** (en anglais ou en allemand). Ce service de messagerie électronique est surveillé pendant les heures d’ouverture habituelles de MA Lighting en Allemagne, de 8h30 à 17h, du lundi au vendredi. ### Hotline d’urgence [Section titled “Hotline d’urgence”](#hotline-durgence) En cas d’urgence, veuillez contacter le support technique de MA Lighting. Téléphone +49 5251 68 88 65 99 Veuillez prendre note que cette ligne d’assistance 24 heures sur 24 et 7 jours sur 7 est strictement réservée aux cas d’urgence. ### Propriété intellectuelle [Section titled “Propriété intellectuelle”](#propriété-intellectuelle) MA Lighting Technology a déposé plusieurs brevets, marques de commerce, brevets de conception et modèles d’utilité pour ses produits. Nous intenterons une action en justice contre la violation de cette propriété intellectuelle. Pour plus d’informations, voir:
# Technical Data
> grandMA3 8Port Node DIN-Rail front panel
| | | | ------------------------------------------ | --------------------------------------------------------------------------------------------------------------------------------------------- | |  | **Hint:** grandMA3 nodes DIN-Rail are powered by a direct power connection using a terminal block connector, a PoE switch, or a PoE injector. | | | | | ------------------------------------------------ | -------------------------------------------------------------------------------------------------------------------------------------------------------------------------------------------------------------------------- | |  | **Important:** Only use adequately protected power cables (min. Ø = 3 x 1.0 mm²). The required power cable must meet the country’s standards. **Only qualified personnel is allowed to perform work on the power cable!** | | | | | ------------------------------------------------ | ---------------------------------------------------------------------------------------------------------------------------------------------------------------------------------------- | |  | **Important:** Use the USB port for updates only. Do not connect any peripheral devices (for example, mouse, keyboard). Each 3pin DMX512-A Out can be individually configured as DMX In. | * DMX: The maximum length of the cable is 350 m (in ideal conditions). * Use CAT-5e Ethernet cable or higher. Max. length of the cable 75 m.  *grandMA3 8Port Node DIN-Rail front panel* ### grandMA3 8Port Node DIN-Rail [Section titled “grandMA3 8Port Node DIN-Rail ”](#grandma3-8port-nodedin-rail) | Technical Data | | | ----------------------------------- | -------------------------------------------------------- | | Parameters | None | | Display | 3.9 ” TFT color | | Operating voltage (electrical grid) | 100-240 V AC, 50/60 Hz | | Operating voltage (PoE) | IEEE 802.3af 48 V DC/max. 12 W | | Net weight | 1 kg / 3 lbs | | Power | max. 15 VA | | Dimensions | 150 x 50 x 90 mm / 6 x 2 x 4 in (width x depth x height) | ### Outputs grandMA3 8Port Node DIN-Rail [Section titled “Outputs grandMA3 8Port Node DIN-Rail ”](#outputs-grandma3-8port-nodedin-rail)  *grandMA3 8Port Node DIN-Rail rear panel* | Number | Connector | | ------ | --------------------------------- | | 8 x | 3pin PCB connector (DMX512-A Out) | | 1 x | RJ45 | | 1 x | USB 2.0 (type A) | ### grandMA3 4Port Node DIN-Rail [Section titled “grandMA3 4Port Node DIN-Rail”](#grandma3-4port-nodedin-rail) | Technical Data | | | ----------------------------------- | -------------------------------------------------------- | | Parameters | None | | Display | 3.9 ” TFT color | | Operating voltage (electrical grid) | 100-240 V AC, 50/60 Hz | | Operating voltage (PoE) | IEEE 802.3af 48 V DC/max. 12 W | | Net weight | 1 kg / 3 lbs | | Power | max. 15 VA | | Dimensions | 150 x 50 x 90 mm / 6 x 2 x 4 in (width x depth x height) | ### Outputs grandMA3 4Port Node DIN-Rail [Section titled “Outputs grandMA3 4Port Node DIN-Rail”](#outputs-grandma3-4port-nodedin-rail)  *grandMA3 4Port Node DIN-Rail rear panel* | Number | Connector | | ------ | --------------------------------- | | 4 x | 3pin PCB connector (DMX512-A Out) | | 1 x | RJ45 | | 1 x | USB 2.0 (type A) | ### grandMA3 2Port Node DIN-Rail [Section titled “grandMA3 2Port Node DIN-Rail”](#grandma3-2port-nodedin-rail) | Technical Data | | | ----------------------------------- | -------------------------------------------------------- | | Parameters | None | | Display | 3.9 ” TFT color | | Operating voltage (electrical grid) | 100-240 V AC, 50/60 Hz | | Operating voltage (PoE) | IEEE 802.3af 48 V DC/max. 12 W | | Net weight | 1 kg / 3 lbs | | Power | max. 15 VA | | Dimensions | 150 x 50 x 90 mm / 6 x 2 x 4 in (width x depth x height) | ### Outputs grandMA3 2Port Node DIN-Rail [Section titled “Outputs grandMA3 2Port Node DIN-Rail”](#outputs-grandma3-2port-nodedin-rail)  *grandMA3 2Port Node DIN-Rail rear panel* | Number | Connector | | ------ | --------------------------------- | | 2 x | 3pin PCB connector (DMX512-A Out) | | 1 x | RJ45 | | 1 x | USB 2.0 (type A) | ### grandMA3 onPC 8Port Node DIN-Rail 4k [Section titled “grandMA3 onPC 8Port Node DIN-Rail 4k”](#grandma3-onpc-8port-nodedin-rail-4k) | Technical Data | | | ----------------------------------- | -------------------------------------------------------- | | Parameters | 4 096 (HTP/LTP) | | Parameters Mode2 | 2 048 (HTP/LTP) | | Display | 3.9 ” TFT color | | Operating voltage (electrical grid) | 100-240 V AC, 50/60 Hz | | Operating voltage (PoE) | IEEE 802.3af 48 V DC/max. 12 W | | Net weight | 1 kg / 3 lbs | | Power | max. 15 VA | | Dimensions | 150 x 50 x 90 mm / 6 x 2 x 4 in (width x depth x height) | ### grandMA3 onPC 4Port Node DIN-Rail 4k [Section titled “grandMA3 onPC 4Port Node DIN-Rail 4k”](#grandma3-onpc-4port-nodedin-rail-4k) | Technical Data | | | ----------------------------------- | -------------------------------------------------------- | | Parameters | 4 096 (HTP/LTP) | | Parameters Mode2 | 2 048 (HTP/LTP) | | Display | 3.9 ” TFT color | | Operating voltage (electrical grid) | 100-240 V AC, 50/60 Hz | | Operating voltage (PoE) | IEEE 802.3af 48 V DC/max. 12 W | | Net weight | 1 kg / 3 lbs | | Power | max. 15 VA | | Dimensions | 150 x 50 x 90 mm / 6 x 2 x 4 in (width x depth x height) | ### grandMA3 onPC 2Port Node DIN-Rail 2k [Section titled “grandMA3 onPC 2Port Node DIN-Rail 2k”](#grandma3-onpc-2port-nodedin-rail-2k) | Technical Data | | | ----------------------------------- | --------------------------------------------------------- | | Parameters | 4 096 (HTP/LTP) | | Parameters Mode2 | 1 024 (HTP/LTP) | | Display | 3.9 ” TFT color | | Operating voltage (electrical grid) | 100-240 V AC, 50/60 Hz | | Operating voltage (PoE) | IEEE 802.3af 48 V DC/max. 12 W | | Net weight | 1 kg / 3 lbs | | Power | max. 15 VA | | Dimensions | 150 x 50 x 90 mm / 6 x 2 x 4 in (width x depth x height) |
# Technische Daten
> grandMA3 xPort Node DIN-Rail Vorderseite
| | | | ------------------------------------------ | ---------------------------------------------------------------------------------------------------------------------------------------------------------------------------- | |  | **Hinweis:** Das grandMA3 xPort Node DIN-Rail kann direkt über die Klemmleiste ans Netz angeschlossen oder durch ein PoE Switch oder PoE Injector mit Strom versorgt werden. | | | | | ------------------------------------------------ | ------------------------------------------------------------------------------------------------------------------------------------------------------------------------------------------------------------------------------------------------------- | |  | **Wichtig:** Ausreichend isolierte und geschützte Netzkabel verwenden (min. Ø = 3 x 1,0 mm²). Das Netzkabel muss den Standards des Landes entsprechen. **Arbeiten am Netzkabel dürfen ausschließlich von qualifiziertem Personal durchgeführt werden!** | | | | | ------------------------------------------------ | ------------------------------------------------------------------------------------------------------------------------------------------------------------------------------------------------------------- | |  | **Wichtig:** Den USB-Anschluss nur für Software-Aktualisierungen verwenden. Keine Geräte anschließen (zum Beispiel Tastatur oder Maus). Jeder 3-polige DMX512-A Out kann auch als DMX In konfiguriert werden. | * DMX: maximale Kabellänge beträgt 350 m (unter idealen Bedingungen). * CAT-5e Ethernet-Kabel Kategorie oder höher verwenden; die maximale Kabellänge beträgt 75 m.  *grandMA3 xPort Node DIN-Rail Vorderseite* ### grandMA3 8Port Node DIN-Rail [Section titled “grandMA3 8Port Node DIN-Rail ”](#grandma3-8port-nodedin-rail) | Technische Daten | | | -------------------------------- | ------------------------------------------------------- | | Parameter | Keine | | Anzeige | 3,9 ” TFT-Farbmonitor | | Betriebsspannung (Netzanschluss) | 100-240 V AC, 50/60 Hz | | Betriebsspannung (PoE) | IEEE 802.3af 48 V DC/max. 12 W | | Gewicht (ohne Verpackung) | 1 kg / 3 lbs | | Anschlussleistung | max. 15 VA | | Maße | 150 x 50 x 90 mm / 6 x 2 x 4 in (Breite x Tiefe x Höhe) | ### Ausgänge grandMA3 8Port Node DIN-Rail [Section titled “Ausgänge grandMA3 8Port Node DIN-Rail ”](#ausgänge-grandma3-8port-nodedin-rail)  *grandMA3 8Port Node DIN-Rail Rückseite* | Anzahl | Steckverbinder | | ------ | -------------------------------------- | | 8 x | 3-polige Platinenbuchse (DMX512-A Out) | | 1 x | RJ45 | | 1 x | USB 2.0 (Typ A) | ### grandMA3 4Port Node DIN-Rail [Section titled “grandMA3 4Port Node DIN-Rail ”](#grandma3-4port-nodedin-rail) | Technische Daten | | | -------------------------------- | ------------------------------------------------------- | | Parameter | Keine | | Anzeige | 3,9 ” TFT-Farbmonitor | | Betriebsspannung (Netzanschluss) | 100-240 V AC, 50/60 Hz | | Betriebsspannung (PoE) | IEEE 802.3af 48 V DC/max. 12 W | | Gewicht (ohne Verpackung) | 1 kg / 3 lbs | | Anschlussleistung | max. 15 VA | | Maße | 150 x 50 x 90 mm / 6 x 2 x 4 in (Breite x Tiefe x Höhe) | ### Ausgänge grandMA3 4Port Node DIN-Rail [Section titled “Ausgänge grandMA3 4Port Node DIN-Rail ”](#ausgänge-grandma3-4port-nodedin-rail)  *grandMA3 4Port Node DIN-Rail Rückseite* | Anzahl | Steckverbinder | | ------ | -------------------------------------- | | 4 x | 3-polige Platinenbuchse (DMX512-A Out) | | 1 x | RJ45 | | 1 x | USB 2.0 (Typ A) | ### grandMA3 2Port Node DIN-Rail [Section titled “grandMA3 2Port Node DIN-Rail ”](#grandma3-2port-nodedin-rail) | Technische Daten | | | -------------------------------- | ------------------------------------------------------- | | Parameter | Keine | | Anzeige | 3,9 ” TFT-Farbmonitor | | Betriebsspannung (Netzanschluss) | 100-240 V AC, 50/60 Hz | | Betriebsspannung (PoE) | IEEE 802.3af 48 V DC/max. 12 W | | Gewicht (ohne Verpackung) | 1 kg / 3 lbs | | Anschlussleistung | max. 15 VA | | Maße | 150 x 50 x 90 mm / 6 x 2 x 4 in (Breite x Tiefe x Höhe) | ### Ausgänge grandMA3 2Port Node DIN-Rail [Section titled “Ausgänge grandMA3 2Port Node DIN-Rail ”](#ausgänge-grandma3-2port-nodedin-rail)  *grandMA3 2Port Node DIN-Rail Rückseite* | Anzahl | Steckverbinder | | ------ | -------------------------------------- | | 2 x | 3-polige Platinenbuchse (DMX512-A Out) | | 1 x | RJ45 | | 1 x | USB 2.0 (Typ A) | ### grandMA3 onPC 8Port Node DIN-Rail 4k [Section titled “grandMA3 onPC 8Port Node DIN-Rail 4k”](#grandma3-onpc-8port-nodedin-rail-4k) | Technische Daten | | | -------------------------------- | ------------------------------------------------------- | | Parameter | 4 096 (HTP/LTP) | | Parameter Mode2 | 2 048 (HTP/LTP) | | Anzeige | 3,9 ” TFT-Farbmonitor | | Betriebsspannung (Netzanschluss) | 100-240 V AC, 50/60 Hz | | Betriebsspannung (PoE) | IEEE 802.3af 48 V DC/max. 12 W | | Gewicht (ohne Verpackung) | 1 kg / 3 lbs | | Anschlussleistung | max. 15 VA | | Maße | 150 x 50 x 90 mm / 6 x 2 x 4 in (Breite x Tiefe x Höhe) | ### grandMA3 onPC 4Port Node DIN-Rail 4k [Section titled “grandMA3 onPC 4Port Node DIN-Rail 4k”](#grandma3-onpc-4port-nodedin-rail-4k) | Technische Daten | | | -------------------------------- | ------------------------------------------------------- | | Parameter | 4 096 (HTP/LTP) | | Parameter Mode2 | 2 048 (HTP/LTP) | | Anzeige | 3,9 ” TFT-Farbmonitor | | Betriebsspannung (Netzanschluss) | 100-240 V AC, 50/60 Hz | | Betriebsspannung (PoE) | IEEE 802.3af 48 V DC/max. 12 W | | Gewicht (ohne Verpackung) | 1 kg / 3 lbs | | Anschlussleistung | max. 15 VA | | Maße | 150 x 50 x 90 mm / 6 x 2 x 4 in (Breite x Tiefe x Höhe) | ### grandMA3 onPC 2Port Node DIN-Rail 2k [Section titled “grandMA3 onPC 2Port Node DIN-Rail 2k”](#grandma3-onpc-2port-nodedin-rail-2k) | Technische Daten | | | -------------------------------- | ------------------------------------------------------- | | Parameter | 4 096 (HTP/LTP) | | Parameter Mode2 | 1 024 (HTP/LTP) | | Anzeige | 3,9 ” TFT-Farbmonitor | | Betriebsspannung (Netzanschluss) | 100-240 V AC, 50/60 Hz | | Betriebsspannung (PoE) | IEEE 802.3af 48 V DC/max. 12 W | | Gewicht (ohne Verpackung) | 1 kg / 3 lbs | | Anschlussleistung | max. 15 VA | | Maße | 150 x 50 x 90 mm / 6 x 2 x 4 in (Breite x Tiefe x Höhe) |
# Données Techniques
> grandMA3 xPort Node DIN-Rail panneau avant
| | | | ------------------------------------------ | ----------------------------------------------------------------------------------------------------------------------------------------------------------------------------------- | |  | **Indice:** Les rails DIN xPort Node grandMA3 sont alimentés par une connexion électrique directe utilisant un connecteur de bloc terminal, un commutateur PoE ou un injecteur PoE. | | | | | ------------------------------------------------ | ------------------------------------------------------------------------------------------------------------------------------------------------------------------------------------------------------------------------------------------------------------------------- | |  | **Important:** N’utilisez que des câbles électriques suffisamment protégés (Ø min. = 3 x 1,0 mm²). Le câble d’alimentation requis doit être conforme aux normes du pays. **Seul un personnel qualifié est autorisé à effectuer des travaux sur le câble d’alimentation!** | | | | | ------------------------------------------------ | ---------------------------------------------------------------------------------------------------------------------------------------------------------------------------------------------------------------------------------- | |  | **Important:** Utilisez le port USB uniquement pour les mises à jour. Ne connectez aucun périphérique (par exemple, souris, clavier). Chaque sortie DMX512-A à 3 broches peut être configurée individuellement comme entrée DMX. | * DMX: la longueur maximale du câble est de 350 m (dans des conditions idéales). * Utilisez un câble Ethernet CAT-5e ou supérieur. La longueur maximale du câble est de 75 m.  \_grandMA3 xPort Node DIN-Rail \_panneau avant ### grandMA3 8Port Node DIN-Rail [Section titled “grandMA3 8Port Node DIN-Rail ”](#grandma3-8port-nodedin-rail) | Données Techniques | | | ------------------------------- | ---------------------------------------------------------------- | | Paramètres | Aucun | | Affichage | 3.9 ” TFT couleur | | Tension de fonctionnement | 100-240 V AC, 50/60 Hz | | Tension de fonctionnement (PoE) | IEEE 802.3af, 48 V DC/max. 12 W | | Poids Net | 1 kg / 3 lbs | | Puissance | max. 15 VA | | Dimensions | 150 x 50 x 90 mm / 6 x 2 x 4 po (largeur x profonduer x hauteur) | ### Sorties grandMA3 8Port Node DIN-Rail [Section titled “Sorties grandMA3 8Port Node DIN-Rail ”](#sorties-grandma3-8port-nodedin-rail)  *grandMA3 8Port Node DIN-Rail panneau arrière* | Nombre | Connecteur | | ------ | --------------------------------- | | 8 x | 3pin PCB connector (DMX512-A Out) | | 1 x | RJ45 | | 1 x | USB 2.0 (type A) | ### grandMA3 4Port Node DIN-Rail [Section titled “grandMA3 4Port Node DIN-Rail ”](#grandma3-4port-nodedin-rail) | Données Techniques | | | ------------------------------- | ---------------------------------------------------------------- | | Paramètres | Aucun | | Affichage | 3.9 ” TFT couleur | | Tension de fonctionnement | 100-240 V AC, 50/60 Hz | | Tension de fonctionnement (PoE) | IEEE 802.3af, 48 V DC/max. 12 W | | Poids Net | 1 kg / 3 lbs | | Puissance | max. 15 VA | | Dimensions | 150 x 50 x 90 mm / 6 x 2 x 4 po (largeur x profonduer x hauteur) | ### Sorties grandMA3 4Port Node DIN-Rail [Section titled “Sorties grandMA3 4Port Node DIN-Rail ”](#sorties-grandma3-4port-nodedin-rail)  *grandMA3 4Port Node DIN-Rail panneau arrière* | Nombre | Connecteur | | ------ | --------------------------------- | | 4 x | 3pin PCB connector (DMX512-A Out) | | 1 x | RJ45 | | 1 x | USB 2.0 (type A) | ### grandMA3 2Port Node DIN-Rail [Section titled “grandMA3 2Port Node DIN-Rail ”](#grandma3-2port-nodedin-rail) | Données Techniques | | | ------------------------------- | ---------------------------------------------------------------- | | Paramètres | Aucun | | Affichage | 3.9 ” TFT couleur | | Tension de fonctionnement | 100-240 V AC, 50/60 Hz | | Tension de fonctionnement (PoE) | IEEE 802.3af, 48 V DC/max. 12 W | | Poids Net | 1 kg / 3 lbs | | Puissance | max. 15 VA | | Dimensions | 150 x 50 x 90 mm / 6 x 2 x 4 po (largeur x profonduer x hauteur) | ### Sorties grandMA3 2Port Node DIN-Rail [Section titled “Sorties grandMA3 2Port Node DIN-Rail ”](#sorties-grandma3-2port-nodedin-rail)  *grandMA3 2Port Node DIN-Rail panneau arrière* | Nombre | Connecteur | | ------ | --------------------------------- | | 2 x | 3pin PCB connector (DMX512-A Out) | | 1 x | RJ45 | | 1 x | USB 2.0 (type A) | ### grandMA3 onPC 8Port Node DIN-Rail 4k [Section titled “grandMA3 onPC 8Port Node DIN-Rail 4k”](#grandma3-onpc-8port-nodedin-rail-4k) | Données Techniques | | | ------------------------------- | ---------------------------------------------------------------- | | Paramètres | 4 096 (HTP/LTP) | | Paramètres Mode2 | 2 048 (HTP/LTP) | | Affichage | 3.9 ” TFT couleur | | Tension de fonctionnement | 100-240 V AC, 50/60 Hz | | Tension de fonctionnement (PoE) | IEEE 802.3af, 48 V DC/max. 12 W | | Poids Net | 1 kg / 3 lbs | | Puissance | max. 15 VA | | Dimensions | 150 x 50 x 90 mm / 6 x 2 x 4 po (largeur x profonduer x hauteur) | ### grandMA3 onPC 4Port Node DIN-Rail 4k [Section titled “grandMA3 onPC 4Port Node DIN-Rail 4k”](#grandma3-onpc-4port-nodedin-rail-4k) | Données Techniques | | | ------------------------------- | ---------------------------------------------------------------- | | Paramètres | 4 096 (HTP/LTP) | | Paramètres Mode2 | 2 048 (HTP/LTP) | | Affichage | 3.9 ” TFT couleur | | Tension de fonctionnement | 100-240 V AC, 50/60 Hz | | Tension de fonctionnement (PoE) | IEEE 802.3af, 48 V DC/max. 12 W | | Poids Net | 1 kg / 3 lbs | | Puissance | max. 15 VA | | Dimensions | 150 x 50 x 90 mm / 6 x 2 x 4 po (largeur x profonduer x hauteur) | ### grandMA3 onPC 2Port Node DIN-Rail 2k [Section titled “grandMA3 onPC 2Port Node DIN-Rail 2k”](#grandma3-onpc-2port-nodedin-rail-2k) | Données Techniques | | | ------------------------------- | ---------------------------------------------------------------- | | Paramètres | 4 096 (HTP/LTP) | | Paramètres Mode2 | 1 024 (HTP/LTP) | | Affichage | 3.9 ” TFT couleur | | Tension de fonctionnement | 100-240 V AC, 50/60 Hz | | Tension de fonctionnement (PoE) | IEEE 802.3af, 48 V DC/max. 12 W | | Poids Net | 1 kg / 3 lbs | | Puissance | max. 15 VA | | Dimensions | 150 x 50 x 90 mm / 6 x 2 x 4 po (largeur x profonduer x hauteur) |
# Transport
> Noncompliance of the safety instructions can result in personal injury or material damage;
* The grandMA3 xPort Node DIN-Rails must be protected from environmental factors such as physical shocks and vibration during transportation; * Remove all cables before transport; * The user is responsible for securely fastening the products for transport and for following the manufacturer´s safety instructions when transporting the device;\ Noncompliance of the safety instructions can result in personal injury or material damage; * Do not place the grandMA3 xPort Node DIN-Rails on unstable surfaces; * Do not place any objects on top of the grandMA3 xPort Node DIN-Rails. ## Subtopics [Section titled “Subtopics”](#subtopics) * [Limitations](/grandma3/2-3/key_dinrail_limitations/)
# Transport
# * Die grandMA3 xPort Node DIN-Rails während des Transports vor Umwelteinflüssen wie Erschütterungen und Vibrationen schützen. * Alle Kabel vor dem Transport entfernen. * Der Benutzer ist dafür verantwortlich, das Gerät beim Transport sicher zu befestigen und die Sicherheitshinweise des Herstellers zu beachten. Die Nichteinhaltung der Sicherheitshinweise kann zu Personen- oder Sachschäden führen. * Die grandMA3 xPort Node DIN-Rails nicht auf eine instabile Oberfläche stellen. * Keine weiteren Objekte auf die grandMA3 xPort Node DIN-Rails stellen. | | | | ----------------------------------------- | -------------------------------------------------------------------------------------------------------------------------------------------------------------------------------------------------------------------------------------------------------------------------------------------------------------------------------------------------------- | |  | **Warnung:** Beim Transport die zulässigen Werte für Temperaturen und Luftfeuchte beachten. Für weitere Information, siehe [Betriebsgrenzen](/grandma3/2-3/key_dinrail_limitations-1/). Nach dem Transport das Gerät prüfen. Wenn das Gerät oder sein Display beschädigt ist (verbeult, verbogen oder kaputt), nicht an die Stromversorgung anschließen! |
# Transport
> Le non-respect des consignes de sécurité peut entraîner des dommages corporels ou matériels ;
# * Les grandMA3 xPort Node DIN-Rails doivent être protégés des influences environnementales telles que les chocs physiques et les vibrations pendant le transport ; * Retirez tous les câbles avant le transport ; * L’utilisateur est responsable de la sûreté de la fixation des produits pour le transport et du respect des consignes de sécurité du fabricant lors du transport de l’appareil ;\ Le non-respect des consignes de sécurité peut entraîner des dommages corporels ou matériels ; * Ne placez pas les grandMA3 xPort Node DIN-Rails sur des surfaces instables ; * Ne placez aucun objet sur les grandMA3 xPort Node DIN-Rails. | | | | ----------------------------------------- | ------------------------------------------------------------------------------------------------------------------------------------------------------------------------------------------------------------------------------------------------------------------------------------------------------------------------------------------------------------------------------- | |  | **Attention:** -Faites attention à la température et à l’humidité pendant le transport. Pour plus d’informations, voir [Limitations d’usage](/grandma3/2-3/key_dinrail_limitations-1-2/). -Après le transport, vérifiez l’appareil. -Si l’appareil ou son écran est endommagé (cabossé, tordu ou cassé), ne connectez pas le grandMA3 xPort Node DIN-Rail au réseau électrique! |
# . [Dot]
> Pressing . [Dot] enters a . into the command line.
Pressing . \[Dot] enters a . into the command line. | | | | ------------------------------------------------------------------ | --------------------------------- | |  | User name\[Fixture]>Store Cue 1.2 |
# Down
> Pressing Down acesses one level deeper in the fixture structure.
Pressing Down acesses one level deeper in the fixture structure. ## Location [Section titled “Location”](#location) Down is located in the command section on the left side of the five dual encoders. 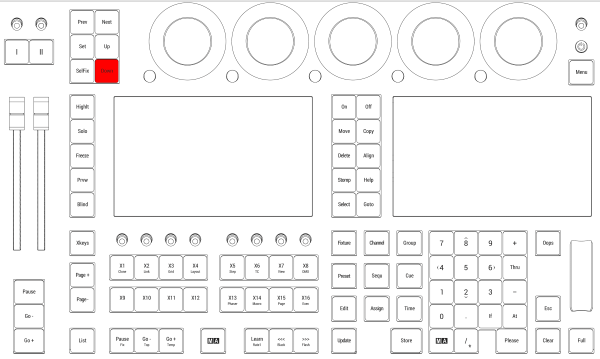 *Location on grandMA3 full-size and grandMA3 light consoles* *** 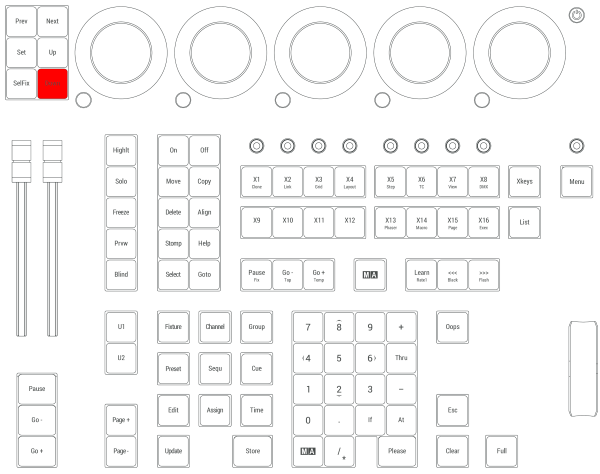 *Location on grandMA3 compact consoles and grandMA3 onPC command wing*
# Edit
> Pressing Edit enters the Edit keyword into the command line.
Pressing Edit enters the Edit keyword into the command line. | | | | ------------------------------------------------------------------ | ------------------------ | |  | User name\[Fixture]>Edit | For more information about Edit, see the [Edit keyword](/grandma3/2-3/keyword_edit/). ## EditSetting [Section titled “EditSetting”](#editsetting) Pressing Edit Edit enters the EditSetting keyword into the command line. | | | | ------------------------------------------------------------------ | ------------------------------- | |  | User name\[Fixture]>EditSetting | For more information about EditSetting, see the [EditSetting keyword](/grandma3/2-3/keyword_editsetting/). ## Location [Section titled “Location”](#location) Edit is located in the command section. 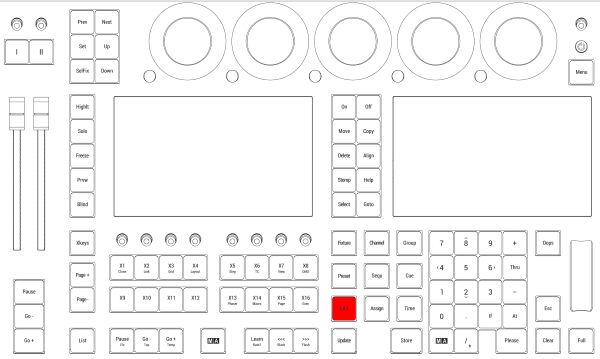 *Location on grandMA3 full-size and grandMA3 light consoles* ***  *Location on grandMA3 compact consoles and grandMA3 onPC command wing*
# Esc
> Pressing Esc deletes commands that were not executed in the command line and closes pop-ups.
Pressing Esc deletes commands that were not executed in the command line and closes pop-ups. Location Esc is located in the command section. 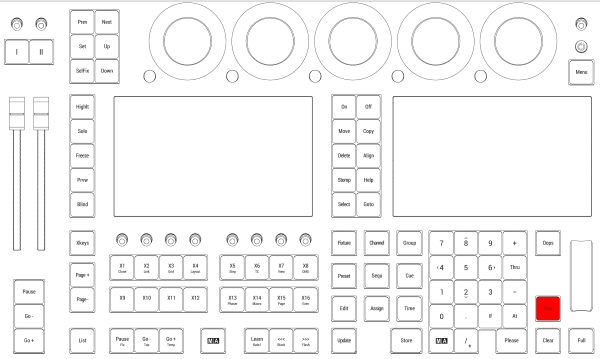 *Location on grandMA3 full-size and grandMA3 light consoles* *** 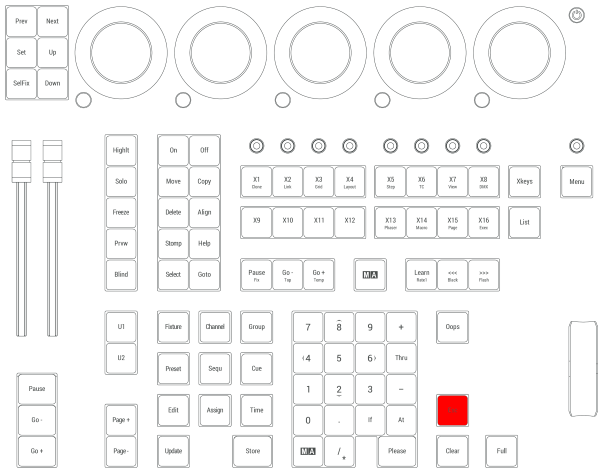 *Location on grandMA3 compact consoles and grandMA3 onPC command wing*
# Declaration of Conformity
> Manufacturer:
## CE and FCC Standards and Approvals [Section titled “CE and FCC Standards and Approvals”](#ce-and-fcc-standards-and-approvals) **Manufacturer:** MA Lighting Technology GmbH\ \ Dachdeckerstraße 16\ 97297 Waldbüttelbrunn\ GERMANY *** *declares that the product* *** **Name of product:** * grandMA3 onPC fader wing *** *is conform to the following directives and harmonized standards* *** \*\*Safety: \*\* **2014/35/EU (Low Voltage Directive)** * IEC/EN/UL 62368-1:2014 * CAN/CSA-C22. No. 62368-1:2014 *** **EMC – Electromagnetic Compatibility:** **FCC** * 47 CFR, Part 15, Subpart B: 2019 (Class A) \*\*2014/30/EU \*\* * EN55032:2016-02 (Class A) * EN61000-3-2 * EN55035:2018-04 *** **RoHS:** **2011/65/EU (RoHS II)** * EN50581:2012 * WEEE-Reg.-NR. DE 14150988 *** **Additional information:** All data lines and signal lines must be shielded and the shielding must be connected to the grounding or the housing of the connector. Waldbüttelbrunn, July 28, 2020 Dipl.-Ing. Michael Adenau (CEO) 
# Konformitätserklärung
> Hersteller:
# ## CE und FCC Normen und Zulassungen [Section titled “CE und FCC Normen und Zulassungen”](#ce-und-fcc-normen-und-zulassungen) **Hersteller:** MA Lighting Technology GmbH\ \ Dachdeckerstraße 16\ 97297 Waldbüttelbrunn\ Deutschland *** *erklärt, dass das Produkt* *** **Produktname:** * grandMA3 onPC fader wing *** *den folgenden Richtlinien sowie harmonisierten Normen entspricht* *** \*\*Sicherheit: \*\* **2014/35/EU (Niederspannungsrichtlinie)** * IEC/EN/UL 62368-1:2014 * CAN/CSA-C22. No. 62368-1:2014 *** **EMV (elektromagnetische Verträglichkeit):** **FCC** * 47 CFR, Part 15, Subpart B: 2019 (Class A) **2014/30/EU** * EN55032:2016-02 (Class A) * EN61000-3-2 * EN55035:2018-04 *** **RoHS:** **2011/65/EU (RoHS II)** * EN50581:2012 * WEEE-Reg.-NR. DE 14150988 *** **Zusätzliche Informationen:** Alle Daten- und Signalleitungen müssen geschirmt sein und der Schirm muss mit der Masse bzw. dem Gehäuse des entsprechenden Steckers verbunden sein. Waldbüttelbrunn, 28. Juli 2020 Dipl.-Ing. Michael Adenau (Geschäftsführer) 
# Déclaration de conformité
> Fabricant :
## Normes et approbations CE et FCC [Section titled “Normes et approbations CE et FCC”](#normes-et-approbations-ce-et-fcc) **Fabricant :** MA Lighting Technology GmbH\ \ Dachdeckerstraße 16\ 97297 Waldbüttelbrunn\ ALLEMAGNE *** *déclare que les produits* *** **Nom du produit:** * grandMA3 onPC fader wing *** *sont conformes aux directives et normes harmonisées suivantes* *** \*\*Sécurité : \*\* **2014/35/UE (Directive Basse Tension**\*\*)\*\* * IEC/EN/UL 62368-1:2014 * CAN/CSA-C22. No. 62368-1:2014 *** **CEM - Compatibilité électromagnétique :** **FCC** * 47 CFR, Part 15, Subpart B: 2019 (Class A) **2014/30/UE** * EN55032:2016-02 (Class A) * EN61000-3-2 * EN55035:2018-04 *** **RoHS:** **2011/65/UE (RoHS II)** * EN50581:2012 * WEEE-Reg.-NR. DE 14150988 *** **Informations complémentaires :** Toutes les lignes de données et de signaux doivent être blindées et le blindage doit être relié à la terre ou au boîtier du connecteur. Waldbüttelbrunn, 28 julliet 2019 Dipl.-Ing. Michael Adenau (CEO) 
# Disposal
> According to the directive 2011/65 EU (RoHS) the device was produced in the European Union, and is hence to be disposed of as stated in the directive.
According to the directive 2011/65 EU (RoHS) the device was produced in the European Union, and is hence to be disposed of as stated in the directive. If the device is used within the European Union, follow the directive WEEE 2012/19/EU. If the device is used outside the European Union, the corresponding country´s waste disposal regulations apply.
# Entsorgung
> Das Gerät ist gemäß der Richtlinie 2011/65 EU (RoHS) der Europäischen Gemeinschaft hergestellt und muss dementsprechend entsorgt werden.
Das Gerät ist gemäß der Richtlinie 2011/65 EU (RoHS) der Europäischen Gemeinschaft hergestellt und muss dementsprechend entsorgt werden. Falls das Gerät innerhalb der Europäischen Union betrieben wird, ist die WEEE 2012/19/EU zu beachten. Falls das Gerät außerhalb der Europäischen Union betrieben wird, sind die nationalen Entsorgungsvorschriften im jeweiligen Land zu beachten.
# Élimination
> Selon la directive 2011/65 UE (RoHS), l'appareil a été fabriqué dans l'Union européenne et doit donc être éliminé conformément à la directive.
Selon la directive 2011/65 UE (RoHS), l’appareil a été fabriqué dans l’Union européenne et doit donc être éliminé conformément à la directive. Si l’appareil est utilisé dans l’Union européenne, suivre la directive WEEE 2012/19/EU. Si l’appareil est utilisé en dehors de l’Union européenne, les règlements d’élimination des déchets du pays correspondant s’appliquent.
# Maintenance
| | | | ----------------------------------------- | ------------------------------------------------------------------------------------------------------------------------------------------------------------------------------------------------------------------------------ | |  | **Warning:** All repair and service work has to be exclusively performed by qualified service technicians as live parts may be exposed when opening and / or removing coverings. Touching live parts may cause electric shock. | | | | | ------------------------------------------------ | -------------------------------------------------------------------------------------------------------------------- | |  | **Important:** | | | The intervals between maintenance may differ depending on the frequency of transport and the operational environment | * Disconnect the power supply before cleaning; * Clean the surface with dry cloth only; * Do not use liquid cleanser or compressed air; * Do not use solvent; * Depending on the environment, we recommend to professionally clean the device every 2 to 5 years.
# Wartung
| | | | ----------------------------------------- | ----------------------------------------------------------------------------------------------------------------------------------------------------------------------------------------------------------------------------------------------------------------------------------------- | |  | **Warnung:** Sämtliche Reparatur- und Wartungsarbeiten dürfen ausschließlich von geschultem Personal durchgeführt werden, da beim Öffnen von Abdeckungen spannungsführende Teile freigelegt werden können. Spannungsführende Teile nicht berühren, da die Gefahr von Stromschlag besteht! | | | | | ------------------------------------------------ | --------------------------------------------------------------------------------------------- | |  | **Wichtig:** Die Wartungsintervalle variieren je nach Transportfrequenz und Betriebsumgebung. | * Vor dem Reinigen das Gerät spannungsfrei schalten. * Die Oberflächen mit einem trockenen Tuch reinigen. * Handauflage nur mit einem feuchtem Tuch reinigen. * Keine flüssigen Reinigungsmittel oder Druckluft zum Reinigen verwenden. * Kein Lösungsmittel verwenden. * Je nach Umgebungsbedingungen empfehlen wir das Gerät alle 2 bis 5 Jahre durch einen Servicetechniker professionell reinigen zu lassen.
# Entretient
| | | | ----------------------------------------- | ------------------------------------------------------------------------------------------------------------------------------------------------------------------------------------------------------------------------------------------------------------------------------------------------------------------ | |  | **Avertissement:** les travaux de réparation et d’entretien doivent être effectués exclusivement par des techniciens qualifiés, car les pièces sous tension peuvent être exposées lors de l’ouverture et/ou du retrait des couvercles. Le contact avec des pièces sous tension peut provoquer un choc électrique. | | | | | ------------------------------------------------ | ------------------------------------------------------------------------------------------------------------------------------------------------- | |  | **Important:** Les intervalles entre les entretiens peuvent varier en fonction de la fréquence des transports et de l’environnement opérationnel. | * Débranchez l’alimentation électrique avant le nettoyage; * Nettoyez la surface à l’aide d’un chiffon sec uniquement; * Nettoyez le repose-poignet à l’aide d’un chiffon humide uniquement; * N’utilisez pas de nettoyant liquide ou d’air comprimé; * N’utilisez pas de solvant; * Vérifiez si les orifices de ventilation sont obstrués; * En fonction de l’environnement, nous recommandons de nettoyer l’appareil professionnellement une fois par an.
# Quick Start
> grandMA3 onPC fader wing front panel
 \_grandMA3 onPC fader wing front panel \_ 1. Executor buttons 101-190 + 201-290 2. Executor faders 201-290 3. Executor buttons 301-390 + 401-490 4. Executor knobs 301-390 + 401-490 For more information about executors, see [Executor elements](/grandma3/2-3/do_control_executor/). ### Connect and Power Up the Device [Section titled “Connect and Power Up the Device”](#connect-and-power-up-the-device) 1. Unpack the device. 2. Remove the packaging and cushioning material. 3. Place the device indoors on a stable surface. 4. Download the grandMA3 onPC software on [www.malighting.com](http://www.malighting.com) 5. Install the software on your PC or laptop. For minimum requirements see [System Requirements](/grandma3/2-3/onpc_system_requirements/) grandMA3 in the grandMA3 user manual. 6. Connect the grandMA3 onPC fader wing with your command wing XT, PC or laptop using a USB cable. 7. Start the command wing XT, PC or laptop . 8. Switch on the grandMA3 onPC fader wing: \ -Insert the IEC connector into the corresponding jack. \ -Connect the main power plug. \ -Turn on the power switch:\ -Set it to position **I**. \ -The power switch lights up in red. ### Turn off the grandMA3 onPC fader wing [Section titled “Turn off the grandMA3 onPC fader wing”](#turn-off-the-grandma3-onpc-fader-wing) To turn off the grandMA3 onPC fader wing set the power switch to position **0**. | | | | ------------------------------------------------ | ------------------------------------------------------------------------------------------------------------------- | |  | **Important:** -Show data is only saved in the grandMA3 onPC software. -For updates use the grandMA3 onPC software. | | | | | ------------------------------------------------ | ------------------------------------------------------------------------------------------------------------------------------------------------------ | |  | **Important:** You can disconnect the grandMA3 onPC fader wing using the grandMA3 onPC software. The DMX output will then be interrupted immediately. | ### Different Combinations [Section titled “Different Combinations”](#different-combinations) | Device | Connected To | Parameters | | -------------------------- | ------------------------------------------- | ---------- | | grandMA3 onPC fader wing + | PC/laptop | 4 096 | | grandMA3 onPC fader wing + | PC/laptop + grandMA3 onPC 8/4/2Port Node | 4 096 | | grandMA3 onPC fader wing + | PC/laptop + grandMA3 processing unit M/L/XL | 4 096 |
# Quick Start
> grandMA3 onPC fader wing Vorderseite
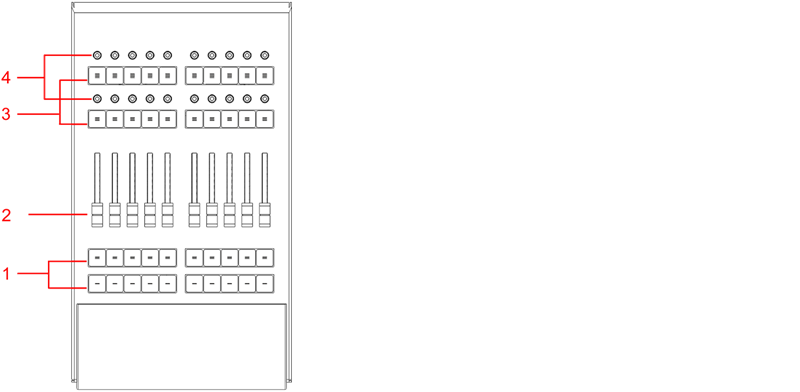 \_grandMA3 onPC fader wing \_Vorderseite 1. Executor Buttons 101-190 + 201-290 2. Executor Fader 201-290 3. Executor Buttons 301-390 + 401-490 4. Rotierbare Executors 301-390 + 401-490 Für weitere Informationen über Executors siehe den Abschnitt [Executor elements](/grandma3/2-3/do_control_executor/) im [grandMA3 Online Benutzerhandbuch](https://help.malighting.com/grandMA3/2.3/HTML/help.html) unter [www.malighting.com.](https://www.malighting.com/)  *grandMA3 onPC fader wing Rückseite* 1. [DMX A+B](/grandma3/2-3/fs_connect_dmx/) 2. [USB](/grandma3/2-3/fs_connect_usb/) 3. [Power switch](/grandma3/2-3/key_power/) 4. [IEC connector](/grandma3/2-3/fs_connect_power/) 5. [Desk light](/grandma3/2-3/fs_connect_desk_light/) 6. Kensington-Schloss ### Das Gerät anschließen und einschalten [Section titled “Das Gerät anschließen und einschalten”](#das-gerät-anschließen-und-einschalten) 1. Gerät auspacken. 2. Verpackungs- und Polstermaterial entfernen. 3. Gerät in einem geschlossenen Raum auf eine stabile Fläche stellen. 4. grandMA3 onPC Software auf [www.malighting.com herunterladen. ](http://www.malighting.com%C2%A0herunterladen.%C2%A0) 5. Die Software auf PC oder Laptop installieren. Für Mindestanforderungen, siehe System Requirements im grandMA3 Online Benutzerhandbuch. 6. Den grandMA3 onPC fader wing über das USB-Kabel mit dem PC oder Laptop oder einem command wing XT verbinden. 7. Den command wing XT oder den PC oder Laptop einschalten. 8. Den grandMA3 onPC fader wing einschalten:\ -IEC-Kaltgerätestecker mit der dafür vorgesehenen Buchse verbinden. \ -Netzstecker an die Steckdose anschließen. \ -Netzschalter auf \*\*I \*\*stellen. \ -Netzschalter leuchtet rot. ### grandMA3 onPC fader wing ausschalten [Section titled “grandMA3 onPC fader wing ausschalten”](#grandma3-onpc-fader-wing-ausschalten) Um den grandMA3 onPC fader wing auszuschalten, Netzschalter auf \*\*O \*\*stellen. | | | | ------------------------------------------------ | -------------------------------------------------------------------------------------------------------------------------------- | |  | **Wichtig:** -Showdaten werden nur in der grandMA3 onPC Software gespeichert. -Für Updates die grandMA3 onPC Software verwenden. | | | | | ------------------------------------------------ | --------------------------------------------------------------------------------------------------------------------------------------------------------------------- | |  | **Wichtig:** Der grandMA3 onPC fader wing kann ebenfalls über die grandMA3 onPC Software deaktiviert werden. Der DMX-Ausgang wird dann abrupt unterbrochen.\*\* \*\* | ### Kombinationsmöglichkeiten [Section titled “Kombinationsmöglichkeiten”](#kombinationsmöglichkeiten) | Gerät | Verbunden mit | Parameter | | -------------------------- | ------------------------------------------- | --------- | | grandMA3 onPC fader wing + | PC/Laptop | 4 096 | | grandMA3 onPC fade wing + | PC/Laptop + grandMA3 onPC 8/4/2Port Node | 4 096 | | grandMA3 onPC fader wing + | PC/Laptop + grandMA3 processing unit M/L/XL | 4 096 | | | | | ------------------------------------------------ | --------------------------------------------------------------------------------------------------------------------------------------------------------- | |  | **Wichtig:** Unabhängig davon, welche Geräte an die grandMA3 onPC Software angeschlossen sind, kann die Parameteranzahl insgesamt maximal 4 096 betragen. | Weitere Information im [User Manual](https://help.malighting.com/grandMA3/2.3/HTML/help.html) unter [Expand the Amount of Parameters.](/grandma3/2-3/system_parameter_expand/)
# Guide De Démarrage
> 1. Executor boutons 101-190 + 201-290
 1. Executor boutons 101-190 + 201-290 2. Executor faders 201-290 3. Executor boutons 301-390 + 401-490 4. Executor rotatifs 301-390 + 401-490 Pour plus d’information, voir la section [Executor elements](/grandma3/2-3/do_control_elements/) dans le [Mode d’emploi](https://help.malighting.com/grandMA3/2.3/HTML/help.html). ### Branchement et mise sous tension de l’appareil [Section titled “Branchement et mise sous tension de l’appareil”](#branchement-et-mise-sous-tension-de-lappareil) 1. *Déballer l’appareil.* 2. *Enlever l’emballage et le matériel de protection.* 3. *Installer l’appareil à l’intérieur sur une surface stable.* 4. *Télécharger le logiciel de la grandMA3 onPC à [www.malighting.com](http://www.malighting.com)* 5. *Installer le logiciel sur votre PC ou laptop. Pour connaître le minimum requis pour votre système, voir [System Requirements](/grandma3/2-3/onpc_system_requirements/) dans le manuel utilisateur de la grandMA3* 6. *Brancher la grandMA3 onPC fader wing à votre command wing XT, PC ou laptop en utilisant um câble USB.* 7. *Démarrer la command wing XT. le PC ou le laptop.* 8. *Allumer la fader wing grandMA3 onPC:\ -Insérer le connecteur IEC dans le jack correspondant. \ -Brancher à une prise de courant.\ \- Allumer le commutateur:\ -Mettre en position poition **I**. -Le commutateur s’élumine en rouge.* *Éteindre la grandMA3 fader wing onPC* *Pour éteindre la fader wing grandMA3 onPC, mettre le commutateur en position\*\* 0\*\*.* | | | | ------------------------------------------------ | ------------------------------------------------------------------------------------------------------------------------------------------------------------------ | |  | **Important:** -Les données de l’émission sont uniquement enregistrées dans le logiciel grandMA3 onPC. -Pour les mises à jour, utilisez le logiciel grandMA3 onPC. | | | | | ------------------------------------------------ | ------------------------------------------------------------------------------------------------------------------------------------------------------------------ | |  | **Important:** Vous pouvez déconnecter l’aile du fader grandMA3 onPC en utilisant le logiciel grandMA3 onPC. La sortie DMX sera alors immédiatement interrompue. | *Différentes Combinaisons* | ***Appareil*** | ***Connecté à*** | ***Paramèters*** | | ---------------------------- | --------------------------------------------- | ---------------- | | *grandMA3 onPC fader wing +* | *PC/laptop* | *4 096* | | *grandMA3 onPC fader wing +* | *PC/laptop + grandMA3 onPC 8/4/2Port Node* | *4 096* | | *grandMA3 onPC fader wing +* | *PC/laptop + grandMa3 processing unit M/L/XL* | *4 096* | | | | | ------------------------------------------------ | ----------------------------------------------------------------------------------------------------------------------------------- | |  | **Important:** | | | Indépendamment des appareils connectés au logiciel grandMA3 onPC, le nombre de paramètres ne peut atteindre qu’un maximum de 4 096. | *Pour plus d’information voir: [Expand the amount of parameters topic.](/grandma3/2-3/system_parameter_expand/)*
# Support
> Contact us for any questions about your MA product.
Contact us for any questions about your MA product. MA Lighting and its extensive distributor network offer unparalleled technical support. Call on our expertise for help with any problem, no matter if it is about the operation, software features, software installations, or troubleshooting. ### Help Pages [Section titled “Help Pages ”](#help-pages) The help pages are included in every software installer package and are automatically loaded into the software. To access and read the help pages, press Help + Please. The help pop-up opens on the main screen. To jump directly into a special help topic, use the context-sensitive help: * Press and hold Help and tap the desired user interface element (UI element) to open the corresponding help topic. * Tap  in the control bar and tap a UI element to open the corresponding help topic. ### Online Manuals [Section titled “Online Manuals”](#online-manuals) All MA product-related manuals are available as online versions. Just select your MA product and click on the respective link. All further documents can be found in our download area. Go to [https://www.malighting.com/training-support/online-manuals.](https://www.malighting.com/training-support/online-manuals) ### Video Tutorials [Section titled “Video Tutorials”](#video-tutorials) Get tips and tricks from our MA experts on your MA product. MA offers a whole range of videos on how to use your MA product in the best possible way. Just select your series and click on the links to watch the videos on our YouTube channel. Go to [https://www.malighting.com/training-support/video-tutorials.](https://www.malighting.com/training-support/video-tutorials) ### Community [Section titled “Community”](#community) Share your knowledge and get help from other MA users. A community can be stronger and better than the individual. Be part of the MA community! Go to [https://www.malighting.com/training-support/community.](https://www.malighting.com/training-support/community) ### Fixture Shares [Section titled “Fixture Shares”](#fixture-shares) In our MA Fixture Share you will find a comprehensive database of different fixture types for grandMA3, grandMA2, and dot2. You can also find the grandMA2 GDTF Converter there. Simply upload the GDTF file and it will be converted into a grandMA2 Fixture Profile.\ \ The GTDF Share contains a comprehensive library of all available GDTF files with all relevant modes and firmware versions. Like the MA Fixture Share, this database is continuously updated. For more information see: ### Local Support [Section titled “Local Support”](#local-support) If you have a question regarding your MA Lighting product, please first of all contact your local MA product specialists. ### Central Support [Section titled “Central Support”](#central-support) If you are in need of further assistance or manufacturer support, please fill out an email request on [www.malighting.com in](http://www.malighting.com%C2%A0in) Training and Support. Your request will automatically be sent to\*\* \*\*(in English or German). This email service is monitored during MA Lighting’s regular business hours in Germany from 8.30 am until 5 pm, Monday through Friday. ### Emergency Hotline [Section titled “Emergency Hotline”](#emergency-hotline) In any case of a show critical emergency please contact the MA Lighting support hotline. Phone +49 5251 68 88 65 99 Please note that this 24/7 hotline is strictly for emergency cases. ### Intellectual Property [Section titled “Intellectual Property”](#intellectual-property) MA Lighting Technology has registered multiple patents, trademarks, design patents, and utility models for its products.\ We will take legal action against the violation of this intellectual property. For more information see:
# Support
> Bei Fragen zu Ihren MA Produkten wenden Sie sich bitte an uns.
Bei Fragen zu Ihren MA Produkten wenden Sie sich bitte an uns. MA Lighting bietet mit dem angeschlossenen umfassenden Distributionsnetzwerk einen einmaligen technischen Support. Sollten wider Erwarten Probleme auftreten, stehen wir Ihnen mit unserem Know-how zur Seite, ganz gleich worum es sich handelt – Bedienung, Software-Features, Software-Installation oder Fehlerbeseitigung. ### Offline Hilfe [Section titled “Offline Hilfe”](#offline-hilfe) Die Offline Hilfe ist in jedem Software Installer enthalten und wird automatisch in die Software geladen. Zum Aufrufen der Hilfe die Tasten Help + Please drücken. Das Hilfe Fenster öffnet sich auf dem Hauptmonitor. Um ein spezielles Hilfethema direkt anzuspringen, die Kontextsensitive Hilfe verwenden. Um das entsprechende Hilfethema zu öffnen: * Taste Help drücken und halten und das gewünschte Bedienelement antippen. * Das  in der Kontrollleiste und das gewünschte Bedienelement antippen. ### Online Manuals [Section titled “Online Manuals”](#online-manuals) Alle Benutzerhandbücher der MA Produkte sind als Online-Versionen verfügbar. Einfach auswählen, für welches MA Produkt Sie eine Bedienungsanleitung benötigen. Gehe zu . ### Video Tutorials [Section titled “Video Tutorials”](#video-tutorials) Hier erhalten Sie Tipps und Tricks von unseren MA Experten für Ihr MA Produkt. MA Lighting bietet eine große Anzahl an Tutorial-Videos an, damit Sie Ihr MA Produkt bestmöglich nutzen können. Wählen Sie dafür einfach eine Serie aus und sehen Sie alle Videos dazu auf unserem YouTube Kanal. Gehe zu . ### Community [Section titled “Community”](#community) Teilen Sie Ihr Wissen mit anderen MA Usern. In der Gemeinschaft ist man effektiver. Werden Sie Mitglied der MA Community! Gehe zu [https://www.malighting.com/de/training-support/community](https://www.malighting.com/de/training-support/community/). ### Fixture Shares [Section titled “Fixture Shares”](#fixture-shares) Im MA Fixture Share befindet sich eine umfassende Bibliothek der unterschiedlichsten Fixture Typen für alle grandMA3, grandMA2 und dot2 Serien. Im GTDF Share finden Sie eine umfassende Bibliothek aller verfügbaren GDTF Files mit allen relevanten Modi und Firmware Versionen. Diese Datenbank wird, wie das MA Fixture Share kontinuierlich aktualisiert. Mehr Info unter . ### Lokaler Support [Section titled “Lokaler Support”](#lokaler-support) Bei Fragen zu Ihren MA Lighting Produkten wenden Sie sich bitte als erstes an Ihre MA Produktspezialisten vor Ort. ### Zentraler Support [Section titled “Zentraler Support”](#zentraler-support) Für weitere Hilfe oder Herstellerunterstützung schicken Sie uns bitte ein [ausgefülltes E-Mail-Formular](https://www.malighting.com/de/training-support/support-anfrage) unter , Training und Support. Diese Anfrage wird automatisch an \*\* \*\*(in Englisch oder Deutsch) gesendet. Dieser E-Mail-Service ist während der regulären Geschäftszeiten von MA Lighting von 8.30 Uhr bis 17 Uhr von Montag bis Freitag erreichbar. ### Notfall-Hotline [Section titled “Notfall-Hotline”](#notfall-hotline) In show-kritischen Situationen nehmen Sie bitte Kontakt zur MA Lighting Support-Hotline auf. Tel. +49 5251.68 88 65 99 Diese Hotline ist 24 Stunden am Tag und 7 Tage in der Woche besetzt. Sie ist nur für Notfälle. ### Intellectual Property [Section titled “Intellectual Property”](#intellectual-property) MA Lighting Technology hat für seine Produkte zahlreiche Patente, Marken, Geschmacksmuster und Gebrauchsmuster angemeldet. Im Falle der Verletzung dieses geistigen Eigentums werden wir rechtliche Schritte einleiten. Mehr Info unter .
# Support technique
> Contactez-nous pour toute question concernant votre produit MA.
Contactez-nous pour toute question concernant votre produit MA. MA Lighting et son vaste réseau de distributeurs offrent un support technique incomparable. Faites appel à notre expertise pour tout problème, qu’il s’agisse de fonctionnement, de fonctionnalités logicielles, d’installations logicielles ou de dépannage. ### Pages d’aide [Section titled “Pages d’aide”](#pages-daide) Les pages d’aide sont incluses dans chaque logiciel d’installation et sont automatiquement chargées dans le logiciel. Pour accéder et lire les pages d’aide, appuyez sur Help + Please. La fenêtre contextuelle d’aide s’ouvre sur l’écran principal. Pour accéder directement à une rubrique d’aide spéciale, utilisez l’aide contextuelle : * Appuyez et maintenez enfoncé le bouton Help et touchez l’élément d’interface utilisateur (élément IU) souhaité pour ouvrir la rubrique d’aide correspondante. * Tapez sur  dans la barre de contrôle et appuyez sur un élément de l’IU pour ouvrir le sujet d’aide correspondant. ### Guides en ligne [Section titled “Guides en ligne”](#guides-en-ligne) Tous les guides relatifs aux produits MA sont disponibles en ligne. Choisissez simplement votre produit MA et cliquez sur le lien correspondant. Tous les autres documents sont disponibles dans notre espace de téléchargement. Visitez . ### Tutoriels vidéo [Section titled “Tutoriels vidéo”](#tutoriels-vidéo) Obtenez des conseils et astuces de nos experts MA sur votre produit MA. MA vous propose toute une gamme de vidéos sur la meilleure façon d’utiliser votre produit MA. Sélectionnez simplement votre série et cliquez sur les liens pour regarder les vidéos sur notre chaîne YouTube. Visitez . ### Communauté [Section titled “Communauté”](#communauté) Partagez vos connaissances et obtenez l’aide d’autres utilisateurs de MA. Une communauté peut être plus forte et meilleure que l’individu. Faites partie de la communauté MA ! Visitez . ### Fixture Shares [Section titled “Fixture Shares”](#fixture-shares) Dans notre MA Fixture Share, vous trouverez une base de données complète des différents types de luminaires pour grandMA3, grandMA2 et dot2. Le partage GTDF contient une bibliothèque complète de tous les fichiers GDTF disponibles avec tous les modes et versions de micrologiciel pertinents. Tout comme MA Fixture Share, cette base de données est continuellement mise à jour. Pour plus d’informations, voir: ### Support local [Section titled “Support local”](#support-local) Si vous avez une question concernant votre produit MA Lighting, veuillez tout d’abord contacter votre spécialiste MA local. ### Support central [Section titled “Support central”](#support-central) Si vous avez besoin de plus d’aide ou d’assistance de la part du fabricant, veuillez remplir une demande par e-mail à [www.malighting.com](https://www.malighting.com/) sous Training and Support. Votre demande sera automatiquement envoyée à **** (en anglais ou en allemand). Ce service de messagerie électronique est surveillé pendant les heures d’ouverture habituelles de MA Lighting en Allemagne, de 8h30 à 17h, du lundi au vendredi. ### Hotline d’urgence [Section titled “Hotline d’urgence”](#hotline-durgence) En cas d’urgence, veuillez contacter le support technique de MA Lighting. Téléphone +49 5251 68 88 65 99 Veuillez prendre note que cette ligne d’assistance 24 heures sur 24 et 7 jours sur 7 est strictement réservée aux cas d’urgence. ### Propriété intellectuelle [Section titled “Propriété intellectuelle”](#propriété-intellectuelle) MA Lighting Technology a déposé plusieurs brevets, marques de commerce, brevets de conception et modèles d’utilité pour ses produits. Nous intenterons une action en justice contre la violation de cette propriété intellectuelle. Pour plus d’informations, voir:
# Technical Data
> grandMA3 onPC fader wing front panel
| | | | ------------------------------------------------ | ------------------------------------------------------------------------------------------------------------------------------------------------------------------------------------------------------------------------- | |  | **Important:** Only use adequately protected power cables (min. Ø = 3 x 1.0 mm²). The required power cable must meet the country’s standards. **Only qualified personnel is allowed to perform work on the power cable!** | | | | | ------------------------------------------------ | ------------------------------------------------------------ | |  | **Important:** | | | Power cable and connector are not included in the delivery. | * DMX: The maximum length of the cable is 350 m (in ideal conditions).  *grandMA3 onPC fader wing front panel* | Technical Data | | | ----------------- | ----------------------------------- | | Parameters | 4 096 (HTP/LTP) | | Operating voltage | 100-240 V AC, 50/60 Hz | | Net weight | 5 kg / 11 lbs | | Power | max. 50 VA | | Dimensions | 240 x 427 x 102 mm / 10 x 17 x 4 in | ### Outputs grandMA3 onPC fader wing [Section titled “Outputs grandMA3 onPC fader wing”](#outputs-grandma3-onpc-fader-wing)  *grandMA3 onPC fader wing rear panel* | Number | Connector | | ------ | -------------------------------- | | 1 x | USB 2.0 (type B) | | 2 x | DMX512-A OUT (5pin XLR female) | | 1 x | IEC connector | | 1 x | LED desk light (4pin XLR female) |
# Données Techniques
> grandMA3 onPC fader wing panneau avant
| | | | ------------------------------------------------ | ----------------------------------------------------------------------------------------------------------------------------------------------------------------------------------------------------------------------------------------------------------- | |  | **Important:** Utiliser des câbles protégés adéquatement (min. Ø = 3 x 1.0 mm²). Le câble de courant requis pour le branchement doit être conforme au standard du pays. **Seul une personne qualifiée est autorisée à travailler sur le câble de courant!** | | | | | ------------------------------------------------ | -------------------------------------------------------------------------------- | |  | **Important:** | | | Le câble d’allimentation et le connecteur ne sont pas inclus dans la livraison. | * DMX: la longueur maximale du câble ne doit pas excéder 350 m (dans des conditions idéal).  \_grandMA3 onPC fader wing \_panneau avant | Données Techniques | | | ------------------------- | ----------------------------------- | | Paramètres | 4 096 (HTP/LTP) | | Tension de fonctionnement | 100-240 V AC, 50/60 Hz | | Poids net | 5 kg / 11 lbs | | Puissance | max. 50 VA | | Dimensions | 240 x 427 x 102 mm / 10 x 17 x 4 po | ### Sorties grandMA3 onPC fader wing [Section titled “Sorties grandMA3 onPC fader wing”](#sorties-grandma3-onpc-fader-wing)  \_grandMA3 onPC fader wing \_panneau arrière | Nombres | Connecteur | | ------- | --------------------------------------- | | 1 x | USB 2.0 (type B) | | 2 x | DMX512-A OUT (5pin XLR female) | | 1 x | IEC connecteur | | 1 x | Lumière d’appoint DEL (4pin XLR female) |
# Technische Daten
> grandMA3 onPC fader wing Vorderseite
| | | | ------------------------------------------------ | ------------------------------------------------------------------------------------------------------------------------------------------------------------------------------------------------------------------------------------------------------- | |  | **Wichtig:** Ausreichend isolierte und geschützte Netzkabel verwenden (min. Ø = 3 x 1,0 mm²). Das Netzkabel muss den Standards des Landes entsprechen. **Arbeiten am Netzkabel dürfen ausschließlich von qualifiziertem Personal durchgeführt werden!** | | | | | ------------------------------------------------ | ------------------------------------------------------------------------------------ | |  | \*\*Wichtig: \*\* Netzkabel und Steckverbinder sind im Lieferumfang nicht enthalten. | * DMX: Die maximale Kabellänge beträgt 350 m (unter idealen Bedingungen).  *grandMA3 onPC fader wing Vorderseite* | Technische Daten | | | ------------------------- | ----------------------------------- | | Parameter | 4 096 (HTP/LTP) | | Betriebsspannung | 100-240 V AC, 50/60 Hz | | Gewicht (ohne Verpackung) | 5 kg / 11 lbs | | Anschlussleistung | max. 50 VA | | Maße | 240 x 427 x 102 mm / 10 x 17 x 4 in | ### Steckverbinder grandMA3 onPC fader wing [Section titled “Steckverbinder grandMA3 onPC fader wing”](#steckverbinder-grandma3-onpc-fader-wing)  *grandMA3 onPC fader wing Rückseite* | Anzahl | Steckverbinder | | ------ | -------------------------------------- | | 1 x | RJ 45 | | 1 x | USB 2.0 (Typ B) | | 2 x | DMX512-A OUT (5-polig XLR weiblich) | | 1 x | Kaltgeräteeinbaustecker | | 1 x | LED Pultleuchte (4-polig XLR weiblich) |
# Transport
> Noncompliance with the safety instructions can result in personal injury or material damage;
* The grandMA3 onPC fader wing must be protected from environmental factors such as physical shocks and vibration during transportation; * Remove all cables before transport; * The user is responsible for securely fastening the products for transport and for following the manufacturer´s safety instructions when transporting the device;\ Noncompliance with the safety instructions can result in personal injury or material damage; * Do not place the grandMA3 onPC fader wing on unstable surfaces; * Do not place any objects on top of the grandMA3 onPC fader wing. ## Subtopics [Section titled “Subtopics”](#subtopics) * [Limitations](/grandma3/2-3/key_onpc_limitations/)
# Transport
> Le non-respect des consignes de sécurité peut entraîner des dommages corporels ou matériels ;
* Les grandMA3 onPC fader wings doivent être protégés des influences environnementales telles que les chocs physiques et les vibrations pendant le transport ; * Retirez tous les câbles avant le transport ; * L’utilisateur est responsable de la sûreté de la fixation des produits pour le transport et du respect des consignes de sécurité du fabricant lors du transport de l’appareil ;\ Le non-respect des consignes de sécurité peut entraîner des dommages corporels ou matériels ; * Ne placez pas les grandMA3 onPC fader wings sur des surfaces instables ; * Ne placez aucun objet sur les grandMA3 onPC fader wings. | | | | ----------------------------------------- | --------------------------------------------------------------------------------------------------------------------------------------------------------------------------------------------------------------------------------------------------------------------------------------------------------------------------------------------------------------------------------------------------------------------------------------------- | |  | **Attention:** -Faites attention à la température et à l’humidité pendant le transport. Pour plus d’informations, voir [Limitations d’usage](https://malighting.clickhelp.co/smart/project-waduc_qa_grandma3-user-manual/key_xport_nodes_limitations-1-2). -Après le transport, vérifiez l’appareil. -Si l’appareil ou son écran est endommagé (cabossé, tordu ou cassé), ne connectez pas le grandMA3 onPC fader wing au réseau électrique ! |
# Transport
# * Den grandMA3 onPC fader wing während des Transports vor Umwelteinflüssen wie Erschütterungen und Vibrationen schützen. * Alle Kabel vor dem Transport entfernen. * Der Benutzer ist dafür verantwortlich, das Gerät beim Transport sicher zu befestigen und die Sicherheitshinweise des Herstellers zu beachten. Die Nichteinhaltung der Sicherheitshinweise kann zu Personen- oder Sachschäden führen. * Den grandMA3 onPC fader wing nicht auf eine instabile Oberfläche stellen. * Keine weiteren Gegenstände auf den grandMA3 onPC fader wing stellen. | | | | ----------------------------------------- | ---------------------------------------------------------------------------------------------------------------------------------------------------------------------------------------------------------------------------------------------------------------------------------------------------------------------------------------------------------------------------------- | |  | **Wichtig:** - Beim Transport die zulässigen Werte für Temperaturen und Luftfeuchte beachten. Für weitere Information, siehe [Betriebsgrenzen](/grandma3/2-3/key_onpc_rack_unit_limitations-1/). - Nach dem Transport das Gerät auf Beschädigungen prüfen. - Falls das Gerät beschädigt sein sollte (verbeult, verbogen oder kaputt), es nicht an die Stromversorgung anschließen! |
# Toleranzen
> Die folgenden Punkte sind keine Mängel oder Fehlfunktionen. Es handelt sich lediglich um Gegebenheiten, die während des Herstellungsprozesses auftreten können:
## Gerätespezifische Gegebenheiten [Section titled “Gerätespezifische Gegebenheiten”](#gerätespezifische-gegebenheiten) Die folgenden Punkte sind keine Mängel oder Fehlfunktionen. Es handelt sich lediglich um Gegebenheiten, die während des Herstellungsprozesses auftreten können: 1. Bei der Herstellung von LCD-Bildschirmen kann es zu Backlight-Bleeding kommen. 2. Farbtemperaturabweichungen bei der Herstellung von LCD-Bildschirmen unterliegen technischen Toleranzen. 3. Gerätespezifische Farbabweichungen, beispielsweise im Bildschirmgehäuse, sowie in der Oberflächenbeschaffenheit, etwa bei Polstern, unterliegen technischen Toleranzen bei der Herstellung solcher Materialien. ## Pixelfehler [Section titled “Pixelfehler”](#pixelfehler) Die Bildschirme der grandMA3 Serie orientieren sich an der Pixelfehlerklasse II (ISO 9241-307). Die folgende Tabelle zeigt die maximale Anzahl zulässiger Fehler pro 1 Million Pixel. | Pixelfehler | Maximale Anzahl von Fehlern pro 1 Million Pixel | | ------------------------------------------------ | ----------------------------------------------- | | Ständig leuchtendes Pixel (immer an, Farbe weiß) | 2 | | 2 angrenzende ständig leuchtende Pixel | 1 | | Ständig schwarzes Pixel (immer aus) | 5 | | 2 angrenzende ständig schwarze Pixel | 1 | | Defekte Subpixel (ständig leuchtend) | 5 | | Defekte Subpixel (ständig schwarz) | 5 | Aus technischen Gründen können die Bildschirme leichte Kratzer haben.
# Événements
> La liste suivante ne décrit ni les défauts ni les dysfonctionnements. Elle indique simplement les cas qui peuvent se manifester au cours du processus de fabrica
## Événements liés au matériel [Section titled “Événements liés au matériel”](#événements-liés-au-matériel) La liste suivante ne décrit ni les défauts ni les dysfonctionnements. Elle indique simplement les cas qui peuvent se manifester au cours du processus de fabrication. 1. Une fuite du rétroéclairage peut se produire lors de la fabrication des écrans LCD. 2. Des différences de température peuvent entraîner des différences de couleur dans les écrans LCD. 3. Les déviations de couleur dans le matériel, par exemple dans le boîtier de l’écran, et les déviations dans la texture de la surface, par exemple dans les coussinets de repose-mains, sont soumises à des tolérances techniques lors de la fabrication de ces matériaux. ## Défaut de pixel [Section titled “Défaut de pixel”](#défaut-de-pixel) Les écrans de la série grandMA3 sont soumis à la classe de défaut de pixel II (ISO 9241-307). Le tableau ci-dessous indique le nombre maximum de défauts autorisés par million de pixels. | Défaut de pixel | Nombre maximal de défauts par million de pixels | | ----------------------------------------------------------------- | ----------------------------------------------- | | Pixel actif permanent (toujours allumé, étant de couleur blanche) | 2 | | 2 pixels actifs permanents qui sont adjacents | 1 | | Pixel inactif permanent (toujours éteint, c’est-à-dire noir) | 5 | | 2 pixels inactifs permanents qui sont adjacents | 1 | | Sous-pixel défectueux (toujours actif) | 5 | | Sous-pixel défectueux (toujours inactif) | 5 | Pour des raisons techniques, il peut y avoir de légères rayures sur les écrans.
# Fixture
> Pressing Fixture enters the Fixture keyword into the command line.
Pressing Fixture enters the Fixture keyword into the command line. | | | | ------------------------------------------------------------------ | --------------------------- | |  | User name\[Fixture]>Fixture | For more information about Fixture, see the [Fixture keyword](/grandma3/2-3/keyword_fixture/). ## ## Selection [Section titled “Selection”](#selection) Pressing Fixture Fixture enters the Selection keyword into the command line. | | | | ------------------------------------------------------------------ | --------------------------------- | |  | User name\[Fixture]>Off Selection | For more information about Selection, see the [Selection keyword](/grandma3/2-3/keyword_selection/). ## Location [Section titled “Location”](#location) Fixture is located in the command section. 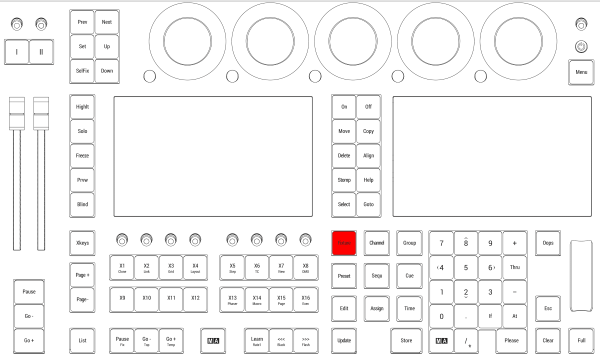 *Location on grandMA3 full-size and grandMA3 light consoles* ***  *Location on grandMA3 compact consoles and grandMA3 onPC command wing*
# Freeze
> Pressing Freeze toggles the Freeze function.
Pressing Freeze toggles the Freeze function. | | | | ---- | ------ | | OK : | Freeze | For more information about Freeze, see the [Freeze keyword](/grandma3/2-3/keyword_freeze/). ## Location [Section titled “Location”](#location) Freeze is located in the command section. *Location on grandMA3 full-size and grandMA3 light consoles* ***  *Location on grandMA3 compact consoles and grandMA3 onPC command wing*
# Full
> Pressing Full enters the Full keyword into the command line.
Pressing Full enters the Full keyword into the command line. Full sets the dimmer values to 100% in the selected fixtures. | | | | ------------------------------------------------------------------ | ------------------------ | |  | User name\[Fixture]>Full | For more information about Full, see the [Full keyword](/grandma3/2-3/keyword_full/). ## Location [Section titled “Location”](#location) Full is located in the command section.  *Location on grandMA3 full-size and grandMA3 light consoles* ***  *Location on grandMA3 compact consoles and grandMA3 onPC command wing*
# <<< [GoFastBackward] | Black
> Pressing <<< enters the <<< keyword into the command line.
Pressing <<< enters the <<< keyword into the command line. | | | | ------------------------------------------------------------------ | ----------------------- | |  | User name\[Fixture]><<< | For more information about <<<, see the [GoFastBackward keyword](/grandma3/2-3/keyword_gofastbackward/). ## ## Black [Section titled “Black”](#black) Pressing and holding MA + <<< enters the Black keyword into the command line. | | | | ------------------------------------------------------------------ | ------------------------- | |  | User name\[Fixture]>Black | For more information about Black, see the [Black keyword](/grandma3/2-3/keyword_black/). ## [Section titled “”](#-1) ## Location [Section titled “Location”](#location) <<< is located in the command section.  *Location on grandMA3 full-size and grandMA3 light consoles* ***  *Location on grandMA3 compact consoles and grandMA3 onPC command wing*
# >>> [GoFastForward] | Flash
> Pressing >>> enters the >>> keyword into the command line.
Pressing >>> enters the >>> keyword into the command line. | | | | ------------------------------------------------------------------ | ----------------------- | |  | User name\[Fixture]>>>> | For more information about >>>, see the [GoFastForward keyword](/grandma3/2-3/keyword_gofastforward/). ## ## Flash [Section titled “Flash”](#flash) Pressing and holding MA + >>> enters the Flash keyword into the command line. | | | | ------------------------------------------------------------------ | ------------------------- | |  | User name\[Fixture]>Flash | For more information about Flash, see the [Flash keyword](/grandma3/2-3/keyword_flash/). ## [Section titled “”](#-1) ## Location [Section titled “Location”](#location) \>>> is located in the command section.  *Location on grandMA3 full-size and grandMA3 light consoles* ***  *Location on grandMA3 compact consoles and grandMA3 onPC command wing*
# Go- | Top
> Pressing Go- enters the Go- keyword into the command line.
Pressing Go- enters the Go- keyword into the command line. | | | | ------------------------------------------------------------------ | ----------------------- | |  | User name\[Fixture]>Go- | For more information about Go-, see the [Go- keyword](/grandma3/2-3/keyword_gominus/). ## Top [Section titled “Top”](#top) Pressing and holding MA + Go- enters the Top keyword into the command line. | | | | ------------------------------------------------------------------ | ----------------------- | |  | User name\[Fixture]>Top | For more information about Top, see the [Top keyword](/grandma3/2-3/keyword_top/). ## Location [Section titled “Location”](#location) Go- is located in the command section.  *Location on grandMA3 full-size and grandMA3 light consoles* ***  *Location on grandMA3 compact consoles and grandMA3 onPC command wing*
# Go- [large]
> Go- Executor is executed immediately in the command line when pressing Go- [large].
Go- Executor is executed immediately in the command line when pressing Go- \[large]. | | | | ---- | ------------ | | OK : | Go- Executor | For more information about Go-, see the [Go- keyword](/grandma3/2-3/keyword_gominus/). Location Go- \[large] is located in the master section under the two master faders.  *Location on grandMA3 full-size and grandMA3 light consoles* ***  *Location on grandMA3 compact consoles and grandMA3 onPC command wing*
# Go+ | Temp
> Pressing Go+ enters the Go+ keyword into the command line.
Pressing Go+ enters the Go+ keyword into the command line. | | | | ------------------------------------------------------------------ | ----------------------- | |  | User name\[Fixture]>Go+ | For more information about Go+, see the [Go+ keyword](/grandma3/2-3/keyword_goplus/). ## Temp [Section titled “Temp”](#temp) Pressing and holding MA + Go+ enters the Temp keyword into the command line. | | | | ------------------------------------------------------------------ | ------------------------ | |  | User name\[Fixture]>Temp | For more information about Temp, see the [Temp keyword](/grandma3/2-3/keyword_temp/). ## Toggle [Section titled “Toggle”](#toggle) Pressing and holding MA + Go+ Go+ enters the Toggle keyword into the command line. | | | | ------------------------------------------------------------------ | -------------------------- | |  | User name\[Fixture]>Toggle | For more information about Toggle, see the [Toggle keyword](/grandma3/2-3/keyword_toggle/). ## Location [Section titled “Location”](#location) Go+ is located in the command section.  *Location on grandMA3 full-size and grandMA3 light consoles* ***  *Location on grandMA3 compact consoles and grandMA3 onPC command wing*
# Go+ [large]
> Go+ Executor is executed immediately in the command line when pressing Go+ [large].
Go+ Executor is executed immediately in the command line when pressing Go+ \[large]. | | | | ---- | ------------ | | OK : | Go+ Executor | For more information about Go+, see the [Go+ keyword](/grandma3/2-3/keyword_goplus/). ## Go+ Loaded [Section titled “Go+ Loaded”](#go-loaded) Pressing MA + Go+ \[large] executes the Go+ Loaded keyword in the command line. | | | | ------------------------------------------------------------------ | ------------------------------ | |  | User name\[Fixture]>Go+ Loaded | For more information about Go+, see the [Go+ keyword](/grandma3/2-3/keyword_goplus/). ## Location [Section titled “Location”](#location) Go+ \[large] is located in the master section below the two master faders.  *Location on grandMA3 full-size and grandMA3 light consoles* ***  *Location on grandMA3 compact consoles and grandMA3 onPC command wing*
# Goto
> Pressing Goto enters the Goto keyword into the command line.
Pressing Goto enters the Goto keyword into the command line. | | | | ------------------------------------------------------------------ | ------------------------ | |  | User name\[Fixture]>Goto | For more information about Goto, see the [Goto keyword](/grandma3/2-3/keyword_goto/). ## Load [Section titled “Load”](#load) Pressing Goto Goto enters the Load keyword into the command line. | | | | ------------------------------------------------------------------ | ------------------------ | |  | User name\[Fixture]>Load | For more information about Load, see the [Load keyword](/grandma3/2-3/keyword_load/). ## Location [Section titled “Location”](#location) Goto is located in the command section.  *Location on grandMA3 full-size and grandMA3 light consoles* ***  *Location on grandMA3 compact consoles and grandMA3 onPC command wing*
# Limitations
> Operation:
### **Temperature** [Section titled “Temperature”](#temperature) Operation: I/O Nodes: 0 °C up to 40 °C / 32 °F up to 104 °F I/O Nodes DIN-Rail: -10 °C up to +50 °C / 14 °F up to 122 °F
# Betriebsgrenzen
> Betrieb I/O Nodes: 0 °C bis 40 °C / 32 °F bis 104 °F
### **Temperatur** [Section titled “Temperatur”](#temperatur) Betrieb I/O Nodes: 0 °C bis 40 °C / 32 °F bis 104 °F Betrieb I/O Nodes DIN-Rail: -10 °C bis +50 °C / 14 °F bis 122 °F | | | | ----------------------------------------- | --------------------------------------------------------------------------------------------------------------------------------- | |  | **Achtung:** Hohe Temperaturen können das Kühlsystem des Gerätes überfordern und zum Ausfall von elektrischen Komponenten führen. | Lagerung / Transport: -10 °C bis +50 °C / 14 °F bis 122 °F ### **Luftfeuchte** [Section titled “Luftfeuchte”](#luftfeuchte) Betrieb: 20 % bis 90 % relative Luftfeuchtigkeit (nicht kondensierend) Lagerung / Transport: 10 % bis 90 % relative Luftfeuchtigkeit (nicht kondensierend) ### **Umgebung** [Section titled “Umgebung”](#umgebung) * Alle Sicherheitshinweise beachten; * Das Gerät innerhalb der Betriebsgrenzen betreiben; * Des Gerät nur in geschlossenen Räumen betreiben; * Die Umgebungsluft muss staubfrei und frei von gefährlichen und explosiven Stoffen sein; * Erschütterungen vermeiden; * Das Gerät ist nicht gegen Spritzwasser geschützt. Nicht in der Nähe von Wasser benutzen; * Das Gerät nicht in der Nähe von Regen oder Nebel betreiben. * Das Gerät nicht an einem Ort platzieren, an dem es in Kontakt mit korrosiven Gasen oder salzhaltiger Luft gelangen könnte. Dadurch kann es zu Fehlfunktionen kommen.
# Limitations
> Fonctionnement I/O Nodes: 0 °C jusqu'à 40 °C / 32 °F jusqu'à 104 °F
### **Température** [Section titled “Température”](#température) Fonctionnement I/O Nodes: 0 °C jusqu’à 40 °C / 32 °F jusqu’à 104 °F Fonctionnement I/O Nodes DIN-Rail: -10 °C jusqu’à +50 °C / 14 °F jusqu’à 122 °F | | | | ----------------------------------------- | -------------------------------------------------------------------------------------------------------------------------------------------------- | |  | **Attention:** Des températures plus élevées peuvent solliciter le système de refroidissement de l’appareil et détruire des composants matériels. | Stockage / Transport: -10 °C jusqu’à +50 °C / 14 °F jusqu’à 122 °F ### **Humidité** [Section titled “Humidité”](#humidité) Fonctionnement: 20 % jusqu’à 90 % d’humidité relative (sans condensation) Stockage / Transport: 10 % jusqu’à 90 % d’humidité relative (sans condensation) ### **Environnement** [Section titled “Environnement”](#environnement) * Suivez toutes les consignes de sécurité ; * N’utilisez l’appareil que dans ses limites de fonctionnement ; * N’utilisez l’appareil qu’à l’intérieur ; * L’air doit être dépourvu de poussière et de toute substance dangereuse ou explosive ; * Évitez les secousses ; * Cet appareil n’est pas protégé contre les éclaboussures d’eau. Ne l’utilisez pas à proximité de l’eau ; * N’utilisez pas l’appareil sous la pluie ou l’humidité ; * Ne placez pas l’appareil à un endroit où il peut entrer en contact avec des gaz corrosifs ou de l’air salin car cela peut provoquer un mauvais fonctionnement.
# grandMA3 List of Trademarks
> The grandMA3 Software supports other brands and highlights their intellectual property in its software.
The grandMA3 Software supports other brands and highlights their intellectual property in its software. The following trademarks used by grandMA3 are protected in the US and other countries: * Rosco colors are protected by Rosco Laboratiories, Inc. | Rosco Laboratories, Inc. | | ------------------------ | | Rosco | | CalColor | | Cinegel | | Cinelux | | Mix | | Mixbook | | R26 | | R80 | | Roscolux | | Supergel | | True Rosco Color | | VS | * macOS is protected by Apple Inc. * Windows is protected by Microsoft Corporation
# Declaration of Conformity
> Manufacturer:
## CE and FCC Standards and Approvals [Section titled “CE and FCC Standards and Approvals”](#ce-and-fcc-standards-and-approvals) \*\*Manufacturer: \*\* MA Lighting Technology GmbH Dachdeckerstraße 16\ 97297 Waldbüttelbrunn\ GERMANY *** *declares that the product* *** **Name of product:** * grandMA3 onPC rack-unit *** *is conform to the following directives and harmonized standards* *** \*\*Safety: \*\* **2014/35/EU (Low Voltage Directive)** * IEC/EN/UL 62368-1:2014 * CAN/CSA-C22. No. 62368-1:2014 *** **EMC – Electromagnetic Compatibility:** **FCC** * 47 CFR, Part 15, Subpart B: 2019 (Class A) **2014/30/EU** * EN55032:2016-02 (Class A) * EN61000-3-2 * EN55035:2018-04 *** **RoHS:** **2011/65/EU (RoHS II)** * EN50581:2012 * WEEE-Reg.-NR. DE 14150988 *** **Additional information:** All data lines and signal lines must be shielded and the shielding must be connected to the grounding or the housing of the connector. Waldbüttelbrunn, May 28, 2021 Dipl.-Ing. Michael Adenau (CEO) 
# Konformitätserklärung
> Hersteller:
# ## CE und FCC Normen und Zulassungen [Section titled “CE und FCC Normen und Zulassungen”](#ce-und-fcc-normen-und-zulassungen) **Hersteller:** MA Lighting Technology GmbH\ \ Dachdeckerstraße 16\ 97297 Waldbüttelbrunn\ Deutschland *** *erklärt, dass das Produkt* *** **Produktname:** * grandMA3 onPC rack-unit *** *den folgenden Richtlinien sowie harmonisierten Normen entspricht* *** \*\*Sicherheit: \*\* **2014/35/EU (Niederspannungsrichtlinie)** * IEC/EN/UL 62368-1:2014 * CAN/CSA-C22. No. 62368-1:2014 *** **EMV (elektromagnetische Verträglichkeit):** **FCC** * 47 CFR, Part 15, Subpart B: 2019 (Class A) **2014/30/EU** * EN55032:2016-02 (Class A) * EN61000-3-2 * EN55035:2018-04 *** **RoHS:** **2011/65/EU (RoHS II)** * EN50581:2012 * WEEE-Reg.-NR. DE 14150988 *** **Zusätzliche Informationen:** Alle Daten- und Signalleitungen müssen geschirmt sein und der Schirm muss mit der Masse bzw. dem Gehäuse des entsprechenden Steckers verbunden sein. Waldbüttelbrunn, 28. Mai 2021 Dipl.-Ing. Michael Adenau (Geschäftsführer) 
# Déclaration de conformité
> Fabricant :
## Normes et approbations CE et FCC [Section titled “Normes et approbations CE et FCC”](#normes-et-approbations-ce-et-fcc) **Fabricant :** MA Lighting Technology GmbH\ \ Dachdeckerstraße 16\ 97297 Waldbüttelbrunn\ ALLEMAGNE *** *déclare que les produits* *** **Nom du produit:** * grandMA3 onPC rack-unit *** *sont conformes aux directives et normes harmonisées suivantes* *** \*\*Sécurité : \*\* **2014/35/UE (Directive Basse Tension**\*\*)\*\* * IEC/EN/UL 62368-1:2014 * CAN/CSA-C22. No. 62368-1:2014 *** **CEM - Compatibilité électromagnétique :** **FCC** * 47 CFR, Part 15, Subpart B: 2019 (Class A) **2014/30/UE** * EN55032:2016-02 (Class A) * EN61000-3-2 * EN55035:2018-04 *** **RoHS:** **2011/65/UE (RoHS II)** * EN50581:2012 * WEEE-Reg.-NR. DE 14150988 *** **Informations complémentaires :** Toutes les lignes de données et de signaux doivent être blindées et le blindage doit être relié à la terre ou au boîtier du connecteur. Waldbüttelbrunn, 28 mai 2021 Dipl.-Ing. Michael Adenau (CEO) 
# Intended Use
> The grandMA3 onPC rack-unit controls all kinds of lighting genres such as conventional, moving lights, LEDs, video, and media via DMX signal or within a network
The grandMA3 onPC rack-unit controls all kinds of lighting genres such as conventional, moving lights, LEDs, video, and media via DMX signal or within a network environment. All grandMA3 components, despite different hardware solutions, use the same software. All components are fully integrable into the network environment. Use all grandMA3 components and accessories within closed rooms and in the permissible environmental conditions only. Installation and connection of the devices are explicitly to be carried out by trained personnel in compliance with all safety regulations.
# Verwendungszweck
> Die grandMA3 onPC rack-unit steuert alle Arten von Lichttechnik wie konventionelles Licht, intelligentes Licht, LED, Video und ähnliche Medien mit Hilfe von DMX
## Bestimmungsgemäße Verwendung [Section titled “Bestimmungsgemäße Verwendung”](#bestimmungsgemäße-verwendung) Die grandMA3 onPC rack-unit steuert alle Arten von Lichttechnik wie konventionelles Licht, intelligentes Licht, LED, Video und ähnliche Medien mit Hilfe von DMX-Signalen oder in einer Netzwerkumgebung. Alle grandMA3 Komponenten verwenden die gleiche Software, ungeachtet unterschiedlicher Hardware. Sämtliche Komponenten können komplett ins Netzwerk integriert werden. Alle grandMA3 Komponenten und Zubehör dürfen ausschließlich in geschlossenen Räumen und innerhalb zulässiger Umgebungsbedingung verwendet werden. Installation und Anschluss von Geräten dürfen nur vom geschulten Personal, unter Einhaltung aller Sicherheitsvorschriften, durchgeführt werden.
# Usage Prévu
> Les rack-units grandMA3 onPC contrôlent tous genres de projecteurs tels que les projecteurs conventionnels, les motorisées, les LEDs, la vidéo et les média, en
Les rack-units grandMA3 onPC contrôlent tous genres de projecteurs tels que les projecteurs conventionnels, les motorisées, les LEDs, la vidéo et les média, en utilisant le signal DMX ou dans un environnement réseau. Toutes les composantes grandMA3, malgré des solutions matérielles différentes, utilisent le même logiciel. Tous les composants sont entièrement intégrables dans l’environnement du réseau. Utilisez tous les composants et accessoires de grandMA3 uniquement dans des locaux fermés et dans les conditions environnementales autorisées. L’installation et le raccordement des appareils doivent être effectués explicitement par un personnel qualifié, en conformité avec toutes les règles de sécurité.
# Group
> Pressing Group enters the Group keyword into the command line.
Pressing Group enters the Group keyword into the command line. | | | | ------------------------------------------------------------------ | ------------------------- | |  | User name\[Fixture]>Group | For more information about Group, see the [Group keyword](/grandma3/2-3/keyword_group/). ## World [Section titled “World”](#world) Pressing Group Group enters the World keyword into the command line. | | | | ------------------------------------------------------------------ | ------------------------- | |  | User name\[Fixture]>World | For more information about World, see the [World keyword](/grandma3/2-3/keyword_world/). ## ## Filter [Section titled “Filter”](#filter) Pressing Group Group Group enters the Filter keyword into the command line. | | | | ------------------------------------------------------------------ | -------------------------- | |  | User name\[Fixture]>Filter | For more information about Filter, see the [Filter keyword](/grandma3/2-3/keyword_filter/). ## Location [Section titled “Location”](#location) Group is located in the command section.  *Location on grandMA3 full-size and grandMA3 light consoles* ***  *Location on grandMA3 compact consoles and grandMA3 onPC command wing*
# Help
> Pressing Help enters the Help keyword into the command line.
Pressing Help enters the Help keyword into the command line. | | | | ------------------------------------------------------------------ | ------------------------ | |  | User name\[Fixture]>Help | Pressing Help and an element in the user interface opens the corresponding article in the Help. For more information about the Help, see the [Help keyword](/grandma3/2-3/keyword_help/) and [Open the Help in the Console](/grandma3/2-3/atm_open_help_console/). Location Help is located in the command section.  *Location on grandMA3 full-size and grandMA3 light consoles* ***  *Location on grandMA3 compact consoles and grandMA3 onPC command wing*
# Highlt [Highlight]
> Pressing Highlt toggles the highlight function.
Pressing Highlt toggles the highlight function. For more information about Highlight, see the [Highlight keyword](/grandma3/2-3/keyword_highlight/). Pressing MA + Highlt toggles the lowlight function. For more information about Lowlight, see the [Lowlight keyword](/grandma3/2-3/keyword_lowlight/). ## Location [Section titled “Location”](#location) Highlt is located in the command section.  *Location on grandMA3 full-size and grandMA3 light consoles* ***  *Location on grandMA3 compact consoles and grandMA3 onPC command wing*
# Declaration of Conformity
> Manufacturer:
## CE and FCC Standards and Approvals [Section titled “CE and FCC Standards and Approvals ”](#ce-and-fcc-standards-and-approvals) **Manufacturer:** MA Lighting Technology GmbH\ Dachdeckerstraße 16\ 97297 Waldbüttelbrunn\ GERMANY *** *declares that the product* *** **Name of product:** * grandMA3 I/O Node * grandMA3 I/O Node PoE * grandMA3 I/O Node DIN-Rail *** *is conform to the following directives and harmonized standards* *** \*\*Safety: \*\* **2014/35/EU (Low Voltage Directive)** * IEC/EN/UL 62368-1:2014 * CAN/CSA-C22. No. 62368-1:2014 *** **EMC – Electromagnetic Compatibility:** **FCC** * 47 CFR, Part 15, Subpart B: 2019 (Class A) \*\*2014/30/EU \*\* * EN55032:2016-02 (Class A) * EN61000-3-2 * EN55035:2018-04 *** **RoHS:** **2011/65/EU (RoHS II)** * EN50581:2012 * WEEE-Reg.-NR. DE 14150988 *** **Additional information:** All data lines and signal lines must be shielded and the shielding must be connected to the grounding or the housing of the connector. The device has to be grounded (connected with PE). Waldbüttelbrunn, October 01, 2020 Dipl.-Ing. Michael Adenau (CEO) 
# Konformitätserklärung
> Hersteller:
## CE und FCC Normen und Zulassungen [Section titled “CE und FCC Normen und Zulassungen”](#ce-und-fcc-normen-und-zulassungen) **Hersteller:** MA Lighting Technology GmbH\ \ Dachdeckerstraße 16\ 97297 Waldbüttelbrunn\ Deutschland *** *erklärt, dass das Produkt* *** **Produkt:** * grandMA3 I/O Node * grandMA3 I/O Node PoE * grandMA3 I/O Node DIN-Rail *** *den folgenden Richtlinien sowie harmonisierten Normen entspricht* *** \*\*Sicherheit: \*\* **2014/35/EU (Niederspannungsrichtlinie)** * IEC/EN/UL 62368-1:2014 * CAN/CSA-C22. No. 62368-1:2014 *** **EMV (Elektromagnetische Verträglichkeit):** **FCC** * 47 CFR, Part 15, Subpart B: 2019 (Class A) **2014/30/EU** * EN55032:2016-02 (Class A) * EN61000-3-2 * EN55035:2018-04 *** **RoHS:** **2011/65/EU (RoHS II)** * EN50581:2012 * WEEE-Reg.-NR. DE 14150988 *** **Zusätzliche Informationen:** Alle Daten- und Signalleitungen müssen geschirmt sein und der Schirm muss mit der Masse bzw. dem Gehäuse des entsprechenden Steckers verbunden sein. Waldbüttelbrunn, 1. Oktober 2020 Dipl.-Ing. Michael Adenau (Geschäftsführer) 
# Déclaration de conformité
> Fabricant :
## Normes et approbations CE et FCC [Section titled “Normes et approbations CE et FCC”](#normes-et-approbations-ce-et-fcc) **Fabricant :** MA Lighting Technology GmbH\ \ Dachdeckerstraße 16\ 97297 Waldbüttelbrunn\ ALLEMAGNE *** *déclare que les produits* *** **Nom de produit :** * grandMA3 I/O Node * grandMA3 I/O Node PoE * grandMA3 I/O Node DIN-Rail *** *sont conformes aux directives et normes harmonisées suivantes* *** \*\*Sécurité: \*\* **2014/35/UE (Directive Basse Tension)** * IEC/EN/UL 62368-1:2014 * CAN/CSA-C22. No. 62368-1:2014 *** \*\*CEM - Compatibilité électromagnétique \*\* **FCC** * 47 CFR, Part 15, Subpart B: 2019 (Class A) **2014/30/UE** * EN55032:2016-02 (Class A) * EN61000-3-2 * EN55035:2018-04 *** **RoHS:** **2011/65/UE (RoHS II)** * EN50581:2012 * WEEE-Reg.-NR. DE 14150988 *** **Informations complémentaires :** Toutes les lignes de données et de signaux doivent être blindées et le blindage doit être relié à la terre ou au boîtier du connecteur. Waldbüttelbrunn, 01 octobre 2020 Dipl.-Ing. Michael Adenau (PDG) 
# Disposal
> According to the directive 2011/65 EU (RoHS) the device was produced in the European Union, and is hence to be disposed of as stated in the directive.
According to the directive 2011/65 EU (RoHS) the device was produced in the European Union, and is hence to be disposed of as stated in the directive. If the device is used within the European Union, follow the directive WEEE 2012/19/EU. If the device is used outside the European Union, the corresponding country´s waste disposal regulations apply.
# Élimination
> Selon la directive 2011/65 UE (RoHS), l'appareil a été fabriqué dans l'Union européenne et doit donc être éliminé conformément à la directive.
Selon la directive 2011/65 UE (RoHS), l’appareil a été fabriqué dans l’Union européenne et doit donc être éliminé conformément à la directive. Si l’appareil est utilisé dans l’Union européenne, suivre la directive WEEE 2012/19/EU. Si l’appareil est utilisé en dehors de l’Union européenne, les règlements d’élimination des déchets du pays correspondant s’appliquent.
# Entsorgung
> Das Gerät ist gemäß der Richtlinie 2011/65/EU (RoHS) der Europäischen Gemeinschaft hergestellt und muss dementsprechend entsorgt werden.
Das Gerät ist gemäß der Richtlinie 2011/65/EU (RoHS) der Europäischen Gemeinschaft hergestellt und muss dementsprechend entsorgt werden. Falls das Gerät innerhalb der Europäischen Union betrieben wird, ist die WEEE 2012/19/EU zu beachten. Falls das Gerät außerhalb der Europäischen Union betrieben wird, sind die nationalen Entsorgungsvorschriften im jeweiligen Verwenderland zu beachten.
# Intended Use
> The grandMA3 I/O nodes, grandMA3 I/O nodes DIN-Rail and grandMA3 I/O nodes PoE, control all kinds of lighting genres such as conventional, moving lights, LEDs,
The grandMA3 I/O nodes, grandMA3 I/O nodes DIN-Rail and grandMA3 I/O nodes PoE, control all kinds of lighting genres such as conventional, moving lights, LEDs, video, and media via DMX signal or within a network environment. All grandMA3 components, despite different hardware solutions, use the same software. All components are fully integrable into the network environment. Use all grandMA3 components and accessories within closed rooms and in the permissible environmental conditions only. Installation and connection of the devices are explicitly to be carried out by trained personnel in compliance with all safety regulations.
# Verwendungszweck
> Der grandMA3 I/O Node und grandMA3 I/O Node DIN-Rail steuern alle Arten von Lichttechnik wie konventionelles Licht, intelligentes Licht, LED, Video und ähnliche
Der grandMA3 I/O Node und grandMA3 I/O Node DIN-Rail steuern alle Arten von Lichttechnik wie konventionelles Licht, intelligentes Licht, LED, Video und ähnliche Medien mit Hilfe von DMX-Signalen oder in einer Netzwerkumgebung. Alle grandMA3 Komponenten verwenden die gleiche Software, ungeachtet unterschiedlicher Hardware. Sämtliche Komponenten können komplett ins Netzwerk integriert werden. Alle grandMA3 Komponenten und Zubehör dürfen ausschließlich in geschlossenen Räumen und innerhalb zulässiger Umgebungsbedingungen verwendet werden. Installation und Anschluss von Geräten dürfen nur vom geschulten Personal, unter Einhaltung aller Sicherheitsvorschriften, durchgeführt werden.
# Usage Prévu
> Le grandMA3 I/O Node et grandMA3 I/O Node DIN-Rail contrôle tous genres de dispositifs d'éclairage comme les traditionnels, les motorisés, les DELS, la vidéo et
Le grandMA3 I/O Node et grandMA3 I/O Node DIN-Rail contrôle tous genres de dispositifs d’éclairage comme les traditionnels, les motorisés, les DELS, la vidéo et les médias en utilisant le signal DMX directement à la sortie de la console et/ou dans un environnement réseau. Toutes les composantes grandMA3, à l’exception de certaines solutions pour d’autre matériel, utilisent le même logiciel. Toutes les composantes peuvent tous être intégrées à un réseau. Utiliser toutes les composantes grandMA3 et ses accessoires dans des pièces fermées et des conditions environnementales permises. L’installation et le branchement des dispositifs doit être effectué par du personnel qualifié en conformité avec les règles de sécurité.
# Maintenance
| | | | ----------------------------------------- | ------------------------------------------------------------------------------------------------------------------------------------------------------------------------------------------------------------------------------ | |  | **Warning:** All repair and service work has to be exclusively performed by qualified service technicians as live parts may be exposed when opening and / or removing coverings. Touching live parts may cause electric shock. | | | | | ------------------------------------------------ | --------------------------------------------------------------------------------------------------------------------- | |  | **Important:** | | | The intervals between maintenance may differ depending on the frequency of transport and the operational environment. | * Disconnect the power supply before cleaning; * Clean the surface with a dry cloth only; * Do not use liquid cleanser or compressed air; * Do not use solvent; * Depending on the environment, we recommend to professionally clean the device every 2 to 5 years.
# Wartung
| | | | ----------------------------------------- | ----------------------------------------------------------------------------------------------------------------------------------------------------------------------------------------------------------------------------------------------------------------------------------------- | |  | **Warnung:** Sämtliche Reparatur- und Wartungsarbeiten dürfen ausschließlich vom geschulten Personal durchgeführt werden, da beim Öffnen von Abdeckungen spannungsführende Teile freigelegt werden können. Spannungsführende Teile nicht berühren, da die Gefahr von Stromschlag besteht! | * Vor dem Reinigen das Gerät vom Netz trennen (Netzstecker ziehen). * Die Oberflächen nur mit einem trockenen Tuch reinigen. * Keine flüssigen Reinigungsmittel oder Druckluft zum Reinigen verwenden. * Kein Lösungsmittel verwenden. * Überprüfen ob Belüftungsöffnungen frei sind. * Je nach Umgebungsbedingung ist es ratsam, das Gerät alle 2 bis 5 Jahre durch einen Servicetechniker professionell reinigen zu lassen.
# Entretient
| | | | ----------------------------------------- | ----------------------------------------------------------------------------------------------------------------------------------------------------------------------------------------------------------------------------------------------------------------------------------------------------------------------- | |  | **Avertissement:** Tous les travaux de réparation et d’entretien doivent être effectués exclusivement par des techniciens qualifiés, car les pièces sous tension peuvent être exposées lors de l’ouverture et/ou du retrait des couvercles. Le contact avec des pièces sous tension peut provoquer un choc électrique. | | | | | ------------------------------------------ | ---------------------------------------------------------------------------------------------------------------------------------- | |  | Les intervalles entre les entretiens peuvent varier en fonction de la fréquence des transports et de l’environnement opérationnel. | * Débranchez l’alimentation électrique avant le nettoyage; * Nettoyez la surface à l’aide d’un chiffon sec uniquement; * N’utilisez pas de nettoyant liquide ou d’air comprimé; * N’utilisez pas de solvant; * Vérifiez si les orifices de ventilation sont obstrués; * En fonction de l’environnement, nous recommandons de nettoyer l’appareil professionnellement tous les 2 à 5 ans.
# Safety
> Warning – Danger area
## Symbols and Warning Labels [Section titled “Symbols and Warning Labels”](#symbols-and-warning-labels) | | | | ----------------------------------------- | ------------------------------------------------------------------------------------------------------------------------------------------------------------------------- | |  | **Warning:** Only trained personnel is allowed to install, power up, and operate the I/O Node DIN-Rail. Follow your country’s safety and accident prevention regulations. |  **Warning** – Danger area ***  **Caution**– Risk of electric shock *** ## Risk of Electric Shock [Section titled “Risk of Electric Shock”](#risk-of-electric-shock) The device is to be serviced by qualified personnel only as live parts may be exposed when opening and/or removing coverings. Touching live parts may cause electric shock.  ***  Dispose of as hazardous waste. Follow the applicable regulations. For more information see [Disposal](/grandma3/2-3/key_i_o_node_disposal/). ***  Declaration of conformity. For more information see [Conformity](/grandma3/2-3/key_i_o_node_conformity/). ***  Operating voltage ON/OFF
# Sicherheit
> Warnung – Gefahrenbereich
## Symbole und Warnzeichen [Section titled “Symbole und Warnzeichen”](#symbole-und-warnzeichen) | | | | ----------------------------------------- | ---------------------------------------------------------------------------------------------------------------------------------------------------------------------------------------------------------------------------------------- | |  | **Warnung:** Die Installation, Inbetriebnahme und Bedienung des I/O Node DIN-Rails dürfen ausschließlich von geschultem Personal durchgeführt werden. Unbedingt die Sicherheits- und Unfallverhütungsvorschriften Ihres Landes beachten. |  \*\*Warnung \*\*– Gefahrenbereich ***  **Vorsicht**– Stromschlaggefahr *** ## Stromschlaggefahr [Section titled “Stromschlaggefahr”](#stromschlaggefahr) Die Wartung des Gerätes darf ausschließlich von geschultem Personal durchgeführt werden, da beim Öffnen und / oder Entfernen von Abdeckungen spannungsführende Teile freigelegt werden könnten. Spannungsführende Teile nicht berühren – Gefahr von Stromschlag!  ***  Das Gerät ist als Sonderabfall zu entsorgen. Die örtlichen Vorschriften beachten! Für weitere Informationen siehe [Entsorgung](/grandma3/2-3/key_i_o_node_disposal-3/). ***  Konformitätserklärung Für weitere Informationen siehe [Konformität](/grandma3/2-3/key_i_o_node_conformity-1/). ***  Betriebsspannung AN/AUS | | | | ----------------------------------------- | ------------------------------------------------------------------------------------------------------------------------------------------------------------------------------------------------------------------------------------------------ | |  | **Warnung:** Das Gerät muss geerdet sein. Nicht den Sicherheitszweck eines Schutzkontaktsteckers ignorieren. Ein Schutzkontaktstecker hat zwei Stromkontakte und einen dritten Erdungskontakt. Der dritte Erdungskontakt dient Ihrer Sicherheit. | Alle Anweisungen in diesem Quick Manual aufmerksam lesen und befolgen, vor allem die [Allgemeinen Sicherheitsanweisungen](/grandma3/2-3/key_i_o_node_safety-1/#h2_632920942) weiter unten in diesem Kapitel und die [Betriebsgrenzen](/grandma3/2-3/key_grandma3_i_o_node-1/). Das Quick Manual für den späteren Gebrauch aufbewahren. Alle Vorsichtsmaßnahmen und Warnhinweise, die in diesem Quick Manual und auf dem Gerät selbst vermerkt sind, befolgen. | | | | ------------------------------------------------ | -------------------------------------------------------------------------------------------------------------------------- | |  | **Wichtig:** Sämtliche Reparatur- und Wartungsarbeiten dürfen ausschließlich von geschultem Personal durchgeführt werden. | Dieses Gerät entspricht dem neusten Stand der Technik, trotzdem kann ein Restrisiko nicht komplett ausgeschlossen werden. Um dieses Restrisiko zu vermeiden, befolgen Sie die Sicherheitsanweisungen. Dieses Gerät ist nur für den professionellen Gebrauch bestimmt und nicht für den privaten Gebrauch geeignet. MA Lighting Technology GmbH kommt für den Schaden nicht auf, der aufgrund von Nichtbeachtung der Sicherheitsanweisungen entstehen könnte. | | | | ----------------------------------------- | --------------------------------------------------------------------------------------------------------------------------------------------------------------------------------------------------------------------------- | |  | **Warnung:** Durch den Nutzer herbeigeführte Modifikationen an diesen Geräten, die nicht ausdrücklich von der für die Übereinstimmung verantwortlichen Stelle genehmigt wurden, führen zum Verbot der Benutzung der Geräte. | | | | | ------------------------------------------------ | --------------------------------------------------------------------------------------------------------------------------------------------------------------------------------------------------------------------------------------------------------------------------------------------------------------------------------------------------------------------------------------------------------------------------------------------------------------------------------------------------------------------------------------------------------------------------------------------------------------------------------------- | |  | **Wichtig:** Diese Geräte wurden getestet und entsprechen den Grenzwerten eines digitalen Geräts der Klasse A gemäß der FCC-Bestimmungen Teil 15 und der CE-Regularien. Diese Grenzwerte bieten im professionellen Betrieb einen angemessenen Schutz gegen störende Interferenzen. Die Geräte erzeugen, verwenden und strahlen möglicherweise Funkwellen aus. Wenn sie nicht gemäß dieser Anleitung installiert und verwendet werden, können sie den Funkverkehr stören. Der Betrieb dieser Geräte im privaten, häuslichen Bereich kann u. U. Funkstörungen verursachen. In diesem Fall muss der Benutzer die Störungen selbst beheben. | ## Vermeiden von Stromschlag [Section titled “Vermeiden von Stromschlag”](#vermeiden-von-stromschlag) Ein beschädigtes Gerät oder Netzkabel kann schwere oder tödliche Verletzungen verursachen. Die Sicherheitsanweisungen befolgen, um die Verletzungen, die durch elektrischen Strom verursacht werden können, zu vermeiden. * Kein beschädigtes Netzkabel nutzen. * Keine festgeschraubten Abdeckungen am Gehäuse öffnen. * Gerät nur im technisch einwandfreien Zustand nutzen. * Gerät niemals selbst reparieren. * Gerät nicht modifizieren und keine Änderungen an dessen Komponenten und Zubehör vornehmen. * Gerät nicht Regen oder Feuchtigkeit aussetzen. * Gerät nicht in Wasser tauchen. ## []()Allgemeine Sicherheitsanweisungen [Section titled “Allgemeine Sicherheitsanweisungen”](#allgemeine-sicherheitsanweisungen) Um Verletzungen vorzubeugen oder Schaden am Gerät zu vermeiden: * Beim Bedienen nicht in das Gerät hineingreifen. * Gerät und Netzkabel von Kindern unter 8 Jahren fernhalten. * Kinder nicht mit dem Gerät spielen lassen. * Bei Gewitter das Gerät vom Netz trennen (Netzstecker ziehen). * Bei längerer Nichtverwendung Gerät vom Netz trennen (Netzstecker ziehen). * Vor dem Reinigen Gerät vom Netz trennen (Netzstecker ziehen). * Keine flüssigen Reinigungsmittel oder Sprühreiniger verwenden. * Nur mit trockenem Tuch reinigen. * Gerät nicht in der Nähe von Wasser nutzen. * Gerät nicht einer feuchten Umgebung aussetzen. * Keine Flüssigkeiten auf das Gerät schütten. * Belüftungsöffnungen im Gehäuse nicht blockieren – diese sind für den Luftstrom innerhalb des Gerätes wichtig und schützen es vor Überhitzung. * Keine Fremdkörper in die Belüftungsöffnungen stecken, da diese mit spannungsführenden Teilen in Kontakt kommen und Kurzschlüsse, Feuer und / oder Stromschlag verursachen können. * Keine Gegenstände auf das Netzkabel stellen; Nicht auf das Netzkabel treten oder zusammendrücken, besonders am Stecker und an Stellen, an denen die Kabel das Gehäuse verlassen. * Wird ein Verlängerungskabel genutzt, muss sichergestellt werden, dass die Summe der Nennleistungen der an das Kabel angeschlossenen Geräte die Nennleistung des Verlängerungskabels nicht überschreitet. * Sich nicht mit dem Körpergewicht auf dem Gerät abstützen. * Keine schweren Gegenstände auf dem Gerät abstellen. * Keine übermäßige Kraft auf Tasten, Knöpfe, Schalter, Verbinder oder Drehknöpfe ausüben. * Sind Netzkabel oder Stecker beschädigt, müssen diese umgehend von einer Fachkraft ausgetauscht werden. * Gerät nur auf stabilen Oberflächen platzieren; Wird es auf instabilen Oberflächen platziert, kann das Gerät herunterfallen und stark beschädigt werden. * Nur Netzkabel mit Sicherheitsprüfzeichen nutzen. * Keine leistungsstarken Funkgeräte oder Mobiltelefone in der Nähe des Gerätes verwenden. * Das Gerät hat ein Schutzkontaktstecker, der nur in Verbindung mit einer Schutzkontaktsteckdose genutzt werden kann. Sollte der Schutzkontaktstecker nicht in die Steckdose passen, muss diese von einem Elektriker ausgetauscht werden. * Nicht den Sicherheitszweck eines Schutzkontaktsteckers ignorieren. Ein Schutzkontaktstecker hat zwei Stromkontakte und einen dritten Erdungskontakt. Der dritte Erdungskontakt dient Ihrer Sicherheit. * Wie bei allen industriell gefertigten Gütern kann die Verwendung von Stoffen, die Allergien hervorrufen können, wie z.B. Aluminium, nicht gänzlich ausgeschlossen werden. Sollten allergische Reaktionen (wie z.B. Hautausschlag, ständiges Niesen, gerötete Augen oder Atemwegsbeschwerden) auftreten, ist umgehend ein Arzt zur Ursachenklärung aufzusuchen. **Sollte einer der folgenden Punkte zutreffen, das Gerät vom Strom nehmen und den Kundendienst kontaktieren!** * Netzkabel oder -Stecker sind beschädigt, spröde oder brüchig. * Eintritt von Wasser. * Gerät wurde Regen oder hoher Luftfeuchtigkeit ausgesetzt. * Gerät funktioniert bei Einhaltung von Bedienungsanweisungen, die im Quick Manual stehen, nicht einwandfrei. Steuerelemente so einstellen wie im Quick Manual beschrieben, da eine falsche Einstellung das Gerät beschädigen könnte. * Gerät ist heruntergefallen und dabei wurde das Gehäuse beschädigt.
# Sécurité
> Avertissement – Zone de danger
## Symboles et consignes de sécurité [Section titled “Symboles et consignes de sécurité”](#symboles-et-consignes-de-sécurité) | | | | ----------------------------------------- | ------------------------------------------------------------------------------------------------------------------------------------------------------------------------------------------------------------------------- | |  | **Avertissement :** Seul du personnel entraîné est autorisé à installer, mettre sous tension et faire fonctionner le I/0 Node DIN-Rail. Respectez les consignes de sécurité et de prévention des accidents de votre pays. | **Avertissement** – Zone de danger  \*\*Avertissement \*\*– Zone de danger ***  **Attention** – Risque de choc électrique *** ## Risque de choc électrique [Section titled “Risque de choc électrique”](#risque-de-choc-électrique) L’appareil ne doit être entretenu que par du personnel qualifié, des parties sous tension risquant d’être exposées lors de l’ouverture et / ou du retrait des couvercles. Le contact avec des pièces sous tension peut provoquer un choc électrique.  ***  Éliminer comme déchets dangereux. Respecter la réglementation en vigueur. Pour plus d’informations, voir [Élimination](/grandma3/2-3/key_i_o_node_disposal-2/). ***  Déclaration de conformité Pour plus d’informations, voir [Conformité](/grandma3/2-3/key_i_o_node_conformity-1-2/). ***  Tension de service Marche / Arrêt | | | | ----------------------------------------- | -------------------------------------------------------------------------------------------------------------------------------------------------------------------------------------------------------------------------------------------------------------- | |  | **Avertissement:** L’appareil doit être mis à la terre. Ne pas ignorer la fonction de sécurité d’une prise avec terre. Une prise avec terre a deux contacts électriques et un troisième contact de terre. Le troisième contact est prévu pour votre sécurité. | Lisez attentivement toutes les instructions de ce guide rapide, en particulier les consignes générales de sécurité ci-dessous et les [limitations d’usages](/grandma3/2-3/key_i_o_node_safety-1-2/#general_safety_instructions). Suivez les instructions et conservez ce guide rapide pour une utilisation ultérieure. Respectez toutes les mises en garde et tous les avertissements mentionnés dans ce guide rapide et indiqués sur l’appareil. | | | | ------------------------------------------------ | ------------------------------------------------------------------------------------------------------------------------------------------- | |  | **Important:** Tous les travaux de réparation et d’entretien doivent être effectués exclusivement par des techniciens de service qualifiés. | * Cet appareil est à la pointe de la technologie ; * Cependant, des risques résiduels ne peuvent être exclus ; * Pour éviter les risques, suivez les consignes de sécurité ; * Cet appareil est destiné uniquement à un usage professionnel et ne convient pas à un usage résidentiel. MA Lighting Technology GmbH ne prend pas en charge d’éventuels dommages pouvant survenir en cas de non-respect des consignes de sécurité. | | | | ----------------------------------------- | ----------------------------------------------------------------------------------------------------------------------------------------------------------------------------------------------------------- | |  | **Avertissement:** Des changements ou des modifications à ces appareils non expressément approuvés par la partie responsable de la conformité pourraient annuler le droit de l’utilisateur de les utiliser. | | | | | ------------------------------------------------ | --------------------------------------------------------------------------------------------------------------------------------------------------------------------------------------------------------------------------------------------------------------------------------------------------------------------------------------------------------------------------------------------------------------------------------------------------------------------------------------------------------------------------------------------------------------------------------------------------------------------------------------------------------------------------------------------------------------------------------------------------------------------------------- | |  | **Note :** Ces appareils ont été testés et jugés conformes aux limites d’un appareil numérique de classe A, conformément à la partie 15 des règles de la FCC et aux normes CE. Ces limites sont conçues pour fournir une protection raisonnable contre de possibles interférences lorsque les appareils sont utilisés dans un environnement commercial. Ceux-ci génèrent, utilisent et peuvent émettre de l’énergie radiofréquence et, s’ils ne sont pas installés et utilisés conformément à ce guide rapide, peuvent éventuellement causer des interférences aux communications radio. L’utilisation de ces appareils dans une zone résidentielle est susceptible de causer des interférences, auquel cas l’utilisateur devra corriger ces interférences à ses propres frais. | ## Dangers causés par le courant électrique [Section titled “Dangers causés par le courant électrique”](#dangers-causés-par-le-courant-électrique) Un appareil ou un câble d’alimentation défectueux présente un risque de blessures graves ou mortelles dues à un choc électrique. Suivez les consignes de sécurité pour éviter les risques liés au courant électrique. * N’utilisez pas de câble d’alimentation défectueux ; * Ne pas ouvrir les couvercles vissés de l’appareil ; * N’utilisez l’appareil que s’il est dans un état technique impeccable ; * Ne réparez pas l’appareil par vos propres moyens ; * N’effectuez pas d’ingénierie inverse sur l’appareil et n’apporter aucune modification à ses composants et accessoires ; * N’exposez pas l’appareil à la pluie ou à l’humidité ; * Ne pas plonger l’appareil dans l’eau. ## []()Consignes de sécurité générales [Section titled “Consignes de sécurité générales”](#consignes-de-sécurité-générales) Pour éviter des blessures ou des dommages à l’appareil : * Ne mettez pas vos mains à l’intérieur de l’appareil pendant le fonctionnement ; * L’appareil et le câble d’alimentation doivent être tenus à l’écart des enfants de moins de 8 ans ; * Les enfants ne sont pas autorisés à jouer avec l’appareil ; * Débranchez l’alimentation électrique du réseau pendant les orages ; * Débranchez l’alimentation électrique du réseau si l’appareil est laissé sans surveillance pendant une longue période ; * Débranchez l’alimentation électrique avant de nettoyer l’appareil ; * N’utilisez pas de nettoyant liquide ou en aérosol. Utilisez uniquement un chiffon sec ; * Ne pas utiliser l’appareil à proximité de l’eau ; * Ne l’exposez pas à un environnement humide ; * Ne versez aucun liquide sur l’appareil ; * Ne bouchez pas ou ne couvrez pas les trous de ventilation de l’appareil. Ceux-ci sont essentiels à la circulation de l’air à l’intérieur de l’appareil et protègent l’appareil contre la surchauffe ; * N’insérez aucun objet dans les trous de ventilation de l’appareil car ceux-ci pourraient entrer en contact avec des pièces sous tension ou provoquer des courts-circuits, un incendie et / ou un choc électrique ; * Ne placez aucun objet sur le câble d’alimentation. Protégez-le contre tout risque de piétinement ou de pincement, en particulier au niveau du connecteur et à l’endroit où les câbles sortent de l’appareil ; * Lors de l’utilisation d’un cable de rallonge, assurez-vous que la puissance nominale de tous les appareils connectés en série ne dépasse pas la puissance nominale maximale du cable de rallonge ; * Ne vous appuyez pas sur l’appareil ; * Ne placez aucun objet lourd sur l’appareil ; * N’utilisez pas de force excessive sur les touches, les boutons, les interrupteurs, les connecteurs ou sur les boutons tournants ; * Si le câble d’alimentation ou la fiche d’alimentation principale sont défectueux, faites-les remplacer immédiatement par un technicien qualifié ; * Placez l’appareil uniquement sur des surfaces stables. S’il est placé sur des surfaces instables, il peut tomber et se casser ; * N’utilisez que des câbles d’alimentation homologués avec marquage ; * N’utilisez pas de talkie-walkie puissant ou de téléphone portable à proximité de l’appareil ; * L’appareil est équipé d’une fiche de sécurité. Cette fiche ne peut être utilisé qu’avec des prises de sécurité compatible. * Comme pour tous les produits fabriqués industriellement, l’utilisation de substances induisant une réaction allergique telle que l’aluminium ne peut généralement pas être exclue. Si vous développez une réaction allergique (éruption cutanée, éternuements fréquents, yeux rouges ou difficultés respiratoires), consultez immédiatement un médecin pour en déterminer la cause. \*\*Si l’une des conditions suivantes se produit, débranchez la fiche d’alimentation principale et appelez votre distributeur local ou le \*\***support technique !** * Le câble d’alimentation ou la fiche principale est endommagé ou usé ; * Pénétration de liquides ; * L’appareil a été exposé à la pluie ou à une forte humidité ambiante ; * L’appareil ne fonctionne pas correctement, même si vous avez suivi toutes les instructions de ce guide rapide. N’utilisez les commandes que comme indiquées dans le guide rapide. Des paramètres incorrects peuvent endommager l’appareil ; * L’appareil est tombé et le boitier est endommagé.
# Support
> Contact us for any questions about your MA product.
Contact us for any questions about your MA product. MA Lighting and its extensive distributor network offer unparalleled technical support. Call on our expertise for help with any problem, no matter if it is about the operation, software features, software installations, or troubleshooting. ### Help Pages [Section titled “Help Pages”](#help-pages) The help pages are included in every software installer package and are automatically loaded into the software. To access and read the help pages, press Help + Please. The help pop-up opens on the main screen. To jump directly into a special help topic, use the context-sensitive help: * Press and hold Help and tap the desired user interface element (UI element) to open the corresponding help topic. * Tap  in the control bar and tap a UI element to open the corresponding help topic. ### Online Manuals [Section titled “Online Manuals”](#online-manuals) All MA product-related manuals are available as online versions. Just select your MA product and click on the respective link. All further documents can be found in our download area. Go to [https://www.malighting.com/training-support/online-manuals.](https://www.malighting.com/training-support/online-manuals) ### Video Tutorials [Section titled “Video Tutorials”](#video-tutorials) Get tips and tricks from our MA experts on your MA product. MA offers a whole range of videos on how to use your MA product in the best possible way. Just select your series and click on the links to watch the videos on our YouTube channel. Go to [https://www.malighting.com/training-support/video-tutorials.](https://www.malighting.com/training-support/video-tutorials) ### Community [Section titled “Community”](#community) Share your knowledge and get help from other MA users. A community can be stronger and better than the individual. Be part of the MA community! Go to [https://www.malighting.com/training-support/community.](https://www.malighting.com/training-support/community) ### Fixture Shares [Section titled “Fixture Shares”](#fixture-shares) In our MA Fixture Share you will find a comprehensive database of different fixture types for grandMA3, grandMA2, and dot2. You can also find the grandMA2 GDTF Converter there. Simply upload the GDTF file and it will be converted into a grandMA2 Fixture Profile.\ \ The GTDF Share contains a comprehensive library of all available GDTF files with all relevant modes and firmware versions. Like the MA Fixture Share, this database is continuously updated. For more information see: ### Local Support [Section titled “Local Support”](#local-support) If you have a question regarding your MA Lighting product, please first of all contact your local MA product specialists. ### Central Support [Section titled “Central Support”](#central-support) If you are in need of further assistance or manufacturer support, please fill out an email request on [www.malighting.com in](http://www.malighting.com%C2%A0in) Training and Support. Your request will automatically be sent to\*\* \*\*(in English or German). This email service is monitored during MA Lighting’s regular business hours in Germany from 8.30 am until 5 pm, Monday through Friday. ### Emergency Hotline [Section titled “Emergency Hotline”](#emergency-hotline) In any case of a show critical emergency please contact the MA Lighting support hotline. Phone +49 5251 68 88 65 99 Please note that this 24/7 hotline is strictly for emergency cases. ### Intellectual Property [Section titled “Intellectual Property”](#intellectual-property) MA Lighting Technology has registered multiple patents, trademarks, design patents, and utility models for its products.\ We will take legal action against the violation of this intellectual property. For more information see:
# Support
> Bei Fragen zu Ihren MA Produkten wenden Sie sich bitte an uns.
Bei Fragen zu Ihren MA Produkten wenden Sie sich bitte an uns. MA Lighting bietet mit dem angeschlossenen umfassenden Distributionsnetzwerk einen einmaligen technischen Support. Sollten wider Erwarten Probleme auftreten, stehen wir Ihnen mit unserem Know-how zur Seite, ganz gleich worum es sich handelt – Bedienung, Software-Features, Software-Installation oder Fehlerbeseitigung. ### Offline Hilfe [Section titled “Offline Hilfe”](#offline-hilfe) Die Offline Hilfe ist in jedem Software Installer enthalten und wird automatisch in die Software geladen. Zum Aufrufen der Hilfe die Tasten Help + Please drücken. Das Hilfe Fenster öffnet sich auf dem Hauptmonitor. Um ein spezielles Hilfethema direkt anzuspringen, die Kontextsensitive Hilfe verwenden. Um das entsprechende Hilfethema zu öffnen: * Taste Help drücken und halten und das gewünschte Bedienelement antippen. * Das  in der Kontrollleiste und das gewünschte Bedienelement antippen. ### Online Manuals [Section titled “Online Manuals”](#online-manuals) Alle Benutzerhandbücher der MA Produkte sind als Online-Versionen verfügbar. Einfach auswählen, für welches MA Produkt Sie eine Bedienungsanleitung benötigen. Gehe zu . ### Video Tutorials [Section titled “Video Tutorials”](#video-tutorials) Hier erhalten Sie Tipps und Tricks von unseren MA Experten für Ihr MA Produkt. MA Lighting bietet eine große Anzahl an Tutorial-Videos an, damit Sie Ihr MA Produkt bestmöglich nutzen können. Wählen Sie dafür einfach eine Serie aus und sehen Sie alle Videos dazu auf unserem YouTube Kanal. Gehe zu . ### Community [Section titled “Community”](#community) Teilen Sie Ihr Wissen mit anderen MA Usern. In der Gemeinschaft ist man effektiver. Werden Sie Mitglied der MA Community! Gehe zu [https://www.malighting.com/de/training-support/community](https://www.malighting.com/de/training-support/community/). ### Fixture Shares [Section titled “Fixture Shares”](#fixture-shares) Im MA Fixture Share befindet sich eine umfassende Bibliothek der unterschiedlichsten Fixture Typen für alle grandMA3, grandMA2 und dot2 Serien. Im GTDF Share befindet sich eine umfassende Bibliothek aller verfügbaren GDTF Files mit allen relevanten Modi und Firmware Versionen. Diese Datenbank wird, wie das MA Fixture Share kontinuierlich aktualisiert. Mehr Info unter . ### Lokaler Support [Section titled “Lokaler Support”](#lokaler-support) Bei Fragen zu Ihren MA Lighting Produkten bitte als erstes an Ihre MA Produktspezialisten vor Ort wenden. ### Zentraler Support [Section titled “Zentraler Support”](#zentraler-support) Für weitere Hilfe oder Herstellerunterstützung schicken Sie uns bitte ein [ausgefülltes E-Mail-Formular](https://www.malighting.com/de/training-support/support-anfrage) unter , Training und Support. Diese Anfrage wird automatisch an \*\* \*\*(in Englisch oder Deutsch) gesendet. Dieser E-Mail-Service ist während der regulären Geschäftszeiten von MA Lighting von 8.30 Uhr bis 17 Uhr von Montag bis Freitag erreichbar. ### Notfall-Hotline [Section titled “Notfall-Hotline”](#notfall-hotline) In show-kritischen Situationen nehmen Sie bitte Kontakt zur MA Lighting Support-Hotline auf. Tel. +49 5251.68 88 65 99 Diese Hotline ist 24 Stunden am Tag und 7 Tage in der Woche besetzt. Sie ist nur für Notfälle. ### Intellectual Property [Section titled “Intellectual Property”](#intellectual-property) MA Lighting Technology hat für seine Produkte zahlreiche Patente, Marken, Geschmacksmuster und Gebrauchsmuster angemeldet. Im Falle der Verletzung dieses geistigen Eigentums werden wir rechtliche Schritte einleiten. Mehr Info unter .
# Support technique
> Contactez-nous pour toute question concernant votre produit MA.
Contactez-nous pour toute question concernant votre produit MA. MA Lighting et son vaste réseau de distributeurs offrent un support technique incomparable. Faites appel à notre expertise pour tout problème, qu’il s’agisse de fonctionnement, de fonctionnalités logicielles, d’installations logicielles ou de dépannage. ### Pages d’aide [Section titled “Pages d’aide”](#pages-daide) Les pages d’aide sont incluses dans chaque logiciel d’installation et sont automatiquement chargées dans le logiciel. Pour accéder et lire les pages d’aide, appuyez sur Help + Please. La fenêtre contextuelle d’aide s’ouvre sur l’écran principal. Pour accéder directement à une rubrique d’aide spéciale, utilisez l’aide contextuelle : * Appuyez et maintenez enfoncé le bouton Help et touchez l’élément d’interface utilisateur (élément IU) souhaité pour ouvrir la rubrique d’aide correspondante. * Tapez sur  dans la barre de contrôle et appuyez sur un élément de l’IU pour ouvrir le sujet d’aide correspondant. ### Guides en ligne [Section titled “Guides en ligne”](#guides-en-ligne) Tous les guides relatifs aux produits MA sont disponibles en ligne. Choisissez simplement votre produit MA et cliquez sur le lien correspondant. Tous les autres documents sont disponibles dans notre espace de téléchargement. Visitez . ### Tutoriels vidéo [Section titled “Tutoriels vidéo”](#tutoriels-vidéo) Obtenez des conseils et astuces de nos experts MA sur votre produit MA. MA vous propose toute une gamme de vidéos sur la meilleure façon d’utiliser votre produit MA. Sélectionnez simplement votre série et cliquez sur les liens pour regarder les vidéos sur notre chaîne YouTube. Visitez . ### Communauté [Section titled “Communauté”](#communauté) Partagez vos connaissances et obtenez l’aide d’autres utilisateurs de MA. Une communauté peut être plus forte et meilleure que l’individu. Faites partie de la communauté MA ! Visitez . ### Fixture Shares [Section titled “Fixture Shares”](#fixture-shares) Dans notre MA Fixture Share, vous trouverez une base de données complète des différents types de luminaires pour grandMA3, grandMA2 et dot2. Le partage GTDF contient une bibliothèque complète de tous les fichiers GDTF disponibles avec tous les modes et versions de micrologiciel pertinents. Tout comme MA Fixture Share, cette base de données est continuellement mise à jour. Pour plus d’informations, voir: ### Support local [Section titled “Support local”](#support-local) Si vous avez une question concernant votre produit MA Lighting, veuillez tout d’abord contacter votre spécialiste MA local. ### Support central [Section titled “Support central”](#support-central) Si vous avez besoin de plus d’aide ou d’assistance de la part du fabricant, veuillez remplir une demande par e-mail à [www.malighting.com](https://www.malighting.com/) sous Training and Support. Votre demande sera automatiquement envoyée à **** (en anglais ou en allemand). Ce service de messagerie électronique est surveillé pendant les heures d’ouverture habituelles de MA Lighting en Allemagne, de 8h30 à 17h, du lundi au vendredi. ### Hotline d’urgence [Section titled “Hotline d’urgence”](#hotline-durgence) En cas d’urgence, veuillez contacter le support technique de MA Lighting. Téléphone +49 5251 68 88 65 99 Veuillez prendre note que cette ligne d’assistance 24 heures sur 24 et 7 jours sur 7 est strictement réservée aux cas d’urgence. ### Propriété intellectuelle [Section titled “Propriété intellectuelle”](#propriété-intellectuelle) MA Lighting Technology a déposé plusieurs brevets, marques de commerce, brevets de conception et modèles d’utilité pour ses produits. Nous intenterons une action en justice contre la violation de cette propriété intellectuelle. Pour plus d’informations, voir:
# Technical Data
| | | | ------------------------------------------ | ------------------------------------------------------------------------------------------------------------------------ | |  | **Hint:** grandMA3 I/O nodes PoE can also be powered by a direct power connection using a PoE switch, or a PoE injector. | | | | | ------------------------------------------------ | ------------------------------------------------------------------------------------------------------------------------------------------------------------------------------------------------------------------------- | |  | **Important:** Only use adequately protected power cables (min. Ø = 3 x 1.0 mm²). The required power cable must meet the country’s standards. **Only qualified personnel is allowed to perform work on the power cable!** | | | | | ------------------------------------------------ | ----------------------------------------------------------------------------------- | |  | **Important:** Power cable and connector are not included in the delivery.\*\* \*\* |
# Données Techniques
> Données Techniques
| | | | ------------------------------------------ | ----------------------------------------------------------------------------------------------------------------------------------------------- | |  | **Indice:** La I/O Node PoE grandMA3 peut être alimenté par une connexion électrique directe utilisant un commutateur PoE ou un injecteur PoE. | | | | | ------------------------------------------------ | ----------------------------------------------------------------------------------------------------------------------------------------------------------------------------------------------------------------------------------------------------------- | |  | **Important:** Utiliser des câbles protégés adéquatement (min. Ø = 3 x 1.0 mm²). Le câble de courant requis pour le branchement doit être conforme au standard du pays. **Seul une personne qualifiée est autorisée à travailler sur le câble de courant!** | | | | | ------------------------------------------------ | --------------------------------------------------------------------------------------------- | |  | **Important:** Le câble d’alimentation et le connecteur ne sont pas inclus dans la livraison. | | | | | ------------------------------------------------ | --------------------------------------------------------------------------------------------------------------------------------------- | |  | **Important:** Utiliser le port USB pour la mise à niveau seulement. Ne branché pas d’appareil périphérique (exemple, souris, clavier). | * DMX: la longueur maximale du câble ne doit pas excéder 350 m (dans des conditions idéal) * Utiliser un câble Ethernet de type CAT-5e ou supérieur. La longueur maximale du câble est de 75 m. ### grandMA3 I/O Node [Section titled “grandMA3 I/O Node”](#grandma3-io-node)  **Données Techniques** | Paramètres | Aucun | | ------------------------------- | ----------------------------------------------------------------- | | Affichage | 3.9 ” TFT color | | Tension | 100-240 V AC, 50/60 Hz | | Tension de fonctionnement (PoE) | IEEE 802.3af, 48 V DC/max. 12 W | | Poids net | 2 kg / 5 lbs | | Puissance | max. 15 VA | | Dimensions | 207 x 184 x 43 mm / 9 x 8 x 2 in (largeur x profondeur x hauteur) | ### Sorties grandMA3 I/O Node [Section titled “Sorties grandMA3 I/O Node ”](#sortiesgrandma3-io-node)  | Nombre | Connecteur | | ------ | ------------------------------------------- | | 1 x | powerCON TRUE1\* | | 1 x | MIDI In | | 1 x | MIDI Out | | 1 x | LTC | | 1 x | DC Remote IN | | 1 x | etherCON/RJ45 L (link) G (gigabit) | | 1 x | USB 2.0 (type A)\*\* | \* marque déposée de Neutrik AG, Liechtenstein\ \*\* Ne branché pas d’appareil périphérique (souris, clavier, ou autre). ### grandMA3 I/O Node DIN-Rail [Section titled “grandMA3 I/O Node DIN-Rail”](#grandma3-io-node-din-rail)  | Données Techniques | | | ------------------------------- | ---------------------------------------------------------------- | | Paramètres | Aucun | | Affichage | 3.9 ” TFT couleur | | Tension de fonctionnement | 100-240 V AC, 50/60 Hz | | Tension de fonctionnement (PoE) | IEEE 802.3af, 48 V DC/max. 12 W | | Poids Net | 1 kg / 3 lbs | | Puissance | max. 15 VA | | Dimensions | 150 x 50 x 90 mm / 6 x 2 x 4 po (largeur x profonduer x hauteur) | ### Sorties grandMA3 I/O Node DIN-Rail [Section titled “Sorties grandMA3 I/O Node DIN-Rail”](#sortiesgrandma3-io-node-din-rail)  | Nombre | Connecteur | | ------ | ------------------------------------------- | | 1 x | MIDI In | | 1 x | MIDI Out | | 1 x | LTC | | 1 x | DC Remote | | 1 x | etherCON/RJ45 L (link) G (gigabit) | | 1 x | USB 2.0 (type A)\*\* | \*\* Ne branché pas d’appareil périphérique (souris, clavier, ou autre).
# Technische Daten
> eingetragene Marke der Neutrik AG, Liechtenstein
| | | | ------------------------------------------ | --------------------------------------------------------------------------------------------------------------------------------------------------------- | |  | **Hinweis:** Der grandMA3 I/O Node PoE und der grandMA3 I/O Node DIN-Rail können auch durch einen PoE Switch oder PoE Injector mit Strom versorgt werden. | | | | | ------------------------------------------------ | ------------------------------------------------------------------------------------------------------------------------------------------------------------------------------------------------------------------------------------------------------- | |  | **Wichtig:** Ausreichend isolierte und geschützte Netzkabel verwenden (min. Ø = 3 x 1,0 mm²). Das Netzkabel muss den Standards des Landes entsprechen. **Arbeiten am Netzkabel dürfen ausschließlich von qualifiziertem Personal durchgeführt werden!** | | | | | ------------------------------------------------ | ----------------------------------------------------------------------------- | |  | **Wichtig:** Netzkabel und Verbinder nicht im Lieferumfang enthalten.\*\*\*\* | | | | | ------------------------------------------------ | --------------------------------------------------------------------------------------------------------------------------------------- | |  | **Wichtig:** Den USB-Anschluss nur für Software-Aktualisierungen verwenden. Keine Geräte anschließen (zum Beispiel Tastatur oder Maus). | * CAT-5e Ethernet-Kabel Kategorie oder höher verwenden; die maximale Kabellänge beträgt 75 m. ### grandMA3 I/O Node [Section titled “grandMA3 I/O Node”](#grandma3-io-node)  | Technische Daten | | | -------------------------------- | --------------------------------------------------------- | | Parameter | Keine | | Anzeige | 3,9 ” TFT Farbmonitor | | Betriebsspannung (Netzanschluss) | 100-240 V AC, 50/60 Hz | | Betriebsspannung (PoE) | IEEE 802.3af; 48 V DC/max. 12 W | | Gewicht (ohne Verpackung) | 2 kg / 5 lbs | | Anschlussleistung | max. 15 VA | | Maße | 207 x 184 x 43 mm / 9 x 8 x 2 in (Breite x Tiefe x Höhe) | ### Ausgänge grandMA3 I/O Node [Section titled “Ausgänge grandMA3 I/O Node ”](#ausgänge-grandma3-io-node)  | Anzahl | Steckverbinder | | ------ | ------------------------------------------- | | 1 x | powerCON TRUE1\* | | 1 x | MIDI In | | 1 x | MIDI Out | | 1 x | LTC | | 1 x | DC Remote IN | | 1 x | etherCON/RJ45 L (link) G (gigabit) | | 1 x | USB 2.0 (type A)\*\* | \* eingetragene Marke der Neutrik AG, Liechtenstein\ \*\* Keine Geräte anschließen (zum Beispiel Tastatur oder Maus). ### grandMA3 I/O Node DIN-Rail [Section titled “grandMA3 I/O Node DIN-Rail”](#grandma3-io-node-din-rail)  | Technische Daten | | | -------------------------------- | ------------------------------------------------------- | | Parameter | Keine | | Anzeige | 3,9 ” TFT-Farbmonitor | | Betriebsspannung (Netzanschluss) | 100-240 V AC, 50/60 Hz | | Betriebsspannung (PoE) | IEEE 802.3af 48 V DC/max. 12 W | | Gewicht (ohne Verpackung) | 1 kg / 3 lbs | | Anschlussleistung | max. 15 VA | | Maße | 150 x 50 x 90 mm / 6 x 2 x 4 in (Breite x Tiefe x Höhe) | ### Ausgänge grandMA3 I/O Node DIN-Rail [Section titled “Ausgänge grandMA3 I/O Node DIN-Rail”](#ausgänge-grandma3-io-node-din-rail)  | Anzahl | Steckverbinder | | ------ | ------------------------------------------- | | 1 x | MIDI In | | 1 x | MIDI Out | | 1 x | LTC | | 1 x | DC Remote | | 1 x | etherCON/RJ45 L (link) G (gigabit) | | 1 x | USB 2.0 (Typ A)\*\* | \*\* Keine Geräte anschließen (zum Beispiel Tastatur oder Maus).
# Transport
> Noncompliance with the safety instructions can result in personal injury or material damage;
* The grandMA3 I/O Node must be protected from environmental factors such as physical shocks and vibration during transportation; * Remove all cables before transport; * The user is responsible for securely fastening the products for transport and for following the manufacturer’s safety instructions when transporting the device;\ Noncompliance with the safety instructions can result in personal injury or material damage; * Do not place the grandMA3 I/O Node on unstable surfaces; * Do not place any objects on top of the grandMA3 I/O Node. | | | | ----------------------------------------- | ----------------------------------------------------------------------------------------------------------------------------------------------------------------------------------------------------------------------------------------------------------------------------------------------- | |  | **Warning:** Pay attention to temperature and humidity during transport. For more information see [Limitations](/grandma3/2-3/key_grandma3_i_o_node/). After the transport check the device. If the device is damaged (dented, bent, or broken), do not connect the grandMA3 I/O Node to power! |
# Transport
* Die grandMA3 I/O Nodes während des Transports vor Umwelteinflüssen wie Erschütterungen und Vibrationen schützen. * Alle Kabel vor dem Transport entfernen. * Der Benutzer ist dafür verantwortlich, das Gerät beim Transport sicher zu befestigen und die Sicherheitshinweise des Herstellers zu beachten. Die Nichteinhaltung der Sicherheitshinweise kann zu Personen- oder Sachschäden führen. * Die grandMA3 xPort Nodes nicht auf eine instabile Oberfläche stellen. * Keine weiteren Objekte auf die grandMA3 xPort Nodes stellen. | | | | ----------------------------------------- | ------------------------------------------------------------------------------------------------------------------------------------------------------------------------------------------------------------------------------------------------------------------------------------------------------------------------------------------------------------ | |  | **Warnung:** - Beim Transport die zulässigen Werte für Temperaturen und Luftfeuchte beachten. Für weitere Information, siehe [Betriebsgrenzen](/grandma3/2-3/key_grandma3_i_o_node-1/). - Nach dem Transport das Gerät prüfen. - Wenn das Gerät oder sein Display beschädigt ist (verbeult, verbogen oder kaputt), nicht an die Stromversorgung anschließen! |
# Transport
> Le non-respect des consignes de sécurité peut entraîner des dommages corporels ou matériels ;
* Les grandMA3 I/O Nodes doivent être protégés des influences environnementales telles que les chocs physiques et les vibrations pendant le transport ; * Retirez tous les câbles avant le transport ; * L’utilisateur est responsable de la sûreté de la fixation des produits pour le transport et du respect des consignes de sécurité du fabricant lors du transport de l’appareil ;\ Le non-respect des consignes de sécurité peut entraîner des dommages corporels ou matériels ; * Ne placez pas les grandMA3 xPort Nodes sur des surfaces instables ; * Ne placez aucun objet sur les grandMA3 xPort Nodes. | | | | ----------------------------------------- | ---------------------------------------------------------------------------------------------------------------------------------------------------------------------------------------------------------------------------------------------------------------------------------------------------------------------------------------------------------------------------------------------------------------------------------- | |  | **Attention:** -Faites attention à la température et à l’humidité pendant le transport. Pour plus d’informations, voir [Limitations d’usage](https://malighting.clickhelp.co/smart/project-waduc_qa_grandma3-user-manual/key_grandma3_i_o_node-1-2). -Après le transport, vérifiez l’appareil. -Si l’appareil ou son écran est endommagé (cabossé, tordu ou cassé), ne connectez pas le grandMA3 xPort Node au réseau électrique ! |
# If
> Pressing If enters the IfOutput keyword into the command line.
## IfOutput [Section titled “IfOutput”](#ifoutput) Pressing If enters the IfOutput keyword into the command line. | | | | ------------------------------------------------------------------ | ---------------------------- | |  | User name\[Fixture]>IfOutput | For more information about IfOutput, see the [IfOutput keyword](/grandma3/2-3/keyword_ifoutput/). ## IfActive [Section titled “IfActive”](#ifactive) Pressing If If enters the IfActive keyword into the command line. | | | | ------------------------------------------------------------------ | ---------------------------- | |  | User name\[Fixture]>IfActive | For more information about IfActive, see the [IfActive keyword](/grandma3/2-3/keyword_ifactive/). ## IfProg [Section titled “IfProg”](#ifprog) Pressing If If If enters the IfProg keyword into the command line. | | | | ------------------------------------------------------------------ | -------------------------- | |  | User name\[Fixture]>IfProg | For more information about IfProg, see the [IfProg keyword](/grandma3/2-3/keyword_ifprogrammer/). ## If [Section titled “If”](#if) Pressing If If If If enters the If keyword into the command line. | | | | ------------------------------------------------------------------ | ---------------------- | |  | User name\[Fixture]>If | For more information about If, see the [If keyword](/grandma3/2-3/keyword_if/). ## EndIf [Section titled “EndIf”](#endif) Pressing If again once the If command is already in the command line enters the EndIf keyword into the command line. | | | | ------------------------------------------------------------------ | ----------------------------------------------------- | |  | User name\[Fixture]>Store If Group 5 EndIf Preset 1.1 | For more information about EndIf, see the [EndIf keyword](/grandma3/2-3/keyword_endif/). Location If is located in the numeric keys section.  *Location on grandMA3 full-size and grandMA3 light consoles* ***  *Location on grandMA3 compact consoles and grandMA3 onPC command wing*
# Intended Use
> The grandMA3 onPC fader wing controls all kinds of lighting genres such as conventional, moving lights, LEDs, video, and media via DMX signal or within a networ
The grandMA3 onPC fader wing controls all kinds of lighting genres such as conventional, moving lights, LEDs, video, and media via DMX signal or within a network environment. All grandMA3 components, despite different hardware solutions, use the same software. All components are fully integrable into the network environment. Use all grandMA3 components and accessories within closed rooms and in the permissible environmental conditions only. Installation and connection of the devices are explicitly to be carried out by trained personnel in compliance with all safety regulations.
# Verwendungszweck
> Der grandMA3 onPC fader wing steuert alle Arten von Lichttechnik wie konventionelles Licht, intelligentes Licht, LED, Video und ähnliche Medien mit Hilfe von DM
## Bestimmungsgemäße Verwendung [Section titled “Bestimmungsgemäße Verwendung”](#bestimmungsgemäße-verwendung) Der grandMA3 onPC fader wing steuert alle Arten von Lichttechnik wie konventionelles Licht, intelligentes Licht, LED, Video und ähnliche Medien mit Hilfe von DMX-Signalen oder in einer Netzwerkumgebung. Alle grandMA3 Komponenten verwenden die gleiche Software, ungeachtet unterschiedlicher Hardware. Sämtliche Komponenten können komplett ins Netzwerk integriert werden. Alle grandMA3 Komponenten und Zubehör dürfen ausschließlich in geschlossenen Räumen und innerhalb zulässiger Umgebungsbedingung verwendet werden. Installation und Anschluss von Geräten dürfen nur vom geschulten Personal, unter Einhaltung aller Sicherheitsvorschriften, durchgeführt werden.
# Usage Prévu
> Les fader wings grandMA3 onPC contrôlent tous genres de projecteurs tels que les projecteurs conventionnels, les motorisées, les LEDs, la vidéo et les média, en
Les fader wings grandMA3 onPC contrôlent tous genres de projecteurs tels que les projecteurs conventionnels, les motorisées, les LEDs, la vidéo et les média, en utilisant le signal DMX ou dans un environnement réseau. Toutes les composantes grandMA3, malgré des solutions matérielles différentes, utilisent le même logiciel. Tous les composants sont entièrement intégrables dans l’environnement du réseau. Utilisez tous les composants et accessoires de grandMA3 uniquement dans des locaux fermés et dans les conditions environnementales autorisées. L’installation et le raccordement des appareils doivent être effectués explicitement par un personnel qualifié, en conformité avec toutes les règles de sécurité.
# Installation
> 1. Install the grandMA3 I/O Node DIN-Rail onto the rail.
| | | | ------------------------------------------ | ----------------------------------------------------------------------------------------------------------------------------------------------------------------------------------------------- | |  | **Hint:** The grandMA3 I/O Node can be connected with the power cable. Only the grandMA3 I/O Nodes DIN-Rail need to be installed on the rail following DIN EN 60715 and the instructions below. | | | | | ------------------------------------------------ | ------------------------------------------------------------------------------------------------------------------------ | |  | **Important:** Install the grandMA3 I/O Node DIN-Rail horizontally so that the input terminal is located at the bottom. | | | | | ----------------------------------------- | --------------------------------------------------------------------------------------------------------------------------------------------------------------------- | |  | **Warning:** In order for the device to dissipate heat, comply with a minimum distance of 30 mm (approx. 2 inches) above and beneath the grandMA3 I/O Node DIN-Rail. | 1. Install the grandMA3 I/O Node DIN-Rail onto the rail.  Place the grandMA3 I/O Node DIN-Rail on the rail.  Snap into place 2. Build the I/O Node DIN-Rail into the switchboard. ### Connections [Section titled “Connections”](#connections)  Connect with electrical grid -or-  Connect via PoE | Power | | | --------------------- | -------------------------------------------------------------- | | Connector | MC 1.5/ 3-ST1-5.08 | | Rigid cables | 0.75 mm² - 1.5 mm² (18-16 AWG) | | Flexible cables | 0.75 mm² - 1.5 mm² (18-16 AWG) Wire end sleeves are permitted. | | Wire stripping length | 7 mm | | Tightening torque | 0.22 Nm - 0.25 Nm | | MIDI & LTC | | | --------------------- | --------------------------------------------------------------- | | Connector | FK-MC 0.5/ 3-ST-2.5 | | Rigid cables | 0.14 mm² - 0.5 mm² (26-20 AWG) | | Flexible cables | 0.14 mm² - 0.5 mm² (26-20 AWG) Wire end sleeves are permitted. | | Wire stripping length | 8 mm | | DC Remote | | | --------------------- | --------------------------------------------------------------- | | Connector | FK-MC 0.5/ 7-ST-2.5 | | Rigid cables | 0.14 mm² - 0.5 mm² (26-20 AWG) | | Flexible cables | 0.14 mm² - 0.5 mm² (26-20 AWG) Wire end sleeves are permitted. | | Wire stripping length | 8 mm |
# Installation
> 1. Den grandMA3 I/O Node DIN-Rail auf der Schiene installieren.
| | | | ------------------------------------------ | -------------------------------------------------------------------------------------------------------------------------------------------------------------------------------------------- | |  | **Hinweis:** Der grandMA3 I/O Node lässt sich über das Netzkabel anschließen. Zur Installation eines grandMA3 I/O Nodes DIN-Rail auf einer DIN EN 60715 Hutschiene folgen Sie den Hinweisen. | | | | | ------------------------------------------------ | ---------------------------------------------------------------------------------------------------------------------- | |  | **Wichtig:** Den grandMA3 I/O Node DIN-Rail horizontal installieren, sodass die Eingangsbuchse sich unten befindet. | | | | | ----------------------------------------- | ------------------------------------------------------------------------------------------------------------------------------------------------------- | |  | **Warnung:** Für eine optimale Wärmeabführung einen Mindestabstand von 30 mm (ca. 2 Zoll) zwischen den grandMA3 I/O Node DIN-Rail Geräten einhalten. | 1. Den grandMA3 I/O Node DIN-Rail auf der Schiene installieren.  *Den grandMA3 *I/O Node* DIN-Rail auf der Schiene aufsetzen.*  *Das Gerät einrasten.* 2. Den I/O Node DIN-Rail im Schaltschrank installieren. *** ## Anschlüsse [Section titled “Anschlüsse”](#anschlüsse)  *Netzanschluss* -oder-  *Anschluss über PoE* | Netzanschluss | | | -------------- | ----------------------------------------------------------- | | Anschluss | MC 1,5/ 3-ST1-5,08 | | Starre Kabel | 0,75 mm² - 1,5 mm² (18-16 AWG) | | Flexible Kabel | 0,75 mm² - 1,5 mm² (18-16 AWG) Aderendhülsen sind zulässig. | | Abisolierlänge | 7 mm | | Drehmoment | 0,22 Nm - 0,25 Nm | | MIDI & LTC | | | -------------- | ------------------------------------------------------------ | | Anschluss | FK-MC 0,5/ 3-ST-2,5 | | Starre Kabel | 0,14 mm² - 0,5 mm² (26-20 AWG) | | Flexible Kabel | 0,14 mm² - 0,5 mm² (26-20 AWG) Aderendhülsen sind zulässig. | | Abisolierlänge | 8 mm | | DC Remote | | | -------------- | ----------------------------------------------------------- | | Anschluss | FK-MC 0.5/ 7-ST-2.5 | | Starre Kabel | 0,14 mm² - 0,5 mm² (26-20 AWG) | | Flexible Kabel | 0,14 mm² - 0,5 mm² (26-20 AWG) Aderendhülsen sind zulässig. | | Abisolierlänge | 8 mm |
# Installation
> 1. Installer la I/O Node DIN-Rail grandMA3 sur le rail.
| | | | ------------------------------------------ | ------------------------------------------------------------------------------------------------------------------------------------------------------------------------------------------------- | |  | **Indice:** La grandMA3 I/O Node peut être connecté avec le câble d’alimentation. Installer la I/O Node DIN-Rail grandMA3 sur le rail selon la norme DIN EN 60715 et les instructions ci-dessous. | | | | | ------------------------------------------------ | ---------------------------------------------------------------------------------------------------------------------------- | |  | **Important:** Installer la I/O Node DIN-Rail grandMA3 horizontalement de sorte que le terminal d’entrée soit situé en bas. | | | | | ----------------------------------------- | --------------------------------------------------------------------------------------------------------------------------------------------------------------------------- | |  | **Avertissement:** Pour que le dispositif puisse dissiper la chaleur, respecter une distance minimale de 30 mm au-dessus et au-dessous de la I/O Node DIN-Rail grandMA3. | 1. Installer la I/O Node DIN-Rail grandMA3 sur le rail.  *Placer la *I/O Node* DIN-Rail grandMA3 sur le rail*  *La mettre en place* 2. Monter la I/O Node DIN-Rail dans le tableau de distribution. *** ## Connections [Section titled “Connections”](#connections)  Se connecter au grid électrique -ou-  Se connecter via le PoE | Alimentation | | | --------------------------- | -------------------------------------------------------------------- | | Connecteur | MC 1,5/ 3-ST1-5,08 | | Câbles rigides | 0,75 mm² - 1,5 mm² (18-16 AWG) | | Câbles souples | 0,75 mm² - 1,5 mm² (18-16 AWG) Les embouts de câbles sont autorisés. | | Longueur de dénudage du fil | 7 mm | | Couple de serrage | 0,22 Nm - 0,25 Nm | | MIDI & LTC | | | --------------------------- | -------------------------------------------------------------------- | | Connecteur | FK-MC 0,5/ 3-ST-2,5 | | Câbles rigides | 0,14 mm² - 0,5 mm² (26-20 AWG) | | Câbles souples | 0,14 mm² - 0,5 mm² (26-20 AWG) Les embouts de câbles sont autorisés. | | Longueur de dénudage du fil | 8 mm | | DC Remote | | | --------------------------- | -------------------------------------------------------------------- | | Connecteur | FK-MC 0.5/ 7-ST-2.5 | | Câbles rigides | 0,14 mm² - 0,5 mm² (26-20 AWG) | | Câbles souples | 0,14 mm² - 0,5 mm² (26-20 AWG) Les embouts de câbles sont autorisés. | | Longueur de dénudage du fil | 8 mm |
# Quick Start
> grandMA3 I/O Node front panel
### grandMA3 I/O Node [Section titled “grandMA3 I/O Node”](#grandma3-io-node)  grandMA3 I/O Node front panel 1. Display 2. Rotary knob  *grandMA3 I/O Node rear panel* 1. Power switch 2. [powerCON TRUE1](/grandma3/2-3/fs_connect_power/) 3. [Ethernet with L (link) and G (gigabit) LEDs](/grandma3/2-3/fs_connect_ethernet/) 4. [USB 2.0](/grandma3/2-3/fs_connect_usb/) 5. [MIDI In & Out](/grandma3/2-3/remote_inputs/) 6. [LTC](/grandma3/2-3/fs_connect_smpte_ltc/) 7. [DC Remote In](/grandma3/2-3/fs_connect_dc_remote_in/) ### Start-up [Section titled “Start-up”](#start-up) 1. Unpack the device. 2. Remove the packaging and cushioning material. 3. Place the device indoors on a stable surface. 4. Switch on the grandMA3 I/O Node: \ -Insert powerCON TRUE1 into the corresponding jack. \ -Connect the main power plug. \ -Turn on the power switch (set it to position **I**.)\ -The power switch lights up in red.\ OR\ Connect the grandMA3 I/O Node PoE with a PoE switch, or a PoE injector. 5. The device starts booting. 6. To make basic settings, turn the rotary knob on the front panel of the device. 7. To turn off the grandMA3 I/O Node, set the power switch to position **O**. ### Update the software [Section titled “Update the software”](#update-the-software) 1. To update a grandMA3 device, download the latest software version from [www.malighting.com](http://www.malighting.com). 2. The required installer is called grandMA3 Software x.x.x.x. 3. Extract the zip file and copy the folders EFI, ma, and the update.scr file into the root directory of your USB flash drive. 4. Insert the USB flash drive in the device’s USB port. 5. Turn off the grandMA3 device. 6. Power up the grandMA3 device. 7. Follow the onscreen instructions during the update process. | | | | ------------------------------------------------ | --------------------------------------------------------------------------------------------------------------------------------------------------------------------------------------------------------------------------------------------------------------------------------------------------------------------------------------------------------------------------------------------------------------------------------------------------------------------------------------------------------------------------------------------------- | |  | **Important:** To configure the device, or to update or downdate the installed software, use a grandMA3 console or your PC or laptop with the grandMA3 onPC software installed. For more information see the topics [Control other MA Devices](/grandma3/2-3/comad_xport_nodes/) and [Update the Software](/grandma3/2-3/update/) via [Network Update](/grandma3/2-3/update_network/) in the [grandMA3 User Manual](https://help.malighting.com/grandMA3/2.3/HTML/help.html) online available at [www.malighting.com](https://www.malighting.com/). | ### grandMA3 I/O Node DIN-Rail [Section titled “grandMA3 I/O Node DIN-Rail”](#grandma3-io-node-din-rail)  grandMA3 I/O Node DIN-Rail front panel 1. Terminal block 2. Rotary knob  grandMA3 I/O Node DIN-Rail rear panel 1. [MIDI In & Out](/grandma3/2-3/remote_inputs/) 2. [LTC](/grandma3/2-3/fs_connect_smpte_ltc/) 3. [DC Remote In](/grandma3/2-3/fs_connect_dc_remote_in/) 4. [Ethernet with L (link) and G (gigabit) LEDs](/grandma3/2-3/fs_connect_ethernet/) 5. [USB 2.0](/grandma3/2-3/fs_connect_usb/) ### Start-up [Section titled “ Start-up”](#start-up-1) 1. Unpack the device. 2. Remove the packaging and cushioning material. 3. Install the device on a rail. For more information see [Installation](/grandma3/2-3/key_io_node_installation/). 4. Connect the grandMA3 I/O Node DIN-Rail with the electrical grid using a terminal block connector, a PoE switch, or a PoE injector.\ The device starts booting. 5. To make basic settings, turn the rotary knob on the front panel of the device. 6. To turn off the grandMA3 I/O Node DIN-Rail, disconnect the RJ45 connector or the terminal block connector. ### Update the software [Section titled “Update the software”](#update-the-software-1) 1. To update a grandMA3 device, download the latest software version from [www.malighting.com](http://www.malighting.com).\ The required installer is called grandMA3 Software x.x.x.x. 2. Extract the zip file and copy the folders EFI, ma, and the update.scr file into the root directory of your USB flash drive. 3. Insert the USB flash drive in the device’s USB port. 4. Turn off the grandMA3 device. 5. Power up the grandMA3 device. 6. Follow the onscreen instructions during the update process. | | | | ------------------------------------------------ | --------------------------------------------------------------------------------------------------------------------------------------------------------------------------------------------------------------------------------------------------------------------------------------------------------------------------------------------------------------------------------------------------------------------------------------------------------------------------------------------------------------------------------------------------- | |  | **Important:** To configure the device, or to update or downdate the installed software, use a grandMA3 console or your PC or laptop with the grandMA3 onPC software installed. For more information see the topics [Control other MA Devices](/grandma3/2-3/comad_xport_nodes/) and [Update the Software](/grandma3/2-3/update/) via [Network Update](/grandma3/2-3/update_network/) in the [grandMA3 User Manual](https://help.malighting.com/grandMA3/2.3/HTML/help.html) online available at [www.malighting.com](https://www.malighting.com/). |
# Quick Start
> grandMA3 I/O Node Vorderseite
# Quick Start [Section titled “Quick Start”](#quick-start) ### grandMA3 I/O Node [Section titled “grandMA3 I/O Node ”](#grandma3-io-node)  grandMA3 I/O Node Vorderseite 1. Display 2. Drehregler  *grandMA3 I/O Node Rückseite* 1. [Netzschalter](/grandma3/2-3/key_power/) 2. [powerCON TRUE1](/grandma3/2-3/fs_connect_power/) 3. [Ethernet mit L (link) und G (gigabit) LEDs](/grandma3/2-3/fs_connect_ethernet/) 4. [USB-Anschluss](/grandma3/2-3/fs_connect_usb/) 5. [MIDI In & Out](/grandma3/2-3/fs_connect_midi/) 6. [LTC](/grandma3/2-3/fs_connect_smpte_ltc/) 7. [DC Remote In](/grandma3/2-3/fs_connect_dc_remote_in/) ### Inbetriebnahme [Section titled “Inbetriebnahme”](#inbetriebnahme) 1. Gerät auspacken. 2. Verpackungsmaterial entfernen. 3. Gerät in einem geschlossenen Raum auf eine stabile Fläche stellen. 4. Den grandMA3 I/O Node einschalten: \ -powerCON TRUE1 mit der dafür vorgesehenen Buchse verbinden. \ -Hauptstecker an die Steckdose anschließen. \ -Netzschalter auf **I** stellen. (Der Netzschalter leuchtet rot.)\ ODER\ -Den grandMA3 I/O Node PoE direkt über einen PoE Switch oder PoE Injector ans Netz anschließen. 5. Das Gerät startet. 6. Um Grundeinstellungen vorzunehmen, den Drehregler an der Frontblende bedienen. 7. Um den grandMA3 I/O Node auszuschalten, Netzschalter auf **O** stellen oder beim grandMA3 I/O Node PoE den RJ45 Stecker ziehen. ### Software aktualisieren [Section titled “Software aktualisieren”](#software-aktualisieren) 1. Besuchen Sie [www.malighting.com](http://www.malighting.com/), um die aktuellste Software herunterzuladen.\ Der benötigte Installer heißt grandMA3 Software x.x.x.x. 2. Entpacken Sie die Zip-Datei und kopieren Sie die Ordner EFI und ma sowie die Datei update.scr in das Root-Verzeichnis Ihres USB-Sticks. 3. Stecken Sie den USB-Stick in den USB-Anschluss am Gerät. 4. Schalten Sie das Gerät aus. 5. Schalten Sie das Gerät ein. 6. Folgen Sie während des Update-Vorgangs den Bildschirmanweisungen. | | | | ------------------------------------------------ | --------------------------------------------------------------------------------------------------------------------------------------------------------------------------------------------------------------------------------------------------------------------------------------------------------------------------------------------------------------------------------------------------------------------------------------------------------------------------------------------------------------------------------------------------------------------- | |  | **Wichtig:** Um das Gerät zu konfigurieren oder ein Update oder Downdate durchzuführen, verwenden Sie eine grandMA3 Konsole oder Ihren PC oder Ihr Laptop mit grandMA3 onPC Software. Für weitere Informationen siehe die Abschnitte [Control Other MA Devices](/grandma3/2-3/control_other_ma_devices/) und [Update the Software](/grandma3/2-3/update/) via [Network Update](/grandma3/2-3/update_network/) im [grandMA3 Online Benutzerhandbuch](https://help.malighting.com/grandMA3/2.3/HTML/help.html) unter [www.malighting.com.](https://www.malighting.com/) | ### grandMA3 I/O Node DIN-Rail [Section titled “grandMA3 I/O Node DIN-Rail”](#grandma3-io-node-din-rail)  grandMA3 I/O Node DIN Rail Vorderseite 1. [Klemmleiste für Netzanschluss](/grandma3/2-3/do_connector_pin_assignment/) 2. Drehregler 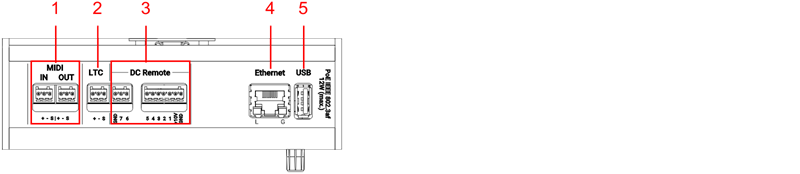 *grandMA3 I/O Node DIN-Rail Rückseite* 1. [MIDI In & Out](/grandma3/2-3/fs_connect_midi/) 2. [LTC](/grandma3/2-3/fs_connect_smpte_ltc/) 3. [DC Remote In](/grandma3/2-3/fs_connect_dc_remote_in/) 4. [Ethernet mit L (link) und G (gigabit) LEDs](/grandma3/2-3/fs_connect_ethernet/) 5. [USB-Anschluss](/grandma3/2-3/fs_connect_usb/) ### Inbetriebnahme [Section titled “Inbetriebnahme”](#inbetriebnahme-1) 1. Gerät auspacken und Verpackungs- und Polstermaterial entfernen. 2. Installieren Sie das Gerät auf der Hutschiene. Mehr Information unter [Installation](/grandma3/2-3/key_io_node_installation-1/). 3. Den grandMA3 I/O Node DIN-Rail direkt über die Klemmleiste, einen PoE Switch oder PoE Injector ans Netz anschließen.\ Das Gerät startet. 4. Um Grundeinstellungen vorzunehmen, den Drehregler an der Frontblende bedienen. 5. Um den grandMA3 I/O Node DIN-Rail auszuschalten, trennen Sie das Gerät von der Stromversorgung. ### Software aktualisieren [Section titled “Software aktualisieren”](#software-aktualisieren-1) 1. Besuchen Sie [www.malighting.com](http://www.malighting.com/), um die aktuellste Software herunterzuladen.\ Der benötigte Installer heißt grandMA3 Software x.x.x.x. 2. Entpacken Sie die Zip-Datei und kopieren Sie die Ordner EFI und ma sowie die Datei update.scr in das Root-Verzeichnis Ihres USB-Sticks. 3. Stecken Sie den USB-Stick in den USB-Anschluss am Gerät. 4. Schalten Sie das Gerät aus. 5. Schalten Sie das Gerät ein. 6. Folgen Sie während des Update-Vorgangs den Bildschirmanweisungen. | | | | ------------------------------------------------ | --------------------------------------------------------------------------------------------------------------------------------------------------------------------------------------------------------------------------------------------------------------------------------------------------------------------------------------------------------------------------------------------------------------------------------------------------------------------------------------------------------------------------------------------------------------------- | |  | **Wichtig:** Um das Gerät zu konfigurieren oder ein Update oder Downdate durchzuführen, verwenden Sie eine grandMA3 Konsole oder Ihren PC oder Ihr Laptop mit grandMA3 onPC Software. Für weitere Informationen siehe die Abschnitte [Control Other MA Devices](/grandma3/2-3/control_other_ma_devices/) und [Update the Software](/grandma3/2-3/update/) via [Network Update](/grandma3/2-3/update_network/) im [grandMA3 Online Benutzerhandbuch](https://help.malighting.com/grandMA3/2.3/HTML/help.html) unter [www.malighting.com.](https://www.malighting.com/) |
# Guide De Démarrage
> grandMA3 I/O Node panneau avant
# Guide De Démarrage [Section titled “Guide De Démarrage”](#guide-de-démarrage) ### grandMA3 I/O Node [Section titled “grandMA3 I/O Node”](#grandma3-io-node)  grandMA3 I/O Node panneau avant 1. Affichage 2. Bouton rotatif  \_grandMA3 I/O Node \_panneau arrière 1. Interrupteur d’alimentation 2. [powerCON TRUE1](/grandma3/2-3/fs_connect_power/) 3. [Ethernet avec L (link) et G (gigabit) LEDs](/grandma3/2-3/fs_connect_ethernet/) 4. [USB 2.0](/grandma3/2-3/fs_connect_usb/) 5. [MIDI In & Out](/grandma3/2-3/fs_connect_midi/) 6. [LTC](/grandma3/2-3/fs_connect_smpte_ltc/) 7. [DC Remote In](/grandma3/2-3/fs_connect_dc_remote_in/) ### Mise en service [Section titled “Mise en service”](#mise-en-service) 1. Déballer l’appareil. 2. Enlever le matériel de protection. 3. Placer l’appareil à l’intérieur sur une surface stable. 4. Allumer la I/O Node grandMA3: \ -Insérer le connecteur IEC au branchement correspondant. \ -Brancher la prise principale de courant.\ -Allumer l’interrupteur de courant:\ -Mettre en position **I**. \ -L’interrupteur s’illumine en rouge.\ OU\ Connecter la I/O Node PoE grandMA3 au réseau électrique à l’aide d’un commutateur PoE ou d’un injecteur PoE. 5. L’appareil se met en marche. 6. Pour faire des ajustements de base, tourner le bouton rotatif en avant de l’appareil. 7. Pour éteindre la I/O Node grandMA3, mettre l’intérupteur en position **O**. Pour éteindre la I/O Node PoE grandMA3, débranchez le connecteur RJ45. ### Software update [Section titled “Software update”](#software-update) 1. Pour mettre à jour un appareil grandMA3, téléchargez le logiciel grandMA3 sur [www.malighting.com](http://www.malighting.com/).\ L’installateur requis est appelé grandMA3 Software x.x.x.x. 2. Extrayez le fichier zip et copiez les dossiers EFI et ma et le fichier update.scr dans le répertoire racine de votre clé USB. 3. Insérez la clé USB dans le port USB de l’appareil. 4. Éteignez l’appareil grandMA3 5. Allumez l’appareil grandMA3. 6. Suivez les instructions à l’écran pendant le processus de mise à jour. | | | | ------------------------------------------------ | --------------------------------------------------------------------------------------------------------------------------------------------------------------------------------------------------------------------------------------------------------------------------------------------------------------------------------------------------------------------------------------------------------------------------------------------------------------------------------------------------------------- | |  | **Important:** Pour configurer l’appareil ou pour faire un update ou downdate, utilisé la console grandMA3 ou le logiciel grandMA3 onPC. Pour plus d’information, voir les sections [Control Other MA Devices](/grandma3/2-3/control_other_ma_devices/) et [Update the Software](/grandma3/2-3/update/) via [Network Update](/grandma3/2-3/update_network/) dans le [Mode d’emploi](https://help.malighting.com/grandMA3/2.3/HTML/help.html) disponible sous [www.malighting.com](https://www.malighting.com/). | ### grandMA3 I/O Node DIN-Rail [Section titled “grandMA3 I/O Node DIN-Rail”](#grandma3-io-node-din-rail)  grandMA3 I/O Node DIN Rail panneau avant 1. [Bornier](/grandma3/2-3/do_connector_pin_assignment/) 2. Bouton rotatif  \_grandMA3 I/O Node DIN-Rail \_panneau arrière 1. [MIDI In & Out](/grandma3/2-3/fs_connect_midi/) 2. [LTC](/grandma3/2-3/fs_connect_smpte_ltc/) 3. [DC Remote In](/grandma3/2-3/fs_connect_dc_remote_in/) 4. [Ethernet avec L (link) and G (gigabit) LEDs](/grandma3/2-3/fs_connect_ethernet/) 5. [USB 2.0](/grandma3/2-3/fs_connect_usb/) ### Mise en service [Section titled “Mise en service”](#mise-en-service-1) 1. Déballer l’appareil. 2. Elever le matériel de protection. 3. Installer l’appareil sur un rail. Pour plus d’informations, voir [Installation](/grandma3/2-3/key_io_node_installation-1-2/). 4. Connecter la I/O Node DIN-Rail grandMA3 au réseau électrique à l’aide d’un connecteur de bornier, d’un commutateur PoE ou d’un injecteur PoE. 5. L’appareil se met en marche. 6. Pour faire des ajustements de base, tourner le bouton rotatif en avant de l’appareil. 7. Pour éteindre la I/O Node DIN-Rail grandMA3, débranchez le connecteur RJ45 ou le connecteur du bornier. ### Software update [Section titled “Software update”](#software-update-1) 1. Pour mettre à jour un appareil grandMA3, téléchargez le logiciel grandMA3 sur [www.malighting.com](http://www.malighting.com/).\ L’installateur requis est appelé grandMA3 Software x.x.x.x. 2. Extrayez le fichier zip et copiez les dossiers EFI et ma et le fichier update.scr dans le répertoire racine de votre clé USB. 3. Insérez la clé USB dans le port USB de l’appareil. 4. Éteignez l’appareil grandMA3 5. Allumez l’appareil grandMA3. 6. Suivez les instructions à l’écran pendant le processus de mise à jour. | | | | ------------------------------------------------ | --------------------------------------------------------------------------------------------------------------------------------------------------------------------------------------------------------------------------------------------------------------------------------------------------------------------------------------------------------------------------------------------------------------------------------------------- | |  | **Important:** Pour configurer l’appareil ou pour faire un update ou downdate, utilisé la console grandMA3 ou le logiciel grandMA3 onPC. Pour plus d’information, voir les sections [Control Other MA Devices](/grandma3/2-3/control_other_ma_devices/) et [Update the Software](/grandma3/2-3/update/) via [Network Update](/grandma3/2-3/update_network/) dans le [Mode d’emploi](https://help.malighting.com/grandMA3/2.3/HTML/help.html). |
# Toleranzen
> Die folgenden Punkte sind keine Mängel oder Fehlfunktionen. Es handelt sich lediglich um Gegebenheiten, die während des Herstellungsprozesses auftreten können:
## Gerätespezifische Gegebenheiten [Section titled “Gerätespezifische Gegebenheiten”](#gerätespezifische-gegebenheiten) Die folgenden Punkte sind keine Mängel oder Fehlfunktionen. Es handelt sich lediglich um Gegebenheiten, die während des Herstellungsprozesses auftreten können: 1. Bei der Herstellung von LCD-Bildschirmen kann es zu Backlight-Bleeding kommen. 2. Farbtemperaturabweichungen bei der Herstellung von LCD-Bildschirmen unterliegen technischen Toleranzen. 3. Gerätespezifische Farbabweichungen, beispielsweise im Bildschirmgehäuse, sowie in der Oberflächenbeschaffenheit, etwa bei Polstern, unterliegen technischen Toleranzen bei der Herstellung solcher Materialien. ## Pixelfehler [Section titled “Pixelfehler”](#pixelfehler) Die Bildschirme der grandMA3 Serie orientieren sich an der Pixelfehlerklasse II (ISO 9241-307). Die folgende Tabelle zeigt die maximale Anzahl zulässiger Fehler pro 1 Million Pixel. | Pixelfehler | Maximale Anzahl von Fehlern pro 1 Million Pixel | | ------------------------------------------------ | ----------------------------------------------- | | Ständig leuchtendes Pixel (immer an, Farbe weiß) | 2 | | 2 angrenzende ständig leuchtende Pixel | 1 | | Ständig schwarzes Pixel (immer aus) | 5 | | 2 angrenzende ständig schwarze Pixel | 1 | | Defekte Subpixel (ständig leuchtend) | 5 | | Defekte Subpixel (ständig schwarz) | 5 | Aus technischen Gründen können die Bildschirme leichte Kratzer haben.
# Événements
> La liste suivante ne décrit ni les défauts ni les dysfonctionnements. Elle indique simplement les cas qui peuvent se manifester au cours du processus de fabrica
## Événements liés au matériel [Section titled “Événements liés au matériel”](#événements-liés-au-matériel) La liste suivante ne décrit ni les défauts ni les dysfonctionnements. Elle indique simplement les cas qui peuvent se manifester au cours du processus de fabrication. 1. Une fuite du rétroéclairage peut se produire lors de la fabrication des écrans LCD. 2. Des différences de température peuvent entraîner des différences de couleur dans les écrans LCD. 3. Les déviations de couleur dans le matériel, par exemple dans le boîtier de l’écran, et les déviations dans la texture de la surface, par exemple dans les coussinets de repose-mains, sont soumises à des tolérances techniques lors de la fabrication de ces matériaux. ## Défaut de pixel [Section titled “Défaut de pixel”](#défaut-de-pixel) Les écrans de la série grandMA3 sont soumis à la classe de défaut de pixel II (ISO 9241-307). Le tableau ci-dessous indique le nombre maximum de défauts autorisés par million de pixels. | Défaut de pixel | Nombre maximal de défauts par million de pixels | | ----------------------------------------------------------------- | ----------------------------------------------- | | Pixel actif permanent (toujours allumé, étant de couleur blanche) | 2 | | 2 pixels actifs permanents qui sont adjacents | 1 | | Pixel inactif permanent (toujours éteint, c’est-à-dire noir) | 5 | | 2 pixels inactifs permanents qui sont adjacents | 1 | | Sous-pixel défectueux (toujours actif) | 5 | | Sous-pixel défectueux (toujours inactif) | 5 | Pour des raisons techniques, il peut y avoir de légères rayures sur les écrans.
# Learn | Rate1
> Pressing Learn enters the Learn keyword into the command line.
Pressing Learn enters the Learn keyword into the command line. | | | | ------------------------------------------------------------------ | ------------------------- | |  | User name\[Fixture]>Learn | For more information about Learn, see the [Learn keyword](/grandma3/2-3/keyword_learnspeed/). ## Rate1 [Section titled “Rate1”](#rate1) Pressing and holding MA + Learn enters the Rate1 keyword into the command line. | | | | ------------------------------------------------------------------ | ------------------------- | |  | User name\[Fixture]>Rate1 | For more information about Rate1, see the [Rate1 keyword](/grandma3/2-3/keyword_rate/). ## Location [Section titled “Location”](#location) Learn is located in the command section. 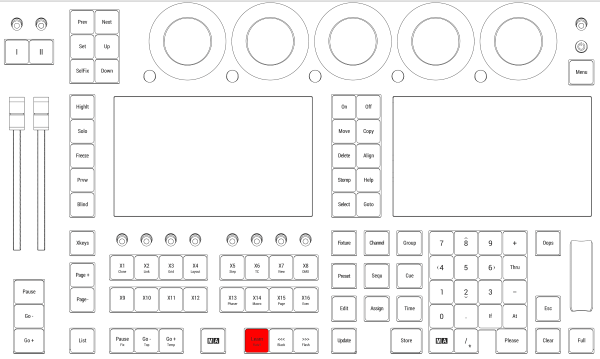 *Location on grandMA3 full-size and grandMA3 light consoles* *** 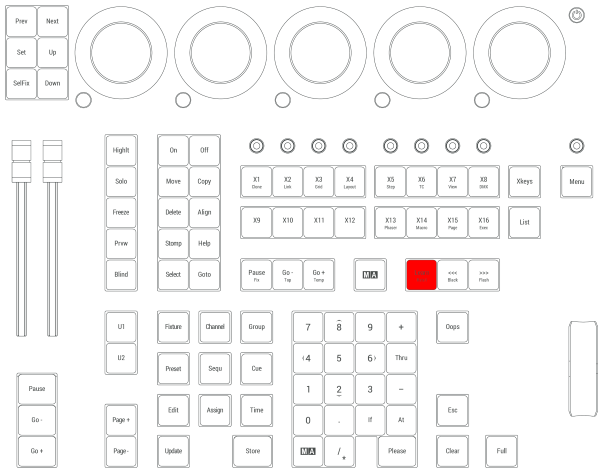 *Location on grandMA3 compact consoles and grandMA3 onPC command wing*
# List
> Pressing List enters the List keyword into the command line.
Pressing List enters the List keyword into the command line. | | | | ------------------------------------------------------------------ | ------------------------ | |  | User name\[Fixture]>List | For more information about List, see the [List keyword](/grandma3/2-3/keyword_list/). ## ListRef [Section titled “ListRef”](#listref) Pressing and holding MA + List enters the ListRef keyword into the command line. | | | | ------------------------------------------------------------------ | --------------------------- | |  | User name\[Fixture]>ListRef | For more information about List, see the [ListRef keyword](/grandma3/2-3/keyword_listreference/). Location List is located in the command section. 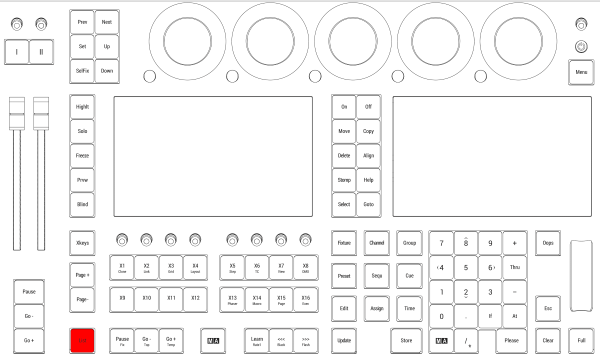 *Location on grandMA3 full-size and grandMA3 light consoles* ***  *Location on grandMA3 compact consoles and grandMA3 onPC command wing*
# MA
> Pressing and holding MA in combination with other keys, provides shortcuts to other functions. There are two MA keys there – on both layouts of the console. The
Pressing and holding MA in combination with other keys, provides shortcuts to other functions. There are two MA keys there – on both layouts of the console. They are identical and have the same function. Pressing MA + Please sets the focus to the command line. To check out the complete list of functions, see [Keys](/grandma3/2-3/keys/). Location MA is located in the command section.  *Location on grandMA3 full-size and grandMA3 light consoles* ***  *Location on grandMA3 compact consoles and grandMA3 onPC command wing*
# Menu
> Pressing Menu opens the Menu pop-up.
Pressing Menu opens the Menu pop-up. For more information about Menu, see the [Menu keyword](/grandma3/2-3/keyword_menu/). ## Location [Section titled “Location”](#location) Menu is located in the command section.  *Location on grandMA3 full-size and grandMA3 light consoles* *** 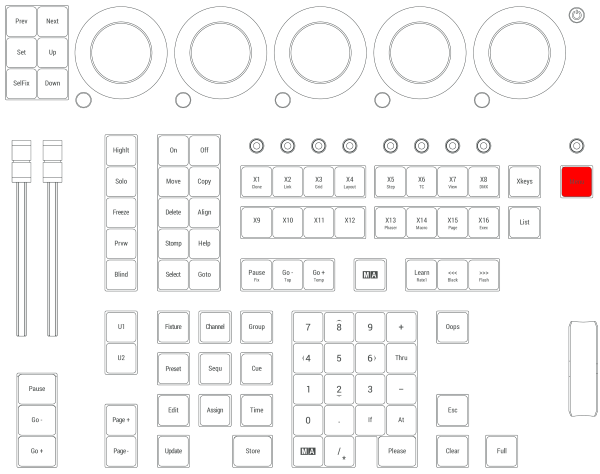 *Location on grandMA3 compact consoles and grandMA3 onPC command wing*
# - [Minus]
> Pressing - enters a - into the command line.
Pressing - enters a - into the command line. | | | | ------------------------------------------------------------------ | ---------------------------------------- | |  | User name\[Fixture]>Group 5 - Channel 11 |
# Move
> Pressing Move enters the Move keyword into the command line.
Pressing Move enters the Move keyword into the command line. | | | | ------------------------------------------------------------------ | ------------------------ | |  | User name\[Fixture]>Move | For more information about Move, see the [Move keyword](/grandma3/2-3/keyword_move/). Exchange Pressing Move Move enters the Exchange keyword into the command line. | | | | ------------------------------------------------------------------ | ---------------------------- | |  | User name\[Fixture]>Exchange | For more information about Exchange, see the [Exchange Keyword](/grandma3/2-3/keyword_exchange/). ## Location [Section titled “Location”](#location) Move is located in the command section. 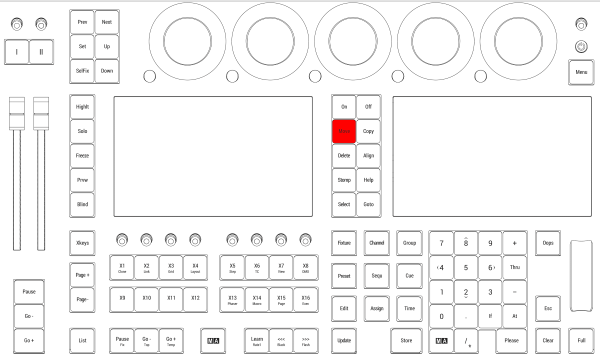 *Location on grandMA3 full-size and grandMA3 light consoles* *** 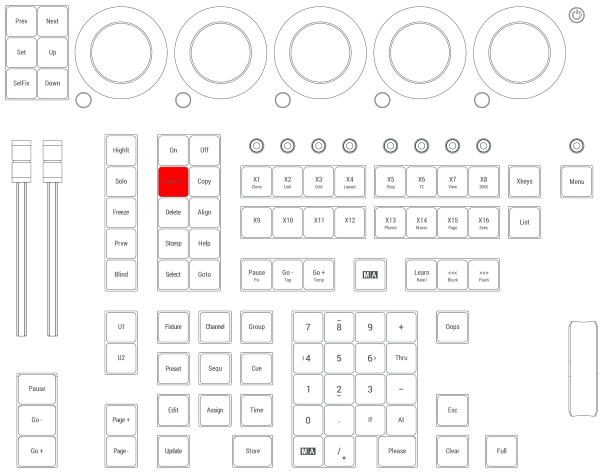 *Location on grandMA3 compact consoles and grandMA3 onPC command wing*
# Next
> Pressing Next executes the Next keyword in the command line.
Pressing Next executes the Next keyword in the command line. | | | | ------------------------------------------------------------------ | ------------------------ | |  | User name\[Fixture]>Next | For more information about Next, see the [Next keyword](/grandma3/2-3/keyword_next/). Next Step Pressing MA + Next executes the Next Step command in the command line. | | | | ------------------------------------------------------------------ | ----------------------------- | |  | User name\[Fixture]>Next Step | For more information about Next Step, see the [Next keyword](/grandma3/2-3/keyword_next/) and the [Step keyword](/grandma3/2-3/keyword_step/). For more information on steps see [Phaser](/grandma3/2-3/phaser/). ## Location [Section titled “Location”](#location) Next is located in the command section. 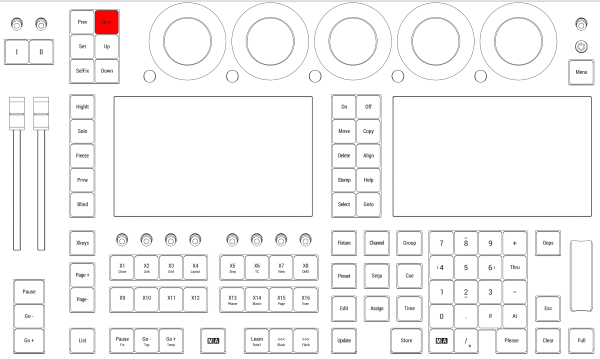 *Location on grandMA3 full-size and grandMA3 light consoles* ***  *Location on grandMA3 compact consoles and grandMA3 onPC command wing*
# Toleranzen
> Die folgenden Punkte sind keine Mängel oder Fehlfunktionen. Es handelt sich lediglich um Gegebenheiten, die während des Herstellungsprozesses auftreten können:
## Gerätespezifische Gegebenheiten [Section titled “Gerätespezifische Gegebenheiten”](#gerätespezifische-gegebenheiten) Die folgenden Punkte sind keine Mängel oder Fehlfunktionen. Es handelt sich lediglich um Gegebenheiten, die während des Herstellungsprozesses auftreten können: 1. Bei der Herstellung von LCD-Bildschirmen kann es zu Backlight-Bleeding kommen. 2. Farbtemperaturabweichungen bei der Herstellung von LCD-Bildschirmen unterliegen technischen Toleranzen. 3. Gerätespezifische Farbabweichungen, beispielsweise im Bildschirmgehäuse, sowie in der Oberflächenbeschaffenheit, etwa bei Polstern, unterliegen technischen Toleranzen bei der Herstellung solcher Materialien. ## Pixelfehler [Section titled “Pixelfehler”](#pixelfehler) Die Bildschirme der grandMA3 Serie orientieren sich an der Pixelfehlerklasse II (ISO 9241-307). Die folgende Tabelle zeigt die maximale Anzahl zulässiger Fehler pro 1 Million Pixel. | Pixelfehler | Maximale Anzahl von Fehlern pro 1 Million Pixel | | ------------------------------------------------ | ----------------------------------------------- | | Ständig leuchtendes Pixel (immer an, Farbe weiß) | 2 | | 2 angrenzende ständig leuchtende Pixel | 1 | | Ständig schwarzes Pixel (immer aus) | 5 | | 2 angrenzende ständig schwarze Pixel | 1 | | Defekte Subpixel (ständig leuchtend) | 5 | | Defekte Subpixel (ständig schwarz) | 5 | Aus technischen Gründen können die Bildschirme leichte Kratzer haben.
# Événements
> La liste suivante ne décrit ni les défauts ni les dysfonctionnements. Elle indique simplement les cas qui peuvent se manifester au cours du processus de fabrica
## Événements liés au matériel [Section titled “Événements liés au matériel”](#événements-liés-au-matériel) La liste suivante ne décrit ni les défauts ni les dysfonctionnements. Elle indique simplement les cas qui peuvent se manifester au cours du processus de fabrication. 1. Une fuite du rétroéclairage peut se produire lors de la fabrication des écrans LCD. 2. Des différences de température peuvent entraîner des différences de couleur dans les écrans LCD. 3. Les déviations de couleur dans le matériel, par exemple dans le boîtier de l’écran, et les déviations dans la texture de la surface, par exemple dans les coussinets de repose-mains, sont soumises à des tolérances techniques lors de la fabrication de ces matériaux. ## Défaut de pixel [Section titled “Défaut de pixel”](#défaut-de-pixel) Les écrans de la série grandMA3 sont soumis à la classe de défaut de pixel II (ISO 9241-307). Le tableau ci-dessous indique le nombre maximum de défauts autorisés par million de pixels. | Défaut de pixel | Nombre maximal de défauts par million de pixels | | ----------------------------------------------------------------- | ----------------------------------------------- | | Pixel actif permanent (toujours allumé, étant de couleur blanche) | 2 | | 2 pixels actifs permanents qui sont adjacents | 1 | | Pixel inactif permanent (toujours éteint, c’est-à-dire noir) | 5 | | 2 pixels inactifs permanents qui sont adjacents | 1 | | Sous-pixel défectueux (toujours actif) | 5 | | Sous-pixel défectueux (toujours inactif) | 5 | Pour des raisons techniques, il peut y avoir de légères rayures sur les écrans.
# Toleranzen
> Die folgenden Punkte sind keine Mängel oder Fehlfunktionen. Es handelt sich lediglich um Gegebenheiten, die während des Herstellungsprozesses auftreten können:
# ## Gerätespezifische Gegebenheiten [Section titled “Gerätespezifische Gegebenheiten”](#gerätespezifische-gegebenheiten) Die folgenden Punkte sind keine Mängel oder Fehlfunktionen. Es handelt sich lediglich um Gegebenheiten, die während des Herstellungsprozesses auftreten können: 1. Bei der Herstellung von LCD-Bildschirmen kann es zu Backlight-Bleeding kommen. 2. Farbtemperaturabweichungen bei der Herstellung von LCD-Bildschirmen unterliegen technischen Toleranzen. 3. Gerätespezifische Farbabweichungen, beispielsweise im Bildschirmgehäuse, sowie in der Oberflächenbeschaffenheit, etwa bei Polstern, unterliegen technischen Toleranzen bei der Herstellung solcher Materialien. ## Pixelfehler [Section titled “Pixelfehler”](#pixelfehler) Die Bildschirme der grandMA3 Serie orientieren sich an der Pixelfehlerklasse II (ISO 9241-307). Die folgende Tabelle zeigt die maximale Anzahl zulässiger Fehler pro 1 Million Pixel. | Pixelfehler | Maximale Anzahl von Fehlern pro 1 Million Pixel | | ------------------------------------------------ | ----------------------------------------------- | | Ständig leuchtendes Pixel (immer an, Farbe weiß) | 2 | | 2 angrenzende ständig leuchtende Pixel | 1 | | Ständig schwarzes Pixel (immer aus) | 5 | | 2 angrenzende ständig schwarze Pixel | 1 | | Defekte Subpixel (ständig leuchtend) | 5 | | Defekte Subpixel (ständig schwarz) | 5 | Aus technischen Gründen können die Bildschirme leichte Kratzer haben.
# Événements
> La liste suivante ne décrit ni les défauts ni les dysfonctionnements. Elle indique simplement les cas qui peuvent se manifester au cours du processus de fabrica
## Événements liés au matériel [Section titled “Événements liés au matériel”](#événements-liés-au-matériel) La liste suivante ne décrit ni les défauts ni les dysfonctionnements. Elle indique simplement les cas qui peuvent se manifester au cours du processus de fabrication. 1. Une fuite du rétroéclairage peut se produire lors de la fabrication des écrans LCD. 2. Des différences de température peuvent entraîner des différences de couleur dans les écrans LCD. 3. Les déviations de couleur dans le matériel, par exemple dans le boîtier de l’écran, et les déviations dans la texture de la surface, par exemple dans les coussinets de repose-mains, sont soumises à des tolérances techniques lors de la fabrication de ces matériaux. ## Défaut de pixel [Section titled “Défaut de pixel”](#défaut-de-pixel) Les écrans de la série grandMA3 sont soumis à la classe de défaut de pixel II (ISO 9241-307). Le tableau ci-dessous indique le nombre maximum de défauts autorisés par million de pixels. | Défaut de pixel | Nombre maximal de défauts par million de pixels | | ----------------------------------------------------------------- | ----------------------------------------------- | | Pixel actif permanent (toujours allumé, étant de couleur blanche) | 2 | | 2 pixels actifs permanents qui sont adjacents | 1 | | Pixel inactif permanent (toujours éteint, c’est-à-dire noir) | 5 | | 2 pixels inactifs permanents qui sont adjacents | 1 | | Sous-pixel défectueux (toujours actif) | 5 | | Sous-pixel défectueux (toujours inactif) | 5 | Pour des raisons techniques, il peut y avoir de légères rayures sur les écrans.
# Numeric Keys | Arrows
> Pressing a numeric key enters the number into the command line.
Pressing a numeric key enters the number into the command line. | | | | ------------------------------------------------------------------ | --------------------------------- | |  | User name\[Fixture]>Fixture 1+7+8 | *** ## Move Cursor [Section titled “Move Cursor”](#move-cursor) Pressing MA + 8 moves the cursor one row upward. Pressing MA + 2 moves the cursor one row downward. Pressing MA + 4 moves the cursor one column to the left. Pressing MA + 6 moves the cursor one column to the right. The arrow keys have the same functions on a keyboard. ## Location [Section titled “Location”](#location) The numeric keys are located in the command section.  *Location on grandMA3 full-size and grandMA3 light consoles* ***  *Location on grandMA3 compact consoles and grandMA3 onPC command wing*
# Off
> Pressing Off enters the Off keyword into the command line.
Pressing Off enters the Off keyword into the command line. | | | | ------------------------------------------------------------------ | ----------------------- | |  | User name\[Fixture]>Off | For more information about Off, see the [Off keyword](/grandma3/2-3/keyword_off/). Off Menu Pressing Off Off opens the Off menu. Read more about the Off menu [here](/grandma3/2-3/executor_running_playbacks/). Close RemoteHID Connection Pressing MA + MA + Off closes every RemoteHID connection that is active. For more information about RemoteHID connections, see the [RemoteHID](/grandma3/2-3/comad_remotehid/). ## Location [Section titled “Location”](#location) Off is located in the command section.  *Location on grandMA3 full-size and grandMA3 light consoles* ***  *Location on grandMA3 compact consoles and grandMA3 onPC command wing*
# On
> Pressing On enters the On keyword into the command line.
Pressing On enters the On keyword into the command line. | | | | ------------------------------------------------------------------ | ---------------------- | |  | User name\[Fixture]>On | For more information about On, see the [On keyword](/grandma3/2-3/keyword_on/). Call Pressing On On enters the Call keyword into the command line. | | | | ------------------------------------------------------------------ | ------------------------ | |  | User name\[Fixture]>Call | For more information about Call, see the [Call keyword](/grandma3/2-3/keyword_call/). ## Location [Section titled “Location”](#location) On is located in the command section.  *Location on grandMA3 full-size and grandMA3 light consoles* ***  *Location on grandMA3 compact consoles and grandMA3 onPC command wing*
# Declaration of Conformity
> Manufacturer:
### CE and FCC Standards and Approvals [Section titled “CE and FCC Standards and Approvals”](#ce-and-fcc-standards-and-approvals) **Manufacturer:** MA Lighting Technology GmbH\ \ Dachdeckerstraße 16\ 97297 Waldbüttelbrunn\ GERMANY *** *declares that the product* *** **Name of product:** * grandMA3 onPC command wing *** *is conform to the following directives and harmonized standards* *** \*\*Safety: \*\* **2014/35/EU (Low Voltage Directive)** * IEC/EN/UL 62368-1:2014 * CAN/CSA-C22. No. 62368-1:2014 *** **EMC – Electromagnetic Compatibility:** **FCC** * 47 CFR, Part 15, Subpart B: 2019 (Class A) \*\*2014/30/EU \*\* * EN55032:2016-02 (Class A) * EN61000-3-2 * EN55035:2018-04 *** **RoHS:** **2011/65/EU (RoHS II)** * EN50581:2012 * WEEE-Reg.-NR. DE 14150988 *** **Additional information:** All data lines and signal lines must be shielded and the shielding must be connected to the grounding or the housing of the connector. Waldbüttelbrunn, November 01, 2019 Dipl.-Ing. Michael Adenau (CEO) 
# Konformitätserklärung
> Hersteller:
## CE und FCC Normen und Zulassungen [Section titled “CE und FCC Normen und Zulassungen”](#ce-und-fcc-normen-und-zulassungen) **Hersteller:** MA Lighting Technology GmbH\ \ Dachdeckerstraße 16\ 97297 Waldbüttelbrunn\ Deutschland *** *erklärt, dass das Produkt* *** **Produktname:** * grandMA3 onPC command wing *** *den folgenden Richtlinien sowie harmonisierten Normen entspricht* *** \*\*Sicherheit: \*\* **2014/35/EU (Niederspannungsrichtlinie)** * IEC/EN/UL 62368-1:2014 * CAN/CSA-C22. No. 62368-1:2014 *** **EMV (elektromagnetische Verträglichkeit):** **FCC** * 47 CFR, Part 15, Subpart B: 2019 (Class A) **2014/30/EU** * EN55032:2016-02 (Class A) * EN61000-3-2 * EN55035:2018-04 *** **RoHS:** **2011/65/EU (RoHS II)** * EN50581:2012 * WEEE-Reg.-NR. DE 14150988 *** **Zusätzliche Informationen:** Alle Daten- und Signalleitungen müssen geschirmt sein und der Schirm muss mit der Masse bzw. dem Gehäuse des entsprechenden Steckers verbunden sein. Waldbüttelbrunn, 1. November 2019 Dipl.-Ing. Michael Adenau (Geschäftsführer) 
# Déclaration de conformité
> Fabricant :
# ## Normes et approbations CE et FCC [Section titled “Normes et approbations CE et FCC”](#normes-et-approbations-ce-et-fcc) **Fabricant :** MA Lighting Technology GmbH\ \ Dachdeckerstraße 16\ 97297 Waldbüttelbrunn\ ALLEMAGNE *** *déclare que les produits* *** **Nom de produit :** * grandMA3 onPC command wing *** *sont conformes aux directives et normes harmonisées suivantes* *** \*\*Sécurité: \*\* **2014/35/UE (Directive Basse Tension)** * IEC/EN/UL 62368-1:2014 * CAN/CSA-C22. No. 62368-1:2014 *** \*\*CEM - Compatibilité électromagnétique \*\* **FCC** * 47 CFR, Part 15, Subpart B: 2019 (Class A) **2014/30/UE** * EN55032:2016-02 (Class A) * EN61000-3-2 * EN55035:2018-04 *** **RoHS:** **2011/65/UE (RoHS II)** * EN50581:2012 * WEEE-Reg.-NR. DE 14150988 *** **Informations complémentaires :** Toutes les lignes de données et de signaux doivent être blindées et le blindage doit être relié à la terre ou au boîtier du connecteur. Waldbüttelbrunn, 01 novembre 2019 Dipl.-Ing. Michael Adenau (PDG) 
# Disposal
> According to the directive 2011/65 EU (RoHS) the device was produced in the European Union, and is hence to be disposed of as stated in the directive.
According to the directive 2011/65 EU (RoHS) the device was produced in the European Union, and is hence to be disposed of as stated in the directive. If the device is used within the European Union, follow the directive WEEE 2012/19/EU. If the device is used outside the European Union, the corresponding country´s waste disposal regulations apply.
# Entsorgung
> Das Gerät ist gemäß der Richtlinie 2011/65 EU (RoHS) der Europäischen Gemeinschaft hergestellt und muss dementsprechend entsorgt werden.
Das Gerät ist gemäß der Richtlinie 2011/65 EU (RoHS) der Europäischen Gemeinschaft hergestellt und muss dementsprechend entsorgt werden. Falls das Gerät innerhalb der Europäischen Union betrieben wird, ist die WEEE 2012/19/EU zu beachten. Falls das Gerät außerhalb der Europäischen Union betrieben wird, sind die nationalen Entsorgungsvorschriften im jeweiligen Land zu beachten.
# Élimination
> Selon la directive 2011/65 UE (RoHS), l'appareil a été fabriqué dans l'Union européenne et doit donc être éliminé conformément à la directive.
Selon la directive 2011/65 UE (RoHS), l’appareil a été fabriqué dans l’Union européenne et doit donc être éliminé conformément à la directive. Si l’appareil est utilisé dans l’Union européenne, suivre la directive WEEE 2012/19/EU. Si l’appareil est utilisé en dehors de l’Union européenne, les règlements d’élimination des déchets du pays correspondant s’appliquent.
# Intended Use
> The grandMA3 onPC command wing controls all kinds of lighting genres such as conventional, moving lights, LEDs, video, and media via DMX signal or within a netw
The grandMA3 onPC command wing controls all kinds of lighting genres such as conventional, moving lights, LEDs, video, and media via DMX signal or within a network environment. All grandMA3 components, despite different hardware solutions, use the same software. All components are fully integrable into the network environment. Use all grandMA3 components and accessories within closed rooms and in the permissible environmental conditions only. Installation and connection of the devices are explicitly to be carried out by trained personnel in compliance with all safety regulations.
# Verwendungszweck
> Der grandMA3 onPC command wing steuert alle Arten von Lichttechnik wie konventionelles Licht, intelligentes Licht, LED, Video und ähnliche Medien mit Hilfe von
# ## Bestimmungsgemäße Verwendung [Section titled “Bestimmungsgemäße Verwendung”](#bestimmungsgemäße-verwendung) Der grandMA3 onPC command wing steuert alle Arten von Lichttechnik wie konventionelles Licht, intelligentes Licht, LED, Video und ähnliche Medien mit Hilfe von DMX-Signalen oder in einer Netzwerkumgebung. Alle grandMA3 Komponenten verwenden die gleiche Software, ungeachtet unterschiedlicher Hardware. Sämtliche Komponenten können komplett ins Netzwerk integriert werden. Alle grandMA3 Komponenten und Zubehör dürfen ausschließlich in geschlossenen Räumen und innerhalb zulässiger Umgebungsbedingung verwendet werden. Installation und Anschluss von Geräten dürfen nur vom geschulten Personal, unter Einhaltung aller Sicherheitsvorschriften, durchgeführt werden.
# Usage Prévu
> Les command wing grandMA3 onPC contrôlent tous genres de projecteurs tels que les projecteurs conventionnels, les motorisées, les LEDs, la vidéo et les média, e
# Les command wing grandMA3 onPC contrôlent tous genres de projecteurs tels que les projecteurs conventionnels, les motorisées, les LEDs, la vidéo et les média, en utilisant le signal DMX ou dans un environnement réseau. Toutes les composantes grandMA3, malgré des solutions matérielles différentes, utilisent le même logiciel. Tous les composants sont entièrement intégrables dans l’environnement du réseau. Utilisez tous les composants et accessoires de grandMA3 uniquement dans des locaux fermés et dans les conditions environnementales autorisées. L’installation et le raccordement des appareils doivent être effectués explicitement par un personnel qualifié, en conformité avec toutes les règles de sécurité.
# Limitations
> Operation: 0 °C up to 40 °C / 32 °F up to 104 °F
## **Temperature** [Section titled “Temperature”](#temperature) Operation: 0 °C up to 40 °C / 32 °F up to 104 °F
# Betriebsgrenzen
> Betrieb: 0 °C bis 40 °C / 32 °F bis 104 °F
### **Temperatur** [Section titled “Temperatur”](#temperatur) Betrieb: 0 °C bis 40 °C / 32 °F bis 104 °F | | | | ----------------------------------------- | ---------------------------------------------------------------------------------------------------------------------------------- | |  | **Achtung:** Hohe Temperaturen können das Kühlsystem des Gerätes überfordern und zum Ausfall von elektrischen Komponenten führen. | Lagerung/Transport: -10 °C bis +50 °C / 14 °F bis 122 °F ### **Luftfeuchte** [Section titled “Luftfeuchte”](#luftfeuchte) Betrieb: 20 % bis 90 % relative Luftfeuchte (nicht kondensierend) Lagerung/Transport: 10 % bis 90 % relative Luftfeuchte (nicht kondensierend) ### **Umgebung** [Section titled “Umgebung”](#umgebung) * Alle Sicherheitshinweise beachten. * Das Gerät innerhalb der Betriebsgrenzen betreiben. * Das Gerät nur in geschlossenen Räumen betreiben. * Die Umgebungsluft muss staubfrei und frei von gefährlichen und explosiven Stoffen sein. * Erschütterungen vermeiden. * Das Gerät ist nicht gegen Spritzwasser geschützt. Nicht in der Nähe von Wasser betreiben. * Das Gerät nicht bei Regen oder Nebel betreiben. * Das Gerät nicht an einem Ort platzieren, an dem es mit korrosiven Gasen oder salzhaltiger Luft in Kontakt kommen könnte, da dies sonst Fehlfunktionen verursachen könnte.
# Limitations
> Fonctionnement : 0 °C jusqu'à 40 °C / 32 °F jusqu'à 104 °F
### **Température** [Section titled “Température”](#température) Fonctionnement : 0 °C jusqu’à 40 °C / 32 °F jusqu’à 104 °F | | | | ----------------------------------------- | --------------------------------------------------------------------------------------------------------------------------------------------------- | |  | **Attention :** Des températures plus élevées peuvent solliciter le système de refroidissement de l’appareil et détruire des composants matériels. | Stockage / Transport : -10 °C jusqu’à +50 °C / 14 °F jusqu’à 122 °F ### **Humidité** [Section titled “Humidité”](#humidité) Fonctionnement : 20 % jusqu’à 90 % d’humidité relative (sans condensation) Stockage / Transport : 10 % jusqu’à 90 % d’humidité relative (sans condensation) ### **Environnement** [Section titled “Environnement”](#environnement) * Suivez toutes les consignes de sécurité ; * N’utilisez l’appareil que dans ses limites de fonctionnement ; * N’utilisez l’appareil qu’à l’intérieur ; * L’air doit être dépourvu de poussière et de toute substance dangereuse ou explosive ; * Évitez les secousses ; * Cet appareil n’est pas protégé contre les éclaboussures d’eau. Ne l’utilisez pas à proximité de l’eau ; * N’utilisez pas l’appareil sous la pluie ou l’humidité ; * Ne placez pas l’appareil à un endroit où il peut entrer en contact avec des gaz corrosifs ou de l’air salin car cela peut provoquer un mauvais fonctionnement.
# Maintenance
| | | | ----------------------------------------- | ------------------------------------------------------------------------------------------------------------------------------------------------------------------------------------------------------------------------------- | |  | **Warning:** All repair and service work has to be exclusively performed by qualified service technicians as live parts may be exposed when opening and / or removing coverings. Touching live parts may cause electric shock. | | | | | ------------------------------------------------ | ------------------------------------------------------------------------------------------------------------------------------------- | |  | **Important:** The intervals between maintenance may differ depending on the frequency of transport and the operational environment. | * Disconnect power supply before cleaning; * Clean the surface using dry cloth only; * Clean the wrist rest using a damp cloth only; * Do not use liquid cleanser or compressed air; * Do not use solvent; * Check if the ventilation holes are blocked; * Depending on the environment, we recommend to professionally clean the device once a year.
# Entretient
| | | | ----------------------------------------- | ----------------------------------------------------------------------------------------------------------------------------------------------------------------------------------------------------------------------------------------------------------------------------------------------------------------------- | |  | **Avertissement:** Tous les travaux de réparation et d’entretien doivent être effectués exclusivement par des techniciens qualifiés, car les pièces sous tension peuvent être exposées lors de l’ouverture et/ou du retrait des couvercles. Le contact avec des pièces sous tension peut provoquer un choc électrique. | | | | | ------------------------------------------------ | ------------------------------------------------------------------------------------------------------------------------------------------------- | |  | **Important:** Les intervalles entre les entretiens peuvent varier en fonction de la fréquence des transports et de l’environnement opérationnel. | * Débranchez l’alimentation électrique avant le nettoyage; * Nettoyez la surface à l’aide d’un chiffon sec uniquement; * Nettoyez le repose-poignet à l’aide d’un chiffon humide uniquement; * N’utilisez pas de nettoyant liquide ou d’air comprimé; * N’utilisez pas de solvant; * Vérifiez si les orifices de ventilation sont obstrués; * En fonction de l’environnement, nous recommandons de nettoyer l’appareil professionnellement une fois par an.
# Wartung
| | | | ----------------------------------------- | ----------------------------------------------------------------------------------------------------------------------------------------------------------------------------------------------------------------------------------------------------------------------------------------- | |  | **Warnung:** Sämtliche Reparatur- und Wartungsarbeiten dürfen ausschließlich von geschultem Personal durchgeführt werden, da beim Öffnen von Abdeckungen spannungsführende Teile freigelegt werden können. Spannungsführende Teile nicht berühren, da die Gefahr von Stromschlag besteht! | | | | | ------------------------------------------------ | --------------------------------------------------------------------------------------------- | |  | **Wichtig:** Die Wartungsintervalle variieren je nach Transportfrequenz und Betriebsumgebung. | * Vor dem Reinigen das Gerät spannungsfrei schalten. * Die Oberflächen mit einem trockenen Tuch reinigen. * Handauflage nur mit einem feuchtem Tuch reinigen. * Keine flüssigen Reinigungsmittel oder Druckluft zum Reinigen verwenden. * Kein Lösungsmittel verwenden. * Je nach Umgebungsbedingungen empfehlen wir das Gerät alle 2 bis 5 Jahre durch einen Servicetechniker professionell reinigen zu lassen.
# Quick Start
> grandMA3 onPC command wing front panel
 *grandMA3 onPC command wing front panel* 1. [Master area](/grandma3/2-3/do_control_master/) 2. [Dual encoder section](/grandma3/2-3/do_control_encoder/) 3. [Command area](/grandma3/2-3/do_control_command/) 4. [Level wheel](/grandma3/2-3/do_control_level/) 5. Executor buttons 101-190 + 201-290 6. Executor faders 201-290 7. Executor buttons 301-390 + 401-490 8. Executor knobs 301-390 + 401-490 For more information about executors, see [Executor elements](/grandma3/2-3/do_control_executor/).  *grandMA3 onPC command wing rear panel* 1. [DMX A, B, C](/grandma3/2-3/fs_connect_dmx/) 2. [MIDI In+Out](/grandma3/2-3/remote_inputs/) 3. [DC Remote Control](/grandma3/2-3/fs_connect_dc_remote_in/) 4. [LTC](/grandma3/2-3/fs_connect_smpte_ltc/) 5. USB 6. Power switch 7. [IEC connector](/grandma3/2-3/fs_connect_power/) 8. [Desk light](/grandma3/2-3/fs_connect_desk_light/) 9. Kensington lock ### Turn on the grandMA3 onPC command wing [Section titled “Turn on the grandMA3 onPC command wing”](#turn-on-the-grandma3-onpc-command-wing) 1. Unpack the device. 2. Remove the packaging and cushioning material. 3. Place the device indoors on a stable surface. 4. Download the grandMA3 onPC software on [www.malighting.com](http://www.malighting.com) 5. Install the software on your PC or laptop. For minimum requirements see [System Requirements](/grandma3/2-3/onpc_system_requirements/) grandMA3 in the grandMA3 user manual. 6. Connect the grandMA3 onPC command wing with your PC or laptop using a USB cable. 7. Start the grandMA3 console or grandMA3 onPC software. 8. Insert the power connector into the corresponding jack. 9. Connect the power plug with the mains. 10. Turn on the power switch on the rear panel.\ The device starts booting. To turn off the grandMA3 onPC command wing set the power switch to position **O**. | | | | ------------------------------------------------ | ------------------------------------------------------------------------------------------------------------------- | |  | **Important:** -Show data is only saved in the grandMA3 onPC software. -For updates use the grandMA3 onPC software. | | | | | ------------------------------------------------ | -------------------------------------------------------------------------------------------------------------------------------------------------------- | |  | **Important:** You can disconnect the grandMA3 onPC command wing using the grandMA3 onPC software. The DMX output will then be interrupted immediately. | ### Different Combinations [Section titled “Different Combinations”](#different-combinations) | Device | Connected To | Parameters | | ---------------------------- | ------------------------------------------- | ---------- | | grandMA3 onPC command wing + | PC/laptop | 4 096 | | grandMA3 onPC command wing + | PC/laptop + grandMA3 onPC 8/4/2Port Node | 4 096 | | grandMA3 onPC command wing + | PC/laptop + grandMA3 processing unit M/L/XL | 4 096 |
# Quick Start
> 1. Master Bereich
# Quick Start [Section titled “Quick Start”](#quick-start) 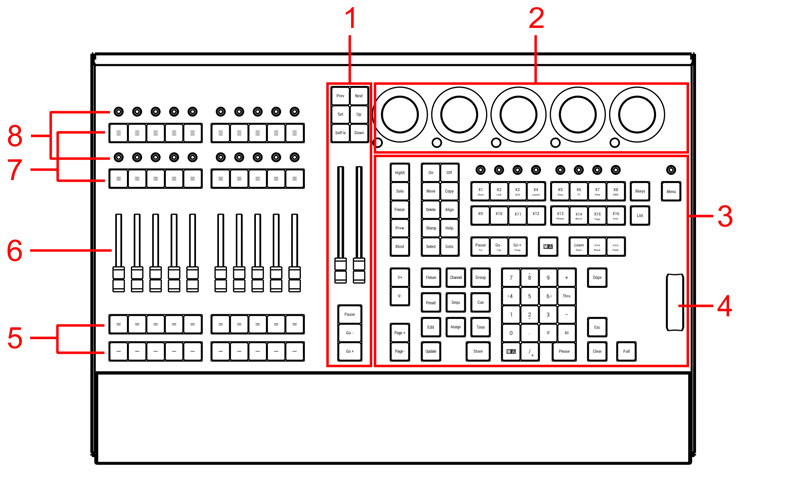 1. [Master Bereich](/grandma3/2-3/do_control_master/) 2. [Dual Encoder Sektion](/grandma3/2-3/do_control_encoder/) 3. Kommando Bereich 4. [Level Wheel](/grandma3/2-3/do_control_level/) 5. Executor Buttons 101-190 + 201-290 6. Executor Fader 201-290 7. Executor Buttons 301-390 + 401-490 8. Rotierbare Executors 301-390 + 401-490 Für weitere Informationen über Executors siehe den Abschnitt [Executor elements](/grandma3/2-3/do_control_elements/) im [grandMA3 Online Benutzerhandbuch](https://help.malighting.com/grandMA3/2.3/HTML/help.html) unter [www.malighting.com.](https://www.malighting.com/) 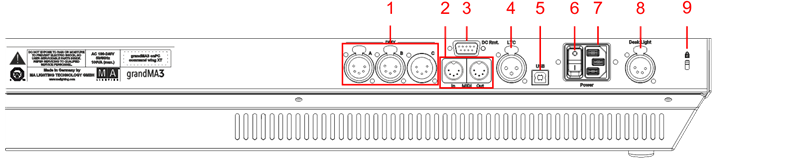 grandMA3 onPC command wing Rückseite 1. [DMX A, B, C](/grandma3/2-3/fs_connect_dmx/) 2. [MIDI In+Out](/grandma3/2-3/fs_connect_midi/) 3. [DC Remote Control](/grandma3/2-3/remote_inputs_dc/) 4. [LTC](/grandma3/2-3/fs_connect_smpte_ltc/) 5. USB 6. Netzschalter 7. [IEC Buchse](/grandma3/2-3/fs_connect_power/) 8. [Pultleuchte](/grandma3/2-3/si_desklights/) 9. Kensington-Schloss ### Das Gerät anschließen und einschalten [Section titled “Das Gerät anschließen und einschalten”](#das-gerät-anschließen-und-einschalten) 1. Gerät auspacken. 2. Verpackungs- und Polstermaterial entfernen. 3. Gerät in einem geschlossenen Raum auf eine stabile Fläche stellen. 4. grandMA3 onPC Software auf [www.malighting.com](https://help.malighting.com/grandMA3/2.3/HTML/www.%20malighting.com) herunterladen. 5. Die Software auf PC oder Laptop installieren. Für Mindestanforderungen, siehe System Requirements grandMA3 im grandMA3 Online Benutzerhandbuch. 6. Den grandMA3 onPC command wing mit dem PC oder Laptop mithilfe eines USB-Kabels verbinden. 7. Die grandMA3 Konsole oder grandMA3 onPC einschalten. 8. Den grandMA3 onPC command wing einschalten:\ -IEC-Kaltgerätestecker mit der dafür vorgesehenen Buchse verbinden. \ -Netzstecker an die Steckdose anschließen. \ -Netzschalter auf **I** stellen. \ -Netzschalter leuchtet rot. ### Den grandMA3 onPC command wing ausschalten [Section titled “Den grandMA3 onPC command wing ausschalten”](#den-grandma3-onpc-command-wing-ausschalten) Um den grandMA3 onPC command wing auszuschalten, Netzschalter auf **O** stellen. | | | | ------------------------------------------------ | -------------------------------------------------------------------------------------------------------------------------------- | |  | **Wichtig:** -Showdaten werden nur in der grandMA3 onPC Software gespeichert. -Für Updates die grandMA3 onPC Software verwenden. | | | | | ------------------------------------------------ | ------------------------------------------------------------------------------------------------------------------------------------------------------------- | |  | **Wichtig:** Der grandMA3 onPC command wing kann ebenfalls über die grandMA3 onPC Software deaktiviert werden. Der DMX-Ausgang wird dann abrupt unterbrochen. | ### Kombinationsmöglichkeiten [Section titled “Kombinationsmöglichkeiten”](#kombinationsmöglichkeiten) | Gerät | Verbunden mit | Parameter | | ---------------------------- | ------------------------------------------- | --------- | | grandMA3 onPC command wing + | PC/Laptop | 4 096 | | grandMA3 onPC command wing + | PC/Laptop + grandMA3 onPC 8/4/2Port Node | 4 096 | | grandMA3 onPC command wing + | PC/Laptop + grandMA3 processing unit M/L/XL | 4 096 | | | | | ------------------------------------------------ | --------------------------------------------------------------------------------------------------------------------------------------------------------- | |  | **Wichtig:** Unabhängig davon, welche Geräte an die grandMA3 onPC Software angeschlossen sind, kann die Parameteranzahl insgesamt maximal 4 096 betragen. | Weitere Information finden Sie im User Manual unter Expand the [Amount of Parameters](/grandma3/2-3/system_parameter_expand/).
# Guide De Démarrage
> 1. Aire Master
 1. [Aire Master](/grandma3/2-3/do_control_master/) 2. [Dual encoder section](/grandma3/2-3/do_control_encoder/) 3. Aire Command 4. [Level wheel](/grandma3/2-3/do_control_level/) 5. Executor boutons 101-190 + 201-290 6. Executor faders 201-290 7. Executor boutons 301-390 + 401-490 8. Executor rotatifs 301-390 + 401-490 Pour plus d’information, voir la section [Executor elements](/grandma3/2-3/do_control_executor/) dans le [Mode d’emploi](https://help.malighting.com/grandMA3/2.3/HTML/help.html).  \_grandMA3 onPC command wing \_panneau arrière 1. [DMX A, B, C](/grandma3/2-3/fs_connect_dmx/) 2. [MIDI In+Out](/grandma3/2-3/fs_connect_midi/) 3. [DC Remote Control](/grandma3/2-3/fs_connect_dc_remote_in/) 4. [LTC](/grandma3/2-3/fs_connect_smpte_ltc/) 5. Interrupteur de courant 6. [Connecteur IEC](/grandma3/2-3/fs_connect_power/) 7. [Lumière d’appoint](/grandma3/2-3/si_desklights/) 8. Kensington lock 9. [Line In+Out](/grandma3/2-3/do_connector_pin_assignment/) 10. [Ethernet 1+2](/grandma3/2-3/fs_connect_ethernet/) 11. [USB 2.0](/grandma3/2-3/fs_connect_usb/) 12. [USB 3.0](/grandma3/2-3/fs_connect_usb/) 13. [DisplayPort 1-4](/grandma3/2-3/fs_connect_external_screens/) ### Branchement et mise sous tension de l’appareil [Section titled “Branchement et mise sous tension de l’appareil ”](#branchement-et-mise-sous-tension-de-lappareil) 1. Déballer l’appareil. 2. Enlever le matériel de protection. 3. Placer l’appareil à l’intérieur sur une surface stable. 4. Télécharger le logiciel grandMA3 onPC sur [www.malighting.com](https://help.malighting.com/grandMA3/2.3/HTML/www.malighting.com) 5. Installer le logiciel sur votre PC ou votre laptop. Pour connaitre la configuration minimale requise pour votre system voir [System Requirements](/grandma3/2-3/onpc_system_requirements/) dans le manuel utilisateur de la grandMA3. 6. Brancher la command wing grandMA3 à votre PC ou laptop en utilisant un câble USB. 7. Démarrer la console grandMA3 ou le logiciel grandMA3 onPC. 8. Allumer la command wing grandMA3 onPC: \ -Insérer le connecteur IEC au branchement correspondant. \ -Brancher la prise principale de courant.\ -Allumer l’interrupteur de courant:\ -Mettre en position **I**. \ -L’interrupteur s’illumine en rouge. Pour éteindre la command wing grandMA3 onPC, mettre l’interrupteur en position **O**. | | | | ------------------------------------------------ | --------------------------------------------------------------------------------------------------------------------------------------------------------- | |  | **Important:** -Les données sont enregistrées seulement dans le logiciel de grandMA3 onPC. -Pour les mises à niveau, utiliser le logiciel grandMA3 onPC . | | | | | ------------------------------------------------ | ----------------------------------------------------------------------------------------------------------------------------------------------------------------------- | |  | **Important:** Vous pouvez déconnecter la command wing grandMA3 onPC en utilisant le logiciel de la grandMA3 onPC. La sortie DMX sera alors interrompue immédiatement. | ### Différentes Combinaisons [Section titled “Différentes Combinaisons”](#différentes-combinaisons) | Appareil | Branché à | Paramètres | | ---------------------------- | ------------------------------------------- | ---------- | | grandMA3 onPC command wing + | PC/laptop | 4 096 | | grandMA3 onPC command wing + | PC/laptop + grandMA3 onPC 8/4/2Port Node | 4 096 | | grandMA3 onPC command wing + | PC/laptop + grandMA3 processing unit M/L/XL | 4 096 | | | | | ------------------------------------------------ | --------------------------------------------------------------------------------------------------------------------------- | |  | **Important:** Peu importe les appareils branchés au logiciel grandMA3 onPC, le nombre de paramètres ne peut excéder 4 096. | Pour plus d’information, voir: [Expand the Amount of Parameters topic](/grandma3/2-3/system_parameter_expand/).
# Safety
> Warning – Danger area
## Symbols and Warning Labels [Section titled “Symbols and Warning Labels”](#symbols-and-warning-labels)  **Warning** – Danger area ***  **Caution**– Risk of electric shock *** ## Risk of Electric Shock [Section titled “Risk of Electric Shock”](#risk-of-electric-shock) The device is to be serviced by qualified personnel only as live parts may be exposed when opening and/or removing coverings. Touching live parts may cause electric shock.  ***  Dispose of as hazardous waste. Follow the applicable regulations. For more information see [Disposal](/grandma3/2-3/key_onpc_command_wing_disposal/). ***  Declaration of conformity. For more information see [Conformity](/grandma3/2-3/key_onpc_command_wing_conformity/). ***  Operating voltage ON/OFF.
# Sécurité
> Avertissement – Zone de danger
# ## Symboles et consignes de sécurité [Section titled “Symboles et consignes de sécurité”](#symboles-et-consignes-de-sécurité)  **Avertissement** – Zone de danger ***  **Attention** – Risque de choc électrique *** ### Risque de choc électrique [Section titled “Risque de choc électrique”](#risque-de-choc-électrique) L’appareil ne doit être entretenu que par du personnel qualifié, des parties sous tension risquant d’être exposées lors de l’ouverture et / ou du retrait des couvercles. Le contact avec des pièces sous tension peut provoquer un choc électrique.  ***  Éliminer comme déchets dangereux. Respecter la réglementation en vigueur. Pour plus d’informations, voir [Élimination](/grandma3/2-3/key_onpc_command_wing_disposal-1-2/). ***  Déclaration de conformité. Pour plus d’informations, voir [Conformité](/grandma3/2-3/key_onpc_command_wing_conformity-1/). ***  Tension de service Marche / Arrêt. | | | | ----------------------------------------- | -------------------------------------------------------------------------------------------------------------------------------------------------------------------------------------------------------------------------------------------------------------- | |  | **Avertissement :** L’appareil doit être mis à la terre. Ne pas ignorer la fonction de sécurité d’une prise avec terre. Une prise avec terre a deux contacts électriques et un troisième contact de terre. Le troisième contact est prévu pour votre sécurité. | Lisez attentivement toutes les instructions de ce guide rapide, en particulier les [consignes générales de sécurité](/grandma3/2-3/key_onpc_command_wing_safety-2/#general_safety_instructions) et les [limitations d’usages](/grandma3/2-3/key_onpc_command_wing_limitations-1-2/). Suivez les instructions et conservez ce guide rapide pour une utilisation ultérieure. Respectez toutes les mises en garde et tous les avertissements mentionnés dans ce guide rapide et indiqués sur l’appareil. | | | | ------------------------------------------------ | ------------------------------------------------------------------------------------------------------------------------------------------------ | |  | ****Important :** Tous les travaux de réparation et d’entretien doivent être effectués exclusivement par des techniciens de service qualifiés.** | * Cet appareil est à la pointe de la technologie ; * Cependant, des risques résiduels ne peuvent être exclus ; * Pour éviter les risques, suivez les consignes de sécurité ; * Cet appareil est destiné uniquement à un usage professionnel et ne convient pas à un usage résidentiel. MA Lighting Technology GmbH ne prend pas en charge d’éventuels dommages pouvant survenir en cas de non-respect des consignes de sécurité. | | | | ----------------------------------------- | ------------------------------------------------------------------------------------------------------------------------------------------------------------------------------------------------------------- | |  | **Avertissement :** Des changements ou des modifications à ces appareils non expressément approuvés par la partie responsable de la conformité pourraient annuler le droit de l’utilisateur de les utiliser. | | | | | ------------------------------------------------ | ------------------------------------------------------------------------------------------------------------------------------------------------------------------------------------------------------------------------------------------------------------------------------------------------------------------------------------------------------------------------------------------------------------------------------------------------------------------------------------------------------------------------------------------------------------------------------------------------------------------------------------------------------------------------------------------------------------------------------------------------------------------------------- | |  | **Note :** Ces appareils ont été testés et jugés conformes aux limites d’un appareil numérique de classe A, conformément à la partie 15 des règles de la FCC et aux normes CE. Ces limites sont conçues pour fournir une protection raisonnable contre de possibles interférences lorsque les appareils sont utilisés dans un environnement commercial. Ceux-ci génèrent, utilisent et peuvent émettre de l’énergie radiofréquence et, s’ils ne sont pas installés et utilisés conformément à ce guide rapide, peuvent éventuellement causer des interférences aux communications radio. L’utilisation de ces appareils dans une zone résidentielle est susceptible de causer des interférences, auquel cas l’utilisateur devra corriger ces interférences à ses propres frais. | ## Dangers causés par le courant électrique [Section titled “Dangers causés par le courant électrique”](#dangers-causés-par-le-courant-électrique) Un appareil ou un câble d’alimentation défectueux présente un risque de blessures graves ou mortelles dues à un choc électrique. Suivez les consignes de sécurité pour éviter les risques liés au courant électrique. * N’utilisez pas de câble d’alimentation défectueux ; * Ne pas ouvrir les couvercles vissés de l’appareil ; * N’utilisez l’appareil que s’il est dans un état technique impeccable ; * Ne réparez pas l’appareil par vos propres moyens ; * N’effectuez pas d’ingénierie inverse sur l’appareil et n’apporter aucune modification à ses composants et accessoires ; * N’exposez pas l’appareil à la pluie ou à l’humidité ; * Ne pas plonger l’appareil dans l’eau. ## []()Consignes de sécurité générales [Section titled “Consignes de sécurité générales”](#consignes-de-sécurité-générales) | | | | ------------------------------------------------ | ---------------------------------------------------------------------------------------------------------------------------------------------------------------------------------------------------------------- | |  | **Important :** La fiche de l’appareil et la fiche de la ligne d’alimentation servent de séparateur. - Pour couper l’alimentation électrique, débranchez la fiche de l’appareil et / ou la fiche d’alimentation. | Pour éviter des blessures ou des dommages à l’appareil : * Ne mettez pas vos mains à l’intérieur de l’appareil pendant le fonctionnement ; * L’appareil et le câble d’alimentation doivent être tenus à l’écart des enfants de moins de 8 ans ; * Les enfants ne sont pas autorisés à jouer avec l’appareil ; * Débranchez l’alimentation électrique du réseau pendant les orages ; * Débranchez l’alimentation électrique du réseau si l’appareil est laissé sans surveillance pendant une longue période ; * Débranchez l’alimentation électrique avant de nettoyer l’appareil ; * N’utilisez pas de nettoyant liquide ou en aérosol. Utilisez uniquement un chiffon sec ; * Ne pas utiliser l’appareil à proximité de l’eau ; * Ne l’exposez pas à un environnement humide ; * Ne versez aucun liquide sur l’appareil ; * Ne bouchez pas ou ne couvrez pas les trous de ventilation de l’appareil. Ceux-ci sont essentiels à la circulation de l’air à l’intérieur de l’appareil et protègent l’appareil contre la surchauffe ; * N’insérez aucun objet dans les trous de ventilation de l’appareil car ceux-ci pourraient entrer en contact avec des pièces sous tension ou provoquer des courts-circuits, un incendie et / ou un choc électrique ; * Ne placez aucun objet sur le câble d’alimentation. Protégez-le contre tout risque de piétinement ou de pincement, en particulier au niveau du connecteur et à l’endroit où les câbles sortent de l’appareil ; * Lors de l’utilisation d’un cable de rallonge, assurez-vous que la puissance nominale de tous les appareils connectés en série ne dépasse pas la puissance nominale maximale du cable de rallonge ; * Ne vous appuyez pas sur l’appareil ; * Ne placez aucun objet lourd sur l’appareil ; * N’utilisez pas de force excessive sur les touches, les boutons, les potentiomètres, les interrupteurs, les connecteurs ou sur les écrans ; * Si le câble d’alimentation ou la fiche d’alimentation principale sont défectueux, faites-les remplacer immédiatement par un technicien qualifié ; * Placez l’appareil uniquement sur des surfaces stables. S’il est placé sur des surfaces instables, il peut tomber et se casser ; * N’utilisez que des câbles d’alimentation homologués avec marquage ; * N’utilisez pas de talkie-walkie puissant ou de téléphone portable à proximité de l’appareil ; * L’appareil est équipé d’une fiche de sécurité. Cette fiche ne peut être utilisé qu’avec des prises de sécurité compatible ; * Comme pour tous les produits fabriqués industriellement, l’utilisation de substances induisant une réaction allergique telle que l’aluminium ne peut généralement pas être exclue. Si vous développez une réaction allergique (éruption cutanée, éternuements fréquents, yeux rouges ou difficultés respiratoires), consultez immédiatement un médecin pour en déterminer la cause. \*\*Si l’une des conditions suivantes se produit, débranchez la fiche d’alimentation principale et appelez votre distributeur local ou le \*\***support technique !** * Le câble d’alimentation ou la fiche principale est endommagé ou usé ; * Pénétration de liquides ; * L’appareil a été exposé à la pluie ou à une forte humidité ambiante ; * L’appareil ne fonctionne pas correctement, même si vous avez suivi toutes les instructions de ce guide rapide. N’utilisez les commandes que comme indiquées dans le guide rapide. Des paramètres incorrects peuvent endommager l’appareil ; * L’appareil est tombé et le boitier est endommagé.
# Sicherheit
> Warnung – Gefahrenbereich
# ## Symbole und Warnzeichen [Section titled “Symbole und Warnzeichen”](#symbole-und-warnzeichen)  \*\*Warnung \*\*– Gefahrenbereich ***  **Vorsicht**– Stromschlaggefahr *** ### Stromschlaggefahr [Section titled “Stromschlaggefahr”](#stromschlaggefahr) Die Wartung des Gerätes darf ausschließlich vom geschulten Personal durchgeführt werden, da beim Öffnen und/oder Entfernen von Abdeckungen spannungsführende Teile freigelegt werden könnten. Spannungsführende Teile nicht berühren – Gefahr eines elektrischen Schlages.  ***  Das Gerät ist als Sondermüll zu entsorgen. Die örtlichen Vorschriften beachten. Für weitere Informationen siehe [Entsorgung](/grandma3/2-3/key_onpc_command_wing_disposal-1/). ***  Konformitätserklärung. Für weitere Informationen siehe [Konformität](/grandma3/2-3/key_onpc_command_wing_conformity-1/). ***  Betriebsspannung AN/AUS. | | | | ----------------------------------------- | ------------------------------------------------------------------------------------------------------------------------------------------------------------------------------------------------------------------------------------------------- | |  | **Warnung:** Das Gerät muss geerdet sein. Nicht den Sicherheitszweck eines Schutzkontaktsteckers ignorieren. Ein Schutzkontaktstecker hat zwei Stromkontakte und einen dritten Erdungskontakt. Der dritte Erdungskontakt dient Ihrer Sicherheit. | Alle Anweisungen in diesem Quick Manual aufmerksam durchlesen, vor allem die [Allgemeinen Sicherheitsanweisungen](/grandma3/2-3/key_onpc_command_wing_safety-3/#h2_632920942) weiter unten in diesem Kapitel und die [Betriebsgrenzen](/grandma3/2-3/key_onpc_command_wing_limitations-1/). Das Quick Manual für den späteren Gebrauch aufbewahren. Alle Vorsichtsmaßnahmen und Warnhinweise befolgen, die in diesem Quick Manual und am Gerät vermerkt sind. | | | | ------------------------------------------------ | -------------------------------------------------------------------------------------------------------------------------- | |  | **Wichtig:** Sämtliche Reparatur- und Wartungsarbeiten dürfen ausschließlich vom geschulten Personal durchgeführt werden. | Dieses Gerät entspricht dem neusten Stand der Technik, trotzdem kann ein Restrisiko nicht komplett ausgeschlossen werden. Um dieses Restrisiko zu vermeiden, die Sicherheitsanweisungen befolgen. Dieses Gerät ist nur für den professionellen Gebrauch bestimmt und nicht für den Privatgebrauch geeignet. MA Lighting Technology GmbH kommt für den Schaden nicht auf, der aufgrund von Nichtbeachtung der Sicherheitsanweisungen enstehen könnte. | | | | ----------------------------------------- | --------------------------------------------------------------------------------------------------------------------------------------------------------------------------------------------------------------------------- | |  | **Warnung:** Durch den Nutzer herbeigeführte Modifikationen an diesen Geräten, die nicht ausdrücklich von der für die Übereinstimmung verantwortlichen Stelle genehmigt wurden, führen zum Verbot der Benutzung der Geräte. | | | | | ------------------------------------------------ | --------------------------------------------------------------------------------------------------------------------------------------------------------------------------------------------------------------------------------------------------------------------------------------------------------------------------------------------------------------------------------------------------------------------------------------------------------------------------------------------------------------------------------------------------------------------------------------------------------------------------------------- | |  | **Wichtig:** Diese Geräte wurden getestet und entsprechen den Grenzwerten eines digitalen Geräts der Klasse A gemäß der FCC-Bestimmungen Teil 15 und der CE-Regularien. Diese Grenzwerte bieten im professionellen Betrieb einen angemessenen Schutz gegen störende Interferenzen. Die Geräte erzeugen, verwenden und strahlen möglicherweise Funkwellen aus. Wenn sie nicht gemäß dieser Anleitung installiert und verwendet werden, können sie den Funkverkehr stören. Der Betrieb dieser Geräte im privaten, häuslichen Bereich kann u. U. Funkstörungen verursachen. In diesem Fall muss der Benutzer die Störungen selbst beheben. | ## Vermeiden von Stromschlag [Section titled “Vermeiden von Stromschlag”](#vermeiden-von-stromschlag) Ein beschädigtes Gerät oder Netzkabel kann schwere oder tödliche Verletzungen verursachen. Die Sicherheitsanweisungen befolgen, um Verletzungen, die durch elektrischen Strom verursacht werden können, zu vermeiden. * Kein beschädigtes Netzkabel nutzen. * Keine festgeschraubten Abdeckungen am Gehäuse öffnen. * Gerät nur im technisch einwandfreien Zustand nutzen. * Gerät niemals selbst reparieren. * Gerät nicht modifizieren und keine Änderungen an dessen Komponenten und Zubehör vornehmen. * Gerät nicht Regen oder Feuchtigkeit aussetzen. * Gerät nicht in Wasser tauchen. ## []()Allgemeine Sicherheitsanweisungen [Section titled “Allgemeine Sicherheitsanweisungen”](#allgemeine-sicherheitsanweisungen) | | | | ------------------------------------------------ | --------------------------------------------------------------------------------------------------------------------------------------------------------------------------------- | |  | **Wichtig:** Der Gerätestecker und der Netzstecker der Zuleitung dienen als Trennvorrichtung. Ziehen Sie den Geräte- und/oder Netzstecker um das Gerät spannungsfrei zu schalten. | Um Verletzungen vorzubeugen oder Schäden am Gerät zu vermeiden: * Beim Bedienen nicht in das Gerät hineingreifen. * Gerät und Netzkabel von Kindern unter 8 Jahren fernhalten. * Kinder nicht mit dem Gerät spielen lassen. * Bei Gewitter das Gerät spannungsfrei schalten. * Bei längerer Nichtverwendung das Gerät spannungsfrei schalten. * Vor dem Reinigen das Gerät spannungsfrei schalten. * Keine flüssigen Reinigungsmittel oder Sprühreiniger verwenden. * Nur mit einem trockenen Tuch reinigen. * Gerät nicht in der Nähe von Wasser nutzen. * Gerät nicht einer feuchten Umgebung aussetzen. * Keine Flüssigkeiten auf das Gerät schütten. * Belüftungsöffnungen im Gehäuse nicht blockieren – diese sind für den Luftstrom innerhalb des Gerätes wichtig und schützen es vor Überhitzung. * Keine Fremdkörper in die Belüftungsöffnungen stecken, da diese mit spannungsführenden Teilen in Kontakt kommen und Kurzschlüsse, Feuer und/oder Stromschlag verursachen können. * Keine Gegenstände auf das Netzkabel stellen; Nicht auf das Netzkabel treten oder zusammendrücken, besonders am Stecker und an Stellen an denen die Kabel das Gehäuse verlassen. * Wird ein Verlängerungskabel genutzt, muss sichergestellt werden, dass die Summe der Nennleistungen der an das Kabel angeschlossenen Geräte die Nennleistung des Verlängerungskabels nicht überschreitet. * Sich nicht mit dem Körpergewicht auf dem Gerät abstützen. * Keine schweren Gegenstände auf dem Gerät abstellen. * Keine übermäßige Gewalt auf Tasten, Knöpfe, Fader, Drehknöpfe, Schalter, Verbindungen oder Monitor Wing ausüben. * Ist das Netzkabel oder der Stecker beschädigt, müssen diese umgehend von einer Fachkraft ausgetauscht werden. * Gerät nur auf stabilen Oberflächen platzieren; Wird es auf instabilen Flächen platziert, kann das Gerät herunterfallen und stark beschädigt werden. * Nur Netzkabel mit Sicherheitsprüfzeichen nutzen. * Keine leistungsstarken Funkgeräte oder Mobiltelefone in der Nähe des Gerätes verwenden. * Das Gerät hat ein Schutzkontaktstecker, der nur in Verbindung mit einer Schutzkontaktsteckdose genutzt werden darf. * Wie bei allen industriell gefertigten Gütern kann die Verwendung von Stoffen, die Allergien hervorrufen können, wie z.B. Aluminium, nicht gänzlich ausgeschlossen werden. Sollten allergische Reaktionen (wie z.B. Hautausschlag, ständiges Niesen, gerötete Augen oder Atemwegsbeschwerden) auftreten, ist umgehend ein Arzt zur Ursachenklärung aufzusuchen. **Sollte einer der folgenden Punkte zutreffen, das Gerät spannungsfrei schalten und den Kundendienst kontaktieren!** * Netzkabel und/oder Verbindung ist/sind beschädigt, spröde oder brüchig. * Eintritt von Wasser. * Gerät wurde Regen oder hoher Luftfeuchtigkeit ausgesetzt. * Gerät funktioniert bei Einhaltung von Bedienungsanweisungen, die im Quick Manual stehen, nicht einwandfrei. Steuerelemente so einstellen wie im Quick Manual beschrieben, da eine falsche Einstellung das Gerät beschädigen könnte. * Gerät ist heruntergefallen und dabei wurde das Gehäuse beschädigt.
# Support
> Contact us for any questions about your MA product.
Contact us for any questions about your MA product. MA Lighting and its extensive distributor network offer unparalleled technical support. Call on our expertise for help with any problem, no matter if it is about the operation, software features, software installations, or troubleshooting. ### Help Pages [Section titled “Help Pages”](#help-pages) The help pages are included in every software installer package and are automatically loaded into the software. To access and read the help pages, press Help + Please. The help pop-up opens on the main screen. To jump directly into a special help topic, use the context-sensitive help: * Press and hold Help and tap the desired user interface element (UI element) to open the corresponding help topic. * Tap  in the control bar and tap a UI element to open the corresponding help topic. ### Online Manuals [Section titled “Online Manuals”](#online-manuals) All MA product-related manuals are available as online versions. Just select your MA product and click on the respective link. All further documents can be found in our download area. Go to [https://www.malighting.com/training-support/online-manuals.](https://www.malighting.com/training-support/online-manuals) ### Video Tutorials [Section titled “Video Tutorials”](#video-tutorials) Get tips and tricks from our MA experts on your MA product. MA offers a whole range of videos on how to use your MA product in the best possible way. Just select your series and click on the links to watch the videos on our YouTube channel. Go to [https://www.malighting.com/training-support/video-tutorials.](https://www.malighting.com/training-support/video-tutorials) ### Community [Section titled “Community”](#community) Share your knowledge and get help from other MA users. A community can be stronger and better than the individual. Be part of the MA community! Go to [https://www.malighting.com/training-support/community.](https://www.malighting.com/training-support/community) ### Fixture Shares [Section titled “Fixture Shares”](#fixture-shares) In our MA Fixture Share you will find a comprehensive database of different fixture types for grandMA3, grandMA2, and dot2. You can also find the grandMA2 GDTF Converter there. Simply upload the GDTF file and it will be converted into a grandMA2 Fixture Profile.\ \ The GTDF Share contains a comprehensive library of all available GDTF files with all relevant modes and firmware versions. Like the MA Fixture Share, this database is continuously updated. For more information see: ### Local Support [Section titled “Local Support”](#local-support) If you have a question regarding your MA Lighting product, please first of all contact your local MA product specialists. ### Central Support [Section titled “Central Support”](#central-support) If you are in need of further assistance or manufacturer support, please fill out an email request on [www.malighting.com in](http://www.malighting.com%C2%A0in) Training and Support. Your request will automatically be sent to\*\* \*\*(in English or German). This email service is monitored during MA Lighting’s regular business hours in Germany from 8.30 am until 5 pm, Monday through Friday. ### Emergency Hotline [Section titled “Emergency Hotline”](#emergency-hotline) In any case of a show critical emergency please contact the MA Lighting support hotline. Phone +49 5251 68 88 65 99 Please note that this 24/7 hotline is strictly for emergency cases. ### Intellectual Property [Section titled “Intellectual Property”](#intellectual-property) MA Lighting Technology has registered multiple patents, trademarks, design patents, and utility models for its products.\ We will take legal action against the violation of this intellectual property. For more information see:
# Support
> Bei Fragen zu Ihren MA Produkten wenden Sie sich bitte an uns.
Bei Fragen zu Ihren MA Produkten wenden Sie sich bitte an uns. MA Lighting bietet mit dem angeschlossenen umfassenden Distributionsnetzwerk einen einmaligen technischen Support. Sollten wider Erwarten Probleme auftreten, stehen wir Ihnen mit unserem Know-how zur Seite, ganz gleich worum es sich handelt – Bedienung, Software-Features, Software-Installation oder Fehlerbeseitigung. ### Offline Hilfe [Section titled “Offline Hilfe”](#offline-hilfe) Die Offline Hilfe ist in jedem Software Installer enthalten und wird automatisch in die Software geladen. Zum Aufrufen der Hilfe die Tasten Help + Please drücken. Das Hilfe Fenster öffnet sich auf dem Hauptmonitor. Um ein spezielles Hilfethema direkt anzuspringen, die Kontextsensitive Hilfe verwenden. Um das entsprechende Hilfethema zu öffnen: * Taste Help drücken und halten und das gewünschte Bedienelement antippen. * Das  in der Kontrollleiste und das gewünschte Bedienelement antippen. ### Online Manuals [Section titled “Online Manuals”](#online-manuals) Alle Benutzerhandbücher der MA Produkte sind als Online-Versionen verfügbar. Einfach auswählen, für welches MA Produkt Sie eine Bedienungsanleitung benötigen. Gehe zu . ### Video Tutorials [Section titled “Video Tutorials”](#video-tutorials) Hier erhalten Sie Tipps und Tricks von unseren MA Experten für Ihr MA Produkt. MA Lighting bietet eine große Anzahl an Tutorial-Videos an, damit Sie Ihr MA Produkt bestmöglich nutzen können. Wählen Sie dafür einfach eine Serie aus und sehen Sie alle Videos dazu auf unserem YouTube Kanal. Gehe zu . ### Community [Section titled “Community”](#community) Teilen Sie Ihr Wissen mit anderen MA Usern. In der Gemeinschaft ist man effektiver. Werden Sie Mitglied der MA Community! Gehe zu [https://www.malighting.com/de/training-support/community](https://www.malighting.com/de/training-support/community/). ### Fixture Shares [Section titled “Fixture Shares”](#fixture-shares) Im MA Fixture Share finden Sie eine umfassende Bibliothek der unterschiedlichsten Fixture Typen für alle grandMA3, grandMA2 und dot2 Serien. Im GTDF Share finden Sie eine umfassende Bibliothek aller verfügbaren GDTF Files mit allen relevanten Modi und Firmware Versionen. Diese Datenbank wird, wie das MA Fixture Share kontinuierlich aktualisiert. Mehr Info unter . ### Lokaler Support [Section titled “Lokaler Support”](#lokaler-support) Bei Fragen zu Ihren MA Lighting Produkten wenden Sie sich bitte als erstes an Ihre MA Produktspezialisten vor Ort. ### Zentraler Support [Section titled “Zentraler Support”](#zentraler-support) Wenn Sie weitere Hilfe oder Herstellerunterstützung benötigen, schicken Sie uns bitte ein [ausgefülltes E-Mail-Formular](https://www.malighting.com/de/training-support/support-anfrage) unter , Training und Support. Diese Anfrage wird automatisch an \*\* \*\*(in Englisch oder Deutsch) gesendet. Dieser E-Mail-Service ist während der regulären Geschäftszeiten von MA Lighting von 8.30 Uhr bis 17 Uhr von Montag bis Freitag erreichbar. ### Notfall-Hotline [Section titled “Notfall-Hotline”](#notfall-hotline) In show-kritischen Situationen nehmen Sie bitte Kontakt zur MA Lighting Support-Hotline auf. Tel. +49 5251.68 88 65 99 Diese Hotline ist 24 Stunden am Tag und 7 Tage in der Woche besetzt. Sie ist nur für Notfälle. ### Intellectual Property [Section titled “Intellectual Property”](#intellectual-property) MA Lighting Technology hat für seine Produkte zahlreiche Patente, Marken, Geschmacksmuster und Gebrauchsmuster angemeldet. Im Falle der Verletzung dieses geistigen Eigentums werden wir rechtliche Schritte einleiten. Mehr Info unter .
# Support technique
> Contactez-nous pour toute question concernant votre produit MA.
Contactez-nous pour toute question concernant votre produit MA. MA Lighting et son vaste réseau de distributeurs offrent un support technique incomparable. Faites appel à notre expertise pour tout problème, qu’il s’agisse de fonctionnement, de fonctionnalités logicielles, d’installations logicielles ou de dépannage. ### Pages d’aide [Section titled “Pages d’aide”](#pages-daide) Les pages d’aide sont incluses dans chaque logiciel d’installation et sont automatiquement chargées dans le logiciel. Pour accéder et lire les pages d’aide, appuyez sur Help + Please. La fenêtre contextuelle d’aide s’ouvre sur l’écran principal. Pour accéder directement à une rubrique d’aide spéciale, utilisez l’aide contextuelle : * Appuyez et maintenez enfoncé le bouton Help et touchez l’élément d’interface utilisateur (élément IU) souhaité pour ouvrir la rubrique d’aide correspondante. * Tapez sur  dans la barre de contrôle et appuyez sur un élément de l’IU pour ouvrir le sujet d’aide correspondant. ### Guides en ligne [Section titled “Guides en ligne”](#guides-en-ligne) Tous les guides relatifs aux produits MA sont disponibles en ligne. Choisissez simplement votre produit MA et cliquez sur le lien correspondant. Tous les autres documents sont disponibles dans notre espace de téléchargement. Visitez . ### Tutoriels vidéo [Section titled “Tutoriels vidéo”](#tutoriels-vidéo) Obtenez des conseils et astuces de nos experts MA sur votre produit MA. MA vous propose toute une gamme de vidéos sur la meilleure façon d’utiliser votre produit MA. Sélectionnez simplement votre série et cliquez sur les liens pour regarder les vidéos sur notre chaîne YouTube. Visitez . ### Communauté [Section titled “Communauté”](#communauté) Partagez vos connaissances et obtenez l’aide d’autres utilisateurs de MA. Une communauté peut être plus forte et meilleure que l’individu. Faites partie de la communauté MA ! Visitez . ### Fixture Shares [Section titled “Fixture Shares”](#fixture-shares) Dans notre MA Fixture Share, vous trouverez une base de données complète des différents types de luminaires pour grandMA3, grandMA2 et dot2. Le partage GTDF contient une bibliothèque complète de tous les fichiers GDTF disponibles avec tous les modes et versions de micrologiciel pertinents. Tout comme MA Fixture Share, cette base de données est continuellement mise à jour. Pour plus d’informations, voir: ### Support local [Section titled “Support local”](#support-local) Si vous avez une question concernant votre produit MA Lighting, veuillez tout d’abord contacter votre spécialiste MA local. ### Support central [Section titled “Support central”](#support-central) Si vous avez besoin de plus d’aide ou d’assistance de la part du fabricant, veuillez remplir une demande par e-mail à [www.malighting.com](https://www.malighting.com/) sous Training and Support. Votre demande sera automatiquement envoyée à **** (en anglais ou en allemand). Ce service de messagerie électronique est surveillé pendant les heures d’ouverture habituelles de MA Lighting en Allemagne, de 8h30 à 17h, du lundi au vendredi. ### Hotline d’urgence [Section titled “Hotline d’urgence”](#hotline-durgence) En cas d’urgence, veuillez contacter le support technique de MA Lighting. Téléphone +49 5251 68 88 65 99 Veuillez prendre note que cette ligne d’assistance 24 heures sur 24 et 7 jours sur 7 est strictement réservée aux cas d’urgence. ### Propriété intellectuelle [Section titled “Propriété intellectuelle”](#propriété-intellectuelle) MA Lighting Technology a déposé plusieurs brevets, marques de commerce, brevets de conception et modèles d’utilité pour ses produits. Nous intenterons une action en justice contre la violation de cette propriété intellectuelle. Pour plus d’informations, voir:
# Technical Data
> grandMA3 onPC command wing front panel
| | | | ------------------------------------------------ | ------------------------------------------------------------------------------------------------------------------------------------------------------------------------------------------------------------------------- | |  | **Important:** Only use adequately protected power cables (min. Ø = 3 x 1.0 mm²). The required power cable must meet the country’s standards. **Only qualified personnel is allowed to perform work on the power cable!** | | | | | ------------------------------------------------ | -------------------------------------------------------------------------- | |  | **Important:** Power cable and connector are not included in the delivery. | * DMX: The maximum length of the cable is 350 m (in ideal conditions).  *grandMA3 onPC command wing front panel* | Technical Data | | | ----------------- | ----------------------------------- | | Parameters | 4 096 | | Parameters Mode2 | not applicable (no Mode 2) | | Operating voltage | 100-240 V AC, 50/60 Hz | | Net weight | 10 kg / 23 lbs | | Power | max. 50 VA | | Dimensions | 620 x 427 x 102 mm / 24 x 17 x 4 in | ### Outputs grandMA3 onPC command wing [Section titled “Outputs grandMA3 onPC command wing”](#outputs-grandma3-onpc-command-wing)  *grandMA3 onPC command wing rear panel* | Number | Connector | | ------ | ------------------------------------------------------------------ | | 1 x | IEC connector | | 2 x | DMX512-A OUT (5pin XLR female) | | 1 x | DMX512-A IN (5pin XLR male) | | 1 x | MIDI IN (5pin DIN female) | | 1 x | MIDI OUT (5pin DIN female) | | 1 x | LTC – Linear Time Code (3pin XLR female) | | 1 x | GPI – General Purpose Input (D-SUB DE9 female – DC remote control) | | 1 x | USB 2.0 (type B) | | 1 x | LED desk light (4pin XLR female) |
# Technische Daten
> grandMA3 onPC command wing – Vorderseite
| | | | ------------------------------------------------ | ------------------------------------------------------------------------------------------------------------------------------------------------------------------------------------------------------------------------------------------------------- | |  | **Wichtig:** Ausreichend isolierte und geschützte Netzkabel verwenden (min. Ø = 3 x 1,0 mm²). Das Netzkabel muss den Standards des Landes entsprechen. **Arbeiten am Netzkabel dürfen ausschließlich von qualifiziertem Personal durchgeführt werden!** | | | | | ------------------------------------------------ | ------------------------------------------------------------------------------- | |  | **Wichtig:** Netzkabel und Steckverbinder sind im Lieferumfang nicht enthalten. | * DMX: Die maximale Kabellänge beträgt 350 m (unter idealen Bedingungen).  *grandMA3 onPC command wing – Vorderseite* | Technische Daten | | | ------------------------- | ----------------------------------- | | Parameter | 4 096 | | Parameter Mode2 | nicht zutreffend (kein Mode2) | | Betriebsspannung | 100-240 V AC, 50/60 Hz | | Gewicht (ohne Verpackung) | 10 kg / 23 lbs | | Anschlussleistung | max. 50 VA | | Maße | 620 x 427 x 102 mm / 24 x 17 x 4 in | ### Steckverbinder grandMA3 onPC command wing [Section titled “Steckverbinder grandMA3 onPC command wing”](#steckverbinder-grandma3-onpc-command-wing)  *grandMA3 onPC command wing – Rückseite* | Anzahl | Steckverbinder | | ------ | -------------------------------------------------------------------- | | 1 x | Kaltgeräteeinbaustecker | | 2 x | DMX512-A OUT (5-polig XLR weiblich) | | 1 x | DMX512-A IN (5-polig XLR männlich) | | 1 x | MIDI IN (5-polig DIN weiblich) | | 1 x | MIDI OUT (5-polig DIN weiblich) | | 1 x | LTC – Linear Time Code (3-polig XLR weiblich) | | 1 x | GPI – General Purpose Input (D-SUB DE9 weiblich – DC Remote Control) | | 1 x | USB 2.0 (Typ B) | | 1 x | LED Pultleuchte (4-polig XLR weiblich) |
# Données Techniques
> grandMA3 onPC command wing panneau avant
| | | | ------------------------------------------------ | ----------------------------------------------------------------------------------------------------------------------------------------------------------------------------------------------------------------------------------------------------------- | |  | **Important:** Utiliser des câbles protégés adéquatement (min. Ø = 3 x 1.0 mm²). Le câble de courant requis pour le branchement doit être conforme au standard du pays. **Seul une personne qualifiée est autorisée à travailler sur le câble de courant!** | | | | | ------------------------------------------------ | ------------------------------------------------------------------------------ | |  | **Important:** Le câble et le connecteur ne sont pas inclus dans la livraison. | * DMX: la longueur maximale du câble ne doit pas excéder 350 m (dans des conditions idéal). ### grandMA3 onPC command wing [Section titled “grandMA3 onPC command wing”](#grandma3-onpc-command-wing) 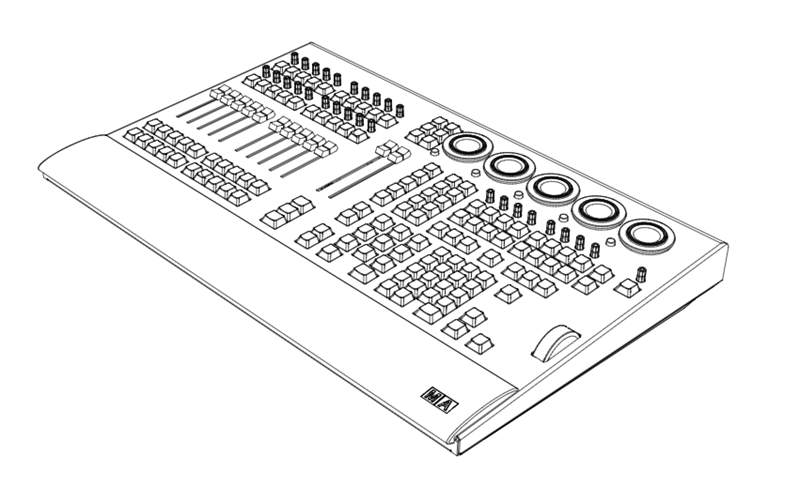 grandMA3 onPC command wing panneau avant | Données Techniques | | | ------------------ | ----------------------------------- | | Paramètres | 4 096 | | Paramètres Mode2 | Aucun | | Tension | 100-240 V AC, 50/60 Hz | | Poids net | 10 kg / 23 lbs | | Puissance | max. 50 VA | | Dimensions | 620 x 427 x 102 mm / 24 x 17 x 4 in | ### Sorties grandMA3 onPC command wing [Section titled “Sorties grandMA3 onPC command wing”](#sorties-grandma3-onpc-command-wing)  grandMA3 onPC command wing panneau arrière | Nombre | Connecteur | | ------ | ------------------------------------------------------------------ | | | | | 1 x | IEC connector | | 2 x | DMX512-A OUT (5pin XLR female) | | 1 x | DMX512-A IN (5pin XLR male) | | 1 x | MIDI IN (5pin DIN female) | | 1 x | MIDI OUT (5pin DIN female) | | 1 x | LTC – Linear Time Code (3pin XLR female) | | 1 x | GPI – General Purpose Input (D-SUB DE9 female – DC remote control) | | 1 x | USB 2.0 (type B) | | 1 x | LED desk light (4pin XLR female) |
# Transport
> Noncompliance of the safety instructions can result in personal injury or material damage;
* The grandMA3 onPC command wing must be protected from environmental factors such as physical shocks and vibration during transportation; * Remove all cables before transport; * The user is responsible for securely fastening the products for transport and for following the manufacturer´s safety instructions when transporting the device;\ Noncompliance of the safety instructions can result in personal injury or material damage; * Do not place the grandMA3 onPC command wing on unstable surfaces; * Do not place any objects on top of the grandMA3 onPC command wing. | | | | ----------------------------------------- | ---------------------------------------------------------------------------------------------------------------------------------------------------------------------------------------------------------------------------------------------------------------------------------------------------------------------- | |  | **Warning:** -Pay attention to temperature and humidity during transport. For more information see [Limitations](/grandma3/2-3/key_onpc_command_wing_limitations/). -After the transport check the device. -If the device is damaged (dented, bent or broken), do not connect the grandMA3 onPC command wing to power! |
# Transport
* Den grandMA3 command wing während des Transports vor Umwelteinflüssen wie Erschütterungen und Vibrationen schützen. * Alle Kabel vor dem Transport entfernen. * Der Benutzer ist dafür verantwortlich, das Gerät beim Transport sicher zu befestigen und die Sicherheitshinweise des Herstellers zu beachten. Die Nichteinhaltung der Sicherheitshinweise kann zu Personen- oder Sachschäden führen. * Den grandMA3 command wing nicht auf eine instabile Oberfläche stellen. * Keine weiteren Gegenstände auf den grandMA3 command wing stellen. | | | | ----------------------------------------- | ------------------------------------------------------------------------------------------------------------------------------------------------------------------------------------------------------------------------------------------------------------------------------------------------------------------------------------------------------------------------------------- | |  | **Wichtig:** - Beim Transport die zulässigen Werte für Temperaturen und Luftfeuchte beachten. Für weitere Information, siehe [Betriebsgrenzen](/grandma3/2-3/key_onpc_command_wing_limitations-1/). - Nach dem Transport das Gerät auf Beschädigungen prüfen. - Falls das Gerät beschädigt sein sollte (verbeult, verbogen oder kaputt), es nicht an die Stromversorgung anschließen! |
# Transport
> Le non-respect des consignes de sécurité peut entraîner des dommages corporels ou matériels ;
* Les grandMA3 onPC command wings doivent être protégés des influences environnementales telles que les chocs physiques et les vibrations pendant le transport ; * Retirez tous les câbles avant le transport ; * L’utilisateur est responsable de la sûreté de la fixation des produits pour le transport et du respect des consignes de sécurité du fabricant lors du transport de l’appareil ;\ Le non-respect des consignes de sécurité peut entraîner des dommages corporels ou matériels ; * Ne placez pas les grandMA3 onPC command wings sur des surfaces instables ; * Ne placez aucun objet sur les grandMA3 onPC command wings. | | | | ----------------------------------------- | ----------------------------------------------------------------------------------------------------------------------------------------------------------------------------------------------------------------------------------------------------------------------------------------------------------------------------------------------------------------------------------------------------------------------------------------------- | |  | **Attention:** -Faites attention à la température et à l’humidité pendant le transport. Pour plus d’informations, voir [Limitations d’usage](https://malighting.clickhelp.co/smart/project-waduc_qa_grandma3-user-manual/key_xport_nodes_limitations-1-2). -Après le transport, vérifiez l’appareil. -Si l’appareil ou son écran est endommagé (cabossé, tordu ou cassé), ne connectez pas le grandMA3 onPC command wing au réseau électrique ! |
# Limitations
> Operation:
Operation: 0 °C up to 40 °C / 32 °F up to 104 °F
# Limitations
> Fonctionnement : 0 °C jusqu'à 40 °C / 32 °F jusqu'à 104 °F
### **Température** [Section titled “Température”](#température) Fonctionnement : 0 °C jusqu’à 40 °C / 32 °F jusqu’à 104 °F | | | | ----------------------------------------- | --------------------------------------------------------------------------------------------------------------------------------------------------- | |  | **Attention :** Des températures plus élevées peuvent solliciter le système de refroidissement de l’appareil et détruire des composants matériels. | Stockage / Transport : -10 °C jusqu’à +50 °C / 14 °F jusqu’à 122 °F ### **Humidité** [Section titled “Humidité”](#humidité) Fonctionnement : 20 % jusqu’à 90 % d’humidité relative (sans condensation) Stockage / Transport : 10 % jusqu’à 90 % d’humidité relative (sans condensation) ### **Environnement** [Section titled “Environnement”](#environnement) * Suivez toutes les consignes de sécurité ; * N’utilisez l’appareil que dans ses limites de fonctionnement ; * N’utilisez l’appareil qu’à l’intérieur ; * L’air doit être dépourvu de poussière et de toute substance dangereuse ou explosive ; * Évitez les secousses ; * Cet appareil n’est pas protégé contre les éclaboussures d’eau. Ne l’utilisez pas à proximité de l’eau ; * N’utilisez pas l’appareil sous la pluie ou l’humidité ; * Ne placez pas l’appareil à un endroit où il peut entrer en contact avec des gaz corrosifs ou de l’air salin car cela peut provoquer un mauvais fonctionnement.
# Betriebsgrenzen
> Betrieb: 0 °C bis 40 °C / 32 °F bis 104 °F
### **Temperatur** [Section titled “Temperatur”](#temperatur) Betrieb: 0 °C bis 40 °C / 32 °F bis 104 °F | | | | ----------------------------------------- | ---------------------------------------------------------------------------------------------------------------------------------- | |  | **Achtung:** Hohe Temperaturen können das Kühlsystem des Gerätes überfordern und zum Ausfall von elektrischen Komponenten führen. | Lagerung/Transport: -10 °C bis +50 °C / 14 °F bis 122 °F ### **Luftfeuchte** [Section titled “Luftfeuchte”](#luftfeuchte) Betrieb: 20 % bis 90 % relative Luftfeuchte (nicht kondensierend) Lagerung/Transport: 10 % bis 90 % relative Luftfeuchte (nicht kondensierend) ### **Umgebung** [Section titled “Umgebung”](#umgebung) * Alle Sicherheitshinweise beachten. * Das Gerät innerhalb der Betriebsgrenzen betreiben. * Das Gerät nur in geschlossenen Räumen betreiben. * Die Umgebungsluft muss staubfrei und frei von gefährlichen und explosiven Stoffen sein. * Erschütterungen vermeiden. * Das Gerät ist nicht gegen Spritzwasser geschützt. Nicht in der Nähe von Wasser betreiben. * Das Gerät nicht bei Regen oder Nebel betreiben. * Das Gerät nicht an einem Ort platzieren, an dem es mit korrosiven Gasen oder salzhaltiger Luft in Kontakt kommen könnte, da dies sonst Fehlfunktionen verursachen könnte.
# Limitations
> Operation:
Operation: 0 °C up to 40 °C / 32 °F up to 104 °F
# Betriebsgrenzen
> Betrieb: 0 °C bis 40 °C / 32 °F bis 104 °F
### **Temperatur** [Section titled “Temperatur”](#temperatur) Betrieb: 0 °C bis 40 °C / 32 °F bis 104 °F | | | | ----------------------------------------- | ---------------------------------------------------------------------------------------------------------------------------------- | |  | **Achtung:** Hohe Temperaturen können das Kühlsystem des Gerätes überfordern und zum Ausfall von elektrischen Komponenten führen. | Lagerung/Transport: -10 °C bis +50 °C / 14 °F bis 122 °F ### **Luftfeuchte** [Section titled “Luftfeuchte”](#luftfeuchte) Betrieb: 20 % bis 90 % relative Luftfeuchte (nicht kondensierend) Lagerung/Transport: 10 % bis 90 % relative Luftfeuchte (nicht kondensierend) ### **Umgebung** [Section titled “Umgebung”](#umgebung) * Alle Sicherheitshinweise beachten. * Das Gerät innerhalb der Betriebsgrenzen betreiben. * Das Gerät nur in geschlossenen Räumen betreiben. * Die Umgebungsluft muss staubfrei und frei von gefährlichen und explosiven Stoffen sein. * Erschütterungen vermeiden. * Das Gerät ist nicht gegen Spritzwasser geschützt. Nicht in der Nähe von Wasser betreiben. * Das Gerät nicht bei Regen oder Nebel betreiben. * Das Gerät nicht an einem Ort platzieren, an dem es mit korrosiven Gasen oder salzhaltiger Luft in Kontakt kommen könnte, da dies sonst Fehlfunktionen verursachen könnte.
# Limitations
> Fonctionnement : 0 °C jusqu'à 40 °C / 32 °F jusqu'à 104 °F
### **Température** [Section titled “Température”](#température) Fonctionnement : 0 °C jusqu’à 40 °C / 32 °F jusqu’à 104 °F | | | | ----------------------------------------- | --------------------------------------------------------------------------------------------------------------------------------------------------- | |  | **Attention :** Des températures plus élevées peuvent solliciter le système de refroidissement de l’appareil et détruire des composants matériels. | Stockage / Transport : -10 °C jusqu’à +50 °C / 14 °F jusqu’à 122 °F ### **Humidité** [Section titled “Humidité”](#humidité) Fonctionnement : 20 % jusqu’à 90 % d’humidité relative (sans condensation) Stockage / Transport : 10 % jusqu’à 90 % d’humidité relative (sans condensation) ### **Environnement** [Section titled “Environnement”](#environnement) * Suivez toutes les consignes de sécurité ; * N’utilisez l’appareil que dans ses limites de fonctionnement ; * N’utilisez l’appareil qu’à l’intérieur ; * L’air doit être dépourvu de poussière et de toute substance dangereuse ou explosive ; * Évitez les secousses ; * Cet appareil n’est pas protégé contre les éclaboussures d’eau. Ne l’utilisez pas à proximité de l’eau ; * N’utilisez pas l’appareil sous la pluie ou l’humidité ; * Ne placez pas l’appareil à un endroit où il peut entrer en contact avec des gaz corrosifs ou de l’air salin car cela peut provoquer un mauvais fonctionnement.
# Declaration of Conformity
> Manufacturer:
## CE and FCC Standards and Approvals [Section titled “CE and FCC Standards and Approvals”](#ce-and-fcc-standards-and-approvals) **Manufacturer:** MA Lighting Technology GmbH\ Dachdeckerstraße 16\ 97297 Waldbüttelbrunn\ GERMANY *** *declares that the product* *** **Name of product:** * grandMA3 onPC command wing XT *** *is conform to the following directives and harmonized standards* *** \*\*Safety: \*\* **2014/35/EU (Low Voltage Directive)** * IEC/EN/UL 62368-1:2014 * CAN/CSA-C22. No. 62368-1:2014 *** **EMC – Electromagnetic Compatibility:** **FCC** * 47 CFR, Part 15, Subpart B: 2019 (Class A) \*\*2014/30/EU \*\* * EN55032:2016-02 (Class A) * EN61000-3-2 * EN55035:2018-04 *** **RoHS:** **2011/65/EU (RoHS II)** * EN50581:2012 * WEEE-Reg.-Nr. DE 14150988 *** **Additional information:** All data lines and signal lines must be shielded and the shielding must be connected to the grounding or the housing of the connector. Waldbüttelbrunn, March 24, 2020 Dipl.-Ing. Michael Adenau (CEO) 
# Konformitätserklärung
> Hersteller:
# ## CE und FCC Normen und Zulassungen [Section titled “CE und FCC Normen und Zulassungen”](#ce-und-fcc-normen-und-zulassungen) **Hersteller:** MA Lighting Technology GmbH\ Dachdeckerstraße 16\ 97297 Waldbüttelbrunn\ Deutschland *** *erklärt, dass das Produkt* *** **Produktname:** * grandMA3 onPC command wing XT *** *den folgenden Richtlinien sowie harmonisierten Normen entspricht* *** \*\*Sicherheit: \*\* **2014/35/EU (Niederspannungsrichtlinie)** * IEC/EN/UL 62368-1:2014 * CAN/CSA-C22. No. 62368-1:2014 *** **EMV (elektromagnetische Verträglichkeit):** **FCC** * 47 CFR, Part 15, Subpart B: 2019 (Class A) **2014/30/EU** * EN55032:2016-02 (Class A) * EN61000-3-2 * EN55035:2018-04 *** **RoHS:** **2011/65/EU (RoHS II)** * EN50581:2012 * WEEE-Reg.-NR. DE 14150988 *** **Zusätzliche Informationen:** Alle Daten- und Signalleitungen müssen geschirmt sein und der Schirm muss mit der Masse bzw. dem Gehäuse des entsprechenden Steckers verbunden sein. Waldbüttelbrunn, den 24. März 2020 Dipl.-Ing. Michael Adenau (Geschäftsführer) 
# Déclaration de conformité
> Fabricant :
# ## Normes et approbations CE et FCC [Section titled “Normes et approbations CE et FCC”](#normes-et-approbations-ce-et-fcc) **Fabricant :** MA Lighting Technology GmbH\ Dachdeckerstraße 16\ 97297 Waldbüttelbrunn\ ALLEMAGNE *** *déclare que les produits* *** **Nom de produit :** * grandMA3 onPC command wing XT *** *sont conformes aux directives et normes harmonisées suivantes* *** \*\*Sécurité: \*\* **2014/35/UE (Directive Basse Tension)** * IEC/EN/UL 62368-1:2014 * CAN/CSA-C22. No. 62368-1:2014 *** \*\*CEM - Compatibilité électromagnétique \*\* **FCC** * 47 CFR, Part 15, Subpart B: 2019 (Class A) **2014/30/UE** * EN55032:2016-02 (Class A) * EN61000-3-2 * EN55035:2018-04 *** **RoHS:** **2011/65/UE (RoHS II)** * EN50581:2012 * WEEE-Reg.-NR. DE 14150988 *** **Informations complémentaires :** Toutes les lignes de données et de signaux doivent être blindées et le blindage doit être relié à la terre ou au boîtier du connecteur. Waldbüttelbrunn, 24 mars 2020 Dipl.-Ing. Michael Adenau (PDG) 
# Disposal
> According to the directive 2011/65 EU (RoHS) the device was produced in the European Union, and is hence to be disposed of as stated in the directive.
According to the directive 2011/65 EU (RoHS) the device was produced in the European Union, and is hence to be disposed of as stated in the directive. If the device is used within the European Union, follow the directive WEEE 2012/19/EU. If the device is used outside the European Union, the corresponding country´s waste disposal regulations apply.
# Élimination
> Selon la directive 2011/65 UE (RoHS), l'appareil a été fabriqué dans l'Union européenne et doit donc être éliminé conformément à la directive.
# Selon la directive 2011/65 UE (RoHS), l’appareil a été fabriqué dans l’Union européenne et doit donc être éliminé conformément à la directive. Si l’appareil est utilisé dans l’Union européenne, suivre la directive WEEE 2012/19/EU. Si l’appareil est utilisé en dehors de l’Union européenne, les règlements d’élimination des déchets du pays correspondant s’appliquent.
# Entsorgung
> Das Gerät ist gemäß der Richtlinie 2011/65 EU (RoHS) der Europäischen Gemeinschaft hergestellt und muss dementsprechend entsorgt werden.
# Das Gerät ist gemäß der Richtlinie 2011/65 EU (RoHS) der Europäischen Gemeinschaft hergestellt und muss dementsprechend entsorgt werden. Falls das Gerät innerhalb der Europäischen Union betrieben wird, ist die WEEE 2012/19/EU zu beachten. Falls das Gerät außerhalb der Europäischen Union betrieben wird, sind die nationalen Entsorgungsvorschriften im jeweiligen Land zu beachten.
# Intended Use
> The grandMA3 onPC command wing XT controls all kinds of lighting genres such as conventional, moving lights, LEDs, video, and media via DMX signal or within a n
The grandMA3 onPC command wing XT controls all kinds of lighting genres such as conventional, moving lights, LEDs, video, and media via DMX signal or within a network environment. All grandMA3 components, despite different hardware solutions, use the same software. All components are fully integrable into the network environment. Use all grandMA3 components and accessories within closed rooms and in the permissible environmental conditions only. Installation and connection of the devices are explicitly to be carried out by trained personnel in compliance with all safety regulations.
# Usage Prévu
> Les command wings grandMA3 onPC contrôlent tous genres de projecteurs tels que les projecteurs conventionnels, les motorisées, les LEDs, la vidéo et les média,
# Les command wings grandMA3 onPC contrôlent tous genres de projecteurs tels que les projecteurs conventionnels, les motorisées, les LEDs, la vidéo et les média, en utilisant le signal DMX ou dans un environnement réseau. Toutes les composantes grandMA3, malgré des solutions matérielles différentes, utilisent le même logiciel. Tous les composants sont entièrement intégrables dans l’environnement du réseau. Utilisez tous les composants et accessoires de grandMA3 uniquement dans des locaux fermés et dans les conditions environnementales autorisées. L’installation et le raccordement des appareils doivent être effectués explicitement par un personnel qualifié, en conformité avec toutes les règles de sécurité.
# Verwendungszweck
> Bestimmungsgemäße Verwendung
# **Bestimmungsgemäße Verwendung** Der grandMA3 onPC command wing XT steuert alle Arten von Lichttechnik wie konventionelles Licht, intelligentes Licht, LED, Video und ähnliche Medien mit Hilfe von DMX-Signalen oder in einer Netzwerkumgebung. Alle grandMA3 Komponenten verwenden die gleiche Software, ungeachtet unterschiedlicher Hardware. Sämtliche Komponenten können komplett ins Netzwerk integriert werden. Alle grandMA3 Komponenten und Zubehör dürfen ausschließlich in geschlossenen Räumen und innerhalb zulässiger Umgebungsbedingung verwendet werden. Installation und Anschluss von Geräten dürfen nur vom geschulten Personal, unter Einhaltung aller Sicherheitsvorschriften, durchgeführt werden.
# Limitations
> Operation:
## **Temperature** [Section titled “Temperature”](#temperature) Operation: 0 °C up to 40 °C / 32 °F up to 104 °F
# Betriebsgrenzen
> Betrieb:
# ## **Temperatur** [Section titled “Temperatur”](#temperatur) Betrieb: 0 °C bis 40 °C / 32 °F bis 104 °F | | | | ----------------------------------------- | ---------------------------------------------------------------------------------------------------------------------------------- | |  | **Achtung:** Hohe Temperaturen können das Kühlsystem des Gerätes überfordern und zum Ausfall von elektrischen Komponenten führen. | Lagerung/Transport: -10 °C bis +50 °C / 14 °F bis 122 °F ## [Section titled “ ”](#-1) ## **Luftfeuchte** [Section titled “Luftfeuchte”](#luftfeuchte) Betrieb: 20 % bis 90 % relative Luftfeuchte (nicht kondensierend) Lagerung/Transport: 10 % bis 90 % relative Luftfeuchte (nicht kondensierend) ## **Umgebung** [Section titled “Umgebung”](#umgebung) * Alle Sicherheitshinweise beachten. * Das Gerät innerhalb der Betriebsgrenzen betreiben. * Das Gerät nur in geschlossenen Räumen betreiben. * Die Umgebungsluft muss staubfrei und frei von gefährlichen und explosiven Stoffen sein. * Erschütterungen vermeiden. * Das Gerät ist nicht gegen Spritzwasser geschützt. Nicht in der Nähe von Wasser betreiben. * Das Gerät nicht bei Regen oder Nebel betreiben. * Das Gerät nicht an einem Ort platzieren, an dem es mit korrosiven Gasen oder salzhaltiger Luft in Kontakt kommen könnte, da dies sonst Fehlfunktionen verursachen könnte.
# Limitations
> Fonctionnement :
# ## **Température** [Section titled “Température”](#température) Fonctionnement : 0 °C jusqu’à 40 °C / 32 °F jusqu’à 104 °F | | | | ----------------------------------------- | --------------------------------------------------------------------------------------------------------------------------------------------------- | |  | **Attention :** Des températures plus élevées peuvent solliciter le système de refroidissement de l’appareil et détruire des composants matériels. | Stockage / Transport : -10 °C jusqu’à +50 °C / 14 °F jusqu’à 122 °F\ ## **Humidité** [Section titled “Humidité”](#humidité) Fonctionnement : 20 % jusqu’à 90 % d’humidité relative (sans condensation) Stockage / Transport : 10 % jusqu’à 90 % d’humidité relative (sans condensation) ## **Environnement** [Section titled “Environnement”](#environnement) Suivez toutes les consignes de sécurité ; * N’utilisez l’appareil que dans ses limites de fonctionnement ; * N’utilisez l’appareil qu’à l’intérieur ; * L’air doit être dépourvu de poussière et de toute substance dangereuse ou explosive ; * Évitez les secousses ; * Cet appareil n’est pas protégé contre les éclaboussures d’eau. Ne l’utilisez pas à proximité de l’eau ; * N’utilisez pas l’appareil sous la pluie ou l’humidité ; * Ne placez pas l’appareil à un endroit où il peut entrer en contact avec des gaz corrosifs ou de l’air salin car cela peut provoquer un mauvais fonctionnement.
# Maintenance
| | | | ----------------------------------------- | ------------------------------------------------------------------------------------------------------------------------------------------------------------------------------------------------------------------------------- | |  | **Warning:** All repair and service work has to be exclusively performed by qualified service technicians as live parts may be exposed when opening and / or removing coverings. Touching live parts may cause electric shock. | | | | | ------------------------------------------------ | ------------------------------------------------------------------------------------------------------------------------------------- | |  | **Important:** The intervals between maintenance may differ depending on the frequency of transport and the operational environment. | * Disconnect power supply before cleaning; * Clean the surface using dry cloth only; * Clean the wrist rest using a damp cloth only; * Do not use liquid cleanser or compressed air; * Do not use solvent; * Check if the ventilation holes are blocked; * Depending on the environment, we recommend to professionally clean the device once a year.
# Wartung
# | | | | ----------------------------------------- | ----------------------------------------------------------------------------------------------------------------------------------------------------------------------------------------------------------------------------------------------------------------------------------------- | |  | **Warnung:** Sämtliche Reparatur- und Wartungsarbeiten dürfen ausschließlich von geschultem Personal durchgeführt werden, da beim Öffnen von Abdeckungen spannungsführende Teile freigelegt werden können. Spannungsführende Teile nicht berühren, da die Gefahr von Stromschlag besteht! | | | | | ------------------------------------------------ | --------------------------------------------------------------------------------------------- | |  | **Wichtig:** Die Wartungsintervalle variieren je nach Transportfrequenz und Betriebsumgebung. | * Vor dem Reinigen das Gerät spannungsfrei schalten. * Die Oberflächen mit einem trockenen Tuch reinigen. * Handauflage nur mit einem feuchtem Tuch reinigen. * Keine flüssigen Reinigungsmittel oder Druckluft zum Reinigen verwenden. * Kein Lösungsmittel verwenden. * Je nach Umgebungsbedingungen empfehlen wir das Gerät alle 2 bis 5 Jahre durch einen Servicetechniker professionell reinigen zu lassen.
# Entretient
# | | | | ----------------------------------------- | ----------------------------------------------------------------------------------------------------------------------------------------------------------------------------------------------------------------------------------------------------------------------------------------------------------------------- | |  | **Avertissement:** Tous les travaux de réparation et d’entretien doivent être effectués exclusivement par des techniciens qualifiés, car les pièces sous tension peuvent être exposées lors de l’ouverture et/ou du retrait des couvercles. Le contact avec des pièces sous tension peut provoquer un choc électrique. | *** | | | | ------------------------------------------------ | ----------------------------------------------------------------------------------------------------------------------------------------------------------------------------------------------------------------------------------------------------------------------------------------------------------------------- | |  | **Avertissement:** Tous les travaux de réparation et d’entretien doivent être effectués exclusivement par des techniciens qualifiés, car les pièces sous tension peuvent être exposées lors de l’ouverture et/ou du retrait des couvercles. Le contact avec des pièces sous tension peut provoquer un choc électrique. | * Débranchez l’alimentation électrique avant le nettoyage; * Nettoyez la surface à l’aide d’un chiffon sec uniquement; * Nettoyez le repose-poignet à l’aide d’un chiffon humide uniquement; * N’utilisez pas de nettoyant liquide ou d’air comprimé; * N’utilisez pas de solvant; * Vérifiez si les orifices de ventilation sont obstrués; * En fonction de l’environnement, nous recommandons de nettoyer l’appareil professionnellement une fois par an.
# Quick Start
> grandMA3 onPC command wing XT front panel
 *grandMA3 onPC command wing XT front panel* 1. [Master area](/grandma3/2-3/do_control_master/) 2. [Dual encoder section](/grandma3/2-3/do_control_encoder/) 3. [Power key](/grandma3/2-3/key_power/) 4. [Command area](/grandma3/2-3/do_control_command/) 5. [Level wheel](/grandma3/2-3/do_control_level/) 6. Executor buttons 101-190 + 201-290 7. Executor faders 201-290 8. Executor buttons 301-390 + 401-490 9. Executor knobs 301-390 + 401-490 For more information about executors, see [Executor elements](/grandma3/2-3/do_control_executor/).  1. [DMX A, B, C](/grandma3/2-3/fs_connect_dmx/) 2. [MIDI In+Out](/grandma3/2-3/remote_inputs/) 3. [DC Remote Control](/grandma3/2-3/fs_connect_dc_remote_in/) 4. [LTC](/grandma3/2-3/fs_connect_smpte_ltc/) 5. Power switch 6. [IEC connector](/grandma3/2-3/fs_connect_power/) 7. [Desk light](/grandma3/2-3/fs_connect_desk_light/) 8. Kensington lock 9. [Line In+Out](/grandma3/2-3/do_connector_pin_assignment/#Jack) 10. [Ethernet 1+2](/grandma3/2-3/fs_connect_ethernet/) 11. [USB 2.0](/grandma3/2-3/fs_connect_usb/) 12. [USB 3.0](/grandma3/2-3/fs_connect_usb/) 13. [DisplayPort 1-4](/grandma3/2-3/fs_connect_external_screens/) ### Turn on the grandMA3 onPC command wing XT [Section titled “Turn on the grandMA3 onPC command wing XT”](#turn-on-the-grandma3-onpc-command-wing-xt) 1. Unpack the device. 2. Remove the packaging and cushioning material. 3. Place the device indoors on a stable surface. 4. Connect external monitors using the native DisplayPort connectors. 5. Connect an external mouse or keyboard using the USB ports. 6. Insert the power connector into the corresponding jack. 7. Connect the power plug with the mains. 8. Turn on the power switch on the rear panel. 9. Press the power key on the front panel.\ The device starts booting. ### Turn off the grandMA3 onPC command wing XT [Section titled “Turn off the grandMA3 onPC command wing XT”](#turn-off-the-grandma3-onpc-command-wing-xt) | | | | ------------------------------------------------ | ------------------------------------------------------------------------------------------------------------------------------------------------------------- | |  | **Important:** Do not press the power key to turn off the device. Only if a hard shutdown is necessary, press and hold the power key for more than 3 seconds. | 1. Tap  at the top of the control bar to start the shutdown procedure or shutdown the onPC software by the [shutdown keyword](/grandma3/2-3/keyword_shutdown/). A warning pop-up appears:  2. Tap OK. 3. Shut down the Windows system. The grandMA3 onPC command wing XT powers down. | | | | ------------------------------------------------ | ------------------------------------------------------------------------------------------------------------------------------------------------------------------------------------------------------------------ | |  | **Important:** Do not switch off the grandMA3 onPC command wing XT too early. Make sure that you wait until Windows has completely shut down. All LEDs on the grandMA3 onPC command wing XT must have turned off. | 4. Set the power switch to position **O**. ### Install the Latest grandMA3 onPC Software and the Operating System [Section titled “Install the Latest grandMA3 onPC Software and the Operating System”](#install-the-latest-grandma3-onpc-software-and-the-operating-system) | | | | ----------------------------------------- | -------------------------------------------------------------------------------------------------------------- | |  | **Warning:** Updating the grandMA3 onPC software and the operating system deletes all files previously stored. | | | | | ------------------------------------------ | --------------------------------------------------------------------------------------------------------------------------------------------------------------- | |  | **Hint:** To update only the grandMA3 onPC software, use the network update process. For more information, see [Network update](/grandma3/2-3/update_network/). | 1. To install, download the latest software version from [www.malighting.com](http://www.malighting.com).\ The required installer is called grandMA3 onPC Windows Hardware Image x.x.x.x. 2. Save the full software image on your computer’s hard drive. 3. Extract the zip file “grandMA3\_v.x.x.x.x\_windows\_hardware\_image.zip” and copy it onto a USB flash drive (FAT32 formatted, minimum 8 GB). 4. Insert the USB flash drive. 5. Power up the grandMA3 onPC command wing XT. 6. If necessary, tap F8 to choose Boot device and select boot from USB. 7. Follow the onscreen instructions during the update process. To learn more about the update process, read the [Update grandMA3 onPC windows hardware](/grandma3/2-3/update_windows_hardware/) topic in the [online user manual](https://help.malighting.com/grandMA3/2.3/HTML/help.html). | | | | ------------------------------------------------ | ---------------------------------------------------------------------------------------------------------------------------------------------------------------------------------------------------------------------------------------------------------------------------------------------------------------------------------------------------------------------------------------------------------------------------------------------------------------------------------- | |  | **Important:** To configure the device, or to update or downdate the installed software, use a grandMA3 console or your PC or laptop with the grandMA3 onPC software installed. For more information see the topics [Update the Software](/grandma3/2-3/update/) via [Network Update](/grandma3/2-3/update_network/) in the [grandMA3 User Manual](https://help.malighting.com/grandMA3/2.3/HTML/help.html) online available at [www.malighting.com](https://www.malighting.com/). | ### Different Combinations [Section titled “Different Combinations”](#different-combinations) | Device | Connected To | Parameters | | ----------------------------- | --------------------------------- | ---------- | | grandMA3 onPC command wing XT | standalone | 4 096 | | grandMA3 onPC command wing XT | + grandMA3 onPC 8/4/2Port Node | 4 096 | | grandMA3 onPC command wing XT | + grandMA3 processing unit M/L/XL | 4 096 |
# Guide De Démarrage
> grandMA3 onPC command wing XT panneau avant
# 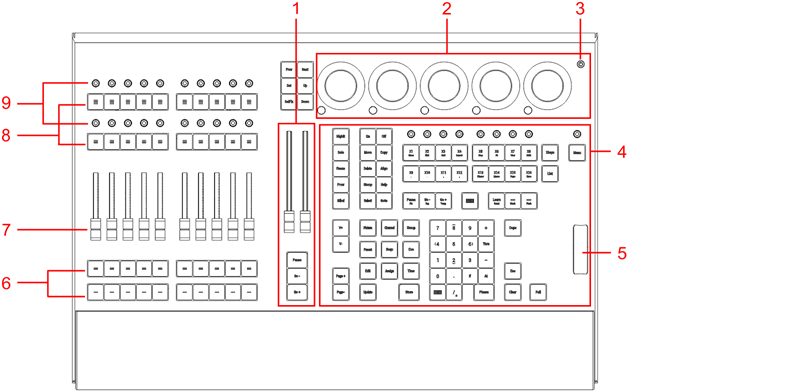 grandMA3 onPC command wing XT panneau avant 1. [Aire Master](/grandma3/2-3/ws_master_controls/) 2. [Dual encoder section](/grandma3/2-3/do_control_encoder/) 3. [Touche Marche/Arrêt](/grandma3/2-3/key_power/) 4. Aire Command 5. [Level wheel](/grandma3/2-3/do_control_level/) 6. Executor boutons 101-190 + 201-290 7. Executor faders 201-290 8. Executor boutons 301-390 + 401-490 9. Executor rotatifs 301-390 + 401-490 Pour plus d’information, voir la section [Executor elements](/grandma3/2-3/do_control_elements/) dans le Mode d’emploi.  grandMA3 onPC command wing XT panneau arriére 1. [DMX A, B, C](/grandma3/2-3/fs_connect_dmx/) 2. [MIDI In+Out](/grandma3/2-3/fs_connect_midi/) 3. [DC Remote Control](/grandma3/2-3/remote_inputs_dc/) 4. [LTC](/grandma3/2-3/fs_connect_smpte_ltc/) 5. Interrupteur de courant 6. [IEC connector](/grandma3/2-3/fs_connect_power/) 7. [Lumière d’appoint](/grandma3/2-3/si_desklights/) 8. Kensington lock 9. [Line In+Out](/grandma3/2-3/fs_connect_audio_in/) 10. [Ethernet 1+2](/grandma3/2-3/fs_connect_ethernet/) 11. [USB 2.0](/grandma3/2-3/fs_connect_usb/) 12. [USB 3.0](/grandma3/2-3/fs_connect_usb/) 13. [DisplayPort 1-4](/grandma3/2-3/fs_connect_external_screens/) ### Branchement et mise sous tension de l’appareil [Section titled “Branchement et mise sous tension de l’appareil”](#branchement-et-mise-sous-tension-de-lappareil) 1. Déballer l’appareil. 2. Enlever le matériel de protection. 3. Placer l’appareil à l’intérieur sur une surface stable. 4. Brancher les écrans externes à la command wing XT grandMA3 onPC en utilisant des connecteurs d’origine DisplayPort. 5. Connecter un clavier externe ou une souris avec un port USB. 6. Insérer le connecteur IEC dans la prise correspondante. 7. Brancher la prise principale de courant. 8. Allumer l’interrupteur de courant sur le panneau arrière. 9. Appuyer sur la touche Marche/Arrêt sur le panneau avant. ### Éteindre la command wing XT grandMA3 onPC [Section titled “Éteindre la command wing XT grandMA3 onPC”](#éteindre-la-command-wing-xt-grandma3-onpc) | | | | ------------------------------------------------ | --------------------------------------------------------------------------------------------------------------------------------------------------------------------------------------------------------------------- | |  | **Important:** N’appuyer pas sur la touche Marche/Arrêt pour éteindre l’appareil. Seulement si un arrêt brutal est nécessaire, appuyer sur la touche Marche/Arrêt et maintenez-la enfoncée pendant plus de 3 secondes | 1. Appuyer sur l’icone  en haut de la barre de contrôle pour démarrer le processus de fermeture de la console ou de l’application onPC ou fermer le logiciel onPC en utilisant **shutdown keyword**. Un pop-up d’avertissement s’ouvre:  2. Appuyer sur OK. 3. Fermer le système Windows. La command wing XT grandMA3 onPC s’éteint. | | | | ------------------------------------------------ | -------------------------------------------------------------------------------------------------------------------------------------------------------------------------------------------------------------------------------- | |  | **Important:** Ne pas éteindre la command wing XT grandMA3 onPC trop rapidement. Assurez-vous d’attendre jusqu’à la fermeture complète de Windows. Toutes les DELs sur la command wing XT grandMA3 onPC doivent s’être éteintes. | 4. Mettre l’interrupteur en position O. ### Installer la dernière version du logiciel grandMA3 onPC et du système d’exploitation [Section titled “Installer la dernière version du logiciel grandMA3 onPC et du système d’exploitation”](#installer-la-dernière-version-du-logiciel-grandma3-onpc-et-du-système-dexploitation) | | | | ----------------------------------------- | ----------------------------------------------------------------------------------------------------------------------------------------- | |  | **Attention:** La mise à jour du logiciel grandMA3 onPC et du système d’exploitation supprime tous les fichiers sauvegardés précédemment. | | | | | ------------------------------------------ | ----------------------------------------------------------------------------------------------------------------------------------------------------------------------- | |  | **Astuce:** Pour mettre à jour uniquement le logiciel grandMA3 onPC, utilisez le processus de mise à jour en réseau. Pour plus d’informations, voir Mise à jour réseau. | 1. Pour installer, téléchargez le logiciel grandMA3 sur [www.malighting.com](http://www.malighting.com).\ L’installateur requis est appelé grandMA3 onPC Windows Hardware Image x.x.x.x. 2. Sauvegardez l’image complète du logiciel sur le disque dur de votre ordinateur. 3. Extrayer le fichier zip “grandMA2\_vx.x.x.x\_windows\_hardware\_image.zip” et copier le fichier complet dans le répertoire racine de votre clé USB (FAT32 formatted, minimum 8 GB). 4. Insérer la clé USB dans le port USB de l’appareil. 5. Allumer l’appareil grandMA3. 6. Quand nécessaire, appuyer sur la touche 8/F8 pour choisir “Boot from USB”. 7. Suivre les instructions à l’écran pendant le processus de mise à jour. Pour plus d’information, voir la section Update grandMA3 onPC windows hardware dans le Mode d’emploi. | | | | ------------------------------------------------ | ----------------------------------------------------------------------------------------------------------------------------------------------------------------------------------------------------------------------------------------------------------------- | |  | \*\*\*\*Important: Pour configurer l’appareil ou pour faire un update ou downdate, utiliser la console grandMA3 ou le logiciel grandMA3 onPC. Pour plus d’information, voir les sections Update the Software via Network Update dans le Mode d’emploi. \*\* \*\* | ### Différentes Combinaison [Section titled “Différentes Combinaison”](#différentes-combinaison) | Appareil | Branché à | Paramètres | | ------------------------------- | ------------------------------------------- | ---------- | | grandMA3 onPC command wing XT + | PC/laptop | 4 096 | | grandMA3 onPC command wing XT + | PC/laptop + grandMA3 onPC 8/4/2Port Node | 4 096 | | grandMA3 onPC command wing XT + | PC/laptop + grandMA3 processing unit M/L/XL | 4 096 | | | | | ------------------------------------------------ | --------------------------------------------------------------------------------------------------------------------------- | |  | **Important:** Peu importe les appareils branchés au logiciel grandMA3 onPC, le nombre de paramètres ne peut excéder 4 096. | Pour plus d’information, voir: **Expand the Amount of Parameters**.
# Quick Start
> grandMA3 onPC command wing XT Vorderseite
# 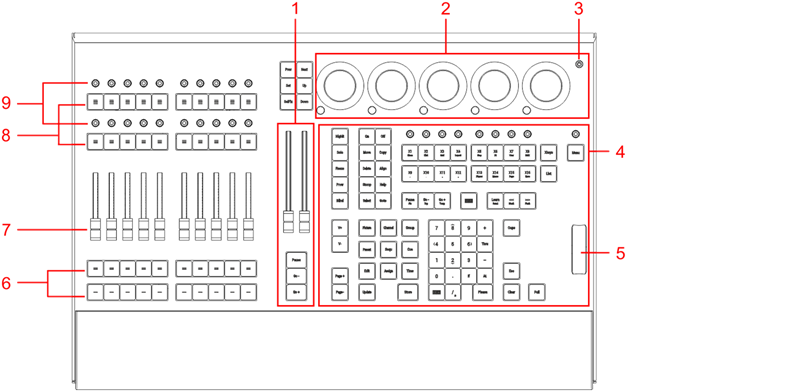[ShutDown Keyword](/grandma3/2-3/keyword_shutdown/) \_grandMA3 onPC command wing XT \_Vorderseite 1. [Master Bereich](/grandma3/2-3/ws_master_controls/) 2. [Dual Encoder Sektion](/grandma3/2-3/do_control_encoder/) 3. [Ein/Aus-Taste](/grandma3/2-3/key_power/) 4. Kommando Bereich 5. [Level Wheel](/grandma3/2-3/do_control_level/) 6. Executor Buttons 101-190 + 201-290 7. Executor Fader 201-290 8. Executor Buttons 301-390 + 401-490 9. Rotierbare Executors 301-390 + 401-490 Für weitere Informationen über Executors siehe den Abschnitt [Executor elements](/grandma3/2-3/do_control_executor/) im [grandMA3 Online Benutzerhandbuch](https://help.malighting.com/grandMA3/2.3/HTML/help.html) unter [www.malighting.com.](https://www.malighting.com/) 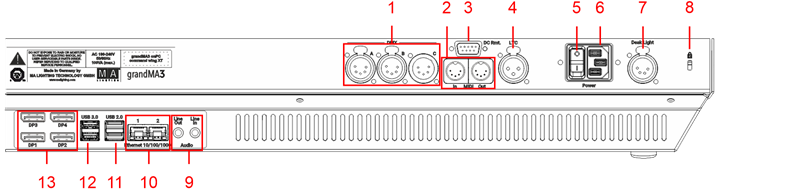 \_grandMA3 onPC command wing XT \_Rückseite 1. [DMX A, B, C](/grandma3/2-3/fs_connect_dmx/) 2. [MIDI In+Out](/grandma3/2-3/remote_inputs_midi/) 3. [DC Remote Control](/grandma3/2-3/fs_connect_dc_remote_in/) 4. [LTC](/grandma3/2-3/fs_connect_smpte_ltc/) 5. Netzschalter 6. [IEC Buchse](/grandma3/2-3/fs_connect_power/) 7. [Pultleuchte](/grandma3/2-3/si_desklights/) 8. Kensington-Schloss 9. [Line In+Out](/grandma3/2-3/do_connector_pin_assignment/) 10. [Ethernet 1+2](/grandma3/2-3/fs_connect_ethernet/) 11. [USB 2.0](/grandma3/2-3/fs_connect_usb/) 12. [USB 3.0](/grandma3/2-3/fs_connect_usb/) 13. [DisplayPort 1-4](/grandma3/2-3/fs_connect_external_screens/) ### grandMA3 onPC command wing XT einschalten [Section titled “grandMA3 onPC command wing XT einschalten”](#grandma3-onpc-command-wing-xt-einschalten) 1. Gerät auspacken. 2. Verpackungs- und Polstermaterial entfernen. 3. Gerät in einem geschlossenen Raum auf eine stabile Fläche stellen. 4. Externe Monitore mit DisplayPort Anschluss an das Gerät anschließen. 5. Externe Maus und Keyboard über die USB Ports anschließen. 6. Kaltegerätestecker mit der dafür vorgesehenen Buchse verbinden. 7. Netzstecker in die Steckdose stecken. 8. Netzschalter auf der Rückseite auf **I** stellen. 9. Ein/Aus-Taste auf der Vorderseite drücken. ### grandMA3 onPC command wing XT ausschalten [Section titled “grandMA3 onPC command wing XT ausschalten”](#grandma3-onpc-command-wing-xt-ausschalten) | | | | ------------------------------------------------ | ---------------------------------------------------------------------------------------------------------------------------------------------------------------- | |  | **Wichtig!** Schalten Sie das Gerät nie über die Ein/Aus-Taste aus. Nur wenn ein hartes Ausschalten erforderlich ist, die Ein/Aus-Taste 3 Sekunden lang drücken. | 1. In der onPC Software das  Symbol in der oberen linken Ecke der Kontrollleiste antippen, um die Software zu beenden oder das [Shutdown keyword](/grandma3/2-3/keyword_shutdown/) verwenden. Eine Warnmeldung erscheint:  2. OK tippen. 3. Windows beenden. Der grandMA3 onPC command wing XT fährt runter. | | | | ------------------------------------------------ | ------------------------------------------------------------------------------------------------------------------------------------------------------------------------------------------------------------------- | |  | **Wichtig:** Schalten Sie den grandMA3 onPC command wing XT nicht zu früh aus. Vergewissern Sie sich, dass Windows komplett heruntergefahren ist. Alle LEDs am grandMA3 onPC command wing XT müssen erloschen sein. | 4. Netzschalter auf **O** stellen. ### Die neueste grandMA3 onPC Software installieren und das Betriebssystem aktualisieren [Section titled “Die neueste grandMA3 onPC Software installieren und das Betriebssystem aktualisieren”](#die-neueste-grandma3-onpc-software-installieren-und-das-betriebssystem-aktualisieren) | | | | ----------------------------------------- | --------------------------------------------------------------------------------------------------------------------------------- | |  | **Warnung:** Das Aktualisieren der grandMA3 onPC Software zusammen mit dem Betriebssystem, löscht alle zuvor gespeicherten Daten. | | | | | ------------------------------------------ | --------------------------------------------------------------------------------------------------------------------------------------------------------------------------------------------------------------------- | |  | **Hinweis:** Wenn Sie lediglich die grandMA3 onPC Software aktualisieren möchten, so führen Sie das Update über das Netzwerk aus. Für mehr Informationen lesen Sie [Network Update](/grandma3/2-3/update_network/). | 1. Besuchen Sie [www.malighting.com](https://www.malighting.com/), um die aktuellste Software herunterzuladen. Der benötigte Installer heißt grandMA3 onPC Windows Hardware Image x.x.x.x. 2. Speichern Sie das gesamte Software Image auf der Festplatte Ihres Computers. 3. Entpacken Sie die Zip-Datei und kopieren Sie das Image auf Ihren USB-Stick (FAT32 formatiert, mindestens 8 GB). 4. Stecken Sie den USB-Stick in den USB-Anschluss am Gerät. 5. Schalten Sie das Gerät ein. 6. Falls notwendig, drücken Sie auf der Tastatur mehrfach die Taste 8/F8. und wählen Sie “Von USB starten”. 7. Folgen Sie während des Update-Vorgangs den Bildschirmanweisungen. Für weitere Informationen über den Update-Vorgang siehe den Abschnitt [Update grandMA3 onPC windows hardware](/grandma3/2-3/update_windows_hardware/) im [grandMA3 Online Benutzerhandbuch](https://help.malighting.com/grandMA3/2.3/HTML/help.html) unter [www.malighting.com.](https://www.malighting.com/) | | | | ------------------------------------------------ | ---------------------------------------------------------------------------------------------------------------------------------------------------------------------------------------------------------------------------------------------------------------------------------------------------------------------------------------------------------------------------------------------------------------------------------------------------------------------------------------------------------------- | |  | **Wichtig:** Um das Gerät zu konfigurieren oder ein Update oder Downdate durchzuführen, verwenden Sie eine andere grandMA3 Konsole im Netzwerk oder Ihren PC oder Ihr Laptop mit grandMA3 onPC Software. Für weitere Informationen siehe die Abschnitte [Update the Software](/grandma3/2-3/update/) via [Network Update](/grandma3/2-3/update_network/) im [grandMA3 Online Benutzerhandbuch](https://help.malighting.com/grandMA3/2.3/HTML/help.html) unter [www.malighting.com.](https://www.malighting.com/) | ### Kombinationsmöglichkeiten [Section titled “Kombinationsmöglichkeiten”](#kombinationsmöglichkeiten) | Gerät | Verbunden mit | Parameter | | ------------------------------- | ------------------------------- | --------- | | grandMA3 onPC command wing XT | keinem weiteren Gerät. | 4 096 | | grandMA3 onPC command wing XT + | grandMA3 onPC 8/4/2Port Node | 4 096 | | grandMA3 onPC command wing XT + | grandMA3 processing unit M/L/XL | 4 096 | | | | | ------------------------------------------------ | --------------------------------------------------------------------------------------------------------------------------------------------------------- | |  | **Wichtig:** Unabhängig davon, welche Geräte an der grandMA3 onPC Software angeschlossen sind, kann die Parameteranzahl insgesamt maximal 4 096 betragen. | Weitere Information finden Sie im [User Manual](https://help.malighting.com/grandMA3/2.3/HTML/help.html) unter [Expand the Amount of Parameters.](/grandma3/2-3/system_parameter_expand/)
# Safety
> Warning – Danger area
## Symbols and Warning Labels [Section titled “Symbols and Warning Labels”](#symbols-and-warning-labels)  **Warning** – Danger area ***  **Caution**– Risk of electric shock *** ## Risk of Electric Shock [Section titled “Risk of Electric Shock”](#risk-of-electric-shock) The device is to be serviced by qualified personnel only as live parts may be exposed when opening and/or removing coverings. Touching live parts may cause electric shock.  ***  Dispose of as hazardous waste. Follow the applicable regulations. For more information see [Disposal](/grandma3/2-3/key_onpc_xt_disposal/). ***  Recycle the battery. ***  Declaration of conformity. For more information see [Conformity](/grandma3/2-3/key_onpc_xt_conformity/). ***  Operating voltage ON/OFF. | | | | ----------------------------------------- | ----------------------------------------------------------------------------------------------------------------------------------------------------------------------------------------------------------------------------------- | |  | **Warning:** The device has to be grounded. Do not ignore the safety purpose of the grounding-type plug. A grounding-type plug has two blades and a third grounding connection. The third connection is provided for your safety. | Read all the instructions in this Quick Manual thoroughly, especially the [General Safety Instructions](/grandma3/2-3/key_onpc_xt_safety/#h2__2044492547) further down and [Limitations](/grandma3/2-3/key_onpc_xt_limitations/). Follow the instructions and keep this Quick Manual for future use. Follow all cautions and warnings stated in this Quick Manual and indicated on the device. | | | | ------------------------------------------------ | ------------------------------------------------------------------------------------------------------------ | |  | **Important:** All repair and service work has to be exclusively performed by qualified service technicians. | * This device is state-of-the-art technology; * However, residual risks cannot be ruled out; * To avoid risks, follow the safety instructions; * This device is intended for professional use only and is not suitable for residential use. MA Lighting Technology GmbH does not bear the damage which may occur due to inobservance of the safety instructions. | | | | ----------------------------------------- | ----------------------------------------------------------------------------------------------------------------------------------------------------------------------- | |  | **Warning:** Changes or modifications to this device not expressly approved by the party responsible for the compliance could void the user’s authority to operate it. | | | | | ------------------------------------------------ | ---------------------------------------------------------------------------------------------------------------------------------------------------------------------------------------------------------------------------------------------------------------------------------------------------------------------------------------------------------------------------------------------------------------------------------------------------------------------------------------------------------------------------------------------------------------------------------------------------------------------------------------------------------------------------------------------- | |  | **Note:** These devices have been tested and found to comply with the limits of a Class A digital device, pursuant to Part 15 of the FCC Rules and the CE Standards. These limits are designed to provide reasonable protection against possible interference when the devices are operated in a commercial environment. These generate, use, and can radiate radio frequency energy and, if not installed and used in accordance with this Quick Manual, may possibly cause interference to radio communications. Operation of these devices in a residential area is likely to cause interference in which case the user will be required to correct the interference at their own expense. | ## Avoid Risks Caused by Electric Current [Section titled “Avoid Risks Caused by Electric Current”](#avoid-risks-caused-by-electric-current) A defective device or defective power cable can cause severe or fatal injury due to electrical shock. Follow the safety instructions to avoid the risks caused by electric current. * Do not use a defective power cable; * Do not open screwed down covers from the housing; * Use the device only if it is in a technically impeccable condition; * Do not repair the device on your own; * Do not reverse engineer the device, and make any changes to its components, and accessories; * Do not expose the device to rain or moisture; * Do not submerge the device in water. ## General Safety Instructions [Section titled “General Safety Instructions”](#general-safety-instructions) | | | | ------------------------------------------------ | -------------------------------------------------------------------------------------------------------------------------------------------------------------------------------- | |  | **Important:** The device plug and the power plug of the supply line serve as a separator. - To disconnect the power supply, disconnect the device plug and / or the power plug. | *** To avoid injury or damage to the device: * Do not put your hands inside the device during operation; * Device and power cable must be kept away from children under the age of 8; * Children are not allowed to play with the device; * Disconnect the power supply from electric voltage during thunderstorms; * Disconnect the power supply from electric voltage if it is unattended for a longer period of time; * Disconnect the power supply before cleaning the device; * Do not use any liquid or spray cleaner. Use a dry cloth only; * Do not use the device in the vicinity of water; * Do not expose it to a humid environment; * Do not pour any liquids over the device. * Do not block or cover any ventilation holes in the housing. These are essential for the airflow within the device and protect the device from overheating; * Do not insert any objects into the ventilation holes of the device as these could get in contact with live parts or could cause short circuits, fire and/or an electric shock; * Do not place any objects on the power cable. Protect it from being walked on or pinched, particularly at the connector and where the cables exit the device; * When using an extension cable, make sure the rated output of all devices connected in series does not exceed the maximum rated output of the extension cable; * Do not support yourself on the device; * Do not place any heavy objects on top of the device; * Do not use excessive force on keys, buttons, faders, dual encoders, knobs, switch, connector; * If the power cable or the main power plug is defective, let a qualified technician replace it immediately; * Place the device on stable surfaces only. If it is placed on unstable surfaces, it may fall and break. * Only use power cables which are safety-marked; * Do not use any high-power walkie-talkies or cell phones near the device; * The device is provided with a safety plug. This plug can only be used with safety outlets. * As with all industrially manufactured goods, the use of substances that induce an allergic reaction such as aluminum cannot be generally excluded. If you develop an allergic reaction (such as a skin rash, frequent sneezing, red eyes or respiratory difficulties), consult a physician immediately to determine the cause. **If one of the following conditions occurs, disconnect the main power plug and call your local distributor or the technical support!** * Power cable or power plug is damaged or worn; * Ingress of liquids; * The device was exposed to rain or high ambient humidity; * The device does not function properly, even if you followed all the instructions of this Quick Manual. Only operate the controls as stated in the Quick Manual. Incorrect control settings may damage the device; * The device fell damaging the housing.
# Sicherheit
> Warnung – Gefahrenbereich
# ## Symbole und Warnzeichen [Section titled “Symbole und Warnzeichen”](#symbole-und-warnzeichen)  \*\*Warnung \*\*– Gefahrenbereich ***  **Vorsicht**– Stromschlaggefahr *** ### Stromschlaggefahr [Section titled “Stromschlaggefahr”](#stromschlaggefahr) Die Wartung des Gerätes darf ausschließlich vom geschulten Personal durchgeführt werden, da beim Öffnen und/oder Entfernen von Abdeckungen spannungsführende Teile freigelegt werden könnten. Spannungsführende Teile nicht berühren – Gefahr eines elektrischen Schlages.  ***  Das Gerät ist als Sondermüll zu entsorgen. Die örtlichen Vorschriften beachten. Für weitere Informationen siehe [Entsorgung](/grandma3/2-3/key_onpc_xt_disposal-3/). ***  Batterie recyceln. ***  Konformitätserklärung. Für weitere Informationen siehe [Konformität](/grandma3/2-3/key_onpc_xt_conformity-1/). ***  Betriebsspannung AN/AUS | | | | ----------------------------------------- | ------------------------------------------------------------------------------------------------------------------------------------------------------------------------------------------------------------------------------------------------- | |  | **Warnung:** Das Gerät muss geerdet sein. Nicht den Sicherheitszweck eines Schutzkontaktsteckers ignorieren. Ein Schutzkontaktstecker hat zwei Stromkontakte und einen dritten Erdungskontakt. Der dritte Erdungskontakt dient Ihrer Sicherheit. | Alle Anweisungen in diesem Quick Manual aufmerksam durchlesen, vor allem die [Allgemeinen Sicherheitsanweisungen](/grandma3/2-3/key_onpc_xt_safety-1/#h2_632920942) weiter unten in diesem Kapitel und die [Betriebsgrenzen](/grandma3/2-3/key_onpc_xt_limitations-1/). Das Quick Manual für den späteren Gebrauch aufbewahren. Alle Vorsichtsmaßnahmen und Warnhinweise befolgen, die in diesem Quick Manual und am Gerät vermerkt sind. | | | | ------------------------------------------------ | -------------------------------------------------------------------------------------------------------------------------- | |  | **Wichtig:** Sämtliche Reparatur- und Wartungsarbeiten dürfen ausschließlich vom geschulten Personal durchgeführt werden. | Dieses Gerät entspricht dem neusten Stand der Technik, trotzdem kann ein Restrisiko nicht komplett ausgeschlossen werden. Um dieses Restrisiko zu vermeiden, die Sicherheitsanweisungen befolgen. Dieses Gerät ist nur für den professionellen Gebrauch bestimmt und nicht für den Privatgebrauch geeignet. MA Lighting Technology GmbH kommt für den Schaden nicht auf, der aufgrund von Nichtbeachtung der Sicherheitsanweisungen entstehen könnte. | | | | ----------------------------------------- | --------------------------------------------------------------------------------------------------------------------------------------------------------------------------------------------------------------------------- | |  | **Warnung:** Durch den Nutzer herbeigeführte Modifikationen an diesen Geräten, die nicht ausdrücklich von der für die Übereinstimmung verantwortlichen Stelle genehmigt wurden, führen zum Verbot der Benutzung der Geräte. | | | | | ------------------------------------------------ | --------------------------------------------------------------------------------------------------------------------------------------------------------------------------------------------------------------------------------------------------------------------------------------------------------------------------------------------------------------------------------------------------------------------------------------------------------------------------------------------------------------------------------------------------------------------------------------------------------------------------------------- | |  | **Wichtig:** Diese Geräte wurden getestet und entsprechen den Grenzwerten eines digitalen Geräts der Klasse A gemäß der FCC-Bestimmungen Teil 15 und der CE-Regularien. Diese Grenzwerte bieten im professionellen Betrieb einen angemessenen Schutz gegen störende Interferenzen. Die Geräte erzeugen, verwenden und strahlen möglicherweise Funkwellen aus. Wenn sie nicht gemäß dieser Anleitung installiert und verwendet werden, können sie den Funkverkehr stören. Der Betrieb dieser Geräte im privaten, häuslichen Bereich kann u. U. Funkstörungen verursachen. In diesem Fall muss der Benutzer die Störungen selbst beheben. | ## Vermeiden von Stromschlag [Section titled “Vermeiden von Stromschlag”](#vermeiden-von-stromschlag) Ein beschädigtes Gerät oder Netzkabel kann schwere oder tödliche Verletzungen verursachen. Die Sicherheitsanweisungen befolgen, um Verletzungen, die durch elektrischen Strom verursacht werden können, zu vermeiden. * Kein beschädigtes Netzkabel nutzen. * Keine festgeschraubten Abdeckungen am Gehäuse öffnen. * Gerät nur im technisch einwandfreien Zustand nutzen. * Gerät niemals selbst reparieren. * Gerät nicht modifizieren und keine Änderungen an dessen Komponenten und Zubehör vornehmen. * Gerät nicht Regen oder Feuchtigkeit aussetzen. * Gerät nicht in Wasser tauchen. ## []()Allgemeine Sicherheitsanweisungen [Section titled “Allgemeine Sicherheitsanweisungen”](#allgemeine-sicherheitsanweisungen) | | | | ------------------------------------------------ | ------------------------------------------------------------------------------------------------------------------------------------------------------------------------------- | |  | **Wichtig:** Der Gerätestecker und der Netzstecker der Zuleitung dienen als Trennvorrichtung. Den Geräte- und/oder Netzstecker abziehen um das Gerät spannungsfrei zu schalten. | Um Verletzungen vorzubeugen oder Schäden am Gerät zu vermeiden: * Beim Bedienen nicht in das Gerät hineingreifen. * Gerät und Netzkabel von Kindern unter 8 Jahren fernhalten. * Kinder nicht mit dem Gerät spielen lassen. * Bei Gewitter das Gerät spannungsfrei schalten. * Bei längerer Nichtverwendung das Gerät spannungsfrei schalten. * Vor dem Reinigen das Gerät spannungsfrei schalten. * Keine flüssigen Reinigungsmittel oder Sprühreiniger verwenden. * Nur mit einem trockenen Tuch reinigen. * Gerät nicht in der Nähe von Wasser nutzen. * Gerät nicht einer feuchten Umgebung aussetzen. * Keine Flüssigkeiten auf das Gerät schütten. * Belüftungsöffnungen im Gehäuse nicht blockieren – diese sind für den Luftstrom innerhalb des Gerätes wichtig und schützen es vor Überhitzung. * Keine Fremdkörper in die Belüftungsöffnungen stecken, da diese mit spannungsführenden Teilen in Kontakt kommen und Kurzschlüsse, Feuer und/oder Stromschlag verursachen können. * Keine Gegenstände auf das Netzkabel stellen; Nicht auf das Netzkabel treten oder zusammendrücken, besonders am Stecker und an Stellen an denen die Kabel das Gehäuse verlassen. * Wird ein Verlängerungskabel genutzt, muss sichergestellt werden, dass die Summe der Nennleistungen der an das Kabel angeschlossenen Geräte die Nennleistung des Verlängerungskabels nicht überschreitet. * Sich nicht mit dem Körpergewicht auf dem Gerät abstützen. * Keine schweren Gegenstände auf dem Gerät abstellen. * Keine übermäßige Gewalt auf Tasten, Knöpfe, Fader, Drehknöpfe, Schalter, Verbindungen oder Monitor Wing ausüben. * Ist das Netzkabel oder der Stecker beschädigt, müssen diese umgehend von einer Fachkraft ausgetauscht werden. * Gerät nur auf stabilen Oberflächen platzieren; Wird es auf instabilen Flächen platziert, kann das Gerät herunterfallen und stark beschädigt werden. * Nur Netzkabel mit Sicherheitsprüfzeichen nutzen. * Keine leistungsstarken Funkgeräte oder Mobiltelefone in der Nähe des Gerätes verwenden. * Das Gerät hat ein Schutzkontaktstecker, der nur in Verbindung mit einer Schutzkontaktsteckdose genutzt werden darf. * Wie bei allen industriell gefertigten Gütern kann die Verwendung von Stoffen, die Allergien hervorrufen können, wie z.B. Aluminium, nicht gänzlich ausgeschlossen werden. Sollten allergische Reaktionen (wie z.B. Hautausschlag, ständiges Niesen, gerötete Augen oder Atemwegsbeschwerden) auftreten, ist umgehend ein Arzt zur Ursachenklärung aufzusuchen. **Sollte einer der folgenden Punkte zutreffen, das Gerät spannungsfrei schalten und den Kundendienst kontaktieren!** * Netzkabel und/oder Verbindung ist/sind beschädigt, spröde oder brüchig. * Eintritt von Wasser. * Gerät wurde Regen oder hoher Luftfeuchtigkeit ausgesetzt. * Gerät funktioniert bei Einhaltung von Bedienungsanweisungen, die im Quick Manual stehen, nicht einwandfrei. Steuerelemente so einstellen wie im Quick Manual beschrieben, da eine falsche Einstellung das Gerät beschädigen könnte. * Gerät ist heruntergefallen und dabei wurde das Gehäuse beschädigt.
# Sécurité
> Avertissement – Zone de danger
# ## Symboles et consignes de sécurité [Section titled “Symboles et consignes de sécurité”](#symboles-et-consignes-de-sécurité)  **Avertissement** – Zone de danger ***  **Attention** – Risque de choc électrique *** ### Risque de choc électrique [Section titled “Risque de choc électrique”](#risque-de-choc-électrique) L’appareil ne doit être entretenu que par du personnel qualifié, des parties sous tension risquant d’être exposées lors de l’ouverture et / ou du retrait des couvercles. Le contact avec des pièces sous tension peut provoquer un choc électrique.  ***  Éliminer comme déchets dangereux. Respecter la réglementation en vigueur. Pour plus d’informations, voir [Élimination](/grandma3/2-3/key_onpc_xt_disposal-2/). ***  Recycler la batterie. ***  Déclaration de conformité. Pour plus d’informations, voir [Conformité](/grandma3/2-3/key_onpc_xt_conformity-1-2/). ***  Tension de service Marche / Arrêt. | | | | ----------------------------------------- | -------------------------------------------------------------------------------------------------------------------------------------------------------------------------------------------------------------------------------------------------------------- | |  | **Avertissement :** L’appareil doit être mis à la terre. Ne pas ignorer la fonction de sécurité d’une prise avec terre. Une prise avec terre a deux contacts électriques et un troisième contact de terre. Le troisième contact est prévu pour votre sécurité. | Lisez attentivement toutes les instructions de ce guide rapide, en particulier les [consignes générales de sécurité](/grandma3/2-3/key_onpc_xt_safety-1-2/#general_safety_instructions) et les [limitations d’usages](/grandma3/2-3/key_onpc_xt_limitations-1-2/). Suivez les instructions et conservez ce guide rapide pour une utilisation ultérieure. Respectez toutes les mises en garde et tous les avertissements mentionnés dans ce guide rapide et indiqués sur l’appareil. | | | | ------------------------------------------------ | -------------------------------------------------------------------------------------------------------------------------------------------- | |  | **Important :** Tous les travaux de réparation et d’entretien doivent être effectués exclusivement par des techniciens de service qualifiés. | * Cet appareil est à la pointe de la technologie ; * Cependant, des risques résiduels ne peuvent être exclus ; * Pour éviter les risques, suivez les consignes de sécurité ; * Cet appareil est destiné uniquement à un usage professionnel et ne convient pas à un usage résidentiel. MA Lighting Technology GmbH ne prend pas en charge d’éventuels dommages pouvant survenir en cas de non-respect des consignes de sécurité. | | | | ----------------------------------------- | ------------------------------------------------------------------------------------------------------------------------------------------------------------------------------------------------------------- | |  | **Avertissement :** Des changements ou des modifications à ces appareils non expressément approuvés par la partie responsable de la conformité pourraient annuler le droit de l’utilisateur de les utiliser. | | | | | ------------------------------------------------ | ------------------------------------------------------------------------------------------------------------------------------------------------------------------------------------------------------------------------------------------------------------------------------------------------------------------------------------------------------------------------------------------------------------------------------------------------------------------------------------------------------------------------------------------------------------------------------------------------------------------------------------------------------------------------------------------------------------------------------------------------------------------------------- | |  | **Note :** Ces appareils ont été testés et jugés conformes aux limites d’un appareil numérique de classe A, conformément à la partie 15 des règles de la FCC et aux normes CE. Ces limites sont conçues pour fournir une protection raisonnable contre de possibles interférences lorsque les appareils sont utilisés dans un environnement commercial. Ceux-ci génèrent, utilisent et peuvent émettre de l’énergie radiofréquence et, s’ils ne sont pas installés et utilisés conformément à ce guide rapide, peuvent éventuellement causer des interférences aux communications radio. L’utilisation de ces appareils dans une zone résidentielle est susceptible de causer des interférences, auquel cas l’utilisateur devra corriger ces interférences à ses propres frais. | ## Dangers causés par le courant électrique [Section titled “Dangers causés par le courant électrique”](#dangers-causés-par-le-courant-électrique) Un appareil ou un câble d’alimentation défectueux présente un risque de blessures graves ou mortelles dues à un choc électrique. Suivez les consignes de sécurité pour éviter les risques liés au courant électrique. * N’utilisez pas de câble d’alimentation défectueux ; * Ne pas ouvrir les couvercles vissés de l’appareil ; * N’utilisez l’appareil que s’il est dans un état technique impeccable ; * Ne réparez pas l’appareil par vos propres moyens ; * N’effectuez pas d’ingénierie inverse sur l’appareil et n’apporter aucune modification à ses composants et accessoires ; * N’exposez pas l’appareil à la pluie ou à l’humidité ; * Ne pas plonger l’appareil dans l’eau. ## []()Consignes de sécurité générales [Section titled “Consignes de sécurité générales”](#consignes-de-sécurité-générales) | | | | ------------------------------------------------ | ---------------------------------------------------------------------------------------------------------------------------------------------------------------------------------------------------------------- | |  | **Important :** La fiche de l’appareil et la fiche de la ligne d’alimentation servent de séparateur. - Pour couper l’alimentation électrique, débranchez la fiche de l’appareil et / ou la fiche d’alimentation. | Pour éviter des blessures ou des dommages à l’appareil : * Ne mettez pas vos mains à l’intérieur de l’appareil pendant le fonctionnement ; * L’appareil et le câble d’alimentation doivent être tenus à l’écart des enfants de moins de 8 ans ; * Les enfants ne sont pas autorisés à jouer avec l’appareil ; * Débranchez l’alimentation électrique du réseau pendant les orages ; * Débranchez l’alimentation électrique du réseau si l’appareil est laissé sans surveillance pendant une longue période ; * Débranchez l’alimentation électrique avant de nettoyer l’appareil ; * N’utilisez pas de nettoyant liquide ou en aérosol. Utilisez uniquement un chiffon sec ; * Ne pas utiliser l’appareil à proximité de l’eau ; * Ne l’exposez pas à un environnement humide ; * Ne versez aucun liquide sur l’appareil ; * Ne bouchez pas ou ne couvrez pas les trous de ventilation de l’appareil. Ceux-ci sont essentiels à la circulation de l’air à l’intérieur de l’appareil et protègent l’appareil contre la surchauffe ; * N’insérez aucun objet dans les trous de ventilation de l’appareil car ceux-ci pourraient entrer en contact avec des pièces sous tension ou provoquer des courts-circuits, un incendie et / ou un choc électrique ; * Ne placez aucun objet sur le câble d’alimentation. Protégez-le contre tout risque de piétinement ou de pincement, en particulier au niveau du connecteur et à l’endroit où les câbles sortent de l’appareil ; * Lors de l’utilisation d’un cable de rallonge, assurez-vous que la puissance nominale de tous les appareils connectés en série ne dépasse pas la puissance nominale maximale du cable de rallonge ; * Ne vous appuyez pas sur l’appareil ; * Ne placez aucun objet lourd sur l’appareil ; * N’utilisez pas de force excessive sur les touches, les boutons, les potentiomètres, les interrupteurs, les connecteurs ou sur les écrans ; * Si le câble d’alimentation ou la fiche d’alimentation principale sont défectueux, faites-les remplacer immédiatement par un technicien qualifié ; * Placez l’appareil uniquement sur des surfaces stables. S’il est placé sur des surfaces instables, il peut tomber et se casser ; * N’utilisez que des câbles d’alimentation homologués avec marquage ; * N’utilisez pas de talkie-walkie puissant ou de téléphone portable à proximité de l’appareil ; * L’appareil est équipé d’une fiche de sécurité. Cette fiche ne peut être utilisé qu’avec des prises de sécurité compatible ; * Comme pour tous les produits fabriqués industriellement, l’utilisation de substances induisant une réaction allergique telle que l’aluminium ne peut généralement pas être exclue. Si vous développez une réaction allergique (éruption cutanée, éternuements fréquents, yeux rouges ou difficultés respiratoires), consultez immédiatement un médecin pour en déterminer la cause. \*\*Si l’une des conditions suivantes se produit, débranchez la fiche d’alimentation principale et appelez votre distributeur local ou le \*\***support technique !** * Le câble d’alimentation ou la fiche principale est endommagé ou usé ; * Pénétration de liquides ; * L’appareil a été exposé à la pluie ou à une forte humidité ambiante ; * L’appareil ne fonctionne pas correctement, même si vous avez suivi toutes les instructions de ce guide rapide. N’utilisez les commandes que comme indiquées dans le guide rapide. Des paramètres incorrects peuvent endommager l’appareil ; * L’appareil est tombé et le boitier est endommagé.
# Support
> Contact us for any questions about your MA product.
Contact us for any questions about your MA product. MA Lighting and its extensive distributor network offer unparalleled technical support. Call on our expertise for help with any problem, no matter if it is about the operation, software features, software installations, or troubleshooting. ### Help Pages [Section titled “Help Pages”](#help-pages) The help pages are included in every software installer package and are automatically loaded into the software. To access and read the help pages, press Help + Please. The help pop-up opens on the main screen. To jump directly into a special help topic, use the context-sensitive help: * Press and hold Help and tap the desired user interface element (UI element) to open the corresponding help topic. * Tap  in the control bar and tap a UI element to open the corresponding help topic. ### Online Manuals [Section titled “Online Manuals”](#online-manuals) All MA product-related manuals are available as online versions. Just select your MA product and click on the respective link. All further documents can be found in our download area. Go to [https://www.malighting.com/training-support/online-manuals.](https://www.malighting.com/training-support/online-manuals) ### Video Tutorials [Section titled “Video Tutorials”](#video-tutorials) Get tips and tricks from our MA experts on your MA product. MA offers a whole range of videos on how to use your MA product in the best possible way. Just select your series and click on the links to watch the videos on our YouTube channel. Go to [https://www.malighting.com/training-support/video-tutorials.](https://www.malighting.com/training-support/video-tutorials) ### Community [Section titled “Community”](#community) Share your knowledge and get help from other MA users. A community can be stronger and better than the individual. Be part of the MA community! Go to [https://www.malighting.com/training-support/community.](https://www.malighting.com/training-support/community) ### Fixture Shares [Section titled “Fixture Shares”](#fixture-shares) In our MA Fixture Share you will find a comprehensive database of different fixture types for grandMA3, grandMA2, and dot2. You can also find the grandMA2 GDTF Converter there. Simply upload the GDTF file and it will be converted into a grandMA2 Fixture Profile.\ \ The GTDF Share contains a comprehensive library of all available GDTF files with all relevant modes and firmware versions. Like the MA Fixture Share, this database is continuously updated. For more information see: ### Local Support [Section titled “Local Support”](#local-support) If you have a question regarding your MA Lighting product, please first of all contact your local MA product specialists. ### Central Support [Section titled “Central Support”](#central-support) If you are in need of further assistance or manufacturer support, please fill out an email request on [www.malighting.com in](http://www.malighting.com%C2%A0in) Training and Support. Your request will automatically be sent to\*\* \*\*(in English or German). This email service is monitored during MA Lighting’s regular business hours in Germany from 8.30 am until 5 pm, Monday through Friday. ### Emergency Hotline [Section titled “Emergency Hotline”](#emergency-hotline) In any case of a show critical emergency please contact the MA Lighting support hotline. Phone +49 5251 68 88 65 99 Please note that this 24/7 hotline is strictly for emergency cases. ### Intellectual Property [Section titled “Intellectual Property”](#intellectual-property) MA Lighting Technology has registered multiple patents, trademarks, design patents, and utility models for its products.\ We will take legal action against the violation of this intellectual property. For more information see:
# Support technique
> Contactez-nous pour toute question concernant votre produit MA.
# Contactez-nous pour toute question concernant votre produit MA. MA Lighting et son vaste réseau de distributeurs offrent un support technique incomparable. Faites appel à notre expertise pour tout problème, qu’il s’agisse de fonctionnement, de fonctionnalités logicielles, d’installations logicielles ou de dépannage. ### Pages d’aide [Section titled “Pages d’aide”](#pages-daide) Les pages d’aide sont incluses dans chaque logiciel d’installation et sont automatiquement chargées dans le logiciel. Pour accéder et lire les pages d’aide, appuyez sur Help + Please. La fenêtre contextuelle d’aide s’ouvre sur l’écran principal. Pour accéder directement à une rubrique d’aide spéciale, utilisez l’aide contextuelle : * Appuyez et maintenez enfoncé le bouton Help et touchez l’élément d’interface utilisateur (élément IU) souhaité pour ouvrir la rubrique d’aide correspondante. * Tapez sur  dans la barre de contrôle et appuyez sur un élément de l’IU pour ouvrir le sujet d’aide correspondant. ### Guides en ligne [Section titled “Guides en ligne”](#guides-en-ligne) Tous les guides relatifs aux produits MA sont disponibles en ligne. Choisissez simplement votre produit MA et cliquez sur le lien correspondant. Tous les autres documents sont disponibles dans notre espace de téléchargement. Visitez . ### Tutoriels vidéo [Section titled “Tutoriels vidéo”](#tutoriels-vidéo) Obtenez des conseils et astuces de nos experts MA sur votre produit MA. MA vous propose toute une gamme de vidéos sur la meilleure façon d’utiliser votre produit MA. Sélectionnez simplement votre série et cliquez sur les liens pour regarder les vidéos sur notre chaîne YouTube. Visitez . ### Communauté [Section titled “Communauté”](#communauté) Partagez vos connaissances et obtenez l’aide d’autres utilisateurs de MA. Une communauté peut être plus forte et meilleure que l’individu. Faites partie de la communauté MA ! Visitez . ### Fixture Shares [Section titled “Fixture Shares”](#fixture-shares) Dans notre MA Fixture Share, vous trouverez une base de données complète des différents types de luminaires pour grandMA3, grandMA2 et dot2. Le partage GTDF contient une bibliothèque complète de tous les fichiers GDTF disponibles avec tous les modes et versions de micrologiciel pertinents. Tout comme MA Fixture Share, cette base de données est continuellement mise à jour. Pour plus d’informations, voir: ### Support local [Section titled “Support local”](#support-local) Si vous avez une question concernant votre produit MA Lighting, veuillez tout d’abord contacter votre spécialiste MA local. ### Support central [Section titled “Support central”](#support-central) Si vous avez besoin de plus d’aide ou d’assistance de la part du fabricant, veuillez remplir une demande par e-mail à [www.malighting.com](https://www.malighting.com/) sous Training and Support. Votre demande sera automatiquement envoyée à **** (en anglais ou en allemand). Ce service de messagerie électronique est surveillé pendant les heures d’ouverture habituelles de MA Lighting en Allemagne, de 8h30 à 17h, du lundi au vendredi. ### Hotline d’urgence [Section titled “Hotline d’urgence”](#hotline-durgence) En cas d’urgence, veuillez contacter le support technique de MA Lighting. Téléphone +49 5251 68 88 65 99 Veuillez prendre note que cette ligne d’assistance 24 heures sur 24 et 7 jours sur 7 est strictement réservée aux cas d’urgence. ### Propriété intellectuelle [Section titled “Propriété intellectuelle”](#propriété-intellectuelle) MA Lighting Technology a déposé plusieurs brevets, marques de commerce, brevets de conception et modèles d’utilité pour ses produits. Nous intenterons une action en justice contre la violation de cette propriété intellectuelle. Pour plus d’informations, voir:
# Support
> Bei Fragen zu Ihren MA Produkten wenden Sie sich bitte an uns.
# Bei Fragen zu Ihren MA Produkten wenden Sie sich bitte an uns. MA Lighting bietet mit dem angeschlossenen umfassenden Distributionsnetzwerk einen einmaligen technischen Support. Sollten wider Erwarten Probleme auftreten, stehen wir Ihnen mit unserem Know-how zur Seite, ganz gleich worum es sich handelt – Bedienung, Software-Features, Software-Installation oder Fehlerbeseitigung. ### Offline Hilfe [Section titled “Offline Hilfe”](#offline-hilfe) Die Offline Hilfe ist in jedem Software Installer enthalten und wird automatisch in die Software geladen. Zum Aufrufen der Hilfe die Tasten Help + Please drücken. Das Hilfe Fenster öffnet sich auf dem Hauptmonitor. Um ein spezielles Hilfethema direkt anzuspringen, die Kontextsensitive Hilfe verwenden. Um das entsprechende Hilfethema zu öffnen: * Taste Help drücken und halten und das gewünschte Bedienelement antippen. * Das  in der Kontrollleiste und das gewünschte Bedienelement antippen. ### Online Manuals [Section titled “Online Manuals”](#online-manuals) Alle Benutzerhandbücher der MA Produkte sind als Online-Versionen verfügbar. Einfach auswählen, für welches MA Produkt Sie eine Bedienungsanleitung benötigen. Gehe zu . ### Video Tutorials [Section titled “Video Tutorials”](#video-tutorials) Hier erhalten Sie Tipps und Tricks von unseren MA Experten für Ihr MA Produkt. MA Lighting bietet eine große Anzahl an Tutorial-Videos an, damit Sie Ihr MA Produkt bestmöglich nutzen können. Wählen Sie dafür einfach eine Serie aus und sehen Sie alle Videos dazu auf unserem YouTube Kanal. Gehe zu . ### Community [Section titled “Community”](#community) Teilen Sie Ihr Wissen mit anderen MA Usern. In der Gemeinschaft ist man effektiver. Werden Sie Mitglied der MA Community! Gehe zu [https://www.malighting.com/de/training-support/community](https://www.malighting.com/de/training-support/community/). ### Fixture Shares [Section titled “Fixture Shares”](#fixture-shares) Im MA Fixture Share finden Sie eine umfassende Bibliothek der unterschiedlichsten Fixture Typen für alle grandMA3, grandMA2 und dot2 Serien. Im GTDF Share finden Sie eine umfassende Bibliothek aller verfügbaren GDTF Files mit allen relevanten Modi und Firmware Versionen. Diese Datenbank wird, wie das MA Fixture Share kontinuierlich aktualisiert. Mehr Info unter . ### Lokaler Support [Section titled “Lokaler Support”](#lokaler-support) Bei Fragen zu Ihren MA Lighting Produkten wenden Sie sich bitte als erstes an Ihre MA Produktspezialisten vor Ort. ### Zentraler Support [Section titled “Zentraler Support”](#zentraler-support) Wenn Sie weitere Hilfe oder Herstellerunterstützung benötigen, schicken Sie uns bitte ein [ausgefülltes E-Mail-Formular](https://www.malighting.com/de/training-support/support-anfrage) unter , Training und Support. Diese Anfrage wird automatisch an \*\* \*\*(in Englisch oder Deutsch) gesendet. Dieser E-Mail-Service ist während der regulären Geschäftszeiten von MA Lighting von 8.30 Uhr bis 17 Uhr von Montag bis Freitag erreichbar. ### Notfall-Hotline [Section titled “Notfall-Hotline”](#notfall-hotline) In show-kritischen Situationen nehmen Sie bitte Kontakt zur MA Lighting Support-Hotline auf. Tel. +49 5251.68 88 65 99 Diese Hotline ist 24 Stunden am Tag und 7 Tage in der Woche besetzt. Sie ist nur für Notfälle. ### Intellectual Property [Section titled “Intellectual Property”](#intellectual-property) MA Lighting Technology hat für seine Produkte zahlreiche Patente, Marken, Geschmacksmuster und Gebrauchsmuster angemeldet. Im Falle der Verletzung dieses geistigen Eigentums werden wir rechtliche Schritte einleiten. Mehr Info unter .
# Technical Data
> grandMA3 onPC command wing XT front panel
| | | | ------------------------------------------------ | ------------------------------------------------------------------------------------------------------------------------------------------------------------------------------------------------------------------------- | |  | **Important:** Only use adequately protected power cables (min. Ø = 3 x 1.0 mm²). The required power cable must meet the country’s standards. **Only qualified personnel is allowed to perform work on the power cable!** | | | | | ------------------------------------------------ | -------------------------------------------------------------------------- | |  | **Important:** Power cable and connector are not included in the delivery. | * DMX: The maximum length of the cable is 350 m (in ideal conditions).  grandMA3 onPC command wing XT front panel | Technical Data | | | ----------------- | ----------------------------------- | | Parameters | 4 096 | | Parameters Mode2 | not applicable (no Mode2) | | Operating voltage | 100-240 V AC, 50/60 Hz | | Net weight | 12 kg / 27 lbs | | Power | max. 100 VA | | Dimensions | 620 x 427 x 112 mm / 24 x 17 x 5 in | ### Outputs grandMA3 onPC command wing XT [Section titled “Outputs grandMA3 onPC command wing XT”](#outputs-grandma3-onpc-command-wing-xt) 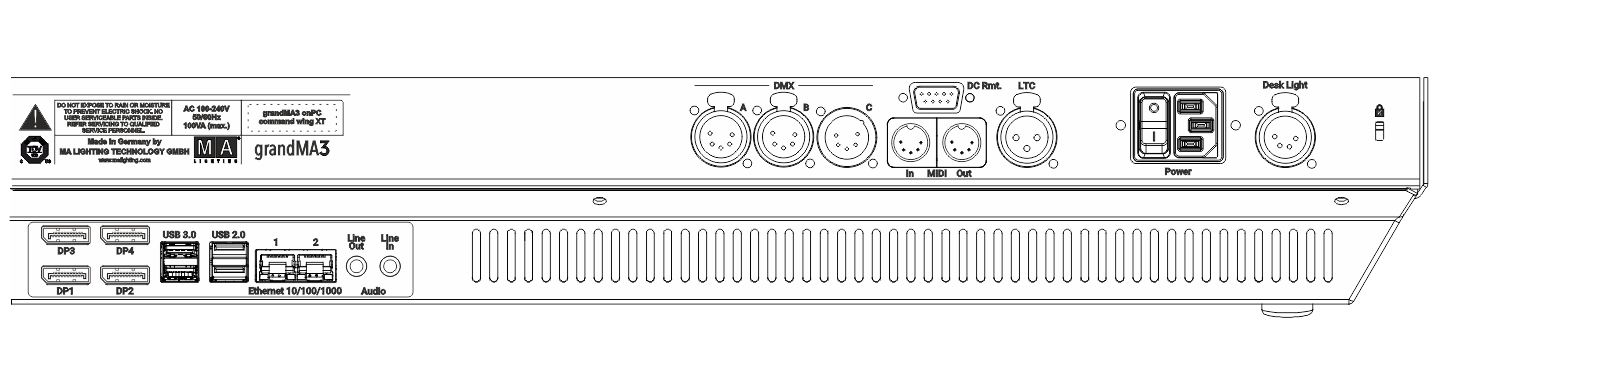 grandMA3 onPC command wing XT rear panel | Number | Connector | | ------ | --------------------------------------------------------------- | | 4x | DisplayPort 1.2 for external screens | | 2x | RJ 45 | | 2x | USB 3.0 (type A) max. 900 mA | | 2x | USB 2.0 (type A) max. 500 mA | | 1x | Audio In (mini jack 3.5mm) | | 1x | Audio Out (mini jack 3.5mm) | | 2 x | DMX512-A OUT (5pin XLR female) | | 1 x | DMX512-A IN (5pin XLR male) | | 1 x | MIDI IN (5pin DIN female) | | 1 x | MIDI OUT (5pin DIN female) | | 1 x | LTC – Linear Time Code (3pin XLR female) | | 1 x | GPI – General Purpose Input (D-SUB DE9 female – remote control) | | 1x | IEC connector | | 1 x | LED desk light (4pin XLR female) |
# Technische Daten
> grandMA3 onPC command wing XT Vorderseite
# | | | | ------------------------------------------------ | ------------------------------------------------------------------------------------------------------------------------------------------------------------------------------------------------------------------------------------------------------- | |  | **Wichtig:** Ausreichend isolierte und geschützte Netzkabel verwenden (min. Ø = 3 x 1,0 mm²). Das Netzkabel muss den Standards des Landes entsprechen. **Arbeiten am Netzkabel dürfen ausschließlich von qualifiziertem Personal durchgeführt werden!** | | | | | ------------------------------------------------ | ------------------------------------------------------------------------------- | |  | **Wichtig:** Netzkabel und Steckverbinder sind im Lieferumfang nicht enthalten. | * DMX: Die maximale Kabellänge beträgt 350 m (unter idealen Bedingungen). * CAT-5e Ethernet-Kabel oder höher verwenden; die maximale Kabellänge beträgt 75 m.  grandMA3 onPC command wing XT Vorderseite | Technische Daten | | | ------------------------- | ----------------------------------- | | Parameter | 4 096 | | Parameter Mode2 | nicht zutreffend (kein Mode2) | | Betriebsspannung | 100-240 V AC, 50/60 Hz | | Gewicht (ohne Verpackung) | 12 kg / 27 lbs | | Anschlussleistung | max. 100 VA | | Maße | 620 x 427 x 112 mm / 24 x 17 x 5 in | ### Steckverbinder grandMA3 onPC command wing XT [Section titled “Steckverbinder grandMA3 onPC command wing XT”](#steckverbinder-grandma3-onpc-command-wing-xt) 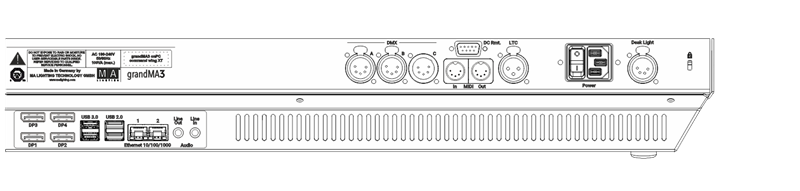 grandMA3 onPC command wing XT Rückseite | Anzahl | Steckverbinder | | ------ | -------------------------------------------------------------------- | | 4 x | DisplayPort (externe Bildschirme) | | 2 x | RJ45 | | 2 x | USB 3.0 (Typ A) max. 900 mA | | 2 x | USB 2.0 (Typ A) max. 500 mA | | 1 x | Audio In (Miniklinke 3,5 mm) | | 1 x | Audio Out (Miniklinke 3,5 mm) | | 2 x | DMX512-A OUT (5-polig XLR weiblich) | | 1 x | DMX512-A IN (5-polig XLR männlich) | | 1 x | MIDI IN (5-polig DIN weiblich) | | 1 x | MIDI OUT (5-polig DIN weiblich) | | 1 x | LTC – Linear Time Code (3-polig XLR weiblich) | | 1 x | GPI – General Purpose Input (D-SUB DE9 weiblich – DC Remote Control) | | 1 x | Kaltgeräteeinbaustecker | | 1 x | LED Pultleuchte (4-polig XLR weiblich) |
# Données Techniques
> grandMA3 onPC command wing XT panneau avant
# | | | | ------------------------------------------------ | ----------------------------------------------------------------------------------------------------------------------------------------------------------------------------------------------------------------------------------------------------------- | |  | **Important:** Utiliser des câbles protégés adéquatement (min. Ø = 3 x 1.0 mm²). Le câble de courant requis pour le branchement doit être conforme au standard du pays. **Seul une personne qualifiée est autorisée à travailler sur le câble de courant!** | | | | | ------------------------------------------------ | ------------------------------------------------------------------------------ | |  | **Important:** Le câble et le connecteur ne sont pas inclus dans la livraison. | * DMX: la longueur maximale du câble ne doit pas excéder 350 m (dans des conditions idéal). * Utiliser un câble Ethernet de type CAT-5e ou supérieur. La longueur maximale du câble est de 75 m.  grandMA3 onPC command wing XT panneau avant | Données Techniques | | | ------------------ | ----------------------------------- | | Paramètres | 4 096 | | Paramètres Mode2 | Aucun | | Tension | 100-240 V AC, 50/60 Hz | | Poids net | 12 kg / 27 lbs | | Puissance | max. 100 VA | | Dimensions | 620 x 427 x 112 mm / 24 x 17 x 5 in | ### Sorties grandMA3 onPC command wing XT [Section titled “Sorties grandMA3 onPC command wing XT”](#sorties-grandma3-onpc-command-wing-xt)  grandMA3 onPC command wing XT panneau arrière | Nombre | Connecteur | | ------ | ------------------------------------------------------------------ | | 4x | DisplayPort 1.2 pour écrans externes | | 2x | RJ 45 | | 2x | USB 3.0 (type A) max. 900 mA | | 2x | USB 2.0 (type A) max. 500 mA | | 1x | Audio In (mini jack 3.5mm) | | 1x | Audio Out (mini jack 3.5mm) | | 2 x | DMX512-A OUT (5pin XLR female) | | 1 x | DMX512-A IN (5pin XLR male) | | 1 x | MIDI IN (5pin DIN female) | | 1 x | MIDI OUT (5pin DIN female) | | 1 x | LTC – Linear Time Code (3pin XLR female) | | 1 x | GPI – General Purpose Input (D-SUB DE9 female – DC remote control) | | 1x | IEC connector | | 1 x | LED desk light (4pin XLR female) |
# Transport
> Noncompliance of the safety instructions can result in personal injury or material damage;
* The grandMA3 onPC command wing XT must be protected from environmental factors such as physical shocks and vibration during transportation; * Remove all cables before transport; * The user is responsible for securely fastening the products for transport and for following the manufacturer´s safety instructions when transporting the device;\ Noncompliance of the safety instructions can result in personal injury or material damage; * Do not place the grandMA3 onPC command wing XT on unstable surfaces; * Do not place any objects on top of the grandMA3 onPC command wing XT. | | | | ----------------------------------------- | --------------------------------------------------------------------------------------------------------------------------------------------------------------------------------------------------------------------------------------------------------------------------------------------------------------- | |  | **Warning:** -Pay attention to temperature and humidity during transport. For more information see [Limitations](/grandma3/2-3/key_onpc_xt_limitations/). -After the transport check the device. -If the device is damaged (dented, bent or broken), do not connect the grandMA3 onPC command wing XT to power! |
# Transport
# * Den grandMA3 command wing XT während des Transports vor Umwelteinflüssen wie Erschütterungen und Vibrationen schützen. * Alle Kabel vor dem Transport entfernen. * Der Benutzer ist dafür verantwortlich, das Gerät beim Transport sicher zu befestigen und die Sicherheitshinweise des Herstellers zu beachten. Die Nichteinhaltung der Sicherheitshinweise kann zu Personen- oder Sachschäden führen. * Den grandMA3 command wing XT nicht auf eine instabile Oberfläche stellen. * Keine weiteren Gegenstände auf den grandMA3 command wing XT stellen. | | | | ----------------------------------------- | ---------------------------------------------------------------------------------------------------------------------------------------------------------------------------------------------------------------------------------------------------------------------------------------------------------------------------------------------------------------------------- | |  | **Wichtig:** - Beim Transport die zulässigen Werte für Temperaturen und Luftfeuchte beachten. Für weitere Information, siehe [Betriebsgrenzen](/grandma3/2-3/key_consoles_limitations-1/). - Nach dem Transport das Gerät auf Beschädigungen prüfen. - Falls das Gerät beschädigt sein sollte (verbeult, verbogen oder kaputt), es nicht an die Stromversorgung anschließen! |
# Transport
> Le non-respect des consignes de sécurité peut entraîner des dommages corporels ou matériels ;
* Les grandMA3 onPC command wings XT doivent être protégés des influences environnementales telles que les chocs physiques et les vibrations pendant le transport ; * Retirez tous les câbles avant le transport ; * L’utilisateur est responsable de la sûreté de la fixation des produits pour le transport et du respect des consignes de sécurité du fabricant lors du transport de l’appareil ;\ Le non-respect des consignes de sécurité peut entraîner des dommages corporels ou matériels ; * Ne placez pas les grandMA3 onPC command wings XT sur des surfaces instables ; * Ne placez aucun objet sur les grandMA3 onPC command wings XT. | | | | ----------------------------------------- | ------------------------------------------------------------------------------------------------------------------------------------------------------------------------------------------------------------------------------------------------------------------------------------------------------------------------------------------------------------------------------ | |  | **Attention:** -Faites attention à la température et à l’humidité pendant le transport. Pour plus d’informations, voir [Limitations d’usage](/grandma3/2-3/key_onpc_xt_limitations-1-2/). -Après le transport, vérifiez l’appareil. -Si l’appareil ou son écran est endommagé (cabossé, tordu ou cassé), ne connectez pas le grandMA3 onPC command wing au réseau électrique ! |
# Oops
> Pressing Oops executes the Oops command.
Pressing Oops executes the Oops command. | | | | ---- | ---- | | OK : | Oops | For more information about Oops, see the [Oops keyword](/grandma3/2-3/keyword_oops/). ## Location [Section titled “Location”](#location) Oops is located in the command section.  *Location on grandMA3 full-size and grandMA3 light consoles* ***  *Location on grandMA3 compact consoles and grandMA3 onPC command wing*
# Page-
> Pressing Page- executes the command Previous Page in the command line.
Pressing Page- executes the command **Previous Page** in the command line. | | | | ---- | ------------- | | OK : | Previous Page | Pressing and holding Page- for over a 1 second sets the page to page 1. ## Location [Section titled “Location”](#location) Page- is located in the command section.  *Location on grandMA3 full-size and grandMA3 light consoles* ***  *Location on grandMA3 compact consoles and grandMA3 onPC command wing*
# Page+
> Pressing Page+ executes the command Next Page in the command line.
Pressing Page+ executes the command **Next Page** in the command line. | | | | ---- | --------- | | OK : | Next Page | ## Location [Section titled “Location”](#location) Page+ is located in the command section.  *Location on grandMA3 full-size and grandMA3 light consoles* ***  *Location on grandMA3 compact consoles and grandMA3 onPC command wing*
# Pause | Fix
> Pressing Pause enters the Pause keyword into the command line.
Pressing Pause enters the Pause keyword into the command line. | | | | ------------------------------------------------------------------ | ------------------------- | |  | User name\[Fixture]>Pause | For more information about Pause, see the [Pause keyword](/grandma3/2-3/keyword_pause/). Pause Pressing Pause Pause enters the Park keyword into the command line. | | | | ------------------------------------------------------------------ | ----------------------------------- | |  | User name\[Fixture]>Park Fixture 17 | For more information about Park, see the [Park keyword](/grandma3/2-3/keyword_park/). Fix Pressing and holding MA + Pause enters the Fix keyword into the command line. | | | | ------------------------------------------------------------------ | ----------------------- | |  | User name\[Fixture]>Fix | For more information about Fix, see the [Fix keyword](/grandma3/2-3/keyword_fix/). Desk Lock Pressing and holding MA + MA + Pause toggles the desk lock. For more information about the desk lock, see [Desk Lock](/grandma3/2-3/ws_ui_desk_lock/). ## Location [Section titled “Location”](#location) Pause is located in the command section.  *Location on grandMA3 full-size and grandMA3 light consoles* ***  *Location on grandMA3 compact consoles and grandMA3 onPC command wing*
# Pause [large]
> Pressing Pause [large] executes the Pause Executor command in the command line
Pressing Pause \[large] executes the **Pause Executor** command in the command line | | | | ------------------------------------------------------------------ | ---------------------------------- | |  | User name\[Fixture]>Pause Executor | For more information about the Pause, see the [Pause keyword](/grandma3/2-3/keyword_pause/). ## Location [Section titled “Location”](#location) Pause \[large] is located in the master section under the two master faders.  *Location on grandMA3 full-size and grandMA3 light consoles* ***  *Location on grandMA3 compact consoles and grandMA3 onPC command wing*
# Hardware-related Instances
> The following list does neither depict defects nor malfunctions. It merely states instances that may occur during the manufacturing process.
The following list does neither depict defects nor malfunctions. It merely states instances that may occur during the manufacturing process. 1. Backlight bleeding may occur during manufacturing of LCD displays. 2. Deviations in color temperature are subject to technical tolerances during the manufacturing process of LCD displays. 3. Color deviations in hardware, for example in display housing, and deviations in the surface texture, such as hand rest pads, are subject to technical tolerances during manufacturing of such materials. ## Pixel Faults [Section titled “Pixel Faults”](#pixel-faults) The screens of the grandMA3 series are subject to pixel fault class II (ISO 9241-307). The table below shows the maximum number of allowed defects per 1 million pixels. | Pixel fault | Maximum number of faults per 1 million pixels | | -------------------------------------------------- | --------------------------------------------- | | Permanent hot pixel (always on, being color white) | 2 | | 2 permanent hot pixels that are adjacent | 1 | | Permanent dead pixel (always off, meaning black) | 5 | | 2 permanent dead pixels that are adjacent | 1 | | Defective subpixel (always on) | 5 | | Defective subpixel (always off) | 5 | Due to technical reasons, you might detect light scratches on the screens.
# Hardware-Related Instances
> The following list does neither depict defects nor malfunctions. It merely states instances that may occur during the manufacturing process.
## The following list does neither depict defects nor malfunctions. It merely states instances that may occur during the manufacturing process. 1. Backlight bleeding may occur during manufacturing of LCD displays. 2. Deviations in color temperature are subject to technical tolerances during the manufacturing process of LCD displays. 3. Color deviations in hardware, for example in display housing, and deviations in the surface texture, such as hand rest pads, are subject to technical tolerances during manufacturing of such materials. ## Pixel Faults [Section titled “Pixel Faults”](#pixel-faults) The screens of the grandMA3 series are subject to pixel fault class II (ISO 9241-307). The table below shows the maximum number of allowed defects per 1 million pixels. | Pixel fault | Maximum number of faults per 1 million pixels | | -------------------------------------------------- | --------------------------------------------- | | Permanent hot pixel (always on, being color white) | 2 | | 2 permanent hot pixels that are adjacent | 1 | | Permanent dead pixel (always off, meaning black) | 5 | | 2 permanent dead pixels that are adjacent | 1 | | Defective subpixel (always on) | 5 | | Defective subpixel (always off) | 5 | Due to technical reasons, you might detect light scratches on the screens.
# Hardware-related Instances
> The following list does neither depict defects nor malfunctions. It merely states instances that may occur during the manufacturing process.
The following list does neither depict defects nor malfunctions. It merely states instances that may occur during the manufacturing process. 1. Backlight bleeding may occur during manufacturing of LCD displays. 2. Deviations in color temperature are subject to technical tolerances during the manufacturing process of LCD displays. 3. Color deviations in hardware, for example in display housing, and deviations in the surface texture, such as hand rest pads, are subject to technical tolerances during manufacturing of such materials. ## Pixel Faults [Section titled “Pixel Faults”](#pixel-faults) The screens of the grandMA3 series are subject to pixel fault class II (ISO 9241-307). The table below shows the maximum number of allowed defects per 1 million pixels. | Pixel fault | Maximum number of faults per 1 million pixels | | -------------------------------------------------- | --------------------------------------------- | | Permanent hot pixel (always on, being color white) | 2 | | 2 permanent hot pixels that are adjacent | 1 | | Permanent dead pixel (always off, meaning black) | 5 | | 2 permanent dead pixels that are adjacent | 1 | | Defective subpixel (always on) | 5 | | Defective subpixel (always off) | 5 | Due to technical reasons, you might detect light scratches on the screens.
# Hardware-related Instances
> The following list does neither depict defects nor malfunctions. It merely states instances that may occur during the manufacturing process.
## The following list does neither depict defects nor malfunctions. It merely states instances that may occur during the manufacturing process. 1. Backlight bleeding may occur during manufacturing of LCD displays. 2. Deviations in color temperature are subject to technical tolerances during the manufacturing process of LCD displays. 3. Color deviations in hardware, for example in display housing, and deviations in the surface texture, such as hand rest pads, are subject to technical tolerances during manufacturing of such materials. ## Pixel Faults [Section titled “Pixel Faults”](#pixel-faults) The screens of the grandMA3 series are subject to pixel fault class II (ISO 9241-307). The table below shows the maximum number of allowed defects per 1 million pixels. | Pixel fault | Maximum number of faults per 1 million pixels | | -------------------------------------------------- | --------------------------------------------- | | Permanent hot pixel (always on, being color white) | 2 | | 2 permanent hot pixels that are adjacent | 1 | | Permanent dead pixel (always off, meaning black) | 5 | | 2 permanent dead pixels that are adjacent | 1 | | Defective subpixel (always on) | 5 | | Defective subpixel (always off) | 5 | Due to technical reasons, you might detect light scratches on the screens.
# Hardware_related Instances
> The following list does neither depict defects nor malfunctions. It merely states instances that may occur during the manufacturing process.
The following list does neither depict defects nor malfunctions. It merely states instances that may occur during the manufacturing process. 1. Backlight bleeding may occur during manufacturing of LCD displays. 2. Deviations in color temperature are subject to technical tolerances during the manufacturing process of LCD displays. 3. Color deviations in hardware, for example in display housing, and deviations in the surface texture, such as hand rest pads, are subject to technical tolerances during manufacturing of such materials. ## Pixel Faults [Section titled “Pixel Faults”](#pixel-faults) The screens of the grandMA3 series are subject to pixel fault class II (ISO 9241-307). The table below shows the maximum number of allowed defects per 1 million pixels. | Pixel fault | Maximum number of faults per 1 million pixels | | -------------------------------------------------- | --------------------------------------------- | | Permanent hot pixel (always on, being color white) | 2 | | 2 permanent hot pixels that are adjacent | 1 | | Permanent dead pixel (always off, meaning black) | 5 | | 2 permanent dead pixels that are adjacent | 1 | | Defective subpixel (always on) | 5 | | Defective subpixel (always off) | 5 | Due to technical reasons, you might detect light scratches on the screens.
# Hardware-related Instances
> The following list does neither depict defects nor malfunctions. It merely states instances that may occur during the manufacturing process.
## The following list does neither depict defects nor malfunctions. It merely states instances that may occur during the manufacturing process. 1. Backlight bleeding may occur during manufacturing of LCD displays. 2. Deviations in color temperature are subject to technical tolerances during the manufacturing process of LCD displays. 3. Color deviations in hardware, for example in display housing, and deviations in the surface texture, such as hand rest pads, are subject to technical tolerances during manufacturing of such materials. ## Pixel Faults [Section titled “Pixel Faults”](#pixel-faults) The screens of the grandMA3 series are subject to pixel fault class II (ISO 9241-307). The table below shows the maximum number of allowed defects per 1 million pixels. | Pixel fault | Maximum number of faults per 1 million pixels | | -------------------------------------------------- | --------------------------------------------- | | Permanent hot pixel (always on, being color white) | 2 | | 2 permanent hot pixels that are adjacent | 1 | | Permanent dead pixel (always off, meaning black) | 5 | | 2 permanent dead pixels that are adjacent | 1 | | Defective subpixel (always on) | 5 | | Defective subpixel (always off) | 5 | Due to technical reasons, you might detect light scratches on the screens.
# Hardware-related Instances
> The following list does neither depict defects nor malfunctions. It merely states instances that may occur during the manufacturing process.
The following list does neither depict defects nor malfunctions. It merely states instances that may occur during the manufacturing process. 1. Backlight bleeding may occur during manufacturing of LCD displays. 2. Deviations in color temperature are subject to technical tolerances during the manufacturing process of LCD displays. 3. Color deviations in hardware, for example in display housing, and deviations in the surface texture, such as hand rest pads, are subject to technical tolerances during manufacturing of such materials. ## Pixel Faults [Section titled “Pixel Faults”](#pixel-faults) The screens of the grandMA3 series are subject to pixel fault class II (ISO 9241-307). The table below shows the maximum number of allowed defects per 1 million pixels. | Pixel fault | Maximum number of faults per 1 million pixels | | -------------------------------------------------- | --------------------------------------------- | | Permanent hot pixel (always on, being color white) | 2 | | 2 permanent hot pixels that are adjacent | 1 | | Permanent dead pixel (always off, meaning black) | 5 | | 2 permanent dead pixels that are adjacent | 1 | | Defective subpixel (always on) | 5 | | Defective subpixel (always off) | 5 | Due to technical reasons, you might detect light scratches on the screens.
# Toleranzen
> Die folgenden Punkte sind keine Mängel oder Fehlfunktionen. Es handelt sich lediglich um Gegebenheiten, die während des Herstellungsprozesses auftreten können:
# ## Gerätespezifische Gegebenheiten [Section titled “Gerätespezifische Gegebenheiten”](#gerätespezifische-gegebenheiten) Die folgenden Punkte sind keine Mängel oder Fehlfunktionen. Es handelt sich lediglich um Gegebenheiten, die während des Herstellungsprozesses auftreten können: 1. Bei der Herstellung von LCD-Bildschirmen kann es zu Backlight-Bleeding kommen. 2. Farbtemperaturabweichungen bei der Herstellung von LCD-Bildschirmen unterliegen technischen Toleranzen. 3. Gerätespezifische Farbabweichungen, beispielsweise im Bildschirmgehäuse, sowie in der Oberflächenbeschaffenheit, etwa bei Polstern, unterliegen technischen Toleranzen bei der Herstellung solcher Materialien. ## Pixelfehler [Section titled “Pixelfehler”](#pixelfehler) Die Bildschirme der grandMA3 Serie orientieren sich an der Pixelfehlerklasse II (ISO 9241-307). Die folgende Tabelle zeigt die maximale Anzahl zulässiger Fehler pro 1 Million Pixel. | Pixelfehler | Maximale Anzahl von Fehlern pro 1 Million Pixel | | ------------------------------------------------ | ----------------------------------------------- | | Ständig leuchtendes Pixel (immer an, Farbe weiß) | 2 | | 2 angrenzende ständig leuchtende Pixel | 1 | | Ständig schwarzes Pixel (immer aus) | 5 | | 2 angrenzende ständig schwarze Pixel | 1 | | Defekte Subpixel (ständig leuchtend) | 5 | | Defekte Subpixel (ständig schwarz) | 5 | Aus technischen Gründen können die Bildschirme leichte Kratzer haben.
# Événements
> La liste suivante ne décrit ni les défauts ni les dysfonctionnements. Elle indique simplement les cas qui peuvent se manifester au cours du processus de fabrica
# Événements [Section titled “Événements”](#événements) ## Événements liés au matériel [Section titled “Événements liés au matériel”](#événements-liés-au-matériel) La liste suivante ne décrit ni les défauts ni les dysfonctionnements. Elle indique simplement les cas qui peuvent se manifester au cours du processus de fabrication. 1. Une fuite du rétroéclairage peut se produire lors de la fabrication des écrans LCD. 2. Des différences de température peuvent entraîner des différences de couleur dans les écrans LCD. 3. Les déviations de couleur dans le matériel, par exemple dans le boîtier de l’écran, et les déviations dans la texture de la surface, par exemple dans les coussinets de repose-mains, sont soumises à des tolérances techniques lors de la fabrication de ces matériaux. ## Défaut de pixel [Section titled “Défaut de pixel”](#défaut-de-pixel) Les écrans de la série grandMA3 sont soumis à la classe de défaut de pixel II (ISO 9241-307). Le tableau ci-dessous indique le nombre maximum de défauts autorisés par million de pixels. | Défaut de pixel | Nombre maximal de défauts par million de pixels | | ----------------------------------------------------------------- | ----------------------------------------------- | | Pixel actif permanent (toujours allumé, étant de couleur blanche) | 2 | | 2 pixels actifs permanents qui sont adjacents | 1 | | Pixel inactif permanent (toujours éteint, c’est-à-dire noir) | 5 | | 2 pixels inactifs permanents qui sont adjacents | 1 | | Sous-pixel défectueux (toujours actif) | 5 | | Sous-pixel défectueux (toujours inactif) | 5 | Pour des raisons techniques, il peut y avoir de légères rayures sur les écrans.
# Please
> Pressing Please executes a command. It behaves the same as pressing Enter on an external keyboard.
Pressing Please executes a command. It behaves the same as pressing Enter on an external keyboard. ## Activate all Attributes [Section titled “Activate all Attributes”](#activate-all-attributes) * Pressing Please Please activates all attributes of the selected fixtures. * Pressing Please once more deactivates all attributes of the selected fixtures. ## Location [Section titled “Location”](#location) Please is located in the numeric keys section.  *Location on grandMA3 full-size and grandMA3 light consoles* ***  *Location on grandMA3 compact consoles and grandMA3 onPC command wing*
# + [Plus]
> Pressing + enters the + into the command line.
Pressing + enters the + into the command line. | | | | ------------------------------------------------------------------ | -------------------------------------- | |  | User name\[Fixture]>Group 8 + Group 11 |
# Power
> Pressing Power boots up the console or shuts it down.
Pressing Power boots up the console or shuts it down. | | | | ------------------------------------------------ | ------------------------------------------------------------------------ | |  | **Important:** | | | To switch the console on or off, use the power switch on the rear panel. |
# Preset
> Pressing Preset enters the Preset keyword into the command line.
Pressing Preset enters the Preset keyword into the command line. | | | | ------------------------------------------------------------------ | -------------------------- | |  | User name\[Fixture]>Preset | For more information about Preset, see the [Preset keyword](/grandma3/2-3/keyword_preset/). Attribute Pressing Preset Preset enters the Attribute keyword into the command line. | | | | ------------------------------------------------------------------ | ----------------------------- | |  | User name\[Fixture]>Attribute | For more information about Attribute, see the [Attribute keyword](/grandma3/2-3/keyword_attribute/). Gel Pressing Preset Preset Preset enters the Gel keyword into the command line. | | | | ------------------------------------------------------------------ | ----------------------- | |  | User name\[Fixture]>Gel | For more information about Gel, see the [Gel keyword](/grandma3/2-3/keyword_gel/). FeatureGroup Pressing MA + Preset enters the FeatureGroup keyword into the command line. | | | | ------------------------------------------------------------------ | -------------------------------- | |  | User name\[Fixture]>FeatureGroup | For more information about FeatureGroup, see the [FeatureGroup keyword](/grandma3/2-3/keyword_featuregroup/). DataPool Pressing MA + Preset + Preset enters the DataPool keyword into the command line. | | | | ------------------------------------------------------------------ | ---------------------------- | |  | User name\[Fixture]>DataPool | For more information about DataPool, see the [DataPool keyword](/grandma3/2-3/keyword_datapool/). ## Location [Section titled “Location”](#location) Preset is located in the command section.  *Location on grandMA3 full-size and grandMA3 light consoles* ***  *Location on grandMA3 compact consoles and grandMA3 onPC command wing*
# Prev [Previous]
> Pressing Prev executes the Previous keyword in the command line.
Pressing Prev executes the Previous keyword in the command line. | | | | ------------------------------------------------------------------ | ---------------------------- | |  | User name\[Fixture]>Previous | For more information about Previous, see the [Previous keyword](/grandma3/2-3/keyword_previous/). Previous Step Pressing MA + Prev executes the **Previous Step** command in the command line. | | | | ------------------------------------------------------------------ | --------------------------------- | |  | User name\[Fixture]>Previous Step | For more information about Previous Step, see the [Previous keyword](/grandma3/2-3/keyword_previous/) and the [Step keyword](/grandma3/2-3/keyword_step/). For mor information about steps see [Phaser](/grandma3/2-3/phaser/). ## Location [Section titled “Location”](#location) Prev is located in the command section.  *Location on grandMA3 full-size and grandMA3 light consoles* ***  *Location on grandMA3 compact consoles and grandMA3 onPC command wing*
# Prvw [Preview]
> Pressing Prvw executes the the Preview keyword in the command line.
Pressing Prvw executes the the Preview keyword in the command line. | | | | ------------------------------------------------------------------ | --------------------------- | |  | User name\[Fixture]>Preview | For more information about Prvw, see the [Preview keyword](/grandma3/2-3/keyword_preview/). ## Location [Section titled “Location”](#location) Prvw is located in the command section. 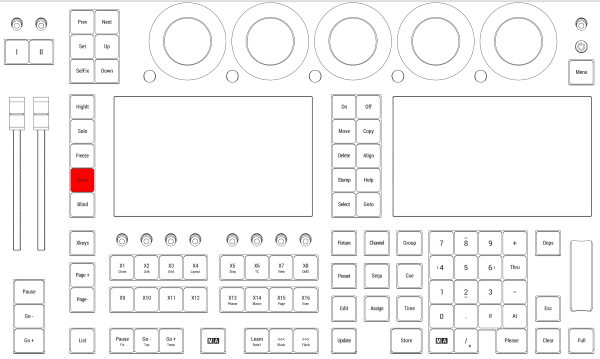 *Location on grandMA3 full-size and grandMA3 light consoles* *** 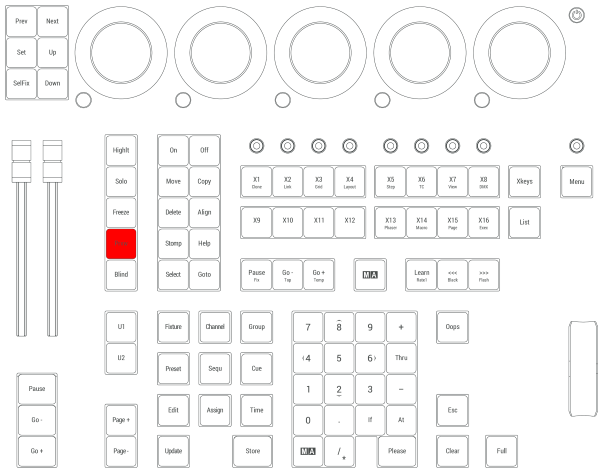 *Location on grandMA3 compact consoles and grandMA3 onPC command wing*
# Declaration of Conformity
> Manufacturer:
## CE and FCC Standards and Approvals [Section titled “CE and FCC Standards and Approvals ”](#ce-and-fcc-standards-and-approvals) **Manufacturer:** MA Lighting Technology GmbH\ \ Dachdeckerstraße 16\ 97297 Waldbüttelbrunn\ GERMANY *** *declares that the products* *** **Name of product:** * grandMA3 processing unit XL * grandMA3 processing unit L * grandMA3 processing unit M *** *are conform to the following directives and harmonized standards* *** \*\*Safety: \*\* **2014/35/EU (Low Voltage Directive)** * IEC/EN/UL 62368-1:2014 * CAN/CSA-C22. No. 62368-1:2014 *** **EMC – Electromagnetic Compatibility:** **FCC** * 47 CFR, Part 15, Subpart B: 2019 (Class A) **2014/30/EU** * EN55032:2016-02 (Class A) * EN61000-3-2 * EN55035:2018-04 *** **RoHS:** **2011/65/EU (RoHS II)** * EN50581:2012 * WEEE-Reg.-NR. DE 14150988 *** **Additional information:** All data lines and signal lines must be shielded and the shielding must be connected to the grounding or the housing of the connector. Waldbüttelbrunn, November 01, 2019 Dipl.-Ing. Michael Adenau (CEO) 
# Déclaration de conformité
> Fabricant :
# ## Normes et approbations CE et FCC [Section titled “Normes et approbations CE et FCC”](#normes-et-approbations-ce-et-fcc) **Fabricant :** MA Lighting Technology GmbH\ \ Dachdeckerstraße 16\ 97297 Waldbüttelbrunn\ ALLEMAGNE *** *déclare que les produits* *** **Nom de produit :** * grandMA3 processing unit XL * grandMA3 processing unit L * grandMA3 processing unit M *** *sont conformes aux directives et normes harmonisées suivantes* *** \*\*Sécurité: \*\* **2014/35/UE (Directive Basse Tension)** * IEC/EN/UL 62368-1:2014 * CAN/CSA-C22. No. 62368-1:2014 *** \*\*CEM - Compatibilité électromagnétique \*\* **FCC** * 47 CFR, Part 15, Subpart B: 2019 (Class A) **2014/30/UE** * EN55032:2016-02 (Class A) * EN61000-3-2 * EN55035:2018-04 *** **RoHS:** **2011/65/UE (RoHS II)** * EN50581:2012 * WEEE-Reg.-NR. DE 14150988 *** **Informations complémentaires :** Toutes les lignes de données et de signaux doivent être blindées et le blindage doit être relié à la terre ou au boîtier du connecteur. Waldbüttelbrunn, 01 novembre 2019 Dipl.-Ing. Michael Adenau (PDG) 
# Konformitätserklärung
> Hersteller:
# Konformitätserklärung [Section titled “Konformitätserklärung”](#konformitätserklärung) ## CE und FCC Normen und Zulassungen [Section titled “CE und FCC Normen und Zulassungen”](#ce-und-fcc-normen-und-zulassungen) **Hersteller:** MA Lighting Technology GmbH\ \ Dachdeckerstraße 16\ 97297 Waldbüttelbrunn\ GERMANY *** *erklärt, dass die Produkte* *** **Produktnamen:** * grandMA3 processing unit XL * grandMA3 processing unit L * grandMA3 processing unit M *** *den folgenden Richtlinien sowie harmonisierten Normen entsprechen* *** \*\*Sicherheit: \*\* **2014/35/EU (Niederspannungsrichtlinie)** * IEC/EN/UL 62368-1:2014 * CAN/CSA-C22. No. 62368-1:2014 *** **EMV (Elektromagnetische Verträglichkeit):** **FCC** * 47 CFR, Part 15, Subpart B: 2019 (Class A) **2014/30/EU** * EN55032:2016-02 (Class A) * EN61000-3-2 * EN55035:2018-04 *** **RoHS:** **2011/65/EU (RoHS II)** * EN50581:2012 * WEEE-Reg.-NR. DE 14150988 *** **Zusätzliche Informationen:** Alle Daten- und Signalleitungen müssen geschirmt sein und der Schirm muss mit der Masse bzw. dem Gehäuse des entsprechenden Steckers verbunden sein. Waldbüttelbrunn, 1. November 2019 Dipl.-Ing. Michael Adenau (CEO) 
# Disposal
> According to the directive 2011/65 EU (RoHS) the device was produced in the European Union, and is hence to be disposed of as stated in the directive.
According to the directive 2011/65 EU (RoHS) the device was produced in the European Union, and is hence to be disposed of as stated in the directive. If the device is used within the European Union, follow the directive WEEE 2012/19/EU. If the device is used outside the European Union, the corresponding country´s waste disposal regulations apply.
# Élimination
> Selon la directive 2011/65 UE (RoHS), l'appareil a été fabriqué dans l'Union européenne et doit donc être éliminé conformément à la directive.
# Selon la directive 2011/65 UE (RoHS), l’appareil a été fabriqué dans l’Union européenne et doit donc être éliminé conformément à la directive. Si l’appareil est utilisé dans l’Union européenne, suivre la directive WEEE 2012/19/EU. Si l’appareil est utilisé en dehors de l’Union européenne, les règlements d’élimination des déchets du pays correspondant s’appliquent.
# Entsorgung
> Das Gerät ist gemäß der Richtlinie 2011/65/EU (RoHS) der Europäischen Gemeinschaft hergestellt und muss dementsprechend
# Das Gerät ist gemäß der Richtlinie 2011/65/EU (RoHS) der Europäischen Gemeinschaft hergestellt und muss dementsprechend\ entsorgt werden. Falls das Gerät innerhalb der Europäischen Union betrieben wird, ist die WEEE 2012/19/EU zu beachten. Falls das Gerät außerhalb der Europäischen Union betrieben wird, sind die nationalen Entsorgungsvorschriften im jeweiligen\ Verwenderland zu beachten.
# Toleranzen
> Die folgenden Punkte sind keine Mängel oder Fehlfunktionen. Es handelt sich lediglich um Gegebenheiten, die während des Herstellungsprozesses auftreten können:
# Toleranzen [Section titled “Toleranzen”](#toleranzen) ## Gerätespezifische Gegebenheiten [Section titled “Gerätespezifische Gegebenheiten”](#gerätespezifische-gegebenheiten) Die folgenden Punkte sind keine Mängel oder Fehlfunktionen. Es handelt sich lediglich um Gegebenheiten, die während des Herstellungsprozesses auftreten können: 1. Bei der Herstellung von LCD-Bildschirmen kann es zu Backlight-Bleeding kommen. 2. Farbtemperaturabweichungen bei der Herstellung von LCD-Bildschirmen unterliegen technischen Toleranzen. 3. Gerätespezifische Farbabweichungen, beispielsweise im Bildschirmgehäuse, sowie in der Oberflächenbeschaffenheit, etwa bei Polstern, unterliegen technischen Toleranzen bei der Herstellung solcher Materialien. ## Pixelfehler [Section titled “Pixelfehler”](#pixelfehler) Die Bildschirme der grandMA3 Serie orientieren sich an der Pixelfehlerklasse II (ISO 9241-307). Die folgende Tabelle zeigt die maximale Anzahl zulässiger Fehler pro 1 Million Pixel. | Pixelfehler | Maximale Anzahl von Fehlern pro 1 Million Pixel | | ------------------------------------------------ | ----------------------------------------------- | | Ständig leuchtendes Pixel (immer an, Farbe weiß) | 2 | | 2 angrenzende ständig leuchtende Pixel | 1 | | Ständig schwarzes Pixel (immer aus) | 5 | | 2 angrenzende ständig schwarze Pixel | 1 | | Defekte Subpixel (ständig leuchtend) | 5 | | Defekte Subpixel (ständig schwarz) | 5 | Aus technischen Gründen können die Bildschirme leichte Kratzer haben.
# Événements
> La liste suivante ne décrit ni les défauts ni les dysfonctionnements. Elle indique simplement les cas qui peuvent se manifester au cours du processus de fabrica
# ## Événements liés au matériel [Section titled “Événements liés au matériel”](#événements-liés-au-matériel) La liste suivante ne décrit ni les défauts ni les dysfonctionnements. Elle indique simplement les cas qui peuvent se manifester au cours du processus de fabrication. 1. Une fuite du rétroéclairage peut se produire lors de la fabrication des écrans LCD. 2. Des différences de température peuvent entraîner des différences de couleur dans les écrans LCD. 3. Les déviations de couleur dans le matériel, par exemple dans le boîtier de l’écran, et les déviations dans la texture de la surface, par exemple dans les coussinets de repose-mains, sont soumises à des tolérances techniques lors de la fabrication de ces matériaux. ## Défaut de pixel [Section titled “Défaut de pixel”](#défaut-de-pixel) Les écrans de la série grandMA3 sont soumis à la classe de défaut de pixel II (ISO 9241-307). Le tableau ci-dessous indique le nombre maximum de défauts autorisés par million de pixels. | Défaut de pixel | Nombre maximal de défauts par million de pixels | | ----------------------------------------------------------------- | ----------------------------------------------- | | Pixel actif permanent (toujours allumé, étant de couleur blanche) | 2 | | 2 pixels actifs permanents qui sont adjacents | 1 | | Pixel inactif permanent (toujours éteint, c’est-à-dire noir) | 5 | | 2 pixels inactifs permanents qui sont adjacents | 1 | | Sous-pixel défectueux (toujours actif) | 5 | | Sous-pixel défectueux (toujours inactif) | 5 | Pour des raisons techniques, il peut y avoir de légères rayures sur les écrans.
# Intended Use
> The grandMA3 processing units M, L, XL control all kinds of lighting genres such as conventional, moving lights, LEDs, video, and media via DMX signal or within
The grandMA3 processing units **M, L, XL** control all kinds of lighting genres such as conventional, moving lights, LEDs, video, and media via DMX signal or within a network environment. All grandMA3 components, despite different hardware solutions, use the same software. All components are fully integrable into the network environment. Use all grandMA3 components and accessories within closed rooms and in the permissible environmental conditions only. Installation and connection of the devices are explicitly to be carried out by trained personnel in compliance with all safety regulations.
# Usage Prévu
> Les processing units grandMA3 contrôlent tous genres de projecteurs tels que les projecteurs conventionnels, les motorisées, les LEDs, la vidéo et les média, en
Les processing units grandMA3 contrôlent tous genres de projecteurs tels que les projecteurs conventionnels, les motorisées, les LEDs, la vidéo et les média, en utilisant le signal DMX ou dans un environnement réseau. Toutes les composantes grandMA3, malgré des solutions matérielles différentes, utilisent le même logiciel. Tous les composants sont entièrement intégrables dans l’environnement du réseau. Utilisez tous les composants et accessoires de grandMA3 uniquement dans des locaux fermés et dans les conditions environnementales autorisées. L’installation et le raccordement des appareils doivent être effectués explicitement par un personnel qualifié, en conformité avec toutes les règles de sécurité.
# Verwendungszweck
> Die grandMA3 processing units M, L, XL steuern alle Arten von Lichttechnik wie konventionelles Licht, intelligentes Licht, LED, Video und ähnliche Medien mit Hi
# ## Bestimmungsgemäße Verwendung [Section titled “Bestimmungsgemäße Verwendung”](#bestimmungsgemäße-verwendung) Die grandMA3 processing units M, L, XL steuern alle Arten von Lichttechnik wie konventionelles Licht, intelligentes Licht, LED, Video und ähnliche Medien mit Hilfe von DMX-Signalen oder in einer Netzwerkumgebung. Alle grandMA3 Komponenten verwenden die gleiche Software, ungeachtet unterschiedlicher Hardware. Sämtliche Komponenten können komplett ins Netzwerk integriert werden. Alle grandMA3 Komponenten und Zubehör dürfen ausschließlich in geschlossenen Räumen und innerhalb zulässiger Umgebungsbedingungen verwendet werden. Installation und Anschluss von Geräten dürfen nur vom geschulten Personal, unter Einhaltung aller Sicherheitsvorschriften, durchgeführt werden.
# Limitations
> Operation: 0 °C up to 40 °C / 32 °F up to 104 °F
### **Temperature** [Section titled “Temperature”](#temperature) Operation: 0 °C up to 40 °C / 32 °F up to 104 °F
# Limitations
> Fonctionnement : 0 °C jusqu'à 40 °C / 32 °F jusqu'à 104 °F
# Limitations [Section titled “Limitations”](#limitations) ### **Température** [Section titled “Température”](#température) Fonctionnement : 0 °C jusqu’à 40 °C / 32 °F jusqu’à 104 °F | | | | ----------------------------------------- | --------------------------------------------------------------------------------------------------------------------------------------------------- | |  | **Attention :** Des températures plus élevées peuvent solliciter le système de refroidissement de l’appareil et détruire des composants matériels. | Stockage / Transport : -10 °C jusqu’à +50 °C / 14 °F jusqu’à 122 °F ### **Humidité** [Section titled “Humidité”](#humidité) Fonctionnement : 20 % jusqu’à 90 % d’humidité relative (sans condensation) Stockage / Transport : 10 % jusqu’à 90 % d’humidité relative (sans condensation) ### **Environnement** [Section titled “Environnement”](#environnement) * Suivez toutes les consignes de sécurité ; * N’utilisez l’appareil que dans ses limites de fonctionnement ; * N’utilisez l’appareil qu’à l’intérieur ; * L’air doit être dépourvu de poussière et de toute substance dangereuse ou explosive ; * Évitez les secousses ; * Cet appareil n’est pas protégé contre les éclaboussures d’eau. Ne l’utilisez pas à proximité de l’eau ; * N’utilisez pas l’appareil sous la pluie ou l’humidité ; * Ne placez pas l’appareil à un endroit où il peut entrer en contact avec des gaz corrosifs ou de l’air salin car cela peut provoquer un mauvais fonctionnement.
# Betriebsgrenzen
> Betrieb: 0 °C bis 40 °C / 32 °F bis 104 °F
# ### **Temperatur** [Section titled “Temperatur”](#temperatur) Betrieb: 0 °C bis 40 °C / 32 °F bis 104 °F | | | | ----------------------------------------- | ---------------------------------------------------------------------------------------------------------------------------------- | |  | **Achtung:** Hohe Temperaturen können das Kühlsystem des Gerätes überfordern und zum Ausfall von elektrischen Komponenten führen. | Lagerung / Transport: -10 °C bis +50 °C / 14 °F bis 122 °F ### **Luftfeuchte** [Section titled “Luftfeuchte”](#luftfeuchte) Betrieb: 20 % bis 90 % relative Luftfeuchte (nicht kondensierend) Lagerung / Transport: 10 % bis 90 % relative Luftfeuchte (nicht kondensierend) ### **Umgebung** [Section titled “Umgebung”](#umgebung) * Alle Sicherheitshinweise beachten. * Das Gerät innerhalb der Betriebsgrenzen betreiben. * Das Gerät nur in geschlossenen Räumen betreiben. * Die Umgebungsluft muss staubfrei und frei von gefährlichen und explosiven Stoffen sein. * Erschütterungen vermeiden. * Das Gerät ist nicht gegen Spritzwasser geschützt. Nicht in der Nähe von Wasser benutzen. * Das Gerät nicht in der Nähe von Regen oder Nebel betreiben. * Das Gerät nicht an einem Ort platzieren, an dem es in Kontakt mit korrosiven Gasen oder salzhaltiger Luft gelangen könnte. Dadurch kann es zu Fehlfunktionen kommen.
# Maintenance
| | | | ----------------------------------------- | ----------------------------------------------------------------------------------------------------------------------------------------------------------------------------------------------------------------------------- | |  | **Warning:** All repair and service work has to be exclusively performed by qualified service technicians as live parts may be exposed when opening and/or removing coverings. Touching live parts may cause electric shock. | | | | | ----------------------------------------- | ----------------------------------------------------------------------------------------------------------------------------------------------- | |  | **Warning:** The grandMA3 processing unit has an air intake filter on the front. Do not wash the filter. Clean it using a vacuum cleaner only. | * Disconnect power supply before cleaning; * Clean the surface with dry cloth only; * Do not use liquid cleanser or compressed air; * Do not use solvent; * Check if the ventilation holes are blocked; * Depending on the environment, we recommend to professionally clean the device every 2 to 5 years.
# Wartung
| | | | ----------------------------------------- | ----------------------------------------------------------------------------------------------------------------------------------------------------------------------------------------------------------------------------------------------------------------------------------------- | |  | **Warnung:** Sämtliche Reparatur- und Wartungsarbeiten dürfen ausschließlich vom geschulten Personal durchgeführt werden, da beim Öffnen von Abdeckungen spannungsführende Teile freigelegt werden können. Spannungsführende Teile nicht berühren, da die Gefahr von Stromschlag besteht! | | | | | ----------------------------------------- | ------------------------------------------------------------------------------------------------------------------------------------------------------------------------------- | |  | **Warnung:** Die grandMA3 proccesing unit hat einen eingebauten Luftansaugfilter an der Vorderseite. Den Filter nicht waschen. Reinigung ausschließlich mit einem Staubsauger. | * Vor dem Reinigen das Gerät spannungsfrei schalten. * Die Oberflächen mit einem trockenen Tuch reinigen. * Keine flüssigen Reinigungsmittel oder Druckluft zum Reinigen verwenden. * Kein Lösungsmittel verwenden. * Überprüfen ob die Belüftungsöffnungen frei sind. * Je nach Umgebungsbedingung, empfehlen wir das Gerät alle 2 bis 5 Jahre durch einen Servicetechniker professionell zu reinigen.
# Entretient
| | | | ----------------------------------------- | ----------------------------------------------------------------------------------------------------------------------------------------------------------------------------------------------------------------------------------------------------------------------------------------------------------------------- | |  | **Avertissement:** Tous les travaux de réparation et d’entretien doivent être effectués exclusivement par des techniciens qualifiés, car les pièces sous tension peuvent être exposées lors de l’ouverture et/ou du retrait des couvercles. Le contact avec des pièces sous tension peut provoquer un choc électrique. | | | | | ----------------------------------------- | ----------------------------------------------------------------------------------------------------------------------------------------------------------------------- | |  | **Avertissement:** Les processing units grandMA3 ont un filtre d’admission d’air à l’arrière. Ne lavez pas le filtre. Nettoyez-le uniquement à l’aide d’un aspirateur. | * Débranchez l’alimentation électrique avant le nettoyage; * Nettoyez la surface à l’aide d’un chiffon sec uniquement; * N’utilisez pas de nettoyant liquide ou d’air comprimé; * N’utilisez pas de solvant; * Vérifiez si les orifices de ventilation sont obstrués; * En fonction de l’environnement, nous recommandons de nettoyer l’appareil professionnellement une fois par an.
# Quick Start
> grandMA3 processing unit M, L, XL front panel
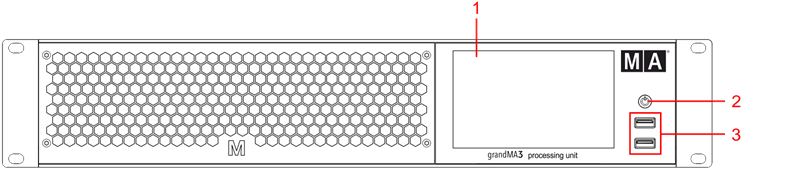 grandMA3 processing unit M, L, XL front panel 1. Internal command multi-touch screen 2. [Power key](/grandma3/2-3/key_power/) 3. [USB 2.0 (type A)](/grandma3/2-3/fs_connect_usb/)  grandMA3 processing unit M, L, XL rear panel 1. [etherCON/RJ45](/grandma3/2-3/fs_connect_ethernet/) 2. Power switch 3. [powerCON TRUE1](/grandma3/2-3/fs_connect_power/) 4. [USB 2.0 (type A)](/grandma3/2-3/fs_connect_usb/) 5. [DMX-512-A OUT (5pin XLR female)](/grandma3/2-3/fs_connect_dmx/) ### Turn on the grandMA3 processing unit [Section titled “Turn on the grandMA3 processing unit”](#turn-on-the-grandma3-processing-unit) 1. Unpack the device. 2. Remove the packaging and cushioning material. 3. Place the device indoors on a stable surface. 4. Connect an external keyboard and mouse to the grandMA3 processing unit using the USB ports. 5. Connect the grandMA3 processing unit with your PC, laptop, or a grandMA3 console using an etherCON/RJ45 connector. 6. Insert the powerCON TRUE1 plug into the corresponding socket. 7. Connect the main power plug. 8. Turn on the power switch (set it to position **I**.) 9. The power switch lights up in red. 10. Press the power key on the front panel. \ The device starts booting.\ The **Mode Selection** dialog appears:\ 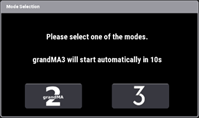 11. Tap to select a mode. ### Turn off the grandMA3 processing unit [Section titled “Turn off the grandMA3 processing unit”](#turn-off-the-grandma3-processing-unit) 1. Press the power key on the front panel.\ A warning pop-up appears:\  2. Tap OK.\ The grandMA3 device shuts down. 3. Set the power switch to position **O**. | | | | ------------------------------------------------ | ----------------------------------------------------------------------------------------------------------------------------------------------------------------------------- | |  | **Important:** You can disconnect the grandMA3 processing unit using the grandMA3 console or the grandMA3 onPC software. The DMX output will then be immediately interrupted. | ### Update the software [Section titled “Update the software”](#update-the-software) 1. To update a grandMA3 device, download the latest software version from [www.malighting.com](http://www.malighting.com).\ The required installer is called grandMA3 Software x.x.x.x. 2. Extract the zip file “grandMA3\_stick\_v.x.x.x.x.zip” and copy the folders EFI, ma, and the update.scr file into the root directory of your USB flash drive. 3. Insert the USB flash drive in the device’s USB port. 4. Shut down the grandMA3 device. 5. Connect an external keyboard with a USB port. 6. Turn on the grandMA3 device. 7. Press the key 8/F8 on the external keyboard several times.\ The **Boot Manager** opens. 8. Scroll down to EFI USB Device using the arrow keys. 9. Press Enter on the external keyboard.\ The grandMA3 device starts to boot. 10. Follow the onscreen instructions during the update process. ## Subtopics [Section titled “Subtopics”](#subtopics) * [Update the Software](/grandma3/2-3/update/) * [Network Update](/grandma3/2-3/update_network/)
# Quick Start
> grandMA3 processing unit M, L, XL Vorderseite
# Quick Start [Section titled “Quick Start”](#quick-start)  grandMA3 processing unit M, L, XL Vorderseite 1. Multi-touch Bildschirm 2. [Ein/Aus-Taste](/grandma3/2-3/key_power/) 3. [USB 2.0](/grandma3/2-3/fs_connect_usb/) 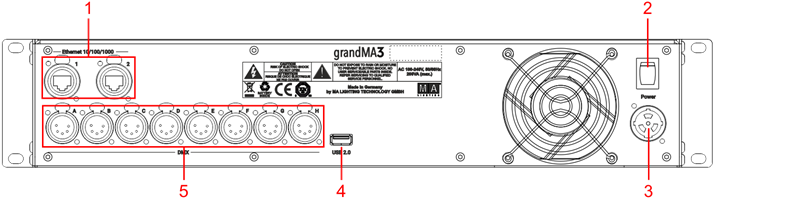 grandMA3 processing unit M, L, XL Rückseite 1. [EthernetCON/RJ45](/grandma3/2-3/fs_connect_ethernet/) 2. Netzschalter 3. [powerCON TRUE1](/grandma3/2-3/fs_connect_power/) 4. [USB 2.0](/grandma3/2-3/fs_connect_usb/) 5. [DMX-512-A OUT (5-polig XLR weiblich)](/grandma3/2-3/fs_connect_dmx/) ### grandMA3 Gerät einschalten [Section titled “grandMA3 Gerät einschalten”](#grandma3-gerät-einschalten) 1. Gerät auspacken. 2. Verpackungs- und Polstermaterial entfernen. 3. Gerät in einem geschlossenen Raum auf eine stabile Fläche stellen. 4. Externe Maus und Keyboard über die USB Ports anschließen. 5. Die grandMA3 processing unit über die etherCON/RJ45 Buchse mit dem PC, Laptop oder der grandMA3 Konsole verbinden. 6. Den powerCON TRUE1 Stecker mit der dafür vorgesehenen Buchse verbinden. 7. Hauptstecker an die Steckdose anschließen. 8. Netzschalter auf **I** stellen.\ Netzschalter leuchtet rot. 9. Auf der Vorderseite die Ein/Aus-Taste drücken.\ Das Gerät fährt hoch.\ Der **Mode Selection** Dialog erscheint:\  10. Den gewünschten Modus durch Tippen des jeweiligen Icons auswählen. ### grandMA3 Gerät ausschalten [Section titled “grandMA3 Gerät ausschalten”](#grandma3-gerät-ausschalten) 1. Die Ein/Aus-Taste drücken.\ Eine Warnmeldung erscheint:\  2) OK tippen.\ Die grandMA3 processing unit fährt runter. 3) Netzschalter auf **O** stellen. | | | | ------------------------------------------------ | ------------------------------------------------------------------------------------------------------------------------------------------------------------------------------------ | |  | **Wichtig:** Die grandMA3 processing unit kann ebenfalls über die grandMA3 Konsole oder grandMA3 onPC Software deaktiviert werden. Die DMX-Ausgabe wird dann abrupt unterbrochen. | ### Software aktualisieren [Section titled “Software aktualisieren”](#software-aktualisieren) 1. Besuchen Sie [www.malighting.com](https://www.malighting.com/), um die aktuellste Software herunterzuladen. Der benötigte Installer heißt grandMA3 Software x.x.x.x. 2. Die Zip-Datei “grandMA3\_stick\_v.x.x.x.x.zip” entpacken und die Ordner EFI und ma sowie die Datei update.scr in das Root-Verzeichnis Ihres USB-Sticks kopieren. 3. Den USB-Stick in den USB-Anschluss am Gerät stecken. 4. Das grandMA3 Gerät ausschalten. 5. Eine externe Tastatur an einen USB-Port anschließen. 6. Das grandMA3 Gerät einschalten. 7. Auf der externen Tastatur mehrfach die Taste 8/F8 drücken.\ Der **Boot Manager** öffnet sich. 8. Mit den Pfeiltasten bis EFI USB Device scrollen. 9. Die Taste Enter auf der externen Tastatur drücken.\ Das grandMA3 Gerät bootet. 10. Während des Update-Vorgangs den Bildschirmanweisungen folgen. | | | | ----------------------------------------- | ------------------------------------------------------------------------------------------------------------------------------------------------------------------------------------------------------------------------------------------------------------------------------------------------------------------------------------------------------------------------------------------------------------------------------------------------------------------------------------------------------------ | |  | **Wichtig:** Um das Gerät zu konfigurieren oder ein Update oder Downdate durchzuführen, eine andere grandMA3 Konsole im Netzwerk oder Ihren PC oder Ihr Laptop mit grandMA3 onPC Software verwenden. Für weitere Informationen siehe die Abschnitte [Update the Software](/grandma3/2-3/update/) via [Network Update](/grandma3/2-3/update_network/) im [grandMA3 Online Benutzerhandbuch](https://help.malighting.com/grandMA3/2.3/HTML/help.html) unter [www.malighting.com.](https://www.malighting.com/) |
# Guide De Démarrage
> grandMA3 processing unit M, L, XL panneau avant
# Guide De Démarrage [Section titled “Guide De Démarrage”](#guide-de-démarrage)  grandMA3 processing unit M, L, XL panneau avant 1. Écran multi-touch 2. [Touche Marche/Arrêt](/grandma3/2-3/key_power/) 3. [USB 2.0 (type A)](/grandma3/2-3/fs_connect_usb/)  grandMA3 processing unit M, L, XL panneau arrière 1. [EtherCON/RJ45](/grandma3/2-3/fs_connect_ethernet/) 2. Interrupteur de courant 3. [powerCON TRUE1](/grandma3/2-3/fs_connect_power/) 4. [USB 2.0 (type A)](/grandma3/2-3/fs_connect_usb/) 5. [DMX-512-A OUT (5pin XLR female)](/grandma3/2-3/fs_connect_dmx/) ### Allumer l’appareil [Section titled “Allumer l’appareil”](#allumer-lappareil) 1. Déballer l’appareil. 2. Enlever le matériel de protection. 3. Placer l’appareil à l’intérieur sur une surface stable. 4. Connecter un clavier et une souris à l’aide des ports USB. 5. Brancher l’appareil grandMA3 à votre PC ou laptop ou une console en utilisant un connecteur etherCON/RJ45. 6. Insérer le connecteur powerCON TRUE1 au branchement correspondant. 7. Brancher la prise principale de courant. 8. Allumer l’interrupteur de courant (mettre en position **I**) sur le panneau arrière. 9. L’interrupteur s’illumine en rouge. 10. Appuyer sur la touche Marche/Arrêt sur le panneau avant.\ L’appareil se met en marche.\ Le dialogue de **sélection du mode** apparaît:\  11. Toucher pour sélectionner un mode. ### Éteindre l’appareil [Section titled “Éteindre l’appareil”](#éteindre-lappareil) 1. Appuyer sur la touche Marche/Arrêt sur le panneau avant. Un pop-up d’avertissement apparaît:\  2. Appuyer sur OK. L’appareil grandMA3 s’éteint. 3. Mettre l’interrupteur en position **O**. | | | | ------------------------------------------------ | -------------------------------------------------------------------------------------------------------------------------------------------------------- | |  | **Important:** Vous pouvez déconnecter l’appareil grandMA3 en utilisant le logiciel grandMA3 onPC. La sortie DMX sera alors immédiatement interrompue. | ### Software update [Section titled “Software update”](#software-update) 1. Pour mettre à jour l’appareil grandMA3, téléchargez le logiciel grandMA3 sur [www.malighting.com](http://www.malighting.com/).\ Le programme d’installation requis s’appelle grandMA3 Software x.x.x.x. 2. Extrayer le fichier zip “grandMA3\_stick\_v.x.x.x.x.zip” et copier les dossiers EFI, ma, et le fichier update.scr dans le répertoire racine de votre clé USB. 3. Insérer la clé USB dans un port USB. 4. Éteigner l’appareil grandMA3. 5. Connecter un clavier externe avec un port USB. 6. Allumer l’appareil grandMA3. 7. Appuyer plusieurs fois sur la touche 8/F8 du clavier externe. Le gestionnaire de démarrage s’ouvre. 8. Faire défiler la liste jusqu’à EFI USB Device à l’aide des touches fléchées. 9. Appuyer sur la touche Enter du clavier externe.\ L’appareil grandMA3 commence à démarrer. 10. Suivre les instructions à l’écran pendant le processus de mise à jour. | | | | ------------------------------------------------ | ---------------------------------------------------------------------------------------------------------------------------------------------------------------------------------------------------------------------------------------------------------------------------------------------------------------------------------------------------------------------- | |  | **Important:** Pour configurer l’appareil ou pour faire un update ou downdate, utilisé la console grandMA3 ou le logiciel grandMA3 onPC. Pour plus d’information, voir les sections [Update the Software](/grandma3/2-3/update/) via [Network Update](/grandma3/2-3/update_network/) dans le [Mode d’emploi](https://help.malighting.com/grandMA3/2.3/HTML/help.html). |
# Safety
> Warning – Danger area
## Symbols and Warning Labels [Section titled “Symbols and Warning Labels”](#symbols-and-warning-labels)  **Warning** – Danger area ***  **Caution**– Risk of electric shock *** ## Risk of Electric Shock [Section titled “Risk of Electric Shock”](#risk-of-electric-shock) The device is to be serviced by qualified personnel only as live parts may be exposed when opening and/or removing coverings. Touching live parts may cause electric shock.  ***  Dispose of as hazardous waste. Follow the applicable regulations. For more information see [Disposal](/grandma3/2-3/key_pu_disposal/). ***  Recycle the battery ***  Declaration of conformity. For more information see [Conformity](/grandma3/2-3/key_pu_conformity/). ***  Operating voltage ON/OFF | | | | ----------------------------------------- | ---------------------------------------------------------------------------------------------------------------------------------------------------------------------------------------------------------------------------------- | |  | **Warning:** The device has to be grounded. Do not ignore the safety purpose of the grounding-type plug. A grounding-type plug has two blades and a third grounding connection. The third connection is provided for your safety. | Read all the instructions in this Quick Manual thoroughly, especially the [General Safety Instructions](/grandma3/2-3/key_pu_safety/#general_safety_instructions) further down and [Limitations](/grandma3/2-3/key_pu_limitations/). Follow the instructions and keep this Quick Manual for future use. Follow all cautions and warnings stated in this Quick Manual and indicated on the device. | | | | ------------------------------------------------ | ------------------------------------------------------------------------------------------------------------ | |  | **Important:** All repair and service work has to be exclusively performed by qualified service technicians. | * This device is state-of-the-art technology; * However, residual risks cannot be ruled out; * To avoid risks, follow the safety instructions; * This device is intended for professional use only and is not suitable for residential use. MA Lighting Technology GmbH does not bear the damage which may occur due to inobservance of the safety instructions. | | | | ----------------------------------------- | --------------------------------------------------------------------------------------------------------------------------------------------------------------------------- | |  | **Warning:** Changes or modifications to these devices not expressly approved by the party responsible for the compliance could void the user’s authority to operate them. | | | | | ------------------------------------------------ | ---------------------------------------------------------------------------------------------------------------------------------------------------------------------------------------------------------------------------------------------------------------------------------------------------------------------------------------------------------------------------------------------------------------------------------------------------------------------------------------------------------------------------------------------------------------------------------------------------------------------------------------------------------------------------------------------- | |  | **Note:** These devices have been tested and found to comply with the limits of a Class A digital device, pursuant to Part 15 of the FCC Rules and the CE Standards. These limits are designed to provide reasonable protection against possible interference when the devices are operated in a commercial environment. These generate, use, and can radiate radio frequency energy and, if not installed and used in accordance with this Quick Manual, may possibly cause interference to radio communications. Operation of these devices in a residential area is likely to cause interference in which case the user will be required to correct the interference at their own expense. | ## Avoid Risks Caused by Electric Current [Section titled “Avoid Risks Caused by Electric Current”](#avoid-risks-caused-by-electric-current) Defective device or defective power cable can cause severe or fatal injury due to electrical shock. Follow the safety instructions to avoid the risks caused by electric current. * Do not use a defective power cable; * Do not open screwed down covers from the housing; * Use the device only if it is in a technically impeccable condition; * Do not repair the device on your own; * Do not reverse engineer the device, and make any changes to its components, and accessories; * Do not expose the device to rain or moisture; * Do not submerge the device in water. ## []()General Safety Instructions [Section titled “General Safety Instructions”](#general-safety-instructions) To avoid injury or damage to the device: * Do not put your hands inside the device during operation; * Device and power cable must be kept away from children under the age of 8; * Children are not allowed to play with the device; * Disconnect the power supply from electric voltage during thunderstorms; * Disconnect the power supply from electric voltage if it is unattended for a longer period of time; * Disconnect the power supply before cleaning the device; * Do not use any liquid or spray cleanser. Use a dry cloth only; * Do not use device in the vicinity of water; * Do not expose it to a humid environment; * Do not pour any liquids over the device. * Do not block or cover any ventilation holes in the housing. These are essential for the airflow within the device and protect the device from overheating; * Do not insert any objects into the ventilation holes of the device as these could get in contact with live parts or could cause short circuits, fire and/or an electric shock; * Do not place any objects on the power cable. Protect it from being walked on or pinched, particularly at the connector and where the cables exit the device; * When using an extension cable, make sure the rated output of all devices connected in series does not exceed the maximum rated output of the extension cable; * Do not support yourself on the device; * Do not place any heavy objects on top of the device; * Do not use excessive force on keys, buttons, switch, connector, or rotary knob; * If the power cable or the main power plug are defective, let a qualified technician replace it immediately; * Place the device on stable surfaces only. If it is placed on unstable surfaces, it may fall and break; * Only use power cables which are safety-marked; * Do not use any high-power walkie-talkies or cell phones near the device; * The device is provided with a safety plug. This plug can only be used with safety outlets. * As with all industrially manufactured goods, the use of substances that induce an allergic reaction such as aluminum cannot be generally excluded. If you develop an allergic reaction (such as a skin rash, frequent sneezing, red eyes or respiratory difficulties), consult a physician immediately to determine the cause. **If one of the following conditions occurs, disconnect the main power plug and call your local distributor or the technical support!** * Power cable or main power plug is damaged or worn; * Ingress of liquids; * The device was exposed to rain or high ambient humidity; * The device does not function properly, even if you followed all the instructions of this Quick Manual. Only operate the controls as stated in the Quick Manual. Incorrect control settings may damage the device; * The device fell damaging the housing.
# Sicherheit
> Warnung – Gefahrenbereich
# ## Symbole und Warnzeichen [Section titled “Symbole und Warnzeichen”](#symbole-und-warnzeichen)  **Warnung** – Gefahrenbereich ***  **Vorsicht** – Stromschlaggefahr *** ## Stromschlaggefahr [Section titled “Stromschlaggefahr”](#stromschlaggefahr) Die Wartung des Gerätes darf ausschließlich von geschultem Personal durchgeführt werden, da beim Öffnen und/oder Entfernen von Abdeckungen spannungsführende Teile freigelegt werden könnten. Spannungsführende Teile nicht berühren – Gefahr von Stromschlag.  ***  Das Gerät ist als Sonderabfall zu entsorgen. Die örtlichen Vorschriften beachten. Für weitere Informationen siehe [Entsorgung](/grandma3/2-3/key_pu_disposal-3/). ***  Batterie recyceln ***  Konformitätserklärung Für weitere Informationen siehe [Konformität](/grandma3/2-3/key_pu_conformity-3/). ***  Betriebsspannung AN/AUS | | | | ----------------------------------------- | ------------------------------------------------------------------------------------------------------------------------------------------------------------------------------------------------------------------------------------------------- | |  | **Warnung:** Das Gerät muss geerdet sein. Nicht den Sicherheitszweck eines Schutzkontaktsteckers ignorieren. Ein Schutzkontaktstecker hat zwei Stromkontakte und einen dritten Erdungskontakt. Der dritte Erdungskontakt dient Ihrer Sicherheit. | Alle Anweisungen in diesem Quick Manual aufmerksam durchlesen, vor allem die [Allgemeine Sicherheitshinweise](/grandma3/2-3/key_pu_safety-1/#h2__510451242) weiter\ unten in diesem Kapitel und die [Betriebsgrenzen](/grandma3/2-3/key_pu_limitations-3/). Das Quick Manual für den späteren Gebrauch aufbewahren. Alle Vorsichtsmaßnahmen und Warnhinweise, die in diesem Quick Manual und dem Gerät selbst vermerkt sind, befolgen. | | | | ------------------------------------------------ | ------------------------------------------------------------------------------------------------------------------------- | |  | **Wichtig:** Sämtliche Reparatur- und Wartungsarbeiten dürfen ausschließlich von geschultem Personal durchgeführt werden. | Dieses Gerät entspricht dem neuesten Stand der Technik, trotzdem kann ein Restrisiko nicht komplett ausgeschlossen werden. Um dieses Restrisiko zu vermeiden, befolgen Sie die Sicherheitsanweisungen. Dieses Gerät ist nur für den professionellen Gebrauch bestimmt und nicht für den privaten Gebrauch geeignet. MA Lighting Technology GmbH kommt für den Schaden nicht auf, der aufgrund von Nichtbeachtung der Sicherheitsanweisungen entstehen könnte. | | | | ----------------------------------------- | --------------------------------------------------------------------------------------------------------------------------------------------------------------------------------------------------------------------------- | |  | **Warnung:** Durch den Nutzer herbeigeführte Modifikationen an diesen Geräten, die nicht ausdrücklich von der für die Übereinstimmung verantwortlichen Stelle genehmigt wurden, führen zum Verbot der Benutzung der Geräte. | | | | | ------------------------------------------------ | ------------------------------------------------------------------------------------------------------------------------------------------------------------------------------------------------------------------------------------------------------------------------------------------------------------------------------------------------------------------------------------------------------------------------------------------------------------------------------------------------------------------------------------------------------------------------------------------------------------------------------------------------- | |  | **Wichtig:** Diese Geräte wurden getestet und entsprechen den Grenzwerten eines digitalen Geräts der Klasse A gemäß der FCC-Bestimmungen Teil 15 und der CE-Regularien. Diese Grenzwerte bieten im professionellen Betrieb einen angemessenen Schutz gegen störende Interferenzen. Die Geräte erzeugen, verwenden und strahlen möglicherweise Funkwellen aus. Wenn sie nicht gemäß dieser Anleitung installiert und verwendet werden, können sie den Funkverkehr stören. Der Betrieb dieser Geräte im privaten, häuslichen Bereich kann u. U. Funkstörungen verursachen. In diesem Fall muss der Benutzer die Störungen selbst beheben. \*\* \*\* | ## Vermeiden von Stromschlag [Section titled “Vermeiden von Stromschlag”](#vermeiden-von-stromschlag) Ein beschädigtes Gerät oder Netzkabel kann schwere oder tödliche Verletzungen verursachen. Die Sicherheitsanweisungen befolgen, um Verletzungen, die durch elektrischen Strom verursacht werden können, zu vermeiden. * Kein beschädigtes Netzkabel nutzen. * Keine festgeschraubten Abdeckungen am Gehäuse öffnen. * Gerät nur im technisch einwandfreien Zustand nutzen. * Gerät niemals selbst reparieren. * Gerät nicht modifizieren und keine Änderungen an dessen Komponenten und Zubehör vornehmen. * Gerät nicht Regen oder Feuchtigkeit aussetzen. * Gerät nicht in Wasser tauchen. ## []()Allgemeine Sicherheitshinweise [Section titled “Allgemeine Sicherheitshinweise”](#allgemeine-sicherheitshinweise) Um Verletzungen vorzubeugen oder Schaden am Gerät zu vermeiden: * Beim Bedienen nicht in das Gerät hineingreifen. * Gerät und Netzkabel von Kindern unter 8 Jahren fernhalten. * Kinder nicht mit dem Gerät spielen lassen. * Bei Gewitter das Gerät vom Netz trennen (Netzstecker ziehen). * Bei längerer Nichtverwendung das Gerät über den Netzschalter ausschalten. * Vor dem Reinigen das Gerät über den Netzschalter ausschalten. * Keine flüssigen Reinigungsmittel oder Sprühreiniger verwenden. * Nur mit einem trockenen Tuch reinigen. * Gerät nicht in der Nähe von Wasser nutzen. * Gerät nicht einer feuchten Umgebung aussetzen. * Keine Flüssigkeiten auf das Gerät schütten. * Belüftungsöffnungen im Gehäuse nicht blockieren – diese sind für den Luftstrom innerhalb des Gerätes wichtig und schützen es vor Überhitzung. * Keine Fremdkörper in die Belüftungsöffnungen stecken, da diese mit spannungsführenden Teilen in Kontakt kommen und Kurzschlüsse, Feuer und/oder Stromschlag verursachen können. * Keine Gegenstände auf das Netzkabel stellen; Nicht auf das Netzkabel treten oder zusammendrücken, besonders am Stecker und an Stellen an denen die Kabel das Gehäuse verlassen. * Wird ein Verlängerungskabel genutzt, muss sichergestellt werden, dass die Summe der Nennleistungen der an das Kabel angeschlossenen Geräte die Nennleistung des Verlängerungskabels nicht überschreitet. * Sich nicht mit dem Körpergewicht auf dem Gerät abstützen. * Keine schweren Gegenstände auf dem Gerät abstellen. * Keine übermäßige Gewalt auf Tasten, Knöpfe, Fader, Drehknöpfe, Schalter, Verbindung oder Monitor Wing ausüben. * Ist das Netzkabel oder der Stecker beschädigt, müssen diese umgehend von einer Fachkraft ausgetauscht werden. * Gerät nur auf stabilen Oberflächen platzieren; Wird es auf instabilen Oberflächen platziert, kann das Gerät herunterfallen und stark beschädigt werden. * Nur Netzkabel mit Sicherheitsprüfzeichen nutzen. * Keine leistungsstarken Funkgeräte oder Mobiltelefone in der Nähe des Gerätes verwenden. * Das Gerät hat ein Schutzkontaktstecker, der nur in Verbindung mit einer Schutzkontaktsteckdose genutzt werden darf. * Wie bei allen industriell gefertigten Gütern kann die Verwendung von Stoffen, die Allergien hervorrufen können, wie z.B. Aluminium, nicht gänzlich ausgeschlossen werden. Sollten allergische Reaktionen (wie z.B. Hautausschlag, ständiges Niesen, gerötete Augen oder Atemwegsbeschwerden) auftreten, ist umgehend ein Arzt zur Ursachenklärung aufzusuchen. **Sollte einer der folgenden Punkte zutreffen, das Gerät spannungsfrei schalten und den Kundendienst kontaktieren!** * Netzkabel und/oder Verbindung ist/sind beschädigt, spröde oder brüchig. * Eintritt von Wasser. * Gerät wurde Regen oder hoher Luftfeuchtigkeit ausgesetzt. * Gerät funktioniert bei Einhaltung von Bedienungsanweisungen, die im Quick Manual stehen, nicht einwandfrei. Steuerelement so einstellen wie im Quick Manual beschrieben, da eine falsche Einstellung das Gerät beschädigen könnte. * Gerät ist heruntergefallen und dabei wurde das Gehäuse beschädigt.
# Sécurité
> Avertissement – Zone de danger
## Symboles et consignes de sécurité [Section titled “Symboles et consignes de sécurité”](#symboles-et-consignes-de-sécurité)  \*\*Avertissement \*\*– Zone de danger ***  **Attention** – Risque de choc électrique *** ## Risque de choc électrique [Section titled “Risque de choc électrique”](#risque-de-choc-électrique) L’appareil ne doit être entretenu que par du personnel qualifié, des parties sous tension risquant d’être exposées lors de l’ouverture et / ou du retrait des couvercles. Le contact avec des pièces sous tension peut provoquer un choc électrique.  ***  Éliminer comme déchets dangereux. Respecter la réglementation en vigueur. Pour plus d’informations, voir [Élimination](/grandma3/2-3/key_pu_disposal-2/). ***  Recycler la batterie ***  Déclaration de conformité Pour plus d’informations, voir [Conformité](/grandma3/2-3/key_pu_conformity-2/). ***  Tension de service Marche / Arrêt | | | | ----------------------------------------- | -------------------------------------------------------------------------------------------------------------------------------------------------------------------------------------------------------------------------------------------------------------- | |  | **Avertissement:** L’appareil doit être mis à la terre. Ne pas ignorer la fonction de sécurité d’une prise avec terre. Une prise avec terre a deux contacts électriques et un troisième contact de terre. Le troisième contact est prévu pour votre sécurité. | Lisez attentivement toutes les instructions de ce guide rapide, en particulier les [consignes générales de sécurité](/grandma3/2-3/key_pu_safety-1-2/#h2_1453644028) ci-dessous et les [limitations d’usages](/grandma3/2-3/key_pu_limitations-2/). Suivez les instructions et conservez ce guide rapide pour une utilisation ultérieure. Respectez toutes les mises en garde et tous les avertissements mentionnés dans ce guide rapide et indiqués sur l’appareil. | | | | ------------------------------------------------ | ------------------------------------------------------------------------------------------------------------------------------------------- | |  | **Important:** Tous les travaux de réparation et d’entretien doivent être effectués exclusivement par des techniciens de service qualifiés. | * Cet appareil est à la pointe de la technologie ; * Cependant, des risques résiduels ne peuvent être exclus ; * Pour éviter les risques, suivez les consignes de sécurité ; * Cet appareil est destiné uniquement à un usage professionnel et ne convient pas à un usage résidentiel. MA Lighting Technology GmbH ne prend pas en charge d’éventuels dommages pouvant survenir en cas de non-respect des consignes de sécurité. | | | | ----------------------------------------- | ------------------------------------------------------------------------------------------------------------------------------------------------------------------------------------------------------------ | |  | **Avertissement:** Des changements ou des modifications à ces appareils non expressément approuvés par la partie responsable de la conformité pourraient annuler le droit de l’utilisateur de les utiliser. | | | | | ------------------------------------------------ | --------------------------------------------------------------------------------------------------------------------------------------------------------------------------------------------------------------------------------------------------------------------------------------------------------------------------------------------------------------------------------------------------------------------------------------------------------------------------------------------------------------------------------------------------------------------------------------------------------------------------------------------------------------------------------------------------------------------------------------------------------------------------------------- | |  | **Note:** Ces appareils ont été testés et jugés conformes aux limites d’un appareil numérique de classe A, conformément à la partie 15 des règles de la FCC et aux normes CE. Ces limites sont conçues pour fournir une protection raisonnable contre de possibles interférences lorsque les appareils sont utilisés dans un environnement commercial. Ceux-ci génèrent, utilisent et peuvent émettre de l’énergie radiofréquence et, s’ils ne sont pas installés et utilisés conformément à ce guide rapide, peuvent éventuellement causer des interférences aux communications radio. L’utilisation de ces appareils dans une zone résidentielle est susceptible de causer des interférences, auquel cas l’utilisateur devra corriger ces interférences à ses propres frais.\*\* \*\* | ## Dangers causés par le courant électrique [Section titled “Dangers causés par le courant électrique”](#dangers-causés-par-le-courant-électrique) Un appareil ou un câble d’alimentation défectueux présente un risque de blessures graves ou mortelles dues à un choc électrique. Suivez les consignes de sécurité pour éviter les risques liés au courant électrique. * N’utilisez pas de câble d’alimentation défectueux ; * Ne pas ouvrir les couvercles vissés de l’appareil ; * N’utilisez l’appareil que s’il est dans un état technique impeccable ; * Ne réparez pas l’appareil par vos propres moyens ; * N’effectuez pas d’ingénierie inverse sur l’appareil et n’apporter aucune modification à ses composants et accessoires ; * N’exposez pas l’appareil à la pluie ou à l’humidité ; * Ne pas plonger l’appareil dans l’eau. ## []()Consignes de sécurité générales [Section titled “Consignes de sécurité générales”](#consignes-de-sécurité-générales) Pour éviter des blessures ou des dommages à l’appareil : * Ne mettez pas vos mains à l’intérieur de l’appareil pendant le fonctionnement ; * L’appareil et le câble d’alimentation doivent être tenus à l’écart des enfants de moins de 8 ans ; * Les enfants ne sont pas autorisés à jouer avec l’appareil ; * Débranchez l’alimentation électrique du réseau pendant les orages ; * Débranchez l’alimentation électrique du réseau si l’appareil est laissé sans surveillance pendant une longue période ; * Débranchez l’alimentation électrique avant de nettoyer l’appareil ; * N’utilisez pas de nettoyant liquide ou en aérosol. Utilisez uniquement un chiffon sec ; * Ne pas utiliser l’appareil à proximité de l’eau ; * Ne l’exposez pas à un environnement humide ; * Ne versez aucun liquide sur l’appareil ; * Ne bouchez pas ou ne couvrez pas les trous de ventilation de l’appareil. Ceux-ci sont essentiels à la circulation de l’air à l’intérieur de l’appareil et protègent l’appareil contre la surchauffe ; * N’insérez aucun objet dans les trous de ventilation de l’appareil car ceux-ci pourraient entrer en contact avec des pièces sous tension ou provoquer des courts-circuits, un incendie et / ou un choc électrique ; * Ne placez aucun objet sur le câble d’alimentation. Protégez-le contre tout risque de piétinement ou de pincement, en particulier au niveau du connecteur et à l’endroit où les câbles sortent de l’appareil ; * Lors de l’utilisation d’un cable de rallonge, assurez-vous que la puissance nominale de tous les appareils connectés en série ne dépasse pas la puissance nominale maximale du cable de rallonge ; * Ne vous appuyez pas sur l’appareil ; * Ne placez aucun objet lourd sur l’appareil ; * N’utilisez pas de force excessive sur les touches, les boutons, les interrupteurs, les connecteurs ou sur les boutons tournants ; * Si le câble d’alimentation ou la fiche d’alimentation principale sont défectueux, faites-les remplacer immédiatement par un technicien qualifié ; * Placez l’appareil uniquement sur des surfaces stables. S’il est placé sur des surfaces instables, il peut tomber et se casser ; * N’utilisez que des câbles d’alimentation homologués avec marquage ; * N’utilisez pas de talkie-walkie puissant ou de téléphone portable à proximité de l’appareil ; * L’appareil est équipé d’une fiche de sécurité. Cette fiche ne peut être utilisé qu’avec des prises de sécurité compatible. * Comme pour tous les produits fabriqués industriellement, l’utilisation de substances induisant une réaction allergique telle que l’aluminium ne peut généralement pas être exclue. Si vous développez une réaction allergique (éruption cutanée, éternuements fréquents, yeux rouges ou difficultés respiratoires), consultez immédiatement un médecin pour en déterminer la cause. \*\*Si l’une des conditions suivantes se produit, débranchez la fiche d’alimentation principale et appelez votre distributeur local ou le \*\***support technique !** * Le câble d’alimentation ou la fiche principale est endommagé ou usé ; * Pénétration de liquides ; * L’appareil a été exposé à la pluie ou à une forte humidité ambiante ; * L’appareil ne fonctionne pas correctement, même si vous avez suivi toutes les instructions de ce guide rapide. N’utilisez les commandes que comme indiquées dans le guide rapide. Des paramètres incorrects peuvent endommager l’appareil ; * L’appareil est tombé et le boitier est endommagé.
# Support
> Contact us for any questions about your MA product.
Contact us for any questions about your MA product. MA Lighting and its extensive distributor network offer unparalleled technical support. Call on our expertise for help with any problem, no matter if it is about the operation, software features, software installations, or troubleshooting. ### Help Pages [Section titled “Help Pages”](#help-pages) The help pages are included in every software installer package and are automatically loaded into the software. To access and read the help pages, press Help + Please. The help pop-up opens on the main screen. To jump directly into a special help topic, use the context-sensitive help: * Press and hold Help and tap the desired user interface element (UI element) to open the corresponding help topic. * Tap  in the control bar and tap a UI element to open the corresponding help topic. ### Online Manuals [Section titled “Online Manuals”](#online-manuals) All MA product-related manuals are available as online versions. Just select your MA product and click on the respective link. All further documents can be found in our download area. Go to [https://www.malighting.com/training-support/online-manuals.](https://www.malighting.com/training-support/online-manuals) ### Video Tutorials [Section titled “Video Tutorials”](#video-tutorials) Get tips and tricks from our MA experts on your MA product. MA offers a whole range of videos on how to use your MA product in the best possible way. Just select your series and click on the links to watch the videos on our YouTube channel. Go to [https://www.malighting.com/training-support/video-tutorials.](https://www.malighting.com/training-support/video-tutorials) ### Community [Section titled “Community”](#community) Share your knowledge and get help from other MA users. A community can be stronger and better than the individual. Be part of the MA community! Go to [https://www.malighting.com/training-support/community.](https://www.malighting.com/training-support/community) ### Fixture Shares [Section titled “Fixture Shares”](#fixture-shares) In our MA Fixture Share you will find a comprehensive database of different fixture types for grandMA3, grandMA2, and dot2. You can also find the grandMA2 GDTF Converter there. Simply upload the GDTF file and it will be converted into a grandMA2 Fixture Profile.\ \ The GTDF Share contains a comprehensive library of all available GDTF files with all relevant modes and firmware versions. Like the MA Fixture Share, this database is continuously updated. For more information see: ### Local Support [Section titled “Local Support”](#local-support) If you have a question regarding your MA Lighting product, please first of all contact your local MA product specialists. ### Central Support [Section titled “Central Support”](#central-support) If you are in need of further assistance or manufacturer support, please fill out an email request on [www.malighting.com in](http://www.malighting.com%C2%A0in) Training and Support. Your request will automatically be sent to\*\* \*\*(in English or German). This email service is monitored during MA Lighting’s regular business hours in Germany from 8.30 am until 5 pm, Monday through Friday. ### Emergency Hotline [Section titled “Emergency Hotline”](#emergency-hotline) In any case of a show critical emergency please contact the MA Lighting support hotline. Phone +49 5251 68 88 65 99 Please note that this 24/7 hotline is strictly for emergency cases. ### Intellectual Property [Section titled “Intellectual Property”](#intellectual-property) MA Lighting Technology has registered multiple patents, trademarks, design patents, and utility models for its products.\ We will take legal action against the violation of this intellectual property. For more information see:
# Support
> Bei Fragen zu Ihren MA Produkten wenden Sie sich bitte an uns.
# Bei Fragen zu Ihren MA Produkten wenden Sie sich bitte an uns. MA Lighting bietet mit dem angeschlossenen umfassenden Distributionsnetzwerk einen einmaligen technischen Support. Sollten wider Erwarten Probleme auftreten, stehen wir Ihnen mit unserem Know-how zur Seite, ganz gleich worum es sich handelt – Bedienung, Software-Features, Software-Installation oder Fehlerbeseitigung. ### Offline Hilfe [Section titled “Offline Hilfe”](#offline-hilfe) Die Offline Hilfe ist in jedem Software Installer enthalten und wird automatisch in die Software geladen. Zum Aufrufen der Hilfe die Tasten Help + Please drücken. Das Hilfe Fenster öffnet sich auf dem Hauptmonitor. Um ein spezielles Hilfethema direkt anzuspringen, die Kontextsensitive Hilfe verwenden. Um das entsprechende Hilfethema zu öffnen: * Taste Help drücken und halten und das gewünschte Bedienelement antippen. * Das  in der Kontrollleiste und das gewünschte Bedienelement antippen. ### Online Manuals [Section titled “Online Manuals”](#online-manuals) Alle Benutzerhandbücher der MA Produkte sind als Online-Versionen verfügbar. Einfach auswählen, für welches MA Produkt Sie eine Bedienungsanleitung benötigen. Gehe zu . ### Video Tutorials [Section titled “Video Tutorials”](#video-tutorials) Hier erhalten Sie Tipps und Tricks von unseren MA Experten für Ihr MA Produkt. MA Lighting bietet eine große Anzahl an Tutorial-Videos an, damit Sie Ihr MA Produkt bestmöglich nutzen können. Wählen Sie dafür einfach eine Serie aus und sehen Sie alle Videos dazu auf unserem YouTube Kanal. Gehe zu . ### Community [Section titled “Community”](#community) Teilen Sie Ihr Wissen mit anderen MA Usern. In der Gemeinschaft ist man effektiver. Werden Sie Mitglied der MA Community! Gehe zu [https://www.malighting.com/de/training-support/community](https://www.malighting.com/de/training-support/community/). ### Fixture Shares [Section titled “Fixture Shares”](#fixture-shares) Im MA Fixture Share finden Sie eine umfassende Bibliothek der unterschiedlichsten Fixture Typen für alle grandMA3, grandMA2 und dot2 Serien. Im GTDF Share finden Sie eine umfassende Bibliothek aller verfügbaren GDTF Files mit allen relevanten Modi und Firmware Versionen. Diese Datenbank wird, wie das MA Fixture Share kontinuierlich aktualisiert. Mehr Info unter . ### Lokaler Support [Section titled “Lokaler Support”](#lokaler-support) Bei Fragen zu Ihren MA Lighting Produkten wenden Sie sich bitte als erstes an Ihre MA Produktspezialisten vor Ort. ### Zentraler Support [Section titled “Zentraler Support”](#zentraler-support) Wenn Sie weitere Hilfe oder Herstellerunterstützung benötigen, schicken Sie uns bitte ein [ausgefülltes E-Mail-Formular](https://www.malighting.com/de/training-support/support-anfrage) unter , Training und Support. Diese Anfrage wird automatisch an \*\* \*\*(in Englisch oder Deutsch) gesendet. Dieser E-Mail-Service ist während der regulären Geschäftszeiten von MA Lighting von 8.30 Uhr bis 17 Uhr von Montag bis Freitag erreichbar. ### Notfall-Hotline [Section titled “Notfall-Hotline”](#notfall-hotline) In show-kritischen Situationen nehmen Sie bitte Kontakt zur MA Lighting Support-Hotline auf. Tel. +49 5251.68 88 65 99 Diese Hotline ist 24 Stunden am Tag und 7 Tage in der Woche besetzt. Sie ist nur für Notfälle. ### Intellectual Property [Section titled “Intellectual Property”](#intellectual-property) MA Lighting Technology hat für seine Produkte zahlreiche Patente, Marken, Geschmacksmuster und Gebrauchsmuster angemeldet. Im Falle der Verletzung dieses geistigen Eigentums werden wir rechtliche Schritte einleiten. Mehr Info unter .
# Support technique
> Contactez-nous pour toute question concernant votre produit MA.
# Support technique [Section titled “Support technique”](#support-technique) Contactez-nous pour toute question concernant votre produit MA. MA Lighting et son vaste réseau de distributeurs offrent un support technique incomparable. Faites appel à notre expertise pour tout problème, qu’il s’agisse de fonctionnement, de fonctionnalités logicielles, d’installations logicielles ou de dépannage. ### Pages d’aide [Section titled “Pages d’aide”](#pages-daide) Les pages d’aide sont incluses dans chaque logiciel d’installation et sont automatiquement chargées dans le logiciel. Pour accéder et lire les pages d’aide, appuyez sur Help + Please. La fenêtre contextuelle d’aide s’ouvre sur l’écran principal. Pour accéder directement à une rubrique d’aide spéciale, utilisez l’aide contextuelle : * Appuyez et maintenez enfoncé le bouton Help et touchez l’élément d’interface utilisateur (élément IU) souhaité pour ouvrir la rubrique d’aide correspondante. * Tapez sur  dans la barre de contrôle et appuyez sur un élément de l’IU pour ouvrir le sujet d’aide correspondant. ### Guides en ligne [Section titled “Guides en ligne”](#guides-en-ligne) Tous les guides relatifs aux produits MA sont disponibles en ligne. Choisissez simplement votre produit MA et cliquez sur le lien correspondant. Tous les autres documents sont disponibles dans notre espace de téléchargement. Visitez . ### Tutoriels vidéo [Section titled “Tutoriels vidéo”](#tutoriels-vidéo) Obtenez des conseils et astuces de nos experts MA sur votre produit MA. MA vous propose toute une gamme de vidéos sur la meilleure façon d’utiliser votre produit MA. Sélectionnez simplement votre série et cliquez sur les liens pour regarder les vidéos sur notre chaîne YouTube. Visitez . ### Communauté [Section titled “Communauté”](#communauté) Partagez vos connaissances et obtenez l’aide d’autres utilisateurs de MA. Une communauté peut être plus forte et meilleure que l’individu. Faites partie de la communauté MA ! Visitez . ### Fixture Shares [Section titled “Fixture Shares”](#fixture-shares) Dans notre MA Fixture Share, vous trouverez une base de données complète des différents types de luminaires pour grandMA3, grandMA2 et dot2. Le partage GTDF contient une bibliothèque complète de tous les fichiers GDTF disponibles avec tous les modes et versions de micrologiciel pertinents. Tout comme MA Fixture Share, cette base de données est continuellement mise à jour. Pour plus d’informations, voir: ### Support local [Section titled “Support local”](#support-local) Si vous avez une question concernant votre produit MA Lighting, veuillez tout d’abord contacter votre spécialiste MA local. ### Support central [Section titled “Support central”](#support-central) Si vous avez besoin de plus d’aide ou d’assistance de la part du fabricant, veuillez remplir une demande par e-mail à [www.malighting.com](https://www.malighting.com/) sous Training and Support. Votre demande sera automatiquement envoyée à **** (en anglais ou en allemand). Ce service de messagerie électronique est surveillé pendant les heures d’ouverture habituelles de MA Lighting en Allemagne, de 8h30 à 17h, du lundi au vendredi. ### Hotline d’urgence [Section titled “Hotline d’urgence”](#hotline-durgence) En cas d’urgence, veuillez contacter le support technique de MA Lighting. Téléphone +49 5251 68 88 65 99 Veuillez prendre note que cette ligne d’assistance 24 heures sur 24 et 7 jours sur 7 est strictement réservée aux cas d’urgence. ### Propriété intellectuelle [Section titled “Propriété intellectuelle”](#propriété-intellectuelle) MA Lighting Technology a déposé plusieurs brevets, marques de commerce, brevets de conception et modèles d’utilité pour ses produits. Nous intenterons une action en justice contre la violation de cette propriété intellectuelle. Pour plus d’informations, voir:
# Technical Data
> grandMA3 processing unit front panel
| | | | ------------------------------------------------ | ------------------------------------------------------------------------------------------------------------------------------------------------------------------------------------------------------------------------- | |  | **Important:** Only use adequately protected power cables (min. Ø = 3 x 1.0 mm²). The required power cable must meet the country’s standards. **Only qualified personnel is allowed to perform work on the power cable!** | | | | | ------------------------------------------------ | -------------------------------------------------------------------------- | |  | **Important:** Power cable and connector are not included in the delivery. | | | | | ------------------------------------------ | --------------------------------------------------------------------------------- | |  | **Hint:** The processing units M, L, XL have an equal front panel and rear panel. | * DMX: max. length of the cable 350 m (in ideal conditions). * Use CAT-5e Ethernet cable or higher. Max. length of the cable 75 m.  grandMA3 processing unit front panel | Technical Data grandMA3 processing unit M, L, XL | | | ------------------------------------------------ | ----------------------------------------------------------- | | Operating voltage | 100-240 V AC, 50/60 Hz | | Net weight | 5 kg / 12 lbs | | Power | max. 200 VA | | Dimensions | 482 x 372 x 87 mm / 19 x 15 x 4 in (width x depth x height) | | Parameters | | | --------------------------- | ------ | | grandMA3 processing unit M | 4 096 | | grandMA3 processing unit L | 8 192 | | grandMA3 processing unit XL | 16 384 | ### Outputs grandMA3 processing unit M, L, XL [Section titled “Outputs grandMA3 processing unit M, L, XL”](#outputs-grandma3-processing-unit-m-l-xl)  grandMA3 processing unit rear panel | Number | Connector | | ------ | ------------------------------------------------------------------ | | 1 x | powerCON TRUE1 (registered trademark of Neutrik AG, Liechtenstein) | | 2 x | etherCON/RJ45 | | 8 x | DMX512-A OUT (5pin XLR female) | | 3 x | USB 2.0 (type A) |
# Technische Daten
> grandMA3 processing unit Vorderseite
# | | | | ------------------------------------------------ | ------------------------------------------------------------------------------------------------------------------------------------------------------------------------------------------------------------------------------------------------------- | |  | **Wichtig:** Ausreichend isolierte und geschützte Netzkabel verwenden (min. Ø = 3 x 1,0 mm²). Das Netzkabel muss den Standards des Landes entsprechen. **Arbeiten am Netzkabel dürfen ausschließlich von qualifiziertem Personal durchgeführt werden!** | | | | | ------------------------------------------------ | ------------------------------------------------------------------------------- | |  | **Wichtig:** Netzkabel und Steckverbinder sind im Lieferumfang nicht enthalten. | | | | | ------------------------------------------ | ----------------------------------------------------------------------------------- | |  | **Hinweis:** Die processing units M, L, XL haben die gleiche Vorder- und Rückseite. | * DMX: Die maximale Kabellänge beträgt 350 m (unter idealen Bedingungen). * CAT-5e Ethernet-Kabel oder höher verwenden; die maximale Kabellänge beträgt 75 m.  grandMA3 processing unit Vorderseite | Technical Data grandMA3 processing unit M, L, XL | | | ------------------------------------------------ | ---------------------------------------------------------- | | Betriebsspannung | 100-240 V AC, 50/60 Hz | | Gewicht (ohne Verpackung) | 5 kg / 12 lbs | | Anschlussleistung | max. 200 VA | | Maße | 482 x 372 x 87 mm / 19 x 15 x 4 in (Breite x Tiefe x Höhe) | | Parameter | | | --------------------------- | ------ | | grandMA3 processing unit M | 4 096 | | grandMA3 processing unit L | 8 192 | | grandMA3 processing unit XL | 16 384 | ### Steckverbinder grandMA3 processing unit M, L, XL [Section titled “Steckverbinder grandMA3 processing unit M, L, XL”](#steckverbinder-grandma3-processing-unit-m-l-xl)  grandMA3 processing unit Rückseite | zahl | Steckverbinder | | ---- | ----------------------------------------------------------------- | | 1 x | powerCON TRUE1 (eingetragene Marke der Neutrik AG, Liechtenstein) | | 2 x | etherCON/RJ45 | | 8 x | DMX512-A OUT (5pin XLR weiblich) | | 3 x | USB 2.0 (type A) |
# Données Techniques
> grandMA3 full-size panneau avant
# | | | | ------------------------------------------------ | ------------------------------------------------------------------------------------------------------------------------------------------------------------------------------------------------------------------------------------------------------------------------- | |  | **Important:** N’utilisez que des câbles électriques suffisamment protégés (Ø min. = 3 x 1,0 mm²). Le câble d’alimentation requis doit être conforme aux normes du pays. **Seul un personnel qualifié est autorisé à effectuer des travaux sur le câble d’alimentation!** | | | | | ------------------------------------------------ | --------------------------------------------------------------------------------------------- | |  | **Important:** Le câble d’alimentation et le connecteur ne sont pas inclus dans la livraison. | | | | | ------------------------------------------ | ---------------------------------------------------------------------------------- | |  | **Hint:** Les processing units M, L, XL ont un panneau avant et arrière identique. | * DMX : longueur maximale du câble 350 m (dans des conditions idéales). * Utilisez un câble Ethernet CAT-5e ou supérieur. Longueur max. du câble 75 m. 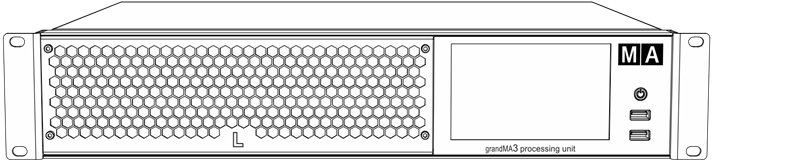 *grandMA3 full-size panneau avant* | Données Techniques processing unit M, L, XL | | | ------------------------------------------- | ------------------------------------------------------------------- | | Tension de fonctionnement | 100-240 V AC, 50/60 Hz | | Poids net | 5 kg / 12 lbs | | Puissance | max. 200 VA | | Dimensions | 482 x 372 x 87 mm / 19 x 15 x 4 po (largeur x profondeur x hauteur) | | Paramètres | | | --------------------------- | ------ | | grandMA3 processing unit M | 4 096 | | grandMA3 processing unit L | 8 192 | | grandMA3 processing unit XL | 16 384 | ### Sorties grandMA3 processing unit M, L, XL [Section titled “Sorties grandMA3 processing unit M, L, XL”](#sorties-grandma3-processing-unit-m-l-xl)  *grandMA3 full-size panneau arrière* | Nombre | Connecteur | | ------ | ------------------------------ | | 1 x | powerCON TRUE1\* | | 2 x | etherCON/RJ45 | | 8 x | DMX512-A OUT (5pin XLR female) | | 3 x | USB 2.0 (type A) | \* marque déposée de Neutrik AG, Liechtenstein
# Transport
> Noncompliance of the safety instructions can result in personal injury or material damage;
* The grandMA3 processing unit must be protected from environmental factors such as physical shocks and vibration during transportation; * Remove all cables before transport; * The user is responsible for securely fastening the products for transport and for following the manufacturer´s safety instructions when transporting the device;\ Noncompliance of the safety instructions can result in personal injury or material damage; * Do not place the grandMA3 processing unit on unstable surfaces; * Do not place any objects on top of the grandMA3 processing unit. | | | | ----------------------------------------- | -------------------------------------------------------------------------------------------------------------------------------------------------------------------------------------------------------------------------------------------------------------------------------------------------------------------- | |  | **Warning:** -Pay attention to temperature and humidity during transport. For more information see [Limitations](/grandma3/2-3/key_pu_limitations/). -After the transport check the device. -If the device or its display is damaged (dented, bent or broken), do not connect the grandMA3 processing unit to power! |
# Transport
# * Die grandMA3 processing unit während des Transports vor Umwelteinflüssen wie Erschütterungen und Vibrationen schützen. * Alle Kabel vor dem Transport entfernen. * Der Benutzer ist dafür verantwortlich, das Gerät beim Transport sicher zu befestigen und die Sicherheitshinweise des Herstellers zu beachten. Die Nichteinhaltung der Sicherheitshinweise kann zu Personen- oder Sachschäden führen. * Die grandMA3 processing unit nicht auf eine instabile Oberfläche stellen. * Keine weiteren Gegenstände auf die grandMA3 processing units stellen. | | | | ----------------------------------------- | -------------------------------------------------------------------------------------------------------------------------------------------------------------------------------------------------------------------------------------------------------------------------------------------------------------------------------------------------------------------------------------------- | |  | **Warnung:** - Beim Transport die zulässigen Werte für Temperaturen und Luftfeuchte beachten. Für weitere Information, siehe [Betriebsgrenzen](/grandma3/2-3/key_consoles_limitations-1/). - Nach dem Transport das Gerät auf Beschädigungen prüfen. - Wenn das Gerät oder sein Display beschädigt ist (verbeult, verbogen oder kaputt), das Gerät nicht an die Stromversorgung anschließen! |
# Transport
> Le non-respect des consignes de sécurité peut entraîner des dommages corporels ou matériels ;
# Transport [Section titled “Transport”](#transport) * Les grandMA3 processing units doivent être protégés des influences environnementales telles que les chocs physiques et les vibrations pendant le transport ; * Retirez tous les câbles avant le transport ; * L’utilisateur est responsable de la sûreté de la fixation des produits pour le transport et du respect des consignes de sécurité du fabricant lors du transport de l’appareil ;\ Le non-respect des consignes de sécurité peut entraîner des dommages corporels ou matériels ; * Ne placez pas les grandMA3 processing units sur des surfaces instables ; * Ne placez aucun objet sur les grandMA3 processing units. | | | | ----------------------------------------- | -------------------------------------------------------------------------------------------------------------------------------------------------------------------------------------------------------------------------------------------------------------------------------------------------------------------------------------------------------------------------------------------------------------------------------------------- | |  | **Attention:** -Faites attention à la température et à l’humidité pendant le transport. Pour plus d’informations, voir [Limitations d’usage](https://malighting.clickhelp.co/smart/project-waduc_qa_grandma3-user-manual/key_xport_nodes_limitations-1-2). -Après le transport, vérifiez l’appareil. -Si l’appareil ou son écran est endommagé (cabossé, tordu ou cassé), ne connectez pas le grandMA3 processing unit au réseau électrique! |
# Disposal
> According to the directive 2011/65 EU (RoHS) the device was produced in the European Union, and is hence to be disposed of as stated in the directive.
According to the directive 2011/65 EU (RoHS) the device was produced in the European Union, and is hence to be disposed of as stated in the directive. If the device is used within the European Union, follow the directive WEEE 2012/19/EU. If the device is used outside the European Union, the corresponding country´s waste disposal regulations apply.
# Entsorgung
> Das Gerät ist gemäß der Richtlinie 2011/65 EU (RoHS) der Europäischen Gemeinschaft hergestellt und muss dementsprechend entsorgt werden.
Das Gerät ist gemäß der Richtlinie 2011/65 EU (RoHS) der Europäischen Gemeinschaft hergestellt und muss dementsprechend entsorgt werden. Falls das Gerät innerhalb der Europäischen Union betrieben wird, ist die WEEE 2012/19/EU zu beachten. Falls das Gerät außerhalb der Europäischen Union betrieben wird, sind die nationalen Entsorgungsvorschriften im jeweiligen Land zu beachten.
# Élimination
> Selon la directive 2011/65 UE (RoHS), l'appareil a été fabriqué dans l'Union européenne et doit donc être éliminé conformément à la directive.
# Selon la directive 2011/65 UE (RoHS), l’appareil a été fabriqué dans l’Union européenne et doit donc être éliminé conformément à la directive. Si l’appareil est utilisé dans l’Union européenne, suivre la directive WEEE 2012/19/EU. Si l’appareil est utilisé en dehors de l’Union européenne, les règlements d’élimination des déchets du pays correspondant s’appliquent.
# Maintenance
| | | | ------------------------------------------ | ---------------------------------------------------------- | |  | **Hint:** | | | The grandMA3 onPC rack-unit only requires minor attention. | | | | | ----------------------------------------- | ------------------------------------------------------------------------------------------------------------------------------------------------------------------------------------------------------------------------------ | |  | **Warning:** All repair and service work has to be exclusively performed by qualified service technicians as live parts may be exposed when opening and / or removing coverings. Touching live parts may cause electric shock. | | | | | ------------------------------------------------ | --------------------------------------------------------------------------------------------------------------------- | |  | **Important:** | | | The intervals between maintenance may differ depending on the frequency of transport and the operational environment. | * Disconnect all cables before cleaning; * Clean the surface with a dry cloth only; * Do not use liquid cleanser or compressed air; * Do not use solvent; * Depending on the environment, we recommend to professionally clean the device every 2 to 5 years.
# Wartung
| | | | ------------------------------------------ | -------------------------------------------------------------------------------- | |  | **Hinweis:** Die grandMA3 onPC rack-unit benötigt nur ein Mindestmaß an Pflege. | | | | | ----------------------------------------- | ----------------------------------------------------------------------------------------------------------------------------------------------------------------------------------------------------------------------------------------------------------------------------------------- | |  | **Warnung:** Sämtliche Reparatur- und Wartungsarbeiten dürfen ausschließlich von geschultem Personal durchgeführt werden, da beim Öffnen von Abdeckungen spannungsführende Teile freigelegt werden können. Spannungsführende Teile nicht berühren, da die Gefahr von Stromschlag besteht! | | | | | ------------------------------------------------ | --------------------------------------------------------------------------------------------- | |  | **Wichtig:** Die Wartungsintervalle variieren je nach Transportfrequenz und Betriebsumgebung. | * Vor dem Reinigen das Gerät spannungsfrei schalten. * Die Oberflächen mit einem trockenen Tuch reinigen. * Handauflage nur mit einem feuchtem Tuch reinigen. * Keine flüssigen Reinigungsmittel oder Druckluft zum Reinigen verwenden. * Kein Lösungsmittel verwenden. * Je nach Umgebungsbedingungen empfehlen wir das Gerät alle 2 bis 5 Jahre durch einen Servicetechniker professionell reinigen zu lassen.
# Entretient
| | | | ------------------------------------------ | --------------------------------------------------------------------------------- | |  | **Indice:** Les rack-units grandMA3 onPC ne nécessitent qu’une attention mineure. | | | | | ----------------------------------------- | ------------------------------------------------------------------------------------------------------------------------------------------------------------------------------------------------------------------------------------------------------------------------------------------------------------------ | |  | **Avertissement:** les travaux de réparation et d’entretien doivent être effectués exclusivement par des techniciens qualifiés, car les pièces sous tension peuvent être exposées lors de l’ouverture et/ou du retrait des couvercles. Le contact avec des pièces sous tension peut provoquer un choc électrique. | | | | | ------------------------------------------------ | ------------------------------------------------------------------------------------------------------------------------------------------------- | |  | **Important:** Les intervalles entre les entretiens peuvent varier en fonction de la fréquence des transports et de l’environnement opérationnel. | * Débranchez l’alimentation électrique avant le nettoyage; * Nettoyez la surface à l’aide d’un chiffon sec uniquement; * Nettoyez le repose-poignet à l’aide d’un chiffon humide uniquement; * N’utilisez pas de nettoyant liquide ou d’air comprimé; * N’utilisez pas de solvant; * Vérifiez si les orifices de ventilation sont obstrués; * En fonction de l’environnement, nous recommandons de nettoyer l’appareil professionnellement une fois par an.
# Quick Start
> grandMA3 onPC rack-unit front panel
\ *grandMA3 onPC rack-unit front panel* 1. Screen 2. [Power key](/grandma3/2-3/key_power/) 3. [USB 2.0](/grandma3/2-3/fs_connect_usb/)  *grandMA3 onPC rack-unit rear panel* 1. [DisplayPort 1+2](/grandma3/2-3/fs_connect_external_screens/) 2. [USB 3.0](/grandma3/2-3/fs_connect_usb/) 3. [USB 2.0](/grandma3/2-3/fs_connect_usb/) 4. [Ethernet 1+2](/grandma3/2-3/fs_connect_ethernet/) 5. [Line In+Out](/grandma3/2-3/do_connector_pin_assignment/#Jack) 6. [DMX A-C](/grandma3/2-3/fs_connect_dmx/) 7. [MIDI In+Out](/grandma3/2-3/remote_inputs/) 8. [DC Remote Control](/grandma3/2-3/fs_connect_dc_remote_in/) 9. [LTC](/grandma3/2-3/fs_connect_smpte_ltc/) 10. Power switch + [IEC connector](/grandma3/2-3/fs_connect_power/) ### Turn on the onPC rack-unit [Section titled “Turn on the onPC rack-unit”](#turn-on-the-onpc-rack-unit) 1. Unpack the grandMA3 device. 2. Remove the packaging and cushioning material. 3. Place the device indoors on a stable surface or install it in a 19” rack. 4. Connect external monitors to the grandMA3 device using the native DisplayPort connectors. 5. Connect an external mouse or keyboard using the USB ports. 6. Insert the IEC connector into the corresponding jack. 7. Connect the power plug. 8. Turn on the power switch on the rear panel. 9. Press the power key on the front panel. ### Turn off the grandMA3 onPC rack-unit [Section titled “Turn off the grandMA3 onPC rack-unit”](#turn-off-the-grandma3-onpc-rack-unit) | | | | ------------------------------------------------ | ------------------------------------------------------------------------------------------------------------------------------------------------------------- | |  | **Important:** Do not press the power key to turn off the device. Only if a hard shutdown is necessary, press and hold the power key for more than 3 seconds. | 1. Tap  at the top of the control bar to start the shutdown procedure or shutdown the onPC software by the [shutdown keyword](/grandma3/2-3/keyword_shutdown/). A warning pop-up appears:  2. Tap OK. 3. Shut down the Windows system. The grandMA3 onPC rack-unit powers down. | | | | ------------------------------------------------ | --------------------------------------------------------------------------------------------------------------------------------------------------------------------------------------------------------------------- | |  | **Important:** Do not switch off the grandMA3 onPC rack-unit too early. Make sure that you wait until Windows has completely shut down. The display and the fan on the grandMA3 onPC rack-unit must have turned off. | 4. Set the power switch to position **O**. ### Install the Latest grandMA3 Software and the Operating System [Section titled “Install the Latest grandMA3 Software and the Operating System”](#install-the-latest-grandma3-software-and-the-operating-system) | | | | ----------------------------------------- | ------------------------------------------------------------------------------------------------------- | |  | **Warning:** Updating the grandMA3 software and the operating system deletes all previous stored files. | | | | | ------------------------------------------ | --------------------------------------------------------------------------------------------------------------------------------------------------------------- | |  | **Hint:** To update only the grandMA3 onPC software, use the network update process. For more information, see [Network update](/grandma3/2-3/update_network/). | 1. To install, download the latest software version from [www.malighting.com](http://www.malighting.com).\ The required installer is called grandMA3 onPC Windows Hardware Image x.x.x.x. 2. Save the full software image on your computer’s hard drive. 3. Extract the zip file “grandMA3\_v.x.x.x.x\_windows\_hardware\_image.zip” and copy it onto a USB flash drive (FAT32 formatted, minimum 8 GB). 4. Insert the USB flash drive. 5. Power up the grandMA3 onPC rack-unit. 6. If necessary, tap F8 to choose Boot device and select boot from USB. 7. Follow the onscreen instructions during the update process. To learn more about the update process, read the [Update grandMA3 onPC windows hardware](/grandma3/2-3/update_windows_hardware/) topic in the [online user manual](https://help.malighting.com/grandMA3/2.3/HTML/help.html). | | | | ------------------------------------------------ | ---------------------------------------------------------------------------------------------------------------------------------------------------------------------------------------------------------------------------------------------------------------------------------------------------------------------------------------------------------------------------------------------------------------------------------------------------------------------------------- | |  | **Important:** To configure the device, or to update or downdate the installed software, use a grandMA3 console or your PC or laptop with the grandMA3 onPC software installed. For more information see the topics [Update the Software](/grandma3/2-3/update/) via [Network Update](/grandma3/2-3/update_network/) in the [grandMA3 User Manual](https://help.malighting.com/grandMA3/2.3/HTML/help.html) online available at [www.malighting.com](https://www.malighting.com/). | ### Different Combinations [Section titled “Different Combinations”](#different-combinations) | Device | Connected To | Parameters | | ------------------------- | ------------------------------- | ---------- | | grandMA3 onPC rack-unit | standalone | 4 096 | | grandMA3 onPC rack-unit + | grandMA3 onPC 8/4/2Port Node | 4 096 | | grandMA3 onPC rack-unit + | grandMA3 processing unit M/L/XL | 4 096 |
# Quick Start
> 1. Multi-touch Bildschirm
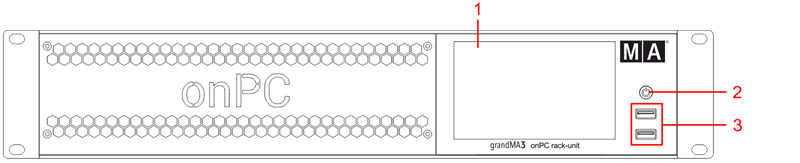 1. Multi-touch Bildschirm 2. [Ein/Aus-Taste](/grandma3/2-3/key_power/) 3. [USB 2.0](/grandma3/2-3/fs_connect_usb/)  *grandMA3 onPC rack-unit Rückseite* 1. [DisplayPort 1+2](/grandma3/2-3/fs_connect_external_screens/) 2. [USB 3.0](/grandma3/2-3/fs_connect_usb/) 3. [USB 2.0](/grandma3/2-3/fs_connect_usb/) 4. [Ethernet 1+2](/grandma3/2-3/fs_connect_ethernet/) 5. [Line In+Out](/grandma3/2-3/do_connector_pin_assignment/) 6. [DMX A-C](/grandma3/2-3/fs_connect_dmx/) 7. [MIDI In+Out](/grandma3/2-3/fs_connect_midi/) 8. [DC Remote Control](/grandma3/2-3/remote_inputs_dc/) 9. [LTC](/grandma3/2-3/fs_connect_smpte_ltc/) 10. Netzschalter + [Kaltgerätebuchse](/grandma3/2-3/fs_connect_power/) ### grandMA3 onPC rack-unit einschalten [Section titled “grandMA3 onPC rack-unit einschalten”](#grandma3-onpc-rack-unit-einschalten) 1. Gerät auspacken. 2. Verpackungs- und Polstermaterial entfernen. 3. Gerät in einem geschlossenen Raum auf eine stabile Fläche stellen oder im Rack installieren. 4. Externe Monitore mit DisplayPort Anschluss an das Gerät anschließen. 5. Externe Maus und Keyboard über die USB Ports anschließen. 6. Kaltegerätestecker mit der dafür vorgesehenen Buchse verbinden. 7. Netzstecker in die Steckdose stecken. 8. Netzschalter auf der Rückseite auf **I** stellen. 9. Ein/Aus-Taste auf der Vorderseite drücken. ### grandMA3 onPC rack-unit ausschalten [Section titled “grandMA3 onPC rack-unit ausschalten”](#grandma3-onpc-rack-unit-ausschalten) | | | | ------------------------------------------------ | ----------------------------------------------------------------------------------------------------------------------------------------------------------- | |  | **Wichtig!** Das Gerät nie über die Ein/Aus-Taste ausschalten. Nur wenn ein hartes Ausschalten erforderlich ist, die Ein/Aus-Taste 3 Sekunden lang drücken. | 1. In der onPC Software das  Symbol in der oberen linken Ecke der Kontrollleiste antippen, um die Software zu beenden oder das [Shutdown keyword](/grandma3/2-3/keyword_shutdown/) verwenden. Eine Warnmeldung erscheint:  2. OK tippen. 3. Windows beenden. Die grandMA3 onPC rack-unit fährt runter. | | | | ------------------------------------------------ | -------------------------------------------------------------------------------------------------------------------------------------------------------------------------------------------------------------------- | |  | **Wichtig:** Die grandMA3 onPC rack-unit nicht zu früh ausschalten. Vergewissern Sie sich, dass Windows komplett heruntergefahren ist. Der Bildschirm und der Lüfter an der grandMA3 onPC rack-unit müssen aus sein. | 4. Um die grandMA3 onPC rack-unit auszuschalten, Netzschalter auf **O** stellen. ### Software aktualisieren [Section titled “Software aktualisieren”](#software-aktualisieren) 1. Besuchen Sie [www.malighting.com](https://www.malighting.com/), um die aktuellste Software herunterzuladen. Der benötigte Installer heißt grandMA3 onPC Windows Hardware Image x.x.x.x. 2. Das gesamte Software Image auf der Festplatte Ihres Computers speichern. 3. Die Zip-Datei entpacken und das Image auf Ihren USB-Stick (FAT32 formatiert, mindestens 8 GB) kopieren. 4. Den USB-Stick in den USB-Anschluss am Gerät stecken. 5. Das Gerät einschalten. 6. Falls notwendig, auf der Tastatur mehrfach die Taste 8/F8. drücken und Sie “Von USB starten” wählen. 7. Während des Update-Vorgangs den Bildschirmanweisungen folgen. Für weitere Informationen über den Update-Vorgang siehe den Abschnitt [Update grandMA3 onPC windows hardware](/grandma3/2-3/update_windows_hardware/) im [grandMA3 Online Benutzerhandbuch](https://help.malighting.com/grandMA3/2.3/HTML/help.html) unter [www.malighting.com.](https://www.malighting.com/) | | | | ------------------------------------------------ | ------------------------------------------------------------------------------------------------------------------------------------------------------------------------------------------------------------------------------------------------------------------------------------------------------------------------------------------------------------------------------------------------------------------------------------------------------------------------------------------------------------ | |  | **Wichtig:** Um das Gerät zu konfigurieren oder ein Update oder Downdate durchzuführen, eine andere grandMA3 Konsole im Netzwerk oder Ihren PC oder Ihr Laptop mit grandMA3 onPC Software verwenden. Für weitere Informationen siehe die Abschnitte [Update the Software](/grandma3/2-3/update/) via [Network Update](/grandma3/2-3/update_network/) im [grandMA3 Online Benutzerhandbuch](https://help.malighting.com/grandMA3/2.3/HTML/help.html) unter [www.malighting.com.](https://www.malighting.com/) | ### Kombinationsmöglichkeiten [Section titled “Kombinationsmöglichkeiten”](#kombinationsmöglichkeiten) | Gerät | Verbunden mit | Parameter | | ------------------------- | ------------------------------------------- | --------- | | grandMA3 onPC rack-unit + | PC/Laptop | 4 096 | | grandMA3 onPC rack-unit + | PC/Laptop + grandMA3 onPC 8/4/2Port Node | 4 096 | | grandMA3 onPC rack-unit + | PC/Laptop + grandMA3 processing unit M/L/XL | 4 096 | | | | | ------------------------------------------------ | --------------------------------------------------------------------------------------------------------------------------------------------------------- | |  | **Wichtig:** Unabhängig davon, welche Geräte an der grandMA3 onPC Software angeschlossen sind, kann die Parameteranzahl insgesamt maximal 4 096 betragen. | Weitere Information finden Sie im [User Manual](https://help.malighting.com/grandMA3/2.3/HTML/help.html) unter [Expand the Amount of Parameters.](/grandma3/2-3/system_parameter_expand/)
# Guide De Démarrage
> 1. Écran
 1. Écran 2. [Touche Marche/Arrêt](/grandma3/2-3/key_power/) 3. [USB 2.0](/grandma3/2-3/fs_connect_usb/) 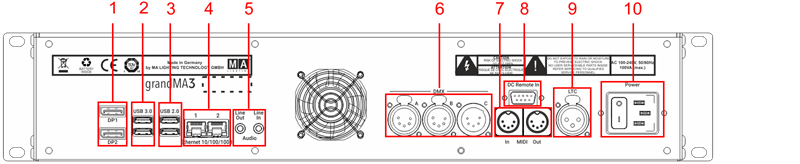 \_grandMA3 onPC rack-unit \_panneau arrière 1. [DisplayPort 1+2](/grandma3/2-3/fs_connect_external_screens/) 2. [USB 3.0](/grandma3/2-3/fs_connect_usb/) 3. [USB 2.0](/grandma3/2-3/fs_connect_usb/) 4. [Ethernet 1+2](/grandma3/2-3/fs_connect_ethernet/) 5. [Line In+Out](/grandma3/2-3/do_connector_pin_assignment/) 6. [DMX A-C](/grandma3/2-3/fs_connect_dmx/) 7. [MIDI In+Out](/grandma3/2-3/fs_connect_midi/) 8. [DC Remote Control](/grandma3/2-3/remote_inputs_dc/) 9. [LTC](/grandma3/2-3/fs_connect_smpte_ltc/) 10. Interrupteur de courant + [connecteur IEC](/grandma3/2-3/fs_connect_power/) ### Branchement et mise en marche de l’appareil [Section titled “Branchement et mise en marche de l’appareil”](#branchement-et-mise-en-marche-de-lappareil) 1. Déballer l’appareil. 2. Enlever le matériel de protection. 3. Placer l’appareil à l’intérieur sur une surface stable ou installer dans un rack 19”. 4. Brancher les écrans externes à la rack-unit en utilisant des connecteurs d’origine DisplayPort. 5. Connecter un clavier externe ou une souris avec un port USB. 6. Insérer le connecteur IEC dans la prise correspondante. 7. Brancher la prise principale de courant. 8. Allumer l’interrupteur de courant sur le panneau arrière. 9. Appuyer sur la touche Marche/Arrêt sur le panneau avant. ### Éteindre la rack-unit [Section titled “Éteindre la rack-unit”](#éteindre-la-rack-unit) | | | | ------------------------------------------------ | ----------------------------------------------------------------------------------------------------------------------------------------------------------------------------------------------------------------------- | |  | **Important :** N’appuyer pas sur la touche Marche/Arrêt pour éteindre l’appareil. Seulement si un arrêt brutal est nécessaire, appuyer sur la touche Marche/Arrêt et maintener-la enfoncée pendant plus de 3 secondes. | -Appuyer sur l’icone  en haut de la barre de contrôle pour démarrer le processus de fermeture de la console ou de l’application onPC ou fermer le logiciel onPC en utilisant [shutdown keyword](/grandma3/2-3/keyword_shutdown/). -Un pop-up d’avertissement s’ouvre:  -Appuyer sur OK.\ -Fermer le système Windows. \ -La rack-unit s’éteint. | | | | ------------------------------------------------ | ------------------------------------------------------------------------------------------------------------------------------------------------------------------------------------------------ | |  | **Important:** Ne pas éteindre la rack-unit trop rapidement. Assurez-vous d’attendre jusqu’à la fermeture complète de Windows. L’écran et le ventilateur de la rack-unit doivent être éteints. | -Mettre l’interrupteur en position **O**. ### Software update [Section titled “Software update”](#software-update) 1. Pour mettre à jour un appareil grandMA3, téléchargez le logiciel grandMA3 sur [www.malighting.com](http://www.malighting.com/).\ L’installateur requis est appelé grandMA3 onPC Windows Hardware Image x.x.x.x. 2. Extrayer le fichier zip et copier le fichier complet dans le répertoire racine de votre clé USB (FAT32 formatted, minimum 8 GB). 3. Insérer la clé USB dans le port USB de l’appareil. 4. Allumer l’appareil grandMA3. 5. Quand nécessaire, appuyer sur la touche 8/F8 pour choisir “Boot from USB”. 6. Suivre les instructions à l’écran pendant le processus de mise à jour. Pour plus d’information, voir la section [Update grandMA3 onPC windows hardware](/grandma3/2-3/update_windows_hardware/) dans le [Mode d’emploi](https://help.malighting.com/grandMA3/2.3/HTML/help.html). | | | | ------------------------------------------------ | ----------------------------------------------------------------------------------------------------------------------------------------------------------------------------------------------------------------------------------------------------------------------------------------------------------------------------------------------------------------------- | |  | **Important:** Pour configurer l’appareil ou pour faire un update ou downdate, utiliser la console grandMA3 ou le logiciel grandMA3 onPC. Pour plus d’information, voir les sections [Update the Software](/grandma3/2-3/update/) via [Network Update](/grandma3/2-3/update_network/) dans le [Mode d’emploi](https://help.malighting.com/grandMA3/2.3/HTML/help.html). | ### Différentes Combinaisons [Section titled “Différentes Combinaisons ”](#différentes-combinaisons) | *Appareil* | *Branché à* | *Paramètres* | | --------------------------- | --------------------------------- | ------------ | | *grandMA3 onPC rack-unit* | \_ \_ | *4 096* | | *grandMA3 onPC rack-unit +* | *grandMA3 onPC 8/4/2Port Node* | *4 096* | | *grandMA3 onPC rack-unit +* | *grandMA3 processing unit M/L/XL* | \_4 096 \_ | | | | | ------------------------------------------------ | ---------------------------------------------------------------------------------------------------------------------------- | |  | **Important:** Peu importe les appareils branchés au logiciel grandMA3 onPC, le nombre de paramètres ne peut excéder 4 096. | Pour plus d’information, voir: [Expand the Amount of Parameters topic.](/grandma3/2-3/system_parameter_expand/)
# Safety
> Warning – Danger area
## Symbols and Warning Labels [Section titled “Symbols and Warning Labels”](#symbols-and-warning-labels)  **Warning** – Danger area ***  **Caution**– Risk of electric shock *** ## Risk of Electric Shock [Section titled “Risk of Electric Shock”](#risk-of-electric-shock) The device is to be serviced by qualified personnel only as live parts may be exposed when opening and/or removing coverings. Touching live parts may cause electric shock.  ***  Dispose of as hazardous waste. Follow the applicable regulations. For more information see [Disposal](/grandma3/2-3/key_rack_unit_disposal/). ***  Declaration of conformity. For more information see [Conformity](/grandma3/2-3/key_grandma3_onpc-rack_unit/): ***  Operating voltage ON/OFF.
# Sécurité
> Avertissement – Zone de danger
# ## Symboles et consignes de sécurité [Section titled “Symboles et consignes de sécurité”](#symboles-et-consignes-de-sécurité)  **Avertissement** – Zone de danger ***  **Attention** – Risque de choc électrique *** ### Risque de choc électrique [Section titled “Risque de choc électrique”](#risque-de-choc-électrique) L’appareil ne doit être entretenu que par du personnel qualifié, des parties sous tension risquant d’être exposées lors de l’ouverture et / ou du retrait des couvercles. Le contact avec des pièces sous tension peut provoquer un choc électrique.  ***  Éliminer comme déchets dangereux. Respecter la réglementation en vigueur. Pour plus d’informations, voir [Élimination](/grandma3/2-3/key_rack_unit_disposal-1-2/). ***  Déclaration de conformité. Pour plus d’informations, voir [Conformité](/grandma3/2-3/key_grandma3_onpc-rack_unit-1-2/). ***  Tension de service Marche / Arrêt. | | | | ----------------------------------------- | -------------------------------------------------------------------------------------------------------------------------------------------------------------------------------------------------------------------------------------------------------------- | |  | **Avertissement :** L’appareil doit être mis à la terre. Ne pas ignorer la fonction de sécurité d’une prise avec terre. Une prise avec terre a deux contacts électriques et un troisième contact de terre. Le troisième contact est prévu pour votre sécurité. | Lisez attentivement toutes les instructions de ce guide rapide, en particulier les consignes générales de sécurité et les [limitations d’usages](/grandma3/2-3/key_onpc_rack_unit_limitations-1-2/). Suivez les instructions et conservez ce guide rapide pour une utilisation ultérieure. Respectez toutes les mises en garde et tous les avertissements mentionnés dans ce guide rapide et indiqués sur l’appareil. | | | | ------------------------------------------------ | -------------------------------------------------------------------------------------------------------------------------------------------- | |  | **Important :** Tous les travaux de réparation et d’entretien doivent être effectués exclusivement par des techniciens de service qualifiés. | * Cet appareil est à la pointe de la technologie ; * Cependant, des risques résiduels ne peuvent être exclus ; * Pour éviter les risques, suivez les consignes de sécurité ; * Cet appareil est destiné uniquement à un usage professionnel et ne convient pas à un usage résidentiel. MA Lighting Technology GmbH ne prend pas en charge d’éventuels dommages pouvant survenir en cas de non-respect des consignes de sécurité. | | | | ----------------------------------------- | ------------------------------------------------------------------------------------------------------------------------------------------------------------------------------------------------------------ | |  | **Avertissement :** Des changements ou des modifications à ces appareils non expressément approuvés par la partie responsable de la conformité pourraient annuler le droit de l’utilisateur de les utiliser. | | | | | ------------------------------------------------ | ------------------------------------------------------------------------------------------------------------------------------------------------------------------------------------------------------------------------------------------------------------------------------------------------------------------------------------------------------------------------------------------------------------------------------------------------------------------------------------------------------------------------------------------------------------------------------------------------------------------------------------------------------------------------------------------------------------------------------------------------------------------------------- | |  | **Note :** Ces appareils ont été testés et jugés conformes aux limites d’un appareil numérique de classe A, conformément à la partie 15 des règles de la FCC et aux normes CE. Ces limites sont conçues pour fournir une protection raisonnable contre de possibles interférences lorsque les appareils sont utilisés dans un environnement commercial. Ceux-ci génèrent, utilisent et peuvent émettre de l’énergie radiofréquence et, s’ils ne sont pas installés et utilisés conformément à ce guide rapide, peuvent éventuellement causer des interférences aux communications radio. L’utilisation de ces appareils dans une zone résidentielle est susceptible de causer des interférences, auquel cas l’utilisateur devra corriger ces interférences à ses propres frais. | ## Dangers causés par le courant électrique [Section titled “Dangers causés par le courant électrique”](#dangers-causés-par-le-courant-électrique) Un appareil ou un câble d’alimentation défectueux présente un risque de blessures graves ou mortelles dues à un choc électrique. Suivez les consignes de sécurité pour éviter les risques liés au courant électrique. * N’utilisez pas de câble d’alimentation défectueux ; * Ne pas ouvrir les couvercles vissés de l’appareil ; * N’utilisez l’appareil que s’il est dans un état technique impeccable ; * Ne réparez pas l’appareil par vos propres moyens ; * N’effectuez pas d’ingénierie inverse sur l’appareil et n’apporter aucune modification à ses composants et accessoires ; * N’exposez pas l’appareil à la pluie ou à l’humidité ; * Ne pas plonger l’appareil dans l’eau. ## []()Consignes de sécurité générales [Section titled “Consignes de sécurité générales ”](#consignes-de-sécurité-générales) | | | | ------------------------------------------------ | ---------------------------------------------------------------------------------------------------------------------------------------------------------------------------------------------------------------- | |  | **Important :** La fiche de l’appareil et la fiche de la ligne d’alimentation servent de séparateur. - Pour couper l’alimentation électrique, débranchez la fiche de l’appareil et / ou la fiche d’alimentation. | Pour éviter des blessures ou des dommages à l’appareil : * Ne mettez pas vos mains à l’intérieur de l’appareil pendant le fonctionnement ; * L’appareil et le câble d’alimentation doivent être tenus à l’écart des enfants de moins de 8 ans ; * Les enfants ne sont pas autorisés à jouer avec l’appareil ; * Débranchez l’alimentation électrique du réseau pendant les orages ; * Débranchez l’alimentation électrique du réseau si l’appareil est laissé sans surveillance pendant une longue période ; * Débranchez l’alimentation électrique avant de nettoyer l’appareil ; * N’utilisez pas de nettoyant liquide ou en aérosol. Utilisez uniquement un chiffon sec ; * Ne pas utiliser l’appareil à proximité de l’eau ; * Ne l’exposez pas à un environnement humide ; * Ne versez aucun liquide sur l’appareil ; * Ne bouchez pas ou ne couvrez pas les trous de ventilation de l’appareil. Ceux-ci sont essentiels à la circulation de l’air à l’intérieur de l’appareil et protègent l’appareil contre la surchauffe ; * N’insérez aucun objet dans les trous de ventilation de l’appareil car ceux-ci pourraient entrer en contact avec des pièces sous tension ou provoquer des courts-circuits, un incendie et / ou un choc électrique ; * Ne placez aucun objet sur le câble d’alimentation. Protégez-le contre tout risque de piétinement ou de pincement, en particulier au niveau du connecteur et à l’endroit où les câbles sortent de l’appareil ; * Lors de l’utilisation d’un cable de rallonge, assurez-vous que la puissance nominale de tous les appareils connectés en série ne dépasse pas la puissance nominale maximale du cable de rallonge ; * Ne vous appuyez pas sur l’appareil ; * Ne placez aucun objet lourd sur l’appareil ; * N’utilisez pas de force excessive sur les touches, les boutons, les potentiomètres, les interrupteurs, les connecteurs ou sur les écrans ; * Si le câble d’alimentation ou la fiche d’alimentation principale sont défectueux, faites-les remplacer immédiatement par un technicien qualifié ; * Placez l’appareil uniquement sur des surfaces stables. S’il est placé sur des surfaces instables, il peut tomber et se casser ; * N’utilisez que des câbles d’alimentation homologués avec marquage ; * N’utilisez pas de talkie-walkie puissant ou de téléphone portable à proximité de l’appareil ; * L’appareil est équipé d’une fiche de sécurité. Cette fiche ne peut être utilisé qu’avec des prises de sécurité compatible ; * Comme pour tous les produits fabriqués industriellement, l’utilisation de substances induisant une réaction allergique telle que l’aluminium ne peut généralement pas être exclue. Si vous développez une réaction allergique (éruption cutanée, éternuements fréquents, yeux rouges ou difficultés respiratoires), consultez immédiatement un médecin pour en déterminer la cause. \*\*Si l’une des conditions suivantes se produit, débranchez la fiche d’alimentation principale et appelez votre distributeur local ou le \*\***support technique !** * Le câble d’alimentation ou la fiche principale est endommagé ou usé ; * Pénétration de liquides ; * L’appareil a été exposé à la pluie ou à une forte humidité ambiante ; * L’appareil ne fonctionne pas correctement, même si vous avez suivi toutes les instructions de ce guide rapide. N’utilisez les commandes que comme indiquées dans le guide rapide. Des paramètres incorrects peuvent endommager l’appareil ; * L’appareil est tombé et le boitier est endommagé.
# Sicherheit
> Warnung – Gefahrenbereich
# ## Symbole und Warnzeichen [Section titled “Symbole und Warnzeichen”](#symbole-und-warnzeichen)  \*\*Warnung \*\*– Gefahrenbereich ***  **Vorsicht**– Stromschlaggefahr *** ### Stromschlaggefahr [Section titled “Stromschlaggefahr”](#stromschlaggefahr) Die Wartung des Gerätes darf ausschließlich vom geschulten Personal durchgeführt werden, da beim Öffnen und/oder Entfernen von Abdeckungen spannungsführende Teile freigelegt werden könnten. Spannungsführende Teile nicht berühren – Gefahr eines elektrischen Schlages.  ***  Das Gerät ist als Sondermüll zu entsorgen. Die örtlichen Vorschriften beachten. Für weitere Informationen siehe [Entsorgung](/grandma3/2-3/key_rack_unit_disposal-1/). ***  Batterie recyceln. ***  Konformitätserklärung. Für weitere Informationen siehe [Konformität](/grandma3/2-3/key_grandma3_onpc-rack_unit-1/). ***  Betriebsspannung AN/AUS | | | | ----------------------------------------- | ------------------------------------------------------------------------------------------------------------------------------------------------------------------------------------------------------------------------------------------------- | |  | **Warnung:** Das Gerät muss geerdet sein. Nicht den Sicherheitszweck eines Schutzkontaktsteckers ignorieren. Ein Schutzkontaktstecker hat zwei Stromkontakte und einen dritten Erdungskontakt. Der dritte Erdungskontakt dient Ihrer Sicherheit. | Lesen Sie alle Anweisungen in diesem Quick Manual aufmerksam durch, vor allem die Allgemeinen Sicherheitsanweisungen weiter unten in diesem Kapitel und die [Betriebsgrenzen](/grandma3/2-3/key_onpc_rack_unit_limitations-1/). Befolgen Sie diese und bewahren Sie das Quick Manual für den späteren Gebrauch auf. Befolgen Sie alle Vorsichtsmaßnahmen und Warnhinweise, die in diesem Quick Manual und am Gerät vermerkt sind. | | | | ------------------------------------------------ | -------------------------------------------------------------------------------------------------------------------------- | |  | **Wichtig:** Sämtliche Reparatur- und Wartungsarbeiten dürfen ausschließlich vom geschulten Personal durchgeführt werden. | Dieses Gerät entspricht dem neuesten Stand der Technik, trotzdem kann ein Restrisiko nicht komplett ausgeschlossen werden. Um dieses Restrisiko zu vermeiden, befolgen Sie die Sicherheitsanweisungen. Dieses Gerät ist nur für den professionellen Gebrauch bestimmt und nicht für den Privatgebrauch geeignet. MA Lighting Technology GmbH kommt für den Schaden nicht auf, der aufgrund von Nichtbeachtung der Sicherheitsanweisungen entstehen könnte. | | | | ----------------------------------------- | --------------------------------------------------------------------------------------------------------------------------------------------------------------------------------------------------------------------------- | |  | **Warnung:** Durch den Nutzer herbeigeführte Modifikationen an diesen Geräten, die nicht ausdrücklich von der für die Übereinstimmung verantwortlichen Stelle genehmigt wurden, führen zum Verbot der Benutzung der Geräte. | | | | | ------------------------------------------------ | --------------------------------------------------------------------------------------------------------------------------------------------------------------------------------------------------------------------------------------------------------------------------------------------------------------------------------------------------------------------------------------------------------------------------------------------------------------------------------------------------------------------------------------------------------------------------------------------------------------------------------------- | |  | **Wichtig:** Diese Geräte wurden getestet und entsprechen den Grenzwerten eines digitalen Geräts der Klasse A gemäß der FCC-Bestimmungen Teil 15 und der CE-Regularien. Diese Grenzwerte bieten im professionellen Betrieb einen angemessenen Schutz gegen störende Interferenzen. Die Geräte erzeugen, verwenden und strahlen möglicherweise Funkwellen aus. Wenn sie nicht gemäß dieser Anleitung installiert und verwendet werden, können sie den Funkverkehr stören. Der Betrieb dieser Geräte im privaten, häuslichen Bereich kann u. U. Funkstörungen verursachen. In diesem Fall muss der Benutzer die Störungen selbst beheben. | ## Vermeiden von Stromschlag [Section titled “Vermeiden von Stromschlag”](#vermeiden-von-stromschlag) Ein beschädigtes Gerät oder Netzkabel kann schwere oder tödliche Verletzungen verursachen. Befolgen Sie die Sicherheitsanweisungen, um Verletzungen, die durch elektrischen Strom verursacht werden können, zu vermeiden. * Kein beschädigtes Netzkabel nutzen. * Keine festgeschraubten Abdeckungen am Gehäuse öffnen. * Gerät nur im technisch einwandfreien Zustand nutzen. * Gerät niemals selbst reparieren. * Gerät nicht modifizieren und keine Änderungen an dessen Komponenten und Zubehör vornehmen. * Gerät nicht Regen oder Feuchtigkeit aussetzen. * Gerät nicht in Wasser tauchen. ## []()Allgemeine Sicherheitsanweisungen [Section titled “Allgemeine Sicherheitsanweisungen”](#allgemeine-sicherheitsanweisungen) | | | | ------------------------------------------------ | --------------------------------------------------------------------------------------------------------------------------------------------------------------------------------- | |  | **Wichtig:** Der Gerätestecker und der Netzstecker der Zuleitung dienen als Trennvorrichtung. Ziehen Sie den Geräte- und/oder Netzstecker um das Gerät spannungsfrei zu schalten. | Um Verletzungen vorzubeugen oder Schäden am Gerät zu vermeiden: * Beim Bedienen nicht in das Gerät hineingreifen. * Gerät und Netzkabel von Kindern unter 8 Jahren fernhalten. * Kinder nicht mit dem Gerät spielen lassen. * Bei Gewitter das Gerät spannungsfrei schalten. * Bei längerer Nichtverwendung das Gerät spannungsfrei schalten. * Vor dem Reinigen das Gerät spannungsfrei schalten. * Keine flüssigen Reinigungsmittel oder Sprühreiniger verwenden. * Nur mit einem trockenen Tuch reinigen. * Gerät nicht in der Nähe von Wasser nutzen. * Gerät nicht einer feuchten Umgebung aussetzen. * Keine Flüssigkeiten auf das Gerät schütten. * Belüftungsöffnungen im Gehäuse nicht blockieren – diese sind für den Luftstrom innerhalb des Gerätes wichtig und schützen es vor Überhitzung. * Keine Fremdkörper in die Belüftungsöffnungen stecken, da diese mit spannungsführenden Teilen in Kontakt kommen und Kurzschlüsse, Feuer und/oder Stromschlag verursachen können. * Keine Gegenstände auf das Netzkabel stellen; Nicht auf das Netzkabel treten oder zusammendrücken, besonders am Stecker und an Stellen an denen die Kabel das Gehäuse verlassen. * Wird ein Verlängerungskabel genutzt, muss sichergestellt werden, dass die Summe der Nennleistungen der an das Kabel angeschlossenen Geräte die Nennleistung des Verlängerungskabels nicht überschreitet. * Sich nicht mit dem Körpergewicht auf dem Gerät abstützen. * Keine schweren Gegenstände auf dem Gerät abstellen. * Keine übermäßige Gewalt auf Tasten, Knöpfe, Fader, Drehknöpfe, Schalter, Verbindungen oder Monitor Wing ausüben. * Ist das Netzkabel oder der Stecker beschädigt, müssen diese umgehend von einer Fachkraft ausgetauscht werden. * Gerät nur auf stabilen Oberflächen platzieren; Wird es auf instabilen Flächen platziert, kann das Gerät herunterfallen und stark beschädigt werden. * Nur Netzkabel mit Sicherheitsprüfzeichen nutzen. * Keine leistungsstarken Funkgeräte oder Mobiltelefone in der Nähe des Gerätes verwenden. * Das Gerät hat ein Schutzkontaktstecker, der nur in Verbindung mit einer Schutzkontaktsteckdose genutzt werden darf. * Wie bei allen industriell gefertigten Gütern kann die Verwendung von Stoffen, die Allergien hervorrufen können, wie z.B. Aluminium, nicht gänzlich ausgeschlossen werden. Sollten allergische Reaktionen (wie z.B. Hautausschlag, ständiges Niesen, gerötete Augen oder Atemwegsbeschwerden) auftreten, ist umgehend ein Arzt zur Ursachenklärung aufzusuchen. **Sollte einer der folgenden Punkte zutreffen, das Gerät spannungsfrei schalten und den Kundendienst kontaktieren!** * Netzkabel und/oder Verbindung ist/sind beschädigt, spröde oder brüchig. * Eintritt von Wasser. * Gerät wurde Regen oder hoher Luftfeuchtigkeit ausgesetzt. * Gerät funktioniert bei Einhaltung von Bedienungsanweisungen, die im Quick Manual stehen, nicht einwandfrei. Steuerelemente so einstellen wie im Quick Manual beschrieben, da eine falsche Einstellung das Gerät beschädigen könnte. * Gerät ist heruntergefallen und dabei wurde das Gehäuse beschädigt.
# Support
> Contact us for any questions about your MA product.
Contact us for any questions about your MA product. MA Lighting and its extensive distributor network offer unparalleled technical support. Call on our expertise for help with any problem, no matter if it is about the operation, software features, software installations, or troubleshooting. ### Help Pages [Section titled “Help Pages”](#help-pages) The help pages are included in every software installer package and are automatically loaded into the software. To access and read the help pages, press Help + Please. The help pop-up opens on the main screen. To jump directly into a special help topic, use the context-sensitive help: * Press and hold Help and tap the desired user interface element (UI element) to open the corresponding help topic. * Tap  in the control bar and tap a UI element to open the corresponding help topic. ### Online Manuals [Section titled “Online Manuals”](#online-manuals) All MA product-related manuals are available as online versions. Just select your MA product and click on the respective link. All further documents can be found in our download area. Go to [https://www.malighting.com/training-support/online-manuals.](https://www.malighting.com/training-support/online-manuals) ### Video Tutorials [Section titled “Video Tutorials”](#video-tutorials) Get tips and tricks from our MA experts on your MA product. MA offers a whole range of videos on how to use your MA product in the best possible way. Just select your series and click on the links to watch the videos on our YouTube channel. Go to [https://www.malighting.com/training-support/video-tutorials.](https://www.malighting.com/training-support/video-tutorials) ### Community [Section titled “Community”](#community) Share your knowledge and get help from other MA users. A community can be stronger and better than the individual. Be part of the MA community! Go to [https://www.malighting.com/training-support/community.](https://www.malighting.com/training-support/community) ### Fixture Shares [Section titled “Fixture Shares”](#fixture-shares) In our MA Fixture Share you will find a comprehensive database of different fixture types for grandMA3, grandMA2, and dot2. You can also find the grandMA2 GDTF Converter there. Simply upload the GDTF file and it will be converted into a grandMA2 Fixture Profile.\ \ The GTDF Share contains a comprehensive library of all available GDTF files with all relevant modes and firmware versions. Like the MA Fixture Share, this database is continuously updated. For more information see: ### Local Support [Section titled “Local Support”](#local-support) If you have a question regarding your MA Lighting product, please first of all contact your local MA product specialists. ### Central Support [Section titled “Central Support”](#central-support) If you are in need of further assistance or manufacturer support, please fill out an email request on [www.malighting.com in](http://www.malighting.com%C2%A0in) Training and Support. Your request will automatically be sent to\*\* \*\*(in English or German). This email service is monitored during MA Lighting’s regular business hours in Germany from 8.30 am until 5 pm, Monday through Friday. ### Emergency Hotline [Section titled “Emergency Hotline”](#emergency-hotline) In any case of a show critical emergency please contact the MA Lighting support hotline. Phone +49 5251 68 88 65 99 Please note that this 24/7 hotline is strictly for emergency cases. ### Intellectual Property [Section titled “Intellectual Property”](#intellectual-property) MA Lighting Technology has registered multiple patents, trademarks, design patents, and utility models for its products.\ We will take legal action against the violation of this intellectual property. For more information see:
# Support
> Bei Fragen zu Ihren MA Produkten wenden Sie sich bitte an uns.
Bei Fragen zu Ihren MA Produkten wenden Sie sich bitte an uns. MA Lighting bietet mit dem angeschlossenen umfassenden Distributionsnetzwerk einen einmaligen technischen Support. Sollten wider Erwarten Probleme auftreten, stehen wir Ihnen mit unserem Know-how zur Seite, ganz gleich worum es sich handelt – Bedienung, Software-Features, Software-Installation oder Fehlerbeseitigung. ### Offline Hilfe [Section titled “Offline Hilfe”](#offline-hilfe) Die Offline Hilfe ist in jedem Software Installer enthalten und wird automatisch in die Software geladen. Zum Aufrufen der Hilfe die Tasten Help + Please drücken. Das Hilfe Fenster öffnet sich auf dem Hauptmonitor. Um ein spezielles Hilfethema direkt anzuspringen, die Kontextsensitive Hilfe verwenden. Um das entsprechende Hilfethema zu öffnen: * Taste Help drücken und halten und das gewünschte Bedienelement antippen. * Das  in der Kontrollleiste und das gewünschte Bedienelement antippen. ### Online Manuals [Section titled “Online Manuals”](#online-manuals) Alle Benutzerhandbücher der MA Produkte sind als Online-Versionen verfügbar. Einfach auswählen, für welches MA Produkt Sie eine Bedienungsanleitung benötigen. Gehe zu . ### Video Tutorials [Section titled “Video Tutorials”](#video-tutorials) Hier erhalten Sie Tipps und Tricks von unseren MA Experten für Ihr MA Produkt. MA Lighting bietet eine große Anzahl an Tutorial-Videos an, damit Sie Ihr MA Produkt bestmöglich nutzen können. Wählen Sie dafür einfach eine Serie aus und sehen Sie alle Videos dazu auf unserem YouTube Kanal. Gehe zu . ### Community [Section titled “Community”](#community) Teilen Sie Ihr Wissen mit anderen MA Usern. In der Gemeinschaft ist man effektiver. Werden Sie Mitglied der MA Community! Gehe zu [https://www.malighting.com/de/training-support/community](https://www.malighting.com/de/training-support/community/). ### Fixture Shares [Section titled “Fixture Shares”](#fixture-shares) Im MA Fixture Share finden Sie eine umfassende Bibliothek der unterschiedlichsten Fixture Typen für alle grandMA3, grandMA2 und dot2 Serien. Im GTDF Share finden Sie eine umfassende Bibliothek aller verfügbaren GDTF Files mit allen relevanten Modi und Firmware Versionen. Diese Datenbank wird, wie das MA Fixture Share kontinuierlich aktualisiert. Mehr Info unter . ### Lokaler Support [Section titled “Lokaler Support”](#lokaler-support) Bei Fragen zu Ihren MA Lighting Produkten wenden Sie sich bitte als erstes an Ihre MA Produktspezialisten vor Ort. ### Zentraler Support [Section titled “Zentraler Support”](#zentraler-support) Wenn Sie weitere Hilfe oder Herstellerunterstützung benötigen, schicken Sie uns bitte ein [ausgefülltes E-Mail-Formular](https://www.malighting.com/de/training-support/support-anfrage) unter , Training und Support. Diese Anfrage wird automatisch an \*\* \*\*(in Englisch oder Deutsch) gesendet. Dieser E-Mail-Service ist während der regulären Geschäftszeiten von MA Lighting von 8.30 Uhr bis 17 Uhr von Montag bis Freitag erreichbar. ### Notfall-Hotline [Section titled “Notfall-Hotline”](#notfall-hotline) In show-kritischen Situationen nehmen Sie bitte Kontakt zur MA Lighting Support-Hotline auf. Tel. +49 5251.68 88 65 99 Diese Hotline ist 24 Stunden am Tag und 7 Tage in der Woche besetzt. Sie ist nur für Notfälle. ### Intellectual Property [Section titled “Intellectual Property”](#intellectual-property) MA Lighting Technology hat für seine Produkte zahlreiche Patente, Marken, Geschmacksmuster und Gebrauchsmuster angemeldet. Im Falle der Verletzung dieses geistigen Eigentums werden wir rechtliche Schritte einleiten. Mehr Info unter .
# Support technique
> Contactez-nous pour toute question concernant votre produit MA.
Contactez-nous pour toute question concernant votre produit MA. MA Lighting et son vaste réseau de distributeurs offrent un support technique incomparable. Faites appel à notre expertise pour tout problème, qu’il s’agisse de fonctionnement, de fonctionnalités logicielles, d’installations logicielles ou de dépannage. ### Pages d’aide [Section titled “Pages d’aide”](#pages-daide) Les pages d’aide sont incluses dans chaque logiciel d’installation et sont automatiquement chargées dans le logiciel. Pour accéder et lire les pages d’aide, appuyez sur Help + Please. La fenêtre contextuelle d’aide s’ouvre sur l’écran principal. Pour accéder directement à une rubrique d’aide spéciale, utilisez l’aide contextuelle : * Appuyez et maintenez enfoncé le bouton Help et touchez l’élément d’interface utilisateur (élément IU) souhaité pour ouvrir la rubrique d’aide correspondante. * Tapez sur  dans la barre de contrôle et appuyez sur un élément de l’IU pour ouvrir le sujet d’aide correspondant. ### Guides en ligne [Section titled “Guides en ligne”](#guides-en-ligne) Tous les guides relatifs aux produits MA sont disponibles en ligne. Choisissez simplement votre produit MA et cliquez sur le lien correspondant. Tous les autres documents sont disponibles dans notre espace de téléchargement. Visitez . ### Tutoriels vidéo [Section titled “Tutoriels vidéo”](#tutoriels-vidéo) Obtenez des conseils et astuces de nos experts MA sur votre produit MA. MA vous propose toute une gamme de vidéos sur la meilleure façon d’utiliser votre produit MA. Sélectionnez simplement votre série et cliquez sur les liens pour regarder les vidéos sur notre chaîne YouTube. Visitez . ### Communauté [Section titled “Communauté”](#communauté) Partagez vos connaissances et obtenez l’aide d’autres utilisateurs de MA. Une communauté peut être plus forte et meilleure que l’individu. Faites partie de la communauté MA ! Visitez . ### Fixture Shares [Section titled “Fixture Shares”](#fixture-shares) Dans notre MA Fixture Share, vous trouverez une base de données complète des différents types de luminaires pour grandMA3, grandMA2 et dot2. Le partage GTDF contient une bibliothèque complète de tous les fichiers GDTF disponibles avec tous les modes et versions de micrologiciel pertinents. Tout comme MA Fixture Share, cette base de données est continuellement mise à jour. Pour plus d’informations, voir: ### Support local [Section titled “Support local”](#support-local) Si vous avez une question concernant votre produit MA Lighting, veuillez tout d’abord contacter votre spécialiste MA local. ### Support central [Section titled “Support central”](#support-central) Si vous avez besoin de plus d’aide ou d’assistance de la part du fabricant, veuillez remplir une demande par e-mail à [www.malighting.com](https://www.malighting.com/) sous Training and Support. Votre demande sera automatiquement envoyée à **** (en anglais ou en allemand). Ce service de messagerie électronique est surveillé pendant les heures d’ouverture habituelles de MA Lighting en Allemagne, de 8h30 à 17h, du lundi au vendredi. ### Hotline d’urgence [Section titled “Hotline d’urgence”](#hotline-durgence) En cas d’urgence, veuillez contacter le support technique de MA Lighting. Téléphone +49 5251 68 88 65 99 Veuillez prendre note que cette ligne d’assistance 24 heures sur 24 et 7 jours sur 7 est strictement réservée aux cas d’urgence. ### Propriété intellectuelle [Section titled “Propriété intellectuelle”](#propriété-intellectuelle) MA Lighting Technology a déposé plusieurs brevets, marques de commerce, brevets de conception et modèles d’utilité pour ses produits. Nous intenterons une action en justice contre la violation de cette propriété intellectuelle. Pour plus d’informations, voir:
# Technical Data
> grandMA3 onPC rack-unit front panel
| | | | ------------------------------------------------ | ------------------------------------------------------------------------------------------------------------------------------------------------------------------------------------------------------------------------- | |  | **Important:** Only use adequately protected power cables (min. Ø = 3 x 1.0 mm²). The required power cable must meet the country’s standards. **Only qualified personnel is allowed to perform work on the power cable!** | | | | | ------------------------------------------------ | -------------------------------------------------------------------------- | |  | **Important:** Power cable and connector are not included in the delivery. | * DMX: The maximum length of the cable is 350 m (in ideal conditions). * Use CAT-5e Ethernet cable or higher. Max. length of the cable 75 m.  grandMA3 onPC rack-unit front panel | Technical Data | | | ----------------- | ------------------------------------ | | Parameters | 4 096 (HTP/LTP) | | Parameters Mode 2 | not applicable (no Mode 2) | | Operating voltage | 100-240 V AC, 50/60 Hz | | Net weight | 4 kg / 9 lbs | | Power | max. 100 VA | | Dimensions | 482 x 249 x 87 mm / 19 x 10 x 3.5 in | ### Outputs grandMA3 onPC rack-unit [Section titled “Outputs grandMA3 onPC rack-unit”](#outputs-grandma3-onpc-rack-unit)  grandMA3 onPC rack-unit rear panel | Number | Connector | | ------ | ------------------------------------------------------------- | | 2x | DisplayPort 1.2 for external screens | | 2x | USB 3.0 (type A) max. 900 mA | | 2x | USB 2.0 (type A) max. 500 mA | | 2x | RJ 45 Ethernet 10 / 100 / 1000 | | 1x | Audio Line Out (mini jack 3.5 mm) | | 1x | Audio Line In (mini jack 3.5 mm) | | 2x | DMX512-A OUT (5pin XLR female) | | 1x | DMX512-A IN (5pin XLR male) | | 1x | GPI General Purpose Interface (D-SUB DE9 female) DC Remote In | | 1x | MIDI In (5pin DIN female) | | 1x | MIDI Out (5pin DIN female) | | 1x | LTC Linear Timecode (3pin XLR female) | | 1x | IEC connector |
# Données Techniques
> grandMA3 onPC rack-unit panneau arrière
| | | | ------------------------------------------------ | ----------------------------------------------------------------------------------------------------------------------------------------------------------------------------------------------------------------------------------------------------------- | |  | **Important:** Utiliser des câbles protégés adéquatement (min. Ø = 3 x 1.0 mm²). Le câble de courant requis pour le branchement doit être conforme au standard du pays. **Seul une personne qualifiée est autorisée à travailler sur le câble de courant!** | | | | | ------------------------------------------------ | ------------------------------------------------------------------------------ | |  | **Important:** Le câble et le connecteur ne sont pas inclus dans la livraison. | * DMX: la longueur maximale du câble ne doit pas excéder 350 m (dans des conditions idéal). * Utiliser un câble Ethernet de type CAT-5e ou supérieur. La longueur maximale du câble est de 75 m.  | Données Techniques | | | ------------------ | ------------------------------------ | | Paramètres | 4 096 (HTP/LTP) | | Paramètres Mode2 | Aucun | | Tension | 100-240 V AC, 50/60 Hz | | Poids net | 4 kg / 9 lbs | | Puissance | max. 100 VA | | Dimensions | 482 x 249 x 87 mm / 19 x 10 x 3.5 in | ### Sorties grandMA3 onPC rack-unit [Section titled “Sorties grandMA3 onPC rack-unit”](#sorties-grandma3-onpc-rack-unit)  grandMA3 onPC rack-unit panneau arrière | Nombre | Connecteur | | ------ | ------------------------------------------------------------- | | 2x | DisplayPort 1.2 pour écrans externes | | 2x | USB 3.0 (type A) max. 900 mA | | 2x | USB 2.0 (type A) max. 500 mA | | 2x | RJ 45 Ethernet 10 / 100 / 1000 | | 1x | Audio Out (mini jack 3.5mm) | | 1x | Audio In (mini jack 3.5mm) | | 2x | DMX512-A OUT (5pin XLR female) | | 1x | DMX512-A IN (5pin XLR male) | | 1x | GPI General Purpose Interface (D-SUB DE9 female) DC Remote In | | 1x | MIDI In (5pin DIN female) | | 1x | MIDI Out (5pin DIN female) | | 1x | LTC Linear Timecode (3pin XLR female) | | 1x | IEC connector |
# Technische Daten
> grandMA3 onPC rack-unit Rückseite
| | | | ------------------------------------------------ | ------------------------------------------------------------------------------------------------------------------------------------------------------------------------------------------------------------------------------------------------------- | |  | **Wichtig:** Ausreichend isolierte und geschützte Netzkabel verwenden (min. Ø = 3 x 1,0 mm²). Das Netzkabel muss den Standards des Landes entsprechen. **Arbeiten am Netzkabel dürfen ausschließlich von qualifiziertem Personal durchgeführt werden!** | | | | | ------------------------------------------------ | ------------------------------------------------------------------------------- | |  | **Wichtig:** Netzkabel und Steckverbinder sind im Lieferumfang nicht enthalten. | * DMX: Die maximale Kabellänge beträgt 350 m (unter idealen Bedingungen). * CAT-5e Ethernet-Kabel oder höher verwenden; die maximale Kabellänge beträgt 75 m.  | Technische Daten | | | ------------------------- | ------------------------------------ | | Parameter | 4 096 (HTP/LTP) | | Parameter Mode2 | nicht zutreffend (kein Mode2) | | Betriebsspannung | 100-240 V AC, 50/60 Hz | | Gewicht (ohne Verpackung) | 4 kg / 9 lbs | | Anschlussleistung | max. 100 VA | | Maße | 482 x 249 x 87 mm / 19 x 10 x 3.5 in | ### SteckverbindergrandMA3 onPC rack-unit [Section titled “SteckverbindergrandMA3 onPC rack-unit”](#steckverbindergrandma3-onpc-rack-unit)  grandMA3 onPC rack-unit Rückseite | Anzahl | Steckverbinder | | ------ | -------------------------------------------------------------------- | | 2x | DisplayPort (externe Bildschirme) | | 2x | USB 3.0 (type A) max. 900 mA | | 2x | USB 2.0 (type A) max. 500 mA | | 2x | RJ 45 Ethernet 10 / 100 / 1000 | | 1x | Audio Out (Miniklinke 3,5 mm) | | 1x | Audio In (Miniklinke 3,5 mm) | | 2x | DMX512-A OUT (5-polig XLR weiblich) | | 1x | DMX512-A IN (5-polig XLR männlich) | | 1x | GPI – General Purpose Input (D-SUB DE9 weiblich – DC Remote Control) | | 1x | MIDI IN (5-polig DIN weiblich) | | 1x | MIDI OUT (5-polig DIN weiblich) | | 1x | LTC – Linear Time Code (3-polig XLR weiblich) | | 1x | Kaltgeräteeinbaustecker |
# Transport
> Noncompliance with the safety instructions can result in personal injury or material damage;
* The grandMA3 onPC rack-unit must be protected from environmental factors such as physical shocks and vibration during transportation; * Remove all cables before transport; * The user is responsible for securely fastening the products for transport and for following the manufacturer’s safety instructions when transporting the device;\ Noncompliance with the safety instructions can result in personal injury or material damage; * Do not place the grandMA3 onPC rack-unit on unstable surfaces; * Do not place any objects on top of the grandMA3 onPC rack-unit. ## Subtopics [Section titled “Subtopics”](#subtopics) * [Limitations](/grandma3/2-3/key_onpc_rack_unit_limitations/)
# Transport
# * Die grandMA3 onPC rack-unit während des Transports vor Umwelteinflüssen wie Erschütterungen und Vibrationen schützen. * Alle Kabel vor dem Transport entfernen. * Der Benutzer ist dafür verantwortlich, das Gerät beim Transport sicher zu befestigen und die Sicherheitshinweise des Herstellers zu beachten. Die Nichteinhaltung der Sicherheitshinweise kann zu Personen- oder Sachschäden führen. * Die grandMA3 onPC rack-unit nicht auf eine instabile Oberfläche stellen. * Keine weiteren Gegenstände auf die grandMA3 onPC rack-unit stellen. | | | | ----------------------------------------- | ----------------------------------------------------------------------------------------------------------------------------------------------------------------------------------------------------------------------------------------------------------------------------------------------------------------------------------------------------------------------------------------------------------------------------------------------- | |  | **Wichtig:** - Beim Transport die zulässigen Werte für Temperaturen und Luftfeuchte beachten. Für weitere Information, siehe [Betriebsgrenzen](https://malighting.clickhelp.co/smart/project-waduc_qa_grandma3-user-manual/key_onpc_rack_unit_limitations-1). - Nach dem Transport das Gerät auf Beschädigungen prüfen. - Falls das Gerät beschädigt sein sollte (verbeult, verbogen oder kaputt), es nicht an die Stromversorgung anschließen! |
# Transport
> Le non-respect des consignes de sécurité peut entraîner des dommages corporels ou matériels ;
* Les grandMA3 onPC rack-units doivent être protégés des influences environnementales telles que les chocs physiques et les vibrations pendant le transport ; * Retirez tous les câbles avant le transport ; * L’utilisateur est responsable de la sûreté de la fixation des produits pour le transport et du respect des consignes de sécurité du fabricant lors du transport de l’appareil ;\ Le non-respect des consignes de sécurité peut entraîner des dommages corporels ou matériels ; * Ne placez pas les grandMA3 onPC rack-units sur des surfaces instables ; * Ne placez aucun objet sur les grandMA3 onPC rack-units. | | | | ----------------------------------------- | ------------------------------------------------------------------------------------------------------------------------------------------------------------------------------------------------------------------------------------------------------------------------------------------------------------------------------------------------------------------------------------------------------------------------------------------------ | |  | **Attention:** -Faites attention à la température et à l’humidité pendant le transport. Pour plus d’informations, voir [Limitations d’usage](https://malighting.clickhelp.co/smart/project-waduc_qa_grandma3-user-manual/key_onpc_rack_unit_limitations-1-2). -Après le transport, vérifiez l’appareil. -Si l’appareil ou son écran est endommagé (cabossé, tordu ou cassé), ne connectez pas le grandMA3 onPC rack-units au réseau électrique ! |
# Toleranzen
> Die folgenden Punkte sind keine Mängel oder Fehlfunktionen. Es handelt sich lediglich um Gegebenheiten, die während des Herstellungsprozesses auftreten können:
## Gerätespezifische Gegebenheiten [Section titled “Gerätespezifische Gegebenheiten”](#gerätespezifische-gegebenheiten) Die folgenden Punkte sind keine Mängel oder Fehlfunktionen. Es handelt sich lediglich um Gegebenheiten, die während des Herstellungsprozesses auftreten können: 1. Bei der Herstellung von LCD-Bildschirmen kann es zu Backlight-Bleeding kommen. 2. Farbtemperaturabweichungen bei der Herstellung von LCD-Bildschirmen unterliegen technischen Toleranzen. 3. Gerätespezifische Farbabweichungen, beispielsweise im Bildschirmgehäuse, sowie in der Oberflächenbeschaffenheit, etwa bei Polstern, unterliegen technischen Toleranzen bei der Herstellung solcher Materialien. ## Pixelfehler [Section titled “Pixelfehler”](#pixelfehler) Die Bildschirme der grandMA3 Serie orientieren sich an der Pixelfehlerklasse II (ISO 9241-307). Die folgende Tabelle zeigt die maximale Anzahl zulässiger Fehler pro 1 Million Pixel. | Pixelfehler | Maximale Anzahl von Fehlern pro 1 Million Pixel | | ------------------------------------------------ | ----------------------------------------------- | | Ständig leuchtendes Pixel (immer an, Farbe weiß) | 2 | | 2 angrenzende ständig leuchtende Pixel | 1 | | Ständig schwarzes Pixel (immer aus) | 5 | | 2 angrenzende ständig schwarze Pixel | 1 | | Defekte Subpixel (ständig leuchtend) | 5 | | Defekte Subpixel (ständig schwarz) | 5 | Aus technischen Gründen können die Bildschirme leichte Kratzer haben.
# Événements
> La liste suivante ne décrit ni les défauts ni les dysfonctionnements. Elle indique simplement les cas qui peuvent se manifester au cours du processus de fabrica
## Événements liés au matériel [Section titled “Événements liés au matériel”](#événements-liés-au-matériel) La liste suivante ne décrit ni les défauts ni les dysfonctionnements. Elle indique simplement les cas qui peuvent se manifester au cours du processus de fabrication. 1. Une fuite du rétroéclairage peut se produire lors de la fabrication des écrans LCD. 2. Des différences de température peuvent entraîner des différences de couleur dans les écrans LCD. 3. Les déviations de couleur dans le matériel, par exemple dans le boîtier de l’écran, et les déviations dans la texture de la surface, par exemple dans les coussinets de repose-mains, sont soumises à des tolérances techniques lors de la fabrication de ces matériaux. ## Défaut de pixel [Section titled “Défaut de pixel”](#défaut-de-pixel) Les écrans de la série grandMA3 sont soumis à la classe de défaut de pixel II (ISO 9241-307). Le tableau ci-dessous indique le nombre maximum de défauts autorisés par million de pixels. | Défaut de pixel | Nombre maximal de défauts par million de pixels | | ----------------------------------------------------------------- | ----------------------------------------------- | | Pixel actif permanent (toujours allumé, étant de couleur blanche) | 2 | | 2 pixels actifs permanents qui sont adjacents | 1 | | Pixel inactif permanent (toujours éteint, c’est-à-dire noir) | 5 | | 2 pixels inactifs permanents qui sont adjacents | 1 | | Sous-pixel défectueux (toujours actif) | 5 | | Sous-pixel défectueux (toujours inactif) | 5 | Pour des raisons techniques, il peut y avoir de légères rayures sur les écrans.
# Release Notes 2.3
> Do you need help getting started in grandMA3? Perfect! Here we describe a few quick steps to get you rolling. The manual will explain functionality in detail wh
* [Let’s Get Started](/grandma3/2-3/key_releasenotes/#h2__1435677565) * [Bug Fix Version 2.3.2.0](/grandma3/2-3/key_releasenotes/#h2_1781474115) * [](/grandma3/2-3/key_releasenotes/#h2__146634055)[Changes](/grandma3/2-3/key_releasenotes/#h2__1821394898) * [Bug Fixes](/grandma3/2-3/key_releasenotes/#h2__146634055) * [Bug Fix Version 2.3.1.1](/grandma3/2-3/key_releasenotes/#h2_1781475297) * [Other Enhancements](/grandma3/2-3/key_releasenotes/#h2_1309759467) * [Bug Fixes](/grandma3/2-3/key_releasenotes/#h2_1309759467) * [Release Version 2.3.0.4](/grandma3/2-3/key_releasenotes/#h2__1841901983) * [Features](/grandma3/2-3/key_releasenotes/#h2_727740091) * [Assign Menu](/grandma3/2-3/key_releasenotes/#h3_1856826362) * [Message Center](/grandma3/2-3/key_releasenotes/#h3__364189110) * [Sheet Masking and Filters](/grandma3/2-3/key_releasenotes/#h3_271449867) * [Phaser Speed Handling and Sync](/grandma3/2-3/key_releasenotes/#h3_778665917) * [Other Enhancements](/grandma3/2-3/key_releasenotes/#h2_1198082799) * [Changes](/grandma3/2-3/key_releasenotes/#h2__656690415) * [Bug Fixes](/grandma3/2-3/key_releasenotes/#h2__146634055) * [Deprecated](/grandma3/2-3/key_releasenotes/#h2__756870347) * [Appendix](/grandma3/2-3/key_releasenotes/#h2__1835053169) * [Known Limitations](/grandma3/2-3/key_releasenotes/#h2__1852571500) *** ## []()Let’s Get Started [Section titled “Let’s Get Started”](#lets-get-started) Do you need help getting started in grandMA3? Perfect! Here we describe a few quick steps to get you rolling. The manual will explain functionality in detail while the MA e-Learning in the MA University offers you all kinds of training. All information can be accessed through the MA Lighting website [www.malighting.com](http://www.malighting.com). Let’s go! To leave the Release Notes, tap I agree on the top right corner. The main screen of grandMA3 software opens. On the right side, you can see predefined views on view buttons. To switch between the views, tap the view buttons. If this is your first time starting grandMA3 software, patch some fixtures first. Or you can load one of the demo shows delivered with the software. Either way, press Menu. If you use grandMA3 onPC software, there is a  symbol in the top left corner there. Clicking the  symbol is the same as pressing Menu on a console. Tap Backup and then Load, now you are ready to load shows. Would you like to get right on it? Switch Shows to Demo Shows in the title bar first. To do so, tap Shows repeatedly until it says Demo Shows. Once Demo Shows is displayed, it is possible to select any demo show in the list. After you selected a demo show, tap Load.\ In case a show was already loaded, a pop-up will appear asking if you want to save the current show first before loading the new one. It’s up to you! Here we go! Now you are ready to work with the grandMA3 software. It is as easy as that! Again - there are view buttons there, which change the screen content. At the bottom, you will find the encoder bar and the command line. Technically that is all you need to get started. For more information, see the grandMA3 help menu. To access the help in the console or the onPC, tap the view buttons named Help or visit the Online Manuals on the MA Lighting website. If you want to learn the grandMA3 software step by step, please see the [Quick Start Guide](https://help.malighting.com/grandMA3/2.0/HTML/qsg.html) and join the MA e-Learning - it’s free of charge and available on the MA Lighting website. Have fun using our grandMA3 software! Find all the improvements and changes of this software version further down. | | | | ------------------------------------------ | ------------------------------------------------------------------------------------------------------------------------- | |  | **Hint:** | | | The grandMA3 software will start using the show file (or status) that was in operation before the software was shut down. | *** ## Bug Fix Version 2.3.2.0 [Section titled “Bug Fix Version 2.3.2.0”](#bug-fix-version-2320) ## Changes [Section titled “Changes”](#changes) * Renamed \*\*Export \*\*in the color theme compare tool → previously **Export As** *** ## Bug Fixes [Section titled “Bug Fixes”](#bug-fixes) ### Command Line and Macro [Section titled “Command Line and Macro”](#command-line-and-macro) | Description | | ----------------------------------------------------------------------------------------------------------------------------------------------------------------------------------------------------------------------------------------------------------------------------------- | | In some cases, if you imported a user profile and logged in with a user that used this user profile, the step size of encoders of special executors was set to zero. As a result, turning the encoders of special executors did not change values as would be expected. | | If a PSR was performed and the target pool object was locked, a pop-up would inform the user about the cancelled action but the reason was not given. Now, an error message is displayed in the system monitor explaining that the import failed because the destination is locked. | ### Connections [Section titled “Connections”](#connections) | Description | | -------------------------------------------------------------------------------------------------------------------------------------------------------------------------- | | onPC rack-units granted parameters and were recognized in the software but did not output DMX. | | In some cases, if you were in a session and loaded a show file that had different data pools compared to the running show file, the software could crash. | | If a show file had incorrectly built fixture types and subfixtures and you were in a session with processing units, in some cases, there was no DMX output. | | Improved reliability of USB reconnection. This update resolves issues that could lead to delayed system startup, unstable reconnections, and errors in the system monitor. | | Reduced fader flickering in some cases by enhancing the stability of position readouts. Operation is now smoother and more consistent, even in harsh environments. | ### Phaser [Section titled “Phaser”](#phaser) | Description | | ------------------------------------------------------------------------------------------------------------------------------------------------------------------- | | If you used a phaser preset that had a speed of 0 bpm in a sequence and played back the sequence, the phaser ran with the default speed of 60 bpm instead of 0 bpm. | ### Playback [Section titled “Playback”](#playback) | Description | | ----------------------------------------------------------------------------------------------------------------------------------- | | While receiving a video stream for a bitmap, the software would sometimes crash if the bitmap was edited during an active playback. | ### Windows [Section titled “Windows”](#windows) | Description | | ------------------------------------------------------------------------------------------------------- | | In the on-screen keyboard, some keys, such as Shift or Ctrl, stayed enabled if you closed the keyboard. | | In some cases, Backspace and Please did not work in the on-screen keyboard. | *** ## Bug Fix Version 2.3.1.1 [Section titled “Bug Fix Version 2.3.1.1”](#bug-fix-version-2311) ## Other Enhancements [Section titled “Other Enhancements”](#other-enhancements)  Updated predefined content: * Updated demo shows: * Demoshow\_grandMA3 * Simple\_Show *** ## Bug Fixes [Section titled “Bug Fixes”](#bug-fixes-1) ### 3D [Section titled “3D”](#3d) | Description | | -------------------------------------------------------------------------------------------------------------------------------------------------------------------------- | | Fixtures with gobo shake enabled could show artefacts on grandMA3 consoles. | | For some fixtures, the 3D position calibration did not work. Therefore, tapping Solve in the position calibration pop-up did not put the fixtures in the correct position. | | Show 3D Positions did not display any beams for the selected fixtures in either the patch or live patch. | ### Command Line and Macro [Section titled “Command Line and Macro”](#command-line-and-macro-1) | Description | | ---------------------------------------------------------------------------------------------------------------------------------------------------------------------------------------------------------------------------------------------------------------------------- | | The output of the Lua function Dump() did not return in the command line history anymore. | | The returning output when executing the Lua function Dump() was capped at some point. | | In OSC messages the spacing between the sequence name and cue number was not consistent. This bug is now fixed. There is now one space between the sequence name and the cue number within OSC messages. | | Using /Remove or /Release in order to reset pan and tilt offsets did not work as expected. | | When going forward in a sequence using Go+, such as Go Cue 10, values were unexpectedly snapping. This bug is fixed. When going through the cue list for the first time, going forward will fade tracked values using the cue timing from the cue where the value is stored. | ### Patch [Section titled “Patch”](#patch) | Description | | ----------------------------------------------------------------------------------------------------------------------------------------------------------------------------------------------------------------------------------------------------------------------------------------------------------------------------------------------------------------------------------------------------------------------------------------------- | | The software could crash when leaving the patch after changing the mode for a particular fixture. | | The column sorting in the patch was lost when migrating show files from version 2.2.5.2 to version 2.3. | | The focus tool was not working anymore in Show 3D Positions. | | It could happen that fixture types were shown with incompatible modes. | | Deleting multiple fixtures of the same fixture type in the patch could crash the software. | | The software could crash in the MVR dialog, when importing specific MVR files. | | When migrating show files that had custom commands for encoders from software version 2.2 to version 2.3, the Use Custom Command setting was disabled. This bug is now fixed. When loading show files from version 2.2 to version 2.3.1.1 or newer, the Use Custom Command setting will be enabled. When loading show files from version 2.3.0.4 to version 2.3.1.1 or newer, the Use Custom Command setting will not be changed automatically. | | Individual fixture type default, highlight, and lowlight values may be overwritten when patching a new fixture, or may be lost when loading a show file created with version 2.2.5.2 that contains such values. | | Loading a show file containing invalid speed master values could cause the software to crash. | | Loading show files with invalid references to objects from older versions into version 2.3, could cause the software to crash. This bug is now fixed. Instead the invalid references will be deleted, and the message center informs the user about all invalid references. | | It was not possible to import meshes using the show creator. | | Dimensions of a mesh pool object were not automatically transferred when the mesh was added as a model of a fixture type in the fixture type editor. | ### Phaser [Section titled “Phaser”](#phaser-1) | Description | | ------------------------------------------------------------------------------------------------------------------------------------------------------------------------------------------------------------------------------------------------ | | Importing sequences, cues, cue parts, and presets could cause the level of the phaser bar in the command line to rise and never return to normal, which could lead to malfunctioning playbacks. | | If the phaser speed was set below 3.75 BPM, after a while running, the phaser would jump to the starting point. | | Running phasers could jump when changing the speed in the recipe the phaser was used by command line. | | Changing the SpeedFromX value in a recipe line for a cue, which referenced to a preset with MAtricks values for SpeedFromX and SpeedToX, did not automatically change the MAtricks value for SpeedToX, resulting in an alternating phaser. | | While improving Phaser Speed Handling and Sync towards version 2.3, Grand Speed became functional in speed calculations. This is not intended for user editing. Grand Speed is again not functional in speed calculations and named as Reserved. | ### Playback [Section titled “Playback”](#playback-1) | Description | | --------------------------------------------------------------------------------------------------------------------------------------------------------------------------------------------------------------------------------------- | | The fixture sheet or the layout viewer incorrectly indicated a white marker as soon as a phaser or preset was running. | | When a master was assigned to an empty executor, the executor did not use the master executor configuration, but instead used the executor configuration of playback masters. | | When using an invalid speed master in a cue, the software could crash when playing back the cue. | | Using Go+ \[large] key or Go- \[large] key to trigger the selected sequence, that was assigned to an executor with a size bigger than 1x1, triggered the selected sequence multiple times. | | In a session, it could happen that in bump sequences executed from a connected station, the sequence would stuck at the first cue with **Release** set to **Yes**, without releasing the second cue with **Trig Type** set to **Time**. | ### Windows [Section titled “Windows”](#windows-1) | Description | | ---------------------------------------------------------------------------------------------------------------------------------------------------------------------------------------------------------------------------------------------------- | | The appearance background color was no longer displayed in layouts. | | Migrating older show files to version 2.3 did not transfer the pool actions for the world pool correctly. | | The functionality that allowed users to switch between Elapsed Time and Session Time in the Oops overlay was broken. | | The sequence setting Executor Display Mode was not respected in the layout viewer. | | The values entered in the setup mode of the layout viewer were not transferred correctly. | | On a console, the software could crash when changing Layer to **DMX** in the layout viewer. | | Files migrated from version 2.2 or earlier did not migrate properly when multiple filters of the same type existed. | | The names of the filters in the mask toolbar were displayed permanently. This bug is fixed. The names are displayed while you press and hold MA. | | When migrating version 2.1 show files, agenda events with a **Call** action are not transferred. | | After storing or updating a sequence, the corresponding sequence pool object was displayed dark and with an update symbol inside. | | In a new show, the note section was missing in the Label pop-up. | | When turning a preset into a Recipe Template, an error message appeared. | | There was a graphical glitch when  was enabled in the title bar of drop-down pop-ups: When you typed something, the text of the search results were only displayed on the left side of the pop-up. | | The console could crash if a running recipe was edited and the EditRecipe command was executed on a configuration line in the recipe editor. | *** ## Release Version 2.3.0.4 [Section titled “Release Version 2.3.0.4”](#release-version-2304) ## Features [Section titled “Features”](#features) The latest release of grandMA3 version 2.3.0.4 rolls out several enhancements that enrich your lighting experience. Besides numerous improvements based on your highly appreciated feedback, many new and clever features have found their way into the software. Read on for a quick introduction and find links for more information. *** ### Assign Menu [Section titled “Assign Menu”](#assign-menu)  Improved in this release The redesigned Handle tab on the left side of the assign menu provides an easier and faster way to assign functions to executors, special executors, and Xkeys. The executor section is displayed on the left and the selected executor button is indicated by a yellow frame, is brighter compared to executors that are not selected, and the title bar is blinking in red. The name of the assigned object is displayed in the middle of the title bar. The starting number of the executor on the left and the number of the assigned pool object on the right. The executor selection can be extended using any of the four resize corners (). Executors can be expanded if there are empty executors next to them. If the executor cannot be expanded, the frame around the executor will turn red. If it is possible to expand the executor, the frame around the executor will turn green. To move the entire executor, tap and drag in the executor’s title bar. Tapping an executor with a less saturated appearance will select this executor. The appearance of sequences and presets are displayed on the executor when the Executor Display Mode setting is set to **Appearance only** or **Both**. Appearances of other objects that are assigned to executors are always displayed. The selected executor comes with a corresponding icon (encoder, fader, or button) in the upper left corner. The selected function with the corresponding icon is displayed in the center. The color of the bar at the top of the executor button indicates the assigned object category (Sequence, Master, Group, etc.). The rest of the button will be the same color as the appearance color of the object if the button is not selected. If more than one trigger option is assigned to a button, the button will be split up according to the number of trigger options that are assigned to it. In the title bar, Executor Config. displays the current executor configuration and its appearance. To edit or load executor configurations, tap Executor Config.. A pop-up opens. The grid options are similar to the ones in the executor configurations pool. For more information, see the [Executor Configurations](/grandma3/2-3/executor_configurations/) topic. You can select different data pools in the title bar. There are four buttons on the bottom of the pop-up: * Insert New Configuration: Adds a new empty executor configuration. The new configuration line is added above the previously selected one in the pop-up. * Delete: The selected executor configuration lines can be deleted. * List Reference: Displays referenced objects. * Recast Config: Transfers the functions that are stored inside the executor configuration to all executors that have this executor configuration assigned. The Width and Height of the executor configuration will not be recast. * Load: The selected executor configuration line can be loaded. * Save: The selected executor configuration line is saved and loaded. When you change a function of the loaded executor configuration, the corresponding executor icon (encoder, fader, or button) and the text in Executor Config. turn cyan. Tap Save in the Executor Config. pop-up to save the changes to the executor configuration. The icon in the upper left corner and the text in Executor Config. turn white again. | | | | ------------------------------------------ | ------------------------------------------------------------------------------------------------------------------------------------------------------------------------------------------------------------------------------------------------------------------------------------------------------------------------------------------------------------------------------------------------------------------------------------------------------------------------------- | |  | **Hint:** | | | Changing the function of only one trigger option of an executor, turns all icons of this trigger cyan, even if they have not changed. If a function, for example for MA + Press has changed to **Empty**, the icon () is not displayed anymore, but the remaining Press icon () is still displayed in cyan. | On the right side of the menu, set different options in the selected executor. Depending on whether a key, fader or encoder is selected, the menu on the right changes. At the top, choose how to trigger the key, fader, or encoder. A key can have up to four different trigger options: * : Press the key to trigger the selected function. * : Release the key to trigger the selected function. * : Press and hold MA and press the key to trigger the selected function. * : Release MA and the key to trigger the selected function. An encoder has six different trigger options: * : Rotate the encoder to the left to trigger the selected function. * : Rotate the encoder to the left to decrease the value of the selected function and to the right to increase the value. * : Rotate the encoder to the right to trigger the selected function. * : Press and hold MA and rotate the encoder to the left to trigger the selected function. * : Press and hold MA and rotate the encoder to the left to decrease the value of the selected function and to the right to increase the value. * : Press and hold MA and rotate the encoder to the right to trigger the selected function. A fader has one trigger option: * : Move the fader up or down to use the selected function. | | | | -------------------------------------------------- | --------------------------------------------------------------------------------------------------------------------------------------------------------------------------------------------------------------------------------------------------------------------------------------------------- | |  | **Restriction:** | | | Pressing MA and triggering a fader or an Xkey is not offered as a trigger option. If an object is assigned to an Xkey, pressing MA and the Xkey will trigger the keyword printed on the Xkey. For example, if an object is assigned to X4 \| Layout, MA + X4 \| Layout triggers the Layout keyword. | Find the list of all functions that can be selected for the key, fader, or encoder below the trigger options. It is also possible to tap and hold a trigger option above to open a drop-down list of all actions possible. | | | | ------------------------------------------ | --------------------------------------------------------------------------------------------------------------------------------------------------------------------------------------------------------------------------------------------------------------------------- | |  | **Hint:** | | | Depending on the assigned object and if it is assigned to a key, an encoder, or a fader, some actions are grayed out. For example, when a sequence is assigned to an encoder, Flash, Black, Temp, and Swap are grayed out for the encoder left and encoder right functions. | If Flash, Black, Temp, or Swap is assigned to a key or MA + key, \, \, \, and \, are automatically assigned to the related release trigger option. This indicates that they are press and hold functions.\ \ If a key, unpress key, MA + key, unpress MA + key, encoder left and encoder right, and MA + encoder left and MA + encoder right, is selected in the executor section, an additional input field for custom commands will appear on the right side. Tap the Custom Command input field to open the [Command Editor](/grandma3/2-3/command-editor/) and type in a command to save it as a function. Setting a custom command enables Use Custom Command. When Use Custom Command is enabled, the small keyboard icon of the input field turns yellow and the custom command is assigned to the selected executor. When disabled, the icon is white and the function selected above is assigned.\ Next to the input field on the right, there is an Add Executor button. Enabled, the corresponding executor is added to the custom command. When the function is executed in the command line, the executor will be added to the command. | | | | ------------------------------------------ | -------------------------------------------------------------------------------------------------------------------------------------------------------------------------------------------------------------------------------------- | |  | **Hint:** | | | When assigning a new function to an encoder or key via command line (for example, Assign Go+ At Executor 201), the set unpress function will be removed. This does not happen when the user does it manually by using the Assign Menu. | To change the resolution for an encoder, or MA + encoder, select an encoder executor in the executor selection, and tap Step Size on the bottom right side of the menu. A pop-up opens and the encoder resolution can be set ranging from 0.01% to 100%. Tap - on the left to decrease the value by 1%. Tap + on the right to increase the value by 1%. To reverse the direction of rotation of the encoder, tap Invert Encoder.\ \ It is also possible to assign functions to keys and MA + key via commands now. For example, to assign Goto as an MA + key function, press Assign + Goto + MA + the key you want the function Goto be assigned to. *** ### Message Center [Section titled “Message Center”](#message-center)  New in this release Added statuses to the message center. The message center now offers a list of different statuses on the right side of the window. Status icons are displayed next to the command line input field on the right side in the command line. All status settings are set per user profile. For some statuses you can choose to see the corresponding status of all user profiles. To show or hide a status icon in the command line, swipe the status in the message center. A drop-down displays the following options: * **Never**: No icon for the status is displayed. The indicator bar of the corresponding status is gray. * **On Activity**: Displays the icon when a setting or function is active. The indicator bar is white. * **Always**: The icon is always displayed in the command line. If the setting or function is not active, the icon will be grayed out. The indicator bar is green. The default for statuses in the Programmer and Filter section is **On Activity**.\ The default for statuses in the More and Toggles section, except for Battery, is **Always**. The default for Battery depends on the device. For some statuses (Highlight; Lowlight; Solo; Timecode Record) you can select different sources for the status in the drop-down: * **My**: The status is active if triggered by the current user profile. * **All**: The status is active if triggered by any user profile. When enabled, a small icon () appears in the status cell. | | | | ------------------------------------------ | ----------------------------------------------------------------------------------------------------------------------------------------------------------------------------------------------------------------------------------------------------------------------------------------------------------------------------------------------------------------------------------------------------------------------------------------------------------------------------------------------- | |  | **Hint:** | | | If the user profile is set to **All** and highlight, lowlight, solo, or a timecode record is triggered by another user profile, **e\*\*\*\*xt** or **m\*\*\*\*y+ext** is displayed below the icons. **ext** is displayed if the function is only triggered by another user profile. **my+ext** is displayed if the function is triggered by both the current and another user profile. If the function is triggered by the currently active user profile, no text is displayed below the icon. | The following statuses can be displayed in the command line: **Programmer:** * **Highlight** (): Highlight is active. Tap the icon to open master controls. * **Lowlight** (): If Lowlight is active, the icon turns blue. Tap the icon to open master controls. * **Solo** (): Solo is active. Tap the icon to open master controls. * **Blind** (): Blind is active. Tap the icon to open master controls. * **Preview** (): Preview is active. * **Timecode Record** (****): A timecode recording is active. When a timecode is recorded, the icon starts to blink. Tap the icon to open the off menu in the timecodes tab. * **Recipe Editing** (): If the recipe editor is active, the icon is green. **Filter:** * **Filter** (): A filter other than Filter 1 is called or selected. * **World** (): A world other than World 1 is selected. **Universe/Patch:** * **Parked** (): If fixtures are parked, the icon is blue. * **DMX Tester** (): If the DMX tester generates output, the icon is white. * **Not Enough Parameters** (): The limit of parameters is exceeded. If the system is in overload and the DMX output refresh rate is slowing down, **Overload** is displayed below the icon. **More:** * **World Server** (): Displays if there is a connection to the world server. The functionality has not changed compared to 2.2. For more information, see [World Server](/grandma3/2-3/system_world/). * \*\*Battery \*\*(): The battery is now part of the message center. On full-size, light, full-size CRV, and light CRV consoles, the icon is displayed by default. Tap the icon to open the battery status pop-up. If the station has no battery, the icon is crossed (). * **Phasers**: Graphically indicates the current processing workload dedicated to phaser calculation in the bar in the command line. The exact value is displayed as a tooltip in the command line. The functionality has not changed compared to 2.2. * **Flow Control**: Graphically indicates the current workload of the network in the bar in the command line. The exact intensity of the flow control is displayed on a scale of 0 to 255 as a tooltip in the command line. The functionality has not changed compared to 2.2. **Toggles:** * **Keyboard Shortcuts** (): If keyboard shortcuts are active, the icon is yellow.  Improved in this release\ Improved the message center: * The message center icon now displays the number of new messages, except spam messages, below the icon in the command line. If there is a new message, the icon flashes in the color of the message priority (Spam, Warnings, Errors, and Alerts). * The latest message of each section is displayed in the cell in the main page.\ If there is a new message, the background of the cell flashes in the color of the message priority. * A timestamp is displayed next to each message in the list that appears if you click on a cell. The date and time is displayed in the format dd.mm.yyyy hh:mm:ss. * To confirm all new messages, tap Confirm Messages in the title bar.\ To confirm single messages, tap on the corresponding cell and then tap the message you want to confirm.\ To confirm all messages of a category and priority, tap on the cell in the message center. Then tap the corresponding Confirm button below the messages. * Each cell has a bell icon () to select a notification type. The color of the icon changes depending on the notification. Swipe the icon to display a drop-down list with all three types, or tap the icon in order to toggle through the different types: * **None**: No notification is displayed. (Gray icon) * **Notification**: A notification is displayed in the upper right corner of all big screens. (White icon) * **Pop-up**: A pop-up is displayed in the middle of all screens. (Red icon)\ The spam category cannot be set to show pop-ups. *** ### Sheet Masking and Filters [Section titled “Sheet Masking and Filters”](#sheet-masking-and-filters) Sheet masking was added to the fixture sheet, the content sheet, and the tracking sheet in the sequence sheet. Sheet masking is controlled by filter objects. Hence, filter rules were added to the filter object editor. Filters can be static or dynamic. | | | | ------------------------------------------ | ------------------------------------------------------------------------------------------------------------------------------------------------------------------------------------------------------ | |  | **Hint:** | | | Dynamic filter rules use sources where data often changes. These rules are based on individual sheets and users. As these filter rules are subject to change, they can only be used for sheet masking. | The default filter pool objects now includes **Prog Only**, **Selection Only,** and **Parked Only.** The **Prog Only** filter includes selected fixtures. Copying a filter object to another filter object opens a pop-up with options to overwrite or cancel the task, but not the option to merge. When creating a new empty filter pool object, the rule type **Attributes** is set per default. The filter editor opens as a menu and is split into two sides, left and right. To adjust the width of the two sides: 1. Use the two-finger tap by placing one finger on each side of the menu. 2. Now drag your fingers left or right. The segmentation is adjusted. Left Side: Here you can set up filter rules. Hierarchically, new filter rules can be added within different dependencies. Multiple filter rules can be collected inside a **Ruleset**. Filters inside a ruleset are logically connected by **AND** logic (indicated by ). **AND** logic means all conditions must be met to display an object. Tap Insert New Filter Rule to insert a filter rule within a ruleset.\ Multiple rulesets are logically connected by **OR** logic (indicated by ). **OR** logic means one condition must be met to display an object. To create a new ruleset, tap Insert New Ruleset. If Settings in the title bar is enabled, Name, Scribble, Appearance, Tags, and Notes can also be set up. | | | | ------------------------------------------ | -------------------------------------------------------------------------------------------------------------------------------------------------------------------------------------- | |  | **Hint:** | | | The functionality for Programming Layers (previously Layers) has not changed. Please note that programming layers are not compatible with sheet masking or input and output filtering. | Right Side: This is the attribute filter area. To enable the user interface for attribute filtering, select the corresponding Attributes rule type. When creating a new filter pool object, Attributes is selected per default. As multiple attribute filter rules can be set per object, the selected filter rule is indicated by a three-digit number in the heading on the right side, for example, Filter 8.2.1. The numbers describe the object number, the ruleset, and the filter rule. Also LineHeight, Select All, and Select None are located in the attribute filter area. If the filter is locked, a lock icon is displayed next to the object name in the title bar of the filter object editor. A dynamic filter rule is indicated by  displayed next to the filter type. The icon is also displayed in the top left corner of a filter pool object. \*\*Dynamic Filte\*\*\*\*r \*\*is displayed below the object name. If it is static, no text or icon are displayed. Filter rules can be definded using multiple options. These options are described as follows, beginning with the Type: * Attributes : Filters the **Attributes**. Prior to that they were located in the filter object editor. * Changed(): Shows changed values and hides cues if they do not contain any changed values. * Cooked(): Filters for cooked values in recipes. * DMX Mode: Filters the specified **DMXMode** of a fixture type. * DMX Tested(): Filters attributes and fixtures with values currently in the DMX tester. * Fade & Delay(): Filters values with individual fade and delay timings. * Fixture Layer & Class: Filters fixtures by fixture **Layer** and **Class**. * ID Type: Filters fixtures by \*\*ID T\*\*\*\*ype. \*\*If the **From** and **To** values are left blank, all fixtures with the defined ID type will be included. * IfActive(): Filters active values. * IfOutput(): Filters fixtures that have output on stage with a dimmer value above 0%. * IfProgrammer(): Filters fixtures and attributes in the programmer. * Live(): Filters fixtures with a dimmer value above 0% or with a 0% value stored in the current cue. * MIB(): Filters fixtures and attributes in an MIB state. * Multi Step(): Filters fixtures and attributes with more than one phaser step. * Name: Filters the predefined fixture name in the **Name Filter**. * Parked(): Filters parked fixtures and attributes. * Patch: Filters fixtures that are patched to DMX channels between the DMX channel by predefined **From** and **To** values. * Selected:() Filters all selected fixtures. With **If Empty** set to **Ignore**, all fixtures will be displayed if there is no selection; this makes it work like the selection filter in previous grandMA3 versions. Leaving **If Empty** blank will result in an empty sheet if there is no selection; this makes it work like the selection filter in grandMA2. * Selected Feature(): The **Mode** filters the feature groups. * Stage: Filters fixtures by stage. * Used In Object: Filters predefined **Objects** in the assignment editor. Objects can be groups, worlds, presets, or sequences. * Used in Selected Sequence: ()Filters fixtures and attributes in the selected sequence. * Used in Show (): Filters fixtures and attributes that are stored in the show. Invert: An empty cell indicates that the filter rule is used as described. Selecting **Yes** inverts the filter rule. Apply to Fixtures, Attributes: Filters for attributes and/or fixtures. The default is **Yes** for both, fixtures and attributes. | | | | ------------------------------------------ | ------------------------------------------------------------------------------------------------------------------------------------------------------------------------------------------------------------------------------- | |  | **Hint:** | | | A few filter rule types have specific options that only apply to them. Columns in the grid that do not apply to a specific filter option have a darker background in the corresponding configuration line and cannot be edited. | Filter rules can be imported and exported using Import and Export. The filter rule configuration lines can be copied, cut, pasted, deleted and oopsed, using Cut, Paste, Ooops, Delete, and Copy. Also List References shows related elements of the filter object. Static filter rules support input and output filtering for sequences, presets, cue breaks, recipes, and the command line. In the assignment editor, Hide Dynamic in the title bar is enabled per default and dynamic filter objects are hidden. Disabling Hide Dynamic shows all dynamic filter rules in red. When Edit Recipe is enabled, the filter pool objects are grayed out. The command line displays an error when attempting to assign a dynamic filter to an object for which it cannot be used. | | | | -------------------------------------------------- | ---------------------------------------------------------------------------------------------------------------------------------------------------------------------------------------------------------------------------------- | |  | **Known Limitation:** | | | It is not possible to turn a static filter into a dynamic filter if it is assigned as an input filter, an output filer, or a cue break. Therefore, the dynamic filter rules are grayed out whenever you create a new filter rule. | To assign filter objects to sheets, for example, the fixture sheet, tap Mask Buttons in the corresponding sheet settings. Up to 16 sheet masks are available per sheet. Tapping a sheet mask button, for example Mask 1, opens the assignment editor. The assignment editor offers 5 options: * Emtpy: No mask is active. * \: Links to the selected filter. * \: Links to the called filter. * Filter: Select a filter from the filter pool. * World: Select a world from the world pool for masking. The Mask Toolbar enables a toolbar in the corresponding sheet. To display the mask toolbar in the sequence sheet, Track Sheet must be enabled. Filter and world objects can be assigned to the mask toolbar directly. Pressing Edit + tapping an assigned sheet mask button will open the corresponding filter or world object editor. Pressing Delete + tapping a sheet mask button will delete its assignment.\ Single sheet masks are toggle buttons. A single sheet mask button can be toggled on or off. Toggling on another sheet mask will deactivate the currently active sheet mask. An active sheet mask is displayed in yellow. Mask buttons can also be displayed in the title bar of the corresponding sheet by enabling them in the Edit Title Bar settings. The mask toolbar and the mask buttons in the title bar are linked to each other. In the fixture sheet, the filters Prog Only and Selection Only are displayed in the mask toolbar as default sheet masks. In the content sheet and the sequence sheet, the filter Selection Only is displayed as a default sheet mask. Groups, worlds, presets, and sequences pool objects can be assigned to filter objects, for example by using the syntax Assign \[Source\_Object] \[“Source\_Object\_Name” or Source\_Object\_Number] At Filter \[“Filter\_Name” or Filter\_Number]. Assigning an object to an already existing filter pool object will create a new ruleset within the object including the **Used in Object** rule type that links to the corresponding object. If an object is assigned to an empty filter pool object, the **Used in Object** rule type will be created, which will then also link to the corresponding object. | | | | ------------------------------------------ | --------------------------------------------------------------------------------------------------------------------------------------------------------------------------------------------------------------- | |  | **Hint:** | | | Any object that can be used in the filter rule **Used in Object** can be assigned to a filter. For example, Assign Group X at Filter Y.The copy function for the corresponding objects to a filter is disabled. | | | | | ------------------------------------------------ | ------------------------------------------------------------------------------------------------------------------------------------------------------------------------------------------------------------------------------------------------------------------------------------------------------------------ | |  | **Important:** | | | Importing filter objects that were exported in version 2.2.5.2 or earlier is not fully supported. Fixture patch information filters will be discarded after import. To migrate these settings, first import the filter objects into a show file in version 2.2.5.2, and then migrate them to the current version. | *** ### Phaser Speed Handling and Sync [Section titled “Phaser Speed Handling and Sync”](#phaser-speed-handling-and-sync) This release introduces several new functions, enhancements, and fixed bugs to provide an easier, more streamlined workflow regarding phasers. It improves the handling of phaser speed and phaser synchronization throughout the software.  New in this release Added **FastSync**, **ReSync**, and **Learn**\*\*\*\* keywords. Use them to synchronize phasers to each other and to a beat. They best work in combination with speed masters. * **[\*\*\*\*](/grandma3/2-3/keyword_resync/)**[FastSync](/grandma3/2-3/keyword_fastsync/)\*\*\*\* adjusts the starting point of a multistep phaser at once. * **[ReSync](/grandma3/2-3/keyword_resync/)** adjusts the starting point of a multistep phaser gradually. * \*\*[Learn](/grandma3/2-3/keyword_learn/) \*\*combines the functionality of ReSync and [LearnSpeed](/grandma3/2-3/keyword_learnspeed/). Use Learn to adjust the starting point and speed of a phaser at the same time. To apply these keywords to an object, use this syntax: \[Keyword] (\[Object] \[“Object\_Name” or Object\_Number]) ReSync, FastSync, and Learn can be set as functions for executors.\ To determine the starting point of the phaser, tap the executor with the FastSync, ReSync, or Learn function once. For Learn\*\*, \*\*tap the executor multiple times to additionally adjust the speed of the phaser. To sync phasers across sequences, set them to the same speed master and apply the keywords to the speed master. | | | | ------------------------------------------ | -------------------------------------------------------------------------------------------------------------------------------- | |  | **Hint:** | | | Phasers with measures that can be divided by three cannot be synced with phasers containing measures that can be divided by two. |  Improved in this release * The **Delay To Phase** column has been added to the sequence sheet. Delay to Phase can be set to **Yes** in the cue and cue part. The default is No. Additionally, Delay To Phase was added to the settings of the preset editor. Delay To Phase links the phase calculations of a phaser to the active individual delay time for the attribute. For more information on Delay to Phase see [Presets](/grandma3/2-3/presets/#h2_1390786845). * BPM analysis of the sound input is improved and more precise by working together with the user adjusted BPM value of the BPM speed master. This value can be adjusted with the fader or the keywords Learn and LearnSpeed. * Knocking in running phasers into the programmer now keeps them synchronized with the running output. * Knocking in the measure layer is now based on the number of steps while keeping the same speed. For example, if a phaser has four steps and you knock in the measure layer, the measure will be 4. * If the same speed master is assigned to a sequence or cue part and an attribute, the speed master will be removed from the attribute when updating or storing the sequence or cue.\ For example, **Speed1** is assigned to a dimmer attribute. Then you set **Speed1** for a cue and update it. **Speed1** is removed from the dimmer attribute. * Speed masters assigned to attributes are always synced to the timeline of the speed master in the active cue or sequence. * If no speed master is assigned to an attribute, but a speed master is set for the sequence or cue part, phasers in the cue apply the speed master depending on the cue part’s sync setting: * Sync enabled for the cue: The phaser is synced to the common timeline. For example, if you tap **Flash**, it always begins at a different point of the phase. * Sync disabled for the cue: The phaser is only using the speed of the speed master. For example, if you tap **Flash**, it always begins at the starting point of the phase. * Additionally, multiple bugs regarding phasers, speed handling, and sync were fixed. For more information, see [below](/grandma3/2-3/key_releasenotes/#h3__118549267). *** ## Other Enhancements [Section titled “Other Enhancements”](#other-enhancements-1)  Updated predefined content: * Updated predefined MAtricks * Added predefined filters * New symbols for the different key functions of executors * MA\_StartShow * Updated the render qualities “Custom” and “Custom Haze” in the Demoshow\_grandMA3  Improved preset pools: * Color definitions and colors were added to the color theme for every default feature group. Preset pool colors can now be defined in the color theme. * The add window pop-up displays the corresponding colors of pools of custom feature groups. When preset pool windows are created they use these defined colors. Additionally, there is one color defined for all All preset pools, and one color for the dynamic preset pool window. Preset pool windows of custom feature groups use the normal PoolWindow\.Presets color.  Improved presets: * Added At to the bottom of the preset editor. Tap At to apply changes made in MAtricks directly to the programmer without closing the editor.  Improved local settings: * Added Mouse Cursor Size and Mouse Speed to the local settings in consoles. Tap Mouse Cursor Size and choose between **Small** (Default), **Medium**, and **Large**. Mouse Speed offers **Slow**, **Normal**, and **Fast** as options for the speed of the mouse cursor.  Improved MAtricks: * Added  to the MAtricks editor and Swap Fade, Swap Delay, Swap Speed, and Swap Phase to the calculators for layer values. Tap to swap the from/to values.  Improved sheets: * The Mask tab in the fixture sheet settings and the content sheet settings have two new buttons: Sorted By, which can either be **FID** or **CID**, and Group By ID Type. Enable Group by ID Type to sort the fixture sheet by ID type grouping. * It is now possible to add Layer to the title bar, using the Edit Title Bar settings in the **Display** tab. In the content sheet, the setting is located in the **Mask** tab. * The fixture and content sheet now display fixtures affected by a group master with a purple background. * Removed obsolete settings in the fixture sheet settings due to sheet masking: Removed Fixture, Channel, Universal, MArker, Houselights, NonDim, Media, Fog, Effect, Pyro, Prog Only, Filter Selection, and Filter Toolbar toggle buttons + the Filter button in the Mask tab. * Removed obsolete settings in the sequence sheet settings due to sheet masking: Removed Selection Only, and Filter Toolbar toggle button + Filter button in the Mask tab.  Improved sequence sheet: * The track sheet allows to edit values in empty cells. * Added Show Fixture Name to the Mask tab of the sequence sheet settings. Enabling Show Fixture Name in track sheet mode shows or hides the fixture names in the sheet. * To learn more about improvements about filters and masks regarding the sequence sheet, read [here](/grandma3/2-3/key_releasenotes/#h3_271449867). * Executing a Goto Cue X command for a non-existing cue opens the Goto pop-up. * It is now possible to assign an object to a property using a + in the syntax. For example, Set Cue X Property ‘Break’ At + Filter ‘Only Dimmer’. * The timing progress bar for cues now includes values from timing masters.  Improved the sequence pool: * Added Executor Style to the sequence pool settings. With Executor Style enabled, the pool objects display all cues of the sequence. The active cue is visualized with a blue moving bar, same as in the sequence sheet.  Improved layouts: * Added Executor Style to the edit layout settings. With Executor Style enabled, sequences are displayed with their cues in layouts. * Added Icons to the arrangement tab of the edit layout elements settings. With Icons enabled, pool objects are displayed with their icons in layouts.  Improved MIB: * If you select some prepositioned fixtures (MIB state) and turn on the dimmer, all prepositioned values of the selected fixtures are knocked in into the programmer. * The user profile now has a KnockIn MIB property. By default it is set to **Post**, meaning that the attributes that have been prepositioned by Move in Black are activated in the programmer to ensure the current state of the fixtures is active. When KnockIn MIB is set to **Off**, only the actively changed attributes are activated in the programmer. This is same behavior as in previous versions. The moved in black attributes stay in the state of MIB and are not automatically activated in the programmer. This means that what is displayed in the output is not necessarily what was stored in the cue, which might result in a cue that looks different when it is played back to when it was stored. | | | | -------------------------------------------------- | --------------------------------------------------------------------------------------------------------- | |  | **Known Limitation:** | | | KnockIn MIB does not work with relative values. Instead, the tracked absolute values will be knocked in. | * Set the **MIB** property in the patch menu and the attribute definitions menu to **Disable** to disable the MIB functionality for the corresponding fixtures and attributes.\ MIB can also be disabled per logical channel in the DMX Modes of fixture types.  Improved the patch menu: * The values in the **Offset** column of **Pan** and \*\*Tilt \*\*can be entered in physical degrees in the patch menu. * Tap Edit DMX Mode in the patch menu to quickly edit the DMX mode of the selected fixture.\  Improved scribbles: * Changes made in the scribble editor are applied to the scribble immediately. In this context Apply and Save were removed in the scribble editor.  Improved pool action settings: * **Toggle** can be set for plugins to turn plugins on and off by tapping on the pool object. * **Top** can be set in sequences to jump to the beginning of the sequence when tapping the pool object. The icon is  . * Added Pool Action to world pool settings. The following pool actions can be selected: **None**; **Select**; **SelFix**.  Improved pool objects: * The render quality pool objects can be locked or unlocked via Lock within the editor of the corresponding object. Previously, this could only be done from the command line. * Copying an object that is locked by the user automatically unlocks the target object.  Improved pool overlay: * The pool overlays (for example, List + MA + X14 | Macro) have a DataPool selector.  Improved handles: * Added Create Handle to the title bar of the [command editor](/grandma3/2-3/command-editor/). When enabled, the last object in the command is automatically resolved into a handle using the [#\[Object\]](/grandma3/2-3/keyword_hashsquarebrackets/) keyword. * The conversion to handles happens via Please in the command line input, for example, in the macro editor. * **Create Command Handle** is a user profile setting. When is set to Yes, Create Handle in the command editor is enabled by default.  Improved recipes: * The Selection column of the recipe sheet now offers **\**. When a selective preset is set in Values, **\** refers to all fixtures of the selective preset. Additionally the selection pop-up has a DataPool selector. * If edit recipe mode is enabled and the last selected preset of the last selected recipe is selected, rotating green dots will be displayed around the pool object. These rotating dots indicate it as the target of MAtricks or filter values. Also, the recipe line in the recipe editor displays the preset that was selected last with rotating green dots. If you tap a preset that is not part of a recipe in the recipe editor, the green dotted frame will appear around the preset. To select an already used preset (which has a green frame), press MA and tap the preset. Now MAtricks, filters, and worlds can be applied to the corresponding recipe. The corresponding line in the recipe editor is displayed with a green dotted frame. * If EditRecipe is enabled, the MAtricks window and the MAtricks overlay will only work with recipes and will not affect the programmer. * An orange cooking pot icon is shown next to the cue in the sequence sheet when the cue has both, cooked and uncooked values.  Improved the 3D viewer: * The Misc settings of the 3D viewer now have a Lines Overlay button. This shows the direction of the fixture beam direction with a colored thin line. Unselected fixtures have a red line, selected fixtures have a yellow line, and sub selected fixtures have a brown line. The following values are available: * **Off**: No lines are showing. * **All**: Every fixture in the patch shows a colored line. * **All Dim 0**: All fixtures with dimmer at 0 shows the colored line. * **Sel**: All selected fixtures show a colored line. * **Sel Dim 0**: All selected fixtures with dimmer at 0 show a colored line. * The 3D viewer now seamlessly visualizes the fading of color transitions in fixtures with color wheels. * Improved the assignment of individual DMX channels to the correct geometries in the case of more complicated geometric structures (nested geometry references). * Improved the performance if Show Label on Spot is enabled. * It is now possible to add the setting Touch Mode to the title bar of the 3D viewer. To do so, tap MA in the upper left corner and enable Edit Title Bar. Then go to the Misc tab and tap Touch Mode.  Improved DMX protocols: The Art-Net and sACN tabs in the DMX Protocols menu display “in” in green text when Enable Input is enabled and “out” in green text when Enable Output is enabled.  Added a MIDI monitor to the MIDI Remotes tab of the In & Out menu: * The MIDI monitor displays all MIDI messages including CC messages.  Added Create Groups /OddEven to the Create Groups tab of the Show Creator menu: * Create Groups /OddEven creates two groups with the fixtures of the selected fixture type, class, or layer. It alternately stores the fixtures of the specified object in a first odd group and a second even group. * Added /OddEven option keyword. The /OddEven option keyword also creates two groups as described above with the fixtures of a specific fixture type, class, or layer. It is also possible to create odd and even groups with the fixtures from a selection using the syntax Fixture x Thru y or the Selection keyword.\ For example: AutoCreate FixtureType 13 At Group 21 /OddEven.  Improved countdown pop-ups: * As soon as the countdown has stopped by tapping on the pop-up, a text is displayed in the countdown bar indicating which user stopped the countdown, for example “Stopped by User 4”.  Added an **Encoder Bar Type** column to user profiles configuration: * It offers three different encoder bar types (Default, Exec, Xkeys) that can be selected per user profile. The types can still be changed, using the [User1](/grandma3/2-3/keyword_user1/) and [User2](/grandma3/2-3/keyword_user2/) keywords.  Improved PSR: * A progress bar indicates the progress of the operation.  Improved special dialog shaper: * If there are too many attributes per blade used in a fixture type, the system monitor will inform the user about this misconfiguration.  Improved the Help: * Added the Command Bot to the help. Open elements, such as windows or settings, directly from the help window using the Command Bot. * You can use the bot wherever [** \_ Paste to Command Line \_](#ma_cmd?Menu%20%22CommandLineHistory%22)is displayed in the manual. Use the Command Bot: 1. To paste the command to the command line, tap [ Paste to Command Line ](#ma_cmd?Menu%20%22CommandLineHistory%22). 2. To execute the command, press Please. | | | | ------------------------------------------------ | --------------------------------------------------------------------------------------------------------------------------------- | |  | **Important:** | | | If you change settings using the Command Bot, the changes are applied to all windows of the same type that are open at that time. | | | | | ------------------------------------------ | -------------------------------------------------------------------------------- | |  | **Hint:** | | | To open a window using the Command Bot, there must be free space on your screen. | There are examples in these topics: [Appearances](/grandma3/2-3/appear/); [Clock](/grandma3/2-3/si_clock/); [Scribbles](/grandma3/2-3/qsg_scribble/); [RDM](/grandma3/2-3/rdm/); [Clone Fixtures in the Patch](/grandma3/2-3/operate_clone_patch/); [Connect MIDI](/grandma3/2-3/fs_connect_midi/); [What is Tracking](/grandma3/2-3/cue_tracking/); [Add Fixtures to the Show](/grandma3/2-3/patch_add_fixtures/); [View Bar and View Buttons](/grandma3/2-3/ws_ui_view_bar_and_buttons/). * Links in the help are now blue and underlined. * Syntax now has a new and more prominent font.  Improved the command line: * Group can be set as default for the command line using the keyword **Group** + Please.  Improved the Next and Previous keyword behavior to target objects: When used in combination with the Cue keyword, Next and Previous can be used to target existing cues in relation to the current cue. (\[Function]) \[Object] \[“Object\_Name” or Object\_Number or Next] **Examples:** * To target the next or previous cue, type: | | | | ------------------------------------------------------------------ | ---------------------------- | |  | User name\[Fixture]>Cue Next | | | | | ------------------------------------------------------------------ | -------------------------------- | |  | User name\[Fixture]>Cue Previous | - To target the next or previously indexed cue, type: | | | | ------------------------------------------------------------------ | ------------------------------ | |  | User name\[Fixture]>Cue Next 1 | | | | | ------------------------------------------------------------------ | ---------------------------------- | |  | User name\[Fixture]>Cue Previous 1 | * To store to the second next cue, type: | | | | ------------------------------------------------------------------ | ------------------------------------ | |  | User name\[Fixture]>Store Cue Next 2 |  Improved the access of buttons to the Next and Previous keywords: In addition to the buttons, Next and Previous keywords can now be accessed using shortcuts closer to the keypad: MA + (shortcut for Next) MA - (shortcut for Previous) Opposed to the buttons Next and Prev, these shortcuts will not immediately execute the command. Instead, they will execute the command once you press Please.  Improved the + (Plus) and - (Minus) keyword behavior: When used in combination with the Cue keyword, + and - can be used to mathematically target numbers of cues relative to the current cue. * To target the object that is +0.1 from the current cue object, type: | | | | ------------------------------------------------------------------ | ----------------------------------- | |  | User name\[Fixture]>Store Cue + 0.1 | If this object exists, the Store Cue Merge pop-up will be displayed. If this object does not exist, this command will create the object. - To target the object that is +1 integer apart form the current cue object, type: | | | | ------------------------------------------------------------------ | --------------------------------- | |  | User name\[Fixture]>Store Cue + 1 | If this object exists, the Store Cue Merge pop-up will be displayed. If this object does not exist, this command will create the object. * To target the object that is +1 integer apart from the current object, type: | | | | ------------------------------------------------------------------ | ---------------------------------- | |  | User name\[Fixture]>Update Cue + 1 | If this object does not exist, an error message will be displayed. **Example:** * To store values to cue 13.5 if you are in cue 12, type: | | | | ------------------------------------------------------------------ | ----------------------------------- | |  | User name\[Fixture]>Store Cue + 1.5 | If cue 13.5 already existed, the values will be updated, if cue 13.5 did not exist yet, a new cue 13.5 will be created (12 + 1.5 = 13.5).  Improved the method to create objects: Using the + and - keyword without including the offset of numbers, creates objects. If you do not specify the offset of numbers when using + or -, while also using any function keyword along with this (Store, Copy, Paste, Insert, Import and so forth),\ Store Cue + will insert a new cue before or after the current cue using an offset of 1, 0.1, 0.01 or 0.001, depending on the space available between the current and next or previous cue that already exists. **Examples:** * To create cue 12 if you are in cue 11 and there is no cue 12 yet, type: | | | | ------------------------------------------------------------------ | ------------------------------- | |  | User name\[Fixture]>Store Cue + | * To copy cue 21 to a new cue between two existing cues 11 and 12 and you are in cue 11, type: | | | | ------------------------------------------------------------------ | ---------------------------------------- | |  | User name\[Fixture]>Copy Cue 21 At Cue + | Cue 21 will be copied as a new cue 11.1 (offset = 0.1, as cue 12 already exists).  Added the option keyword **/AutoFit**. It positions any window in the next free area of the specified screen respecting the minimum requirements: Use this syntax to do so: \[Function] ScreenContent Default \[“Window\_Name”] /AutoFit  Improved IfOutput keyword: * If you selected several fixtures, where dimmer is enabled and then select multiple groups afterward, entering IfOutput Selection into the command line and pressing Please will only select the fixtures where dimmer is open.  Added the option keyword /HighPrecision. However, it has more of an internal use rather than a general one. Using this option keyword shows more digits in the export of the geometry offset values. If you do not use /HighPrecision, the export will still be precise enough and also more intelligible. Use this syntax to do so: Export \[“FixtureType\_Name” or FixtureType\_Number] /HighPrecision  Improved Lua: * Added another boolean to SetBlockInput(boolean, boolean) to display a message on all screens, that the station input is blocked:  Added new value “GridPosition” in the /Type option keyword: It can only be used with the CleanUp keyword. /Type “GridPosition” removes gaps in grid positions and resets offset to origin in one object. Use this syntax to do so: CleanUp \[Object] \[“Object\_Name” or Object\_Number] /Type “GridPosition” *** ## Changes [Section titled “Changes”](#changes-1) * New keywords: * [FastSync](/grandma3/2-3/keyword_fastsync/) * [Learn](/grandma3/2-3/keyword_learn/) * [ReSync](/grandma3/2-3/keyword_resync/) * New option keywords: * [/AutoFit](/grandma3/2-3/ok_autofit/) * [/HighPrecision](/grandma3/2-3/ok_highprecision/) * [/OddEven](/grandma3/2-3/ok_oddeven/) | | | | ------------------------------------------ | ------------------------------------------------------------------------------------------ | |  | **Hint:** | | | For more information about the new keywords, please read the corresponding sections above. | New color theme colors: * ColorDefinitions: * Global.ButtonBackgroundTransparent75 * PoolDefault.PresetDimmer * PoolDefault.PresetPosition * PoolDefault.PresetGobo * PoolDefault.PresetColor * PoolDefault.PresetBeam * PoolDefault.PresetFocus * PoolDefault.PresetControl * PoolDefault.PresetShapers * PoolDefault.PresetVideo * PoolDefault.PresetDynamic * PoolDefault.PresetAll * StatusCenter.Visible * Colors: * Beat.DownBeat * Beat.NormalBeat * Beat.InactiveBeat * Beat.DisabledBeat * ExecConfigEdit.ExecSizeFrame * FilterGrid.RulesetSeparator * FilterGrid.ResultingAttributes * Global.DefaultTransparent75 * Help.Links * PoolWindow\.PresetDimmer * PoolWindow\.PresetPosition * PoolWindow\.PresetGobo * PoolWindow\.PresetColor * PoolWindow\.PresetBeam * PoolWindow\.PresetFocus * PoolWindow\.PresetControl * PoolWindow\.PresetShapers * PoolWindow\.PresetVideo * PoolWindow\.PresetDynamic * PoolWindow\.PresetAll * StatusCenter.Inactive * StatusCenter.Active * StatusCenter.Warning * StatusCenter.Error * StatusCenter.Visible * StatusCenter.Enabled * StatusCenter.Cooking * StatusCenter.Parked * StatusCenter.Alert * StatusCenter.Lowlight * Subfixture.DefaultMarkerColor * TitleButton.DynamicFilterIcon * TitleButton.DynamicFilterShadow * TitleButton.DynamicFilterText * New grandMA3 Lua Functions: * CallRealtimeLockedProtected(function:name): result of function * ChannelTable(string:attribute\_name or integer:attribute\_index): table of ui\_channel\_index * GetBlockInput(boolean) * GetListItemAdditionalInfo(light\_userdata:handle, integer:index): string:value * GetVarVersion(light\_userdata:variables, string:varname): integer:version * HostRevision(nothing): string:hostrevision * RemoteCallRunning(nothing): boolean:remotecall\_is\_running * SelectionTable(nothing): table of subfixture\_index * SetListItemAdditionalInfo(light\_userdata:handle, integer:index, string:value): nothing - In the copy cue pop-up, the buttons in the title bar changed from Load Defaults and Save Defaults to Load Preferences and Save Preferences. - Removed the acronym **AS** in the **AutoStore keyword**. This keyword now uses the shortcut **Autos**. The \*\*As \*\*shortcut is now only used in the **Assign keyword**. - Typing **C** in the command line now enters the Cue keyword. - Typing **I** in the command line now enters the If keyword. - The white focus frames around selected pool objects are now slightly thinner. - Renamed **Lock Executorin** the title bar of the assign menu ->previously **Lock Exec**. - Renamed **Notification Mode** in the title bar of the message center -> previously **Notification Type**. - Moved the **Frequency** column from DMX channels to DMX modes in the fixture type editor. - Moved the **Delay To Phase** setting to the sequence sheet and the settings of the preset editor. The Delay to Phase setting is no longer part of Preferences and Timings - Timings window. - Pool windows with Use Object Action enabled that were marked with a  are now marked with a . *** ## Bug Fixes [Section titled “Bug Fixes”](#bug-fixes-2) ### 3D [Section titled “3D”](#3d-1) | Description | | ---------------------------------------------------------------------------------------------------------------------------------------------------------------------------------------------------------------------------------------- | | Visual artifacts in the form of grain appeared in the shadowed area of a beam. | | Meshes could sometimes be lost after doing a PSR and restarting the software. | | The calculator for the X,Y and Z rotation did not work correctly when the Rotation Mode in the encoder bar was set to **Group**. | | The Render Quality and Camera would not show any label text if a render quality or camera pool object had the default name. | | When creating a new camera and setting Roll to a value other than 0, the camera was displayed incorrectly. | | In some cases subfixture selections would be displayed wrongly in the 3D viewer. | | In rare cases the 2D Right camera in the 3D viewer would not display the bounding box. | | Opening Calibrate Position and loading the show file again would cause a crash. | | Depending on the size of the 3D viewer window, tapping  resulted in different grid values in the selection grid. | | Changing Multi LED Beam Mode in edit render qualities multiple times resulted in a decrease of beam brightness. | | If you patched two MArkers to the same universe using data from multiple PSN sources, only one MArker would move in 3D. | | When using the Position Calibration Dialog, the points P1 to P4 inside the 3D viewer window were displayed with an offset on the Z axis. | | If a stage had an offset position, the arrangement tool in the encoder bar would not always take the offset into account correctly. | | If you tapped Touch Mode in the 3D viewer settings multiple times to switch through the values, the selection would stop at **Follow**. | | Selecting fixtures and resetting the Pos X encoder in 3D Setup mode, and then re-aligning them, the fixtures were sorted incorrectly and did not respect the selection order of the selection grid. | | If you opened the patch on screen 2, enabled Show 3D Positions, and tapped 3D Position Settings, the settings pop-up would open on screen 1. | | If you had Show 3D Positions enabled in the patch and opened the 3D position settings on the Label tab, the faders Background Alpha and Text Alpha would flicker. | | If a view included a 3D viewer window, the view would sometimes take longer to be be displayed fully. Now the 3D viewer displays the message “3D initializing …” to indicate that the 3D viewer requires some time for data preparation. | | Translating and rotating a stage could result in wrong stage sizes and beam cutoffs. | | An MVR-xchange file request could fail due to an invalid character in the commit message. This bug is fixed. Any invalid characters in the comment will now be converted to valid ones. | ### Command Line and Macro [Section titled “Command Line and Macro”](#command-line-and-macro-2) | Description | | ------------------------------------------------------------------------------------------------------------------------------------------------------------------------------------------------------------------------------------------------------------------------------- | | If you selected a subfixture of a multi-instance fixture and executed TopUp or pressed Up, the parent fixture would not be selected. | | If you opened the Oops overlay on onPC with the backspace shortcut, an additional oops was executed undoing the most recent command. | | After selecting a Gel and then pressing Oops, did not remove the Gel from fixtures. | | If a user with setup rights was logged in, New Show in the Backup Menu was not grayed out. | | Typing “Thru” in the calculator using the keyboard lead to wrong results. | | Cue commands in mirrored sequences would be executed even if Cue Command was set to Force No in the mirrored sequence. | | Moving recipes to create a new order did not automatically trigger the cooking process. | | Filters were not stored with individual names, for example with ***Store Filter 5 “My Filter”***, the name was “Filter 5”. | | When editing the command with the handle inside again, handles to recipes became invalid. | | In the Layout Viewer, when editing layout elements via ***Edit Layout x.y***, the selected elements were edited instead of the one called via the command line. | | Pressing MA to close the temporary command line history returned “Failed:Menu “CommandLineHistory” in the command line history. | | It was possible to copy empty strings from the cue command field to the clipboard. | | If you executed Delete Sequence X If Tag 1 and Tag1 had no references, a warning would be displayed. | | If you typed **C** in the command line in order to enter the Cue keyword, the Call keyword would be entered instead. This bug is fixed and typing C now enters the Cue keyword. | | If you typed the **I** in the command line in order to enter the If keyword, the Import keyword would be entered instead. This bug is fixed and typing I now enters the If keyword. | | The ChangeMulticastBase command could not address the own device from which the command was executed. For example ChangeMulticastBase Console Thru /Type “Alternative” changed the multicast base address for all consoles in the network, except the executing console itself. | | If you copied a sequence in the sequence pool, the object action would not be copied to the new sequence. | | If you copied a cue to another cue in the sequence sheet, the options to copy values from the source cue would not be displayed in the pop-up. | | If you assigned functions to encoder left and right and then selected Empty on the encoder, encoder left and right would both be cleared. | | It was not possible to set up a MIDI In Device via the Lua command GetObject(‘root 2.2’):Set(‘onpcmidiindevicename’,‘None’). | | If you executed the HelpKeyword command, the keywords CueDelay, CueFade, Bitmap, and Generator would not be listed in the command line history. | | If you created single groups using the command AutoCreate Group X these single groups would not respect the order of the fixtures in the selection grid. | | If you loaded the “defaultDAYLIGHT” color theme and executed MA + MA + Clear, the “default” theme would not be reloaded. | | If you opened the list of keywords in the command line history, the Multipatch keyword would show an incorrect abbreviation – F10. This bug is fixed. The command line history now displays the correct abbreviation – F+10. | | Using the Goto keyword in combination with a cue that did not exist, for example Goto Cue 6.5, would lead to a syntax error. Now the Goto pop-up opens with focus on the nearest cue. | | Enabling Assert Previous Events while a timecode was running, did not immediately perform an assertion on the running timecode. | | When creating plugins, the property called “Tags” collided with its child container called “Tags”. | | It could happen that the grandMA3 software crashed when moving a cue to an empty sequence. | | It was not possible to assign subfixtures to a layout using the command line, for example by using Assign Fixture 1 Thru 4.Thru At Layout 1. | | Assigning an action to an executor, using a name that did not exist, created an empty executor if it did not already exist on a page. | | Moving an object from an executor to an Xkey with a width of 2, resized it to a width of 1. Moving it back again to a normal executor resized it again to a width of 2. | | Renumbering cues in the sequence sheet did not follow the user input regarding the decimals but the cue with the most decimals in the selection. | | Cloning fixtures referring to data pools, for example Clone Fixture 1 Thru 4 At Fixture 5 Thru 8 if Datapool 1, removed individual delay times of the cloned fixtures. | | Turning a recipe back to a preset could cause a crash. | | Executing a collect command in combination with an asterisk (\*) would lead to to a freeze in the software. | | If a sequence was locked and you stored a cue with a decimal, the cue numbers would change. | | Changing MAtricks in a recipe preset would sometimes not work as expected. | | Using Oops after cloning did not undo all changes to attributes from the cloning process. | | Cancelling an operation using MA + MA + Esc while the “Reading Objects” bar was displayed, could crash the software. | | Merging a preset into an embedded preset could cause references and data in and to the embedded preset to be wrong or lost. | | If you selected **No Shuffle** for a recipe line in presets and referenced to a different preset in the values column, shuffle would not be disabled. | | If there was only a single cue in a sequence and it was locked, it was still possible to store new values into the sequence with Store Sequence X. | | MAgic presets that were created from recipes did not work. | | Moving a range of cues, oopsing, and moving them again would result in cues with decimal numbers. | | Executing Store Sequence /DMX if the programmer was clear would store channels for the Universal fixture and RGB values. | | If you assigned the selected Rate master to an executor, the speed master executor configuration would be assigned instead of the master executor configuration. | | If you opened a menu, like for example the Add Window menu, that did not use encoders other than the screen encoder and the screen encoder setting was enabled in the user profile, all dual encoders behaved as screen encoders instead of only encoder 5. | | Macros that trigger other macros, which then overwrite presets, could lead to a crash if they are executed too fast. | | FaderSpeed At x Fade y could fail if the current speed was learned and is linked to a speed master. | ### Connections [Section titled “Connections”](#connections-1) | Description | | ----------------------------------------------------------------------------------------------------------------------------------------------------------------------------------------------------------------------------------------- | | If you established a RemoteHID connection between two devices using the onscreen keyboard and tried to cut the connection, only the onscreen keyboard would close, the RemoteHID connection would not be cut. | | Sometimes USB drives would be detected stating 0% free space, although they still had free space, | | Some USB devices, for example the SanDisk 3.2 Gen1 SCSI, were not detected as storage devices at all. | | The dual encoders on a command wing would not work if screen 1 of the onPC software was minimized. | | In rare cases, if you installed a new software version using network update with a slow network, some update processes would not be completed fully. This could lead to issues, for example missing wing connectivity or empty oops list. | | If you added Art-Net or sACN data to a show file and performed a PSR with that show file, the Art-Net and sACN data would only be available in the new show file after saving and loading the show file. | | grandMA3 did not start on macOS version 11.7.10 on some devices. | | When playing a song on grandMA3 onPC for MacOS, the software would output sound even if the system volume was set to 0. | | If the minimum or maximum X, Y, or Z position of a MArker was exceeded by using PSN input, the MArker would jump to the 0 position inside its movement space on the according axis. | | Some devices advertised 2.5 Gbps as a possible link mode when connected to the network. This could lead to problems with the network, as not all devices support 2.5 Gbps. | | The software could crash if an individual object action, for example, flash, was assigned to an sequence pool object and then the object was selected via web remote. | | If two consoles were in session and one console had a web remote connected, loading a show file on the other console multiple times would crash the console that was connected with web remote. | | RemoteHID did not work when used with Windows 11. | | In session the master station could crash, if sACN was active and a show file was loaded ont the station. | | It was not possible to use the DumpSystemInformation command from terminal app. | | Pasting a large amount of PSN trackers from an external system could crash the software. A limit was set for PSN trackers per system to avoid crashes. The new limit is 1024 trackers per PSN system. | | The software could crash when a fixture sent a RDM parameter description that exceeded the maximum allowed length of ANSI E1.20. | | Repatching a MArker to a new address via Live Patch while receiving PSN did not initialize the input to the new DMX channels. | | In some cases, if an extension wing was disconnected and then reconnected, the touch, buttons, and faders of the extension wing would stop working. | | The software could crash when a command, for example, in a cue, was changed and was displayed multiple times across different displays. | | If MA-Net interface was set to **Auto** on consoles, the Class C IP address (192.168.x.y) was not preferred. Instead, the Class B IP address (172.16.x.y) was preferred. | | In some bigger show files, if a console booted and automatically connected to a running session, the faders and buttons of the internal wings would not connect. | | The touch function of internal screens could stop working properly after the corresponding product had been running for a week. | | It was possible to invite xPort nodes running in Mode2 into grandMA3 sessions. | ### Patch [Section titled “Patch”](#patch-1) | Description | | --------------------------------------------------------------------------------------------------------------------------------------------------------------- | | If you created a new DMX curve and assigned it to a fixture, the new DMX curve would not be applied to the output. | | Unassigned copies of automatically created spaces from MArkers were deleted after leaving the patch menu. | | If you changed the IDType to “Fixtures”, you could not enter the patch anymore. | | The subcolumn of the DMX column in the edit fixture type menu of the geometries tab was incorrectly named **Offset**. It was renamed **Patch**. | | If you reentered the patch after cutting and pasting a layer or class in the patch, the fixtures would not be in their corresponding layers or classes anymore. | | Editing an already patched fixture type could change the default values of some channels. | | With Partial Show Read the software could crash if universal fixtures had no CID. | | Replacing a used attribute with an unused attribute did not reinitialize the patch. | | The Feature selection pop-up in the Attribute Definitions tab was empty when a feature group with no features was selected. | | In PSR, renamed IDTypes would reset to their default names. | | Fixtures with indirect additive color mixing remained black when indirect color mixing attributes of the main instance were set to RGB 0/0/0. | | Cutting and pasting fixtures in the patch could lose corresponding preset data in cues. | | PatchOffset in edit patch was calculated wrong if you set an offset for multiple fixtures. | | If you stored a show file called “NewShow” and performed a clean start, this show file was loaded instead of a blank new show file. | | If you deleted fixtures in the patch and saved the changes, the programmer would be cleared. | | Exchanging a fixture type with broken channel functions would do nothing due to a missing channel conversion of physical values. | | In the description column of fixture types in the patch, only the first line of the description could be edited. | | Oopsing a newly created channel set in the fixture type editor did not work. Instead the first channel set was removed. | ### Phaser [Section titled “Phaser”](#phaser-2) | Description | | --------------------------------------------------------------------------------------------------------------------------------------------------------------------------------------------------------------------------------------------------------------------------------------------------- | | Using LearnSpeed after executing DoubleSpeed, HalfSpeed, or Speed1, did not scale the speed as correctly. | | When KnockIn Measure was executed, the total width was knocked in instead of the phaser steps. | | Phaser values were not applied to attributes of subfixtures that were part of a subfixture. | | The console could crash if you had more than 25 steps for a phaser. | | If a speed master was assigned to a cue and Sync was set to **No** in the sequence sheet for the cue, the cue phase was still synchronized as if Sync was set to **Yes**. Hence, the cue phase did not start at the beginning of the phase when a cue was started and a phaser was already running. | | Cloning fixtures in a phaser preset with integrated selective presets, would result in the loss of inks to the selective presets. | | Dimmer phasers in multi-instance fixtures that had a phase set in the phaser would not fade out correctly with the determined fade out time. | | Cloning in a phaser preset with integrated selective presets lead to loss of the link to these presets. | | Stomping a phaser with relative values in a tracked cue would sometimes not work. | | If a phaser had a value in step 1 that was equal to the value in a break cue, tracking of the phaser would continue after the break cue. | | Speed7 was not selectable in the speed master calculator. | ### Playback [Section titled “Playback”](#playback-2) | Description | | --------------------------------------------------------------------------------------------------------------------------------------------------------------------- | | Stomping a running phaser from a playback did not always offer the cue in the Update menu. | | Starting a sequence where fixtures had no values in the first cue and Off when Overridden was enabled, the sequence would be immediately disabled again. | | If Wrap Around was enabled for a sequence and Go+ Cue 1 was executed while the last cue was running, Cue 1 would have tracked values of the last cue in the sequence. | | If cues had **Type** set to \*\*Follow \*\*in the sequence sheet, executing Top would sometimes not work. | | Timecode events could get lost when deleting a mirrored sequence. | | The **Break** property in cues did not work properly when tracking shield options are used. | | Setting a **Break** property for filters in cues did only work when storing the corresponding cue the second time. | | In a session, it could happen that in bump sequences, pixels on different fixtures remained active for a short moment after the bump. | | If there was corrupted group data in a show file, patching a fixture into a grouping fixture could change the DMX output. | | The last event of a timecode show was not triggered if the time of the event did not match the actual duration. | | If you renumbered cues, the tracking distance and MIB targets of the cue were not automatically updated. | | If you saved a show while a sequence was running that had a tag with the tag type Kill Instant assigned, the sequence would not be running when you loaded the show. | | If you had executor time enabled and played back a sequence from an executor, the executor fade time would be applied even if an attribute was set to Snap. | | In some cases, fader values could jump when using negative or positive group masters. | ### Windows [Section titled “Windows”](#windows-2) | Description | | -------------------------------------------------------------------------------------------------------------------------------------------------------------------------------------------------------------------------------------------------------------------------------------- | | If you had a fixture type with fixture type presets in it and then switched to FTPresets in the Fixture Types Editor, the calculator values would offer an incorrect range. | | If a sheet was opened on a console and then the Assign menu was used while the command line was visible on that same screen, the edit pop-up when creating new appearances or scribbles would open in the background. | | Certain fixture types could freeze the console due to a number of duplicated channel functions and channel sets. | | The Value column of the recipe sheet did not display the pool number of the All Presets pool when the pool was renamed. | | It was not possible to open the pool window settings using the pool overlay. | | In the Master Controls overlay, the Playback Controls overlay, and Playback window, a long press on the title of an executor did not open the calculator. | | The IDs for objects in the sMArt menu did not match the IDs in the encoder bar. | | If you edited columns in sheets, a white focus box would be drawn above the column edit menu. | | Tap and hold on an object in the dropdown of Timecode in the title bar or the settings of the timecode viewer opened another timecode editor. This also happened if you selected New in the dropdown. | | Pressing Delete and selecting an object in the Layout Viewer, without enabling the setup mode, would open the alert pop-up reminding you to enable setup mode. However, it did not remove the Delete command in the command line. | | Scrolling through the sequence pool resulted in selecting empty pool objects and creating empty sequences. | | If you scrolled through preset pools some feature group indicator bar squares would display wrong colors. | | When appearances were assigned to layouts, they did not create a reference. Deleting appearances from layouts did not display the confirmation pop-up. | | On onPC the phaser editor overlay sometimes did not fit the full screen. | | In some cases, universal presets were displayed as available for a fixture, even if they could not be used. | | The plugin editor did not recall the previous state of the on-screen keyboard and had a button with an arrow instead of a keyboard icon in the title bar. | | If you double-clicked on the header of a column in the import pop-up of a media pool (Images, Videos, Sounds, Symbols), all files would be imported. This bug is now fixed. Now if you double-click on a header, all rows in the column will be selected but no file will be imported. | | If Hide Subfixtures was enabled in the fixture sheet, the attributes of the subfixtures would also be hidden in the main fixture. In Channel Sheet Mode, the main fixture would be hidden as well. | | The XY Rotation pop-up in the selection grid would not close automatically after typing a value in the calculator. | | When tapping the sequence setting Executor Display Mode, a drop down menu would open instead of toggling through the different properties. | | When editing camera views in the 3D viewer, the title bar of the calculator did not show the range of values that were allowed. | | Changing the mode in the Color Picker caused the window to lose focus. | | Oops did not work as a backspace in the Show File Description area of the Backup menu. | | In the Special Dialog window, it was not possible to use arrow keys to navigate through colors in Book mode. | | Load Preferences and Save Preferences of the macro pool windows displayed the filter pool preferences. | | The Add Window dialog stayed on the tab of the previously loaded show file when loading a different show file. This bug is now fixed. When loading a show file or starting a new show, the tab that opens the Add Window dialog is always reset to the Common tab. | | If timecodes were locked, they could still be edited. | | Opening an existing timecode show and editing the timecode would display the wrong time in the calculator in Offset TC Slot of the timecode settings. | | If you saved a show file with a German Umlaut (ä, ö, ü), the show files character limit would be reached faster. | | With Sheet Mode set to **Dimmer+**, the fixture sheet did not display fixtures in a world without dimmer. | | It was not possible to move the tags column using column editing in recipes of the sequence sheet. | | Tapping Ctrl on the on-screen keyboard could remain active after closing the on-screen keyboard. This bug is now fixed. Ctrl in the on-screen keyboard is now immediately released after using it once in combination with any other button of the on-screen keyboard. | | The calculators in the camera pool object edit dialog did not display a range of valid entries in the title bar. | | When dragging the help overlay to the corners of the screen, the overlay was not displayed in full screen. Instead, it was larger than the size of the full screen. | | If a view was stored with a window in Setup mode, disabling setup and calling the view again, setup was still disabled, except for Setup in the selection grid viewer. | | Font sizes in layout elements would not adjust to the element as expected. | | When opening a custom master section window on grandMA3 onPC, disabling Show Title Bar, saving the window as a view and then recalling it, the title bar was displayed. | | It was not possible to directly label the first element with focus on in the edit layout menu using the keyboard. | | Assigning a tag from the label pop-up could cause the software to crash. | | The EncoderBars pool was listed under the category “Show Data” instead of “User Profile” in the all tab of the add window dialog. | | After adding multiple events in the timecode viewer, the focus in the confirmation pop-up would be on Cancel instead of Add. | | The bitmaps width and height dimensions that did not meet the Full HD restrictions could cause the grandMA3 software to crash. | | The selection grid overlay opened and closed without using the Overlay Fade Time property of the user profile. | | Canceling the mirroring of sequences using swipey commands, for example, Assign Sequence 1 At Sequence 2 + Page x.x resulted in a loss of data instead of a rollback. | | If you set the action of a layout element to **None**, and then saved and loaded the show, the previously set action changed to **\**. | | The selection grid would not automatically adjust to fit all selected fixtures if you selected too many fixtures. | | Fixtures selections would not be displayed in selected order in the sequence sheet if Track Sheet and Fixture Sort were enabled. | | If you set a feature group timing in the sequence sheet and switched to track sheet mode, the feature group timing would not be displayed. | | In some cases wrong colors were displayed in the feature graphics column in the track sheet. | | Selected Rate and Grand Rate in the master controls displayed two times ”%”, for example “100%%”. | | If you ran the onPC software on a multi-touch screen and disabled Show Title Bar in the configure display menu, multi-touch would no longer work. | | Recipes in cue parts were not displayed in the content sheet. | | Having a large number of presets in a show file and creating recipes using the Edit Values pop-up in the Recipe Editor would cause the editor to lag and eventually crash. | | On macOS, tapping the drive button in the backup menu multiple times did not always cycle through all drives. | | The software could crash while scrolling through a pool window which was opened using a macro. | | In some cases, the fixture sheet did not display selected fixtures in the fixture sheet modes when the Prog Only mask was enbled. | | It was not possible to display more than 127 wheel slots in the Channel Set Editor. | | Edit Display Preference in edit pop-ups, for example, the edit filter pop-up, did not work properly. | | If you had a layout in setup mode, editing multiple fixtures at the same time by selecting them and tapping Edit Selected would not work. | | In show files with a very high amount of presets the calculator would not open immediately for some attributes. | | The Select DMX Mode pop-up in the filter editor would be missing the fixture type name and index for most modes. | | If you had the onPC software running on multiple monitors that had different resolutions and Show Title Bar was disabled, the grandMA3 window would not fit the screen. | | A few appearance colors made it very difficult to read text and values in the sequence sheet. | | If the user rights were set to **None** for the logged in user after booting the console, screens 8 to 10 would display the wrong content. | | If you imported a fixture type, gobos would not be added to the next available slot in the gobo pool. | | Tapping Park Selected in the DMX tester encoder bar did not work if the focus was not on the DMX sheet window. | | Calling a view with a fixture sheet, moving columns in the sheet and calling the view again, could cause the software to crash. | | Dimmer values above 100% were displayed incorrectly in some sheets. | | If you scrolled the content of the info window using a mouse wheel, the scroll direction would be opposite to other sheets and windows. | | If you opened a pool overlay with another pool overlay already open, the old overlay would close but the new one would not open. | | If you pressed Menu and moved the Display menu on screen 7, there would be two instances of the menu. | | It was possible to store empty screen content by pressing Store and tapping on a blank screen, which would block the screen and make it unusable. | | If you copied an empty scribble to a different slot in the pool and then tapped a combination of Revert, Clear, Oops, and Apply in the scribble editor of this copy, the software could crash. | | If you had a note with more than one line in a cue and hid the Note column, the height of the cue row would not be adjusted. | | For certain objects, their default key function was grayed out in the assign menu. This bug is fixed. The executor configuration for masters uses now Toggle instead of Flash for keys. | | In some cases, the software could crash if you had the agenda window or sequence sheet open on multiple screens and updated the input of the command column. | | In a specific show file, the selection grid window was flickering. | | If opening the layout view in setup mode and deleted all layouts, tapping Snap to Grid would cause the software to crash. | | In the sequence pool, objects that had an input / output / input and output filter assigned did not show the correct icon. | | After importing meshes, the value of the **IsResource** column for the mesh in “Materials” changed. | | The order of the tabs (Empty, Filter, and World) in the assignment editor was different from the order in the input and output filters in sequences. | | Illegal commands with presets, such as moving a locked preset, did not display an error message in the command line, only in the command line history. | | Tapping a parent in the Master or Preset tab closed the assign menu. | | For certain fixture types, the color picker displayed the incorrect gamut when more than nine subfixtures were selected. | *** ## Deprecated [Section titled “Deprecated”](#deprecated) | | | | ------------------------------------------ | ------------------------------------------------------------------------------------------------------------------------------------------------------------------------------------------------------ | |  | **Hint:** | | | The following is deprecated and will be removed in the software in the near future. Make sure you read the sections stated below, so you can adjust your macros and plugins accordingly, if necessary. | * The command Help + Please no longer opens the list of all keywords and option keywords. It was replaced by the new **HelpKeyword** keyword. For more information see HelpKeyword in [Other Enhancements](/grandma3/2-3/key_releasenotes/#h2_1198082799). * The Lua function Aquire() is deprecated. It was replaced by Acquire(). For more information on the new Lua function Acquire(), see [Changes](/grandma3/2-3/key_releasenotes/#h2__656690415). *** ## Appendix [Section titled “Appendix”](#appendix) * We recommend you use a dedicated and a separate physical network for each grandMA3 session. * When using DMX protocols we recommend you use a dedicated physical network for each protocol. * The recommended workflow for executor configurations that are different, compared with the default executor configuration, is to create a new executor configuration, do the changes in the new configuration and save them. * XML files with exported executor configurations from grandMA3 version 1.2 and prior cannot be properly imported to grandMA3 version 1.3 or later due to structural changes. * XML files with exported analog remote setups from grandMA3 version 1.3 and prior cannot be properly imported to grandMA3 version 1.4 or later due to structural changes. * XML files with exported timecode shows from grandMA3 version 1.3 and prior cannot be properly imported to grandMA3 version 1.4 or later due to structural changes. *** ## Known Limitations [Section titled “Known Limitations”](#known-limitations) | | | | ----------------------------------------- | ------------------------------------------------------------------------------------------------------------------------- | |  | Software update via network to onPC stations requires confirmation during the install process at the destination system. | | | | | ----------------------------------------- | ------------------------------------------------------------------------------------------------------------------------------------------------------------------------------------------------------------------------------------------------------------------------------------------ | |  | When multiple GlobalMasters exist on the network, each with the same session and location name, the station with the higher priority takes over automatically. If all stations have the same priority, the station with the longest Online Time becomes the GlobalMaster of all stations. | | | | | ----------------------------------------- | ---------------------------------------------------------------------------------------- | |  | Recast will only recast presets to cues if there is a preset link in the absolute layer. | | | | | ----------------------------------------- | --------------------------------------------------------------------------------------- | |  | Loading show files that were saved in previous versions deletes the programmer content. |
# Release Notes 1.0
> Welcome to grandMA3 software version 1.0!
**Welcome to grandMA3 software version 1.0!** Founded on the legacy of the previous grandMA consoles, the grandMA3 represents a radical re-think of what’s possible from a lighting control platform. The grandMA3 software marks a new level of lighting control that extends your familiar workflows to deal with up-to-date challenges. Converts from grandMA2 will find the most common workflows are still respected and should feel familiar straight away. Learning a new lighting console is never easy, however we have included many tools to help you get up to speed with the new concepts of the grandMA3 software. You will find help within the software - just open the Help window. You can go to [www.malighting.com](http://www.malighting.com), where you will find grandMA3 e-learning courses, grandMA3 tips videos, the official MA support forum and all current MA software. We also encourage you to contact your local MA Distributor, who can register you for e-learning access or arrange for you to attend our new grandMA3 training conversion course. The latest grandMA2 version - called Mode 2 - is implemented in the console software as well. Just type the command “restart” (in both modes) and you are able to change between Mode 2 and Mode 3. We hope you enjoy your grandMA3 journey and welcome your feedback at . **Hint:**\ Make sure to visit our MA University which offers training courses for the new grandMA3.\ For more information go to [www.malighting.com/training-support/ma-university/overview/](http://www.malighting.com/training-support/ma-university/overview/) * [Features](/grandma3/2-3/key_rn_v1_0/#h2_727740091) * [Menu/Patch](/grandma3/2-3/key_rn_v1_0/#h3__845933848) * [Programming](/grandma3/2-3/key_rn_v1_0/#h3_1685124517) * [Playback](/grandma3/2-3/key_rn_v1_0/#h3_826433239) * [Programming Tools](/grandma3/2-3/key_rn_v1_0/#h3_167726520) * [Protocols](/grandma3/2-3/key_rn_v1_0/#h3__1798358011) * [There is More to Come](/grandma3/2-3/key_rn_v1_0/#h3__460056378) * [Known Limitations](/grandma3/2-3/key_rn_v1_0/#h2__1852571500) ## []()Features [Section titled “Features”](#features) The latest release of grandMA3 version 1.0.0.3 rolls out several enhancements that enrich your lighting experience. Read on for a quick introduction and find links for more information. ### []()Menu/Patch [Section titled “Menu/Patch”](#menupatch) * Tree structure for the organization of fixtures according to logical trees; * The entire Fixture Library of grandMA2, grandMA3 and GDTF (General Device Type Format); * Import the complete Patch using MVR (my virtual rig); * Filter & sorting are available as Layer & Classes but are not mandatory; * Color themes change between default and high contrast for daylight use; * Appearance and Scribble pools can customize the software to your liking. ### []()Programming [Section titled “Programming”](#programming) * The Fixture Sheet displays a tree structure that works with the top down principle; * Next/Prev and Up/Down allow easy selection; * Selection Grid dynamically shows selection; * 3D arrangement of selection are stored in Groups, Presets and Cues; * Presets can add/remove attributes to the referenced destinations using the keyword Recast; * There are 5 All Presets pools; * Phasers are the Preset information based on dynamic steps; * Presets with individual timings are stored in cues, which have links to these timings; * Data Pools offer a more fexible organization regarding the structure of the show file. ### []()Playback [Section titled “Playback”](#playback) * Sequences are synchronized and always have the same playback status; * Executors have Handles which can be used more flexible; * Executor assignments can be stored in a pool; * Timecode shows have additional GroupTracks and Markers; * The Sequence Sheet and Sequence Tracking Sheet are now combined; * Temp Fader respects individual timings. ### []()Programming Tools [Section titled “Programming Tools”](#programming-tools) * MATricks are three-dimensional now; * 3D view replaces Stage view and offers real rendering options; * ColorPicker includes RGB, CMY, HSI and CIE views; * Swipeys allow fast operation directly on screen; * Press & Hold stores empty objects or edits already existing objects; * Fully adjustable Playback view; * Integrated Web Remote including access to encoders and pop-ups; * Copy & Paste within Programmer; * Info view to show all references and dependencies of objects; * The Programmer can show all Parts of a Cue; * Screen configurations allow flexible use of the same screen with the same user profile. ### []()Protocols [Section titled “Protocols”](#protocols) * DMX512-A * sACN * Art-Net4 * Midi Notes * OSC - Open Sound Control * Analog Remotes ### []()There is More to Come [Section titled “There is More to Come”](#there-is-more-to-come) * Agenda * XYZ programming including the integration of PSN (Posi Stage Net) * Pixel mapping * RDM * Park functionality * MIB * Mask pool * PSR (Partial Show Read) * Update & store “Tracking Cue Only” These are only a few highlights of the new grandMA3 operating system. There is much more to come - so stay tuned and check out our MA University, the MA official forum or the MA website. ## []() *** ## Known Limitations [Section titled “Known Limitations”](#known-limitations) To have the best network experience within a grandMA3 session, we recommend to enable IGMP Snooping and Flow Control in your network switch configuration. The grandMA3 system supports at the moment only one external DMX source per universe for merging DMX into the system. Software update via network to onPC stations requires confirmation during the install process at the destination system. Playbacks always use Soft LTP, regardless of whether the Soft LTP is enabled or disabled. When deleting a preset that is referenced by a cue the reference cannot be restored when oopsing the deletion. Custom meshes / 3D models are not transmitted within a session nor are they stored within the show file.
# Release Notes 1.1
> The latest release of grandMA3 version 1.1.3.2 rolls out several enhancements that enrich your lighting experience. Read on for a quick introduction and find li
* [Bugfix Version 1.1.4.2](/grandma3/2-3/key_rn_v1_1/#h2__1590821963) * [What’s Changed](/grandma3/2-3/key_rn_v1_1/#h2_563643534) * [Fixed Bugs](/grandma3/2-3/key_rn_v1_1/#h2__1624482491) * [grandMA3 Version 1.1.3.2](/grandma3/2-3/key_rn_v1_1/#h2__488082198) * [Features](/grandma3/2-3/key_rn_v1_1/#h2_727740091) * [Network Software Update](/grandma3/2-3/key_rn_v1_1/#h3_799040378) * [Park](/grandma3/2-3/key_rn_v1_1/#h3__1516408206) * [Layout](/grandma3/2-3/key_rn_v1_1/#h3__2084382304) * [Cue Only](/grandma3/2-3/key_rn_v1_1/#h3__1071679005) * [Tracking Distance](/grandma3/2-3/key_rn_v1_1/#h3__311019666) * [UI Scaling](/grandma3/2-3/key_rn_v1_1/#h3_1763414465) * [Shortcuts](/grandma3/2-3/key_rn_v1_1/#h3__675591373) * [3D](/grandma3/2-3/key_rn_v1_1/#h3__1137860005) * [Output Configuration](/grandma3/2-3/key_rn_v1_1/#h3__1806759397) * [Web Remote](/grandma3/2-3/key_rn_v1_1/#h3__1621231930) * [Presets](/grandma3/2-3/key_rn_v1_1/#h3_956339510) * [grandMA3 Extension](/grandma3/2-3/key_rn_v1_1/#h3_545259682) * [Other Enhancements](/grandma3/2-3/key_rn_v1_1/#h2_1198082799) * [What’s Changed](/grandma3/2-3/key_rn_v1_1/#h2_279488008) * [Fixed Bugs](/grandma3/2-3/key_rn_v1_1/#h2_1272181069) * [Appendix](/grandma3/2-3/key_rn_v1_1/#h2__1835053169) * [Known Limitations](/grandma3/2-3/key_rn_v1_1/#h2__1852571500) ## []() *** ## Bugfix Version 1.1.4.2 [Section titled “Bugfix Version 1.1.4.2”](#bugfix-version1142) ## []()What’s Changed [Section titled “What’s Changed”](#whats-changed) * The maximum allowed time for any cue timing is now set to 14 days. ## []() [Section titled “”](#-1) *** ## Fixed Bugs [Section titled “Fixed Bugs”](#fixed-bugs) ### Command Line and Macro [Section titled “Command Line and Macro”](#command-line-and-macro) | Description | | ------------------------------------------------------------------------------------------------------------------------------------------------------------------------------------------------------------------------------------------------------ | | Oopsing the creation of a cue part crashed the console. This bug is fixed. Reverting the creation of a cue part does not crash the console anymore. | | Importing a user profile discarded the scroll positions of pools in the stored views. This bug is fixed. Import and export of user profiles restore now the saved scroll positions in pools. | | It was not possible to oops the creation of a time range within a timecode show. This bug is fixed. It is now possible to oops the creation of a time range. | | The timecode settings menu did not always open on every attempt to open it. This bug is fixed. The timecode settings menu should now always open. | | It was possible to delete the fonts of the UI. This bug is fixed. It is not possible to delete the fonts anymore. | | If you turned an attribute encoder and the program time was enabled at the same time, the attribute faded using the program time. This bug is fixed. Program time is not applied when turning attribute encoders. | | Layout encoder bar did not respect subselections when modifying layout elements. This bug is fixed. Going through a fixture selection using Next and Prev now only modifies the subselected fixtures upon turning encoders in the layout encoder bar. | | An already executed keyboard shortcut could return to the command line again. This bug is fixed. Keyboard shortcuts do not return to the command line again. | ### Connections [Section titled “Connections”](#connections) | Description | | ------------------------------------------------------------------------------------------------------------------------------------------------------------------------------------------------------------------------------------------------ | | The internal wings of a Compact or Compact XT console did not always initialize properly when doing a restart. This bug is fixed. The internal wings of Compact and Compact XT consoles now always connect to the system. | | Selecting the own console in the network menu and tapping Join resulted in a freeze of the station. This bug is fixed. Trying to join the very same console does not freeze the console anymore. | | The timecode generator did only work when the station had the network enabled. This bug is fixed. The timecode generator works now also in standalone mode. | | witching the timecode slot for an incoming Art-Net timecode routed the timecode signal to the old and the new slot. This bug is fixed. When switching the timecode slot for an incoming Art-Net timecode the time will run only on the new slot. | | A network session created too many negative acknowledgments messages in the system monitor although there were no NACKs. This bug is fixed. The system monitor displays now only NACKs when they are really occur. | | It was not possible to connect to the world server. This bug is fixed. grandMA3 stations connect now again to the world server when it is available. | ### Playback [Section titled “Playback”](#playback) | Description | | --------------------------------------------------------------------------------------------------------------------------------------------------------------------------------------------------------------------------------- | | Loading show files from v1.0 did not display always all tracking values. This bug is fixed. Show files stored with v1.0 are now restoring their tracking values correctly when loading the show with v1.1.4.2 for the first time. | ### Windows [Section titled “Windows”](#windows) | Description | | -------------------------------------------------------------------------------------------------------------------------------------------------------------------------------------------------------------------------- | | Scrolling around several times in an unfolded fixture sheet could display single attributes at the wrong fixtures. This bug is fixed. Scrolling around in a fixture sheet displays the attributes at the correct fixtures. | | The clock window displayed Sytem Clock on Clock Source. This bug is fixed. Clock Source displays System Clock when the internal clock is displayed. | | Locking the Position in the layout settings did not disable the scroll bars. This bug is fixed. The scroll bars are disabled if “lock position” is applied. | | Scaling or moving the visible canvas area of a layout was not transmitted within a session to other stations. This bug is fixed. Changes in the layout window are now correctly transmitted in the session. | | Label of the layout encoder displayed Position/Rotation. This bug is fixed. As layout elements can only be positioned and not rotated at the moment, the label is changed to Position. | *** ## []()grandMA3 Version 1.1.3.2 [Section titled “grandMA3 Version 1.1.3.2”](#grandma3-version-1132) ## []()Features [Section titled “Features”](#features) The latest release of grandMA3 version 1.1.3.2 rolls out several enhancements that enrich your lighting experience. Read on for a quick introduction and find links for more information. *** ### []()Network Software Update [Section titled “Network Software Update”](#network-software-update)  New in this release **Restriction:**\ Only devices running grandMA3 software v1.0.0.3 or higher can be updated via the Network Software Update feature. The Network Software Update is located in Menu - Settings - Software Update. In order to update onPC stations, the installer needs an XML file for the package description. Therefore, both files are bundled in a zip file container. **Restriction:**\ Mac systems receive and launch the installer. However, you have to enter the user password in order to install the new software version.\ After the installation finished, launch the grandMA3 onPC application. There are separate packages for grandMA3 hardware (consoles, RPUs, Processing Units and xPort nodes), grandMA3 onPC Windows and grandMA3 onPC macOS available.\ All of these packages can be sent to all of the different types of stations. This allows to update the target station with the correct package later even if the source system cannot install the file itself. For example sending all packages to an grandMA3 onPC Windows makes it possible for this grandMA3 onPC station to update all other devices that are running grandMA3 software later. Copy the update files onto an USB drive, to be able to update other stations from one grandMA3 station: * grandma3\_stick\_vx.y.z.a.zip: Decompress the zip file and copy all folders (“ma” and “EFI”) with all its content and all files (“update.scr”) to the root of a USB drive. For more information read [Update grandMA3 consoles](/grandma3/2-3/update_consoles/). * grandma3\_onPC\_win\_vx.y.z.a.zip: Decompress the zip file. A folder called “ma” will be created. Copy this folder to the root of your USB drive. * grandMA3\_onPC\_mac\_vx.y.z.a.zip: Decompress the zip file. A folder called “ma” will be created. Copy this folder to the root of your USB drive. Plug this USB drive to your onPC computer or console and choose the USB drive in the pop-up when tapping Choose update file. Choose also the software version and host system you want to update by selecting the corresponding xml file in the pop-up.\ To copy the files to the hard drive of the station, tap Import selected update. On onPC stations, the files will be copied to C:\ProgramData\MALightingTechnology\installation\_packages on Windows stations or to \~/MALightingTechnology/installation\_packages. When an update file is selected, the stations that are to be updated can be selected in the grid of stations within the Software Update menu. Tap Update devices.\ The files will be send to the destinations. After the stations received all files, they will reboot in order to install the update.\ It is possible to hide or display different stations by selectiong a Filter in the title bar of the software update menu.All: Displays all stations in the network. * My Session: Displays all stations that are member of the current session. * Not My Session: Displays all devices that are not part of the current session. * Wrong Version: Displays all stations in the network that have not the same software version as the station you are working on. **Hint:**\ Some zip applications do not unzip all files correctly. Files like ma\grandMA3\_onPC\_v.x.y.z.a.zip cannot be used correctly by the software. In this case use a different zip software then. *** ### []()Park [Section titled “Park”](#park)  New in this release Parking fixtures allows preventing DMX channels of fixtures to change their value accidentally. The syntax to park fixture 1 with all its attributes, type: User name\[Fixture]> Park Fixture 1 To park the current selection, type: User name\[Fixture]> Park It is also possible to enter Park into the command line and tap a cell in the fixture sheet to park a certain attribute. To unpark fixtures and/or attributes the keyword **Unpark** can be used in the same way as the keyword **Park**. To enter Park into the command line using keys, press Pause twice.\ Enter Unpark into the command line using keys with pressing Go+ twice. **Important:**\ When parking a fixture and/or attribute the corresponding DMX channel will be parked. It is also possible to park a fixture at a certain value: User name\[Fixture]> Park Fixture 1 At 50 **Hint:**\ The command Park Fixture At will park all DMX channels of the fixture to the set value. To park only DMX channels for a certain FeatureGroup or Attribute, the FeatureGroup/Attribute can be specified with the If-Appendix: User name\[Fixture]> Park Fixture 1 At 50 If FeatureGroup 1 It is also possible to park a DMX universe: User name\[Fixture]> Park DMXUniverse 2 The desired universe can also be specified by tapping a universe in the universe pool after entering **Park** or **Unpark** in the command line. To park DMX channel 20 on the first universe, type: User name\[Fixture]> Park DMXUniverse 1.20 The desired DMX channel can also be specified by tapping a channel in the DMX sheet after entering **Park** or **Unpark** in the command line. If there are parked channels in a universe, this will be indicated by a blue **P** icon in the universe pool. Parked Fixtures and Attributes are also marked in the Fixture sheet via a blue marker. *** ### []()Layout [Section titled “Layout”](#layout)  Improved in this release It is now possible to select several elements while pressing Ctrl on the internal keyboard. When being in the setup mode of a layout, the selection is synced with the selection in the programmer.\ The former selection is also discarded when no values were changed and the new selection is carried out in the layout window that is set to setup mode. This is the main difference to the normal selection when only working in the programmer. The layout /layout window can be locked with 2 different types of lock: * Lock Position: A layout window can be set to a position lock. This will lock the layout area of this very special layout window so that the visible layout area cannot be dragged anymore. Nevertheless, it is still possible to move single layout elements within the visible area.\ To enable the position lock of a layout window, tap MA in the top left corner of the layout window and tap Lock Position in the context menu.\ When Lock Position is active, Fit Type and Zoom to Fit in the title bar are grayed out.\ Other layout windows that may be open at the same time are unaffected from this setting. * Lock Layout: This lock is set per layout pool element and locks the layout against changes itself. With this lock it is not possible anymore to edit a layout with its elements. Nevertheless, it is still possible to move the visible area of a layout or to do fixture selections, etc. within the layout.\ When a layout is locked, Mode in the title bar is grayed out.\ There are several ways to lock a layout: * User name\[Fixture]> Lock Layout x * Long press/right-click on Layout in the title bar of a layout window, and then tap the padlock icon in the title bar of the layout editor. In the Layouts, the encoder bar uses the same arrangement tools as the 3D encoder bar when in setup mode. **Hint:**\ The Line mode in the arrangement tool places the layout elements around the origin of the layout, while grid and circle mode place the layout elements around the center of the current selection. **Restriction:**\ Assigned default actions and layout element actions are reset to factory default when loading a show file from v1.0. **Restriction:**\ The maximum amount of layout elements is set to 10,000 elements. **Important:**\ It is no longer possible to assign the same fixture more than once in a layout. A message box will pop-up if you try to do so, and cancel the operation for this fixture. *** ### []()Cue Only [Section titled “Cue Only”](#cue-only)  New in this release Cue Only is a store option for cues. When storing into a cue with the Cue Only, the tracked values will be blocked in the next cue or cue part to preserve the previous look on stage. The actual values of the programmer will only be stored in the target cue or the cue part. Cue Only is available for several workflows: * As command line option /CueOnly or /CO: User name\[Fixture]> Store Cue 5 /CueOnly Will store the actual programmer content as cue only into cue 5 of the selected sequence. * In the store options: To open the store options, press and hold Store for at least 2 seconds. To toggle the Cue Only option, tap CueOnly. * In the Store Cue pop-up: When storing onto an existing cue, the Store Cue pop-up will appear and ask whether to Overwrite, Merge, Remove, Release or Cancel the current store operation. It is also possible to decide if the cue is to be stored with active cue only within the pop-up. Remove and Release can be used for Cue Only. The pop-up only appears if the desired cue is not the last one in the sequence. When storing using Cue Only, and new cue part needs to be created for the blocked values created by Cue Only, the cue part will be labeled Cue Only.\ When storing Cue Only, the grandMA3 software decides, on the basis of the 3 following rules, in which cue part it will block the original values: 1. The default cue part for static values is cue part 0. 2. If the next cue already contains a part that has the same name as the cue part the original value is coming from, the blocked value will be used in this part. 3. If the cue already contains attributes of the same feature group, the previous values will be blocked in this cue. If none of the rules turn out to be true for phaser values, a new cue part will be created where the previous values will be blocked. *** ### []()Tracking Distance [Section titled “Tracking Distance”](#tracking-distance)  New in this release With the new cue part option Tracking Distance (TD), it is possible to dynamically return to previously tracked values. The tracking distance can be set a relative positive offset of cues or set to an absolute specific cue. Example 1: | | Fixture 1 Dim | TD | | ----- | ------------- | --- | | Cue 1 | **100%** | | | Cue 2 | *100%* | | | Cue 3 | **50%** | Δ+2 | | Cue 4 | *50%* | | | Cue 5 | *50%* | | | Cue 6 | *100%* | | | Cue 7 | *100%* | | | Cue 8 | *100%* | | In this example, the values 100% in cue 1, and 50% in cue 3 are stored (**blocked**) values. All other values are \_tracked \_values. If you set the tracking distance to Δ+2 (delta +2), the 50% will track all following cues from the current cue number plus 2. The value in cue 1 returns in cue 6.\ When setting the tracking distance to Δ+2.4 it would include all cues until cue 5.4. Example 2: | | Fixture 1 Dim | TD | | ----- | ------------- | -- | | Cue 1 | **100%** | | | Cue 2 | *100%* | | | Cue 3 | **50%** | 7 | | Cue 4 | *50%* | | | Cue 5 | *50%* | | | Cue 6 | *50%* | | | Cue 7 | *50%* | | | Cue 8 | *100%* | | In this example, the values 100% in cue 1, and 50% cue 3 are stored (**blocked**) values. All other values are \_tracked \_values. If you set the tracking distance to cue 7, the 50% will track from cue 3 to cue 7. The value in cue 1 returns in cue 8. If you change the value in cue 1 afterwards, the change will affect the tracking in the cues following the cues with tracking distance. The tracking distance of a cue is only applied to the stored values of the cue.\ It is also possible to embed or overlap a range of cues using tracking distance inside an existing tracking distance. The tracking sheet displays the tracked values within a tracking distance and returns to the former tracking values at the end of a tracking distance. This is indicated by a white vertical line on the left side of the affected value cells. In addition, the end of the tracking distance will be marked with a white horizontal line covering the left part of the bottom border. *** ### []()UI Scaling [Section titled “UI Scaling”](#ui-scaling)  New in this release UI Scaling for high dpi monitors can be accessed through the Configure Display dialog. The Scale value is located in Menu - Display - Configure Display. **Hint:**\ Access the Scale settings also via the Add Window function followed by tapping Configure in the upper right corner. *** ### []() Shortcuts [Section titled “ Shortcuts”](#shortcuts)  New in this release **Keyboard Shortcuts:** Keyboard shortcuts are implemented. They allow fast operation of the console and onPCs.\ To activate the keyboard shortcuts, press F10 or tap ShCuts on the right of the command line. Keyboard Shortcuts are part of the UserProfile. This makes it possible for every user/user profile to use their own shortcut definitons within a show file.\ To modify the shortcut definitions for the current user go to Menu - Preferences and Timing - Edit Keyboard Shortcuts, or right-click/long-press ShCuts on the right of the command line. In the Edit Shortcuts menu it is possible to define shortcuts for each keycode/executor.\ When entering a shortcut that is already in use, a pop-up will warn the user.\ As Enter can also be used as a shortcut, it is not possible to close the Edit Keyboard Shortcut pop-up with Enter. * To confirm the shortcut, tap Ok. * To clear the shortcut, tap None. * To cancel the edit, tap X. **Hint:** \ The Shift keys are always bound to the MA keys. When shortcuts are enabled, the Playback and Command Controls overlay will display the shortcuts for each button below the button label with a smaller font size. The shortcuts symbol at the right end of the command line turns yellow when the shortcuts are activated. In certain overlays and pop-ups where the shortcuts are not relevant, they are switched off and back on automatically. The shortcut symbol turns red. The shortcut color in the Playback and Command Controls overlay and the “automated switched off” color can be set in the color theme. There is a new keyword called KeyboardShortcut. KeyboardShortcut keyword can edit and list the keyboard shortcuts. To modify the keyboard shortcuts, use the [Set](/grandma3/2-3/keyword_set/) keyword. These shortcuts are available on all OS through several input methods: **Desk lock:** * Keyboard * F9 * Pause * Key * MA + MA + Pause * Button * Lock **Toggle keyboard shortcuts:** * Keyboard * F10 * Button * ShCuts **Print screen:** * Keyboard * F11 * Print **Reload UI (If the color theme is set to unreadable values):** * Key * MA + MA + Clear *** ### []()3D [Section titled “3D”](#3d)  New in this release Fixtures can be hidden in the 3D window. Find the related flag per fixture in the Patch and the Live Patch. It is called “3D Visible”. If it is set to “Yes” the fixture is displayed in the 3D window. Default: “Yes” Fixtures can be excluded from the rope selection in the 3D window. Find the related flag per fixture in the Patch and the Live Patch. It is called “3D Selectable”. If it is set to “Yes” the fixture can be selected in the 3D window using the rope selection. Default: “Yes”. *** ### []()Output Configuration [Section titled “Output Configuration”](#output-configuration)  Improved in this release The Output Configuration has now different view modes. The title bar button Columns can be set to one of these values: * Condensed (default) * Displays a reduced view of the XLR ports and all other essential properties like SMPTE Mode, SMPTE TC, Midi TC, Analog Start. * XLR only * Only displays the XLR ports. * Full * Displays the full data of the output configuration. All 3 modes display essential information such as name, type, and IP. The Output Configuration will only display as many physical XLR ports as the device has. At the moment only the universe of an XLR port can be changed when in condensed mode or XLR mode. To change the mode or merge settings, enter full mode. The universe objects in the universe pool now also display the colors of the output configuration and the DMX protocols: * If any XLR connector is used in a universe, the universe pool object will display the XLR 5pin symbol. The color of the symbol stands either for: * All XLRs that are used as output: dark green; * All XLRs that are used as RDM output: jade; * All XLRs that are used as input: orange; * A mix of output, RDM output and/or input: cyan. * If input is created using DMX protocols, the corresponding DMX protocol will flash up on the universe pool object in the color of the input. * Output via DMX protocols will be displayed per universe pool object with an A or S for Art-Net or sACN. On the station that is IdleMaster or GlobaMaster the letters will be highlighted in green when DMX packets will be sent. The XLR mode Out sends now DMX packets with a refresh rate of 30Hz. The XLR mode RDM remains unchanged: If DMX values are changed, they are send immediately. If there are no changes of DMX values, then refresh packets will be send with a rate of 2.1Hz.\ The XLR mode Out is now the default when starting a new show. There may be lighting fixtures that are not capable of the low refresh rate of 2.1Hz in the RDM mode. It is then recommend to switch the XLR mode to Out. *** ### []()Web Remote [Section titled “Web Remote”](#web-remote)  Improved in this release Web remote settings can be set in Menu - Network - Web Remote. To toggle the web remote, tap Web Remote.\ To set the maximum transmitted resolution, tap Resolution Limit: * 480p * 720p * 1080p * Unlimited The smaller the resolution the faster the transmission of the data. To change the maximum allowed web remote connections, change Connection Limit. Consoles allow a maximum of 2 connections. onPC stations allow a maximum of 5 connections. The main part of the Web Remote menu displays all established connections of web remote devices connected to this grandMA3 station:\ The column IP displays the IP of a connected device and UserAgent displays information about the operating system, web browser, and further information. **Hint:**\ All settings and information in the Web Remote menu are designated for one grandMA3 console or grandMA3 onPC only. *** ### []()Presets [Section titled “Presets”](#presets)  Improved in this release Only the normal preset pools (not the all preset pools) have the preset mode property. A preset itself does not have the preset mode property any more.\ The preset mode in Menu - Patch - Attribute Definitions - Feature Groups is now linked with the preset pools. If you store to an existing preset using the merge mode, the selected PresetMode in the store options is considered. IfOutput for presets can deal also with relative values in presets and with integrated presets. It is now possible to store a universal preset using a normal fixture. To do so, select a fixture, adjust the values and select preset mode universal in the store options.\ Or: set the preset mode for the preset pool to universal. In this case, store options have to be set to default. *** ### []()grandMA3 extension [Section titled “grandMA3 extension”](#grandma3-extension)  New in this release The grandMA3 extension allows to extend the amount of physical executor handles for a grandMA3 full-size, grandMA3 light or RPU. A grandMA3 extension has to be connected to the same network or network interface that is used for the MA-Net communication. Furthermore, an extension will connect to a specific console but not to a session. **Restriction:**\ It is only possible to connect extensions to grandMA3 full-size, grandMA3 light or grandMA3 RPUs.\ The maximum connection amount for extensions depends on the device type:\ grandMA3 full-size: 1x extension\ grandMA3 light: 2x extensions\ grandMA3 RPU: 3x extensions To establish a connection with an extension, the IP address of the extension has to be in the same IP range of the console. The IP address of an extension can only be changed remotely from a console or onPC station. To do so, go to Menu - Network Menu and select the entry of the extension and long-press the IP cell. Use the pop-up to change the IP settings of the extension remotely. To establish a connection between a console and an extension, select the extension in the network menu on the console you want to connect, then tap Invite Station. The connection will be initiated.\ It is not possible to invite the extension to a third console when it is already connected to a different console. First, cancel the connection on the console the extension is connected to at the moment. To do so, select the console in the network menu and tap Dismiss Station. After that it can be connected to a different console.\ The column Remote IP in the network menu displays to which console the extensions are connected at the moment. When an extension is connected successfully to a console, it will display the first wing of executors by default. To display a different executor wing, go to Menu - Settings - Extension Configuration. Within the Extension Configuration Menu it is only possible to change the WingID for the connected extension.\ There are 2 column modes: Condensed (default) and Full. Condensed mode only displays information about the connection state, IP and WingID. Full mode displays the columns Connected Count and Device Type in addition. * Connection State: Can be Yes or No. This cell cannot be edited by the user and displays if the extension is connected with the console or not. * IP: Displays the IP address of the extension. This cell also cannot be edited by the user. * Wing ID: Displays the ID of the executor wing the extension controls. This property can be changed by the user. * Connected Count: The higher the number the more often the extension tried to connect to the console. In a faulty network environment the number can increase fast due to reconnection. This value cannot be edited by the user. * Device Type: This column displays the device type of the extension. Typically it is grandMA3 Fader Module Encoder (MFE). This cell also cannot be edited. The desk light of an extension is controlled together with the desk lights of the console.\ Also the custom section of an the extension is not independent from the custom section of the console. *** ## []()Other Enhancements [Section titled “Other Enhancements”](#other-enhancements)  Soft LTP: Having Soft LTP activated or deactivated works now in both cases as expected.  It is possible to specify a show file or a plugin that is to be be loaded upon starting the onPC application.\ To do so, add the SHOW or RUNPLUGIN parameter to the shortcut that launches the onPC application: * “C:\Program Files\MALightingTechnology\gma3\_1.1.4\bin\app\_system.exe” HOSTTYPE=onPC SHOW=“startshow\.show” * “C:\Program Files\MALightingTechnology\gma3\_1.1.4\bin\app\_system.exe” HOSTTYPE=onPC RUNPLUGIN=“startplugin.xml”-x * x represents the number of the LUA component in the plugin that is to be started, e.g., 1 * It is not recommend to specify a path for the plugin although the plugin may be put into a subfolder. In addition, the optional parameters NOLOAD and CLEANSTART are also available when starting the onPC. * NOLOAD will not load the last show file but start with an empty show. Other device related configurations are kept. * CLEANSTART will reset device related configuration back to default and come up with an empty show file. \*\* \*\*In the MIDI Remotes menu, the option to display the incoming MIDI messages in the System Monitor was added.  Lasso selections, e.g., in the fixture sheet, DMX sheet, sequence sheet or layout window, etc. interact now with the command line. If you enter a keyword in the command line and drag a lasso selection around cues, fixtures, etc., the command will be executed for the selected objects.  Speeded up the MVR export if there are a many of objects.  Grand Master and Speed Masters are displayed in BPM instead of %.  SelFix selects the fixtures via specifying a DMX address in absolute notation or tapping one DMX channel in the DMX sheet.  DMXProtocols interface is by default on auto and the correct interface is selected as soon as the device is master. First it will look for an interface with a Class A IP (2. or 10.). If this rule turns out not to be true, it will select for Art-Net the same interface that is used for MA-Net. \ The same rules apply for sACN except it will not select an interface with an IP in the range of 2.x.y.z.  DMX Protocols now support the input priorities. To set the input priority for incoming data, change the input priority setting in the DMX Protocols menu. The input priority can be set individually per data line in the DMX Protocols. Each grandMA3 universe that gets data input with different priorities has to to be set to Merge Mode “Prio” when editing the universe in the universe pool or in the DMX list in the Patch.  The title bar of the fixture sheet, layout, and 3D displays the selected world, except for world 1.  Names and IP addresses within a network of grandMA3 stations can now be changed from the network menu of one station. If the console is running the software version that supports this feature, the corresponding fields can be edited (light gray background color). If a station is in a session with at least one other grandMA3 device, the name cannot be edited.  All grandMA3 hardware stations (except for grandMA3 onPC software) can be switched from grandMA3 software to Mode2 using the command SwitchGma2Mode.\ Executing this command without specifying a station will reboot the current station into Mode2. To specify a certain station, use an IP or device type.\ To switch the device from grandMA3 software to Mode using the IP address 192.168.0.4, type: User Name\[Fixture]> SwitchGma2Mode IP 192.168.0.4 To switch the second xPort Node of all xPort nodes available to Mode2, type: User Name\[Fixture]> SwitchGma2Mode Node 2  When searching for files in the backup menu or an import dialog, the search input field is no longer case-sensitive.  Add Window: The tab All is implemented. The current default sorting is in alphabetical order. It is possible to search within the list of this tab and to filter by the different types of possible windows. The layer CueID - located in the layer toolbar - displays the playback in which the current phaser is stored.  The cue progress bar displays the different kinds of crossfades with different colors. The colors are defined in the color theme in the color group CrossFade.  User meshes and user gobos are stored into the show file when saving it. They will also be transmitted to other session members in the network. Copy user gobos into the folder shared\lib\_fixture\_types\gobos\user and user meshes into the folder shared\lib\_fixture\_types\meshes\user. **Important:**\ User gobos and meshes that are part of a show file will be copied to these folders once a show file is saved. Files in these folders that have the same name are overwritten. **Important:**\ In order to export an MVR file or GDTF file that contains user meshes and gobos, save the show file to the local hard drive before exporting.  The System Info window has a new section called ShowData. This section displays the memory consumption of the loaded show file (=data of the show). The limit for a loaded show file is set to 10GB.  New command RemoteCommand is implemented: RemoteCommand can send commands to any grandMA3 station within a network. The commands will be executed by the currently logged in user on the receiving station.\ To address the target grandMA3 device, use the IP keyword or corresponding keyword for the target station type (e.g., [Console](/grandma3/2-3/keyword_console/), [PU](/grandma3/2-3/keyword_processingunit/), [onPC](/grandma3/2-3/keyword_onpc/) or [Node](/grandma3/2-3/keyword_networknode/)). To send the command Store Cue 1 to the station using the IP address 192.168.0.4, type: User name\[Fixture]> RemoteCommand IP 192.168.0.4 “Store Cue 1” To switch all onPC stations to view 1 on display 2, type: User name\[Fixture]> RemoteCommand onPC \* “View 1 /Screen ‘2’ ”  Stomp of a group is now possible.  Improved network experience.  Sequence sheet now represents a tracking release with a white line on top of the applied row.  The user interface for Processing Units improved: * Removed unnecessary elements in the info view. * In addition to the graph the workload view displays the values for CPU and memory usage.  It is now possible to do a clean start for grandMA3 onPC on macOS. To do so, keep Alt/Option pressed while executing the grandMA3 onPC application.  Renumbering of cues is more clever now: It is not possible anymore to give the same cue number to two or more cues. Setting the cue number to a previous number that is already used is prevented by the system. Entering a cue number that is used later in the sequence, all following cues will be renumbered until no collision with existing cue numbers occurs.  New property “Real Acceleration” was added to the Channel Function of a fixture type. This property is related to the already existing “Real Fade” and is used for visualization. Real Acceleration describes the time that is needed to accelerate from resting state to maximum velocity. Unit: seconds. *** ## []()What’s Changed [Section titled “What’s Changed”](#whats-changed-1) * The maximum amount of data pools, user profiles and users within a show file is now limited to 128 objects. All other pools, the user can store data into, are now limited to 9999 objects. Objects that were stored in grandMA3 v1.0 above the new limits are now not accessible anymore. * The maximum amount of OSC configurations within a show file is now limited to 1024. * To enter DMX Address and DMX Universe keywords, press MA + X8 and MA + X8 + X8. * The DMX sheet displays not granted universes now with a red font color in the title column of the sheet only. * The Layout Element Defaults of a UserProfile were moved from the UserProfiles menu to the Preferences and Timing menu. * When the limit of multicast inputs (sACN) is reached, a warning pop-up appears. The limit is set to 20 multicast inputs. * The image pool is limited to 200MB in total. If the limit would be exceeded during import of an image, a popup will inform the user. * Interface is renamed to MA-Net Interface in the Network menu. * Pools with icons (e.g., Group pool) display now pool name and icon in the title pool object. Therefore, the MA logo is smaller. * Long-press on pool objects now only performs a store operation if the pool object is empty. Long-press on a view button always performs a store operation if empty or a view object is assigned. * Pressing 3x Clear or executing ClearAll now also resets the command filter. In general, Clear is independent on the set filter. * The properties ArtnetIP and SACNIP in the output configuration are renamed to Art-Net IP and sACN IP. * Activating one onPC window on Windows brings also all other onPC windows to the front. * The keyword shortcut for MyRunningSequence, MyRunningMacro, RunningSequence and RunningMacro were changed in order to be aligned: * MyRunning = MyRunningSequence * MyRunningM = MyRunningMacro * Running = RunningSequence * RunningM = RunningMacro * grandMA3 onPC puts the local loopback adapter to the first place in the order of network interfaces and does not offer virtual interfaces anymore. * The properties PositionX and PositionY of layout elements were renamed to PosX and PosY. *** ## []()Fixed Bugs [Section titled “Fixed Bugs”](#fixed-bugs-1) ### 3D [Section titled “3D”](#3d-1) | Description | | ----------------------------------------------------------------------------------------------------------------------------------------------------------------------------------------------------------------------------------------------------------------------------------------------------------------------------------------------------- | | Gobo Rotation was not visualized correctly in the 3D window of an onPC running on Windows with some types of AMD Radeon graphics cards. This bug is fixed. Gobo rotation is now correctly visualized also on AMD Radeon Graphics Cards. | | The position of the labels was not updated when zooming in the 3D window using the mouse wheel. This bug is fixed. The position of the labels is now updated correctly when zooming in the 3D window using the mouse wheel. | | When using the arrangement tool “Circle”, the position of the center of the circle was shifted with other than the default settings of Angle Range and Radius Delta. This bug is fixed. The center of the circle stays in position at the center of the selection. | | When changing the position or rotation of a parent fixture the children were not updated in real-time. This bug is fixed. Children are moved and rotated in real-time if the position or rotation of the parent is changed. | | The option “Rotate to circle center” in the circle arrangement tool did not rotate correctly single fixtures. This bug is fixed. Rotate to circle center rotates fixtures correctly to the center of a circle. In addition, it is possible to step through other possible combinations of rotations by tapping Rotate to circle center several times. | ### Command Line and Macro [Section titled “Command Line and Macro”](#command-line-and-macro-1) | Description | | ----------------------------------------------------------------------------------------------------------------------------------------------------------------------------------------------------------------------------------------------------------------------------------------------------------------------------------- | | Calling a view again after changing something inside the view did not recall the view. This bug is fixed. Calling a view is now always executed. | | Having Edit in the command line and closing the Playback Controls overlay removed Edit from the command line. This bug is fixed. Edit will not be removed from the command line when closing any overlay. | | Console could freeze when entering a wrong password while logging in a new user. This bug is fixed. Entering a wrong password upon user login does not freeze the console anymore. | | Listing references of a sequence displayed the wrong preset numbers. This bug is fixed. References and dependencies of sequences are now displayed correctly again. | | The console could crash when calling the PopupInput function in LUA. This bug is fixed. Calling the PopupInput function in LUA does not crash the console anymore. | | Oopsing the creation of timecode events could delete other timecode events instead. This bug is fixed. When oopsing the creation of timecode events the correct event is now removed. | | It was possible to delete a locked group. This bus is fixed now. Locked groups cannot be deleted anymore. | | Importing the predefined phasers into an empty show file crashed the console. This bug is fixed. The console does not crash anymore when importing the predefined phasers into a new show file. | | Clearing the selection did not clear the selection of all elements in a layout either. This bug is fixed. All selected elements of a layout will now be deselected when executing Clear or ClearSelection. | | The encoders in the layout encoder bar were changing size in the opposite direction. This bug is fixed. The encoders in the layout encoder bar change now the size of an element in the same direction when turning | | Changing the default border size for layout elements in the user profile was not applied to new layout elements. This bug is fixed. New layout elements apply now the correct default border size of the user profile. | | Tapping an empty sequence in the sequence pool while having Off posted in the command line switched off the selected sequence. This bug is fixed. Tapping an empty sequence while having an action keyword already in the command line will not execute this action anymore for the selected sequence. | | Storing a show file while the internal timecode generator is running continued the timecode generation when loading the show file the next time. This bug is fixed. Running timecode generators will be stopped when loading a show file. | | It was not possible to edit a LUA component twice while keeping the Plugin editor open. This bug is fixed. LUA components can be edited several times. | | Layouts in show files of v1.0 did not display the layout elements and were set to the incorrect layers. This bug is fixed. Layouts are now converted correctly from v1.0 to v1.1. | | It was not possible to store Release values in a cue. This bug is fixed. Release values can be stored in cues again. | | The unblock command did not work correctly. This bug is fixed. Unblock is now functional. | | Preset References were not updated properly when copy was applied. This bug is fixed. Preset References are updated properly. | | Deleting a feature group from the encoder bar was possible. This bug is fixed. Deleting a feature group is not possible any more. | | Entering values for a grouping fixture via an attribute calculator did not forward the values to the members of the grouping fixture. This bug is fixed. A grouping fixture now always forwards its values to its members. | | The timecode generator did not work when in a session. This bug is fixed. The timecode generator also works in sessions. | | If you deleted a group that had a limited master, the fixtures stayed limited. This bug is fixed. Deleting a group always resets the limitation of involved fixtures. | | Changing the selected interface for a DMX protocol via command line did not work the first time around. This bug is fixed. The interface for DMX protocols can now always be changed. | | Shutting down, restarting or rebooting a couple of stations via command line did not execute the action on the executing station also if it was included. This bug is fixed. Sending commands to stations in the network executes the command also on the station that sends the command if it is included in the destination list. | | Deleting selections from groups, presets or cues did not work. This bug is fixed. Selections can now be deleted from groups, presets and cues. | | USB drives without names were listed with an empty label. This bug is fixed. USB drives without names do not have empty labels anymore. Furthermore, they are listed with a replacement name. | | SelFix as assigned button function on an executor button did not work. This bug is fixed. SelFix on an executor button selects the fixtures used in the assigned object. | | Fixture At Fixture ignored relative values. This bug is fixed. Fixture At Fixture and cloning work with relative values as well. | | Executing At Full in a new show crashed the console. This bug is fixed. The console does not crash anymore when executing At Full in a new show. | | Storing data pools while being in a session could crash the console. This bug is fixed. Creating data pools in a session does not crash the console anymore. | | Store /merge on a view button did not open the store view pop-up. This bug is fixed. Storing on a view or view button opens always the store view pop-up. | | Update Please did nothing. This bug is fixed. Update Please updates now the selected sequence. | | Starting to type for labelling an object surpressed the first character when being in a session. This bug is fixed. The first character when labelling an object is recognized and used. | | Copy or import of user profiles replaced the user defined views with the default views. This bug is fixed. User created views in the first slots of the view pool are not overwritten with the default views anymore. | | Storing a cue with a custom user profile labeled cues with Cuepart Zero. This bug is fixed. Creating a cue gives the cue always a proper label. | | Entering a file name that is longer than 31 characters did not inform the user about the limitation. This bug is fixed. When exceeding the limitation of the file name length the console will inform the user with a pop-up. | | Moving data pools in a session crashed the console. This bug is fixed. The console does not crash anymore when moving a data pool. | | Copying a user profile did not copy the selected page. This bug is fixed. The selected page is now copied with the user profile. | | Store Sequence x Cue y Part 0 did not work. This bug is fixed. Storing into a specific cue part now also creates the correct cue part and stores the data into this part. | | Selecting a gobo in the gobo attribute calculator while the value readout is set to physical did not set the correct value for the attribute. This bug is fixed. No matter which value the readout is set, the channel sets will call the correct values. | | Gobo thumbnail on gobo encoder and fixture sheet showed gaps between slots although there were no gaps. This bug is fixed. The gobo encoder and the fixture sheet continuously show gobo thumbnail if a value range is well defined with gobo slots. | | Playing back a timecode show with an offset of the timecode did not respect the offset. This bug is fixed. Timecode shows with an offset are played back correctly. | | Importing a macro to an empty macro pool object opened a pop-up that asked if the object should be overwritten, inserted or if it should cancel the operation. This bug is fixed. Importing a macro to an empty pool object does not open pop-ups anymore. | | When working in a session it could happen, that controlling an attribute changed the values on a different attribute. This bug is fixed. When controlling an attribute the correct DMX channel is now changed. | ### Connections [Section titled “Connections”](#connections-1) | Description | | ------------------------------------------------------------------------------------------------------------------------------------------------------------------------------------------------------------------------------------ | | When receiving commands for sequences via OSC, not all of the commands worked. This bug is fixed. All received commands for sequences are executed. | | Creating analog remote entries did not transmit all the data for it within the session. This bug is fixed. Analog remote configurations are displayed now correctly on all stations. | | Creating hundreds of Art-Net, sACN or OSC entries crashed the console. This bug is fixed. The console does not crash anymore when creating a huge amount of Art-Net, sACN or OSC entries at the same time. | | DMX Protocol in and outputs were not displayed properly in the universe pool on a slave station. This bug is fixed. DMX Input / Outputs are now displayed correctly in the universe pool of the slave. | | MIDI Remote in and outputs did not display the correct values. This bug is fixed. Midi values are displayed properly. | | It was possible to send the wrong update files to a station for a network update. This bug is fixed. Sending the wrong files to update is not possible anymore. | | The maximum start for analog remotes was too big. This bug is fixed. The maximum start for analog remotes is now 64 as the system can handle a maximum of 64 analog remotes. | | Receiving timecode for the same slot in a network did not work properly. This bug is fixed. Receiving timecode for the same slot in network is working properly. | | If a timecode signal was lost, the after roll was processed until the backup signal was selected. This bug is fixed. If a timecode signal is lost, the backup signal will be selected within 2s. | | Timecode was not displayed properly in the clock window when the time was exceeding 24h. This bug is fixed. Timecodes are displayed properly. | | Timecode after roll was not transmitted properly in the network. This bug is fixed. Timecode after roll is transmitted properly in the network. | | Store CueFade x did not store a new cue with the given cue time. This bug is fixed. A new cue with the given cue timing is now stored when executing store with cue timing specified. | | It was possible to change the IP of an interface to 0.0.0.0. This bug is fixed. It is not possible to change the IP to 0.0.0.0 anymore for any interface. | | The intensity of the left desk light was not restored correctly after booting the console. This bug is fixed. Both desk lights are initialized with the correct intensity stored in the show file after booting the console. | | Consoles with a built-in UPS did not remove the Power Loss pop-up when the power came back. This bug is fixed. The Power Loss pop-up will be removed correctly when the power comes back. | | Switching an interface from a static IP to DHCP kept the the old static IP in addition to the DHCP IP address. This bug is fixed. When switching from a static IP address to DHCP, the static IP address will be removed completely. | | Pulling and re-plugging a network cable did no re-establish the network communication. This bug is fixed. Re-plugging a network cable continues now with sending and receiving DMX protocols and network protocols. | | It could happen, that grandMA3 onPC stations running on macOS crashed while being part of a session. This bug is fixed. grandMA3 onPC running on macOS should not crash anymore while only being idle in a session. | ### Patch [Section titled “Patch”](#patch) | Description | | ------------------------------------------------------------------------------------------------------------------------------------------------------------------------------------------------------------------------------------------------------------ | | It was possible to assign Scribbles and Appearances to Layers and Classes. This bug is fixed. Scribbles and Appearance cannot be assigned to Layers and Classes anymore. | | Importing a patch into a show while lacking a couple of fixture types crashed the console. This bug is fixed. Importing invalid patch data does not crash the console anymore. | | A crash occurred if an attribute used in a fixture type was not linked to a valid Feature Group and Feature. This bug is fixed. There is no crash any longer if an attribute is not linked to a Feature Group or Feature. | | Selecting a channel set in the calculator did not set the corresponding channel function on the encoder to active. This bug is fixed. If a channel set is selected in the calculator the corresponding channel function is activated. | | Calling a preset did not set the corresponding channel function on the encoder to active. This bug is fixed. If a preset is called the corresponding channel function on the related encoder is set to active. | | DMX addresses of granted universes without patched fixtures were displayed in red color in the DMX sheet. This bug is fixed. Unpatched but granted DMX addresses won’t be displayed as ungranted DMX addresses anymore. | | An exported GDTF file had wrong Wheel Slot Indices. There was an offset of -1. This bug is fixed. A GDTF file has correct Wheel Slot Indices after it is exported. | | An exported GDTF file lost its Mode Dependencies if the ModeMaster was pointing to a DMX Channel. This bug is fixed. Mode Dependencies are exported correctly to a GDTF file now. | | Global fixtures of unused fixture modes were used in the show. This bug is fixed. Unused modes of fixture types do not create global fixtures for them. | | Fixtures stored in worlds could become uncontrollable when the patch was entered afterwards. This bug is fixed. Fixtures stored in worlds are controllable after entering the patch again. | | Phaser and 3D window follow tool did not work if a fixture type was part of the show that had a Pan2 or Tilt2 attribute. This bug is fixed. Phaser and 3D window follow tool work if a fixture type with attributes Pan2 and Tilt2 is part of the show file. | ### Phaser [Section titled “Phaser”](#phaser) | Description | | ------------------------------------------------------------------------------------------------------------------------------------------------------- | | Oopsing the creation of phaser steps with the Step Creator was not possible. This bug is fixed. Creating steps with the Step Creator can now be undone. | | The Step Creator entered Remove values into the programmer when using presets. This bug is fixed. The Step Creator works with presets. | ### Playback [Section titled “Playback”](#playback-1) | Description | | ------------------------------------------------------------------------------------------------------------------------------------------------------------------------------------------------------------------------------------------------------- | | If a timecode show was stopped several times, events may have not been triggered when the show was started again. This bug is fixed. Timecode events are now triggered always when they should be triggered. | | Deleting a sequence, cue or cue part could crash the console. This bug is fixed. Deleting a sequence, cue or cue part does not crash the console anymore. | | The console crashed when 240 programmer parts were created. This bug is fixed. The console does not crash when creating 240 programmer parts. | | Switching off tracking for a mirrored sequence crashed the console. This bug is fixed. The console does not crash anymore when switching off the tracking for a mirrored sequence. | | Playing back a cue did not execute an assert for blocked values in the cue. This bug is fixed. An assert is now executed for blocked values in a cue, when it is needed. | | When fading from a phaser in a cue to a static value in the next cue let the fixtures snap to the static value, also if a fade time was specified. This bug is fixed. Fixtures do not snap anymore from a phaser value to a static value during a fade. | ### Windows [Section titled “Windows”](#windows-1) | Description | | ---------------------------------------------------------------------------------------------------------------------------------------------------------------------------------------------------------------------------------------------------------------------------------------------------------------------- | | Insert new fixtures dialog had different alignments of the input fields. This bug is fixed. All input fields in the Insert new fixtures dialog are now aligned to the left. | | If you tapped and held the title bar and simultaneously moved context menus, the main window, the context menu belongs to, was resized. This bug is fixed. Tap, hold and move of context menus does not resize the main window anymore. | | Backup menu displayed drives of the current version (Internal) and of the same streaming version again. This bug is fixed. The drive selector in the backup menu displays only the internal drive for the current streaming version. | | The scribble pad was smaller in the “edit scribble” pop-up than in the label pop-up. This bug is fixed. Both edit popups have the same field size. | | The Priority property in the Output configuration menu always opened a calculator. This bug is fixed. The Priority property in the Output Configuration offers now only a dropdown with all possible priorities. | | Timecode was displayed on top of the timecode slot pool object. This bug is fixed. Timecode is displayed on bottom of the timecode slot pool object. | | The fixture sheet did not expand the children of a fixture when entering them with the down command. This bug is fixed. The fixture sheet will expand now automatically when selecting a collapsed subfixture. There is no automatic collapsing yet. | | The sheet in the network menu did not update correctly when choosing a filter. This bug is fixed. The network menu refreshes correctly when choosing a filter. | | The sequence sheet did not jump to the current cue when opening the sequence sheet or selecting a different sequence while AutoScroll was activated. This bug is fixed. AutoScroll in the sequence sheet now jumps to the current cue. | | Patching a grouping fixture did not allow to set the focus to Apply in the Insert new fixture dialog. This bug is fixed. It is now possible to navigate the focus to Apply when patching a grouping fixture. | | It was not possible to close the context menu of the layout window by pressing ESC. This bug is fixed. The layout window context window can now also be closed by pressing ESC. | | The Add window dialog displayed a scroll bar in the Pools tab also when the dialog was big enough to display all buttons. This bug is fixed. The Add window dialog displays only scroll bars if they are needed. | | The caption in the title bar of the align bar window and selection bar window were cut off when the height was set to half of the row. This bug is fixed. The align bar window and selection bar window display always the caption. | | Adding multiple events in the timecode editor did not allow to cancel the pop-up. This bug is fixed. The add multiple events pop-up can be cancelled now. | | Sometimes the timecode toolbar in the timecode editor was displayed too small. This bug is fixed. The timecode toolbar is displayed correctly. | | Windows could overlap in a view when storing into an existing view in a multi-user environment. This bug is fixed. It is not possible anymore to create views with overlapping windows. When loading a show from 1.0 with views having this issue we recommend you delete the views with this issue and recreate them. | ## []() [Section titled “”](#-2) *** ## Appendix [Section titled “Appendix”](#appendix) * It is recommended to use a dedicated and a separate physical network for each grandMA3 session. * When using DMX protocols it is recommended to use a dedicated physical network for each protocol. *** ## []()Known Limitations [Section titled “Known Limitations”](#known-limitations) The grandMA3 system supports at the moment only one external DMX source per universe for merging DMX into the system. Software update via network to onPC stations requires confirmation during the install process at the destination system. When deleting a preset that is referenced by a cue the reference cannot be restored when oopsing the deletion. Show files saved with versions prior to v1.0.0.3 cannot be loaded using this version.
# Release Notes 1.2
> Features
* [Features](/grandma3/2-3/key_rn_v1_2/#offline-title) * [Cue Part and Programmer Part Management](/grandma3/2-3/key_rn_v1_2/#h3__1052496443) * [Cue Transition](/grandma3/2-3/key_rn_v1_2/#h3__911910712) * [Move in Black](/grandma3/2-3/key_rn_v1_2/#h3_500261061) * [Selection](/grandma3/2-3/key_rn_v1_2/#h3__786962412) * [Shuffle Selection](/grandma3/2-3/key_rn_v1_2/#h3__1057755481) * [Multiple Selections](/grandma3/2-3/key_rn_v1_2/#h3_968851195) * [Shift Selection](/grandma3/2-3/key_rn_v1_2/#h3__1252988096) * [Variables](/grandma3/2-3/key_rn_v1_2/#h3_442277137) * [Trackpad Window](/grandma3/2-3/key_rn_v1_2/#h3__438336978) * [3D Window](/grandma3/2-3/key_rn_v1_2/#h3__673189665) * [Frame and Time Readout](/grandma3/2-3/key_rn_v1_2/#h3__1969116833) * [Preferred IP for DMX protocols](/grandma3/2-3/key_rn_v1_2/#h3__1107293925) * [Other Enhancements](/grandma3/2-3/key_rn_v1_2/#h2_1198082799) * [What’s Changed](/grandma3/2-3/key_rn_v1_2/#h2_563643534) * [Fixed Bugs](/grandma3/2-3/key_rn_v1_2/#h2__1624482491) * [Appendix](/grandma3/2-3/key_rn_v1_2/#h2__1835053169) * [Known Limitations](/grandma3/2-3/key_rn_v1_2/#h2__1852571500) *** Features The latest release of grandMA3 version 1.2.0.2 rolls out several enhancements that enrich your lighting experience. Read on for a quick introduction and find links for more information. *** ### []()Cue Part and Programmer Part Management [Section titled “Cue Part and Programmer Part Management”](#cue-part-and-programmer-part-management)  Improved in this release With the new properties Static Part, Dynamic Part From and Dynamic Part To it is possible per preset pool and per single preset to determine into which programmer part the preset will be called. Each preset containing a phaser will be called into a single part of the corresponding dynamic part range.\ By default, static values will be called into part 0. The dynamic ranges are separated per feature group and include 100 parts each.\ The start of the dynamic range for each feature group is the corresponding number range in the hundreds of the feature group ID. For example, feature group dimmer (= ID 1) has a dynamic range from part 100 to 199.\ All preset pools are also using this style of numbering. All preset pool 1 starts at 2100 with its dynamic range.\ These part properties can be set individually per data pool. The former PartMode property of preset pools and presets is obsolete now.\ When loading older show files the made PartMode settings are skipped and the new defaults will be applied. When storing a cue (without specifying a dedicated cue part) the programmer content with all its parts will be stored as a cue with corresponding cue parts.\ When storing a cue with specifying a dedicated cue part the programmer content of the actual selected programmer part will be stored into the specified cue part. In the sequence sheet are now two separated columns for the cue number (No) and the part number (Part). This allows now also a free editing of the part number. When renumbering a cue part, the same rules and logic for renumbering a cue apply. *** ### []()Cue Transition [Section titled “Cue Transition”](#cue-transition)  New in this release The new cue part property cue transition allows to modify the path of values during the fade from one cue to another cue. The transition can be set per cue part. There are nine different transition forms available: | Transition Type | Illustration | | Transition Type | Illustration | | Transition Type | Illustration | | --------------- | ---------------------------------------------- | - | --------------- | ----------------------------------------- | - | --------------- | --------------------------------------------- | | Linear |  | | Fast |  | | Fast+ |  | | SCurve |  | | Slow |  | | Slow+ |  | | Swing- |  | | Swing |  | | Swing+ |  | *** ### []()Move in Black [Section titled “Move in Black”](#move-in-black)  New in this release Move in Black (MIB) is a function which in a tracking sequence will look ahead and preposition attributes of fixtures that are fading the dimmer in from zero, to automatically prevent “ugly” transitions where you would normally see the fixture move the attributes into position, while the fixture is fading in. MIB is enabled individually per cue part by giving the MIB property of the cue part a value which tells the console when it should do the prepositioning. There are several options and properties that modify the MIB behavior: * MIB Fade is the fade time of attributes that will be positioned by MIB. It is available at different places. There is also an order of importance which MIB fade time to apply: 1. Per cue part 2. Per attribute in a fixture type 3. Global in the show file When an MIB fade time is specified in the cue part, the individual attribute MIB fade time will be ignored. When the MIB fade time of the cue is set to default the global MIB fade time will be applied, unless an attribute has an individual MIB fade time set. * MIB Delay is the time the attributes wait from having the dimmer closed until the MIB fade will be performed. The MIB delay time can be specified per cue part or global in the show file. The same ruleset as for MIB fade applies: When the MIB delay time of the cue is set to default the global MIB delay time will be applied. The global MIB fade time and MIB delay time can be set in the Timing tab located in Menu - Preferences and Timing. When performing an MIB fade and/or MIB delay the MIB times of the cue part where the dimmer opens again will be applied. The sequence sheet displays now several columns for the different additional MIB settings. All MIB related columns can be displayed or hidden together by the new mask MIB Settings within the sequence sheet context menu. * MIB Preference: The user can specify the suitability of a cue for MIB. Any value between 0 and 100 can be chosen. The higher the value the better is the suitability to execute MIB in this cue. There are also special values available: * Never (0) * Worst (1) * Bad (25) * Normal (50) * Good (75) * Best (100) For example if the cue is very silent, the user can set the MIB preference to Never, as he maybe does not want to have an MIB transition during this cue. The MIB mode values Early, Late and UponGo will then look, which cue has the highest rated suitability and will choose this cue then for executing the MIB. MIB mode Defined does not respect the MIB Preference! * MIB Mode: Defines how early or late the MIB shall be performed per cue part. * Default performs MIB corresponding to the MIB mode setting of the sequence property “MIB mode”. Please read below about the sequence-wide MIB settings. * None: MIB will not be performed for this cue. * Defined: In the MIB target cell, the user can specify a cue to perform the MIB. When the specified cue is active, the MIB will then be executed. * Early will perform the MIB as soon as the dimmer is closed. If the next cue transition would already open the dimmer again, then an early MIB will be performed. * UponGo performs the MIB with the next cue transition after the dimmer has closed. If the next cue transition would already open the dimmer again, then an early MIB will be performed. * Late performs the MIB latest in the cue before the dimmer opens again. If the next cue transition would already open the dimmer again, then an early MIB will be performed. * MIB Target: A specific cue when MIB shall be performed for this cue part, see MIB mode. * MIB Fade: The MIB fade time per cue part. Can be a user set time or default. Default takes the global show file MIB fade time or an individual MIB fade time per attribute specified in the fixture type (see above at MIB fade). * MIB Delay: The MIB delay time per cue part. Can be a user set time or default. Default takes the global show file MIB delay time. * MIB Dynamic: The user can decide whether a phaser where the fixtures are already prepositioned shall keep running with the closed dimmer, or if they shall be paused. This can prevent unwanted noise of stepper motors of prepositioned fixtures that are running a phaser, especially when it is very quiet in the audience. * Running: A phaser is running with closed dimmer. * Paused: A phaser will be prepositioned but does not start running until opening the dimmer. The sequence sheet hides those MIB cells, that are not considered for the different combinations of MIB settings or if a cue or cue part is not suitable for MIB. When setting an MIB target the MIB mode will be changed to Defined, and vice versa, when changing an MIB mode to not Defined will remove the MIB target. For a more simple way of configuring MIB, the user can also define sequence-wide MIB settings within the sequence settings. To enter the sequence settings you can do one of the following actions: * Edit + tap the sequence in the sequence pool and then tap Settings. * Open the assign menu of the executor the sequence is assigned to (Assign + press the executor button) and then tap Settings. * Tap Settings in the title bar of the sequence sheet. This opens the settings for the displayed sequence. The column MIB hosts all available MIB settings for the sequence: * MIB: * Enabled: MIB will be performed according to the cue and cue part MIB settings. * Never: MIB will never be performed for this sequence. All cue and cue part specific MIB settings will be ignored. When this setting is selected it will be displayed in the MIB mode column of the sequence sheet as “Never!”. * Force Early: Will perform the MIB for all cues that can perform MIB as soon as the dimmer is closed. Further MIB settings specified by the user per cue or cue part will be ignored. When this setting is selected it will be displayed in the MIB mode column of the sequence sheet as “Early!”. * Force UponGo: MIB will be executed with the next cue transition after the dimmer is closed. For all cues that can perform MIB. Further MIB settings specified by the user per cue or cue part will be ignored. When this setting is selected it will be displayed in the MIB mode column of the sequence sheet as “UponGo!”. * Force Late: Performs the MIB latest in the cue before the dimmer opens again. For all cues that can perform MIB. Further MIB settings specified by the user per cue or cue part will be ignored. When this setting is selected it will be displayed in the MIB mode column of the sequence sheet as “Late!”. * MIB Mode: This setting defines which MIB mode will be executed for any cue parts whose MIB mode is set to Default. * None * Early * UponGo * Late For more information about the single MIB mode types, please read above. When the MIB setting per sequence is set to Force Early, Force UponGo or Force Late it still pays attention to the MIB preference per cue.\ To change the global MIB preferences go to Menu - Preferences and Timing.\ In the MIB preferences column of the Cue section, it is possible to change the defaults that will be set to a new cue when storing it: * MIB Mode: The mode that shall be set when storing a new cue that is able to execute MIB. * MIB Fade: The MIB fade time that shall be set when storing a new cue that is able to execute MIB. * MIB Delay: The MIB delay time that shall be set when storing a new cue that is able to execute MIB. * MIB Dynamic: The MIB dynamic mode that shall be set when storing a new cue that is able to execute MIB. For more information about these MIB properties, please read above. The section Timing allows to set the global MIB settings:\ The global MIB fade and MIB delay times can be set here. For more information about MIB fade and MIB delay, please read above.\ The property MIB transition defines which transition type will be applied to the fade of MIB. Read more about the different types of transition in the [Cue Transition paragraph above](/grandma3/2-3/key_rn_v1_2/#CueTransition).\ The MIB transition can only be defined for all MIB fades globally in the show file. It is not possible to define a different transition type for a single MIB fade per cue or cue part. Attribute values that are already prepositioned or currently doing a move in black will be displayed with special colors within the fixture sheet and sequence sheet (in track sheet mode): * During an MIB fade (only fixture sheet) * The background color of attribute cells that are fading will be displayed in a brighter peacock green. * The font color of attribute cells that are fading is black. * Prepositioned * The background color of attribute cells that are prepositioned by MIB is a darker peacock green. * The font color of attribute cells that are prepositioned by MIB is black. All these colors are defined in the color theme: * Color definition group SheetColor * TextMIBFade * BackMIBFade * TextMIB * BackMIB * ColorGroup FixtureSheetCell * MIBActive * TextPlaybackMIB * BackgroundPlaybackMIB * TextMIBFade * BackgroundMIBFade * TextSelectedPlaybackMIB * BackgroundSelectedPlaybackMIB * TextSelectedPlaybackMIBFade * BackgroundSelectedPlaybackMIBFade *** ### []()Selection [Section titled “Selection”](#selection) ### []()Shuffle Selection [Section titled “Shuffle Selection”](#shuffle-selection)  New in this release The new keyword Shuffle allows to shuffle the selection order in a random sort. Shuffle is part of the MAtricks toolset. To enter the Shuffle keyword in the command line, use one of the options: * Press SelFix SelFix * Type **Shuffle** * Type the shortcut **Shuf** By default Shuffle will randomize the selection order on all 3 axes. To shuffle on a single axis only the user has to enter a value for shuffle of the desired axis in the MAtricks.\ To do so, open an MAtricks window, and tap + for XShuffle, YShuffle and/or ZShuffle, or tap XShuffle, YShuffle and/or ZShuffle to enter a value for the settings.\ When having a value greater 0, it is also possible to decrease the value by tapping -. Each shuffle setting per axis can be set to a value from 0 (=None) up to 32768. Each value represents a different shuffled selection order. When selecting the very same amount of fixtures again and again, the same shuffle value will result in the same shuffled selection order. This can be helpful when you have found a nice shuffled selection order for e.g. 20 fixtures and you want to have the same shuffled selection order for other 20 fixtures. In this case apply the same shuffle value in the MAtricks when having the new fixtures selected.\ These shuffle values can also be stored into MAtricks in the MAtricks pool. By tapping Shuffle in the MAtricks window, shuffle will be executed for all three axes. (The following examples require a selection that has fixtures placed on more than one positions along the axis that shall be shuffled. For more information read about the [selection grid](/grandma3/2-3/operate_selection/) and the [grid keyword](/grandma3/2-3/keyword_grid/).) To shuffle the current selection on the x-axis, type: User name\[Fixture]> MAtricks “XShuffle” + To shuffle the current selection on the y-axis, type: User name\[Fixture]> MAtricks “YShuffle” + To shuffle the current selection on the z-axis, type: User name\[Fixture]> MAtricks “ZShuffle” + It is also possible to set a certain value to any of the three shuffle settings. To set the shuffle to 4 for the y axis, type: User name\[Fixture]> MAtricks “YShuffle” 4 3 shuffle modes are available: * Auto: When doing shuffle only for one dimension this behaves like Linked. Shuffling on two or three axes behaves like Unlinked. * Linked: All fixtures that are placed on the same position along the axis that will be shuffled but have different position on the other axis, will keep their alignment along the other axis. * Unlinked: The fixtures placed on other axis than the axis that will be shuffled but have the same position on the shuffled axis will be shuffled independently. To switch between these shuffle modes, tap ShuffleMode in the MAtricks window. **Hint:**\ When deactivating or resetting the MAtricks, the original selection order will be restored. **Known issue:**\ The shuffle command generates greater numbers for the MAtricks shuffle settings than the user can enter manually. *** ### []()Multiple Selections [Section titled “Multiple Selections”](#multiple-selections)  New in this release Each user profile has now 2 different selections called Selection 1 and Selection 2.\ At the moment, the active selection is displayed in the MAtricks window. The button ActiveSel displays a 1 for selection 1 and a 2 for selection 2.\ To switch between the two selections tap or tap and hold ActiveSel in the MAtricks window. To switch from selection 1 to selection 2, type: User name\[Fixture]> Select Selection 2 It is possible to copy the selection from one to the other selection. Copy Sel copies the current selection to the other selection. To copy selection 1 to selection 2, type: User name\[Fixture]> Copy Selection 1 At Selection 2 You can also clone the values from one to the other selection. To clone the values from selection 1 to selection 2, type: User name\[Fixture]> Clone Selection 1 At Selection 2 Or select the target selection and then tap Copy Values in the MAtricks window. The combination of Shuffle and Copy Values allows to shuffle the existing values across the shuffled selection. To do so follow these steps: 1. Do the initial selection and apply the values. 2. Copy the current selection to the other selection. 3. Shuffle the current selection by tapping Shuffle. 4. Copy the values from the other selection to the current selection. 5. With each additional copy action the values will be shuffled again. *** ### []()Shift Selection [Section titled “Shift Selection”](#shift-selection)  New in this release The new MAtricks setting Shift allows to shift the current selection within the actual grid positions. This can be done per axis in the grid. Therefore, change the values for XShift, YShift or ZShift.\ Positive values shift to the right (x axis), to the bottom (y axis) and to the front (z axis). According to this, negative values shift into the opposite direction. In combination with the 2 selections per user profile it is possible to do a circular copy of values. To do so follow these steps: 1. Do the initial selection and apply the values. 2. Copy the current selection to the other selection. 3. Shift the current selection by the shift value of your choice. 4. Copy the values from the other selection to the current selection. 5. With each additional copy action the values will be shifted again by the set shift value. *** ### []()Variables [Section titled “Variables”](#variables)  New in this release Variables of each type can be concatenated together. Precondition: The variables need to be created by the user first. OK:GetUserVar ”\*“\ answer Integer 42\ grandMA Integer 3\ greeting Text “Hello World” To concatenate the values of the variables greeting and answer into one variable called result, type: User name\[Fixture]> SetUserVar result $“greeting”$answer OK:GetUserVar “result”\ result Text “Hello World42” To concatenate the values of the variables greeting and answer into one variable called result but with a space in between, type: User name\[Fixture]> SetUserVar result $“greeting"" “$answer OK:GetUserVar “result”\ result Text “Hello World 42” To concatenate the integer values of the variables grandMA and answer as a string into one variable called result, type: User name\[Fixture]> SetUserVar result $“grandMA”$“answer” OK:GetUserVar “result”\ result Text “342” To do a mathematical addition of the values of the variables grandMA and answer into one variable called result, type: User name\[Fixture]> SetUserVar result $grandMA$answer OK:GetUserVar “result”\ result Integer 45 With a smart use of quotes and setting variables it is also possible to convert the variable types: Precondition: Variable of the type integer: OK:GetUserVar “answer”\ answer Integer 42 To convert the integer to text, type: User name\[Fixture]> SetUserVar answer $“answer” OK:GetUserVar “answer”\ answer Text “42” This works also vice versa. The same rules for working with integer variables apply also to variables of tye double (e.g., 1.500000).  Improved in this release The user can now also add single quotes into a text value. To create the variable called command which shall contain the value “Store Group 1 ‘Spot’”, type: User name\[Fixture]> SetUserVar command “Label Group 1 ‘Spot’” OK:GetUserVar “command”\ command Text “Label Group 1 ‘Spot’ ”  Improved in this release Setting a variable into quotes when calling it will handle the value of the variable as a quoted string, no matter of which data type the variable is defined. To get the string interpreted as a command call the variable without quotes, type: User name\[Fixture]> $command OK: Label Group 1 “Spots” To call the value as a string put the variable name into quotes, type: User name\[Fixture]> $“command” Fixture “Label Group 1 ‘Spots’ “ *** ### []()Trackpad Window [Section titled “Trackpad Window”](#trackpad-window)  New in this release The trackpad window can be used in two different modes: PanTilt and Mouse. It can be opened when tapping into the free area of the user defineable area. The Add Window pop-up opens. Tap Other and then Trackpad.\ The minimum size of the trackpad window is 4x4 half-size squares. To change the mode of the trackpad window, tap Mode in the title bar of the trackpad window.\ In Pan/Tilt mode the pan and tilt attributes of the selected fixtures can be controlled. To change the resolution of the trackpad in PanTilt mode, tap Resolution in the title bar. It will change between the resolutions Coarse, Normal and Fine. The trackpad resolution is independent of the encoder resolution. A gray grid is displayed for better axis guidance.\ In addition, it is possible to invert pan and/or tilt with Invert Mode. P/T Mode allows to move only one axis or both axes for a more precise input. When switching the mode to Mouse, the user can use the trackpad as a substitution for a hardware mouse. It provides two mouse buttons at the bottom: Left and Right. In mouse mode, it is also possible to adjust the resolution. The resolutions of mouse mode and pan tilt mode are independent from each other.\ The cursor fades out after 5 seconds of idle time and returns at the last used position when using it again. When the cursor returns, it is displayed zoomed for 3 seconds and will then shrink to its normal size. With Reset Mouse, it is possible to respawn the cursor centered at screen one.\ When Tap for Click is activated the user can also tap into the trackpad area to execute a left click. When it is disabled, only tapping Left will execute a left click. **Important:**\ The main usage of the trackpad window is on devices with a touch screen. Therefore, it is necessary to click and hold the mouse key on a physical mouse when you try to operate the trackpad window with a normal mouse. *** ### []()3D Window [Section titled “3D Window”](#3d-window)  New in this release Prisms are visualized in the 3D window now. The visualization of prisms is not limited to circular or linear prisms.\ In the current state the attributes “Prism” (prism selection), “PrismPos” (prism indexed rotation) and “PrismPosRotate” (prism continuous rotation) are visualized.\ Each prism needs to be defined with its facets as one slot of a wheel. In Beam Quality “Line” the beam is visualized with only one line even if a prism is inserted. To display one line for every facet of a prism go to the Window Settings of the 3D Window and enable Prism Lines. It is disabled by default.  New in this release CTO, CTB and CTC are visualized in the 3D window now. The color temperature can be defined by the physical values of a related channel function or its channel sets and the property “ColorTemperature” of the Geometry Type “Beam”. If both are defined, the value of the channel has priority over the value of the geometry. **Hint:**\ Fixture Types that are imported from previous versions of grandMA3 or are part of show files from previous versions may show a wrong color temperature. In this case, exchange the fixture type with one from the grandMA3 fixture library of version 1.2 or correct the physical values of the fixture type.  New in this release Additional support of multi-touch gestures was added. Use 2 fingers scroll gesture to move the camera and the 2 finger zoom gesture to zoom the camera to the center of its view. For more information about the gestures, read the [gestures topic](/grandma3/2-3/ws_gestures/).  New in this release A new Beam Quality was added. Select the new Beam Quality “High Shadow Fancy” in the title bar of the 3D window. This quality setting offers a less technical representation of the beams in favor of a more realistic look. *** ### []()Frame and Time Readout [Section titled “Frame and Time Readout”](#frame-and-time-readout)  New in this release With the frame and time readout is it possible to choose a preferred display format for timings. It is divided into 2 readouts: Time and Frame.\ Time includes days, hours, minutes and seconds, while frame defines the display format of fractions of a second. As time readout are 4 different format available: * 10d11h23m45: All values, except seconds, display their unit. In this case days are d, hours are h and minutes are m. * 251h23m45: All values, except seconds, display their unit. Days are converted to hours. * 10.11:23:45: The units are not displayed. Days and hours are separated with a dot (.) , while all other units are separated with a colon (:). * 251:23:45: The units are not displayed. Days are converted to hours. The preferred time format and frame readout can be set in the user profile. The applied values are used at several places: | Location | Time Readout | Frame Readout | | --------------------------------------- | -------------------------------- | -------------------------------------------------------------------------------------- | | Fixture Sheet | Yes | Yes | | Sequence Sheet | Yes | Yes | | Macros | Yes | Yes | | Timecode Slot | Yes | Frame Readout is determined by the incoming timecode source or the timecode generator. | | Timecode running with internal clock | Yes | Yes | | Timecode running with external timecode | Yes | Determined by the timecode slot | | Timecode Editor | Determined by the timecode show | Determined by the timecode show | | Timecode Viewer | Determined by the timecode show | Determined by the timecode show | | Clock (ClockSource set to Timecode) | Determined by the timecode slot | Determined by the timecode slot | | Preferences and Timing | Yes | Yes | The readout can be changed individually for each location in the corresponding settings of the windows or objects, except for macros, and the preferences and timing menu. When a readout value is set into angled brackets, e.g., \, then the readout is set to default at this place and the readout value from the level above in the hierachy is used. **Hint:**\ The user defined time readout is used in the encoder bar even if the readout for an e.g. fixture sheet is changed separately. When opening a timing calculator, e.g., for the fade time, the preselected frame readout is determined by the settings in the user profile. Timing calculators offer only timing formats like seconds, 24 fps, 25 fps, 30 fps and 60 fps. Speed calculators offer only speed formats as seconds, Hertz or BPM. The timecode generator frame unit is always set to seconds by default. The sequence sheet displays timings are now right aligned in columns where only one time is displayed. This leads to having the same parts of a time always aligned to the same location within the cell. The readability is improved. When the condensed timing option is enabled in the sequence sheet the combined timing columns are center aligned. To provide a better optical representation, the trailing zeros of seconds are always suppressed. When the frame readout is set to a frame unit the times will always display trailing zeros.\ To easily distinguish between fractions of a second and frames, fractions of a second will be separated with a dot (.) from the seconds, while frames will be separated with a colon (:) from the seconds. **Restriction:**\ It is not possible to enter times with frames as fractions of a second by entering it as second:frame, e.g., 2:5.\ Timing calculators in condensed timing columns, e.g., in the sequence sheet, do not allow the input of frame formats, e.g., 2:5/4:8 or 2S5F/4S8F *** ### []()Preferred IP for DMX protocols [Section titled “Preferred IP for DMX protocols”](#preferred-ip-for-dmx-protocols)  New in this release DMX protocols (Art-Net or sACN) choose now their interface in auto mode depending on the setting made in the Preferred IP setting.\ Preferred IP is available for each DMX protocol separately in Menu - DMX Protocols.\ The first interface that fits into the IP range of preferred IPs will be chosen to handle the protocol.\ When an interface is selected, the label of the auto mode value will change from Auto to \, e.g., \.\ When no interface could be determined, then \ will be displayed. The user can then change the preferred IP or change the selected interface manually. Tap Preferred IP in order to enter a new preferred IP.\ The preferred IP can be entered in different styles. The most accurate style is IP/Prefix, e.g., 10.0.0.0/8. The prefix defines the area of IPs to search for the best interface.\ A prefix defines the amount of possible IPs. The start of the possible IP range and the range itself depends on the common rules and definitions of IPv4 networks. Prefix 0 includes 4,294,967,296 IPs (255 \* 255 \* 255 \* 255) up to prefix 32 which is only one IP.\ When entering an IP without a prefix, the prefix will automatically be determined by the software. IPs of the class A area (0.0.0.0 - 127.255.255.255) get prefix 8, class B (128.0.0.0 - 191.255.255.255) gets prefix 16 and class C (192.0.0.0 - 223.255.255.255) gets prefix 24. The user can also only enter the beginning of an IP and the software completes it to the first IP of this range, e.g.: * 10 will be completed to 10.0.0.0/8 * 172.16 will be completed to 172.16.0.0/16 * 192.168 will be completed to 192.168.0.0/24 In addition the output configuration (Menu - Output Configuration) has now the properties ArtnetInterface and SACNInterface. These properties display only the index of the selected interface (not auto mode) or Auto when auto mode is selected. *** ## []()Other Enhancements [Section titled “Other Enhancements”](#other-enhancements)  Sequence sheet: * Cue number and cue part number columns are now in front of the name column. * Sequence sheet shows a world indicator if the user is in a different world than world 1. * The column coloring improved so that related columns are grouped together. * Sequence appearance and scribble options are available in the sequence settings pop-up. * The sequence sheet context menu is updated: * The display tab is now more structured. * Properties that mask the sequence sheet, e.g., Cue Settings, Preset Timings, etc. are moved to the new tab Mask. * In newly created sequence sheets the preset timing is hidden by default. It can be displayed any time by enabling Preset Timing in the mask tab in the context menu of the sequence sheet. * Sequence sheet in track sheet mode distinguishes now between increasing and decreasing dimmer values. Increasing dimmer values are displayed with a cyan font color, while decreasing dimmer values are displayed with a green font color. * The sequence sheet in track sheet mode allows to change values of stored attributes. To do so, tap and hold or do the 2-finger edit gestures. The editor for the selected cell(s) opens. it is now possible to change the value to another value/channel set, a preset, a sound code or execute a special function like removing the value or releasing the value.\ It is possible to select values across different cues and attributes and fixtures. To do so, press and hold Ctrl and tap single cells and/or do a lasso selection.\ The option CueOnly in the title bar allows to change the values with the cue only option. This option can be modified in the calculator as well. CueOnly is only displayed in the title bar when the track sheet mode is enabled.\ Destination Attribute(s) defines if the values should only be changed for the selected cells (=Selection), for all attributes of the feature group of the selected attributes (=Feature), for all attributes that are part of the same activation group the selected attributes are part of (=Activation Group) or for all attributes of all fixtures used in this cue part (=All Fixtures). \ Tapping Apply to steps through the different values Selected Parts, All Parts in sel. Cues and All Cues/Parts in order to define where to change the values to the new value: * Selected Parts: Changes the value only in the cue parts of the selected cells. * All Parts in sel. Cues: Changes the value for all fixtures and attributes in all parts of the cues, where cells are selected. * All Cues/Parts: Changes the value for all selected attribute cells in all cues. * In addition to the above way of editing values in the track sheet mode, it is possible to edit the values with the value encoder of the sequence sheet encoder bar. To do so, tap into the title bar of the sequence sheet. The sequence sheet encoder bar will pop-up on the encoders. Switch to the Data Edit page by tapping Page several times in the encoder bar. The value encoder changes its label depending on the selected layer of the sequence sheet, e.g., Absolute, Relative, Fade, and so on. To change the layer in the sequence sheet enable the Layer Toolbar in the settings of the sequence sheet. As above, Cue Only editing is here also possible by enabling Cue Only in the title bar of the sequence sheet.  grandMA3 supports now USB drives formatted with the exFAT file system for the show file handling.  Objects in the Mesh Pool displays a thumbnail preview of the mesh now.  MIDI * The system monitor outputs now also messages for MIDI Control Changes if the option Show MIDI Data in System Monitor is enabled. * MIDI Control Changes are now respecting the MIDI Offset of the Output Configuration. * It is now also possible to set a MIDI remote that reacts to MIDI Control Change address 0.  It is now possible to enter simple mathematic formulas into input calculators, e.g., the attribute calculator.  Filters for filtering tables, e.g., patch or layout editor, have now an option to filter also blank cells. To display only data entries with blank cells, choose the option \. To remove the column from the filter, choose the option \.  The style of the attribute calculators changed. The right section with the buttons allows showing the list of special categories like Specials, Presets, Channel Sets and Sound Codes permanently. The last selected category will be remembered when opening the calculator again. The calculators in the fixture sheet, encoder bar and sequence sheet (in track sheet mode) remember their state individually.  Output configuration: Column modes Condensed and XLR Only open now an editor when editing an XLR port. The editor allows to change all possible properties of the port at the same time. When setting a port to input, the additional property Merge mode appears. When the merge mode is set to Prio the property Prio will be also displayed.\ It is also possible to edit the same port on multiple devices at a time. When doing so, you can also specify a range of universes when editing a port with the help of the Thru keyword, e.g., 1 Thru 5.  When copying cues, the copy cue pop-up allows now to choose if the cue should copied by applying cue only to the target cue and/or copying the values with or without calling the cue status. To do so, enable or disable Cue Only or Status in the pop-up. These buttons will appear in the pop-up when the copy operation allows to use these options.  New command TopUp selects the top instance of the currently selected subfixtures. To enter the TopUp keyword in the command line, use one of the options: * Press Set Up * Type **TopUp** * Type the shortcut **TopU**  Encoder bar was added to the Phaser Editor. When setting focus to the Phaser Editor by tapping the title bar, the encoder bar will change to the Phaser editor encoder bar. The encoders work only for position phasers.\ The encoders MoveX, MoveY, Handle, Size, Aspect and Rotate work and control their corresponding tools in the Phaser. The displayed values next to the encoders currently show the value delta in percent. After finishing the turning of an encoder the new values are applied to the fixtures, and the value will turn gray in the encoder display. The encoder displays the percentage of change in percentage compared to the prior values of the fixture. When the values turn gray, the encoders still display the percentage value until the next changes are made. The screen encoders behave differently than in all other places of the software: Screen Y cycles through the single steps of the phaser.\ Screen X cycles through the fixtures of the current selection.\ Toggling between single and all steps is possible by pressing the inner or outer ring of the screen encoders (dual encoder 5). Fixtures that are limited by a group master display now a light purple marker in the IDType column of the fixture sheet.  SelFix, On and Off works now also in conjunction with DMXUniverse, e.g. SelFix DMXUniverse 1 selects all fixtures patched to universe 1.  Improved the general network experience in sessions.  The update menu now also offers cue parts to update into.  The fixture sheet now displays a red marker per attribute and fixture when an attribute is active in a different programmer part or step.  New macros were added to the macro library and MAtricks were added to the MAtricks library. *** ## []()What’s Changed [Section titled “What’s Changed”](#whats-changed) * The folder for demoshows moved from the folder shared to shared/resources. * The default IP for Con2 is changed to be an address in the range of 10.x.y.z. This changes applies only after a format and install of the new version. * grandMA3 onPC on macOS puts the local loop back adapter to the first place in the order of network interfaces and does not offer virtual interfaces anymore. * The value for the timecode slot of timecode shows is now 1-normalized. These values are possible: * -1 = Internal * 0 = Selected Timecode Slot * 1-8 = Timecode Slots 1 - 8. * The maximum allowed size per mesh is now restricted to 10MB. * The world indicator in sheets changed from “World:” to the world icon. * Shutdown and Display are removed from the control bar in the web remote. * The input for the unicast IP address in the DMX protocols menu and in the OSC menu is now a numeric calculator instead of a text input. * On all places where it makes sense to enter an IP address together with a prefix it is now possible to do so, e.g., My Interfaces Menu and Preferred IP. * The color picker to change colors in the settings of a pool window displayed a non-functional button for the Swatch Book. The button is now removed. * The default for the timecode after roll is now set to 0.5s. * In new show files the sync option for user profiles and cues is now set to off. * grandMA3 onPC on Windows does not open the single terminal window anymore. * Newly opened fixture sheets have Fixture Sort enabled. * The input calculator for the Address in the DMX Remote menu allows now only to enter numbers and the dot. * The maximum possible dimensions for stages are now limited to -11500km to +11500km on X and Y axis. Z axis is limited to -20km to +20km. On the XY plane the resulting area is as big as the surface of the earth itself. * The default overall intensity of beams and spots in the 3D window is adjusted. Beams and spots have less intensity now by default. * The readout of the overall intensity of spot and beam in the 3D window options is changed. The intensity of spots and beams can be adjusted between 0% and 400%. The default is 100%. * The wait time of macro lines is now a real time and is not rounded to the next DMX frame anymore. Nevertheless a macro line can still only be executed within one DMX calculation cycle. * New hard key shortcuts: * Scribble : MA + X4|Layout + X4|Layout + X4|Layout * ListRef: MA + List * Timecode Slot: MA + X6|TC + X6|TC * The Prefix column in the network menu is renamed to Mask, as it displays the subnet mask. * Unpatched fixtures do not show any output in the 3D window. Unpatched fixtures are displayed with a dark red color in the 3D window. This marking can be disabled in the window settings of the 3D window by disabling Mark Unpatched in the tab “Misc”. Default: Enabled. * Fixture Type: the properties “MIBFade” and “DMXChangeTimeLimit” were moved from the DMX Channel to the Logical Channel. * The limit of chat messages is now set to 2,500 characters. * The version column in the network menu and software update menu moved more to the left, so that it is always visible when opening these menus on the big displays. * The names of presets that are played back by a sequence are only displayed in the absolute layer. All other layers display only the value and a preset marker. To learn more about markers in the fixture sheet, read [here](/grandma3/2-3/ws_colors_markers/). * The default color for sounds has changed from a bright orange to a dark purple. This color is applied to new sound pool windows, and to the color indicator of the sound codes. * In Menu - Preferences and Timings the Timing tab is renamed to Cue Defaults , the Sequence Preferences to Sequ Defaults , and a new tab for global Timing , accomodating MIB global timing, is added. * Data lines that are added to the Art-Net and sACN configuration are created “not enabled” to avoid any conflicts with active output. * The physical XLR Input ports are set to mode IN per default. * Layout element properties DimensionX and DimensionY are renamed to PositionX and PositionY. * DMX protocols are now sent with 30Hz instead of 60Hz. * Frames per second in the 3D window is shown without decimals now. * The 3D window does not show line beams if wireframe is activated and the Beam Quality is set to “None” *** ## []()Fixed Bugs [Section titled “Fixed Bugs”](#fixed-bugs) ### 3D [Section titled “3D”](#3d) | Description | | -------------------------------------------------------------------------------------------------------------------------------------------------------------------------------------------------------------------------------------------------------------------------------------------- | | No label was displayed if a fixture did not have a Fixture ID. This bug is fixed. A label is shown even if a fixture only has a Custom ID. | | A label was shown even if 3D visible of a fixture was set to “No” in the patch. This bug is fixed. If a fixture is hidden also its label is not displayed. | | ColorRGB attributes linked to different geometries on the same level in the hierarchy were mixed together. This bug is fixed. ColorRGB attributes now only affect the geometry they are linked to and not other geometries on the same level. | | 3ds mesh files were not imported correctly if there was a dot (.) in the name of the file. This bug is fixed. 3ds files that have a dot in the file name are now imported correctly. | | The Center button in the 3D Setup Encoder Bar did not work as expected. This bug is fixed. Tapping Center resets the value of the axis that is not part of the Axis Group Type selected in the Arrangement. | | The grandMA3 application did possibly crash if a 3ds file with a lot of linked materials was imported. This bug is fixed. 3ds files with a lot of linked materials do not possibly cause a crash any longer. | | Opening a 3D window with very detailed meshes or a very high count of meshes and a Selection Grid on the same display could cause a crash. This bug is fixed. | | Executing SelFix and At to a preset very fast and having individual times in the preset did not display the timings correctly in the 3D. This bug is fixed. Selecting fixtures and executing a preset very fast right behind each other is now displayed with the correct timings in the 3D. | | In the 3D setup encoder bar the first one or two ticks of the dual encoder were not recognized. This bug is fixed. Now also the first ticks of the encoder are recognized. | | When editing a camera in the camera pool Reload Camera did not apply changes of FOV, Camera Mode and Zoom. This bug is fixed. Changes on FOV, Camera Mode and Zoom are applied to the camera with the when tapping Reload Camera. | | A recall of the camera in the 3D window was executed if another camera was selected in the camera pool. This bug is fixed. The active camera in the 3D window if the selected camera is changed in the camera pool. | | The position of the pink preview boxes of the 3D setup encoder bar arrangement tool was not in sync with other stations on the network. This bug is fixed. The position of the pink preview boxes is synced to other stations on the network now. | | Rotate to circle center did not work properly if the Angle Range of the circle was not 360 degree. This bug is fixed. Return to circle center in the arrangement tool circle now works as expected with Angle Range and Angle Start. | | Labels in the 3D window were drawn above the fps indication. This bug is fixed. Labels are not drawn above the fps counter any longer. | | The label of a fixture was shown even if “3D Visible” of the fixture was set to “No”. This bug is fixed. Labels are shown only for fixtures that are set to visible in the 3D window. | | Changing the rotation of a fixture directly after using the “Rotate to Circle Center” functionality of the arrangement tool caused a jump of rotation of the fixtures. This bug is fixed. Changing the rotation does not cause a jump after Rotate to circle center. | | Changing the Throw Ratio of a fixture type with a rectangular beam did not change the throw ratio of the beam in the 3D window. This bug is fixed. The 3D window now shows the correct Throw Ratio of the fixture type. | | The title bar of the 3D window displayed the selected tool only after changing the tool once. This bug is fixed. The selected tool is immediately shown once the 3D window is open. | | Column Interval and Row Interval in the arrangement tool “Grid” were swapped. This bug has been fixed. Column Interval now adjusts the offset between several columns. | | 3 finger scroll did not work if all three fingers were inside a 3D window. This bug is fixed. 3 finger scroll works now also in the 3D view. | ### Command Line and Macro [Section titled “Command Line and Macro”](#command-line-and-macro) | Description | | --------------------------------------------------------------------------------------------------------------------------------------------------------------------------------------------------------------------------------------------------------------------------------------------------------------------------------------------------------------- | | Tap and hold of Page Down in the executor bar did not switch to page 1. This bug is fixed. The selected page switches now to page 1 when the user taps and holds Page Down in the executor bar. | | The calculator for entering MAtricks values displayed too many decimals. This bug is fixed. MAtricks calculators allow now only to enter integer numbers. | | Turning an encoder in the layout encoder bar to the end and beyond turned the encoder internally further. This bug is fixed. Turning encoder in the layout encoder bar to the end and then turning into the other direction continues directly with changing the values. | | Reducing the height of a layout element to smaller than 25 removed the dimmer bar of the element. This bug is fixed. Small layout elements keep their dimmer bars. | | Pressing Power several times on a console let the shutdown pop-up several times. This bug is fixed. The shutdown pop-up can only appear once. | | Labelling of an executor opened only a keyboard without the possibility to add a scribble. This bug is fixed. An input field with the option to display an on screen keyboard and a scribble area opens now when labelling an executor. | | Help listed the shortcuts in the entries for the custom ID types in different styles. This bug is fixed. Help displays now the entries of the custom ID types in the same style in the command line feedback. | | Macro wait times allowed up to 10 decimals. This bug is fixed. The maximum allowed digits for macro wait times is set to 3. | | Setting the maximum allowed wait time within a macro switched the wait time to trigger Go. This bug is fixed. Entering the maximum possible wait time applies it now correctly to the macro line. | | Entering a wait time for a macro line that was a bit smaller than the maximum allowed time rounded the time up to be above the limit. This bug is fixed. The wait time is not rounded anymore to be above the maximum allowed wait time. | | The software could crash when cutting and pasting a huge amount of objects. This bug is fixed. The software does not crash anymore when doing cut and paste. | | Pause assigned to an executor button was only activated during press and hold of the executor button. This bug is fixed. The pause function assigned to an executor button can now be toggled. | | The software crashed when deleting several layout elements that were selected with the lasso tool and the sorting order was not subsequent. This bug is fixed. The software does not crash anymore when deleting layout elements. | | It was not possible to oops the creation of a time range within a timecode show. This bug is fixed. It is now possible to undo the creation of a time range. | | Entering mathematic calculations into a timing calculator did not calculate the correct results. This bug is fixed. Doing mathematic calculations within a timing calculator are now done correctly. All input times will be converted into seconds before doing the calculation. | | It was possible to overwrite the demo shows when having one loaded and displaying the network for one of the stations that were part of the session. This bug is fixed. Demo shows can not be overwritten anymore. | | Key presses were not recognized by grandMA3 onPC on Windows when one of the windows was minimized. This bug is fixed. grandMA3 onPC on Windows now always recognizes key presses if any of the windows has the focus. | | When closing grandMA3 onPC and starting it again the former display setting such as size and position were not remembered. This bug is fixed. Starting grandMA3 onPC remembers now the former display settings. | | It could happen that macro lines were not triggered after the wait time expired. This bug is fixed. Macro lines will be executed after the wait time expires. | | The maximum possible length of variable names was limited to 15 characters. This bug is fixed. The maximum length of variable names is now set to 4,096 characters. Exceeding this limit will cut off the rest of the name. | | Copying one cue to another via the “At” keyword was not possible. This bug is fixed. Copying Cue 1 At Cue 2 is possible. | | LUA Obj.Get command was not working properly together with timecode events. This bug is fixed. Obj.Get command is working as expected when using together with timecode events. | | The input of input pop-ups was always interpreted as string. This bug is fixed. The input pop-ups detect now the type of the inputted values and treat it in the correct way: Integers are handled now as numbers and not as strings. When the input shall be handled as a string, the pop-up needs to be created with quotes, e.g., (“Enter your input here”). | | Exchange Filter y At Filter y deleted filter y. This bug is fixed. Exchange of filters in the filter pool does not delete filters anymore. | | Select Layout x.y did not select the layout element y of layout x. This bug is fixed. Select Layout can now select layout elements. | | Lasso selection in layouts did not always work as expected depending on the direction of drawing the lasso. This bug is fixed. A lasso selection in the layout window selects now the layout elements in the correct order. | | Using %s in functions but referencing to a number instead a string crashed the software. This bug is fixed. %s and referencing to numbers returns now an error in the system monitor. | | When selecting fixtures in a not consecutive order while being in a world added gaps between the fixtures in the selection grid. This bug is fixed. Selecting fixtures while being in a world puts the fixtures now on the correct grid positions. | | The large Go+, Go- and Pause did not work when a pop-up was open. This bug is fixed. Large Go+, Go- and Pause can now always be operated. | | Delete Programmer did not work. This bug is fixed. Delete Programmer deletes now the selected steps of the current selected programmer. | | While being in the patch and pressing Edit + Please closed the patch without asking how to proceed with the changes. This bug is fixed. Edit + Please does not do anything anymore while being in the patch. | | MA + X9, X10, X11 or X12 entered the keyword Executor into the command line. This bug is fixed. MA + X9, X10, X11 or X12 does not enter a keyword into the command line anymore. | | Loading a show file from v1.1.3.2 in v1.1.4.2 or newer moved all timecode events to 0s. This bug is fixed. Loading show files from prior versions recall the timecode events as they were stored. | | Update of preset did not take the preset mode of the store options into account. This bug is fixed. Updating presets uses now the preset store mode. | | Empty card readers were listed as nameless drives. This bug is fixed. Card readers that have no card inserted are not listed anymore. | | Parts that were labeled with the default name (e.g., Part 1) did not change their label when they were moved to a different part index. This bug is fixed. Part labels are now updated when moving parts. | | Macros were listed still as running when the last macro line had set the wait time to Go. This bug is fixed. Macros are not staying on anymore when the last macro line is triggered by a Go. | | It was not always possible to select fixtures in the fixture sheet by tapping them when the sheet was set to channel mode. This bug is fixed. Tapping fixtures in the fixture sheet in channel mode selects them now always. | | Exporting data pool 1 crashed the console. This bug is fixed. The console does not crash anymore when exporting the first data pool. | | It was possible to keep a pressed flash on forever. This bug is fixed. Pressed down flashes are released when loading the show file again. | | Clearing the programmer and having a command filter active did not stop the blinking of the At key. This bug is fixed. At stops blinking when clearing the programmer completely and having a command filter active before. | | Pressing Set resetted the MAtricks. This bug is fixed. Set toggles now the activation of the MAtricks instead of resetting them. | | Labelling an executor added “Exec:” in front of the actual object name. This bug is fixed. Labelling an executor does not add extra terms in front of the original object name. | | Tapping Save when loading a different show did not always save the show. This bug is fixed. When saving a show it is now always saved. | | Edit + tapping a dual encoder crashed the console. This bug is fixed. Tapping a dual encoder while having Edit in the command line opens now the attribute calculator. | | Store Please and Store Cue Please did not store a new cue of the selected sequence or did not store into the current cue of the selected sequence. This bug is fixed. Store Please now creates a new cue at the end of the selected sequence, while Store Cue Please stores into the current cue of the selected sequence. | | When closing grandMA3 onPC on macOS a new terminal window was opened. This bug is fixed. During shutdown of grandMA3 onPC on macOS the terminal window is needed, but it will close the application afterwards. For existing terminal sessions the user will be asked if they should be closed. | | Keyboard shortcuts were not disabled temporarily when opening the import MVR dialog. This bug is fixed. Keyboard shortcuts are not disturbing the input into the import MVR dialog anymore. | | Copying a sequence while being in a session resulted in a wrong output when playing it back. This bug is fixed. Playback of copied sequences creates now the correct output when being in a session. | | When copying locked objects the lock state was discarded. This bug is fixed. A copy of an object creates now an excat 1:1 copy of the object. | | Export and import of timecode shows ignored the leading zeros of decimals in the times of events. This bug is fixed. After exporting and importing timecode shows the correct times of events are applied. | ### Connections [Section titled “Connections”](#connections) | Description | | ------------------------------------------------------------------------------------------------------------------------------------------------------------------------------------------------------------------------------------------------------------------------------------- | | Art-Net poll replies were not sent by the grandMA3 every time. This bug is fixed. Art-Net poll replies are now send after every poll. | | grandMA3 onPC on macOS could crash after a long time being in a session. This bug is fixed. grandMA3 onPC running on macOS should not crash anymore while only being idle in a session. | | If the console was connected to a switch with DHCP disabled, changing the date and time was not possible during the first startup after a full install. This bug is fixed. Changing the date and time is possible after performing a full install and starting up for the first time. | | Setting the world server address to loopback device or another MA station in the network caused the application to crash. This bug is fixed. Setting the world server address to different IP/URL does not crash the application anymore. | | An extension did not keep its custom set name when rebooting or repowering it. This bug is fixed. A custom set name on an extension remains until the user changes it again. | | The control bar and the message center used the same shortcut (Alt M). This bug is fixed. The shortcut for the control bar is now Alt B. | | Connections via the web remote did not always work, especially when using Google Chrome as browser. This bug is fixed. A web remote connection can now be established again when using Google Chrome. | | Web remote connections to grandMA3 onPC running on macOS displayed only the bottom left quarter of the real display. This bug is fixed. Web remote connections to grandMA3 onPC on macOS display now again the full screen content. | | The user layout element defaults were not always transmitted to connected stations within a session. This bug is fixed. Changing layout element defaults are now transmitted within a session to other stations. | | Timecode stopped immediately if the timecode was input on a connected station and the connected station disappeared from the network. This bug is fixed. Timecode after roll is triggered also when the incoming timecode signal of a connected station disappears. | | xPort nodes did not always display the correct show file name when loading a different show file in the session. This bug is fixed. xPort nodes now update the show file name when loading a different show file in the session. | | The show file was not saved before a station with higher priority was invited or joined the session. This bug is fixed. The show file is saved before a show file from another station is downloaded. | ### Patch [Section titled “Patch”](#patch) | Description | | -------------------------------------------------------------------------------------------------------------------------------------------------------------------------------------------------------------------------------------------- | | Rotations of geometries were not processed correctly in some cases when editing a fixture type. This bug is fixed. Rotations are now applied correctly to geometries. | | The toolbar at the bottom of the window of the edit fixture type menu did not refresh when changing the tab of the menu. This bug is fixed. The toolbar is now updated according to the selected tab. | | Changes in the DMX footprint of a fixture type were only applied after leaving the patch once. This bug is fixed. Changes in the DMX footprint of a fixture type are now effected even without leaving the patch. | | Cut and Paste of environment objects in the patch caused the link to the fixture type to break. This bug is fixed. Cut and pasted instances of environment objects do not lose their link to the correct fixture type. | | Dimensions follow ratio did not work properly for all meshes when editing the properties of the model of a fixture type. This bug is fixed. Dimensions follow ratio does now also work if a mesh originally has a dimension of 1m x 1m x 1m. | | When adding fixtures to the patch it could happen that cues lost the preset link for already programmed fixtures. This bug is fixed. Preset links in existing cues are not lost anymore when adding new fixtures to the show. | ### Phaser [Section titled “Phaser”](#phaser) | Description | | ----------------------------------------------------------------------------------------------------------------------------------------------------------------------------------------------------------------- | | The grouping fixture could not be used in the step creator. This bug is fixed. The step creator can also create phasers now with the grouping fixture. | | Values created by the step creator were displayed as deactivated values in the fixture sheet. This bug is fixed. Values created by the step creator are now displayed as active in the programmer. | | Changing the speed of a running phaser restarted the phaser with every single encoder turn. This bug is fixed. Changing the speed of a phaser adjusts the speed now smoothly without restarting the phaser again. | ### Playback [Section titled “Playback”](#playback) | Description | | ------------------------------------------------------------------------------------------------------------------------------------------------------------------ | | Timecode events were not triggered when the after roll was running. This bug is fixed. Timecode events will always be triggered when the timecode show is running. | ### Windows [Section titled “Windows”](#windows) | Description | | ----------------------------------------------------------------------------------------------------------------------------------------------------------------------------------------------------------------------------------------------------------------------------------------------------------------- | | When switching on Selection Only in the DMX sheet the focussed cell was scrolled to the bottom of the DMX sheet. This bug is fixed. The DMX sheet scrolls now again to the top of the window when enabling Selection Only. | | The priority drop down menu displayed HTP. This bug is fixed. Priority HTP is now displayed correctly as HTP in the priority drop-down. | | The shadow of text in the DMX sheet was not linked to the color theme. This bug is fixed. The color definition Global.Shadow is now also used in the DMX sheet. | | It was not possible to clear the search in the color picker swatch book by one click. Thus bug is fixed. Clear Filter is added to the color picker swatch book. | | All buttons to add a new entry into a table were labeled with “Insert New xyz”. This bug is fixed. Buttons to add a new entry to a table are now labelled with “Insert new xyz”. | | The LED indicator in ? in the control bar did not light up when tapping it. This bug is fixed. The LED indicator in ? in the control bar lights up when it is activated for the context sensitive help. | | The MAtricks editor displayed buttons like Insert, Delete and Paste which were not really useable in this kind of editor. This bug is fixed. The MAtricks editor displays now only useful buttons. | | The calculator for fixture positions always added m (for meter) to existing values which failed then when extending the value with a range. This bug is fixed. The values for fixture position in the calculator are now always recalled without a unit. | | The table header of a timecode show in text mode could be displayed at the bottom of the window. This bug is fixed. The table header in text mode in the timecode window is always displayed at the top. | | It was not possible to switch to the empty tab in the object area of the assign menu. This bug is fixed. Executors can now be set to no object again. | | The appearance menu displayed always Appearance also when no object was assigned. This bug is fixed. Appearance is now only displayed within the assign menu when an object is assigned. | | Turning the executor knob within a playback window ignored assigned EncoderLeft and EncoderRight actions. This bug is fixed. The playback window uses now also assigned ExecutorLeft and ExecutorRight actions when turning the executor knob within the window. | | If the on-screen keyboard for labeling in a store view popup was used, the text was not selected. This bug is fixed. The text will be selected when storing a view and using the onscreen keyboard. | | The assign menu did not offer to choose an executor configuration from a different data pool. This bug is fixed. It is now possible to select a data pool in the title bar of the assign menu in order to select an executor configuration from a different data pool. | | It was possible to delete entries in the all tab of the add window dialog. This bug is fixed. Entries in the all tab of the add window dialog can not be deleted anymore. | | The timecode settings window was displayed too big when opening it on the small screens. This bug is fixed. The size of the timecode settings window is now scaled to the size of the screen when opening it on one of the small screens. | | The styles of LinkType in the sequence sheet, Universe and Address in the DMX sheet were different between the context menu and the title bar of these windows. This bug is fixed. Button styles of sequence sheet buttons and DMX sheet buttons are now the same in the context menu as in the title bars. | | The help window used the keyboard shortcuts when they were enabled. This made it impossible to enter a search string. This bug is fixed. When setting focus to the help window, the keyboard shortcuts will be disabled temporarily. | | Opening the calculator for entering a new trigger time for a cue opened a normal numeric calculator. This bug is fixed. The calculator for the cue trigger time is now a timing calculator. | | Deleting a step in the step creator did not work correctly. This bug is fixed. Deleting steps in the step creator works now as expected. | | Resizing a playback window to a smaller size and then resizing it again to a bigger size kept the fader area limited to the former and smaller size. This bug is fixed. The faders in the playback window use now the real estate of the available screen space. | | Activating Shift or Caps Lock on the on screen keyboard moved the keyboard on the display to a different position. This bug is fixed. Using Shift or Caps Lock keeps the on screen keyboard now in its place. | | Scaling a calculator to a smaller size allowed to change it nearly to zero height. This bug is fixed. The minimum size for calculators is now set to a useful value, so that the calculators can always be operated. | | Sorting by object column when editing a layout could crash the application. This bug is fixed. Sorting by any column is possible when editing a layout. | | Layout Element Defaults menu allowed to add, delete, copy and paste entries. This bug is fixed. Layout Element Defaults can now only change their properties, but it is not possible to add, delete, copy or paste defaults. | | The width of columns in the step creator window was unfortunate depending on the mode of the step creator. This bug is fixed. The column width in the step creator offers now the best readability when opening a step creator window. | | The naming of buttons and columns in the step creator were not clear. This bug is fixed. Ins Step is renamed to Insert Step, Del Step is renamed to Delete Step and the column Preset Ref is renamed to Preset Reference. | | Calling a group with fixtures inside in a not consecutive order did not display the selection order correctly in the fixture sheet when fixture sort was enabled. This bug is fixed. Enabled fixture sort in the fixture sheet represents now also not consecutive selection orders, e.g., from groups. | | The black shadow on texts in the daylight color theme made some texts unreadable. This bug is fixed. The text shadow in the daylight color theme is now changed to a brighter color. This makes texts also on dark backgrounds readable. | | The graphs of the system info window could escape out of the window boundaries. This bug is fixed. The graphs of the system info window are not displayed outside the window anymore when the graph would exceed the window border. | | The playback window cut off the elements at the bottom when changing the width of the window. This bug is fixed. The playback window displays always all elements of a column. Depending on the ratio of width and height it will hide whole columns beginning on the right. | | When scrolling through a DMX sheet the separator line between single universes flickered. This bug is fixed. The universe separator line in the DMX sheet does not flicker anymore when scrolling. | | The executor bar displayed the white touch frame also when pressing a key and the outfade faded to black and jumped then to the correct colors. This bug is fixed. The executor bar displays only the touch frame when touching a hardware fader. The outfade fades now directly to the correct background color. | | Help + tapping an element in one of the letterbox displays opened the help on the letterbox displays. This bug is fixed. As the letterbox displays are too small to display the help window in a readable size, the help window now opens on the corresponding large display. | | The scribble editor did not offer the complete possible area of the scribble. This bug is fixed. The scribble area in the scribble editor takes now advantage of the maximum possible scribble size. | | Scaling to canvas or elements in a layout window did not work correctly when the elements are not centered. This bug is fixed. Layout window zooms now correctly, even when the layout elements are not centered. | | Pool Appearance and Canvas Appearance in the layout editor displayed the same appearance in different styles. This bug is fixed. Pool Appearance and Canvas Appearance are now displayed in the same style. | | The white touch frame around executor labels in the executor bar was also displayed when pressing an executor key. In addition it faded in. This bug is fixed. The white touch frame in the executor bar is now only displayed when touching a fader. It only fades out. | | The screen encoder did not work in the Add Window dialog. This bug is fixed. The Add Window dialog can now be operated with the screen encoder. | | Sequence sheet offered LastGo as value for Link Type. This bug is fixed. As LastGo is not yet implemented it is removed as value for Link Type in the sequence sheet. | | Timecode events set to a time smaller than 1s were displayed in gray. This bug is fixed. Timecode events between 0s and 1s are also displayed in white. | | Turning off the title bar on Windows onPC displayed the desktop behind the former title bar position. This bug is fixed. When disabling the title bars on Windows onPC the window makes now use of the new free space. | | If a gobo was imported to the gobo pool from a USB drive this was not stored into the show file if the show file was saved to the local drive. This bug is fixed. The gobo is stored to the show file now if the show file is saved on the local drive. | | Reload Camera did not work reliable when editing the properties of a camera. This bug is fixed. Reload Camera now applies the values to the camera in a reliable way. | *** ## []()Appendix [Section titled “Appendix”](#appendix) * It is recommended to use a dedicated and a separate physical network for each grandMA3 session. * When using DMX protocols it is recommended to use a dedicated physical network for each protocol. *** ## []()Known Limitations [Section titled “Known Limitations”](#known-limitations) The grandMA3 system supports at the moment only one external DMX source per universe for merging DMX into the system. Software update via network to onPC stations requires confirmation during the install process at the destination system. When deleting a preset that is referenced by a cue the reference cannot be restored when oopsing the deletion. Show files saved with versions prior to v1.0.0.3 cannot be loaded using this version. When multiple GlobalMasters exist on the network, each having the same session and location name, the station with the higher priority takes over without user input. If all stations are of the same priority, then the station with the longest Online Time becomes the GlobalMaster for all stations.
# Release Notes 1.3
> Features
* [Features](/grandma3/2-3/key_rn_v1_3/#offline-title) * [Encoder Bar](/grandma3/2-3/key_rn_v1_3/#h3_2107302277) * [Backup Menu](/grandma3/2-3/key_rn_v1_3/#h3_1498318733) * [Filter](/grandma3/2-3/key_rn_v1_3/#h3__1623789156) * [Master Section and Custom Section](/grandma3/2-3/key_rn_v1_3/#h3_1282248970) * [Phaser Editor](/grandma3/2-3/key_rn_v1_3/#h3__1379228610) * [Other Enhancements](/grandma3/2-3/key_rn_v1_3/#h2_1198082799) * [What’s Changed](/grandma3/2-3/key_rn_v1_3/#h2_563643534) * [Fixed Bugs](/grandma3/2-3/key_rn_v1_3/#h2__1624482491) * [Appendix](/grandma3/2-3/key_rn_v1_3/#h2__1835053169) * [Known Limitations](/grandma3/2-3/key_rn_v1_3/#h2__1852571500) *** Features The latest release of grandMA3 version 1.3.1.3 rolls out several enhancements that enrich your lighting experience. Read on for a quick introduction and find links for more information. *** ### []()Encoder Bar [Section titled “Encoder Bar”](#encoder-bar)  Improved in this release * A colored indicator stripe was added to guide the user through the available encoder page groups and attributes for the selected fixture(s). The color indicator changes with the selected attribute layer to assist the presentation of the selected layer. Furthermore, the LEDs of the dual encoders change their color, too. * Added “Select all Steps” button next to the step selection area. * The MAtricks button and the Align button show now their active status.  New in this release The Encoder Bar is now available as a dedicated window. It is also possible to show/hide the grandmaster section. The encoder bar window is part of the More tab in the [add window dialog](/grandma3/2-3/wvm_add_window/). *** ### []()Backup Menu [Section titled “Backup Menu”](#backup-menu)  Improved in this release The backup menu is now completely new structured. On the left side a toolbar provides several functions like Load, Save, Delete and Settings.\ To execute an action in the sections “Load”, “Save” and “Delete”, the corresponding button in the down right corner needs to be tapped: * Load Show: Enter a file name of an existing show in the input field or select a show file in the list. Then tap Load Show in the bottom right corner. * New Show: Enter a file name in the input field or leave it blank. Then tap New Show in the bottom right corner. When entering the name of an already existing show, a pop-up warns the user if the show shall be overwritten. Leaving it blank creates a new show with an autogenerated show name. * Save Show: Enter a file name of an existing show in the input field, select a show file in the list, or enter a new show name. Then tap SaveShow in the bottom right corner. When entering a new file name in the Save section, the button changes its function from Save Show to Save Show As. * Delete Show: Enter a file name of an existing show in the input field or select a show file in the list. Then tap Delete Show in the bottom right corner. The list of show files is always visible in order to have an overview across all show files.\ The demo show folder and the backup folder are excluded in the new and save sections.  New in this release The settings section in the backup menu offers to set up automatic savings (AutoSave) of the show. Switching AutoSaveTimeout from Off to any of the predefined intervals activates this feature. After counting down the defined time, the show will be saved automatically, and the timer starts again. When AutoSave is active, a timer will display the remaining time until the next automatic save in the title bar of the backup menu. *** ### []()Filter [Section titled “Filter”](#filter)  New in this release Filters can now be used to filter windows. These windows are the patch, fixture sheet, sequence sheet in track sheet mode and the layout window.\ To do so, create a filter, open one of the supported windows, tap MA in order to open the context menu of the window, tap Mask, tap Filter, and select the desired filter in the list.\ In addition, the context menu offers the possibility to display the filter toolbar in the fixture sheet and sequence sheet. Tap Filter Toolbar in the mask tab. The filter toolbar will be displayed at the bottom of the sheet, surrounded by a blue border. Read more about the filter criteria in the paragraph below.\ In the patch menu instead, tap Filter in the title bar to select a filter. Furthermore, the known temporary patch filter is still available by tapping the filter symbol in the title bar of the patch.\ When a filter is set, the title bar of the window displays a blue filter symbol with the ID and label of the filter: Filter x ‘Name’. In addition to the possibility to filter by attributes, the filter editor is equipped with options to filter by Name, IDType, FixtureType, Layer, and/or Class. To create a filter edit a filter pool object and add a condition to the desired category.\ With the - right of the header cell of each category, it is possible to change the filter behavior: When it is disabled, the items filtered by this category with all its criteria are displayed. If it is enabled (yellow minus symbol), the items filtered by this category are hidden.\ To delete a criterion press Delete and tap the corresponding criterion in the filter editor. New shows will add predefined filters for the different places where filtering can be applied. They are called Patch, Fixture Sheet, Sequence Sheet and Layout. These filters are already set to their corresponding windows when calling the predefined views in a new show. *** ### []()Master Section and Custom Section [Section titled “Master Section and Custom Section”](#master-section-and-custom-section)  New in this release A new window is available that represents the [Master Section](/grandma3/2-3/do_control_master/) and the [Custom Section](/grandma3/2-3/do_control_custom/). This window is mainly useful for onPC users who want to have these sections visible on their screens. This window displays by default the label of the Custom Section Wheels, Custom Section Encoders and the Master Section.\ The encoder bar window is part of the other tab in the [add window dialog](/grandma3/2-3/wvm_add_window/). By tapping MA in the top left corner of the window the context menu opens and allows to display or hide more elements. These are: * Custom Section Encoders: Displays or hides both, labels and hardware area of the custom encoder section. * Encoders Label: Displays or hides the labels of the custom encoder section. * Encoders Hardware Area: Displays or hides the hardware area of the custom encoder section. * Custom Section Wheels: Displays or hides both, labels and hardware area of the custom wheel section. * Wheels Label: Displays or hides the labels of the custom wheel section. * Wheels Hardware Area: Displays or hides the hardware area of the custom wheel section. * Master Section: Displays or hides both, labels and hardware area of the master section. * Master Label: Displays or hides the labels of the master section. * Master Hardware Area: Displays or hides the hardware area of the master section. * Default Playback Buttons: Displays or hides the default playback buttons of the master section: Pause \[large], Go- \[large] and Go+ \[large]. * Page Section: Displays or hides the page button section with Page+, Page x and Page- that is located on the right side of the executor bars. *** ### []()Phaser Editor [Section titled “Phaser Editor”](#phaser-editor)  Improved in this release The phaser editor 1D view mode allows now to manipulate the attribute values and handles (acceleration and deceleration).\ To change the attribute value, select the steps you want to manipulate, select the Move Points tool, and tap and drag up and down in the corresponding timeline of the desired attribute.\ To change the handles, select the Move Handles tool, and tap and drag the desired handles in the timeline. The handles are displayed by a yellow circled dot. It is possible to drag the handles outside of the visible timeline area. To get them back, use the corresponding accel and decel encoders in the phaser encoder bar. *** ## []()Other Enhancements [Section titled “Other Enhancements”](#other-enhancements)  The command “At Speed 60” uses the speed readout specified in the user profile.  The MIB mode per cue is set into angle brackets when the cue MIB mode is set to default. The value inside the angle brackets is the MIB mode of the sequence.  Sequence settings offer a new setting called Master Go Mode. In combination with Auto Start, Auto Stop, and Restart Mode there are plenty of possibilities to affect the behavior of the master fader.  IfOutput supports now also to specify a value or range of values, e.g., IfOutput At 50 selects all fixtures that have an output of 50%.  GDTF import and export support fixture images now.  The align mode >< (butterfly) now keeps the center fixtures at their value when turning the encoder.  The update menu settings are now always set back to the saved preferences after updating a cue or preset. It is possible to save the current settings as preference by tapping Save Preferences in the title bar of the update menu. It is also possible to restore the preferences by tapping Load Preferences. The update menu has now the same behavior as the store settings.  Oops settings: The user profile has now two settings to define the oops/undo behavior: * Undo Programmer: Setting this to No blocks oops to undo the changes of the programmer, e.g., setting attribute values. * Undo General: Changing this setting to No excludes all other executed commands and actions from the possibility to oops them.  Updated the converted grandMA2 fixture library to Carallon 16.2.  Groups containing only one fixture are now marked as single fixture groups. They are labeled with the name of the fixture and have the appearance of the fixture type. *** ## []()What’s Changed [Section titled “What’s Changed”](#whats-changed) * onPC Windows * onPC taskbar labels changed to “Display \[number] onPC \[version] \[show file name]. * The desktop icon names of the onPC main app and terminal app do no longer include the version number. * Update indicators only appear on objects possible to update if update is entered in the command line. The update hardkey and the button in Command Section remain alternating. * The button label changed from Create to Active in the step creator. * When using the follow function in the 3D window or choosing a new color in the color picker for fixtures that are running a phaser at the same time, the programmer will then switch temporarily into [Single Step mode](/grandma3/2-3/ws_encoder_bar/). The Single Step mode is only switched on during tapping and holding in the 3D window or the color picker. * The fallback mechanism for executor configurations changed. When starting with a 1x1 configuration and expanding it, the functions of the new handles are determined by the handles left or below. This is the case as long as the configuration has not stored any dedicated function information for this size and the handle at all. * The proposed name for new show files is now NewShow\_date\_timeUTC. *** ## []()Fixed Bugs [Section titled “Fixed Bugs”](#fixed-bugs) ### Command Line and Macro [Section titled “Command Line and Macro”](#command-line-and-macro) | Description | | ----------------------------------------------------------------------------------------------------------------------------------------------------------------------------------------------------------------------------------------------------------------------------------------------------------------------------------------------------- | | Storing cues using a number beginning with a dot (e.g. .5) did not work properly. This bug is fixed. Storing cue numbers beginning with a dot is working as expected. | | Names that were entered with a leading Z were split up into the Zero command and the rest of the name. E.g.: Fixture “Zorro” was executed as Fixture Zero “orro”. This bug is fixed. Names are now executed in the correct way. | | New data pools were missing some default pool objects like an executor configuration and a sequence. This bug is fixed. New data pools have now the same default pool objects as data pool 1 has. | | Backup file names had only one digit days, months, hours, minutes and seconds in the file name, which did not allow a proper sorting. This bug is fixed. Backup file names now contain always 2 digit dates. Backup files are using now this scheme of naming: Filename.backup\_date\_timeUTC.show | | Loading show files from v1.1 discarded individual wait times in macros and did reset them all to follow. This bug is fixed. Macros in show files from v1.1 load their wait times as they were set before. | | SetGlobalVer interpreted decimal numbers as integers. This bug is fixed. Setting a decimal number as a global variable interprets it now as type double. | | When switching from a keyword that was entered via a shortcut with a modifier to a keyword of the same hard key but without a modifier, did the new keyword was not entered into the command line, e.g. MA + Preset and then switching to Preset. This bug is fixed. Keywords of the same key are now always entered correctly into the command line. | | Faders could start to jitter after a long operation time of the grandMA3 software. This bug is fixed. Faders should not jitter anymore. | | xPort nodes and Processing Units did not allow to change the IP address using the UI on the device itself. This bug is fixed. IP addresses of xPort nodes and Processing Units can be changed via UI on the device or remotely within the network using a console or onPC. | ### Connections [Section titled “Connections”](#connections) | Description | | ---------------------------------------------------------------------------------------------------------------------------------------------------------------------------------------------------------------------------------------------------------------------------- | | Art-Net poll replies could carry wrong universe information. This bug is fixed. Art-Net poll replies contain correct universe information. | | When several wings (console and extension) used the same WingID not all faders on the wings were moved, when one fader was moved. This bug is fixed. When moving a fader, all faders that represent the same executor on other wings will move, too. | | When a new station joins into a session, the new station downloaded first the show file and then stored it with the old show file name. This bug is fixed. When taking a station into a session, the old show file will be saved first before downloading the new show data. | ### Patch [Section titled “Patch”](#patch) | Description | | ------------------------------------------------------------------------------------------------------------------------------------------------------------------------------------------------------------------------------------------------------------------------- | | Leaving the patch could add attributes to presets when multi-instance fixtures are part of the show. This bug is fixed. Leaving the patch does not add new attributes to existing presets. | | Adding new fixtures to the patch could change the stored values of presets for fixtures that use the same attribute on several channel functions. This bug is fixed. Adding new fixtures to the show does not change preset values anymore to the first channel function. | ### Playback [Section titled “Playback”](#playback) | Description | | ------------------------------------------------------------------------------------------------------------------------------------------------------------------------------------------------------------------------------------------------------------------------------------------------------------- | | Outfade and outdelay times were ignored when playing back a cue. This bug is fixed. Outfade and outdelay in cues work again. | | Clearing a programmer with values while another programmer had the same fixtures with its attributes at default values in the programmer created a dimmer output of 100% for these fixtures. This bug is fixed. Clearing a programmer in a multi-user environment does not keep cleared values in the output. | ### Windows [Section titled “Windows”](#windows) | Description | | -------------------------------------------------------------------------------------------------------------------------------------------------------------------------------------------------------------------------------------------------------------------------------------------------------------------------------------------------------------------------------------------------------------------------------------------------------------------- | | When recording over an existing timecode show, the prerecorded events were not triggered. This bug is fixed. Prerecorded events are triggered when recording over an existing timecode show. | | Fixture type custom resources were removed from the show file when storing the show file again, while the resource files were not present on the local hard drive. This bug is fixed. Storing a show file that contains custom resources does not make the custom resource file to be discarded. | | Long press on a number in the calculator did cause multiple entries. This bug is fixed. Long press on the calculator does not cause multiple entries. | | The console crashed when scrolling down in the sequence sheet when it was switched into the transposed mode. This bug is fixed. The console does not crash anymore when scrolling in a transposed sequence sheet. | | MAtrick pool objects that had only their default values set, were displayed as empty, and macros that had no macro lines were displayed as not empty. This bug is fixed. All pool objects display now their state of empty/not empty correctly. | | The encoder bar sometimes missed some button labels after a show download. This bug is fixed. The encoder bar now displays the labels of their buttons. | | The on screen keyboard missed the secondary functions on the numeric keys. This bug is fixed. The on screen keyboard has again the secondary functions on the numeric keys when tapping Shift or CapsLock. | | Scrolling with the cursor, time or duration encoder in the timecode encoder bar changed the times in steps regarding to the scale ratio of the timeline in the editor. This bug is fixed. The cursor, time and duration encoder in the timecode encoder bar now use the defined frame readout of the timecode editor when turning. One click is one frame in the chosen unit, except seconds will always scroll with a resolution of 60 frames (One click is 1/60s). | | The time of the incoming timecode signal was displayed in 1/100s time format on the timecode slot pool objects. This bug is fixed. The timecode slot pool objects display the incoming timecode signal in the format of the signal. | | The command controls overlay displayed the XKeys permanently in the way as would be MA or Shift permanently pressed when Shift was pressed during switching off the shortcuts. This bug is fixed. The command controls display always the correct state of the Keys. | | The console crashed when setting the grid to 0 in the layout window options. This bug is fixed. The allowed range for the grid size in layouts is now limited from 10 to 1000. | | The console could crash when loading a show file with a corrupted layout window. This bug is fixed. The console should not crash anymore when loading a show file with a corrupted layout window. | *** ## []()Appendix [Section titled “Appendix”](#appendix) * It is recommended to use a dedicated and a separate physical network for each grandMA3 session. * When using DMX protocols it is recommended to use a dedicated physical network for each protocol. * The recommended workflow for executor configurations that are different compared with the default executor configuration is to create a new executor configuration, do the changes in the new configuration and save the changes. *** ## []()Known Limitations [Section titled “Known Limitations”](#known-limitations) The grandMA3 system supports at the moment only one external DMX source per universe for merging DMX into the system. Software update via network to onPC stations requires confirmation during the install process at the destination system. When deleting a preset that is referenced by a cue the reference cannot be restored when oopsing the deletion. Show files saved with versions prior to v1.0.0.3 cannot be loaded using this version. When multiple GlobalMasters exist on the network, each having the same session and location name, the station with the higher priority takes over without user input. If all stations are of the same priority, then the station with the longest Online Time becomes the GlobalMaster for all stations.
# Release Notes 1.4
> Bug Fix Version 1.4.2.1
* [Bug Fix Version 1.4.2.1](/grandma3/2-3/key_rn_v1_4/#offline-content) * [Other Enhancements](/grandma3/2-3/key_rn_v1_4/#h2_1198082799) * [Fixed Bugs](/grandma3/2-3/key_rn_v1_4/#h2__1624482491) * [grandMA3 Release Version 1.4.0.2](/grandma3/2-3/key_rn_v1_4/#h2_30567551) * [Features](/grandma3/2-3/key_rn_v1_4/#h2_727740091) * [Selection](/grandma3/2-3/key_rn_v1_4/#h3__786962412) * [](/grandma3/2-3/key_rn_v1_4/#Selection)[Recursive Selection of Fixtures](/grandma3/2-3/key_rn_v1_4/#h3_195672305) * [General Selection Syntax](/grandma3/2-3/key_rn_v1_4/#h3__2047748697) * [Selection of Groups](/grandma3/2-3/key_rn_v1_4/#h3_1092467461) * [MAtricks](/grandma3/2-3/key_rn_v1_4/#h3__802038404) * [Phaser Editor](/grandma3/2-3/key_rn_v1_4/#h3__1379228610) * [Recipes](/grandma3/2-3/key_rn_v1_4/#h3__808614509) * [MA grid interpolation concept (MAgic)](/grandma3/2-3/key_rn_v1_4/#h3__1074724244) * [3D Window](/grandma3/2-3/key_rn_v1_4/#h3__673189665) * [PosiStageNet (PSN)](/grandma3/2-3/key_rn_v1_4/#h3__1538375422) * [Color Picker](/grandma3/2-3/key_rn_v1_4/#h3_1475112279) * [Remote Device Management (RDM)](/grandma3/2-3/key_rn_v1_4/#h3_1861064977) * [Remote Human Interface Device Control (Remote HID)](/grandma3/2-3/key_rn_v1_4/#h3_1141334809) * [Copy](/grandma3/2-3/key_rn_v1_4/#h3__911352779) * [Copy of Cues](/grandma3/2-3/key_rn_v1_4/#h3_937929976) * [Copy of Ranges](/grandma3/2-3/key_rn_v1_4/#h3__1241955370) * [Copy Pop-Up](/grandma3/2-3/key_rn_v1_4/#h3__1677612958) * [Sequence and Sequence Sheet](/grandma3/2-3/key_rn_v1_4/#h3_33384368) * [Timecode and Timecode Editor](/grandma3/2-3/key_rn_v1_4/#h3_519986610) * [Other Enhancements](/grandma3/2-3/key_rn_v1_4/#h2_1460263093) * [What’s Changed](/grandma3/2-3/key_rn_v1_4/#h2_563643534) * [Fixed Bugs](/grandma3/2-3/key_rn_v1_4/#h2__1429873276) * [Appendix](/grandma3/2-3/key_rn_v1_4/#h2__1835053169) * [Known Limitations](/grandma3/2-3/key_rn_v1_4/#h2__1852571500) *** Bug Fix Version 1.4.2.1 ## []()Other Enhancements [Section titled “Other Enhancements”](#other-enhancements)  Layout window has the new property Use RightClick To Edit. When it is enabled, a right-click on a layout element or the 2 finger edit gesture edits the assigned object of the layout element. When it is off, a right-click or the 2 finger edit gesture into a layout will act like a normal tap or like a left-click.  The 2D grid perspective selection in the 3D window has been improved. The arrangement of fixtures in the grid should now be more precise in most use cases.  Installing grandMA3 onPC on Windows computers now only adds the general grandMA3 onPC shortcut on the desktop. This shortcut opens the last installed grandMA3 onPC version. Each version folder in the start menu contains a shortcut to its specific version. The start menu does not have the general shortcut anymore. *** ## []()Fixed Bugs [Section titled “Fixed Bugs”](#fixed-bugs) ### 3D [Section titled “3D”](#3d) | Description | | ------------------------------------------------------------------------------------------------------------------------------------------------------------------------------------------------------------------- | | Loading show files from v1.3 could crash onPC stations when opening a display that has a 3D window open. This bug is fixed. grandMA3 onPC stations should not crash anymore when opening displays with 3D windows. | ### Command Line and Macro [Section titled “Command Line and Macro”](#command-line-and-macro) | Description | | --------------------------------------------------------------------------------------------------------------------------------------------------------------------------------------------------------------------------------------------------------------------------------------- | | The software could crash after selecting a fixture, copying the current selection to the other selection, and then selecting a different fixture in the other selection. This bug is fixed. Selecting fixtures after copying an existing selection does not crash the software anymore. | | Assigning a group onto an executor did not work on grandMA3 onPC Windows stations. This bug is fixed. Groups can now be assigned to executors again. | | The software could crash when selecting a fixture that was added in the patch before an empty fixture line. This bug is fixed. The software does not crash anymore when selecting fixtures while having empty fixture lines in the patch. | | The software could crash when selecting all fixtures while having several color picker windows open. This bug is fixed. The software does not crash anymore when selecting all fixtures of a show and having multiple color picker windows open. | | The keyboard shortcuts were not disabled correctly when using calculators. This bug is fixed. Keyboard shortcuts are disabled in calculators. The only shortcut that is still possible to use is pressing T to enter Thru into the calculator. | ### Connections [Section titled “Connections”](#connections) | Description | | ---------------------------------------------------------------------------------------------------------------------------------------------------------------------------------------------------------------------- | | The consoles could freeze when the user unplugged and replugged a USB mouse repeatedly. This bug is fixed. Unplugging and replugging a USB device should not freeze. | | When rebooting a console while being in standalone mode, did not ouptut any DMX after the reboot. This bug is fixed. A console can now again output DMX immediately after rebooting, also if it is in standalone mode. | ### Patch [Section titled “Patch”](#patch) | Description | | --------------------------------------------------------------------------------------------------------------------------------------------------------------------------------------------------------------------------------------------------------------------------------------------------------------------------------------- | | Changing the default, highlight, or lowlight values of fixture types in the live patch while being in a session, did not apply the changed values to the output immediately. This bug is fixed. Modified default, highlight, and lowlight values of fixture types are output immediately when doing the modification in the live patch. | | Stage dimensions were not converted correctly from show files saved in versions prior v1.4. This bug is fixed. When loading a show file from an older software version the stage dimensions are converted correctly. | | The software could crash when adding a new fixture to the show in the patch menu, while the patch menu had a filter active. This bug is fixed. Active filters in the patch menu do not crash the software anymore when adding new fixtures to the show. | ### Playback [Section titled “Playback”](#playback) | Description | | ------------------------------------------------------------------------------------------------------------------------------------------------------------------------------------------------------------------------------------------------------------------ | | When calling a relative preset after an absolute preset into the programmer, the programmer did only play back the relative preset. This bug is fixed. Combinations of relative preset and absolute presets are now played back in sequences and in the progammer. | | When fading from one cue to another cue, identical values between both cues could flicker slightly on the output. This bug is fixed. Fading between two cues now keeps the DMX output stable when the values do not change in these two cues. | ### Windows [Section titled “Windows”](#windows) | Description | | ---------------------------------------------------------------------------------------------------------------------------------------------------------------------------------------------------------------------------------------- | | The default views displayed All pool 25, while the import predefined phaser macro imports the phaser presets into All pool 21. This bug is fixed. The default views in new shows display now All pool 21, when an All pool is displayed. | | The default views did not have a mode in the color picker windows selected. This bug is fixed. The default views in new shows have now the CIE mode selected in color picker windows. | | It was not possible to edit a keyboard shortcut definition by right clicking it. This bug is fixed. Keyboard shortcuts can now be edited again by right clicking them in Menu - Preferences and Timings - Keyboard Shortcuts. | *** ## []()grandMA3 Release Version 1.4.0.2 [Section titled “grandMA3 Release Version 1.4.0.2”](#grandma3-release-version-1402) ## []()Features [Section titled “Features”](#features) The latest release of grandMA3 version 1.4.0.2 rolls out several enhancements that enrich your lighting experience. Read on for a quick introduction and find links for more information. *** ### []()Selection [Section titled “Selection”](#selection) ### []()Recursive Selection of Fixtures [Section titled “Recursive Selection of Fixtures”](#recursive-selection-of-fixtures)  New in this release For a fast selection of all subfixtures (recursive selection), an additional dot (.) can be added to the selection syntax of the main fixture. To select fixture 1 with all its subfixtures, type: User name\[Fixture]> Fixture 1. To select all subfixtures of fixtures 1 thru 3, type: User name\[Fixture]> Fixture 1 Thru 3. The dot selects all subfixtures downwards from the specified level. Therefore, it is also possible to select, e.g., only the pixels of an AlienPix. To do so, type: User name\[Fixture]> Fixture 1.1. To select all fixtures and subfixtures, type: User name\[Fixture]> Fixture Thru. To still select all parents of all fixures, type: User name\[Fixture]> Fixture Thru ### []()General Selection Syntax [Section titled “General Selection Syntax”](#general-selection-syntax)  Improved in this release To gain a faster and more logical way of selecting fixtures in the hierarchical structure, the general syntax has changed:\ The main rules are: * The dot (.) ends the selection on the current level and steps then one level down. * Instead of using the dot as a separator, dedicated keywords for the objects in the next level of the hierarchy can be used (e.g. Page 1 Executor 201). * To restart at the top level of the hierarchy within one command, the starting keyword (e.g., Fixture) has to be entered again. To select the second subfixture of fixture 5, type: User name\[Fixture]> Fixture 5.2 To select only subfixtures 2 to 4 of fixtures 1 to 3, type: User name\[Fixture]> Fixture 1 Thru 3.2 Thru 4 In this case, the first rule from above can be observed: First, all fixtures on the top level have to be selected (Fixture 1 Thru 3), and after the dot, the subfixtures are then selected (2 Thru 4). To select subfixtures 8 to 10 of fixture 1, all subfixtures of fixture 2, and subfixtures 1 to 5 of fixture 3, type: User name\[Fixture]> Fixture 1.8 Thru 10 Fixture 2. Thru Fixture 3.1 Thru 5 In this example the second rule from above is applied: As .8 in “Fixture 1.8” steps down to the subfixture level, “Fixture 2” needs to be entered to restart at the top level with fixture 2. If “Fixture 2” would not be entered, the second subfixture of subfixtures 8 to 10 would be selected.\ This selection syntax is a replacement for doing a lasso selection in the fixture sheet starting at fixture 1.8 and ending it at fixture 3.5 excluding the parent fixtures. To select all subfixtures on the first subfixture level for all fixtures, type: User name\[Fixture]> Fixture Thru.Thru **Important:**\ These syntax rules not only apply to fixtures and all their levels of subfixtures, but furthermore apply to all types of objects that use a hierarchy structure, e.g. pages with executors, macro with macro lines, and many more. To delete executor 201 on all pages, type: User name\[Fixture]> Delete Page Thru.201 or type: User name\[Fixture]> Delete Page Thru Executor 201 This second example describes the additional rule of the first rule from above: Instead of using Page x.y, the Executor keyword is used to address the executors. ### []()Selection of Groups [Section titled “Selection of Groups”](#selection-of-groups)  Improved in this release Groups are now by default called differently into the selection: * When fixtures are stored in groups with only coordinates along the X axis and have no gaps along this axis, the grid cursor will be set to the next grid position after calling this group. * As soon as the coordinates are different across two or all three axes, the grid cursor will stay at its current position when calling such a group. **Hint:**\ This behavior can be changed in the EditOption menu of each group via the option Move Grid Cursor In all cases, the fixtures are set relative to the selection grid starting at the current position of the grid cursor. The new option Auto Remove X Gaps in the title bar of the selection grid allows to suppress existing gaps in the fixture selection. Gaps on the X axis can only be removed as long as no other fixture is placed on the same X coordinate but with a different Y or Z coordinate. A group, for example, that has fixtures stored to the grid X positions 0, 2, and 4, will recall the fixtures to X 0, 1, and 2, as soon as this option is enabled.\ This option can also be enabled after calling a group or selecting fixtures. It is also possible to remove the gaps via the command line on all three axes.\ To remove the gaps on the X axis only, type: User name\[Fixture]> Remove Grid \* To remove the gaps on the Y axis only, type: User name\[Fixture]> Remove Grid / \* To remove the gaps on the Z axis only, type: User name\[Fixture]> Remove Grid / / \* All these possibilities to remove the gaps on one axis can also be combined. To remove the gaps on all three axes at the same time, type: User name\[Fixture]> Remove Grid \* / \* / \* **Hint:**\ Between each slash ( / ) and asterisks ( \* ) a space needs to be entered. *** ### []()MAtricks [Section titled “MAtricks”](#matricks)  Improved in this release The design of the MAtricks window has changed significantly for better workflow. The main area of the MAtricks window is now visually separated into 3 sections. One section for each axis. Each axis section has its own background color: X: red; Y: blue; Z: green.\ Each section can be individually displayed or hidden by the user. Therefore, the toolbar on the left side provides toggle buttons for X, Y, and Z.\ Within each section, different properties are available, but each section has the same kind of properties for its axis. E.g., Each axis section has properties for blocks, wings, shift, and so on. These kinds of properties are logically grouped together. These groups are called Grid, Layers, and Shuffle. With the help of the title bar buttons Grid, Layers, and Shuffle, these groups can also be displayed or hidden.\ As soon as a property is active, the background of the corresponding button of the section and the group will turn green. The groups contain these properties: * Grid: Single, Block, Group, Wings, and Width. * Layers: Fade From/To, Delay From/To, Speed From/To, and Phase From/To. Learn more about these properties in the [Recipes](/grandma3/2-3/key_rn_v1_4/#Recipes). * Shuffle: Shuffle, and Shift. At the bottom are additional buttons displayed or hidden, depending on the state of Grid, and Shuffle: * When Grid is enabled, additional buttons for invert are displayed. Read more about these options later in this paragraph. * When Shuffle is enabled, additional buttons like Copy Values, Copy Sel, ActiveSel, Shuffle, and ShuffleMode are displayed. The value buttons allow in addition to the normal value input a new style of modifying the value: Tap the value area, hold and slide in order to change the value. Depending on the direction when starting to slide, the value will change when dragging with the finger left or right. It is now also possible to combine several MAtricks from MAtricks pool to the MAtricks of the programmer. The MAtricks editor now has the same look and feel as the MAtricks window.  New in this release Invert options has been added to the MAtricks. The invert options allow an easier and more advanced manipulating of values. With invert, it is possible to define on which axis in the selection grid the values should be inverted when turning the encoder or applying a range of values. The fixtures that will be inverted, are displayed in green in the fixture sheet (font color), 3D (body color), and layout window (border color). Furthermore, it is also possible to limit the value invert to pan and/or tilt: * InvertStyle: Defines if Invert shall be applied to Pan, Tilt, P+T (Pan and Tilt), or to All attributes. * InvertX: Inverts the overall invert of the current individual inverts per MAtrick property on the X axis. * InvertY: Inverts the overall invert of the current individual inverts per MAtrick property on the Y axis. * InvertZ: Inverts the overall invert of the current individual inverts per MAtrick property on the Z axis. In addition, all grid related MAtricks properties can also be inverted. Therefore, these properties have a small button with the invert symbol. These invert options allow an alternating invert. When using Align in combination with Invert the alignment is still based on the arrangement of fixtures inside selection grid, however the aligned values will be inverted. **Restriction:**\ At the moment Align only works with the X axis. *** ### []()Phaser Editor [Section titled “Phaser Editor”](#phaser-editor)  Improved in this release The Phaser Editor has a new Layout mode called Step. To select it, tap Layout in the title bar of the Phaser Editor repeatedly, until the value is set to Step. In the Step mode, a grid displays the values of all current steps currently running in the programmer. Each row displays a step, and each column displays the data of an attribute, like in the fixture sheet. In addition, the phaser editor has now additional buttons in the tool bar on the left side: * Form: Allows to define a form for the current phaser. Available forms are listed in the tool bar on the right side. They are: Rectangle, Sawtooth, Sine and Cosine. These forms modify the values of the transition layer, accel layer and, decel layer. * Speed: Allows to change the speed of the current phaser. In the toolbar on the right side several possible options are available: * Loop: Multiplies the current speed by the number of steps. * Fixture: Divides the current speed by the number of fixtures you have selected. * x2 - x32: Multiplies the current speed by the chosen value. * /2 - /32: Divides the current speed by the chosen value. The symbol of the phase tool has also changed, it does not display the sinus symbol anymore, but a phase symbol. The encoder bar offers now additional Link Encoder settings when having a phaser layer selected. The existing At-Filter value of Link Phaser is still available.\ The new values are: * Single: Only the values of the touched attribute in the selected phaser layer will be changed. * Feature: The values of all attributes in the very same feature will be changed together when changing the value for one attribute. A new button Phaser has been added to the encoder on the top right side. Tapping this button opens a temporary overlay of the phaser editor. Each layer of phaser related layers in the encoder bar display now only encoders for the selected layer. For example, the transition layer displays now only an encoder for transition, and not other additional layers anymore.\ When setting focus into the 2D area of the phaser editor, the encoder bar switches to the phaser editor encoder bar with position feature group. The encoders are rearranged slightly, and the fourth encoder in the encoder bar scrolls now through the existing steps.\ When setting the focus into the 1D area of the phaser editor, the encoder bar changes to the At-Filter encoder bar. This encoder bar manipulates the phaser values for all attributes that are active in the At-Filter at that time. In addition, all encoders are labeled with “At:” in front of the encoder label. The selected Programming Layer is displayed in the title bar for additional guidance. ### []()Recipes [Section titled “Recipes”](#recipes)  New in this release Recipes allow a fast workflow in adapting a show to different setups, and allow you to build your intention before you know your setup. As the setup changes you can use Recipes to recook the data in your presets and cues. Recipes contain the ingredients fixture selection (groups), values (presets), MAtricks, fade, delay, speed, and phase. Recipes can be added to presets, cue parts, and programmer parts. Each cue part and preset can contain several recipes. When cooking, the recipes will be read in the order. Cooking is the process of reading the ingredients and writing the data to the cue, preset, or programmer. When all ingredients are updated to the current setup, the recipes can be cooked, which adjusts the cue parts and presets to the changed setup. The data written by cooking is marked as cooked data and can later be removed with the cook remove command. The cook remove command will remove any values that are marked as cooked data regardless of recipe ingredients. To create a recipe for a cue part, open the Sequence sheet, tap MA in the left corner of the title bar, tap Mask, and enable Show Recipes.\ At the bottom of the sequence sheet, the recipe area will be displayed. To enlarge the recipe area, tap, hold and drag the divider between the cue area and the recipe area upwards. When the recipe area has reached a desired size, release your finger.\ When selecting more than one cue part by doing a lasso selection, the recipes of the last selected cue part will be displayed. To create a recipe in a preset, open the EditOptions-dialog for the desired preset. To do so, tap, hold and move your finger outside the preset in the preset pool in order to open the swipey. While keeping the finger pressed move it to the EditOption button and release then your finger. To create a recipe in the programmer, open a Programmer Parts window, and unfold the programmer part you want to create the recipe into. In all 3 cases, you can now add a new recipe by tapping and holding on New Recipe.\ In the newly created recipe, the ingredients can also be added by tap and hold of the corresponding cell. A drop-down opens and offers all possible types for the ingredient.\ Another way to add the ingredients is to assign them to the corresponding cell. To do so, press Assign, tap the desired ingredient, e.g. a group in the group pool, and tap then the cell in the recipe. **Hint:**\ When a new recipe is added it will automatically capture the values set inside your MAtricks window. After finishing the recipe, the cue or preset can be cooked by tapping Cook. The values will be applied to the cue data, preset data, and/or the programmer for the selected group with the desired modifiers (fade, delay, MAtricks, speed, and phase). There are three cooking modes: * Merge: Remove cooked data and add new data based on the recipe ingredients, but do not replace non-cooked data. * Overwrite: Remove cooked data and add new data based on the recipe ingredients, and replace non-cooked data. * Remove: Remove all cooked data from the destination object. As recipe properties are changed the recipe will auto-cook using the merge mode as long as a selection (groups) is assigned to the recipe. If no group is assigned to the recipe it will not auto-cook. There are a couple of special ways you can use recipes with presets: * If recipes in a preset do not contain a group, calling that preset will cook the ingredients to the programmer using your current selection. This only works when the preset object does not contain any values. * A second approach is to make recipes in a preset with groups and values. Again, if this preset object does not contain any values, calling this preset will cook the recipes directly into your programmer and you will also see those recipe lines in your programmer parts window. Remember to use cook remove to remove the values from your preset. Using presets this way makes it easy for you to build cue parts with recipes because any recipes you have in your programmer parts window will be stored to the cue or preset destination. To cook any object without entering the editor, the keyword Cook can be used. To cook preset 1.1, type: User name\[Fixture]> Cook Preset 1.1 Cook is located on the shortcut: MA + Update. To remove cooked data from preset 1.1, type: User name\[Fixture]> Cook Preset 1.1 /Remove Presets and cue parts with recipes display an orange pot icon. *** ### []()MA grid interpolation concept (MAgic) [Section titled “MA grid interpolation concept (MAgic)”](#ma-grid-interpolation-concept-magic)  New in this release MAgic presets are presented as a special ingredient for recipes but can be used for much more. They are used to align and interpolate preset values across a dynamic selection of fixtures without storing values for each fixture of the range. It is enough to define the edge values for a fixture range and dynamically recall those edge values for different selections. For example, 2 fixtures with 0% and 100% dimmer intensity stored as a MAgic preset allow recalling the preset across an arbitrary number of fixtures, where the first and last fixture of the selection have 0% and 100% intensity, while the fixtures in between are nicely aligned across the range. Edge values are defined by simple grid positions and then interpolated across a larger selection grid of fixtures. To build a MAgic Preset, select the fixtures and apply the values that shall represent the edges. Now the values need to be marked as a MAgic preset. This can be done with the command **At MAgic**. **Hint:**\ The command **At MAgic** captures the current grid position of your selected fixtures. **Important:**\ Always select all the fixtures that will be used with **At MAgic**. Now the MAgic preset can be stored like any other preset. The green MAgic wizard hat icon on the preset indicates that the preset contains MAgic information. If you need to knock out values on the MAgic layer you can use the Off MAgic button or syntax with your selection. **Hint:**\ Use \*\*At MAgic \*\*and **Off MAgic** in combination with your At Filter to limit what attributes will get MAgic values. The At quick command overlay features 2 additional buttons At MAgic and Off MAgic. In addition, a new layer called MAgic has been added to the layer toolbar. **Hint****s****:** \ Up to 5 points can be defined per X / Y / Z axis. For example, you could define a Green, Orange, White, Orange, Green pattern across two axes to create a very cool look on stage. **Known Limitations**\*\*:\*\* \ \- Storing an MAgic preset only works with selective data as you cannot define multiple points across universal or global fixtures.\ \- Calling an MAgic preset into the programmer will extract the data and it will not reference the preset. We recommend to use MAgic presets in combination with recipes to maintain referenceable data. \ \- The MAgic layer will show you the grid positions captured for the value, but you cannot manually enter or edit these grid position values using the calculator. *** ### []()3D Window [Section titled “3D Window”](#3d-window)  New in this release An option to decrease the render resolution of the 3D window was added to the 3D window settings. Decreasing the render resolution will increase the frames per second that are rendered. Find this in the tab “Quality”. There are several options: * Render Scale: this changes the resolution of the whole rendering in the 3D window continuously. 100% means that the 3D window is rendered with its native resolution. 0% means that the resolution of the 3D window is divided by 5 in width and height. Default: 100% * Light Scale: this changes the resolution of the light rendering in the 3D window continuously. 100% means that the 3D window is rendered with its native resolution. 0% means that the resolution of the light in the 3D window is divided by 5 in width and height. Default: 100% * Shadow\[Pix]: this changes the resolution of the rendered shadows. The higher this value is, the higher is the resolution of the shadows. This only affects the rendering in Beam Quality “Gobo Shadow”, “High Shadow” and “High Shadow Fancy”. Default: 128 * Snap: If “Snap” is enabled, the Render Scale and Light Scale are divided with integer values. The fader then indicates the scale (1/1 to 1/5). Render Scale and Light Scale can be used in combination. Setting both to 1/2 means that the whole 3D window is rendered with half of its resolution, while the light is rendered with a quarter of its resolution.  New in this release The 3D window visualizes Blades now. The attributes Blade1-4A, Blade1-4B, Blade1-4Rot, and ShaperRot are visualized. **Hint:**\ There is no special dialog to control the shapers yet.  New in this release Added the two-dimensional grid selection. This selection type is activated by default. To switch to the linearized selection tap Selection Mode in the title bar of the 3D window. The 2D grid selection offers two different modes, “Planar” and “Perspective”. Using the lasso selection to select fixtures in the 3D window now adds them as a two-dimensional selection to the selection grid. In planar mode, the camera position does not affect the selection order. Only the real position of the fixtures is significant. In perspective mode, the orientation of the camera additionally influences the order of the selection in the selection grid. To select fixtures in the 3D window using the planar selection, draw a lasso starting with a horizontal or vertical mouse movement. The color of the lasso changes to green when selection is locked to planar mode. To select fixtures in perspective mode, draw a lasso starting with a diagonal mouse movement. The color of the lasso changes to cyan when the selection is locked to perspective mode. The “Linearize” selection mode is indicated with a yellow lasso. In linearize mode the selection is linearized to only the X axis of the selection grid depending on which direction the lasso was created (top/bottom - left/right). **Hint:**\ The projection distortion of the camera of the 3D window may affect the position of the fixtures in the selection grid if the perspective selection is used. In order to prevent this, use a 2D camera in the 3D window.  New in this release The 3D window visualizes Iris now. The attributes Iris, IrisStrobe, IrisStrobeRandom, IrisPulseClose, and IrisPulseOpen are visualized.  New in this release The 3D window visualizes Strobe now. The attributes ShutterStrobe, ShutterStrobePulse, ShutterStrobePulseClose, ShutterStrobePulseOpen, ShutterStrobeRandom, ShutterStrobeRandom, ShutterStrobeRandomPulse, ShutterStrobeRandomPulseClose and ShutterStrobeRandomPulseOpen are visualized. *** ### []()PosiStageNet (PSN) [Section titled “PosiStageNet (PSN)”](#posistagenet-psn) PosiStageNet data is now received by grandMA3 stations. To open the PSN menu, go to Menu - In & Out - PSN.\ When a PSN source is available in the network, adding a new PSN System by tapping Insert new System is required.\ Depending on the type of transmitting the data, the user may have to make some settings first: In case of sending the PSN data to a multicast address, the user has to manually add the multicast IP of the PSN system. In most cases, this may be the IP 236.10.10.10.\ If the sender is transmitting the data via unicast to the selected interface in the PSN menu, the PSN system automatically detects the data. For each PSN system that is received, the user can map each axis to a different axis and/or invert the incoming data per axis. To do so, tap and hold the cell of an axis or of an invert option. In the case of mapping, a drop-down opens to choose the target axis. Invert just toggles the cell between No (=empty cell) and Yes (= data will be inverted). As soon as an axis is mapped or inverted, the individual trackers display their values according to the settings made by the user. **Hint:**\ At moment the PSN data is only received and displayed by the grandMA3 system. *** ### []()Color Picker [Section titled “Color Picker”](#color-picker)  Improved in this release Improved the color picker and the color engine underneath. The color picker now offers the possibility to be used in Constant Brightness Mode. Enable the Constant Brightness mode by tapping Constant Brightness in the title bar of the color picker. Default: “Off” If the constant brightness is disabled, the selected color is mixed with its maximum brightness, when the brightness fader is set to 100 %. In this case, the output intensity of the fixture is not kept constant, but changes with the color. If the constant brightness mode is enabled, the maximum overall brightness is limited to the brightness of the weakest emitter of the fixture. Changing the color in constant brightness mode does not change the output intensity of the fixture. **Hint:**\ If the constant brightness mode is enabled while the brightness fader is currently in a position above the constant brightness color mixing range, the fader indicator turns red and displays “>100%”.\ To ensure constant brightness color mixing, the fader needs to be moved to <= 100 %. **Hint:**\ The color mixing and the constant brightness mode works the better, the more precise the emitter data of the fixture type is. Tap RGB/HSB Space in the title bar of the color picker to switch the color space of the color picker. There are several options: * Fixture Type: the color space is defined by the emitters of the respective fixture type. - Plasa: Plasa Standard E1.54 for Color Communication in Entertainment Lighting. * Rec. 2020: ITU-R Recommendation BT.2020 for UHDTV - Rec 709: ITU-Recommendation BT.709 for HDTV Except for the Fixture Type color space, the gamut of the selected color space is displayed in the CIE color picker with a white line. Colors outside of the selected color space are displayed shaded in the HSB color picker. Color mixing in the Fader tab and the HSB Color Picker depends on the color coordinates of the RGB primaries of the selected color space. **Hint:**\ If a color is picked in the CIE Color picker that is outside of the gamut of the selected color space, the faders in the Fader tab will show values below 0% or above 100%. The CIE Color Picker now displays the black body curve. The black body curve describes the equivalent color temperature range of a white light source.  New in this release The color picker window now supports the encoder bar operation of its controls. To display the related encoder bar set the focus to the color picker window by tapping its title bar. *** ### []()Remote Device Management (RDM) [Section titled “Remote Device Management (RDM)”](#remote-device-management-rdm) Remote Device Management is a protocol that allows bi-directional communication between a grandMA3 device and RDM-ready devices attached to it (= RDM-ready fixtures) over a standard DMX line. ANSI E1.20 - 2010 by PLASA specifies the RDM standard as an extension of the DMX 512-A protocol (ANSI E1.11). Manual settings, such as adjusting the DMX starting address, are no longer needed. This is especially useful for devices installed in a remote area. RDM is integrated in DMX without influencing the connections. The RDM data is transmitted via the standard XLR-poles – new DMX cables are not required. RDM-ready and conventional DMX devices can be operated in one DMX line. The RDM protocol sends its own data packages in the DMX512 data feed and does not influence conventional devices. To be able to use RDM, RDM has to be enabled at two different spots: 1. Globally within the show file. To do so, tap RDM in Menu - Network Menu, or tap RDM in Menu - Live Patch - RDM. 2. Per XLR port that shall use RDM. Therefore, the mode of an XLR port in the Output Configuration needs to be set from Out to RDM. In RDM mode, DMX data is only sent when there are changes of DMX values. In addition, every 500ms a refreshing packet will be sent so that DMX fixtures will not switch into DMX fail mode.\ This RDM output mode allows more time on the DMX line for RDM configuration. The new RDM Devices window lists all devices that are discovered via RDM. It can be opened via the Add Window dialog and is located in the More-tab.\ The same list is also displayed in Menu - Live Patch - RDM. When an RDM fixture is detected on an XLR port, a new node called RDMPort will be added to the RDM devices list. Within each RDMPort node, all fixtures that are detected via RDM on this physical XLR port are listed. An RDM port is labeled with the IP of the device and the XLR port of the device, e.g., 192.168.0.4 - XLR D. If the device is not available anymore with the port, the font color turns red.\ For each different fixture type, detected per RDM, a new node in the RDMFixtureTypes node in the RDM Devices window will be created. Each RDMFixtureType contains general information of the RDM fixtures, that is similar to all fixtures of the same product, e.g., the parameter description, or the available DMX personalities. The grandMA3 creates RDMFixtureTypes by itself depending on these three parameters: ManufacturerID, DeviceModelID, and SoftwareID.\ As soon as the same physical type of lighting fixtures have different software IDs due to different firmware versions, different RDMFixtureTypes are created. This first implementation of RDM supports these RDM parameters, which can be set by the user: * IDENTIFY\_DEVICE, 0x1000 * DEVICE\_LABEL, 0x0082 * DMX\_PERSONALITY, 0x00E0 * DMX\_START\_ADDRESS, 0x00F0 * PAN\_INVERT, 0x0600 * TILT\_INVERT, 0x0601 * DEVICE\_LABEL 0x0082 * DISPLAY\_INVERT 0x0500 * DISPLAY\_LEVEL 0x0501 * RESET\_DEVICE 0x1001 * FACTORY\_DEFAULTS 0x0090 * LAMP\_STATE 0x0403 Only the cells of properties that an RDM fixture provides as set-able can be edited in the RDM devices window. In grandMA3 the RDM communication follows this process: 1. Discovery for new RDM fixtures. 1. Check if detected fixtures are still available. 2. Check for new RDM fixtures. 2. Get parameter and sensor data. 3. 1s Pause 4. Start again at 1. Parameters that are not changing during the runtime of a fixture, e.g., Device Info, are only pulled via RDM once when creating the corresponding RDMFixtureType. All other parameters and sensors are pulled every time in step 2.\ As soon as an RDM fixture is not available for 3 discoveries in a row, it will be displayed in red in the list of RDM fixtures. It is possible to match an RDM fixture with a fixture of the grandMA3 patch. To do so, edit the fixture cell of the desired RDM fixture in the RDM devices window. A pop-up opens and offers all fixtures of the current show file.\ In addition, it is also possible to match fixtures within the RDM window in the live patch. In the live patch, it is possible to open the fixture list in the same way as described above, and by selecting any cell of a fixture then tapping Match at the bottom of the window.\ To remove a match between an RDM fixture and a grandMA3 fixture, it is possible to tap Unmatch in the RDM window in the live patch or to tap Clear in the match pop-up. *** ### []()Remote Human Interface Device Control (Remote HID) [Section titled “Remote Human Interface Device Control (Remote HID)”](#remote-human-interface-device-control-remote-hid)  New in this release The Remote HID feature allows controlling of other grandMA3 stations that are available in the network via a locally connected mouse and/or keyboard.\ A use case for this feature is controlling of onPC stations that are used for visualization right at a console. Instead of placing several mice and keyboards on the table, only one set of mouse and/or keyboard is needed. To control another station from your local console, follow these steps: 1. Enable RemoteHID in Menu - Network Menu on the station you want to control. 2. Execute the RemoteHID command on your local station: To connect to the station with the IP 192.168.0.4, type: User name\[Fixture]> RemoteHID IP 192.168.0.4 To connect to the onPC station that has the name “3D”, type: User name\[Fixture]> RemoteHID onPC “3D” 3. When the connection has been established, the screen of the local station changes to olive green. During the connection, only the executors including the 100mm faders and Go+\[Large], Go-\[Large], and Pause\[Large] remain usable on the local station. All other elements are blocked. 4. Do the remote control settings, you need to do. E.g.; Change settings in the 3D window. 5. To end the remote control connection, use one of the following options: 1. Press MA + MA + Off 2. Use the shortcut Shift + Ctrl + Alt + E **Important:**\ grandMA3 onPC on Windows controlled via RemoteHID, is not only limited to control the grandMA3 onPC application. Furthermore, the mouse and keyboard can also access remotely the entire system. **Restriction:**\ RemoteHID can only be used on grandMA3 consoles and grandMA3 onPC on Windows. **Restriction:**\ At the moment, it is not possible to use the touch displays of grandMA3 consoles to control the mouse remotely. *** ### []()Copy [Section titled “Copy”](#copy) ### []()Copy of Cues [Section titled “Copy of Cues”](#copy-of-cues)  Improved in this release Copying of cues has been improved. The new options in the copy cue pop-up allow various combinations: * Copy Src(Copy Source): * Content: Copies only the values stored in the source cue. * Status: Copies the status of the source cue. Status includes the values stored in the cue and all tracked values from former cues. * Look: Copies all values of attributes for fixtures where the dimmer is open in the source cue, no matter if the open dimmer value is set in this cue, or if it tracks into the source cue. All other fixtures used in the source sequence will get only their dimmer copied at 0. * Cue Only: * When this checkbox is on, the copied cues will be inserted at the destination with activated cue only. Read more about cue only in the [Store Cues topic](/grandma3/2-3/cue_store/). * Release: * Defines if Release values will be set when using cue only, or when overwriting with Overwrite (Status). When Release is off, the default values will be set instead of using Release values. Attributes that were before introduced with individual values will get their former values back when using cue only. Release and Default values will only be set in the copied cue when an attribute is not used in the copied cue but is used in the destination sequence already.\ When a copied attribute is not part of the destination sequence, Release values or default values will be set for the attributes in the following cue, when cue only is activated. The action buttons behave like this: * Merge: Merges the data of the source to the destination. Existing data in the destination will be kept as long as both, the source and destination do not have data of the same attribute. If existing data in the destination is also part of the source, the data from the source wins and overwrites the destination. * Overwrite (Status): Overwrites the tracking status (and therefore also the content) of the destination with the data of the source. In this case, the option Release ( described above) is important. Fixtures that track into the destination will be set to Release values or default values, depending on the state of the Release checkbox. * Overwrite (Content): Overwrites only the content (stored values) of the destination with the values of the source. When the destination cue does not exist, the copy cue pop-up will display only these action buttons: * Copy: Copies the source to the destination. Prior cues at the destination will track into the destination cues. * Copy (Status): Copies the source to the destination and sets tracking data from prior cues to Release values or default values, depending on the state of the Release checkbox. In addition, there are some new command line options in order to achieve the copy actions that can be done via the copy cue pop-up. The basic command is always a copy cue command: User name \[Fixture]> Copy Cue 1 At Cue 11 The following command options can be added to this basic command: * /CopyCueSrc ( /CCS): Defines how the source cue is taken for copy. Read more above. * Content * Status * Look * /CopyCueDst ( /CCD): Defines how the data is handled at the destination * Merge: Merges the data to the destination. Makes the most sense in combination with the overall merge action (see /Merge). * OverwriteRelease: Sets the data that is part of the destination, but not of the source to Release values in the destination. Makes the most sense in combination with the overall overwrite action (see /Overwrite). * OverwriteDefault: Sets the data that is part of the destination, but not of the source to default values in the destination. Makes the most sense in combination with the overall overwrite action (see /Overwrite). * /CueOnly ( /CO): Defines if the copy action should be executed with cue only. * /Release ( /Rel): Defines if Release values should be set in the following cue of the destination for attributes that will be introduced by the source. * /Default ( /D): Defines if default values should be set in the following cue of the destination for attributes that will be introduced by the source. * /Overwrite ( /O): Overwrites the existing cue data at the destination. The option /CopyCueDst should be used in addition to define how to overwrite the data at the destination. * /Merge ( /M): Merges the data from the source to the destination. * /NoConfirm ( /NC): Surpresses the copy cue pop-up. If this option is not set, the copy cue pop-up opens and the user can still manually change the settings. ### []()Copy of Ranges [Section titled “Copy of Ranges”](#copy-of-ranges)  Improved in this release The copying object ranges can be divided into different parts: Cues and all other objects (e.g., Macros, Presets, Groups, and many more). When copying ranges of cues these rules apply: * When a natural order of cues is selected by using Thru, the console attempts to maintain all gaps from the source range at the destination. Example: *Precondition: Cues 1, 2, and 4 exist.* User name\[Fixture]> Copy Cue 1 Thru 4 At Cue 11 *Result: New cues 11, 12, and 14.* * If a cue exists already in the range of the destination spot (even if it would fit into a gap), the console suppresses the range at the destination, so that the original order of cues is uninterrupted. The console tries to set whole cue numbers. If this is not possible it appends dotted cue numbers. The console tries to use as less as possible decimals (1 -> .1 -> .01 -> .001). Examples: *Precondition: Cues 1, 2, 4, and 12 exist.* User name\[Fixture]> Copy Cue 1 Thru 4 At Cue 11 *Result: New cues 11, 11.1, and 11.3. The gap between cue 2 and 4 is maintained, but shifted, as the start of the destination is 11 and not 11.1.* *Precondition: Cues 1, 2, 4, and 11.1 exist.* User name\[Fixture]> Copy Cue 1 Thru 4 At Cue 11 *Result: New cues 11, 11.01, and 11.03. The gap between cue 2 and 4 is maintained, but shifted, as the start of the destination is 11 and not 11.1.* * When the source range of cues is selected in a reversed order by using Thru, the console ignores the gaps from the source range when creating the destination range. The same rule for the resulting cue numbers at the destination from above applies here as well. Example: *Precondition: Cues 1, 2, and 4 exist.* User name\[Fixture]> Copy Cue 4 Thru 1 At Cue 11 *Result:\ The content, status, or look of cue 4 is copied to cue 11.\ The content, status, or look of cue 2 is copied to cue 12.\ The content, status, or look of cue 1 is copied to cue 13.* * In case of defining the source range by using +, the arising gaps between the single cues can be maintained if the cues are selected in ascending order. If the order is reversed or mixed, then the gaps are suppressed. The same rule for the resulting cue numbers at the destination from above applies here as well. Examples: *Precondition: Cues 1, 2, and 4 exist.* User name\[Fixture]> Copy Cue 1 + 4 At Cue 11 *Result: New cues 11, and 14.* *Precondition: Cues 1, 2, and 4 exist.* User name\[Fixture]> Copy Cue 2 + 1 + 4 At Cue 11 *Result: New cues 11, 12, and 13.* * When the source list is generated by using a combination of Thur and +, the above rules apply. The Thru-part of the source list uses the rules of Thru, while the +-part uses the +-rules. When copying other objects, these rules apply: * When a natural order of objects is selected by using Thru, the console attempts to maintain all gaps from the source range at the destination. Example: *Precondition: Groups 1, 2, and 4 exist.* User name\[Fixture]> Copy Group 1 Thru 4 At Group 11 *Result: New groups 11, 12, and 14.* * In case of already existing objects at the destination spot would fit into gaps of the source list, the existing objects will be kept. In case of objects at the destination spot would collide with objects of the source list, the console asks the user how to proceed (Overwrite, Merge, or Cancel). Examples: *Precondition: Groups 1, 2, 4, and 13 exist.* User name\[Fixture]> Copy Group 1 Thru 4 At Group 11 *Result: New groups 11, 12, and 14. The already existing group 13 stays untouched.* *Precondition: Groups 1, 2, 4, and 12 exist.* User name\[Fixture]> Copy Group 1 Thru 4 At Group 11 *Result: New groups 11, and 14. For group 12, the console asks the user how to proceed.* * When the source list of objects is created by using Thru, but in a reversed order, the console ignores the gaps. *Precondition: Groups 1, 2, and 4 exist.* User name\[Fixture]> Copy Group 4 Thru 1 At Group 11 *Result:\ Group 4 is copied to group 11.\ Group 2 is copied to group 12.\ Group 1 is copied to group 13.* * When the source list of objects is created by using +, the console ignores the gaps. *Precondition: Groups 1, 2, and 4 exist.* User name\[Fixture]> Copy Group 1 + 2 + 4 At Group 11 *Result: New groups 11, 12, and 13.* * When the source list is generated by using a combination of Thru and +, the above rules apply. The Thru-part of the source list uses the Thru-rules, while the +-part uses the +-rules. ### []()Copy Pop-Up [Section titled “Copy Pop-Up”](#copy-pop-up)  Improved in this release The copy pop-up displays now the source objects and destination objects in the title bar.\ As soon as there is more than one source or destination specified in the copy command, only the first source or destination object will be displayed, followed by three dots (…) as an indicator. The general scheme is: Copy ID ‘Name’ At ID ‘Name’, e.g., Copy 1 ‘Intro’ At 11 ‘Outro’\ The resulting string can be different when an object has no user-given name. In this case, the system generated name contains the object ID, and therefore, the ID is then discarded: Copy Cue 1 At 11 ‘Outro’. *** ### []()Sequence and Sequence Sheet [Section titled “Sequence and Sequence Sheet”](#sequence-and-sequence-sheet)  Improved in this release The release behavior of sequences has been improved. From now on the first cue of a sequence will not be set to release mode anymore automatically. Instead of this, the new sequence setting Release First Cue determines if the tracking from the last to the first cue is released or not, when using wrap around. When Release First Cue is enabled, and the first cue in a sequence does not have the cue property Release set to Yes, then a gray \ will be displayed for this cue in the Release cell.\ Release First Cue is enabled by default in all sequences. This includes new sequences and also sequences in shows of older software versions.  Improved in this release The sequence sheet got several improvements to enhance the user experience: It is not possible to sort the sequence sheet anymore, as the order of cues is determined by the cue IDs. The sequence sheet received the Merge Cells option and displays now in track sheet mode the same values of the same feature as one value. Read more about [Merge cells](/grandma3/2-3/wvm_settings/).\ Tracked dimmer values of 0% are now displayed by a dot (.), instead of displaying a tracked 0. This improves the readability of the tracking sheet.\ Cue parts display now always values, also when the values are only tracked values, and a new value would be set in the same cue, but in a later part. The value LinkLastGo is now part of the LinkType-option. When a sequence sheet is set to LinkLastGo, the sequence that was go-ed as last will be displayed by the sequence sheet.\ Executing one of these playback commands for a sequence will trigger LinkLastGo: * <<< * \>>> * Go+, Go- * Goto, Load * On * Select * Top * Temp, Flash * Toggle On * Pause In addition, automatic cue triggers from timecode shows and cue commands trigger LinkLastGo as well. Follow and Time cue triggers are excluded from LinkLastGo.\ Sequences have a new option called Include Link Last Go. It is on by default. When it is set to off, playing back a sequence with the commands listed above will not trigger the LinkLastGo functionality.\ LinkLastGo displays only the sequence that is executed by the same user profile. Custom IDs are now displayed with their corresponding ID type when the sequence sheet is in track sheet mode. Therefore, the cell with the fixture ID is split horizontally. The top row displays the ID type, while the bottom row displays the IDs (Fixture ID = FID; Custom ID = CID): FID:CID or CID. In case of having only a fixture ID for a fixture, the cell is not split. When loading a cue, the sequence sheet jumps now to the loaded cue. The sequence sheet in track sheet mode has now more values for the Preset readout option in the context menu: * ID: Displays only the ID of a preset. * ID+Name: Displays the ID and the name of a preset. * ID+Name+Value: Displays the ID, name and the value of a preset. * Name: Displays only the name of a preset. In former versions, this value was called “Preset”. * Name+Value: Displays the name and the value of a preset. In former versions, this value was called “Both”. * Value: Displays only the value of the preset. The sequence sheet displays running timings now also on the name column. The running timings in the name cell and duration cell are set to blue progress bars by default.\ All cells that have a timing display now also a progress bar as soon as this time is running. Fade times are having a green progress bar, delay times and trigger times are having orange progress bars. All colors can be adjusted in the color theme in the UI color section SequenceGrid. Countdown timing was added to the sequence sheet. Countdown can be set per sequence sheet in the context menu. When countdown timing is enabled, running cue timings will display the remaining time. The times are displayed as whole numbers without fractions of a second or frames. It has these options: * Off: During the transition into a cue, all cells with timings still display the set times. * Duration: During the transition into a cue, the duration cell of the cue displays the remaining time of the transition with a countdown analog to the progress bar. * All: All cells with a running time display the remaining time with a countdown. *** ### []()Timecode and Timecode Editor [Section titled “Timecode and Timecode Editor”](#timecode-and-timecode-editor)  Improved in this release Timecode shows got a bunch of improvements: Markers in timecode shows are now always part of the track group. It is not possible anymore to define a dedicated track as a marker track.\ The default length of a marker is now 1 frame when adding markers without specifying a length. Adding markers with the quick add time marker tool (+M), are also 1 frame long.\ In the timecode editor context menu, a new option allows to displays the markers of the track group in a lighter version within each track of the track group: Marker in tracks. When it is off, the markers are only displayed in the track group. The appearance of timecode events has changed:\ An event is now displayed by a diamond with a vertical line. The vertical line / the center of the diamond is placed at the frame of the event.\ In addition, the action of the event is displayed above the diamond.\ Cue number and cue name are displayed below the diamond.\ All four elements (diamond, symbol, cue number, and cue name) can be displayed separately or hidden, by enabling or disabling the corresponding options in the display section of the timecode editor context menu. A Timecode section has been added to the Preferences and Timing menu. These settings are used when creating a new timecode show. New timecode setting Record Go defines how go events are recorded into timecode shows: “as Go” records usual Go+ as action for events, while “as Goto (Status)” records Goto+ as action. By default “as Go” will also record a destination cue. That ensures that the correct cue will also be played back correctly when playing back the timecode show. It is possible to delete the destination from a Go+ event. In this case, a normal Go+ would be executed, which would then go to the next cue. The new timecode setting Assert Previous Events makes sure that all previous events will be asserted when jumping to a position somewhere in the timecode show, when it is set to Yes. The previous events will be asserted in backward order starting at the current position the play head in the timecode show. Timecode Slots are not recorded anymore automatically into timecode shows. They have to be set manually as a target to a track in order to be able to set events for timecode slots. The Selection Target (Select. target) type can now be defined in the title bar of the timecode editor. It is now possible to define per timecode event, if cue commands shall be executed within this event, or not. Therefore the column Execute Cmd has been added. When it is set to No for an event, the cue command is not executed.  Improved in this release In addition, several improvements were made to the timecode editor: When adding an event into a time range, the select mode will automatically change to time range.\ When using the add event tool in order to add a time range into a track group, the select mode will automatically change to time range.\ Adding events or time ranges via the toolbar in the timecode editor, changes now also the selection mode in the tool bar to event or time ranges. New buttons to jump to markers were added to the timecode navigation bar at the bottom of the timecode editor: M<< and M>> jump directly to the beginning of the next marker in the chosen direction.\ The default color of new markers is white. When the timecode editor is in playback mode, the record button disappears now from the timecode navigation bar at the bottom. When tapping Zoom to Fit, the timecode editor zooms now to a scaling where all recorded events can be seen. In addition, 1s before the first event and 1s after the last event will also be displayed. Collapsed track groups display a smaller summary of all tracks in the track group. The image color of the assigned appearance is now used to color the track when no background color is defined in the appearance. When adding a marker to a track group, a pop-up asks now to enter a name for the marker. In addition, it is possible to select an appearance in the label pop-up. It is now possible to select track groups. To do so, press Select and tap the desired track group in the timecode window. Or execute Select Timecode x.y where x is the ID of the timecode pool object and y is the ID of the track group. When adding markers or new tracks to the timecode show, they will be added to the selected track group. The elements in the context menu of the timecode editor and the settings menu of timecode shows are rearranged. The arrangement of the encoders in the timecode editor encoder bar changed: * Dual encoder 1 outer ring: Marker * Dual encoder 1 inner ring: Cursor * Dual encoder 2 outer ring: TimeRange * Dual encoder 2 inner ring: Track * Dual encoder 3: Event * Dual encoder 4 outer ring: Duration * Dual encoder 4 inner ring: Time The marker encoder in the timecode encoder bar displays now also the track group the marker belongs to.\ Pressing the track encoder in the timecode editor encoder bar opens now a track selection pop-up.\ Pressing the inner encoder of the event encoder opens the token selection pop-up, while pressing the key for the outer encoder of the event encoder allows to select events of the current track.\ The encoders for cursor, time, and duration open now an input calculator when the encoder or its corresponding key is pressed.\ Pressing the keys of the time range encoder and marker encoder opens a drop-down for a direct selection of a time range or marker. When selecting an event in the text mode, it will also be selected in the timeline and vice versa.\ New text mode “Markers” when the editor is in text mode or both mode: Markers will only display the markers.\ Text mode is sorted by time per default.\ The text mode has now a column in order to display the track group of each event.\ The text view does not display the No (number) column anymore.\ Switching the View Mode to Text, the text area is now scaled as big as possible.\ Events and markers display the track appearance or the appearance of the track group in the track cell in the text area of the view modes Text and Both. The command line has now priority above the selected tool in the timecode editor. For example, the add tool is selected and the command line has Label as input. Tapping a time range will label the time range instead of adding a new one to the track group. The option Last Event in the timecode editor works now also in record mode. *** ## []()Other Enhancements [Section titled “Other Enhancements”](#other-enhancements-1)  Network The Network Menu features 2 separate columns called “Version Big” and “Version Small”. Nodes only have to match up with the “Version Small” number for compatibility. The versions of consoles and processing units have to match the “Version Big”. The dropdown for selecting the interface used for MA-Net in the network menu has now also an Auto value. When the MA-Net interface is set to Auto, the grandMA3 software determines the interface to use by itself. In this case, the IP of the selected interface is set into angle brackets on the MA-Net Interface button, e.g., <192.168.0.4>. The automatically determined interface in Auto mode is specified by the order of the following rules: 1. When a Class C IP address (192.168.x.y) is found, the interface if this IP will be taken. No matter of the link state of this interface. (At onPC on Mac the interface link state must be active.) 2. When no Class C IP is found, the software searches for a Class B IP (172.16.x.y). Only if the interface has an active link state. 3. If also no Class B IP address is available, a Class A IP in the range of 10 (10.x.y.z) will be searched. Only if the interface has an active link state. 4. If this also fails, a Class A IP in the range of 2 (2.x.y.z) will be searched. Only if the interface has an active link state. 5. If no Class A IP is available, the loopback interface will be used. The user can still always change the selected interface from Auto to his preferred interface. On grandMA3 consoles, Processing Units, and xPort Nodes, the first interface will still be selected as the default interface after a Full Install.\ Per default grandMA3 onPC on Windows and macOS will be set to Auto.  Web remote * The web remote menu displays now for every connection the requested resolution. * New show files will have an additional user called “Remote” and has its own ScreenConfig “Remote” assigned. This allows independent use of the web remote compared with the console. * When connecting to a grandMA3 station via web remote, the Remote user will be logged in automatically. * Command-line linking allows the user to see the input into the command line of a station on all other stations that are logged in with users that use the same user profile. Command line linking can be activated on the device that is logged in via web remote. Right of the command line, a button with a chain-link symbol is located. When command line linking is enabled, the background of the linked command lines turns slightly yellow.  When a show was saved a small temporary overlay will be displayed for 1s by default at the bottom of all displays. By default the overlay is green. The color can be changed within the color theme: UI color definition Display.SaveShow.\ It is possible to enable or disable the overlay for each display separately. To do so, open the display configuration and tap Show Feedback. This needs to be done for each display on its own.  Timecode Slots have now additional colors for off (gray), running with an external source (green), and running via generator (orange). All colors can be changed individual per timecode slot.  Dropdowns that display appearances or presets, display now a small thumbnail with the appearance or the preset display information (e.g., dimmer intensity, color, gobo, etc.). This can be observed for example in the assign menu of executors that have sequences assigned.  Update menu The update menu has now a button called Sequence Mode with these values: * All: All sequences are displayed. * Selected: Offers only the selected sequence to update. * Last Called: Offers only the last called sequence to update. The Cue Filter property interacts with the Update Mode. The update menu offers now only cue parts to update, and not the cue and its cue parts. In addition, the columns in the sequence area were reworked. Now only the labels and IDs of the sequence, cue, and cue part are displayed.  Delete with Cue Only option works now.  Backup menu When saving a show with a new name, a pop-up asks now the user if he wants to change the name. In addition, a pop-up warns also the user if a show with the same name also exists when tapping Save Show As. The default tab in the backup menu is now the Save-tab. The “.show” file extension of show files is now suppressed in the input field in the backup menu.  The commands SelFix and Off work now also in combination with programmer parts.  Network menu and Update menu The network menu and the update menu display now the following states of stations within the list of network devices: * IP address of other IP address range: Red font color of the IP. * Invite disabled: Orange font color of the station name. * Station is in update mode: Yellow font color of the status. * Different software version: Orange font color of the version numbers.  The on-screen keyboard is now equipped with buttons to navigate through the displayed text.  Layout View: * MAtricks can be assigned to a layout. * The default token for newly assigned objects to a layout is selfix. * The Layout window displays the cue number and cue name of assigned sequences.  The Preset editor can be moved to different screens by tapping the edit display preference button in the upper right corner.  Improved the presentation of colors that are outside of the sRGB color space in the 3D window. *** ## []()What’s Changed [Section titled “What’s Changed”](#whats-changed) * The custom/master section window allows now a minimum width of one square. This is handy when it should only display the page section. * The launcher on macOS displays the different versions now by increasing version numbers. * Backup menu: The name of the autosave time has been changed from Timeout to Interval. * Release and Assert are now set in CueZero instead of Cue 1 in new sequences. * Analog Remotes are renamed to DC Remotes. * The DC Remote input Signals are now assignable via their absolute number (1-64). The Slot/Signal (1-8/1-8) system is replaced. For example, Slot 5/Signal 1 is now Signal 33. * Stomp on a running phaser stopped the phaser and knocked the current values into the programmer. This behavior changed: Stomp on a running phaser now knocks the attribute values of step 1 into the programmer and discards all other steps. * Midi is now always renamed to MIDI. * The sorting mechanism in the fixture sheet sorts now in this order: * By Fixture ID * By ID Type * By Custom ID within each ID Type * The possible range of phase has been extended. Now it is possible to set phases between -720° and +720°. * When Art-Net configuration lines are set to Auto mode, and no Art-Net receiver subscribed for Art-Net universes, Art-Net of this configuration line is now sent as Broadcast. As soon as a subscriber is available, the existing rules for Auto are applied: Until the number of subscribers does not exceed the broadcast threshold, Art-Net will be sent as Unicast. * Keyboard Shortcuts are not automatically disabled anymore when opening a pop-up with a calculator. * Coordinates of stage elements now display only 3 digits. * The setting MIBDynamic is changed to MIBMultiStep * The arrangement of the buttons common tab, pools tab, and more tab in the add window dialog was changed. * The Network menu and the Software update menu is sorted by IP address by default. * The last logged user name is remembered. If a new show is created and the user is not available, the user Admin will be used. * The hardkey shortcut MA + . is entered in the command line instead of executed immediately. * The At button in the Control Bar displays now an additional filter symbol instead of Yes or No. When a different filter than filter 1 is selected, the icon and the At will turn yellow. *** ## []()Fixed Bugs [Section titled “Fixed Bugs”](#fixed-bugs-1) ### 3D [Section titled “3D”](#3d-1) | Description | | ----------------------------------------------------------------------------------------------------------------------------------------------------------------------------------------------------------------------------------------------------------------------------------------------------------- | | The projection of a gobo in the 3D window that was pointing into the camera was displayed in the opposite direction of the stage bounding box in some cases. This bug is fixed. If a beam containing a gobo is pointing into the camera, there is no projection shown on the backside of the bounding box. | | The color of several single color emitters on the same level of the geometrical tree was not treated as a single color but as a combined color mixing system. This bug is fixed. Single additive colors of different geometries on the same level are not mixed together any longer. | | Wrong values were visualized at the lower and upper end of a channel function if the DMX channel had a resolution of 16 bits. This bug is fixed. DMX channels with a 16-bit resolution bit are now visualized correctly at the whole range of its channel functions. | | The lasso of the selection was not restricted to the borders of the 3D window. This bug is fixed. Lasso selection now respects the borders of the 3D window. | ### Command Line and Macro [Section titled “Command Line and Macro”](#command-line-and-macro-1) | Description | | --------------------------------------------------------------------------------------------------------------------------------------------------------------------------------------------------------------------------------------------------------------------------------------------------------------------------------------------------------------------------- | | Macros that opened multiple text input pop-ups within one macro line, rearranged the input values to wrong positions. This bug is fixed. Commands executed by macros should not rearrange the syntax anymore. | | The LUA HTTP library included other libraries wrong. This bug is fixed. The LUA HTTP library is now included properly. | | It was not possible to store a show that was named “show”. This bug is fixed. | | Switching off the recording of a timecode show recorded off events for all recorded playbacks. This bug is fixed. Switching off the record mode of a timecode show does not add off events anymore to the timecode tracks. | | Updating values from presets with individual timings in a cue remained in the preset link even if the new preset had no individual timings. This bug is fixed. Updating values in a cue where the original preset contained individual timings transform the individual timings into hard timing values when the new preset has no individual timings. | | Changing the time of a timecode event using the time encoder could not be oopsed by executing Oops once. Each encoder click was one event for oops. This bug is fixed. Turning the time encoder of a timecode event can now be oopsed at once by executing oops one time. | | It was not possible to manually set a fader value above 59% in a timecode show. This bug is fixed. Editing the fader value of a timecode show event allows now input up to 100%. | | When re-recording a timecode show and an executor fader movement was recorded again, the resulting fader graph was a mix of the old and the new fader movement. This bug is fixed. Recording the fader movement again in a timecode show overwrites the old fader movement now completely. | | Auto Start and Auto Stop in timecode shows did not work independently. This bug is fixed. Auto Stop works now also, even when Auto Start is disabled. | | Padding Top and Padding Bottom in layout elements were interchanged. This bug is fixed. Padding Top affects now the top padding and Padding Bottom affects the padding at the bottom of a layout element. | | The console crashed when Exchange was executed with lasso selections in the sequence sheet. This bug is fixed. Exchange with lasso selections in the sequence sheet does not crash the console anymore. | | When copying a timecode show the action was reset to Go+ and the destination was deleted. This bug is fixed. Copying a timecode show copies it now 1:1. | | It was not possible to alter the values of an attribute by turning the encoder, when the user dialed the encoder before to the upper limit of the current channel function and selected then a different channel function for the encoder. This bug is fixed. Turning an encoder should now always alter the values of the attribute of the selected fixtures. | | Copying a cue range did not respect gaps in the cue numbers or cue numbers with points. This bug is fixed. Gaps in the cue numbers or cue numbers with points are now respected when copying a cue range. | | A provided cue part number was not respected when copying cues. This bug is fixed. Cue part numbers are obeyed when copying cues. | | Editing a color in the color theme editor did not automatically disable the keyboard shortcuts. This bug is fixed. Keyboard shortcuts are now disabled when editing colors in the color theme editor. | | The system monitor in grandMA3 onPC on macOS displayed from time to time the error message “kevent failed with Operation now in progress(36)”. This bug is fixed. All errors with kevent should be fixed now. | | The commands Blind On and Blind Off did not change the state of the blind mode accordingly. This bug is fixed. Blind On and Blind Off work now again as expected. | | The predefined macro “Circular Copy X Plus” referenced not to itself in a macro line. This bug is fixed. The predefined macro “Circular Copy X Plus” should work now as expected. | | Pressing Page + or Page - several times while having already a part of a command inside the command line, e.g., Copy Page 1.201, removed with the second press and every additional press one character from the existing command. This bug is fixed. Changing pages while having already a command in the command line does not delete characters of this command anymore. | | The commands Off and On did not interact properly with the encoder bar attributes and layers. This bug is fixed. Off an On do interact with the encoder bar attribute and layers. | | Next X in an only in Y axis oriented selection in the Selection Grid did not work as expected. This bug is fixed. Next X in an only Y axis oriented Selection performs a selection clear and applies next X. | | Adding a Timecode marker on top of another marker changed the first marker duration to 0. This bug is fixed. Adding a Timecode marker on top of another marker is not possible anymore. | | The command On and Off did not allow defined switching of Highlight, Lowlight, Solo and Blind. This bug is fixed. Defined switching for Highlight, Lowlight, Solo and Blind works as expected. | | Copy and paste of a Time range in a Timecode show did not work as expected. This bug is fixed. Copy and Paste of a Time range works as expected. | | Executor knob events were not recorded within a Timecode show. This bug is fixed. Executor knob events are recorded in a Timecode show. | | The grand master knob function encoderclick was not assignable with e.g. black. This bug is fixed. The grand master knob function encoderclick can be assigned. | | When shortcuts were enabled, the label function was not working with the onscreen keyboard. This bug is fixed. When shortcuts are enabled, the label function is working with the onscreen keyboard. | | The command label selection did not work as expected. This bug is fixed. Label Selection is working correct. | | While recording a timecode show and moving a fader slowly, an event at the start of the movement was not recorded. This bug is fixed. Fader movements during timecode recordings are now recorded properly. | | Appearances could not be assigned to groups that contain only one fixture. This bug is fixed. Appearances can now be assigned to single fixture groups. | | When setting options to commands and a pop-up was then spawned by the command, the options were not displayed anymore in the pop-up. This bug is fixed. Pop-ups of commands (e.g., Store pop-up) display always all options, also when they are already set by the command line. | | Editing fade or delay cells in the sequence sheet in tracking sheet mode corrupted the timings. This bug is fixed. Editing timings in the tracking sheet applies now the timings the user inputs. | | Assigning a filter to a preset pool did not work by pressing Assign, then tapping the filter in the filter pool and tapping the preset pool. This bug is fixed now. Filters can now be easily assigned to pools. | | When keyboard shortcuts were enabled, pressing one Shift key was interpreted as pressing both MA keys. This bug is fixed. The Shift keys are now handled separately when having keyboard shortcuts enabled. | | SelFix assigned to executor buttons did not work for groups assigned to the executor. This bug is fixed. SelFix on executors for groups assigned to the executor selects now the fixtures of the group. | ### Connections [Section titled “Connections”](#connections-1) | Description | | ------------------------------------------------------------------------------------------------------------------------------------------------------------------------------------------------------------------------------- | | The delay of Art-Net and sACN configurations were set to 0.1000000015 ms. This bug is fixed. The default delay is set to 0.1 ms. | | Sending and receiving OSC was only possible on port 8000. This bug is fixed. OSC can now be sent and received on all ports. | | The input of DC remotes was not streamed within the session. The data was only processed locally. This bug is fixed. DC remote input is now transmitted within the session. The data is processed at the global master station. | | The console could crash when moving the master fader of a group via OSC. This bug is fixed. The console should not crash anymore when moving a fader via OSC. | | When a web remote device requested a resolution of 0x0 pixels, the console could crash. This bug is fixed. The console should not crash anymore when a web remote device requests an invalid resolution. | ### Patch [Section titled “Patch”](#patch-1) | Description | | -------------------------------------------------------------------------------------------------------------------------------------------------------------------------------------------------------------------- | | The MIB fade calculator for attributes had a wrong range of the maximum allowed time. This bug is fixed. The MIB fade calculator allows now up to 14D of fade time. | | The console could crash when exchanging the fixture type of a fixture with a dimmer fixture type. This bug is fixed. The console should not crash anymore when exchanging the fixture type of a fixture. | | Importing an MVR file with a huge amount of scene objects could cause the grandMA3 application to freeze. This bug is fixed. | | The Layer and Class information was not kept when performing a cut/paste operation in the patch. This bug is fixed. The Layer and Class information is kept when performing cut/paste inside the patch. | | Leaving the Live Patch asked for a confirmation. This bug is fixed. Leaving the Live patch does not ask for confirmation anymore. | | After the import of a GDTF file, the stage in the patch was set to “All Stages”. This bug is fixed. The import of a GDTF file does not change the stage. | | The DMX Change Time Limit calculator for attributes rounded the input time in a wrong way. This bug is fixed. The DMX Change Time Limit calculator applies now the time the user inputs without rounding errors. | | Individual timings were discarded from cues, when adding new fixtures to the patch or replacing fixture types. This bug is fixed. Individual timings should not get deleted anymore when doing changes in the patch. | ### Playback [Section titled “Playback”](#playback-1) | Description | | ---------------------------------------------------------------------------------------------------------------------------------------------------------------------------------------------------------------------------------------------------------------------------- | | The fixture sheet and encoders displayed the wrong tracking colors when going back in the sequence. This bug is fixed. The tracking state should now always be in sync between the sequence sheet, fixture sheet, and encoders. | | When adjusting the master of an empty group, the output of all fixtures was adjusted. This bug is fixed. Empty group masters do not influence the output of any fixture anymore. | | Timed fades between 2 cues or sequences did not fade to the correct values when the master fader was pulled down. This bug is fixed. Fades between cues respect now the position of the master fader. | | Go+ reasserted the tracking state of a playback, even when the programmer had a different value active for the same attributes. This bug is fixed. Programmer values of attributes are not overwritten by playbacks when the cue has only tracked values for the attributes. | | Setting Release to off in the first cue released nevertheless the values when going from the last cue to the first cue with wrap around. This bug is fixed. Wrap around works now also with release set to off in the first cue. | | Fast backward (<<<), fast forward (>>>), and goback (Go-) triggered the next cue, when it was a timed cue (Follow or Trigger Time). This bug is fixed. Timed cues are not triggered anymore when going to a cue with <<<, >>>, or Go-. | | <<< in the sequence sheet encoder bar executed always a Go- instead of <<<. This bug is fixed. All playback buttons in the sequence sheet encoder bar execute now the actions of their labels. | | Updating a sequence asserted the sequence completely. This bug is fixed. Stolen attributes of other playbacks are not asserted anymore when updating a sequence. | | When activating highlight while being in blind mode with the programmer, the highlight values ignored the blind mode and were output. This bug is fixed. Highlight values are not output anymore while being in blind mode. | ### Windows [Section titled “Windows”](#windows-1) | Description | | -------------------------------------------------------------------------------------------------------------------------------------------------------------------------------------------------------------------------------------------------------------------------------------------------------------------------------------------------------------------------- | | The German on screen keyboard had / and ? twice. This bug is fixed. - and \_ are now available on the German on screen keyboard. The German onscreen keyboard Alt did not work properly. This bug is fixed. The German Alt key at the on screen keyboard is working now. | | The timecode editor window offered the possibility to select a different timecode pool object. This bug is fixed. The timecode editor is now limited to the edited timecode pool object. The timecode window still allows to select and display a different timecode pool object. | | The color theme editor had two Delete buttons. This bug is fixed. The second delete button is now labeled as Delete Color Theme. | | The window title of the In & Out menu was wrong. This bug is fixed. The In & Out menu title is now In & Out. | | When delay times were coming from presets, the sequence sheet in track sheet mode did not display the link, but only the hard values. This bug is fixed. All values, coming from a preset display now the preset link in the tracking sheet. | | The sequence sheet did not store the scroll position into a view. This bug is fixed. The scroll position of the sequence sheet is now recalled when calling a view. Auto-scroll has to be disabled. | | Auto-scroll in the sequence sheet did not scroll back to the left when track sheet mode and transposed mode were enabled and it jumped to the next row. This bug is fixed. The sequence sheet displays now with auto-scroll always the current cue, also when the transposed mode is enabled. | | The sequence sheet displayed markers for phaser values accidentally when storing release values. This bug is fixed. Phaser markers are only displayed when phaser values are present. | | The default width of columns in the sequence sheet was chosen unluckily. This bug is fixed, The width of columns in the sequence sheet are now better adjusted to the purpose of every single column. | | Enabling track sheet mode in the sequence sheet could crash the console. This bug is fixed. The console should not crash anymore when enabling the track sheet mode of the sequence sheet. | | Opening a default 3D view caused a crash in some cases. This bug is fixed. | | Load and Save did not work in the timecode view context menu. This bug is fixed. The window settings can now be saved and recalled in the timecode view. | | The round corners of pop-ups on the xPort nodes had a black background. This bug is fixed. Round corners of pop-ups have now always a transparent background. | | Spinning an encoder directly after switching its channel function could cause the first ticks of the encoder to be lost. This bug is fixed. The first ticks of the encoder do not get lost if the channel function is switched. | | When entering times for CueFade or CueDelay, which were different for in and out timing, the background of the cell changed to black. This bug is fixed. CueFade and CueDelay cells in the sequence sheet have always a gray background when they can be edited. | | When editing values in a sheet by doing a long-press beforehand, a lasso selection was initiated when closing the calculator. This bug is fixed. Opening a calculator by long-pressing a cell does not start a lasso selection anymore. | | From time to time pressing objects in pools was not recognized. This bug is fixed. All pool objects should now be accessible after resizing a pool window. | | Selecting a single attribute cell in the fixture sheet activated the entire row. This bug is fixed. Selecting a single attribute in the fixture sheet is possible. | | When resizing the application window of grandMA3 onPC on Windows, the not touched edges of the window moved slighty on the desktop. This bug is fixed. Resizing the grandMA3 onPC application on Windows does not move the window across the window. | | When a show file was converted from grandMA2 to grandMA3 with a grandMA2 onPC or Mode2. If the grandMA3 software was started on the same machine after that, graphical issues in the user interface occurred. This bug is fixed. There are no longer graphical issues in the user interface of grandMA3 after a show file was converted from grandMA2 on the same machine. | | When having gaps between data pools, the assign menu displayed the wrong data pool on the data pool button. This bug is fixed. The assign menu displays now always the selected data pool om the data pool button. | | The All preset pools disappeared from the Add window dialog, when they were renamed. This bug is fixed. The All preset pools are always displayed in the Add window dialog, no matter if they are labeled, or not. | | Multi-line editors, like the plugin component editor, highlighted the wrong characters, when the user did selections across multiple lines. This bug is fixed. Selections in multi-line editors highlight now the selected characters. | | Not all pool buttons in the Add window dialog displayed their pool color in the indicator bar of their button. This bug is fixed. All pools display now their color in the indicator ar in their buttons in the Add window dialog. | | Scrolling via the mouse wheel in the main menu did not work properly. This bug is fixed. Scrolling with mouse wheel in the main menu is working as expected. | | The Software update menu did not show the selected update file when reopening the menu. This bug is fixed. The Software update menu shows the selected file continuously. | | The selected Timecode Trackgroup was not displayed properly. This bug is fixed. The selected Timcode Trackgroup is displayed with yellow text. | | The power loss pop-up did not appear on the letterbox screens if the console was locked. This bug is fixed. The power loss pop-up does now always appear when there is a loss off power. | | The Add Window did not show colors for all pools and presets. This bug is fixed. Pool and Preset Colors are displayed in the Add Window. | | The Edit User pop-up was too big for the small screens. This bug is fixed. The Edit user pop-up fits now into the small screens. | *** ## []()Appendix [Section titled “Appendix”](#appendix) * It is recommended to use a dedicated and a separate physical network for each grandMA3 session. * When using DMX protocols it is recommended to use a dedicated physical network for each protocol. * The recommended workflow for executor configurations that are different compared with the default executor configuration is to create a new executor configuration, do the changes in the new configuration and save the changes. * XML files with exported executor configurations from grandMA3 v1.2 and prior cannot be properly imported to grandMA3 v1.3 or later due to structural changes. * XML files with exported analog remote setups from grandMA3 v1.3 and prior cannot be properly imported to grandMA3 v1.4 or later due to structural changes. * XML files with exported timecode shows from grandMA3 v1.3 and prior cannot be properly imported to grandMA3 v1.4 or later due to structural changes. *** ## []()Known Limitations [Section titled “Known Limitations”](#known-limitations) Step Recipes and the Step Creator are not anymore part of v1.4 or newer. Existing step recipes of show files in versions up to v1.3.1.3 will be discarded. Independent tracking of absolute and relative values in the same sequence is currently not possible. Moving cues/cue parts does not move the data correctly. It is recommended to use the copy command. Show files saved with versions v1.3.1.3 or prior discard the content of the programmer when loading the show file in v1.4 or newer. The grandMA3 system supports at the moment only one external DMX source per universe for merging DMX into the system. Software update via network to onPC stations requires confirmation during the install process at the destination system. When deleting a preset that is referenced by a cue the reference cannot be restored when oopsing the deletion. Show files saved with versions prior to v1.0.0.3 cannot be loaded using this version. When multiple GlobalMasters exist on the network, each having the same session and location name, the station with the higher priority takes over without user input. If all stations are of the same priority, then the station with the longest Online Time becomes the GlobalMaster for all stations.
# Release Notes 1.5
> Do you need help getting started in grandMA3? Perfect - here we describe a few quick steps to get you rolling. The manual will explain functionality in detail w
* [Get Started](/grandma3/2-3/key_rn_v1_5/#GetStarted) * [Bugfix Version 1.5.2.3](/grandma3/2-3/key_rn_v1_5/#h2__1437913018) * [Other Enhancements](/grandma3/2-3/key_rn_v1_5/#h2_1198082799) * [](/grandma3/2-3/key_rn_v1_5/#Bugfix)[What’s Changed ](/grandma3/2-3/key_rn_v1_5/#h2_563643534) * [Fixed Bugs](/grandma3/2-3/key_rn_v1_5/#h2__1624482491) * [grandMA3 Version 1.5.2.1](/grandma3/2-3/key_rn_v1_5/#h2__234416704) * [Features](/grandma3/2-3/key_rn_v1_5/#h2_727740091) * [Playback Engine](/grandma3/2-3/key_rn_v1_5/#h3__1886388219) * [Absolute and Relative Layers](/grandma3/2-3/key_rn_v1_5/#h3_611999356) * [Release Values](/grandma3/2-3/key_rn_v1_5/#h3_535471253) * [Stomp and Capture](/grandma3/2-3/key_rn_v1_5/#h3__1231776360) * [Cue Parts and Programmer Parts](/grandma3/2-3/key_rn_v1_5/#h3_1922197212) * [Special Values and Pan/Tilt Offset](/grandma3/2-3/key_rn_v1_5/#h3_100054290)[](/grandma3/2-3/key_rn_v1_5/#Features) * [Agenda](/grandma3/2-3/key_rn_v1_5/#h3__1229996058) * [Layout](/grandma3/2-3/key_rn_v1_5/#h3__2084382304) * [3D Window](/grandma3/2-3/key_rn_v1_5/#h3__673189665) * [Import/Export Menu](/grandma3/2-3/key_rn_v1_5/#h3__671156747) * [Readout and Encoder Resolution](/grandma3/2-3/key_rn_v1_5/#h3_1424464029) * [Patch and Live Patch Menu](/grandma3/2-3/key_rn_v1_5/#h3_25192502) * [Special Executors](/grandma3/2-3/key_rn_v1_5/#h3__1819526639) * [DMX Curves](/grandma3/2-3/key_rn_v1_5/#h3_1465530181) * [Assign Menu and Settings Editor](/grandma3/2-3/key_rn_v1_5/#h3_53454221) * [onPC Improvements](/grandma3/2-3/key_rn_v1_5/#h3_539032469) * [USB MIDI Support](/grandma3/2-3/key_rn_v1_5/#h3_847521682) * [Audio In Selection](/grandma3/2-3/key_rn_v1_5/#h3__1163635527) * [MVR Merge](/grandma3/2-3/key_rn_v1_5/#h3_27294869) * [Other Enhancements](/grandma3/2-3/key_rn_v1_5/#h2_596831770) * [What’s Changed](/grandma3/2-3/key_rn_v1_5/#h2__570807996) * [Fixed Bugs](/grandma3/2-3/key_rn_v1_5/#h2_301368596) * [Appendix](/grandma3/2-3/key_rn_v1_5/#h2__1835053169) * [Known Limitations](/grandma3/2-3/key_rn_v1_5/#h2__1852571500) *** ## []()Get Started [Section titled “Get Started”](#get-started) Do you need help getting started in grandMA3? Perfect - here we describe a few quick steps to get you rolling. The manual will explain functionality in detail while the MA e-Learning within the MA University offers you all kinds of training. All information can be accessed through the MA Lighting website [www.malighting.com](http://www.malighting.com). Let´s go! Once you leave the Release Notes by tapping I agree on the top right corner, you get presented with the main screen of grandMA3 software. On the right side, you can see predefined views. By tapping the view buttons you can switch between them. If this is your first time starting grandMA3 software you need to patch some fixtures first to get started. Or you can load one of the demo shows delivered with the software. In both cases, you need to press the Menu key. If you are using grandMA3 onPC software there is a  symbol in the top left corner. Clicking the symbol is the same as pressing the Menu key on a console. Hit Backup, and tap Load tab in the pop-up menu. Now you are ready to load shows. As you want to get started quickly you should change in the header bar from Shows to Demo Shows by tapping the button repeatedly. Once it says Demo Shows you can choose any of them by double-clicking on it or selecting it and then tap Load Show. Just in case there was a show loaded already the software will ask you if want to save the current show first before loading the new one… your choice ;-) Here we go! Now you are ready to work with the grandMA3 software. It is as easy as that! Again - on the right side are the view buttons to change screen content. At the bottom, you find the encoder bar and the command line. Technically that is all you need to get started. For more detailed information, refer to the grandMA3 help menu which you can reach by one of the view buttons named Help or via the MA Lighting website. If you want to learn grandMA3 software step by step please join the MA e-Learning - it’s free of charge and available via the MA Lighting website. Have fun with the grandMA3 software - next, you will find all the improvements and changes of this software version. **Hint:**\ The grandMA3 software will start with the show file (or status) that was active when the software was closed. *** ## []()Bugfix Version 1.5.2.3 [Section titled “Bugfix Version 1.5.2.3”](#bugfix-version-1523) ## []()Other Enhancements [Section titled “Other Enhancements”](#other-enhancements)  The Windows IoT image for the grandMA3 command wing XT and the grandMA3 onPC rack-unit got updated: The Windows IoT version is now 20H2.\ Furthermore, drivers got updated, too. *** ## []()What’s Changed [Section titled “What’s Changed”](#whats-changed) * onPC stations without grandMA3 onPC hardware connected directly to the station generate now a unique serial number. This serial number can be seen in the command line history after executing the [version](/grandma3/2-3/keyword_version/) keyword. *** ## []()Fixed Bugs [Section titled “Fixed Bugs”](#fixed-bugs) ### Command Line and Macro [Section titled “Command Line and Macro”](#command-line-and-macro) | Description | | ------------------------------------------------------------------------------------------------------------------------------------------------------------------------------------------------------------------------------------------------------------------------------ | | Changes in a show file were saved, even when tapping Do not save. This bug is fixed. Choosing Do not save does not save the current show file anymore. | | Executing IfOutput together with a dimmer value, e.g., IfOutput At 0 crashed the software. This bug is fixed. IfOutput At 0 does not crash the software anymore. | | MIDI messages were still received when MIDI via onPC command wing was disabled. This bug is fixed. MIDI messages input into onPC command wings are only processed when MIDI via onPC command wing is enabled. | | It was not possible to load a show by using the SHOW argument of the grandMA3 onPC Windows executable file anymore. This bug is fixed. grandMA3 onPC on Windows can again load a show file on startup. | | The software could crash when loading several show files quickly in a row and the layout window was displayed in the show files. This bug is fixed. Fast and successively loading of different show files should not crash the software anymore. | | Turning an encoder and while that changing to press and turn made the attribute jump to an unexpected value. This bug is fixed. Changing from turning an encoder to press and turn continues to change the value flawlessly. | | grandMA3 onPC on macOS could crash during startup when the user tried to change the size of the window. This bug is fixed. grandMA3 onPC does not crash anymore when the size of the window will be changed during the startup process. | | The software could crash when storing cues with cue only activated. This bug is fixed. Activated cue only should not crash the software when storing a cue. | | When disabling the screen encoder, a possible fifth attribute encoder displayed always the encoder resolutions instead of the channel functions. This bug is fixed. The fifth attribute encoder displays now the channel functions and on pressing MA the encoder resolutions. | ### Playback [Section titled “Playback”](#playback) | Description | | ----------------------------------------------------------------------------------------------------------------------------------------------------------------------------------------------------------------------------------------------------------- | | Sequences were triggered from time to time, when DMX remotes were set up for them, also when there was no trigger event happening for them. This bug is fixed. DMX remotes are working as expected again and do not trigger sequences anymore unexpectedly. | | Playing back sequences with HTP priority did not work as expected. This bug is fixed. Sequence priority HTP works now again as expected. | | Adding a huge amount of attributes to an already running sequence could cause wrong output. This bug is fixed. The output of a running sequence won’t be corrupted anymore when adding a lot of attributes to the sequence. | ### Windows [Section titled “Windows”](#windows) | Description | | ------------------------------------------------------------------------------------------------------------------------------------------------------------------------------------------------------------------------------------------------------------- | | The software could crash when a layout window and several encoder bar windows were displayed at the same time. This bug is fixed. The software does not crash anymore when several encoder bar windows and layout windows are displayed. | | Some fixtures could flicker within the layout window. This bug is fixed. Layout elements displaying fixtures should not flicker anymore. | | The software could crash when importing a color theme, that had not the color MiniEncoder - IndicatorBack defined. This bug is fixed. Importing a color theme that has not the color MiniEncoder - IndicatorBack defined does not crash the software anymore. | | The software could crash when it tried to render a character that is not part of the used font. This bug is fixed. Characters that are not part of the used font type are not tried to be rendered anymore. | | Tapping on the executors in the executor bar could crash the software when another editor, e.g., the macro editor, was already open. This bug is fixed. Opening the assign menu by tapping executors in the executor bar does not crash the software anymore. | *** ## grandMA3 Version 1.5.2.1 [Section titled “grandMA3 Version 1.5.2.1”](#grandma3-version-1521) ## []()Features [Section titled “Features”](#features) The latest release of grandMA3 version 1.5.2.1 rolls out several enhancements that enrich your lighting experience. Read on for a quick introduction and find links for more information. *** ### []()Playback Engine [Section titled “Playback Engine”](#playback-engine) ### []() Absolute and Relative Layers [Section titled “ Absolute and Relative Layers”](#absolute-and-relative-layers)  Improved in this release The playback engine has now the absolute and relative layers separated from each other. This allows now an easy combination of absolute and relative data coming from different presets. **Known Limitations:**\ MIB works only with absolute values. After calling the values of a Preset, the next tap of that preset will discard the programmer values for Layers not included in the Preset. ### []() Release Values [Section titled “ Release Values”](#release-values)  Improved in this release When setting a release value in the programmer for any attribute, a real release value will now be stored. ### []() Stomp and Capture [Section titled “ Stomp and Capture”](#stomp-and-capture)  Improved in this release The behavior of Stomp improved again. When stomping multistep relative phasers, steps 2 and above will be deleted, and the relative values will be set to 0.\ The values in step 1 will be set to the default values on the absolute layer and to 0 on the relative layer. It is now possible to execute stomp directly when calling a preset. Example:\ A relative circle is running around the absolute drummer position. Select some fixtures, press Stomp, and then tap a different absolute position preset, e.g., the one for the singer.\ In this case, the lights will point to the singer without doing the circle anymore.\ When the singer preset would have been called without stomp, the lights would circle around the singer in this case. In addition, it is now also possible to define per preset if it shall be called automatically with stomp. When editing the settings of a preset, Stomp can be enabled.  New in this release The new keyword Capture (Stomp Stomp) knocks the current non-default values of the selected fixtures into the programmer. During a running multistep phaser, it’s not the value of a step that is knocked in, but the current output value when executing Capture will be knocked in. This can be any value between 2 steps, depending on the moment of the execution. Capture allows also to knock in the current output values when fading into a new cue, or when doing a crossfade. *** ### []()Cue Parts and Programmer Parts [Section titled “Cue Parts and Programmer Parts”](#cue-parts-and-programmer-parts)  Improved in this release The displaying of parts in the track sheet and the fixture sheet improved. Sequence sheet:\ When a cue has several parts, but only one value for one attribute in one of the parts, it is not necessary to expand the whole cue in the track sheet mode to see the values that are living in other parts than part 0. The track sheet merges the values of all cue parts into the cue line when the cue is collapsed. Therefore, values from other parts will display the part it is coming from in the lower right corner of the value cell. Fixture Sheet:\ When the programmer has values from different parts, all cells of attributes that are not part of the currently selected programmer part are displayed with darker color.  Improved in this release With the changes regarding absolute and relative values, the different part properties of presets were reduced to only Cue Part. Cue Part defines into which part the preset will be called. By default, the value is set to 0 for all presets. To change this setting, enter EditSetting into the command line and then tap the desired preset. In the EditSetting pop-up, tap Cue Part, enter the new value and apply it by tapping Please. This defined part will also be used when activating values in the programmer via the encoders. **Important:**\ When loading show files saved within grandMA3 v1.4 or older, the old part properties are discarded. *** ### []()Special Values and Pan/Tilt Offset [Section titled “Special Values and Pan/Tilt Offset”](#special-values-and-pantilt-offset)  New in this release Special values are used to modify the default values, highlight values, and lowlight values of attributes per fixture instead of using the values defined by the fixture type.\ This can be used for example when a single fixture should not return to pan/tilt 50%/50% after clearing the programmer. Or when single fixtures should turn to green instead to open white when the highlight function is activated. In both cases, the corresponding values of these fixtures themselves can be modified to reach the goal. When a preset is used as a default value for an attribute, the fixture sheet will display the new default value by displaying also the preset information, e.g., 1.1 Closed instead of 0. The style of displaying the preset information follows also the Preset setting of the fixture sheet. **Hint:**\ When using a preset as a special value while updating the values in the preset, the special values will also use the updated value of the preset. Special values can be set by using different ways: By editing a fixture: 1. To do so, execute, e.g., Edit Fixture 1, or do a right-click onto the fixture name in the fixture sheet. 2. The fixture editor opens and offers a list of all attributes of this fixture at the bottom. The corresponding cells for Default, Highlight, and Lowlight can be edited by doing a long-press on them, or by right-clicking them. 3. A calculator opens that allows entering any value directly. To choose one of the presets the fixture can call, tap Preset in the right area and tap the desired preset, or return to the standard values stored in the corresponding fixture type by tapping Specials and then choose the option Reset to Original. The special section offers to choose Extract. Extract takes the values of the preset and applies it without a link to the preset. The values of the preset are still kept by the attribute, but won’t change anymore when updating the preset in the future.\ Alternatively, it is possible to choose a preset by editing the corresponding preset cell (Default Preset, Highlight Preset, or Lowlight Preset). When doing so, a drop-down opens to select one of the available feature groups of the show file first, and then a preset that can be used by the selected fixture for the desired attribute.\ When using the approach to edit the preset cell, the drop-down offers also to Reset to Original, and Extract. Modifying the RTChannels (Realtime Channels) in the Parameter List: 1. After entering the parameter list (Menu - Patch / Live Patch - Parameter List), scroll to the desired attribute of the desired fixture, and follow the steps of opening the calculator described above in the “By editing a fixture” description. Via command line: **Requirement:**\ The desired presets or values have to be set actively into the programmer, e.g., by calling a preset or turning attribute encoders. * To store the currently active values as default values, type: User name\[Fixture]> Store Default * To store the currently active values as highlight values, type: User name\[Fixture]> Store Highlight * To store the currently active values as lowlight values, type: User name\[Fixture]> Store Lowlight To reset any of the special values, set the corresponding attributes to Remove values in the programmer and store to the desired type of special values. Or set any value for the corresponding attributes and do a store remove. To store remove the currently active values for the default values, type: User name\[Fixture]> Store Default /Remove For resetting the special values of highlight and lowlight, follow the example above but replace Default with Highlight, or Lowlight.\ In addition, storing Release values to the special values will do the same as Remove. **Hint:**\ For which fixtures the special values will be changed when using the command line approach, the Use Selection setting and the If not empty setting of the Store Options are important.\ To learn more about the Use Selection setting and the If not empty setting, read in the [Store Options topic](/grandma3/2-3/cue_store_settings_preferences/). \*\*Restrictions:\ - \*\*It is only possible to store special values using absolute values. Relative values will be ignored.\ \- Presets with more than 1 step (“Phaser presets”) will only use step 1 when using them as special values.  New in this release It is now possible to define Pan Offset and Tilt Offset per fixture. This can be very useful if the show has been preprogrammed or it is a touring show, and the fixtures are not hung the way they were planned to be. The offset value is not visible in the Fixture Sheet, but it can be seen in the DMX Sheet. It is a nice function as long as the fixtures do not come all the way out to their endpoints in the programming.\ To see the columns for Pan Offset and Tilt Offset, go to Menu - Patch/Live Patch, and set Columns to Full. To change the values for an offset, select the desired cells, and tap and hold them. A calculator opens. Enter the desired values and apply them. At the moment, the offsets are displayed corresponding to the selected DMX Readout within the user profile. It is also possible to define the offset without the need to enter the patch. Call a preset into the programmer, or play a cue, for the lamps that need an offset to be applied. The position should be possible in 3D and on the real stage. Now adjust pan and tilt in the programmer for these fixtures in a way, that the fixtures hit the exact same position on the real stage, as they should do when no offset would be needed.\ Then execute: User name\[Fixture]> Store Offset This calculates the offset values and enters them for the selected fixtures. The Offset keyword can be reached via the shortcut MA + Update when Store is already input into the command line. **Hint:**\ \- Store Offset is more precise when the resulting offsets are as small as possible.\ \- For the Offset keyword it is also possible to use relative values in the programmer. **Restriction:**\ \- At the moment, it is only possible to enter positive values for offset in the patch menus. ### []() *** ### Agenda [Section titled “Agenda”](#agenda)  New in this release The Agenda is used to execute scheduled commands on the console, according to the calendar. The agenda also allows to schedule events repeatedly, e.g, the Christmas eve cue every year. To enter the agenda, open an agenda window by using the [Add windows dialog](/grandma3/2-3/wvm_add_window/), tap More, and then Agenda. The agenda window offers several modes for displaying the data. To change between these modes, tap ViewMode in the title bar of the agenda window. These modes are: * Sheet: Lists all agenda entries at a glance. * Year: Displays a calendar view of the whole year. The current date has a light green background. Days with at least one enabled event will be displayed with a dark green background. Days that have all events disabled (also when the whole Agenda is not running) have a bright red background. * Month: Displays a calendar view of the currently selected month with all its agenda entries. Disabled agenda events are displayed with red font color. * Week: Displays a calendar view of the currently selected week with all its agenda entries. Disabled agenda events are displayed with red font color. * Day: Displays a smaller monthly overview and the agenda entries of the selected day. Disabled agenda events are displayed with red font color. Disabled agenda events are displayed within the month, week, and day view mode with red font color. Repeated events in the month, week, and day view mode have the  icon on the right side. Each day in the month, week, and day view mode display also the number of events that will be scheduled throughout each day. An event that will be repeated several times within each day is counted as one event in this case. The Agenda can be enabled or disabled by Running. The calendar view modes offer to jump to the current month, week, or day by tapping Today in the title bar. With the arrow keys next to Today, it is possible to step forward and backward in calendar view modes. To create a new agenda entry, switch to sheet view mode and right-click New AgendaEvent, or in the other view modes use Setup in the title bar to open the toolbar and select + followed by the desired date. An agenda entry offers several properties the user can define: * Name: The name of an agenda entry will be displayed in all different modes. * Appearance: Each agenda entry can have an appearance. Assigned appearances define also how an entry looks like in the calendar views. * Mode: Instead of using the entered start time when set to absolute, twilight times like dawn, sunrise, sunset, and dusk can be used. When using twilight times, the local time zone and location need to be set up properly in the [Date and Time menu](/grandma3/2-3/si_date_and_time/). * Start Date: Sets the start day of the agenda entry. Editing the cell opens a pop-up where the user can edit the day, month, and year separately. Today is a quick option to apply today’s date. * Start Time: Sets the start time of the agenda entry. Editing the cell opens a pop-up where the user can edit the hour, minute, and second separately. Now is a quick option to set the current time. * Sunlight Offset: Defines the offset for an event when a twilight time is set in the Mode column. This allows for example to trigger an event 30 minutes before sunrise. * Valid Duration: If the console is not switched on, or the agenda is disabled during a scheduled entry, the entered duration allows to backcast events whose start time falls into the time from now on backward until the duration is over. * Enabled: To enable or disable single agenda entries. * Object: Defines which object, sequence, macro, or plugin shall be executed within the agenda entry. * Action: Defines which action to use when the defined object is executed. * Command: Instead of defining an object to be triggered, a command can be defined instead. E.g., for shutting down the system at a certain time. * Repeat: Editing the repeat property offers the possibility to define how often the entry is repeated, e.g., every day, every second week, etc. To do so, change the available options to your needs in the tabs Schedule and Iterations. To reset the repeat setting you made before, tap Reset Pattern in the title bar of the pop-up. At the bottom of both tabs you find information fields for how often the event will be repeated (Total Repeat), and on how many days the event will be repeated (Repeated days). The repeat logic repeats the agenda event firstly between the start time and end time within a day and repeats this furthermore then between the start date and the end date. * Schedule: Allows to set up a start date, start time, and end date. The start date and start time are linked to the corresponding settings of the agenda event itself. By default the start and end dates and times are identical. To get repetitions, the user must set at least a different end date or end time.\ Tapping Reset End resets the end date and end time back to the start date and start time of the agenda event.\ By enabling or disabling one of the day settings (Mon, Tue, Wed, Thu, Fri, Sat, or Sun), week settings (1st Week, 2nd Week, 3rd Week, 4th Week, 5th Week, or 6th Week), or month settings (Jan, Feb, Mar, Apr, May, Jun, Jul, Aug, Sep, Oct, Nov, or Dec) the user can decide at which days, weeks or months the event shall be repeated. The week settings are the weeks within a full month: E.g., 1st week is the first week of a month, and not the first week of the agenda event itself. * Iterations: Allows to define a repeat per minute, days, weeks, and month. This allows repeating an agenda event, e.g., every 30 minutes, and/or every second week. These settings are counting from the start date onwards. In addition, when setting Repeat every year to Yes, the event will be repeated every year again.\ When a repeat per minute is set, the setting End Time will become active. The time between Start Time and End Time defines the interval in which the minute repeats will be effected. * Countdown: The remaining days or time until the next launch of the event. * Planned Date: The next date when the event will be launched. * Planned Time: The next time when the event will be launched. * Repeat Count Days / Total: Similar to the edit repeat popup the repeat pattern can be double verified. When editing an agenda event within one of the view modes that are not the sheet view mode and the year view mode an edit agenda pop-up opens and offers to modify the same properties as in the sheet view mode. The sheet mode offers an additional button for testing the selected agenda entries. Tapping Test selected in the title bar executes the selected agenda events immediately. This allows checking if the set object or command will be executed correctly. Delete Old erases all preceded events (includes also the valid duration). It is also possible to display a toolbar on the left edge of the agenda window. To enable the toolbar, tap Setup in the title bar.\ Available tools are: * Mouse Pointer: Select tool, e,g, select a day in the day view mode. * +: When the add tool is selected, tapping into a day will add a new event. * \-: Tapping an event while delete is active will delete the event. * Test(): Tapping an event while test is active will execute the agenda event immediately. * Edit(): Tapping an event in edit mode allows to edit a single event within a pop-up. * Cut(): Tapping an event while cut is active cuts the event out of the agenda. The Paste tool will be activated after cutting an event. * Copy(): Tapping an event while copy is active will copy the event. The Paste tool will be activated after copying an event. * Paste(): The event that is in the clipboard (cut or copy) will be pasted when clicking into a day. *** ### []()Layout [Section titled “Layout”](#layout)  Improved in this release There are several improvements for layouts. The layout editor features a new option called ViewPosActive. When it is enabled the previously stored zoom and position values of the view will be recalled when loading the layout again. When it is switched off the stored zoom and position values of the view can only be recalled when calling the whole view again. This button is switched off by default. Assigning a selection to a layout utilizes the grid position of the selected fixtures. In setup mode, it is possible to transform your current selection position in the layout to a position similar to your camera view in the 3D window. To apply this function change the layout encoder bar to the Arrangement function. Tap Layout Type until it is set to Camera. It is now possible to define some parameters on the encoders before the new positions will be applied: * Camera (Encoder 1): Select the desired camera. * Scale (Inner encoder 2): Scales the whole selection in X and Y direction. * Ratio (Outer encoder 2): Defines the ratio of the selection. * Move X (Inner encoder 2): Move the whole selection in the X direction for a more convenient position. * Move Y (Outer encoder 2): Move the whole selection in the Y direction for a more convenient position. Tapping an encoder will open a calculator for direct value input. The calculator for the camera allows to select a camera out of the list of existing cameras or to enter a camera ID directly. The new Resize Fixed Ratio () tool allows resizing of a layout element by keeping its actual aspect ratio.\ To resize a layout element with the possibility to change also the aspect ratio, chose the normal Resize () tool. The Grid property of a layout window is split up into SnapGrid and VisibleGrid. SnapGrid defines the grid size of a grid that is used when moving layout elements. VisibleGrid defines the grid size of the visible grid. The keyboard keys Del, Ins, and the shortcut Ctrl + A can be used with a layout view. Layout elements can now have text with definable text settings and definable borders. These properties are new: * Custom Text: The individual text the user can enter. * Font Size: The size of the text. * Text color: The color of the text. * Text Horizontal: The horizontal text alignment. Possible values: * Center: The text will be aligned to the horizontal center of the layout element. * Left: The left end of the text will be positioned within the left edge of the layout element. * Right: The right end of the text will be positioned within the right edge of the layout element. * Text Vertical: * Center: The text will be aligned to the vertical center of the layout element. * Top: The text will be placed within the layout element at the top edge. * Bottom: The text will be placed within the layout element at the bottom edge. * Above: The text will be placed outside the layout element at the top edge. * Border color: The color of the border. * Border size: The thickness of the border itself. * Indicator Bar: Defines if the indicator bar on top of pool objects will be displayed also on top of the layout element. * Selection Relevance: When selection relevance is enabled, the image of a layout element will be colored with the For All or For Some color depending on the current selection. This setting applies only to layout elements that have a pool object assigned, e.g., a group. In addition, there is now a drawing hierarchy of layout elements. The hierarchy defines which layout element can be overlayed by other layout elements.\ The following hierarchy applies:\ (Highest to lowest level) 1. The selected objects will always be displayed above all other elements. 2. Layout elements that have objects assigned. 3. Layout elements that have environment fixtures assigned. 4. Empty layout elements (this includes also layout elements that have only a text or border defined) are always displayed at the lowest level. Layout elements can be hidden by disabling Element Visible. Layout element dimensions are now allowed to a maximum size of 14 000 x 14 000 pixels to fill the entire canvas. The Fixture ID, Custom ID, or both can be displayed on layout elements by enabling or disabling ID (= Fixture ID), and or CID (= Custom ID). When the custom ID will be displayed, the corresponding ID type will also be displayed when the size of the layout element is big enough to do so. The ID type will be then displayed in front of the IDs. The IDs are displayed separately when the Fixture ID and the Custom ID are not equal. The style is then FID:CID. An example would be: Channel 1:1001. In this case, the assigned fixture of the layout element has the Fixture ID #1 and the Channel ID #1001. Presets can now be assigned to layouts. They behave like presets in preset pools when tapping them. \*\*Restriction: \*\*\ Existing show files cannot get Layout Element Defaults for presets. Only new shows will have a layout element default for presets. *** ### []()3D Window [Section titled “3D Window”](#3d-window)  New in this release The 3D window visualizes additional iris attributes now. The attributes IrisRandomPulseClose and IrisRandomPulseOpen are visualized now. Separate beams of multi-pixel fixtures are merged into one beam if the pixels are on the same plane. This will increase the performance for that kind of fixture type. The rendering method of the merged beam is used if the array of pixels has a circular or a rectangle shape with a ratio close to 1.\ How much the individual pixels are blurred into each other can be defined via the property “Multi-Beam Blur” per beam geometry. The value range for this property is from 0.1 to 1. The higher the value, the more the beams are blurred together. The beam quality “Gobo Animated” was added. With this beam quality and the higher beam qualities, the transition of wheel slots of gobo wheels is animated now. Snapping transition, as well as a fading transition between slots, is visualized. In addition, also the attributes Gobo#SelectShake, Gobo#WheelSpin, and Gobo#PosShake are visualized now.\ Wheels in fixture types have now a property called “Allow Shortcut”. This defines whether a wheel takes the shortest distance between two wheel slots or if it is following an ascending or descending DMX value. The default is set to “No”. **Hint:**\ The attribute Gobo#WheelSpin is also visualized with the beam quality “Gobo” but without animation between the wheel slots. *** ### []()Import/Export Menu [Section titled “Import/Export Menu”](#importexport-menu)  New in this release The new menu for import or export can be entered via the main menu: Menu - Import / Export. Within the menu, the user can choose whether he wants to import or export data by tapping Import or Export in the tab bar on the left side. Both tabs have a similar structure, but the main areas (which will be described in the following sentences) may be interchanged, depending on import or export.\ The main area is divided into two parts, the drive part, which represents the files on the hard drive or USB drive, and the local part which represents the data inside the show file.\ In the Import tab, the drive part is on the left side, and the local area is on the right side. In the Export tab, it is interchanged: the local area is on the left side, and the drive part is on the right side.\ Besides these two main areas, the title bar of the import/export menu allows switching between the different types of objects that can be imported/exported, e.g., groups, sequences, macros, MAtricks, and many more. To do so, tap ObjectType to toggle through the different object types or tap it, hold the finder and drag it outside the button. The dropdown is divided into 3 columns. The first column contains object types that are not organized within data pools, e.g., Appearances, Scribbles, User Profiles, and so on. The second column contains all different types of media: Images, Videos, Sounds, etc. The last column lists all object types that are organised within data pools and data pools itself, too. As all other objects types are children of the data pools, these object types have a  in front of their labels. When selecting, e.g. PresetPools or GelPools, an additional tab bar will be displayed above the main area to switch between the different preset pools or gel pools. In addition, the selected drive can also be changed by tapping Internal in the title bar of the drive part.\ Within the local area, DataPool allows switching between the different available data pools of the show file.\ Enabling Sheet Style displays the pool of the selected ObjectType in a sheet style instead of the default pool style.\ The drive area offers also to search for files by entering a search string into the input field behind Name. The export tab has, in addition, one special function in the local area. Tapping Select All selects all elements of the current object type. After tapping Select All, the button changes to Deselect All, which will clear the selection of elements. Each area allows the selection of several entries at once. In sheet style it is possible to do a lasso selection or tap single entries while having Ctrl pressed. When the local area is not in sheet style, tapping several pool objects after each other will select them in addition to the current selection. Deselection is possible by tapping a selected pool object again. To export objects, select them in the local area of the export tab, enter a file name in the drive area, or tap an existing file in the drive area, and tap Export. To import objects from a file, select the file in the drive area of the import tab, select the desired spots in the local area, and tap Import. When importing images, the menu offers to immediately create appearances with the imported images. To do so, enable Create Appearance at the bottom of the import tab. *** ### []()Readout and Encoder Resolution [Section titled “Readout and Encoder Resolution”](#readout-and-encoder-resolution)  New in this release The new readout “Natural” allows defining the desired readout type per attribute. E.g., dimmer values are at best displayed in percentage readout, while pan or tilt values are better readable using the physical readout which displays the pan and tilt values as degrees.\ When setting the readout for the fixture sheet, sequence sheet, or user profile, natural can be selected instead of percent, physical, etc. The Natural readout can be defined per attribute in Menu - Patch / Live Patch - Attribute Definitions. The cells in the column Natural Readout can be edited. New shows will come up with a predefined set of natural readouts. New attributes will be set to Percent for the natural readout.\ \ In addition, the natural readout can also be defined per attribute within each user profile. To do so, go to Menu - Settings - User Configuration - Profiles - Select a user profile - Edit Encoder Bar.\ When creating a new user profile within a show, the natural readout for all attributes is linked to the one in the attribute definitions by using the default value. When starting a new show, or creating a new user profile, the readout is set by default to Natural.\ When loading show files stored with grandMA3 v1.4 or prior are applying the same readouts for the natural readout within the attribute definitions. In addition, all user profiles will be set to natural value readout when migrating the show file once from v1.4 or prior to v1.5 or later.  New in this release Encoder resolution can now be defined per attribute. The encoder resolution defines how big the change of an attribute value will be when turning a dual encoder by 1 click. The encoder resolution can be changed per attribute in the Encoder Resolution column within the attribute definitions (Menu - Patch / Live Patch - Attribute Definitions). The size of the value change is also dependent on the current readout per attribute. Parallel to the natural readout, the encoder resolution can also be defined per user profile within the Edit Encoder Bar menu in the user profile menu.\ When creating a new user profile, the current encoder resolution settings will also be copied from the Attribute Definitions to the user profile. It is also possible to change the encoder resolution directly on an encoder. To do so press and hold MA. During the hold, the channel function area of each encoder will switch to display the possible resolutions. By tapping the resolution area of an encoder, the selected resolution of the encoder will change to the next resolution. This will change the encoder resolution of the attribute within the user profile. When the desired resolution is selected, release MA. **Hint:**\ \- An encoder has 24 clicks for one turnaround.\ \- 5 turns of an encoder are needed to cross the whole range of the attribute from its minimum to the maximum while using the coarse encoder resolution. The possible resolutions are: * Coarse: This is the most coarse resolution. One encoder turn click will change the value depending on the readout: * Percent: 1 * PercentFine: 1 * Physical: (MaxValue-MinValue)/(24\*5)\ When fixtures of 2 or more different fixture types are selected, the smallest physical range of one of these fixtures determines the size of one turn click. * Dec8: 255/(24\*5), therefore 1 click equals 2.125. * Dec16: 65 535/(24\*5), therefore 1 click equals 546.125. * Dec24: 1 677 216/(24\*5), therefore 1 click equals 13 976.8. * Hex8: 255 (=FF)/(24\*5), therefore 1 click equals 2.125. * Hex16: 65 535 (FFFF)/(24\*5), therefore 1 click equals 546.125. * Hex24: 1 677 216 (=FFFFFF)/(24\*5), therefore 1 click equals 13 976.8. - Fine: Fine has a 10x finer resolution than coarse. - Increment: When the resolution is set to Increment one encoder turn click will change the lowest digit of the displayed readout. - Native: The value layers Absolute and Relative offer this mode to have direct access to the smallest possible value change of the parameter resolution. **Hint:**\ In Native mode, If a e.g. dimmer channel is based on 8/16/24 bit, one encoder turn always results in one digit change of the DMX output. An encoder displays the current resolution in the center of the encoder symbol within the encoder bar: Depending on the resolution a circle of four dots (=Coarse), a circle of eight dots (=Fine), or a circle with four dots and four bars (=Increment) will be displayed. Native resolution is represented by a gear symbol. Furthermore, the factors of value change between turning the inner encoder and all other encoder actions (press and turn the inner encoder, turn the outer encoder, and press and turn of the outer encoder) can be defined within the Edit Encoder Bar menu. These are the available factors: * Encoder Press Factor: Press and turn the inner encoder, definable per attribute. * Dual Encoder Factor: Turning the outer encoder, definable as a general factor. * Dual Encoder Press Factor: Press and turn the outer encoder, definable as a general factor. The available values for the different factors are these ones: * Div50 * Div25 * Div10 * Div5 * Div2.55 * Div2 * One * Mul2 * Mul2.55 * Mul5 * Mul10 * Mul25 * Mul50 * Disabled When creating a new user profile these factors are set to Mul5 for the encoder press, Div5 for the dual encoder, and Div25 for the dual encoder press. The buttons TimeLayerResolution and PhaserLayerResolution offer to set different desired resolutions depending on the selected layer. TimeLayerResolution is by default set to Fine and PhaserLayerResolution is by default set to coarse. Link Resolution defines if switching the encoder resolution should switch the resolution for all other attributes of the same feature group as well (Link Resolution set to FeatureGroup), or if it should switch the resolution only for the one attribute where you change the resolution now (Link Resolution set to Single). This setting can also be accessed in the encoder bar by pressing and holding MA in order to change the encoder resolution. *** ### []()Patch and Live Patch Menu [Section titled “Patch and Live Patch Menu”](#patch-and-live-patch-menu)  Improved in this release In order to have a more structured workflow inside the Patch Menu, a couple of improvements were made. The navigation in the patch menus changed in such a way, that a tab bar is now used on the left-hand side. This lets the user always know at which part of the patch he is looking, especially when a section has sub-sections, like the attribute definitions. In this case, a tab bar will appear at the top of the section area which allows navigating through the subsections. Furthermore, there are now 2 different styles to look at the real fixture patch. In the title bar, you can toggle Split View. When Split View is deactivated, you can see the complete tree-structured overview of the fixture patch, like known from former versions of grandMA3.\ When it is activated, you can see the new Split View. The tab bar at the top offers to display the patch split by Layers, Classes, ID Types, FixtureTypes, DMX Universes, Filters, or Hierarchy. The left area of the split view displays the corresponding objects. Selecting one of these objects by tapping it will display fixtures on the right side, influenced by these objects: * FixtureTypes: Selecting one fixture type on the left side will display all patched fixtures that use this fixture type. * DMX Universes: The split is done by DMX Universes, which results in displaying all fixtures patched to the selected universe. * ID Types: All ID types can be selected. The fixture area will display all fixtures that have the selected ID type assigned. Fixtures that have an ID type other than Fixture are only displayed in the corresponding ID Type, also when they have an additional FID set up. The left area allows also to label the custom ID types. * Filters: The split is done by the patch information in filters. Read more in the [Create a Filter](/grandma3/2-3/worldfilter_filter_create/) topic. * Layers: All layers set up in the show can be selected. The fixture area will display all fixtures that have the selected layer assigned. The left area allows also to manage the layers of the show file. * Classes: All classes set up in the show can be selected. The fixture area will display all fixtures that have the selected class assigned. The left area allows also to manage the classes of the show file. * Hierarchy: The left side lists the hierarchical structure of the patch. It lists the parent elements and can be unfolded. The right side displays the elements directly dependent on the selected object on the left side. The top-level where the hierarchy starts is the level of the stages. **Hint:**\ In every tab of the Split View there is a \ and a \. In \ you can find all elements no matter which category they belong to. In \ you can find all elements that are not assigned to any Layers/Classes/… . When adding a new fixture while being in split mode, the fixture wizard populates the current split by setting, e.g, selecting a layer in Split by Layer will enter the selected layer in the fixture wizard. Or selecting a fixture type in Split by Fixture Type will create a fixture of the selected fixture type. Cutting and Pasting between categories will automatically adjust the category to which the element is pasted to. The patch menu remembers which tab was selected last when leaving the patch the last time and returns to this tab when entering it again. Leaving the patch without changes does not create a pop-up anymore and will not clear the oops stack anymore.  Improved in this release When a Fixture Type has the flag CanHaveChilderen=“No”, fixtures of this Fixture Type cannot be the parent of any fixtures. The default of the CanHaveChildren flag was set to “No” for most Fixture Types. It still can be manually set to “Yes” if desired.  Improved in this release In the EditPatch menu, the following new buttons were added: * Move Patched To Selected Universe: This moves the fixtures to the selected universe and keeps the DMX address. * Patch To Next Free Address: This gives the fixtures the next available DMX addresses. * Patch To Next Free Universe: This patches the fixtures to the next completely empty universe. * PatchOffset: This can be used to set the desired number of DMX channels between the start address of each fixture. To make advantage of the Patch Offset, the value for the Patch Offset needs to be greater than the fixtures have DMX channels. In case that the chosen Patch Offset is smaller than the amount of DMX channels of the fixtures, the fixtures will be patched as close as possible. When inserting a new fixture you can find a new Column called “No” (Number) in the tab “In current show” of the “Select DMX Mode to use”. This is the index number from the Fixture Types list. The patch menu, live patch menu, the fixture type section and the insert new fixture dialog have a new button called Hide Environmental in the title bar of these menus. When it is active all fixture types, that do not have at least a DMX address assigned to one DMX channel will be hidden. These fixture types are mainly environmental fixture types, e.g., stage elements, trusses, and many more. For the case of hierarchical patch items, it searches recursively, thus showing the parents if a child object is found that has DMX channels with DMX addresses.  New in this release The fixture library now offers the possibility to download GDTF fixture types directly from GDTF-Share.com. In order to do this an active internet connection with connection to the [world server](/grandma3/2-3/system_world/) is needed. This is indicated by a green world server icon right beside the command line. Go to the patch (Menu - Patch) and tap Insert new Fixture. The insert new fixture dialog opens. Besides the already existing fixture libraries tap GDTF Share. The list of fixture types is downloaded. **Hint:**\ Downloading the list of fixture types and downloading individual fixture types may take a while depending on the speed of your internet connection. After selecting a fixture type tap Select. A local copy of the GDTF file is downloaded to the folder gma3\_library/fixturetypes/gdtfs on the selected drive and added to the show file. To learn more about the folder structure in the [Other Enhancements](/grandma3/2-3/key_rn_v1_5/#OtherEnhancements) section of this document. The GDTF Share fixture library has two additional properties. “Uploader” indicates whether the file was uploaded to the GDTF Share by a user or a registered manufacturer. “Rating” displays the average user rating of the fixture type between 1 and 5, where 5 is the best rating. **Hint:**\ The GDTF Share fixture library only displays fixture types whose release status on GDTF-Share.com is set to “Release”.\ Furthermore, ratings, comments, and many more can only be added by visiting GDTF-share.com with a normal web browser. This is not possible within the grandMA3 software. This requires also a GDTF share user account. *** ### []()Special Executors [Section titled “Special Executors”](#special-executors)  Improved in this release The special executors are reworked which helps to have a better overview of them. They are now arranged in this way: * SpecialExecutor 1: The left 100mm fader. * SpecialExecutor 2: The right 100mm fader. * SpecialExecutor 3: The key and mini encoder above the left 100mm fader. * SpecialExecutor 4: The key and mini encoder above the right 100mm fader. * SpecialExecutor 5: The GrandMaster. * SpecialExecutor 10: The lowest key below the left wheel (grandMA3 full-size (CRV) and extension). * SpecialExecutor 11: The lowest key below the right wheel (grandMA3 full-size (CRV) and extension). * SpecialExecutor 20: The left wheel and the key below the left wheel (grandMA3 full-size (CRV) and extension). * SpecialExecutor 21: The right wheel and the key below the right wheel (grandMA3 full-size (CRV) and extension). * SpecialExecutor 30: The lower encoder (grandMA3 full-size (CRV) and extension). * SpecialExecutor 40: The upper encoder (grandMA3 full-size (CRV) and extension). Together with the hardware elements merge of the special executors, the special executor area in the executor bars was cleaned up, too. As a result of this, the special executor area on the left executor bar on a full-size (CRV) and on extensions does not need a scroll bar anymore. With the new structure, all special executors now fit natively into the executor bars.\ Furthermore, the special executor area of the [master section](/grandma3/2-3/do_control_master/) displays now at its top in a 2x2 arrangement the special executors 1 to 4. The bottom area displays now always the selected sequence. The special executor configuration menu with the overview of all special executors is now gone. This menu opened in between when the users wanted to open the assign menu for a special executor.  New in this release A new option per user profile (Mirror SpecialExecutor) allows defining if the special executor areas of grandMA3 extensions should use all together the same set of special executors (Mirror SpecialExecutor set to Yes), or if each individual extension should use its own set of special executors (Mirror SpecialExecutors set to No).\ In the case of setting Mirror SpecialExecutor to Yes, the same special executors are used as the left executor area of a grandMA3 full-size (CRV) uses.\ The sets of special executors are managed by the set WingID of a grandMA3 extension. When 2 connected extensions are set to the same WingID, and Mirror SpecialExecutor is switched off, theses both extensions will display and use the same special executors. To read here more about the [grandMA3 extension](/grandma3/2-3/do_extension/), how to [connect it](/grandma3/2-3/fs_connect_extension/), and [WingIDs](/grandma3/2-3/executor/).  Improved in this release When the assign menu for a special executor is open, the executor label of the chosen special executor alternates now between a red coloring and its normal look. When any other object, then the Grand Master object, is assigned to special executor 5 (which represents the physical grandmaster knob), the encoder bar reduces the area of the grandmaster fader. In the now free area at the bottom of the encoder bar, a special executor label will display the assigned object of special executor 5. In addition, the [control bar](/grandma3/2-3/ws_ui_control_bar/) has now the possibility to open a temporary overlay of the Custom/Master Section window. To open the overlay, tap .  Improved in this release Together with the restructuring of the special executors the Custom/Master Section Window got a brush up as well:\ The settings of the custom/master section has now less properties compared with former versions. These are the current properties: * Show Labels: Displays or hides the labels for all special executors. * Show Hardware Buttons: Displays or hides the hardware buttons for all special executors. * Show Custom Section: Displays or hides the complete custom section with special executors 10 to 40. * Show Master Section: Displays or hides the complete master section with special executors 1 to 4, and Go+ \[large], Go- \[large], Pause \[large]. * Show Master Section Knobs: Displays or hides special executors 3 and 4. This allows to adjust onPC stations or compact (XT) consoles to display only the parts of the master section which they have as hardware. * Show Grand Master: Displays or hides special executor 5 (by default the grand master). * Show Page Section: Displays or hides the page button section with Page+, Page x and Page- that is located on the right side of the executor bars. The custom/master section window now displays the assigned fader function on top of each fader. **Important:**\ All settings of custom/master section windows within show files saved with v1.4 or prior will be reset to default when loading these shows in v1.5! *** ### []()DMX Curves [Section titled “DMX Curves”](#dmx-curves)  New in this release DMX curves allow to modify the usual linear output of DMX channels. This makes it possible for example to define that 100% of the dimmer attribute of a fixture should only output a DMX value of 90% when the dimmer needs to be limited. Another use case could be a DMX channel that shall be treated as a switch channel. DMX Curves can be managed within the DMX Curves section of the Patch menu: Menu - Patch - DMX Curves. It is possible to have up to 9 999 DMX curves within one show file.\ It is possible to define 3 different CurveModes: * MinMax: This allows to define a simple line as a DMX curve, e.g., when the maximum needs to be limited. * Switch: A switch curve allows to define at which point the signal should be switched from its minimum to maximum value and vice versa. It is possible to define different switching points for increasing and decreasing values. The increasing curve is marked with an upwards arrow on the curve, while the decreasing curve is marked with a downwards pointing arrow on the line of the curve. * Custom: Allows to create own curves with linear connections between each defined point. Up to 63 points are possible within a custom DMX curve. To create a new DMX Curve, tap New DmxCurve in the DMX Curves menu, and then tap Insert new DmxCurve.\ Change the CurveMode to the desired mode.\ To move points around within the graph area on the right side, select them with the select tool (Mouse pointer icon).\ Then switch to the move tool (Arrow-cross symbol), tap and hold the selected point and move your finger around. Release the finger when the desired position is reached.\ The custom curve mode has some more tools that can be used: * Selecting the add point tool (+) allows adding of additional points to the curve. When the tool is selected, tap at the desired position in the graph. The previous and the next point along the In axis will automatically be connected to the newly added point. * For deleting points within a custom DMX curve, select the delete tool (-) and tap the point you want to delete. * For the custom curve mode, it is also possible to move the handles of each point in order to modify the incoming part (Decel) or the outgoing part (Accel) of the curve. This allows forming of the linear curve into a round curve. To do so, select the move handle tool (Outlined arrow-cross symbol). The possible handles that can be modified will be displayed in the graphical area. Each handle has a peacock green line and a yellow dot at the end. By tap, hold and move of one of the yellow dots, the corresponding handle can be moved. The curve will transform accordingly. When the desired form is reached, release your finger. It is also possible by tap, hold, and move of the DMX curve point itself to adjust both handles of the point simultaneously. * In the custom mode it is also possible to move around more than one point at the same time. To do so, select all desired points with the select tool. Then switch to the move tool. Tap, hold and move your finger within the graphical area. It is important to tap into free space within the graphical area and not on an existing point. The graph view has in both directions (In and Out) rulers which change their labels depending on the selected DMXReadout. The horizontal direction (In) represents the input value of the attribute, while the vertical direction (Out) represents the resulting DMX output.\ The points of the curve within the graph view display their names or IDs for better identification. Within a custom DMX curve it is possible to move the resulting curve outside of the allowed value range by using the handles. This behavior may be wanted by the user, in case of over-shooting, for example. The resulting DMX value will be cut to the corresponding limit (0 or 255) in this case. Furthermore, the software displays in case of such a curve a new button with the DMX Curves-tab: Show Warnings. By tapping it, the user will be informed, which curves are set up like described before.\ \ For fine adjustment, the grid on the left side offers to enter the In and Out values for each point. To see each point of a DMX Curve, expand the DMX Curve by tapping the triangle icon in front of the name.\ MinMax curves and Switch curves are limited to two points. The points are named Min and Max. It is not possible to add more points to these two types.\ The grid allows also to adjust Accel and Decel of a custom DMX Curve by editing the corresponding cells. **Hint:**\ There are 3 predefined DMX curves available to be imported. These curves are of the DMX curve type Custom, and have curves prepared for Sinus, Square, and Power Correction shape. DMX Curves can be applied to attributes within fixture types or to realtime parameters: For attributes inside a fixture type, edit the fixture type (Menu - Patch - Fixture Types - Select the desired fixture type - Edit), tap DMXModes, expand the desired DMX Mode, expand the DMX Channels. Then edit the DMX Curve cell of the desired DMX Channel.\ A pop-up opens and offers to select one of the existing DMX Curves within this show file in the DMX Curve tab. Or remove an assigned DMX Curve by tapping Empty. For realtime parameters (Menu - Patch / Live Patch - Parameter List) it is possible to assign DMX Curves as well. To do so, open the parameter list, scroll down to the desired parameter (check IDType, CID and ChannelName to identify the desired parameter), and edit the DmxCurve cell. A drop-down opens and offers all DMX Curves of the show file. In addition, the drop-down also allows ignoring a possibly assigned DMX Curve from the fixture type. To do so, select Ignore FT.\ In case, the parameter has already a DMX Curve assigned, and the user wants to remove it, it is also possible to use the DMX Curve of the attribute that is defined within the fixture type. To do so, select Follow FT. **Hint:**\ In case of patching a fixture that has a DMX Curve assigned to a realtime parameter to a different DMX address, the DMX Curve on the realtime parameter will also move to the new DMX address. *** ### []()Assign Menu and Settings Editor [Section titled “Assign Menu and Settings Editor”](#assign-menu-and-settings-editor)  Improved in this release To have a unified experience when assigning or editing settings of objects, the executor assign menu has been reworked. On the left side, the displayed tabs are reduced to Object, Handle, Edit Setting, and Edit (if available for the object). The buttons for Name, Scribble, and Appearance moved to the Edit Setting area of the assigned object. Editing a sequence or macro opens the associated editor inside the assign menu, allowing to go back to other settings by using a different tab on the left side.\ The settings of an assigned object, e.g., group or world, can be edited directly by tapping Edit Setting. In addition, the Settings Editor has a similar layout across the editable objects. Name, scribble, and appearance are always displayed at the left side in the settings. When opening the assign menu, it depends now how the assign menu was called, and therefore the assign menu will be opened with a defined tab: * Edit: Opens the assign menu and selects the Edit tab. If the assigned object does not provide the Edit tab, it will switch to the Edit Setting tab. * EditSetting: Displays the Edit Setting tab of the assign menu when it opens. * Assign: Opens the assign menu with the Handle tab selected. When doing this with an empty executor, the assign menu will open up with the Object tab selected. This can also be achieved via command line and using the new /Tab-option: To open the Edit-tab via the Assign command of executor 201 on page 1, type: User name\[Fixture]> Assign Page 1.201 /Tab “Edit” It is also possible the other way round. To open the assign menu and get the Handle tab displayed by using the Edit command, type: User name\[Fixture]> Edit Page 1.201 /Tab “Handle” The possible values for the /Tab-option are Object, Handle, EditSetting, and Edit. Furthermore, tapping the executor in the executor bar without any of these special additions remembers now the selected tab when having the assign menu open the last time before.\ When the assign menu is now open, the executor label of the chosen executor alternates now between a red coloring and its normal look. *** ### []() onPC Improvements [Section titled “ onPC Improvements”](#onpc-improvements) ### []()USB MIDI Support [Section titled “USB MIDI Support”](#usb-midi-support)  New in this release grandMA3 onPC for macOS and Windows now supports USB MIDI Interfaces. To configure your USB MIDI Interface, go to Menu - Settings - onPC Settings. In the MIDI columns, it can be decided if the MIDI ports from the command wing should be used for input and output: MIDI via onPC command wing. If it is enabled, the MIDI input and output is routed through the connect grandMA3 onPC command wing. If it is disabled, the below configured device is used. Select the desired device for the input and output separately by tapping MIDI In or MIDI Out and choose the device in the pop-up. MIDI Offset allows defining the shift of incoming MIDI Notes and Control Changes (CC) for the selected MIDI In Device. The incoming notes and CCs will then be shifted by the defined offset.\ MIDI TimecodeSlot defines the timecode slot for the selected MIDI In Device. ### []()Audio In Selection [Section titled “Audio In Selection”](#audio-in-selection)  New in this release grandMA3 onPC for Windows now supports selecting the audio interface that shall be used when using sound input into the grandMA3 onPC software. To configure the audio in selection, go to Menu - Settings - onPC Settings. In the Sound column, tap Audio In Device in order to open the pop-up with the different possible sources for audio. Tap the desired interface, to select it. Selecting None disables the audio input into the grandMA3 onPC software. Besides None and the other available sources, the pop-up also offers to select the Default audio in device of the operating system. This can be done by tapping Default \.\ In addition, the Sound window offers now to select the audio in device by tapping Audio In Device within the title bar. This button is only displayed on onPC stations. *** ### []()MVR Merge [Section titled “MVR Merge”](#mvr-merge) The import of MVR files has now the possibility to merge the content of an MVR file with the show file, where the user can decide per fixture if he wants to apply a change coming from the MVR file. Enter the patch (Menu - Patch) and tap Import MVR. Choose an MVR file in the file browser and tap Import. The MVR Merge menu opens. This menu compares the current content of the show file with the content of the MVR file matched by the Fixture ID. The left side (My) displays the patch content of the show file, while the right side (Other) displays the content that is coming from the MVR file that is imported. **Hint:**\ The left side will be empty if there is no fixture in your show file. The user can decide per fixture if he wants to keep the existing data of the show file or overwrite it with the data coming from the MVR file. A blue background marks the data set of a fixture (My or Other) that will be applied. In each line either My or Other can be active. To select one of the sides of a row, tap the side you want to keep. The blue background changes to the side that is selected. To import the selection to the show file tap Import MVR. Like the patch, the MVR Merge Menu allows changing the set of displayed columns, by tapping Columns in the title bar of the MVR Merge pop-up.\ When Columns is set to Condensed, only the most important information is displayed. These are FixtureID, Name, Fixture Type, and the Patch address.\ In the full columns mode, additional information, like the position, the rotation, or the class are displayed. *** ## []()Other Enhancements [Section titled “Other Enhancements”](#other-enhancements-1)  grandMA3 onPC on macOS supports now the new Apple Silicon system architecture.  When having several timecode events selected and turning the time encoder in the encoder bar of the timecode editor moves the selected events now relatively to each other.  Drop-down lists that were scrollable, are not displayed as scrollable lists anymore, but they display all their values as a grid, e.g., when editing the function of a key in the assign menu, or when tapping Appearance while editing the options of a group.  Appearances: Appearances are displayed at more places: * Appearances of fixtures are now displayed in the fixture sheet when enabling Fixture Appearance in the context menu of the fixture sheet window. The image and the background color of the appearance are displayed right before the name of the fixture. * Appearances can now be assigned to cues. Depending on the set value of the CuePart Appearance setting in the context menu of the sequence sheet, the appearance is displayed in these ways: * Off: Appearance is not displayed * Number: The No, and Part columns display the background color of the assigned appearance. The image of the appearance is displayed in front of the cue name. * Num + Name: The No, Part, and Name columns display the background color of the assigned appearance. The image of the appearance is displayed in front of the cue name. * All: All columns in the sequence sheet display the background color of the assigned appearance. The image of the appearance is displayed in front of the cue name. * Drop-down lists that offer to select an appearance display now in front of each appearance name a small preview of the appearance. * If a Sequence is activated, the running cue appearance is displayed at the sequence object, if deactivated, the sequence defined appearance is used. Appearances allow now to rotate assigned images. To do so, edit an appearance, and tap ImageRotation until the desired rotation is set. It is possible to rotate images in steps of 90°.\ In addition, the image can now also be mirrored with the new property ImageMirror. ImageMirror can be set to Horizontal, Vertical, or Both. The image will then be mirrored in the set direction.  Macros: * The macro editor offers now to test only the selected line by tapping Test Macro Line. The Go button was renamed to Test Macro. * The macro editor offers a button CLI to toggle Command-Line Interaction. Deactivated CLI is displayed in red letters on the macro pool object.  Steps can be deleted using the - in the tool area in the phaser editor. Delete as well as Insert is also available via command line. To delete step 3: User name\[Fixture]> Delete Step 3 To insert step 2: User name\[Fixture]> Insert Step 2  It is now possible per station and DMX protocol (Art-Net or sACN) to define if the station shall send these DMX Protocols while being an IdleMaster. This is useful for larger setups with several consoles. If one console gets separated from the original session, it will still send these protocols if the option is enabled. This can cause the receiving devices to jump all the time between these sources.\ To enable or disable the settings, press Menu - DMX Protocols - Art-Net or sACN. Tap SendArtnetIfIdleMaster or SendSacnIfIdleMaster to enable or disable the settings.\ Or go to Menu - Output Configuration and scroll to the right. Here you can set the values for SendArtnetIfIdleMaster or SendSacnIfIdleMaster for every console being part of the current session.\ This setting is enabled by default for all consoles and onPC stations. Also when updating consoles from v1.4 or prior to v1.5 and later, SendArtnetIfIdleMaster and SendSacnIfIdleMaster will be enabled.  When storing onto existing MAtricks Pool Objects, the software asks now the user if the existing one should be overwritten, merged, or if the user wants to cancel.  grandMA3 extensions allow now to change the IP address of the device without having it connected to a host. To do so, tap  in the lower left corner in the display of the grandMA3 extension. A pop-up opens, that is similar to the IP configuration within the grandMA3 software. To read more about Interfaces and IP, read the [Interfaces and IP](/grandma3/2-3/network_interface/) topic. \ In addition, it is possible to reset the current settings of the grandMA3 extension to the factory settings by tapping Factory reset. **Important:**\ This is also possible for the internal wings of grandMA3 full-size consoles and grandMA3 light consoles, but we recommend to use this menu only by instruction of the Tech Support!  The Video Pool now features importing of videos. These videos can be used in appearances instead of images. **Important:**\ Video files count into the overall size limit of 200MB for media pools within a show file.  The folder structure on the hard drive and USB drives changed.\ All user data will now be stored in the gma3\_library folder. The folder is on the same level as the gma3\_vx.y.z folders on hard drives. This allows version-independent management of user files. On USB drives the folder is placed within the grandMA3 folder, which in turn is placed into the root of the USB drive.\ Exporting data from the grandMA3 software creates the files now in the gma3\_library folder. The folders inside the gma3\_vx.y.z folders are now only used for default content the software installs by itself.\ On USB drives, the gma3\_library folder will be created automatically after plugging the USB drive into a station that is running the grandMA3 software, and opening the USB drive in the backup menu. Within the gma3\_library folder, the data is structured into subfolders. These subfolders are created together with the gma3\_library folder. These subfolders are mainly representing the internal data structure. These are the created folders: * agendas * appearances * certificates * colorthemes * datapools * executorconfigurations * executorpages * filters * groups * layouts * macros * matricks * plugins * presets * sequences * timecodes * worlds * fixturetypes * fixtureicons * gdtfs * gobos * meshes * inout * artnet * dcremotes * dmxremotes * midiremotes * osc * outputconfigurations * sacn * media * images * sounds * symbols * videos * mvr * netkeys * patch * dmxcurves * stages * scribbles * userprofiles * cameras * screenconfigurations * viewbuttons * views * users **Hint:**\ The location of show files did not change, as they are more version dependent than exported files. Show files are located here:\ \- onPC Windows® from the folder \*\*C:\ProgramData\MALightingTechnology\gma3\_x.y.z\shared\shows\ - \*\*onPC Apple macOS® version from the folder \*\*HD\users\\\[username]\MALightingTechnology\gma3\_x.y.z\shared\shows \*\*\ \- on USB drives from the folder **\grandMA3\shared\shows** Object types that are not part of the list above, like masters or RDM data, will be exported directly into the “gma3\_library” folder.\ Furthermore, when exporting the parent level of an object, a single file with a sub extension will be placed into the corresponding folder.\ E.g., DMXProtocols (Export Root “DeviceConfigurations”.”DMXProtocols” “MyPerfectDMXProtocolsSetup”) instead of Art-Net and/or sACN as separate exports. In this case, a file with the name “MyPerfectDMXProtocolsSetup.dmxprotocols.xml” will be created in the “inout” folder.\ This applies to more object types, e.g., all remotes, all camera, and so on.\ In addition, when exporting a child object, e.g., a cue (child of a sequence), the exported file will be created in the folder “sequences” of the parent object (sequence), and gets also a subextension. In this case “cuename.cue.xml”. With this change of the folder structure, it is still possible to import files that are part of older software installations that are installed on your grandMA3 device.\ To be able to use the existing files on USB drives a copy file functionality has been implemented. The grandMA3 software detects the existing old folder structure as soon as a USB drive is recognized. A pop-up asks then if the old data should be migrated to the new folder structure. The user has these choices: * Yes, But Keep Old: In this case, the files will be copied from the old folders to the new folders. Old and new software versions can use the files. * Yes, And Delete Old: The files will be moved from the old folders to the new folders. In this case, when using an old software version later again, the old software version is not able to access the files anymore. * Not Now: Nothing is done at moment. The pop-up appears again when starting the software again, or when unplugging and plugging again the USB drive. * No And Don’t Ask Again: Nothing is migrated into the new folder structure, and the pop-up will not appear in the future for this USB drive. In this case a small additional text file will be placed on the USB drive to be able to remember this choice.  New command line options when working with files (Import/Export, SaveShow/LoadShow, List):\ It is now possible to specify a path for files with the command line option /Path. This is handy for example when files are located within subfolders. Examples: The macro library file “bestmacro.xml” is located within “gma3\_library/data/macros/myfavorites”.\ To import this library file, type: User name\[Fixture]> Import Macro Library “bestmacro.xml” At Macro 5 /Path “myfavorites” When the file is in the same folder, but on the first connected USB drive, type: User name\[Fixture]> Import Macro Library “bestmacro.xml” At Macro 5 If Drive 2 /Path “myfavorites” With the path option, it is also possible to import library files that are not placed within the grandMA3 folder structure. To import the same file, but from the folder “My\_grandMA3\_files” that is placed directly in the root of the USB drive, type: User name\[Fixture]> Import Macro Library “bestmacro.xml” At Macro 5 If Drive 2 /Path “/My\_grandMA3\_files” When the value of the path option starts with a slash (/), the system starts to navigate in the root of the drive (See the example from above). When the value of the path starts directly with a name, the system starts to navigate from the corresponding library folders, e.g., the macro folders in the gma3\_library and the resources. With the new gma3\_library (please read above), there are now also 2 places available where library files are located. With the /Type option can now be distinguished between user library files (/Type “User”) and system library files (/Type “System”). To list only the library files of the user MAtricks, type: User name\[Fixture]> List MAtricks Library /Type “User” To list all library files of the predefined MAtricks, type: User name\[Fixture]> List MAtricks Library /Type “System” The type option can also be used when a library file exists with the same name in the user library and the system library. To import the save\_show macro from the system library instead of the user library, type: User name\[Fixture]> Import Macro Library “save\_show\.xml” At Macro 21 /Type “System” The type option is also available for LoadShow, but with different values: The normal shows are /Type “Shows”, demo shows are /Type “Demo”, and backup files can be specified with /Type “Backup” To load the demo show from the demo shows folder, type User name\[Fixture]> LoadShow “Demoshow\_grandMA3.show” /Type “Demo” **Restriction:**\ The /Type option can only be used for LoadShow, Import or List. **Important:**\ When no type is specified, the type “User” has priority. A third and new option is /NoRefresh. When for example listing the library files of a certain type and path, it takes a while to type the options into the command line. When a file shall be imported afterward from the specified type and path, they need to be entered again.\ With /NoRefresh it is not necessary anymore to enter /Type and/or /Path again for the following command. Example: List all macro libraries within a specific path: User name\[Fixture]> List Library If Drive 2 /Path “/My\_grandMA3\_files/macro/archive” To import the second library then to macro 1, type: User name\[Fixture]> Import Library 2 At Macro 1 /NoRefresh Without the /NoRefreshOption, the user would have to execute this command: User name\[Fixture]> Import Library 2 At Macro 1 If Drive 2 /Path “/My\_grandMA3\_files/macro/archive” Also, a new command line option is /Gaps. This option allows specifying whether the number of gaps between pool objects shall be preserved during import, or not. During export, the gaps are always exported. In our following example, the macro pool has macros 1, 2, 4, and 8, and all these macros shall be exported into one XML file. To export the macros from our example, type: User name\[Fixture]> Export Macro 1 Thru 8 “mymacros.xml” Let’s continue and import the exported macros again to macros 11 onwards without the gaps, type: User name\[Fixture]> Import Macro Library “mymacros.xml” At Macro 11 /Gaps “No” But if you want to import the macros and get the former gaps back, then type: User name\[Fixture]> Import Macro Library “mymacros.xml” At Macro 11 /Gaps “Yes” In this case, it would also be possible to not specify the /Gaps-option, as the XML file contains these gaps already: User name\[Fixture]> Import Macro Library “mymacros.xml” At Macro 11  When opening the calculator of the DMX personality cell, the special area on the right side displays a button for each DMX personality. These buttons use the same naming scheme as mentioned above.\ When selecting several RDM fixtures of different RDM fixture types, the calculator displays only the personality of the first selected RDM fixture.When selecting one of the DMX personalities in this example, the DMX personality will only be changed for the corresponding RDM fixtures.  If an absent RDM fixture is connected to a different RDM port, the RDM fixture will be deleted from the previous RDM port.  Disabled properties, objects, etc. are now displayed with a red text color at these places: * Macro lines are displayed in red when the Enabled property of the macro line is set to No. * The sequence sheet displays entered commands in the Cmd cell with a red font color when the Cmd Enable setting of the sequence is switched off. * Layout elements are displayed in the layout editor with a red text color when the visibility of the element itself is set to Hidden, or when the assigned object of a layout element is not part of the currently selected world. * Agenda entries are displayed with a red font color when the agenda entry property Enabled is set to No or when the Agenda itself is totally switched off. * Disabled remote (DC Remotes, DMX Remotes, and MIDI Remotes) entries are also displayed with a red font color.  The Command Controls overlay allows now to use the area of the dimmer wheel for changing the dimmer values. To alter the dimmer values of the selected fixtures, tap into the dimmer wheel above Full, hold, and move the finger up or down. When the desired dimmer value is reached release the finger.  The grandMA3 onPC for macOS can now only be installed when an already installed grandMA3 onPC version is not running. The grandMA3 onPC installer on macOS informs the user with a pop-up if this is the case.  Date & Time menu * In addition to the implementation of the Agenda, the Date and Time menu displays now the sunlight times (Dawn, Sunrise, Sunset, and Dusk) of yesterday, today, and tomorrow in the Sunlight view. **Important:**\ All times are local times taking the time zone into account. Predictions will only work if the correct global location is given! Times are calculated for a flat horizon at sea level. Maximum precision for all times is +- one minute. * The time zone pop-up offers now to choose a time zone not only by entering an offset in relation to the UTC time but offers now also to choose a time zone from a list of the usual time zones. The list has an alphabetical order. The time zone pop-up allows searching within the list of available time zones. All time zones are listed by their official names and their offset to the UTC time. For all time zones that change to daylight saving time in summer, there are additional daylight saving time zones available. * The timezones.xml file within the resource folder of each grandMA3 version allows to add own time zones or to edit the existing time zones. The changes at this file are only visible after restarting the grandMA3 software. * The input fields for latitude and longitude were interchanged to meet the usual notation of coordinates. **Hint:**\ Executing a clean start for grandMA3 onPC pulls the current time and time zone from the operating system and sets it as time and time zone within the grandMA3 onPC software. Clock window * The Clock window has a new ClockSource called Time Zone Clock. When Time Zone Clock is active, a Timezone can be set up in addition. The time zone pop-up is the same as in the date and time menu described above. The clock window will then display the current time of the specified time zone in relation to the setup time in Menu - Settings - Date and Time. * The Clock window has a new property in its context menu called Title Prefix. The title prefix allows the user to enter a custom name, e.g., to enter a city that corresponds with the chosen time zone.  The OSC, PSN, and DMX Protocols menus display a “No Output Station” message in the Interface area and prevent any changes if no output configuration is generated for the station.  The copy cue pop-up was reworked: Instead of dropdowns, the options are now displayed with radio buttons which allows a faster overview and operation. In addition, the labels were reworked, too. * CopySrc is now called Source Cue * The buttons Merge, Overwrite (Status), and Overwrite (Content) have been removed. They are replaced by the Copy button and the new setting Destination Cue: * Merge: Defines that the content of the source cue will be merged to the existing content of the destination cue. * Overwrite: Overwrites the content of the destination cue. * The new option Tracking into Destination Cue defines what should happen with the content that is tracking into the destination cues: * Keep: Attributes that are tracking into the destination cue, and not touched by the copied attributes, will stay as tracked values. * Force Release: Attributes that track into the destination will be set to Release. * Force Default: Attributes that track into the destination will be set to their default values. * Cue Only offers now 3 options in direct access: * Off: Cue Only is off for the copy operation. * On: The copied cues will be inserted at the destination with activated cue only. Attributes that will be introduced by the copy operation will be set back to Release in the following cue. Read more about cue only in the [Store Cues topic](/grandma3/2-3/cue_store/). * On (Default New): Works the same way as On, but instead of setting Release values, the attributes will be set to default values. This revision also makes it necessary to change the command line options slighty: * /CopyCueDestination has now the possible values Keep, ForceRelease, and ForceDefault. * /CueOnly has the possible values Off, On, and OnDefaultNew. * Instead of /CueOnly “On” it is enough to specify only /CueOnly, when the default for CueOnly is set to Off. The workflow how the copy cue pop-up remembers its settings has also changed: The settings are now stored for the next copy operation when tapping Save in the title bar of the copy cue pop-up. After having changed the settings and you want to revert to the stored settings, tap Load.  It is now possible to set the trig type for the OffCue. To be able to do so, wrap around in the sequence settings has to be disabled. The following values can be applied: * NoTrigger: The OffCue will only be executed when switching the sequence off manually. * Go: When the last cue is active, pressing go again will execute the OffCue * Time: The OffCue will be triggered after the defined TrigTime. * Follow: The OffCue will be started when the previous cue has finished its transition. * Sound: Triggers the OffCue via the sound signal when the last cue is active. * BPM: Triggers the OffCue via the BPM signal when the last cue is active. To learn more about cue triggers, read the [Look at Cues and Sequences topics](/grandma3/2-3/cue_sequence_sheet/).  The system monitor displays now proper feedback when sending OSC messages fails. The feedback displays also the number and name of the corresponding OSC configuration line of the OSC menu.  Executor bar The executor bar design was updated: * The selected sequence is now displayed with a yellow background of the label area within the executor bar. Other selected objects, e.g., the selected world, are still displayed by a yellow border around the executor label. This gives a better indication of the selected sequence on the executors. * The value of a fader does not display decimals anymore when it is a percent value. * The function of a fader itself is now recognizable by the background color of the fader bar: * Yellow: Master * Green: Rate * Purple: Speed * White: All other fader functions, like Crossfade, Crossfade A, Crossfade B, Temp, Highlight, Lowlight, and Solo. * The abbreviation of the fader function Speed changed from SPD to SP. Furthermore, when the speed readout of the user profile is set to BPM, only a B will be used for this unit. In addition, in speed readout BPM no decimals are displayed anymore. All three changes allow now to display the full information within the fader bar of an executor label. * An appearance of a sequence is now displayed in the background of the executor. Therefore it will be displayed a bit darker than normal.\ When a sequence does not have an appearance, but part 0 of a cue within the sequence has an appearance, the appearance of part 0 will be displayed in the background of the executor, as soon as the cue is active.\ Each cue in the cue list of an executor displays the appearance of part 0. The image of the appearance will be displayed right in front of the cue number. The whole cue line will display the background color of the appearance. * The object number (in the top right corner), e.g., of a sequence, will now be displayed a bit brighter compared with the executor number in the top left corner of an executor.  Sequence settings Sequences have 2 more options regarding the look of the sequence on executors and in the layout: * PreferCueAppearance: When this option is enabled, and the current cue has an appearance, the cue appearance will be displayed on the executor or in the layout, instead of the sequence appearance. * ExecDisplayMode: The ExecDisplayMode defines how the sequence will be displayed on an executor: * DataOnly: Only the cues with their appearances will be displayed. The cue appearance is only displayed in the line of the cue, and not in the background. * AppearanceOnly: Only the sequence or cue appearance will be displayed. No cue names, fade bar, etc. will be displayed. This can be handy for sequences with only one cue, or for sequences with only color cues or gobo cues. * Both: Each cue line displays its cue appearance, and the sequence appearance or the appearance of the current cue will be displayed in the background of the executor.  It is now possible to create a new sequence directly by selecting an empty sequence in the sequence pool or selecting an empty executor. In case of selecting an empty executor, and the user did not use such a created and empty sequence, selecting then a different executor deletes the first created sequence and makes a new sequence on the newly selected executor.  Backup menu A new setting in the backup menu allows defining if media files shall be additionally exported to the hard drive or USB drive when saving a show. The option Export Media on Show Save is located in Menu - Backup - Settings. When it is enabled images, plugins, meshes, and some more that are part of the show file will be exported to the drive the user saves the show to. When it is disabled, the mentioned objects won’t be exported. Together with the new option, the Settings tab of the backup menu got a small restyling: The Interval button got renamed to AutoSave Interval, and the label on the left side of AutoSave Interval is now gone. Presets display now markers for absolute values and/or relative values depending on their stored values. The markers are squares in red or violet (same colors as in the layer toolbar).  Pop-ups for Goto and Load are now implemented. To open such a pop-up, enter Goto or Load into the command line. This can be done by entering the terms using a keyboard or by pressing Goto for Goto or Goto Goto for Load.\ After that, press the sequence or executor the pop-up should be opened for. Executing Goto or Load directly opens the corresponding pop-up for the selected sequence. Within the pop-up, scroll to the desired cue, and tap it. It is also possible to search for cues by entering the desired name within the filter input field at the top of the pop-up. Both pop-ups allow also to display the cue appearance. To do so, tap Cue Appearance in the title to display or hide the cue appearance. Both pop-ups share this setting. **Known Limitation:**\ It is not possible yet to use Goto or Load as a direct button function on an executor for this.  Swop can be assigned as a button function for an executor. Pressing the executor button plays then the sequence back with the swop functionality. Swop as button function is a temporary function, same as with Flash and Temp. In addition, sequences can be protected against swop. To do so, edit the settings of the desired sequence, and enable Swop Protect. This sequence will not be set to 0 anymore when executing swop with an other sequence. Swop is also affected by the playback master. When swopping a sequence that has a playback master assigned, only the sequences that have also the same playback master assigned will go to zero. Sequences outside of this playback master are not affected. Swop protect within the playback master is also respected.\ A sequence that will be swopped and that has no playback master assigned puts only sequences to zero that are also not having a playback master assigned.  Installed option Images, videos, and plugins can use the new setting Installed. When this setting is enabled, the station uses the resource from the drive from where it was imported, instead of taking it into the show file. This can reduce the size of show files. When taking new stations into the session, the user has to take care, that the files marked as installed are also available on these stations.\ When the Installed setting is disabled, the file will be imported into the show file and used from there. During a session upload, these resources will be transmitted to the joining devices, too.\ By default Installed is disabled.  New command HelpLua. Executing HelpLua exports a file named “grandMA3\_lua\_functions.txt” into the gma3\_library folder on the internal drive. This file contains all grandMA3 specific Lua functions.\ Furthermore, the manual provides now more detailed topics for the grandMA3 specific Lua functions. To learn about these functions, please read the [Lua functions topic and its subtopics.](/grandma3/2-3/lua_objectfree/) The manual does not describe all gandMA3 specific Lua functions, yet. It will be expanded all the time. To read the newest updates, please visit the online manual pages at [https://help2.malighting.com](https://help.malighting.com/grandMA3/2.3/HTML/help.html).  The software update menu got a small rework: * The buttons Select Update File, Import Selected Update File, and Update Devices are reordered to get a useful order that reflects the workflow: 1. Select the file, then the user can import a file or update devices. * The buttons Import Selected Update File, and Update Devices are grayed out, as long as no update file is selected. * When selecting a file to use for updating devices, the End User License Agreement (EULA) pops up, as the update process cannot prompt the user with the EULA on the updated device.  The color engine has been improved. It now makes use of color-measured fixture types with a subtractive color mixing system. If a fixture type has measured emitters or filter data, a DMX curve is created from this data and automatically applied to the corresponding logical channel of the fixture type. In the case of a fixture that has additive color mixing at least one color measurement with a color point at full output per emitter is needed. A DMX curve is created only if there is more than one measurement. In the case of a fixture that has subtractive color mixing at least two color measurements with spectral data are needed. One of these must be at maximum insertion and one at minimum insertion. **Hint:**\ Additional measurement values at different emitter output levels or filter insertions can significantly improve the accuracy, especially for emitters with non-linear brightness curves or filters with non-linear saturation curves.  The color theme got a new color definition for the selected color of pool buttons. It is called Selected and is located within the PoolButton color group. This allows defining a different color for the selected pool elements, e.g., Sequences, compared with the selection color of fixtures. *** ## []()What’s Changed [Section titled “What’s Changed”](#whats-changed-1) * Include Link Last Go moved in the settings of a sequence to the protect column. * Entering one IP out of the following ranges is not allowed anymore. The check will be done when the user tries to apply these IPs in the corresponding calculator. In case one of these IPs has been entered, a pop-up will inform the user about the illegal input.\ These are the blocked IP address ranges:\ 192.168.33.0/24\ 0.0.0.0/8\ 127.0.0.0/8\ 224.0.0.0/4\ 255.255.255.255/32 * Configuration lines in the Art-Net or sACN menu change the font color of their name to green when a corresponding packet is sent. When no packet is sent, the font color turns back to white. * The buttons in the timecode slot editor were rearranged, and the editor displays now also the IP address of the receiving station. * onPC stations that crash offer now to cancel the automatic restart. A pop-up will be displayed for 10s when the software crashed. The focus is set to Restart Now, which will restart the software when tapping the button, or after 10s when taking no further action. In case of choosing Cancel, the software will not start again after 10s. * When a selection has different attribute values set, the corresponding attribute encoder displays now the value of the last selected fixture. * When a pool element, e.g., a preset cannot be called by the current selection, the indicator bar on top of the pool object will display now the For None color of the pool window. * The root index numbers are reorganized. Direct index access commands may have to be adjusted. * The icon of the resize tool in several windows (Phaser Editor, Layout Window, and Timecode Window) has changed. This is the new icon:  * Toggling through the different channel functions on an encoder does not activate the attribute anymore. The attribute will be activated when changing the value of the attribute afterward. * The syntax of MAtricks has changed: The former keyword MAtricksPool to address the MAtricks object in the MAtricks pool is now gone. To address them now, use the MAtricks keyword: SelFix MAtricks 3 will apply the third MAtricks object in the pool to the current selection.\ To modify the MAtricks of one of the selections, address them with the combination of the keywords Selection and MAtricks. To set the XBlocks of the current selection to 3, type: User name\[Fixture]> Set Selection MAtricks “XBlock” 3 **Restriction:**\ Existing macros with MAtricks syntax cannot be converted by the system. * In the case of an RDM fixture that sends data from a non-supported RDM version, the RDM fixture will be displayed with orange font color within the RDM Devices window. * The specific library keywords (ColorThemeLibrary, FixtureTypeLibrary, GDTFLibrary, MacroLibrary, MenuLibrary, MeshLibrary, and PluginLibrary) are replaced by keyword combinations of the corresponding object keyword and Library:\ For example, Macro Library replaces MacroLibrary, ColorTheme Library replaces ColorThemeLibrary, and FixtureType Library replaces FixtureTypeLibrary.\ The GDTFLibrary keyword is replaced by a special combination together with the path option:\ FixtureType Library /Path ”../gdtf”\ This style also allows to address the fixture types that are converted from grandMA2:\ FixtureType Library /Path ”../grandma2” **Restriction:**\ Existing macros that use one of the mention object specific keywords cannot be converted to use the new syntax. * The LUA Core has been updated to LUA v5.4. * Changed the name of the ANSI E1.54 colorspace from “Plasa” to “Standard” in the color picker window. * The Magic workflow changed: * The MAgic layer was renamed to GridPos. * The MAgic values (now GridPos values) are now always activated automatically when entering attribute values or if calling presets. Therefore, they are automatically part of a preset when a preset will be stored. * With the automatic creation of the MAgic values (now GridPos values) on the GridPos layer, it is now possible to have different GridPos values for different attributes of the same fixture which expands the creativity. * Presets have now a MAgic property (edit the options of a preset, e.g., by executing EditOption Preset x.y). When the MAgic property is enabled, the preset will behave as a MAgic preset and distribute its values across the range of selected fixtures when calling it. * The Commands At MAgic and Off MAgic are obsolete now. If you change the grid position of fixtures and would like to apply the new GridPos value you can use At GridPos. **Important:**\ MAgic Presets must be stored as selective. * The EditOption keyword changed to EditSetting. * As executor is the correct word, most places where exec was used instead of executors were refactored. Among others these are: * The SpecialExec keyword changed to SpecialExecutor. * ExecTime changed to Executor Time. * Selection of groups, MAtricks, etc. is not possible anymore. As a result of this change, only the selected sequence can now interact with Go+ \[large], Go+ \[large], and, Pause \[large]. * The TTL of MANet3 network packets is now set to 8. * The phaser editor window uses now ViewMode instead of Layout to change between the different modes to display the data. * All windows that used to have the ability to set the window into a setup mode are having now a Setup toggle button instead of the 2 state button that changed between Normal/Playback and Setup. In detail, these are the 3D window, layout window, timecode window, and timecode editor. * The columns Enable and input (Signal, MIDI Channel, MIDI Index and MIDI Type) in the different remote types menus are moved more to the front. They are all now located right after the name column. * The show file migration converts the preset readouts for sheets (e.g., fixture sheet) of show files from v1.3 or prior in this way: * Preset to ID+Name * Both to Name+Value * Exporting filters exports now also the names of the attributes. * When the software starts, it tries to load the last show file from its last location (e.g., USB drive). If the last location is not connected anymore, the software tries to load a show file with the same name from the internal drive. * Show files that will be loaded from drives, that are not the internal drive, will be internally marked as to be saved. This will trigger the save dialog when loading another show later or when shutting down the system. * The system does not ask anymore to save a show later if loading the show failed, and therefore the show will stay empty. This prevents that the user may accidentally overwrite the existing show file. * The name of the FixtureIcon pool changed to Symbol. In new shows, there will be added some more symbols. Furthermore, a new lib\_symbols folder with many new symbols will be installed with this version onwards. The symbol library folder is located in gma3\_vx.x.x. * The sequence setting Off when Overwritten was renamed to Off when Overridden. **Important:**\ When importing sequences that were exported with v1.4 or earlier, the Off when Overwritten setting inside these files cannot be imported. In this case, Off when Overridden will be set to the default state. * The layers CueID and CueIDEffect within the layer toolbar of the fixture sheet are renamed to CueAbs and CueRel. CueAbs displays the references to the cue, where the played back absolute value is coming from, and CueRel displays the references to the cue, where the relative value of the output is coming from. * The layer toolbar in the fixture sheet was rearranged: Output, DMX, CueAbs, and CueRel are now placed behind Auto. These items are followed by the layers, that are also directly available within the encoder bar. While being on Auto, the layers within the fixture sheet change together with the ones in the encoder bar. * When calling MAtricks pool objects they will now always be activated, no matter if MAtricks were active or not, when storing the MAtricks pool object. * Web remote devices display now always by default the command line, and the control bar. * When activating the To value of any MAtricks property, and the From value is not set, yet, the From value will be activated with its default, e.g., 0s, 60 BPM, or 0°. *** ## []()Fixed Bugs [Section titled “Fixed Bugs”](#fixed-bugs-1) ### 3D [Section titled “3D”](#3d) | Description | | --------------------------------------------------------------------------------------------------------------------------------------------------------------------------------------------------------------------------------------------------------- | | Labels on Spot were not displayed for spots of subfixtures while Selection Only was active. This bug is fixed. The spots of subfixtures now display a label even if selection only is activated. | | Visual artifacts were displayed for fixtures with rectangle beams in the 3D window. This bug is fixed. A rectangle beam should not disappear any longer in any perspective. Also, there should not be visual artifacts with rectangular spots any longer. | ### Command Line and Macro [Section titled “Command Line and Macro”](#command-line-and-macro-1) | Description | | --------------------------------------------------------------------------------------------------------------------------------------------------------------------------------------------------------------------------------------------------------------------------------------------------------------------------------------------------------------------- | | When loading a different show and tapping Save, the previous show file was not always saved. This bug is fixed. Show files are now always saved when tapping Save. | | Command line pop-ups that were triggered via the LUA function cmd() could crash the console. This bug is fixed. Command line pop-ups triggered by LUA are not crashing the console anymore, but post an error message in the system monitor. | | Locking the console by pressing MA + MA + Pause \| Fix kept these buttons still highlighted during desk lock. This bug is fixed. Locking a console lights up now only the buttons that were highlighted before locking the console. | | When holding List pressed and then pressing an object hard key, e.g., Group, the List keyword was also posted into the command line. This bug is fixed. The List keyword will now only be posted into the command line when releasing List, and no other actions have been done. | | Selecting the children of a fixture and specifying the name of the main fixture, e.g., Fixture “Spot\*”, failed. This bug is fixed. Recursive selection of fixtures works now also when specifying the name of the main fixture. | | Selection commands where a range was specified and the range used at least one name, e.g., Fixture 1 Thru “Spot 8”, did not work. This bug is fixed. Selection ranges can now be specified using names. | | It was not possible to add a new selection to a recursive selection within one command, e.g., “Fixture 1. + Fixture 2”. This bug is fixed. Recursive selection is now also at the beginning of a selection syntax possible. | | When doing a recursive selection with fixture IDs that are not valid, all main fixtures were selected, e.g., Fixture 30. Thru in the Demoshow. This bug is fixed. Using invalid fixture IDs for a recursive selection returns now an error in the command line. | | When tapping MA + Update in the Command Section overlay Cook was not entered into the command line and instead, the update menu opened. This bug is fixed. MA + Update in the Command Section overlay inserts now Cook into the command line. | | Renaming groups that contained only one fixture renamed also the fixture itself. This bug is fixed. Fixtures are not renamed anymore when renaming a single fixture group. | | Single fixture groups always displayed the appearance of the fixture. This bug is fixed. When assigning a third appearance to a single fixture group, the new appearance will now be displayed on the group pool object. The appearance of the fixture itself stays unchanged. | | The input of a recursive selection command like “Fixture 301. Thru .1” was not possible via the keys. This bug is fixed. Pressing . in conjunction with a selection command should work now in every case as expected. | | When disabling the general undo for a user profile, users using this user profile could still oops the operation of the sliders in the MAtricks window. This bug is fixed. Oopsing the operation of the MAtricks sliders is now dependent of the undo general setting within the user profile. | | Importing a view that contained a layout window set to a dedicated layout object, the layout window was reset to the selected layout. This bug is fixed. Importing views with layout windows imports the setting of the selected layout object now correctly. | | The console failed to export a color theme for the first time. This bug is fixed. Exporting a color theme does now always work. | | Exporting to a USB drive failed when the USB drive was selected by tapping, holding, and dragging the drive select button, and then choosing the USB drive from the list. This bug is fixed. The correct USB drive will now also be selected when choosing it from the drop-down list of the drive select button. | | The software could crash when copying cues that had values for attributes without a feature definition. This bug is fixed. Attributes without a feature defined do not cause a crash anymore when copying cues. | | Storing an MAtricks object and specifying a name applied the name to the MAtricks object. This bug is fixed. Store MAtricks “Cool Setup” will now create an MAtricks object that is called “Cool Setup”. | | It was possible to set non-existing values for properties when using a number instead of the value name. This bug is fixed. Set Selection 1 MAtricks “InvertStyle” 100 does not apply 100 as value anymore, as this property has not 100 different values. | | Importing multiple objects at once and not specifying a target spot, did not ask the user how to proceed when at least one target spot was not empty. This bug is fixed. Import asks now always when the destination is not empty. | | When exporting and importing a sequence that used individual timings the timings were set to 0 after the import. This bug is fixed. Individual times within sequence are now preserved during export and import. | | The command Off Page x to turn off the executors of a specific page did not work. This bug is fixed. Off Page x works now as expected. | | It was possible to assign the same fixture several times within a layout by creating several layout elements and editing the object cell within the layout editor. This bug is fixed. Fixtures and subfixtures can now only be assigned once within one layout. | | The import of sequences ignored individual fade and delay times. This bug is fixed. Individual fade and delay times within sequences will be imported correctly. | | Stack labeling of objects did not obey leading zeros. This bug is fixed. Leading zeros are kept during relabeling objects. | | Calling an MAtricks object with an assigned appearance and/or scribble into a selection called also the appearance and/or scribble. Storing then a new MAtricks object also included the appearance and/or scribble assigned. This bug is fixed. Calling a MAtrick that has an appearance and/or scribble assigned does not call the assigned objects anymore. | | Moving or deleting layout 1 created immediately a new layout. This bug is fixed. It is now possible to delete all layouts within the layout, and it is possible to not have a layout 1. | | Closing the assign menu for an executor with no object assigned kept an empty executor object. This bug is fixed. Empty executors are now deleted when closing the assign menu. | | List Library did not display library files that were added during the runtime of the software. This bug is fixed. Listing the library files of an object displays now also files that were added since listing them the last time. | | Importing objects into locked objects changed the locked objects. This bug is fixed. Locked objects as import targets are not modified anymore. | | The software could crash when importing a data pool into an existing one. This bug is fixed. Importing data pools should not crash the software anymore. | | Importing a timecode show could not display the events of the first track in the timeline view mode. This bug is fixed. Importing a timecode show imports all events correctly. | | Merging into an existing group switched off the Move Grid Curser setting. This bug is fixed. Move Grid Cursor won’t be disabled anymore when merging into a group. | | Listing groups did not display the Move Grid Cursor setting of the groups. This bug is fixed. The command line history returns now also the Move Grid Cursor settings of groups when listing them. | | Moving objects in pools to IDs above 9 999 were lost. This bug is fixed. Move actions to pool IDs above 9 999 won’t take place anymore. When moving several objects at the same time, and only some of them will moved to be above pool ID 9 999, only the objects below 9 999 will be moved. | | When changing the target of a timecode track, the events inside the track still referenced to the former target. This bug is fixed. Targets of timecode tracks are now also referencing to the new target when the target of the track will be changed. | | When deleting cues of sequences that are used in timecode shows, the now empty events within the timecode show were handled as Go+ when playing back the timecode show. This bug is fixed. Empty timecode events won’t trigger the next cue anymore. | | The cue part number was lost when copying sequences. This bug is fixed. Sequences are now copied without discarding the cue part numbers. | | Exporting a data pool, and importing it again, lost all presets in the imported data pool. This bug is fixed. Importing a data pool preserves now presets. | | Executing “Copy Cue 1” could crash the software. This bug is fixed. Copying a cue into the clipboard should not crash the software anymore. | | Pressing Blind while being in the update menu, updated the current cue of the selected sequence. This bug is fixed. Pressing Blind does not update cues anymore while having the update menu open. | | Fixture At Fixture within layouts did not work. This bug is fixed. Having fixtures selected, adding At into the command line, and then selecting fixtures within a layout window, executes now the Fixture At Fixture functionality correctly. | | Oopsing the store operation into an existing view could cause an empty view button when trying to call the original view button later again. This bug is fixed. View buttons won’t be empty anymore when oopsing the store operation into them when they existed already. | | Recording timecode events did not always record all events that had a trigger time of 0s. This bug is fixed. Timecode events should now always be recorded, no matter of the setup trigger time. | | Tapping Shuffle in the MAtricks window did not shuffle correctly. This bug is fixed. Shuffle creates now again new values when tapping Shuffle in the MAtricks window. | | Entering commands with specifying the input readout for the value, did not work correctly when using Decimal16 or Hex16 readouts. This bug is fixed. Commands like “At Decimal16 512” set now the value to 512 in decimal readout. | | Macros with command keywords, e.g., Move, that had AddToCmdline set to Yes and Execute set to No, executed the command immediately when tapping the first object. This bug is fixed. Macros with a command functions keyword that requires to specify a source and a destination object by tapping them work now as expected. | | The store modes All and All For Selected did not store the attributes that were expected. This bug is fixed. Store modes All and All For Selected store now all attributes of the show, or all attributes of all selected fixtures. | | Storing into an existing preset while having still the values of a different fixture for this preset deactivated in the programmer did not retain a preset link for the new fixture in the programmer. This bug is fixed. Deactivated preset links in the programmer do not prevent other fixtures to get a preset link in the programmer when storing into a preset. | | Moving a list of objects failed, when the destination was also part of the source, e.g., Move Group 1 Thru 3 At Group 3. This bug is fixed. Move with overlapping source and destination works now. | | Moving a range of objects, where the range of objects had gaps, removed the gaps at the destination. This bug is fixed. Having groups 1 and 3, and moving them with Move Group 1 Thru 3 At Group 11 results now in groups 11 and 13, and not groups 11 and 12. | | The software crashed when trying to record new events into a locked timecode show. This bug is fixed. Trying to record events into a locked timecode show does not crash the software anymore. | | Overwriting all integrated data within a preset kept the integrate symbol on the preset. This bug is fixed. The integrate marker will be removed when overwriting all integrated data of a preset. | | Storing into a range of cues created new, but unwanted cues. This bug is fixed. New cues will not be created anymore when storing into a range of existing cues. | | When entering values using the numeric keypad of a grandMA3 console while editing an XLR port of the output configuration, pressing Please was not recognized. This bug is fixed. The Edit XLR pop-up can now be closed by pressing Please on the numeric keypad of grandMA3 consoles. | | Press, hold and turn of an attribute encoder reset align immediately when releasing the encoder. This bug is fixed. Align is not reset anymore when releasing a pressed attribute encoder. It will be reset first when starting to use an encoder of a different attribute. | | When unzipping grandMA3 onPC for Windows zip files with the Archive Utility of macOS, the extracted files were malformed. This bug is fixed. The macOS Archive Utility can now be used again to unzip grandMA3 onPC zip files. | | Changing the background color of an appearance to black changed the size of an additionally used image within the appearance. This bug is fixed. The size of an image is not changed anymore when changing the background color of an appearance. | | The cue only setting and the sequence mode setting of the update menu was not stored when tapping Save Preferences. This bug is fixed. The preferences of the update menu include now the cue only setting and the sequence mode setting. | | When storing a cue right after storing a preset while having Keep Activation enabled did not store the preset link into the cue. This bug is fixed. Storing right behind preserves now the link to presets. | | Importing an MAtricks object did not import the speed values correctly. This bug is fixed. MAtricks are now imported correctly. | | Storing an attribute into part 0 of a cue, that is already stored in a different cue part, did not respect the Allow Duplicate setting. This bug is fixed. Allow Duplicates is now respected when storing explicit into part 0. | | Timecode events that were placed at the beginning of the time range were not always played back. This bug is fixed. Timecode events that are placed at the edges of the time range are now played back correctly. | | Selecting fixtures by pressing the SelFix key of an executor did not select the fixtures within the layout when the layout window was switched into the setup mode. This bug is fixed. Fixtures within the layout window will be selected when pressing SelFix on an executor where these fixtures are part of the assigned object. | | Values on phaser layers were not stored into presets when the value was set to the default value. This bug is fixed. Values of phaser layers are now always stored into presets when they are active. | ### Connections [Section titled “Connections”](#connections) | Description | | ---------------------------------------------------------------------------------------------------------------------------------------------------------------------------------------------------------------------------------------------------------------------------------------------------------------------------------------- | | When having a session with two or more grandMA3 onPC stations running on macOS, it could happen that both stations were displayed alternating on the same line in the network menu. This bug is fixed. Each grandMA3 onPC station running on macOS is now displayed in its own line within the network menu. | | When inviting a station into a session, it could happen that both stations used the same Session Slot. This bug is fixed. When initializing a session, or inviting stations into a session, each station gets now its own and unique Session Slot. | | Layout windows being displayed within a web remote connection could flicker. This bug is fixed. Layout windows displayed within a web remote connection do not flicker anymore even if the same layout is not displayed on the host station. | | It was not possible to output DMX locally when a console booted up in standalone mode. This bug is fixed. Local DMX output is now always immediately possible when a console finished its boot process. | | The software could crash when a web remote connection was not finally established and one of the connection participants already tried to use the connection. This bug is fixed. The software should not crash anymore when a web remote connection is not ready, yet. | | When receiving a long OSC command followed by a short one, fragments of the long one could be visible in the system monitor. This bug is fixed. Fragments of long OSC messages are not visible when followed by a short one. | | If a key with a macro assigned to start a sequence was triggered through OSC, the console GUI could freeze. This bug is fixed. Macros assigned to keys to start a sequence can be triggered through OSC. | | OSC commands were not sent if triggered from a connected console in a session. This bug is fixed. OSC commands are sent from connected consoles in a session as well. | | The Toggle buttons for OSC input and output did not work correctly. This bug is fixed. OSC input and output buttons toggle each property right. | | OSC commands were only sent if Send and SendCmd were enabled in the OSC configuration menu. This bug is fixed. OSC commands are sent also if only SendCmd is enabled. | | The after roll of a timecode slot was not started when the timecode signal was input into an I/O node and the I/O node lost its connection. This bug is fixed. The timecode slot after roll will be started when an I/O node disappears from the session. | | The DMX input of sACN packets ignored the start code and therefore processed alternative sACN packets as DMX sACN packets. This bug is fixed. The DMX input of sACN processes now only DMX sACN packets. | | Connecting via SFTP to a console did not allow to access the user data of other installed versions. This bug is fixed. Accessing the console via SFTP now also allows to enter the folders of other installed software versions. | | The software crashed when trying to change the IP address for an interface, but keeping the input field empty. This bug is fixed. Applying an empty IP address does not crash the software anymore. In this case, the former IP will stay. | | Changing the IP address of a station that is part of a session caused unexpected session behavior. This bug is fixed. Changing the IP address of a station within a session to a totally different subnet does not keep the station trying to join the session all the time. | | The station priority of an onPC station was reset to Normal when connecting an onPC command wing or onPC fader wing the first time after starting the application. This bug is fixed. The station priority does not change anymore when connecting an onPC command wing or onPC fader wing after starting the grandMA3 onPC application. | | The takeover from the main timecode source to the backup timecode source was not smooth. This bug is fixed. When the first received timecode input fails, the input on a different station takes now over seamlessly. | ### Patch [Section titled “Patch”](#patch) | Description | | ------------------------------------------------------------------------------------------------------------------------------------------------------------------------------------------------------------------------------------------------------------------------ | | Copy and paste of fixtures in the patch caused duplicated UUIDs for those fixtures. This bug is fixed. Copy and paste of fixtures do not create duplicate UUIDs for those fixtures or export them if a patch was exported as MVR. | | Oopsing the assignment of a Mode Master when editing a fixture type could cause a crash. This bug is fixed. Oppsing a Mode Master assignment does not cause a crash anymore. | | A fixture without an assigned fixture type in the patch could crash the software when trying to select this fixture. This bug is fixed. Selecting a fixture without an assigned fixture type does not crash the software anymore. | | The DMX footprint of a fixture type with nested geometry references was calculated wrong. This bug is fixed. A fixture type with nested geometry references now has a correct DMX footprint. | | Changing a Fixture ID to an already existing ID did not inquire the user. This bug is fixed. Switching a Fixture ID to an already used one displays a pop-up to review the operation. | | Editing the mode of a fixture displayed all modes available in the show file. This bug is fixed. Editing the mode of a fixture only displays the modes available for the selected fixture. | | Applying the same label command again on fixtures resulted in multiple equally labeled fixtures. This bug is fixed. Relabeling multiple fixtures now counts up the right way. | | The universal fixture could be deleted or moved. This bug is fixed. It is not possible to delete, move, or cut and paste the universal fixture anymore. | | ”Global” could be assigned as a ID Type. This issue has been fixed. The “Global” Fixture Type and the Global Stage are now hidden and can’t be edited nor assigned. | | Cut and paste of fixtures in Patch was losing Layer and Class information. This bug is fixed. Cut and paste of fixtures in Patch keeps Layer and Class information | | Setting the option “React to master” to “None” or “Group” for fixtures in the patch did not work. This bug is fixed. Now, after leaving the patch the setting is saved. | | The property “RealAcceleration” of a channel function was not imported when a GDTF was imported. This bug is fixed. The RealAcceleration property of a GDTF is now correctly imported. | | Channel functions were imported with their default name instead of their custom name when a GDTF was imported. This bug is fixed. Custom names of channel functions of a GDTF are imported correctly now. | | Adding new layers or classes between existing ones changed also the assignment of layers or classes of fixtures when entering the patch later again. This bug is fixed. Layer or class assignments of fixtures are not changed anymore when adding new ones to the show. | | Assigning a fixture that has now DMX patch into a layout crashed the software. This bug is fixed. The software does not crash anymore when adding a fixture without a DMX address into a layout. | | The software could crash when adding hundreds of millions new fixtures. This bug is fixed. Trying to add too many fixtures does not crash the software anymore. | ### Phaser [Section titled “Phaser”](#phaser) | Description | | ------------------------------------------------------------------------------------------------------------------------------------------------------------------------------------------------------------------------------------------------------------------------------------------------------------------------------------- | | When editing a phaser and changing the speed in wide steps, the software could crash. This bug is fixed. Editing the phaser speed in wide steps does not crash the software anymore. | | Changing the form of a phaser by using the phaser editor, reset the phase values to 0°. This bug is fixed. Individual phase values are now kept when changing the form of a phaser. | | When having multiple steps, select them together, and then turning the encoder of an until now not involved attribute set different values for this attribute within the selected steps. This bug is fixed. Activating attributes for multiple selected steps by turning the encoder sets now the same value into the selected steps. | ### Playback [Section titled “Playback”](#playback-1) | Description | | ------------------------------------------------------------------------------------------------------------------------------------------------------------------------------------------------------------------------------------------------------------------------------------------------------------------------------------------------------------------------------------------------------ | | When storing normal values with the cue only option into empty cues, it could happen that the cue displayed the phaser marker. This bug is fixed. Cues should now only display the phaser marker when there is more than 1 step in the cue. | | The I< button in the sequence encoder bar jumped to CueZero. This bug is fixed. The I< button now jumps to the first cue. | | When switching off a sequence where the OffCue has timings, and the master of the sequence was below 100%, the fade and delay to off took place only at the last time frame that was proportional to the position of the master of the sequence. This bug is fixed. The timings of the OffCue are now running completely when switching off a sequence, no matter of the master level of the sequence. | | The position of the master fader of a sequence was not respected when activating attributes that use a preset. This bug is fixed. Knocking in attributes that use presets which are played back by a master scaled sequence activates now the value in respect of the scaled master fader. | | Playing back recipes with a set phase did not use the phase of the recipe, but used the phase of the preset that was specified within the recipe. This bug is fixed. Recipes use now their set phase, instead of the one of the preset. | | Restart Current Cue did not restart the current cue when the sequence was switched off before by using a fade time within the OffCue. This bug is fixed. Restart Current Cue works now also when the OffCue has a fade time. | | Pausing a follow cue by pressing Pause was not possible. This bug is fixed. Follow cues can be now paused. | ### Windows [Section titled “Windows”](#windows-1) | Description | | ---------------------------------------------------------------------------------------------------------------------------------------------------------------------------------------------------------------------------------------------------------------------------------------------------------------------------------------------------------------------------------------------------------------------- | | The timecode markers and time ranges were sorted by their ID in their pop-ups. This bug is fixed. Markers and time ranges are now sorted by their start time. | | When changing between the different tabs of the backup menu, the selected file was not kept selected. This bug is fixed. The selected file stays now selected when changing to a different tab in the backup menu. | | The encoder bar window created several errors in the system monitor when being on another screen than screen 1 and entering the setup mode of the layout window. This bug is fixed. The encoder bar window should not create errors in the system monitor anymore. | | Tapping - the first time for the layer MAtricks property in the MAtricks window, while this property did not have any active value, set the value to non-logical values. This bug is fixed. Tapping - the first time for a layer MAtricks property sets the value to its default values, e.g. 60 BPM for speed MAtricks properties. | | At some places within the recipe editors, MAtricks was spelled wrong. This bug is now fixed. The user interface should now always display MAtricks correctly spelled. | | When entering the setup mode of the timecode editor, the encoder bar did only change to the timecode editor encoder bar when tapping into the title bar of the timecode editor in addition. This bug is fixed. The timecode editor encoder bar is now always displayed when entering the setup mode of the timecode editor. | | In the Fixture sheet, the display rules for selected CIDs were not consistent with the FID rules. This bug is fixed. Selected CIDs are displayed the same way as the FID rules. | | On 2Port nodes the port configuration did not display valid data for port 1. This bug is fixed. The port configuration menu on 2Port nodes displays now again all ports for configuration. | | The performance of the UI slowed down when a layout window with huge images was displayed. This bug is fixed. Images with big resolutions do not drastically slow down the UI performance anymore. | | The timecode editor did not always appear when editing a timecode show. This bug is fixed. When entering the setup mode of a timecode window or when editing a timecode show, the timecode editor bar will now always be displayed immediately. | | When having an overlay above a pool window, and scroll in the pool window behind the overlay, the focus frame of the selected pool object shone through. This bug is fixed. Selected elements behind overlays do not display the white focus frame on top of the overlay anymore. | | Groups in layouts disappeared in the layout window when being in a world where not all fixtures of the group are part of the world. This bug is fixed. Groups are now always displayed, also when the current world is limited to a subset of fixtures that do not allow to select any fixture of the group. | | The different properties in the Date & Time menu had the wrong input ranges defined. This bug is fixed. The Date & Time menu has now useful input ranges defined per property. | | Using the color picker with a fixture that had DMX channels for Hue and Saturation of an HSB color mixing system caused a crash. This bug is fixed. | | When changing the timecode slot generator start time, the displayed time was not updated right away. This bug is fixed. Changing the timecode slot generator start time updates the display directly. | | The Timecode display colors for Generator and External source did not work like expected. This bug is fixed. The display color for Generator and External Source is used correctly in the timecode slot pool and clock set to timecode clock. | | Identical channel functions of different subfixtures were not merged in the channel function selector of the encoder and in the calculator of an encoder in some cases. This bug is fixed. Identical channel functions are merged correctly now. | | The layout window could display the wrong dimmer values for fixtures when changing the dimmer value of another fixture. This bug is fixed. The layout window displays now always the correct dimmer values for each displayed fixture. | | The order of the toolbar copy/cut/paste buttons was inconsistent across several windows. This bug is fixed. The order of the toolbar buttons is now unified. | | If the onscreen keyboard was changed to Russian language, the yY letter was displayed wrong. This bug is fixed. The Russian onscreen keyboard does not display two eE buttons anymore. | | The additional input buttons on the left side of a calculator did not work properly if the calculator was moved. This bug is fixed. Selecting for example a channel set in the calculator of the encoder bar is working fine again after moving the calculator. | | When assigning a sequence or group to an executor not equipped with a fader or encoder, or changing the fader/encoder assignment to empty afterwards, the “MST” for the fadermaster was still displayed in the playback bar. This bug is fixed. “MST” is not displayed anymore when assigning a sequence or group to an executor not equipped with a fader or encoder or changing the fader/encoder function to empty. | | Special executors without an assigned object displayed their internal name on the special executor label which made the user think, that this special executor is not empty. This bug is fixed. Empty special executors do not display a name anymore. | | The speed values on executor labels were wrong when the speed readout was set to Seconds. This bug is fixed. Speed readout Seconds displays now the correct values on executor labels. | | Opening and closing the phaser editor from the encoder bar within a new show file created black layer buttons in the encoder bar. This bug is fixed. The layer buttons do not turn black anymore when toggling the phaser editor from the encoder bar within a new show file. | | The smart view objects, appearances, and presets that had only an appearance assigned did not display a shadow around their labels in their pools. This bug is fixed. All pool objects that have an appearance assigned, display a pie chart, a color or a scribble in the background have now a text shadow for their labels. | | The fixture sheet displayed as IDs of subfixtures always the fixture ID in the CID cell. This bug is fixed. When a fixture has subfixtures and a CID, the CID is now displayed for the subfixtures. | | The IP calculator had the buttons for 0 and . interchanged compared with the layout of the keys on consoles. This bug is fixed. The IP calculator matches now for all buttons, except / the key layout of the consoles. | | It could happen, that not all layout elements were displayed when the layout window was displayed on one of the small screens (display 6 and 7). This bug is fixed. Layout windows on the small screens display now always all layout elements that are placed in the visible area of the layout. | | When entering the In & Out menu again, the last selected tab was not remembered. This bug is fixed. The In & Out menu remembers now the last tab the user selected the last time when entering it again. | | Changing the WingID of an internal wing did not update the content of the executor to the new WingID. This bug is fixed. The content of the letterbox screens is updated immediately when changing the WingID of an internal wing. | | The button Frame Readout within the settings of a timecode show did not display the set frame readout. This bug is fixed. Frame Readout displays now the correct value. | | The executor label within the playback bar did not display newly stored cues. This bug is fixed. New stored cues appear now immediately within the executor label when the new cue will be the next cue after the current cue. | | The order of the available DMX Readouts was not the same at all places where the user can choose it. This bug is fixed. The order of the DMX Readout values should now be the same on all places where it is used. | | When having shortcuts enabled, the Xkeys window did not display the corresponding shortcuts. This bug is fixed. The Xkeys window displays now the shortcuts on its buttons when they are activated. | | The software could crash when opening a 3D window after importing an MVR file. This bug is fixed. The software should not crash anymore when opening a 3D window. | | The settings window of the clock window was too big for screens 6 and 7. This bug is fixed. The settings window of the clock window scales now properly for the two small screens. | | It was not possible to tap I agree or I DO NOT agree within the EULA pop-up after installing a new version on screens 6 and 7. This bug is fixed. The End User License Agreement can now be operated again on the small displays of grandMA3 light and full-size consoles. | | The layout window could display the wrong or no IDs for subfixtures. This bug is fixed. The layout window displays now the IDs of subfixtures correctly | *** ## []()Appendix [Section titled “Appendix”](#appendix) * It is recommended to use a dedicated and a separate physical network for each grandMA3 session. * When using DMX protocols it is recommended to use a dedicated physical network for each protocol. * The recommended workflow for executor configurations that are different compared with the default executor configuration is to create a new executor configuration, do the changes in the new configuration and save the changes. * XML files with exported executor configurations from grandMA3 v1.2 and prior cannot be properly imported to grandMA3 v1.3 or later due to structural changes. * XML files with exported analog remote setups from grandMA3 v1.3 and prior cannot be properly imported to grandMA3 v1.4 or later due to structural changes. * XML files with exported timecode shows from grandMA3 v1.3 and prior cannot be properly imported to grandMA3 v1.4 or later due to structural changes. *** ## []()Known Limitations [Section titled “Known Limitations”](#known-limitations) Software update via network to onPC stations requires confirmation during the install process at the destination system. When deleting a preset that is referenced by a cue the reference cannot be restored when oopsing the deletion. When multiple GlobalMasters exist on the network, each having the same session and location name, the station with the higher priority takes over without user input. If all stations have the same priority, then the station with the longest Online Time becomes the GlobalMaster for all stations. Programmer content is discarded when loading show files from previous versions. NDI as a video source is a feature preview.
# Release Notes 1.6
> Do you need help getting started in grandMA3? Perfect - here we describe a few quick steps to get you rolling. The manual will explain functionality in detail w
* [Get Started](/grandma3/2-3/key_rn_v1_6/#h2__1435677565) * [Bugfix Version 1.6.3.7](/grandma3/2-3/key_rn_v1_6/#h2_551141764) * [Other Enhancements](/grandma3/2-3/key_rn_v1_6/#h2_1198082799) * [What’s Changed](/grandma3/2-3/key_rn_v1_6/#h2_563643534) * [Fixed Bugs](/grandma3/2-3/key_rn_v1_6/#h2__1624482491) * [Bugfix Version 1.6.3.5](/grandma3/2-3/key_rn_v1_6/#h2_1713941178) * [What’s Changed](/grandma3/2-3/key_rn_v1_6/#h2__924702632) * [Fixed Bugs](/grandma3/2-3/key_rn_v1_6/#h2__759464123) * [grandMA3 Version 1.6.1.3](/grandma3/2-3/key_rn_v1_6/#h2_594421974) * [Features](/grandma3/2-3/key_rn_v1_6/#h2_727740091) * [](/grandma3/2-3/key_rn_v1_6/#Features)[Presets](/grandma3/2-3/key_rn_v1_6/#h3_956339510) * [Command Wing Bar](/grandma3/2-3/key_rn_v1_6/#h3__422989463) * [CleanUp Command](/grandma3/2-3/key_rn_v1_6/#h3__1195489397) * [Stomp](/grandma3/2-3/key_rn_v1_6/#h3__938816491) * [RDM](/grandma3/2-3/key_rn_v1_6/#h3__1132175009) * [Markers](/grandma3/2-3/key_rn_v1_6/#h3__430960067) * [Backup Menu](/grandma3/2-3/key_rn_v1_6/#h3_1498318733) * [Other Enhancements](/grandma3/2-3/key_rn_v1_6/#h2_34494591) * [What’s Changed](/grandma3/2-3/key_rn_v1_6/#h2__2036553563) * [Fixed Bugs](/grandma3/2-3/key_rn_v1_6/#h2_1665398321) * [Appendix](/grandma3/2-3/key_rn_v1_6/#h2__1835053169) * [Known Limitations](/grandma3/2-3/key_rn_v1_6/#h2__1852571500) *** ## []()Get Started [Section titled “Get Started”](#get-started) Do you need help getting started in grandMA3? Perfect - here we describe a few quick steps to get you rolling. The manual will explain functionality in detail while the MA e-Learning within the MA University offers you all kinds of training. All information can be accessed through the MA Lighting website [www.malighting.com](http://www.malighting.com). Let´s go! Once you leave the Release Notes by tapping I agree on the top right corner, you get presented with the main screen of grandMA3 software. On the right side, you can see predefined views. By tapping the view buttons you can switch between them. If this is your first time starting grandMA3 software you need to patch some fixtures first to get started. Or you can load one of the demo shows delivered with the software. In both cases, you need to press Menu key. If you are using grandMA3 onPC software there is a  symbol in the top left corner. Clicking the symbol is the same as pressing the Menu on a console. Hit Backup, and tap Load in the pop-up menu. Now you are ready to load shows. As you want to get started quickly you should change in the header bar from Shows to Demo Shows by tapping the button repeatedly. Once it says Demo Shows you can choose any of them by double-clicking on it or selecting it and then tap Load Show. Just in case there was a show loaded already the software will ask you if want to save the current show first before loading the new one… your choice ;-) Here we go! Now you are ready to work with the grandMA3 software. It is as easy as that! Again - on the right side are the view buttons to change screen content. At the bottom, you find the encoder bar and the command line. Technically that is all you need to get started. For more detailed information, refer to the grandMA3 help menu which you can reach by one of the view buttons named Help or via the MA Lighting website. If you want to learn grandMA3 software step by step please join the MA e-Learning - it’s free of charge and available via the MA Lighting website. Have fun with the grandMA3 software - next, you will find all the improvements and changes of this software version. **Hint:**\ The grandMA3 software will start with the show file (or status) that was active when the software was closed. *** ## []()Bugfix Version 1.6.3.7 [Section titled “Bugfix Version 1.6.3.7”](#bugfix-version-1637) ## []()Other Enhancements [Section titled “Other Enhancements”](#other-enhancements)  grandMA3 onPC works now also on Apple Macs running macOS 12 (Monterey). *** ## []()What’s Changed [Section titled “What’s Changed”](#whats-changed) * Using all tools, except the follow tool, within the 3D window does not trigger the temporary Single Step functionality anymore. *** ## []()Fixed Bugs [Section titled “Fixed Bugs”](#fixed-bugs) ### Command Line and Macro [Section titled “Command Line and Macro”](#command-line-and-macro) | Description | | -------------------------------------------------------------------------------------------------------------------------------------------------------------------------------------------------------------------------------------------------------------------------------------------------------------- | | Unblocking could remove the references to presets and left hard values when presets were used. This bug is fixed. Unblocking should not delete preset references anymore. | | When storing a cue the MAtricks setting were not always respected. This bug is fixed. The current MAtricks settings are now again taken into account when storing a cue. | | Storing into an existing cue by using the Release option created an additional step in the cue that contained the release values. This bug is fixed. Store release does not create additional steps in the target cue anymore. | | The size of the value change when turning an encoder could change when the encoder was switched off through a macro that addressed the whole encoder page. This bug is fixed. Off EncoderPage within an executed macro does not change the size of the value change anymore when turning an encoder afterward. | ### Connections [Section titled “Connections”](#connections) | Description | | -------------------------------------------------------------------------------------------------------------------------------------------------------------------------------------- | | It was not possible anymore to connect grandMA3 devices of different subnets using a gateway. This bug is fixed. grandMA3 sessions can be established again across different subnets. | ### Patch [Section titled “Patch”](#patch) | Description | | -------------------------------------------------------------------------------------------------------------------------------------------------------------------------------------------------------------- | | Moving fixture types within the patch could crash the software when applying the changed patch structure. This bug is fixed. The software should not crash anymore when moving fixture types within the patch. | ### Phaser [Section titled “Phaser”](#phaser) | Description | | ------------------------------------------------------------------------------------------------------------------------------------------------------------------------------------------------------------------------------------------------------------------------------------------------------------------------------------ | | Having a preset called in step 1 and then integrating a preset into step 2 set the preset of step 1 also in step 2 into the programmer. This bug is fixed. When integrating presets into steps, the desired preset is integrated again. | | Calling a multi-step preset and then integrating a different preset in one of the steps did not store the resulting phaser correctly. This bug is fixed. Phasers are now stored correctly, also when calling them from a preset and then exchanging one used preset within the programmer. | | Storing a phaser that was created within the programmer and that has presets integrated into two or more steps, displayed hard values within the tracking sheet and fixture sheet when it was stored into a sequence. This bug is fixed. Integrated presets within directly stored phasers in sequences are now displayed correctly. | ### Playback [Section titled “Playback”](#playback) | Description | | ---------------------------------------------------------------------------------------------------------------------------------------------------------------------------------------------------------------------------------------------------------------------------- | | Moving a temp fader up and down could cause a fader error mode. This bug is fixed. Executor faders that have the temp fader function assigned should not go into error mode anymore by only moving the fader up and down unless there is a real issue with the fader itself. | | A large number of running multi-step phasers could sometimes result in a channel not refreshing with each frame. This is fixed. Channels are always refreshing even with a large number of multi-step phasers. | *** ## []()Bugfix Version 1.6.3.5 [Section titled “Bugfix Version 1.6.3.5”](#bugfix-version-1635) ## []()What’s Changed [Section titled “What’s Changed”](#whats-changed-1) * Executor labels that are not at 0% or at 100% display now a value of at least 1% or 99%. * The SequenceMode in the update menu is reset to All for all user profiles when loading a show file the first time in this version. *** ## []()Fixed Bugs [Section titled “Fixed Bugs”](#fixed-bugs-1) ### 3D [Section titled “3D”](#3d) | Description | | ---------------------------------------------------------------------------------------------------------------------------------------------------------------------------------------- | | On Apple M1 systems all beams were flickering if a dimmer phaser was running on some of them. This bug is fixed. Beams on Apple M1 systems do not flicker if a dimmer phaser is running. | ### Command Line and Macro [Section titled “Command Line and Macro”](#command-line-and-macro-1) | Description | | ------------------------------------------------------------------------------------------------------------------------------------------------------------------------------------------------------------------------------------------------------------------------------------------------------------------------------------------------------------------------------------------------------------ | | When changing the patch by e.g., adding or deleting fixtures, existing worlds were reset to have all fixtures included. This bug is fixed. Worlds are not changed anymore when changing the patch. | | The software could crash when editing the time position of a marker in a timecode show using a plugin. This bug is fixed. The software does not crash anymore when changing the position of a marker. | | The software could crash when moving an executor or Xkey. This bug is fixed. Moving executors or Xkeys does not crash the console anymore. | | Loading a show file from v1.5 or prior could crash the software. This bug is fixed. Loading show files from older software versions does not crash the software anymore. | | Global presets could not always be called for all subfixtures of the same geometry. This bug is fixed. All subfixtures using the same geometry can use the same global presets again. | | The functionality of some hard keys within popups was blocked when using hard keys before in combination with MA and releasing MA first. This bug is fixed. The hard keys should now always work in pop-ups. | | Deleting an executor where the originally used executor configuration was resized after creating the executor deleted also the next executors. This bug is fixed. Resizing an executor configuration when it is already in use does not influence further actions with executors anymore. | | The software could crash when moving a layout element from one layout to another layout or oopsing this action. This bug is fixed. Moving layout elements into a different layout or oopsing this does not crash the software anymore. | | The software could crash when turning the encoder of an attribute where the default was set to a value that was not covered by the defined ranges of its channel functions. This bug is fixed. The software does not crash anymore when the default value of an attribute is not part of the value range of its channel functions and the encoder will be turned for it. | | When loading show files from v1.5 or prior including global presets where different modes of a fixture type were stored, the global data of only one mode was correctly migrated. This bug is fixed. Individual global values within a preset of different modes of the same fixture type are now migrated correctly into v1.6. | | Selective phaser presets that had global presets integrated lost their reference to the integrated presets when one of the integrated presets was updated. This bug is fixed. Updating presets that are integrated into other presets do not remove the reference in the other preset anymore. | | A preset could lose its reference to another preset when the source preset would be moved. This bug is fixed. Moving a preset does not lose its references anymore. | | Deleting the cue that holds the same data before a cue that has the same data blocked, kept the block status of the second cue. This bug is fixed. Deleting cues checks now the block status of the following cues and resolves them if necessary. | | Storing a new cue with the same data in front of an existing cue did not block the data in the already existing cue. This bug is fixed. Adding cues in front of existing cues checks now if blocking is needed and blocks it then. | | Blocking a cue that tracks phasers created a new cue part. This bug is fixed. When blocking a cue with phaser data, the values will be blocked correctly in their original cue part. | | It was possible to create executors that did not interact with all commands. This bug is fixed. It is not possible anymore to create executors that are not fully functional. | | Moving an open range of cues, e.g., Move Cue 1 Thru At Cue 501, made it impossible to move the first cue of this range later again. This bug is fixed. Moving an open range of cues does not prevent anymore the first cue of the range to be moved later again. | | It was possible to move a special executor to a normal executor. This bug is fixed. Special executors cannot be moved anymore. | | The automatic blocking of attributes did not work correctly when storing a second cue, and the first fixture of the selection did not have all attributes that should be stored active. This bug is fixed. The automatic blocking when storing or updating a cue works now with all combinations of fixture selection and attributes. | | Storing a fixture at the same level as the previous cue did not block the cue correctly if the previous cue had tracked data for the attribute. This bug is fixed. When storing a cue the automatic blocking works now also when the previous cue had only tracked data. | | The software crashed when oopsing the copy and paste of timecode events. This bug is fixed. Oopsing the copy and paste of timecode events should not crash the software anymore. | | Activating the timecode setting Ignore Follow recorded again timecode events when the timecode show was passing by already recorded timecode events. This bug is fixed. Existing timecode events are not recorded anymore into timecode shows. | | Storing into a preset with the /Remove option did not remove relative values from the preset when relative values were active, but set the relative value to 0. This bug is fixed. Store with the use of the /Remove option removes now also relative values from presets. | | Unblocking a cue did not remove preset references for the attributes that used presets. This bug is fixed. Preset references are now removed when unblocking cues that use presets. | | Storing a stomped attribute into a cue where a preset reference was already stored for the attribute did not remove the preset reference for this attribute. This bug is fixed. Storing a stomped attribute with a hard value into a cue removes now also the preset reference for the attribute within the cue. | | Stomp could sometimes keep a preset reference to the first step of the other layer of a multi-step preset which could result in storing a reference to the wrong information. This bug is fixed. Stomp will now try to link to a single-step preset or use hard values. | | Knocking-in an attribute with a hard value that was already played back by a cue with a preset, knocked in the preset reference from the cue. This bug is fixed. It should not be possible anymore to store a hard value with a preset reference into a cue. | | Editing an attribute in the sequence sheet in track sheet mode and changing from a hard value to a preset did not set the block state correctly. This bug is fixed. Editing values in the tracking sheet now updates the block states correctly. | | When cloning, the system created new phasers in the background. This bug is fixed. Cloning does not create new phasers in the phaser engine anymore. | | It could happen that the ABS and/or REL layer values in a cue or embedded preset were overwritten when only one layer was referencing a preset that contained values for both layers. This bug is fixed. The preset update process will correctly keep the layers separated when updating the referenced values. | | It was not possible to store merge into several cues, that were specified by using + within the command, e.g., Store Cue 1 + 2 /Merge. This bug is fixed. It is possible again to store merge into several cues by using + to specify the cues. | | The software could crash when cooking recipes. This bug is fixed. The software should not crash anymore when cooking recipes. | | Cooking a recipe that had a group with more fixtures assigned, than the assigned selective preset had stored, created unwanted data for the fixtures that were part of the group, but were not part of the preset. This bug is fixed. Cooking a recipe that has different fixtures in the used group and the used preset creates only data for the fixtures that are part of both, the group and the preset. | | The software could freeze when the user tried to set a cue fade time to a range of cues, and the range included the OffCue. This bug is fixed. Addressing a range of cues with the OffCue included does not freeze the software anymore. | ### Connections [Section titled “Connections”](#connections-1) | Description | | ----------------------------------------------------------------------------------------------------------------------------------------------------------------------------------------------------- | | The DMX input merge was only processed on the global master station after another device joined the session. This bug is fixed. DMX input merge works now correctly after devices joined the session. | ### Patch [Section titled “Patch”](#patch-1) | Description | | --------------------------------------------------------------------------------------------------------------------------------------------------------------------------------------------------------------------------------------------------------------------------- | | The software could freeze when having the patch open in split view mode and then trying to open the patch again on a second display. This bug is fixed. Trying to open the patch a second time should not freeze the software anymore. | | When leaving the patch and applying changes, the preset modes of all preset pools were reset to the defaults of a new show. This bug is fixed. The preset modes are now preserved when leaving the patch and applying changes. | | The software could crash if a geometry reference of a fixture type was not linked to any geometry. This bug is fixed. Geometry references without a link to a geometry do not crash the software any longer. | | Exchanging a single-instance fixture to a multi-instance fixture type did not convert global presets correctly. This bug is fixed. Global presets are now converted correctly when exchanging the fixture type of relevant fixtures from single-instance to multi-instance. | | The software could crash when copying and pasting a fixture within the patch. This bug is fixed. Copy and paste of fixtures within the patch menu should not crash the software anymore. | ### Playback [Section titled “Playback”](#playback-1) | Description | | ------------------------------------------------------------------------------------------------------------------------------------------------------------------------------------------------------------------------------------------------------------------------------------------------------------------------------------------- | | The output level of sequences could be changed to 0 when updating a preset. This bug is fixed. Updating a preset should not change the output of an unattended sequence to 0 anymore. | | It could happen that a DMX universe did not recognize the change of values at the first cycle and therefore did not send out the changes immediately. This bug is fixed. DMX universes have been further optimized for value changes and output changes immediately. | | The playback of a timecode show was not triggering the playbacks correctly when the user profile which recorded the events did not exist anymore. This bug is fixed. Timecode shows generate always the correct playback, even when user profiles were deleted. | | A sequence that was already triggered by a timecode was switched off when the incoming timecode signal was lost and reappeared during the After Roll time with a previous time again. This bug is fixed. Restarting the timecode sender does not switch off sequences anymore when the signal is coming back during the After Roll timeout. | | Disabling the timecode setting Assert Previous Events still turned off the sequence when no previous events were found. This bug is fixed. Only when Assert Previous Events is enabled will the software turn off the sequence when no previous events are found. | ### Windows [Section titled “Windows”](#windows) | Description | | ------------------------------------------------------------------------------------------------------------------------------------------------------------------------------------------------------------------------------------- | | The fixture sheet did not display the phase and speed values on fixtures when the phaser was operated by a sequence. This bug is fixed. The phase and speed values of played back phasers are now displayed within the fixture sheet. | | The software could crash when opening a sequence sheet or when editing a sequence. This bug is fixed. Opening the sequence sheet does not crash the software anymore. | *** ## []()grandMA3 Version 1.6.1.3 [Section titled “grandMA3 Version 1.6.1.3”](#grandma3-version-1613) ## []()Features [Section titled “Features”](#features) The latest release of grandMA3 version 1.6.1.3 rolls out several enhancements that enrich your lighting experience. Read on for a quick introduction and find links for more information. *** ### []()Presets [Section titled “Presets”](#presets)  Improved in this release Global data has been streamlined to make it easier for the user to manage. The global data is now stored on real fixtures within the patch. In addition, universal presets can now reference data stored to a real fixture patched within the show file. When storing new global presets, the global data will be created within the new preset automatically. When all data for the fixture type is the same, the first fixture from the stored data will be used to hold the global data within the preset. Each fixture type gets its own global data value so that you can adjust the global value per fixture type. When adding selective data to the preset for one of the fixtures that hold the global data, or when deleting the fixture from the show, the global data will be moved to the first patched fixture for the fixture type. In the case that the global data was held before by the first fixture, the data will be moved to the next patched fixture of this fixture type. When editing a preset with global data, the fixtures with the global data in the programmer will display a yellow square marker in the top right corner of the attribute cell within the fixture sheet. **Important:**\ When converting old show files from grandMA3 v1.5 or prior to grandMA3 v1.6 or later the data from the global fixture type object will be migrated to the first patched fixture of the same fixture type that is not already holding selective data. The global value is determined by the average across all values of attributes within the same activation group:
```plaintext
(Value of fixture 1 + Value of fixture 2 + Value of fixture 3 + ... value of fixture n) / Number of used fixtures = Average value
```
The value that is closest to the calculated average value will be the global value. The fixture with this value will then hold the global value. In the case of color, all color attributes are handled together when choosing the global value. Furthermore, the method to determine the global data across several attributes is now taking all attributes of the same activation group into account. This will result in taking all attributes of the same activation group of one fixture, and not taking the different attributes from different fixtures. Together with the new global data handling, the preset modes for storing or updating were improved: * Auto: When updating or storing into an existing preset, the preset mode of the preset will be respected. In the case of global preset mode, selective data will be added to the preset when at least one fixture that can use the preset is active with new values. When creating a new preset Auto mode will take the mode defined by the pool and use the rules described here for each mode. * Selective: The data will be added as selective data for each fixture that has active data in the programmer. * Global: The data will be added mainly as global data. If there are several fixtures of the same fixture type but with different values, then the global data will be determined by average as described above, and selective data will be added for the other fixtures which have divergent data. * ForceGlobal: Data will be added as global data, and untouched existing selective data will be discarded within the preset for the fixtures of the same fixture type. ForceGlobal will discard the selective data when updating a preset or when storing with the merge option into an existing preset. * Universal: Data will be added as global data, and the PresetMode will be set to Universal. The universal preset gets more versatile and can now use the data from a real fixture with global values when the universal fixture has no data inside the preset. This has the added benefit that you can create your universal presets using a real fixture from your stage, in the case that the universal fixture has these attributes. When calling a universal preset, the software uses global fixture type data first and then uses the data from the universal fixture. When no data exists for the universal fixture the first fixture with global data is used instead. **Hint:**\ When calling universal color, it will be transformed through the color engine. If you use a 7-color LED to create a color and call that data universal, you will get the similar color on the RGBA fixture.  New in this release When the same fixture type (attributes, their order, and their physical from and physical to values) is used several times within a show file, the patched fixtures of these fixture types can now use the global presets that are only stored for one of these fixture types. Therefore, the new fixture type property Share Global needs to be set to Yes for the fixture types. Share Global is set to Yes by default. The fixtures of the fixture type that are set to No cannot call global presets that will be created or modified later by using the other fixture type. When switching Share Global to No when there are already global presets for the fixtures of the fixture type that could use data from a different fixture type, the presets will get copied the global value from the original fixture type to the fixture type that has now Share Global set to No. **Hint:**\ To break up the usage of global presets by fixtures of the other but similar fixture type, the Share Global property needs to be set to No for the fixture type that should not be allowed to use the global presets. Switching Share Global to No for the fixture type of fixtures that hold the global value will not influence the preset call ability of the other fixture types.  New in this release When exchanging the fixture type of a fixture, the data within the global presets will now be converted so that the fixtures with the new fixture type can immediately use these global presets, too.  Improved in this release The update menu and the store preset pop-up have now also PresetMode buttons.\ PresetMode within the update menu is independent of the PresetMode within the store settings.\ PresetMode within the store preset pop-up populates the value of the store settings and can be changed temporarily for only this certain store action. After that it will fall back to the value of the store settings.  Improved in this release The title pool objects of preset pools display now on their upper right corner an S, G, or U depending on the preset mode of their feature group. This preset mode will be mainly taken when storing new presets into that pool by using the preset mode Auto. *** ### []()Command Wing Bar [Section titled “Command Wing Bar”](#command-wing-bar)  New in this release The Command Wing Bar window can be opened by tapping More, and then Command Wing Bar within the Add window dialog.\ It provides access to the encoder bar, the first ten executors of the selected WingID, the grand master, and the special executor section of wing 1. In the command wing bar window settings, it is possible to display or hide the grand master by tapping Show Grand Master. The same procedure is available for the special executor section by tapping Show Master Section. Furthermore, with the settings Display Mode Executors and Display Mode Masters can be decided if the labels or the hardware buttons of the executors should be displayed. The displayed Page and WingID can be selected via the settings pop-up or the title bar. The Command Wing Bar can also be displayed in the encoder bar area on onPC systems. Simply tap  in the control bar to display or hide it. Or use the shortcut Alt + W. *** ### []()CleanUp Command [Section titled “CleanUp Command”](#cleanup-command)  New in this release The CleanUp command allows deleting unused (contains no reference) objects in the show file. For example, sequences that are not assigned to an executor. A pop-up asks the user for confirmation to delete the unused objects and it tells the user how many objects will be deleted. * To delete all unassigned sequences, type: User name\[Fixture]> Cleanup Sequence Thru * To delete all unused color presets in the color preset pool, type: User name\[Fixture]> Cleanup Preset 4.\* * To delete all images which have no reference, type: User name\[Fixture]> Cleanup Image 3.1 Thru *** ### []()Stomp [Section titled “Stomp”](#stomp)  Improved in this release Stomp now knocks in the last used single-step value for the absolute and/or the relative layer of the attribute.\ This can be a value from the programmer or from a playback. If no single-step value is found then it uses the default value. *** ### []()RDM [Section titled “RDM”](#rdm)  Improved in this release The RDM implementation in grandMA3 supports now more RDM parameters. These are the newly supported RDM parameters: * PROXIED\_DEVICES, 0x0010 * PROXIED\_DEVICE\_COUNT, 0x0011 * DEVICE\_MODEL\_DESCRIPTION, 0x0080 * LANGUAGE\_CAPABILITIES, 0x00A0 * SOFTWARE\_VERSION\_LABEL, 0x00C0 * BOOT\_SOFTWARE\_VERSION\_ID, 0x00C1 * BOOT\_SOFTWARE\_VERSION\_LABEL, 0x00C2 * SLOT\_INFO, 0x0120 * SLOT\_DESCRIPTION, 0x0121 * DEFAULT\_SLOT\_VALUE, 0x0122 * SENSOR\_DEFINITION, 0x0200 * SENSOR\_VALUE, 0x0201 * DEVICE\_HOURS, 0x400 * LAMP\_HOURS, 0x401 * LAMP\_STRIKES, 0x402 * LAMP\_ON\_MODE, 0x404 * DEVICE\_POWER\_CYCLES, 0x405 * PAN\_TILT\_SWAP, 0x602 * POWER\_STATE, 0x1010 **Important:**\ Not all of these RDM parameters allow the user to set values for them. As SENSOR\_DEFINITION and SENSOR\_VALUE are now supported, the RDM Fixtures display the sensors with their values within the RDM Devices Window. To watch the sensors and their values, unfold the desired RDM fixture by tapping  in front of the RDM fixture.\ For each sensor, an own line will be displayed as child of the RDM fixture. In most cases, the user has to scroll to the right to see the columns Present Value, Lowest, Highest, and Recorded: * Present Value: The current value of the sensor. * Lowest: The lowest value the sensor can reach. * Highest: The highest value the sensor can reach. * Recorded: The value that was stored by the fixture itself, when RECORD\_SENSORS, 0x0202 was executed. **Hint:**\ RECORD\_SENSORS needs to be executed by a different RDM controller in order to display a value. grandMA3 can now also deal with RDM proxy devices, such as radio DMX links. The RDM parameters PROXIED\_DEVICES, 0x0010 and PROXIED\_DEVICE\_COUNT, 0x0011 are responsible for this feature. A proxy device, in our case of a radio DMX link, is the transmitting device. This device will also show up in the RDM Devices window. The number within the column Proxied Devices reports how many RDM devices are handled by this device. The receiver of the radio DMX/RDM signal counts also into this number. **Important:**\ In our tests, we were only able to get RDM devices working that were connected to a corresponding radio DMX receiver device.\ Fixtures that were directly linked to the radio DMX transmitter, because these fixtures have a built-in radio DMX module, were not detected. Also not by other 3rd party RDM controllers. To learn more about using RDM within the grandMA3 software, please read the [RDM topic](/grandma3/2-3/rdm/). *** ### []()Markers [Section titled “Markers”](#markers)  New in this release A Marker is a virtual fixture, that allows operating (e.g., moving around or rotating) objects such as fixtures, actors, or stage props in the 3D stage environment. To do so, for each object or group of objects that shall be operated separately an own marker fixture needs to be patched. A fixture type called Marker from the Manufacturer MA Lighting is now part of the fixture library.\ As soon as a Marker fixture is patched, other patched fixtures can be added as children of the Marker.\ After applying these changes to the patch, the Marker fixture can be operated like any other fixture in the show. At the moment, a marker fixture provides these attributes: * X, Y, and Z for moving the Marker and all its children together along the corresponding axes. * Rot X, Rot Y, and Rot Z rotate the Marker and all its children together around the corresponding axes. These attributes are located within the features XYZ and Rotation within the feature group Position in the encoder bar. Select the Marker fixture and turn the encoders for the described attributes in order to see the Marker and its children moving around in the 3D window.\ The children of a Marker are always moved around relative to the set up position of the Marker itself. **Important:**\ A Marker fixture needs to have a DMX address patched in order to be able to see its changes within the 3D, etc.  Improved in this release Together with the implementation of Markers, the input of PSN trackers can be linked to Markers. This allows moving around the Marker and its children via an external tracking system. To do so, set up the number of Markers you need, add the desired children to them within the grandMA3 software. Then set up the PSN system and configure the [PSN input](/grandma3/2-3/remote_inputs_psn/) within the grandMA3 software. Within the PSN menu, new columns called IDType and ID allows entering the IDType and ID of the Marker fixture that shall be linked to the input of each tracker.\ The column DMX Priority defines at which level of the grandMA3 playback priorities the PSN data shall be processed. This allows overwriting the input of the PSN system by using a sequence with a higher priority if needed. **Important:**\ The DMX universes the Marker fixtures are patched to which are receiving data from PSN trackers need to be set to the [Merge mode Prio](/grandma3/2-3/patch_dmx_universe/). *** ### []()Backup Menu [Section titled “Backup Menu”](#backup-menu)  Improved in this release Show files are now saved with the timestamp of the current session time. The resulting files on the hard drive of the system will be also stamped using the current session time.  New in this release At the bottom of the backup menu, an area allows you to enter and read the description of the currently loaded show file. Modifying or entering a description will only be applied to the show file when saving it afterward.\ Pressing Enter while editing the description immediately saves and closes the backup menu. Shift + Enter can be used to add another line. By enabling History in the title bar of the backup menu, the history of the selected show file will be displayed at the bottom of the backup menu.\ The history gives useful information regarding the dates and time, used software version, the type of the software, the name, time zone, and UTC time when saving the show file.\ A new entry within the history will be entered when the show file will be saved again and one of these criteria has changed: Version, type, name, time zone, or description. The newest entry will be on top of the history list. The option Enumerate Show File Name when Description Changes in the Settings of the backup menu provides an automatic increase of a 3 digit number, added to the end of the show file name if the description is changed when saving the show.\ If the original show file name is too long to add the number, the command line will return an error. In this case, the former show file name will be used again. Enumerate is always looking at the last three characters of the show file name. When three numbers are found it increases the number by 1. When 999 is found, it will change the number to 001. Enumerating a show file can also be called with the /Enumerate option. To do so, type: User name\[Fixture]> SaveShow /Enumerate **Hint:**\ When saving your show file for the first time, add a custom character to the end of your show file name so it’s easier to see the enumeration (e.g. ShowName# or ShowName\_v or ShowName-) *** ## []()Other Enhancements [Section titled “Other Enhancements”](#other-enhancements-1)  The network menu allows filtering stations by “My Location”.  Reduced show upload time by transferring media objects in the background.  The “Insert New Fixtures” dialog now allows simultaneous access to the grandMA3 Fixture Share and the GDTF Share. Therefore, the GDTF Share tab is renamed to Shares. The column “Source” indicates from which of the two Share sites the fixture originates.  The label process prevents entering system reserved characters when the label pop-up is used. In this case, the title bar of the label dialog turns for about 2s into orange and displays “Character ’.’ not allowed.” Depending on the character the message might be different, as every character that is not allowed but was pressed by the user will be reported within this message.\ When labelling an object by using the label command, the disallowed characters will be removed by the software, and the objects gets a new label with this reduced name: Labeling group 1 with the desired name “Back.Truss” by using this command, will result in the name “BackTruss” for group 1: User name\[Fixture]> Label Group 1 “Back.Truss” In this case, the command line history will report this modification as well: Not allowed characters in name “Back.Truss” changed to “BackTruss”  The operation of encoders in physical readout (includes also attributes in natural readout that are set to physical for the natural readout) when having at minimum 2 fixtures of different fixture types selected, improved. In this case, stepping through the selection with Next and Previous now also uses always the smallest physical range to determine the size of an encoder click. In previous versions the size of an encoder click changed between the different fixtures of the different fixture types when using Next and Prev.  Master faders in the executor label now display their temporary value while flashing or blacking them. Furthermore, the background of the fader bar in the executor label turns red while flash or black, when the value of the master fader is different to the value during flash or black.  The playback window has now a setting that allows how many sections of each 5 faders shall be displayed. To change this setting, tap MA in the top left corner of the playback window, then tap #Sections repeatedly until the desired value is set. The value can be set to Auto, 1, 2, or 3. When set to Auto, the playback window decides by its size how many sections will be displayed. This is anyway how it worked in previous versions. When choosing 1, 2, or 3, the first 5, 10, or 15 faders of the selected WingID will be displayed. This happens independently from the size of the playback window.  Tapping  within the control bar opens now the new shutdown menu. It offers to * : To shutdown the grandMA3 device or to close the grandMA3 onPC software. * : To restart the grandMA3 application. * : To lock the desk. In addition to this improvement, the Desk Lock button has been removed from the control bar.  The new timecode show setting Ignore Follow allows controlling whether follow cues of sequences should be triggered by the timecode show or by the sequence. When it is off, the follow cues will be triggered by the timecode show.\ When it is on, the sequence will trigger its follow cues. In this case the events within the timecode show for the follow cues will be marked with a prohibition sign on top of the event icon within the timeline view.  Move of executors: * Moving executors behave now like moving objects within a pool. For executors, each Wing (15 executors) behaves like a pool. * Moving an executor that is 2 or more wide to a different executor, in a way, that the former executor would be spread across 2 banks (5 executors), the executor will be split into 2 executors, one each on one of the banks. In the past, the executor has been scaled down to only use the executors of the left bank. This works only across the banks of the same wing, and not across wings.  The conversion of channel functions has been improved in the grandMA2 to grandMA3 Show Converter. In the grandMA2 the non-linear physical characteristic of channel functions was described within the physical values of the channel sets. This could cause unexpected behavior of the encoders in natural and physical readout because of the channel function’s invalid range of physical values. The conversion has been improved to the extend that converted channel functions now have a valid range of physical values according to their channel sets.  3D Window: Additional mesh qualities for the BodyQuality setting were added. * **None:** No meshes of fixtures are visualized. Nevertheless, environment objects are displayed. * **Box:** A whole fixture’s body is visualized as one box. This box has the dimensions of the fixture. * **Low:** Every geometry of a fixture is visualized as a box. If one of the fixture’s meshes is a default cylinder, this is not changed. * **Simple:** Fixtures with a common geometrical structure of a moving head (Base - Yoke - Head - Lens with or without Pigtail) are visualized with grandMA3 default meshes. All other fixtures are visualized like in “Low” mode. * **Standard:** Fixtures with a vertex count above 1 200 are visualized as in “Simple” quality mode. The meshes of fixtures with a vertex count lower than 1 200 are not changed. * **High:** All fixtures are displayed with their original meshes. By default, the BodyQuality is set to Standard.  Surfaces has been renamed to Stage Volumes: A stage volume is a defined space within a stage. By default, a volume (Volume 1) always exists, and its size is always the size of the stage.  The assign menu allows now to lock or unlock the executor by tapping Lock Exec in the title bar. When locking ur unlocking the executor via the lock or unlock command, this button reflects also the correct state.  When an event will be repeated every year, the repeat cell of the event displays now in addition “repeat annually” to indicate this repetition.  When creating a new show, the software will now create a prompt asking the operator now if a new show should really be created.  When canceling a store operation the next time doing a store operation the store preferences are loaded again. In addition, pressing ESC once when the store options overlay is open, closes now the overlay. Store and Update work now uniformly regarding closing the menus or canceling the operation.  Fixtures that are modified by a additive group display now also a marker in their ID type cell within the fixture sheet. The color of the marker is lavender by default, and can be changed in the color theme: Color definition SheetColor.AdditiveMasterActive and color FixtureSheetCell.AdditiveMasterActive. *** ## []()What’s Changed [Section titled “What’s Changed”](#whats-changed-2) * The ListRef button in the Update Window was removed as it is obsolete now. * The automatic label functionality of cues changed and does not use the commas (,) anymore to separate different presets within the name. It uses now the slash (/) to separate presets within the cue name. * The first element within the cue list on an executor label shows now always the previous cue of the sequence order, ad not anymore the previous played back cue. * The fixture sheet has now an additional title bar button for the Prog Only setting. * The tab Time within the date and time menu got renamed to Session Time. Session Time is the time the grandMA3 session is running at. In addition, the ClockSource System Time within the clock window got renamed to Session Time. The session time can be different compared to your local time. * With the improvement to presets the universal fixture is now part of Stage 1. * The Store options overlay was renamed to Store Settings. *** ## []()Fixed Bugs [Section titled “Fixed Bugs”](#fixed-bugs-2) ### 3D [Section titled “3D”](#3d-1) | Description | | ----------------------------------------------------------------------------------------------------------------------------------------------------------------------------------------------------------------------------------------------------------------------------------------------------- | | The property “Beam Diameter” of the Beam geometry type was not visualized correctly if a fixture had an iris channel. This bug is fixed. The correct beam diameter is visualized at the origin of the beam, even if a fixture has an iris. | | Gobo rotation was visualized with the wrong center of rotation if the position of a gobo wheel was between two slots. This bug is fixed. Gobos are rotating around their own center point now if the gobo wheel is positioned between two slots. | | Fixture types with a complex geometrical structure (nested geometry references) were not visualized correctly in all cases. This could cause unexpected behavior of intensity or color of subfixtures. This bug is fixed. Fixture types with nested geometry references are visualized correctly now. | | Gobos in the 3D window were flashing when changing the selection or changing settings in the 3D window. This bug is fixed. Fixtures with gobos are not flashing any longer when making changes elsewhere in the software or the 3D window. | | The visualization in the 3D window did not utilize the RealFade values of the fixture type. This bug is fixed. Values of RealFade are now utilized again. | | Iris animations like strobe or pulse were visualized with a much too high speed. This bug is fixed. Iris animations are visualized correctly now. | | Textures of meshes were not imported correctly if the mesh and the texture were located in a subfolder. This bug is fixed. Textures are now imported correctly, even from a subfolder. | | Single Step was switched off when doing a lasso selection in the 3D window. This bug is fixed. A lasso selection in the 3D window will not disable single step. | | Fixtures with Blade channels did not show proper beams on a Mac onPC running on Apple M1 hardware. This bug is fixed. Blades are visualized correctly on Apple M1 hardware. | ### Command Line and Macro [Section titled “Command Line and Macro”](#command-line-and-macro-2) | Description | | ------------------------------------------------------------------------------------------------------------------------------------------------------------------------------------------------------------------------------------------------------------------------------------------------------------------------------ | | Fade in combination with FaderMaster did not obey a specified fade time. This bug is fixed. FaderMaster Page 1.201 at 100 fade 5 is working as expected. | | If several different show files were loaded in a short amount of time, the software could crash. This bug is fixed. Rapid loading of different show files does not crash the software anymore. | | Export and import of user profiles removed the link to default for properties, and therefore the values were set to the hard default value. This bug is fixed. Properties of user profiles are now keeping their link to the default value when the user profile will be exported and imported. | | The encoder could be stuck for a while at value 255 when being in Dec8 readout and turning the encoder several times without interruption from 0 to 255 and vice versa. This bug is fixed. Encoders should not stick to a value anymore when turning them very fast from one end to the other end and back. | | The fifth encoder in grandMA3 onPC running on Windows was still acting as screen encoder when the screen encoder was switched off. This bug is fixed. The fifth encoder works now always within the function it displays. | | Changing the used preset while being in the update mode for a cue changed also the name of the cue. This bug is fixed. Cues labeled by the user won’t change their name anymore when using the edit mode for a cue and changing a used preset. | | When auto start was enabled for a sequence and the master fader of this sequence was set to 100% before starting a timecode show, the first go+ event for this sequence was not triggered by the timecode show. This bug is fixed. All timecode show events should be triggered correctly now. | | When changing agenda events where the valid duration was not over, yet, were triggered again. This bug is fixed. Agenda events won’t be executed again, when their duration is still valid and changes are made to the agenda event. | | Single Step was always temporarily activated when tapping into any kind of a color picker. This bug is fixed. Only the color picker for attributes activates now temporarily Single Step when tapping into the color picker in order to choose a color. | | Commands with non-existing variables in it were executed in a way that the non-existing variable was ignored. This bug is fixed. Commands with non-existing variables won’t be executed anymore. The command line history returns an error in this case. | | Filters did not update their filter results when the properties of fixtures were changed, and these properties were used as a filter criterion. This bug is fixed. Changing fixture properties updates now also the results of filters. | | It was not possible to store a new executor when the selected page was deleted before. This bug is fixed. After deleting the selected page it is now possible again to store immediately new executors on page 1. | | Mode dependencies caused other channels that were dependent to be knocked into the programmer if the active channel function of this channel was changed because of the mode dependency. This bug is fixed. The channel function is changed, but this does not cause the channel to be knocked into the programmer any longer. | | Copy and paste of cues inserted the cues with their former cue number. This bug is fixed. Copy and paste of cues adjust now the cue number of the pasted cue to fit into the cue numbering at the destination. | | The software could crash when data was imported to the wrong destination. This bug is fixed. The software should not crash anymore when data was imported to the wrong destination. | ### Connections [Section titled “Connections”](#connections-2) | Description | | --------------------------------------------------------------------------------------------------------------------------------------------------------------------------------------------------------------------------------------------------------- | | When having 2 consoles in a session with a parallel input of LTC Timecode, the backup console did not take over the LTC smoothly. This bug is fixed. On signal loss, the backup console takes over within half of the defined afterroll time. | | In the onPC settings menu, the “MIDI via onPC command wing” button did not work as expected. This bug is fixed. When the button is toggled “on” the MIDI Signal from command wing is used, if toggle “off” the Signal of the selected USB device is used. | | The target settings in the In/Out menu did not work properly. This bug is fixed. Selecting “Empty” as a target is working again. | | The software could crash when sending an OSC string without specifying an OSC address. This bug is fixed. OSC strings without an address do not crash the software anymore. | ### Patch [Section titled “Patch”](#patch-2) | Description | | ----------------------------------------------------------------------------------------------------------------------------------------------------------------------------------------------------------------------------------- | | In the “Insert New Fixtures” popup, if the DMX sheet was used to directly chose the address, tapping on the address directly was not possible. This bug is fixed. Choosing the desired address directly by tapping is working now. | | In the “Insert New Fixtures” popup, if the DMX sheet was used and resized very small, it was not possible to change the size again. This bug is fixed. Resizing the DMX sheet is working as expected. | | Changing the mode master of a patched fixture type could lead to shifting of default values between DMX channels. This bug is fixed. Default values will not be changed any longer when a mode master of a fixture type is changed. | | Sometimes the Offset value was in the wrong Fixture. This bug is fixed. The Offset value is now in the correct fixture. | ### Phaser [Section titled “Phaser”](#phaser-1) | Description | | --------------------------------------------------------------------------------------------------------------------------------------------------------------------------------------------------------------------------------------------------------------------------------------------------------------------- | | Activating the attributes that were running a phaser discarded the values for fade, delay, speed, and phase when a processing unit is part of the session. This bug is fixed. While having processing units in the session the knock-in of attributes does not discard values anymore when they are running a phaser. | | Changing the speed of a phaser by using the Speed From and Speed To properties within the MAtricks window always restarted the phaser. This bug is fixed. Phasers adjust their speed now flawlessly when changing the speed by using Speed From and Speed To within the MAtricks window. | | Oopsing the stomping of a phaser did not work. This bug is fixed. The stomping of phasers can now be reverted by using Oops. | ### Playback [Section titled “Playback”](#playback-2) | Description | | ------------------------------------------------------------------------------------------------------------------------------------------------------------------------------------------------------------- | | The sequence setting “HTP” was not working properly. This bug is fixed. The sequence setting “HTP” is working as expected. | | Sequences with SoftLTP off outputted their values first when moving their master fader. This bug is fixed. Sequences with SoftLTP off output their resulting value now immediately when they will be started. | ### Windows [Section titled “Windows”](#windows-1) | Description | | -------------------------------------------------------------------------------------------------------------------------------------------------------------------------------------------------------------------------------------------------------------------------------------------------------------------------------------------------------------------------- | | In the sequence edit overlay, the auto-scroll option did not work properly. This bug is fixed. Enabled auto-scroll in the sequence edit sheet jumps to the currently edited cue. | | The sequence sheet did not display individual fade, delay, and duration times correctly. This bug is fixed. The individual times in the sequence sheet are displayed properly now. | | Saved preferences in the update menu did not include all options. This bug is fixed. Saving and recalling the preferences in the update menu is working as expected. | | If multiple encoder bars and layout views were used at the same time, the onPC software could crash. This bug is fixed. Several encoder bars and layout views can be used in parallel. | | When changing the DMX sheet to Levelbar “Bar”, the values were not displayed properly. This bug is fixed. Level bars are displayed properly in the DMX sheet now. | | The Trackpad, set to mode Pan/Tilt was not working with physical readout. This bug is fixed. The Trackpad in Pan/Tilt mode also works with physical readout. | | The values that were displayed within the fixture sheet for a collapsed grouping fixture could flicker from time to time. This bug is fixed. The values of grouping fixtures do not flicker anymore within the fixture sheet. | | The HSB Color Picker and the fader page of the color picker did not work for fixture types with subtractive color mixing and only one measurement of the color flags at 100 % insertion. This bug is fixed. The color picker is working for subtractive color mixing with only one measurement defined for a fixture type. | | In Agenda setup mode, if the entry “New Agenda Event” was copy and pasted on itself, a loop was created. This bug is fixed. If the first entry is copy and pasted on itself only one more event is created. | | The fixture sheet did not display the correct fixtures when leaving the edit mode and the Global mask was enabled. This bug is fixed. After using the edit mode, the fixture sheet redraws properly when using the Global mask. | | Pie charts of color presets displayed a black pie if a fixture with subtractive color mixing had measured filter data. This bug is fixed. Pie charts of color presets now show the correct color even for a fixture with subtractive color mixing and measured filter data. | | The Audio In Device pop-up could display (null) instead of the device name or the manufacturer. This bug is fixed. The Audio In Device pop-up displays now “Device x” when the device name is not provided by the device or it displays “Manufacturer unknown” when the manufacturer is not provided by the device. | | It could happen that not all feature groups were offered as preset pools within the Add window dialog. This bug is fixed. All feature groups of a show file are now offered to create preset pool windows for. | | It was not possible to scroll through the list of cues within the edit sequence window by using the screen encoder when the sequence had not enough cues to get the whole list scrolling on the display. This bug is fixed. It is now always possible to scroll through the list of cues within the edit sequence window by using the screen encoder. | | EditSetting + tapping the area of the selected sequence in the letterbox display opened the sequence setting menu on the letterbox display. This bug is fixed. The sequence settings of the selected sequence will now be opened on display 2 when having EditSetting in the command line and then tapping the area of the selected sequence within the letterbox display. | | The ViewMode Month of the agenda displayed also the last week of the former month, when the week day of the first day of the month matched up with the set up day in the StartOfWeek setting. This bug is fixed. The ViewMode Month in the agenda window does not display unnecessary whole weeks of the former month anymore. | | The command line history window and overlay displayed a black background when having the daylight color theme active. This bug is fixed. The command line history window and overlay respect now the colors of the color theme. | | It was not possible to open the name input popup for a timecode track by using the screen encoder. This bug is fixed. The screen encoder can now be used to open the name input popup for timecode tracks. | | It was not possible to switch between the different feature groups within the Export-tab Import/Export menu when the local area had sheet style enabled. This bug is fixed. The Export-tab of the Import/Export menu allows now to switch between feature groups when sheet style is enabled. | | The Off menu could be moved outside the visible screen area. This bug is fixed. The Off menu cannot be dragged around on the screen anymore. | | The phaser overlay reset its settings every time when it was closed. This bug is fixed. The settings are only reset after a clear. | | Executor labels displayed the cues of the sequence repeatedly when the off cue would have been used for switching off the sequence, and when the executor label was higher than 1 row. This bug is fixed. High executor labels display now only one set of their cues when the off cue has any time set up. | | Calling menus on displays that were not defined for the menus could crash the software. This bug is fixed. Menus won’t open anymore on displays that are not defined for the menus. | | The temporary pool overlays of views and sequences did not use their pool color. This bug is fixed. All temporary pool overlays use now always the defined pool color of their object type. | | The fixture sheet did not display values for attributes in the DMX layer when the values were on their default value. This bug is fixed. The DMX layer in the fixture sheet displays now always the value for each attribute. | *** ## []()Appendix [Section titled “Appendix”](#appendix) * It is recommended to use a dedicated and a separate physical network for each grandMA3 session. * When using DMX protocols it is recommended to use a dedicated physical network for each protocol. * The recommended workflow for executor configurations that are different compared with the default executor configuration is to create a new executor configuration, do the changes in the new configuration and save the changes. * XML files with exported executor configurations from grandMA3 v1.2 and prior cannot be properly imported to grandMA3 v1.3 or later due to structural changes. * XML files with exported analog remote setups from grandMA3 v1.3 and prior cannot be properly imported to grandMA3 v1.4 or later due to structural changes. * XML files with exported timecode shows from grandMA3 v1.3 and prior cannot be properly imported to grandMA3 v1.4 or later due to structural changes. * XML files with exported presets from grandMA3 v1.5 and prior cannot be properly imported to grandMA3 v1.6 or later due to structural changes. *** ## []()Known Limitations [Section titled “Known Limitations”](#known-limitations) Exchanging a multi-instance fixture to a single-instance fixture type might not convert presets when the parent fixture has not the attributes. Software update via network to onPC stations requires confirmation during the install process at the destination system. When deleting a preset that is referenced by a cue the reference cannot be restored when oopsing the deletion. When multiple GlobalMasters exist on the network, each having the same session and location name, the station with the higher priority takes over without user input. If all stations have the same priority, then the station with the longest Online Time becomes the GlobalMaster for all stations. Programmer content is discarded when loading show files from previous versions. Sound input via Apple Silicon hardware is not implemented, yet.
# Release Notes 1.7
> Do you need help getting started in grandMA3? Perfect - here we describe a few quick steps to get you rolling. The manual will explain functionality in detail w
* [Get Started](/grandma3/2-3/key_rn_v1_7/#h2__1435677565) * [Bugfix Version 1.7.2.2](/grandma3/2-3/key_rn_v1_7/#h2__2030687499) * [Fixed Bugs](/grandma3/2-3/key_rn_v1_7/#h2__1624482491) * [grandMA3 Version 1.7.2.0](/grandma3/2-3/key_rn_v1_7/#h2_727740091) * [Features](/grandma3/2-3/key_rn_v1_7/#h2_727740091) * [Presets](/grandma3/2-3/key_rn_v1_7/#h3_956339510) * [Executor Assignment and Playback of Presets](/grandma3/2-3/key_rn_v1_7/#h3_1832424387) * [Recipes](/grandma3/2-3/key_rn_v1_7/#h3__808614509) * [Sequences](/grandma3/2-3/key_rn_v1_7/#h3__1026008) * [Preview](/grandma3/2-3/key_rn_v1_7/#h3__2122125854) * [Phaser and Phaser Editor](/grandma3/2-3/key_rn_v1_7/#h3__946139376) * [Spaces](/grandma3/2-3/key_rn_v1_7/#h3_2096095723) * [MArker Fixture and XYZ](/grandma3/2-3/key_rn_v1_7/#h3_231964299) * [3D](/grandma3/2-3/key_rn_v1_7/#h3__1137860005) * [Render Quality](/grandma3/2-3/key_rn_v1_7/#h3__1135228353) * [glTF Support](/grandma3/2-3/key_rn_v1_7/#h3_1462499028) * [Session Data Merge](/grandma3/2-3/key_rn_v1_7/#h3_1469462798) * [MIDI Out](/grandma3/2-3/key_rn_v1_7/#h3__1503058193) * [Content Sheet](/grandma3/2-3/key_rn_v1_7/#h3_320348620) * [DMX Tester](/grandma3/2-3/key_rn_v1_7/#h3_1956195346) * [Backup Menu](/grandma3/2-3/key_rn_v1_7/#h3_1498318733) * [Other Enhancements](/grandma3/2-3/key_rn_v1_7/#h2_1198082799) * [What’s Changed](/grandma3/2-3/key_rn_v1_7/#h2_563643534) * [Fixed Bugs](/grandma3/2-3/key_rn_v1_7/#h2_895816868) * [Appendix](/grandma3/2-3/key_rn_v1_7/#h2__1835053169) * [Known Limitations](/grandma3/2-3/key_rn_v1_7/#h2__1852571500) *** ## []()Get Started [Section titled “Get Started ”](#get-started) Do you need help getting started in grandMA3? Perfect - here we describe a few quick steps to get you rolling. The manual will explain functionality in detail while the MA e-Learning within the MA University offers you all kinds of training. All information can be accessed through the MA Lighting website [www.malighting.com](http://www.malighting.com). Let´s go! Once you leave the Release Notes by tapping I agree on the top right corner, you get presented with the main screen of grandMA3 software. On the right side, you can see predefined views. By tapping the view buttons you can switch between them. If this is your first time starting grandMA3 software you need to patch some fixtures first to get started. Or you can load one of the demo shows delivered with the software. In both cases, you need to press Menu key. If you are using grandMA3 onPC software there is a  symbol in the top left corner. Clicking the symbol is the same as pressing the Menu on a console. Hit Backup and then Load, now you are ready to load shows. As you want to get started quickly you should change in the header bar from Shows to Demo Shows by tapping the button repeatedly. Once it says Demo Shows you can choose any of them by selecting it and then tapping Load. Just in case there was a show loaded already the software will ask you if want to save the current show first before loading the new one… your choice ;-) Here we go! Now you are ready to work with the grandMA3 software. It is as easy as that! Again - on the right side are the view buttons to change screen content. At the bottom, you find the encoder bar and the command line. Technically that is all you need to get started. For more detailed information, refer to the grandMA3 help menu which you can reach by one of the view buttons named Help or via the MA Lighting website. If you want to learn grandMA3 software step by step please join the MA e-Learning - it’s free of charge and available via the MA Lighting website. Have fun with the grandMA3 software - next, you will find all the improvements and changes of this software version. **Hint:**\ The grandMA3 software will start with the show file (or status) that was active when the software was closed. *** ## []()Bugfix Version 1.7.2.2 [Section titled “Bugfix Version 1.7.2.2”](#bugfix-version1722) ## []()Fixed Bugs [Section titled “Fixed Bugs”](#fixed-bugs) ### Command Line and Macro [Section titled “Command Line and Macro”](#command-line-and-macro) | Description | | ---------------------------------------------------------------------------------------------------------------------------------------------------------------------------------------------------------------------------------------------------------------------------------------------------------------------------------------------------------------- | | The software crashed during loading show file from v1.6 or earlier that had recipes in presets which in turn had no selection assigned. This bug is fixed. Recipes without a selection do not crash the software anymore during the migration of the show file. | | The software crashed when recipes were repeatedly stored into the programmer by pressing Store and then tapping New Recipe in the Programmer Part window. This bug is fixed. Repeatedly storing recipes in the Programmer Part window does not crash the software anymore. | | Executing Fixture At Fixture on a connected console with a different user profile did not output the new programmer content. This bug is fixed. Fixture At Fixture works again in multi-user environments. | | When attributes were stomped in a multi-user environment and processing units were connected, the stomped values could have become part of the programmer of a different user profile instead of the one that executed stomp. This bug is fixed. Stomping in multi-user environments puts the stomped values into the programmer of the user who executed stomp. | | Copying symbol pool object to the image pool crashed the software. This bug is fixed. Copying objects from one pool to a different pool does not crash anymore. | | Importing a Lua plugin crashed the software when General Undo was disabled in the settings of the user profile. This bug is fixed. Disabled General Undo does not crash the software when importing data. | | Addressing objects via their IDs in an OSC message did not trigger the object anymore. This bug is fixed. Triggering objects via their IDs in an OSC message works. | | When switching off the network Art-Net or sACN were still being output. This bug is fixed. Disabling the network stops now also the output of DMX protocols. | | When you brought back a station into session where the session and the joining IdleMaster were both sending Art-Net or sACN, GlobalMaster and the connected station at times could output Art-Net or sACN. This bug is fixed. In sessions with two or more consoles only the GlobalMaster station outputs Art-Net or sACN. | | The keywords IfActive or IfProg selected fixtures with activated or deactivated values in the programmer of different user profiles. This bug is fixed. IfActive and IfProg only select fixtures that have actived or deactivated values in their own programmer. | ### Connections [Section titled “Connections”](#connections) | Description | | -------------------------------------------------------------------------------------------------------------------------------------------------------------------- | | After booting a grandMA3 console the sound input was not always recognized. This bug is fixed. The sound input via XLR now works directly after booting the console. | ### Patch [Section titled “Patch”](#patch) | Description | | -------------------------------------------------------------------------------------------------------------------------------------------------------------------------------------------------------------------------------------------------------------------------------------------------------------------------------------------- | | Adding new fixtures in the patch at the top of a grouping fixture caused layout elements to display the new fixtures instead of the fixtures of the same grouping fixture that were formerly assigned. This bug is fixed. The assigned objects in layouts are not changed anymore when adding new fixtures at the top of a grouping fixture. | | The individual phase values of a phaser in a cue could get lost when exchanging fixture types in the patch. This bug is fixed. Exchanging fixture types should not delete individual values in phaser anymore when the new fixture type has the same attribute. | ### Playback [Section titled “Playback”](#playback) | Description | | ---------------------------------------------------------------------------------------------------------------------------------------------------------------------------------------------------------------------------------------------------------------------------------------------- | | Tracked absolute values were not considered during a cue playback. The cue was played back using only the new relative phaser data of the attribute. This bug is fixed. This bug is fixed. The output of a relative phaser in a cue respects the tracking absolute data of the same attribute. | | When playing a sequence with HTP playback priority with dimmers at 0% in the cue, the former programmer values were still output. This bug is fixed. HTP playbacks of sequences where dimmers are stored at 0% have now the correct playback output. | ### Windows [Section titled “Windows”](#windows) | Description | | ----------------------------------------------------------------------------------------------------------------------------------------------------------------------- | | The filtering in grids, for example the patch menu or the layout editor, could not filter all columns. This bug is fixed. Filtering in grids is fully functional again. | *** ## []() ## grandMA3 Version 1.7.2.0 [Section titled “grandMA3 Version 1.7.2.0”](#grandma3-version-1720) ## Features [Section titled “Features ”](#features) The latest release of grandMA3 version 1.7.2.0 rolls out several enhancements that enrich your lighting experience. Read on for a quick introduction and find links for more information. *** ### []()Presets [Section titled “Presets”](#presets)  New in this release Presets can now contain timing values only. For example, fade and/or delay. Together with this change, it is now possible to only call fade and/or delay times into the programmer. In cues, you cannot store timings only. When calling a timing only preset into the programmer, adding absolute and/or relative values to the programmer for the same attributes, and then storing a cue, the cue will store the values of the timing without a preset reference.  New in this release Presets now store MAtricks directly into the preset. Whenever the MAtricks are active, storing a preset also stores the MAtricks settings in the preset. Should a preset contain MAtricks, the MAtricks icon will be displayed.\ To easily edit the MAtricks settings of a preset, open the EditSettings editor of the desired preset, and edit the MAtricks settings. The new store setting MAtricks defines whether the active MAtricks is to be stored into the preset. Whenever a preset contains fade times and/or delay times in its the MAtricks, the preset object in the pool displays the fade and or delay markers as well. Calling a preset which contains MAtricks, the preset applies the data in this order: 1. MAtricks Grid settings 2. Preset values 3. MAtricks Layer settings (if they exist) ### []()Executor Assignment and Playback of Presets [Section titled “Executor Assignment and Playback of Presets”](#executor-assignment-and-playback-of-presets)  New in this release Presets can now be assigned to executors.\ In addition, the selective content of a preset can be either played back by starting an executor which has such a preset assigned or by executing a playback function with a preset in the preset pools, using Go+ for example. Opening the EditSetting-tab of the assign menu of an executor that has a preset assigned, offers the same settings as for sequences, as long as they make sense for a preset. For more information on playback settings see [Sequence settings](/grandma3/2-3/cue_sequence_settings/). Edit the global preset playback settings in Menu - Preferences and Timing - Preset. The OffFade property of preset playbacks determines the fade time when switching off a preset playback.\ The new executor button function At allows to perform an At Preset x.y for the selected fixtures when having the At function assigned to a preset executor. ### [Section titled “ ”](#-1) ### []()Recipes [Section titled “Recipes”](#recipes)  Improved in this release Creating recipes in presets has become easier and more comprehensive.\ It is possible to add one or more recipe lines to empty preset objects, or to convert already existing presets into recipes.\ Recipes in presets are useful when different MAtricks are to be executed with different fixture selections. The recipe workflow: 1. Execute the command EditSetting on a preset object in the preset pool. 2. To create a recipe line, tap Turn into Recipe.\ If the edited preset previously contained values, these will be converted into the recipe. \ appeares in the column “Values”. \ If the preset was empty, a preset can be entered in the “Values” column. Or values from the programmer can be stored in the recipe by pressing Store and then tapping the recipe line. 3. In order for the preset to have functionality, add a selection:\ Either enter a group in the Selection column or tap Take Selection to take the selection from the programmer. In this case \ is displayed in the Selection column.\ It is also possible to use the “Store /Selection” command and then tap the recipe line. If several recipe lines are created, the columns Values and MAtricks refer to the first recipe of the preset. This is indicated by MAtricks values which are displayed using <>, for example, <2>.\ This makes sense if you assign your own MAtricks values, for example, Fade or Speed, to a special selection. It is also possible to assign other values to the Values column. When tapping Reset Selected the individual MAtricks settings for the selected recipe line will be reset.\ If presets or groups used in recipes are edited, they will be cooked automatically. It is still possible to store attribute data into recipe presets, and to create recipes in normal presets using the Store Preset x.y.z command. Recipes can now use the MAtricks settings Shuffle and Shift. The button Shuffle toggles the display of the corresponding columns in the recipe area and displays the corresponding section in the MAtricks area. The Stored Data column informs the user of which type the data inside the preset or recipe is. This is important when calling a recipe preset that has no Selection stored inside of it. Recipe presets that contain values, but not a selection, call the values of the preset for the current selection of the programmer into the programmer without having a reference to the preset. *** ### []()Sequences [Section titled “Sequences”](#sequences)  Improved in this release Each cue and cue part have now settings to assign a speed master and a speed scale to them. Access these settings in the sequence sheet using the Speed Master and Speed Scale columns. Whenever a speed master is assigned to a cue or cue part, the speed of the cue or cue part will only be controlled by the speed master. A speed master that might be assigned to the sequence itself, does not influence such a cue or cue part. *** ### []()Preview [Section titled “Preview”](#preview)  New in this release Preview allows to have values in a separate programmer that will never generate output on a real stage. To enter the preview mode, press Prvw. When Preview is on, Prvw will light up, and the borders of at least these windows will turn red: * 3D * Align Bar * At Filter, window and overlay * Color Picker * DMX Sheet * Fixture Sheet * Layout * MAtricks, window and overlay * Phaser Editor, window and overlay * Programmer Parts * Selection Grid * Smart * Step Bar To leave the preview mode, press Prvw again. Prvw will turn dark and the windows listed above will turn gray once again. During preview mode, the output of the preview programmer will be displayed in the corresponding windows. Leaving and entering preview brings back the previous values of the preview programmer, unless they were manually cleared.\ The preview programmer behaves the same as the normal live programmer. Editing cues and presets in the preview mode does not create a green frame (as it would in the normal programmer). Instead, the frame turns yellow. **Known Limitations:**\ \- In this version, Preview has a preview programmer only. The preview of playbacks will be integrated at a later point in time.\ \- Highlight, Lowlight, and Solo are not functional yet in Preview. *** ### []()Phaser and Phaser Editor [Section titled “Phaser and Phaser Editor”](#phaser-and-phaser-editor)  Improved in this release The View Mode button in the title bar of the phaser editor was replaced by radio buttons. These allow switching directly between the view modes: * Auto * 1D * 2D * Sheet The phaser editor offers new modes when ViewMode is set to ‘Sheet’. The new mode Layer Sheet lists the values of different layers in rows. Every layer has their own row. Each column represents a step.\ If Layer Sheet is enabled, you can use the additional Attribute Sheet mode. When Attribute Sheet is enabled, the layers will be expanded to display the attributes separately.\ Find LayerSheet and AttributeSheet in the tab Sheet of the context menu.\ Selecting Sheet mode in the phaser overlay displays the data just like an active LayerSheet.\ The additional setting Show Empty Rows in the sheet view modes allows to show or hide empty rows within the sheet view modes. At the top of this view mode, all used attributes are displayed. Disabling the used attributes by simply tapping them disables the attributes for further actions, e.g., adjusting the values. These attribute buttons are linked to the command filter that you can open with a long press on At.\ To toggle selection of all attributes, tap  on the right of the attribute bar. The currently selected layer will be displayed in the layer view mode with a colored background in the layer column on the left side. The background color is the same color as the layer color, too. Layers sharing their value with all steps display their value in the column of step 1. At the bottom of the layer view mode, the used attributes also display their phaser as a graph, like in the 1D view mode. The Filter button allows to show or hide empty lines within the different Sheet modes. When it is on, empty lines, e.g., of layers that do not contain values at the moment, are hidden. When it is off, all lines will be displayed. Regarding the displayed presets, etc. within the phaser editor, the context menu of the phaser window offers now to choose the value readout, speed readout, and preset readout, as known from the fixture sheet, sequence sheet, and many more. Furthermore, with the Transpose setting, it is possible to exchange the columns and rows in the sheet mode. The Transpose setting can be found in the Sheet-tab of the context menu (tap MA in the top left corner of the phaser window).\ The Sheet-tab allows also to set an individual Readout, Speed readout, and Preset readout that differs from the settings of the user profile. To edit values in the Sheet view mode, tap and hold the cell. In Layer Sheet mode it is not possible to edit an absolute value cell or relative value cell when attributes of two or more feature groups are selected in the filter bar at the top of the window. Furthermore, the phaser editor has now the possibility to display the step bar within the phaser editor. By default, the step bar is enabled. To hide or show it, open the context menu of the phaser editor and tap Step Bar.\ In addition, the Step Bar setting in the phaser editor includes 3 more small buttons to the right of the step bar, which define, which encoder bar the user gets displayed when the focus is set to the phaser editor: 2D Bar, Phaser Bar, or Preset Bar. Preset Bar is the normal attribute encoder bar. The graph of the 1D phaser editor does not draw a new line for each single phase value that is active, but instead spreads the fixtures corresponding to their phase along with the graph. The - tool in the left toolbar was removed, as this tool already exists in the right toolbar.  Improved in this release The indicator bars of the step bar buttons are functional: * Purple indicator bar on the First Step button: * Step 2 or above is selected alone. * Some steps are selected. * Purple indicator bar on the First Step button and the Select All Steps button. In addition, the icon of the Select All Steps button turns yellow: * All steps are selected. * No indication: * Only step 1 is selected.  New in this release Keeping X5 | Step pressed and then tapping presets integrates these presets automatically into steps into the programmer. To be able to do so, executor 295 on the current page does not have an object assigned. As soon as an object is assigned, MA + X5 | Step needs to be pressed. Please refer to the [Other Enhancements](/grandma3/2-3/key_rn_v1_7/#OtherEnhancements) section within this document for more information about this Xkeys behavior in general. When pressing X5 | Step and then tapping a preset integrates the preset into the current step. Tapping the next preset will behave differently depending on the attributes of the preset: * Same attributes as already in the step: Next step will be entered and the new preset will be integrated there. * Different attributes as already in the step: The new preset will be integrated into the current step. Furthermore, when calling a preset into step 1 and then integrating a preset in step 2, the preset in step 1 will automatically be integrated, too.\ And when tapping a preset while being in step 2 or higher will also automatically integrate the tapped preset into the current step.  New in this release The new phaser layer, Measure (Unit: Beats), coupled with the phaser speed (Speed layer) defines the length of time a phaser cycle takes. For example, a phaser with 2 beats on the measure layer at 60 BPM will repeat every 2 seconds. The Measure layer also affects how the width of each step is calculated. **Hint:**\ When using the Measure layer, multiple Width value combinations can produce identical results. To ensure predictable timing, it is recommended to consider the Width value of a step as the percentage of a beat and ensure that the total width of all steps in the phaser equals the number of beats specified in the Measure layer. The Measure layer affects the whole phaser, just as the speed layer and the phase layer do. The vertical, bold, blue lines in the 1D view of the phaser editor represent beats, whether the Measure layer is in use or not. When the Phaser encoder bar is displayed, the third dual encoder has the Width layer on the inner encoder, and Measure on the outer encoder.\ The phaser encoder bar only now only affects attributes that have two or more active steps. Depending on the value of the Values button, the 2D Phaser encoder bar colors the indicator bars of the encoder labels: * Absolute: Red color of the absolute layer * Relative: Pink color of the relative layer * Abs + Rel: Purple  Improved in this release It is now possible to set the width to values higher than 100%. The new limit is 3 200%. *** ### []()Spaces [Section titled “Spaces”](#spaces)  New in this release A space is a defined area within a stage. It needs to be used by MArker fixtures to define in which area they can operate (Movement Space), or to attach the space to the MArker fixture in order to let fixtures point to a MArker (Target Space) by using XYZ attributes. A space can be used for both types simultaneously.\ By default, a Stage Space always exists. This space describes the size of the stage.\ The Movement Default space describes a wide area for MArker fixtures to move within. It will always be assigned to MArker fixtures by default, but user-defined spaces are also possible.\ The Target Default space describes an area that can be used as a target area for fixtures to point to when assigned as Target Space to a MArker fixture. This space will always be assigned to new MArker fixtures by default, but user-defined spaces are also possible.\ By default, each patched MArker fixture gets its own set of spaces that will be assigned to it as Target Space and Movement Space. If a different space, e.g., a catwalk, is needed for a MArker fixture, go to Menu - Patch - Stages. Select the stage you want the MArker to be operated on, then tap Edit.\ In the Edit Stage menu, select the cell ‘New Space’, and then tap Insert new Space. The new space will be added.\ With the next steps, the size (Min X, Max X, Min Y, Max Y, Min Z, and Max Z) can be modified. After setting up a new space, this space needs to be assigned as Target Space or as Movement Space to an existing MArker fixture. The Columns need to be set to **Full** in order to see these two columns. To do so, go back to the Patch tab within the Patch menu, and edit the Target Space cell or the Movement Space cell of the desired fixture. Select the new space from the drop-down list.\ By default, a MArker fixture has the Target Default space and/or the Movement Default space of its stage assigned.\ One space can be assigned to several fixtures within the patch. A MArker fixture cannot move outside the edge of its assigned Movement Space within the grandMA3 system. When the input (e.g., via PSN) of a MArker fixture reports a position that is outside the boundaries of the Target space, the MArker fixture will be positioned as close as possible, but within the space. The 3D window allows displaying the spaces that are assigned as Target Space to MArker fixtures. To see these spaces, enable Draw Target Spaces within the Misc-tab of the 3D Window settings. When a space has an appearance assigned, the outlines of the space will be displayed in the background color of the assigned appearance. *** ### []()MArker Fixture and XYZ [Section titled “MArker Fixture and XYZ”](#marker-fixture-and-xyz)  Improved in this release The existing MArker fixture type has now 2 modes: Moving and Still.\ The moving mode reflects the behavior of the MArker fixture type as known from grandMA3 v1.6.\ The still mode has no DMX channels and therefore cannot be moved around by external input (e.g., PSN). A still MArker fixture shall be used when fixtures shall point their beams to still stage elements by using the XYZ system. Still stage elements will not move around during the show, e.g., the drum riser. As soon as an element will move around during the show, the moving mode of the MArker fixture type is the way to go. Learn more about [MArkers](/grandma3/2-3/xyz_marker/). To create a still MArker fixture, start creating a new fixture and select the MA Lighting MArker fixture type and within the fixture type select the Still mode. Once the still MArker fixture is created, a space can be assigned to it as Target Space. The still MArker fixture needs to be placed within the grandMA3 3D space in the same position as to where it is being placed on the real stage. In addition, there is a new custom ID Type called MArker. MArker fixtures need to have a custom ID for the MArker custom ID type. The MArker custom ID type cannot be renamed. The XYZ attribute MArker (see below) points to a fixture by using the custom ID of the MArker ID type. The fixture sheet has also the option to hide or show fixtures that are using the MArker ID type by disabling or enabling the MArker mask within the fixture sheet settings menu.\ When patching MArker fixtures the MArker ID will automatically be set. The MArker ID starts with 1, but the user is also free to set any other number as MArker ID. The MArker ID is not linked to the fixture ID. **Important:**\ It is possible to patch a maximum of 1,024 MArker fixtures within a show file.  New in this release XYZ is a different approach to position the beam of a fixture. Instead of using Pan and Tilt values to point a fixture to a spot on stage, the same position can also be described by a coordinate with X Y, and Z values. The grandMA3 system recalculates automatically the XYZ coordinate into Pan/Tilt values for the fixture. **Important:**\ To get the most accurate result when using XYZ, it is necessary that the fixtures are placed as close as possible within the grandMA3 3D space compared to the real fixtures.\ The [Stage Calibration](/grandma3/2-3/patch_position_fixtures/) feature can be helpful to achieve this. To be able to use the XYZ position system, XYZ needs to be enabled for all fixture types whose fixtures shall do XYZ. To do so, go to Menu - Patch - Fixture Types - select a fixture type - Edit. In the fixture type editor, XYZ needs to be enabled. The XYZ button is only displayed when the fixture is ready to be used for XYZ. An additional column called XYZ within the fixture type editor displays if XYZ is enabled or not for a DMX mode of a fixture. Enabling XYZ will add new virtual XYZ attributes to the selected mode of the fixture type. These attributes are: * X, Y, Z: The attributes to enter the X, Y, and Z coordinates the beam of the fixture shall point to on stage. * Flip: Defines which flip type shall be used (please read the description below to learn more about the different flip areas): * Negative: The negative flip areas that shall be used. * Center: The center flip area shall be used. * Positive: The positive flip areas that shall be used. * Auto Flip: The software decides which flip area it uses. * No Tilt Flip: Flips only the pan attribute. * No Flip: The fixture tries not to flip. * MArker: The custom ID the MArker fixture got assigned of the MArker custom ID Type the fixture(s) shall follow. * Distance: The Distance attribute belongs to the Pan and Tilt attributes when using XYZ. With this attribute, the software can define a unique XYZ coordinate out of a pan/tilt position. The distance attribute sets the distance between the fixture and the point that will be calculated as the XYZ coordinate. Without this attribute, the combination of the pan and tilt attributes only describe an “endless” line within the space. When using the follow tool within the 3D window for pan and tilt, the distance will be automatically set to the value that represents the distance between the fixture and the position that was defined by the follow tool. The value range of the X, Y, and Z attributes goes from 0% to 100%. This is done because the XYZ system can now use relative positioning within the Target Space of a MArker fixture.\ Let’s have four fixtures that point to a 2 m x 2 m riser by using XYZ. These fixtures have a value of 1 set on the MArker attribute because the riser they point to is patched as a MArker fixture with this ID. The space of the riser is defined with an overall size of 2 m x 2 m x 2 m.\ With spreading the X attribute from 0% to 100% the four fixtures align nicely over the riser. Imagine you are now touring and in the next venue the riser is now 4 m wide. Instead of adjusting now the XYZ positions for all four fixtures, it is enough to adjust only the size of the space. With the relative XYZ position, the grandMA3 software adjusts automatically the four fixtures across the range of 4 m. Together with the XYZ implementation, the Phaser Editor window allows defining which position attribute pair shall be used for a phaser when working in the 2D area. Therefore the phaser editor window has now Attributes added within its context menu. It can be set to PanTilt, or any 2D combination of the 3 XYZ attributes (XY, XZ, or YZ). When using the follow tool of the 3D window, XYZ will be used as soon as a fixture has XYZ enabled within its fixture type, and when the encoder bar is set to display the attributes of the XYZ feature (X, Y, Z, Flip, and MArker). As soon as the encoder bar is set to any other feature (PanTilt) or feature group, the follow tool will use pan and tilt attributes. **Known Limitations:**\ \- XYZ can work only with fixtures that have Pan and Tilt attributes and these attributes must be set up with a correctly structured geometry.\ \- Complex fixtures that have multiple pan axes or tilt axes are not supported, yet, for XYZ.\ \- Using XYZ with relative values may cause unexpected results. Therefore, please use only absolute values with XYZ.\ \- For v1.7 we recommend using only one type of position attributes (PanTilt or XYZ) for the same fixture within one sequence.\ \- PanTilt presets that were created before activating XYZ need to manually get the Distance attribute added.\ -Fading between two MArkers is not possible in grandMA3 v1.7. A flip area is a pan or tilt area of 180°. How many flip areas a fixture has is defined by its physical range of pan and tilt. A fixture that has a pan range of 540° has the following flip areas for the pan attribute: * Flip area -1: -270° to -90° * Flip area center: -90° to +90° * Flip area +1: +90° to +270° The flip area starts always in the center of the physical range. From there the center flip area is defined by going 90° into each direction (negative and positive). Consequently, the center flip area also has a size of 180°.\ The following negative and positive flip areas attach seamlessly to the center area. A fixture that has a bigger physical range, will have then more negative and positive flip areas, e.g., a fixture with a pan range of 900° has these flip areas on the pan attribute: * Flip area -2: -450° to -270° * Flip area -1: -270° to -90° * Flip area center: -90° to +90° * Flip area +1: +90° to +270° * Flip area +2: +270° to +450° The negative and the positive flip areas are each limited to 10, which would cover physical ranges of 1800°.\ When a negative or positive flip is set in the flip attribute that the fixture cannot access, the closest one the fixture can access will be used. *** ### []()3D [Section titled “3D”](#3d) ### []()Render Quality [Section titled “Render Quality”](#renderquality)  New in this release The BeamQuality setting, BodyQuality setting, and some more settings within the 3D window got replaced by the Render Quality setting. The render quality setting refers to the new Render Quality pool.\ This pool has already some predefined and locked Render Qualities the user can select within their 3D windows. It is also possible to add new Render Qualities. A Render Quality describes the render quality within the 3D window. Each Render Quality consists of numerous settings that can be freely combined by the user: * Beam: None, Line, Standard, High, and High Fancy define the quality of the rendered beam. * Shadow: Enabled, or Disabled defines if the beam shall also throw shadows when hitting another object. Therefore the 3D object needs the setting **Cast Shadow** enabled within the patch. * Gobo: Disabled, Enabled, or Animated defines if gobos shall be rendered within the beam and spot, or not. Animated means that in addition to the gobo also gobo animations like gobo shake or gobo wheel spin are rendered. When gobo is only set to enabled, these animations won’t be rendered. * BodyQuality: None, Box, Low, Simple, Standard, High and Ultra define the quality of the rendered fixture body. In the qualities Standard, High, and Ultra the meshes are displayed natively up to a certain vertex count per fixture type. If this count is exceeded, the fixture will be displayed with default meshes. While there is no limit in Ultra, the maximum vertex count is 1 200 in Standard and 10 000 in High. * Multi Led Beam Mode: Separated Beams, Single Beam Mean Color, and Single Beam Dynamic Gobo define if every beam of a multi-emitter fixture is drawn individually or if they are drawn combined to save performance. * Light Scale: Defines the resolution of the rendering of the light. 100% means native resolution. The lower the value, the lower the resolution of the rendered light. A lower resolution means less performance impact. * Render Scale: This changes the resolution of the whole rendering in the 3D window continuously. 100% means that the 3D window is rendered with its native resolution. 0% means that the resolution of the 3D window is divided by 5 in width and height. Default: 100% * Shadow \[Pix]: Defines the resolution of the shadow. A lower resolution means less performance impact. This only affects the rendering in Beam Quality “Gobo Shadow”, “High Shadow” and “High Shadow Fancy”. Default: 128 * Snap: If “Snap” is enabled, the Render Scale and Light Scale are divided with integer values. The fader then indicates the scale (1/1 to 1/5). To address the pool object of the Render Qualities pool the new keyword **RenderQuality** is introduced. To create a new Render Quality, open a Render Qualities pool (Add Window dialog - Pools - Render Qualities). Enter **Store** into the command line and then tap an empty pool object. The new Render Quality can now be edited which allows adjusting the parameters listed above. ### []()glTF Support [Section titled “glTF Support”](#gltf-support)  New in this release Mesh files of the glTF (GL Transmission Format) format are supported now. Importing them to the mesh pool works the same way as importing a mesh file of the 3ds format. glTF files with the extensions \*.glb, \*.gltf and \*.gltf with related \*.bin file can be imported. **Hint:**\ glTF version 2.0 is implemented to the grandMA3 software. **Important:**\ There is a size limit of 10 MB for the mesh data and 128 MB for the whole glTF file (mesh + textures). *** ### []()Session Data Merge [Section titled “Session Data Merge”](#session-data-merge)  New in this release When a console or onPC station rejoins a session (either by joining or invitation or network reconnect), the session recognizes that the station joining already was a part of the session at a previous point in time. If the same show file is loaded on both sides, the grandMA 3 software can merge both show files. This is useful in undetected scenarios such as a station being disconnected for a time from the rest of the session (maybe because of a defect in the network cable or other causes of failure). If on both sides (the remaining session and the disconnected station) users worked further on the show file, users have to decide to choose between one of the two show files. Meaning they had to reprogram the changes of the lost show file in the one that is kept. The new **Merge All Data** option combines the data of both show files in one show file. The Session Data Merge pop-up is visible for 60 seconds. After 60 seconds without a response, the session data merge will be canceled. \ To pause the countdown, tap in the text area of the pop-up. When such a station as described above now joins again the session, a pop-up informs the user about a **Session Data Merge**. The user has 3 options they can choose from: * Merge All Data: Merges the changes of all connecting stations into one show file. * Keep only Master Data: The changes in the show file data of the connecting device(s) is ignored. The show file of the Master side is maintained. Before overriding the show file of the connecting devices(s), the show file will be saved automatically on the connecting station. * Cancel: The connecting station(s) will not join the session of the Master side and be made Standalone. The user can now investigate which show file is the correct one from their point of view, then back up each show file, etc. Merging the data of two show files is supported for these object types, at the moment: * Sequences with Cue and Cue Part * Presets * Recipes * Programmer and Programmer Parts * Timecodes * Macros, Plugins, and PluginComponents * Pages and Executors * Images and Videos * DataPools * Groups * All other pools not explicitly mentioned here **Known Limitations:**\ \- Changes made to the patch during the disconnection of a station disables the possibility to merge.\ \- Merging the deletion of parts of objects during the disconnection of a station is not fully working, yet. (e.g. Deleting one Macro line or deleting a Recipe line)\ \- Merging the movement of objects during the disconnection of a station creates duplicates: At the original spot and the new spot. This may result, for example, in having different sequences assigned to the same executor on different stations. *** ### []()MIDI Out [Section titled “MIDI Out”](#midi-out)  New in this release The grandMA3 can now output MIDI notes, MIDI control change messages, and MIDI program change messages by executing the new command SendMIDI. To enter the MidiNote keyword in the command line, use one of the options: * Type **SendMIDI** * Type the shortcut **Sendm** Syntax: **SendMIDI “Note” (Channel/)Note (Velocity) (Status)** **SendMIDI “Program” (Channel/)Value** **SendMIDI “Control” (Channel/)Controller (Value)** If a MIDI channel is entered in the command, the entered MIDI channel will be used.\ If no MIDI channel is entered, MIDI channel 1 will be used. If a velocity is entered in the command, the entered velocity will be used.\ If no velocity is entered, a velocity full (127) will be used. If no status (On or Off) is entered in the command, On will be used. To send out the MIDI note 42 on MIDI channel 2 with a velocity of 99, type: User name\[Fixture]> SendMIDI “Note” 2/42 99 To send out the MIDI note 42 on MIDI channel 1 with a velocity of 99, type: User name\[Fixture]> SendMIDI “Note” 42 99 To send out the MIDI note 37 on MIDI channel 1, type: User name\[Fixture]> SendMIDI “Note” 37 To switch off MIDI note 37 on MIDI channel 1, type: User name\[Fixture]> SendMIDI “Note” 37 Off To send out the MIDI control value 64 to MIDI channel 1 controller 8, type: User name\[Fixture]> SendMIDI “Control” 1/8 64 To send out a MIDI program change of 12, type: User name\[Fixture]> SendMIDI “Program” 12 **Known Limitation:**\ MIDI Through for the MIDI hardware connectors is only working with MIDI Timecode. *** ### []()Content Sheet [Section titled “Content Sheet”](#content-sheet)  New in this release The Content Sheet is used to see the fixtures and values stored in cues. It looks a lot like the Fixture Sheet, but it has a functionality that only displays what is stored in a single cue. It is like a combined Sequence Sheet in Track Sheet mode and Fixture Sheet. It works very similarly to the Sequence Sheet regarding the sequence to display (Link Type). With the Cue Mode the user can decide if they want to see the current cue, the previous cue, or the next cue.\ With the Show Tracked setting it is possible to display also values that are tracking into the displayed cue. When it is off, only attributes are displayed that will change their value within the displayed cue. The data of the displayed cue is also separated by the cue parts the cue may have. Within each cue part the fixtures are positioned vertically and the attributes are placed horizontally, like in the fixture sheet. By tapping the headline of each cue part is it is possible to hide or show this specific cue part. A checkmark to the left of the headline bar indicates whether the data of the cue part is displayed or not. When the new setting Fixture Select is enabled, tapping a cell in the Content Sheet will select these fixtures in the programmer. When this setting is disabled, selecting cells will not select their fixtures in addition. *** ### []()DMX Tester [Section titled “DMX Tester”](#dmx-tester)  New in this release The DMX tester feature allows to output DMX without addressing attributes of fixtures. This can be useful in order to find the correct DMX address of a dimmer channel, e.g., in a theater, or to check if a DMX channel addresses the correct functionality of a fixture. The DMX tester can be used on patched or unpatched DMX addresses. To output a value via the DMX Tester feature, the keywords DmxAddress and DmxUniverse can be used.\ The syntax scheme is as following: **DmxAddress/DmxUniverse \[Dmx-List] At (Readout-keyword) \[Value]**\ **\[Function] DmxAddress/DmxUniverse \[Dmx-List]** To output 50% with the DMX Tester on the third DMX channel of universe 1, type: User name\[Fixture]> DmxAddress 3 At 50 or User name\[Fixture]> DmxUniverse 1.3 At 50 It is also possible to output to a range of DMX channels. To output 42% with the DMX Tester to the DMX channels 8 to 15 on universe 2, type: User name\[Fixture]> DmxAddress 520 Thru 527 At 42 or User name\[Fixture]> DmxUniverse 2.8 Thru 15 At 42 To output 69% with the DMX Tester to DMX channels 11 to 15 on universes 3 to 5, type: User name\[Fixture]> DmxUniverse 3 Thru 5.11 Thru 15 At 69 To output the 8 Bit decimal value 128 with the DMX Testet to all DMX channels of the 42th universe, type: User name\[Fixture]> DmxUniverse 42 At Decimal8 128 **Hint:**\ The readout keywords are [Percent](/grandma3/2-3/keyword_percent_word/), [PercentFine](/grandma3/2-3/keyword_percentfine/), [Decimal8](/grandma3/2-3/keyword_decimal8/), [Decimal16](/grandma3/2-3/keyword_decimal16/), [Decimal24](/grandma3/2-3/keyword_decimal24/), [Hex8](/grandma3/2-3/keyword_hex8/), [Hex16](/grandma3/2-3/keyword_hex16/), and [Hex24](/grandma3/2-3/keyword_hex24/). When a DMX channel outputs values through the DMX Tester, the corresponding cell within the DMX sheet has a white background. To switch off the DMX Tester the Off keyword needs to be combined with the DmxAddress or DmxUniverse keywords. To switch off the DMX Tester on all DMX channels of all universes, type: User name\[Fixture]> Off DmxAddress Thru or User name\[Fixture]> Off DmxUniverse Thru **Important:**\ The former functionality that selected the fixture that was patched to a DMX address when executing the DmxAddress or DmxUniverse keywords, still exists, but it needs to be executed together with the SelFix command, e.g., SelFix DmxAddress 1 selects now the fixture that is patched to DMX channel 1 of universe 1. **Known Limitation:**\ For grandMA3 v1.7 the DMX Tester can only be operated throughout the command line. *** ### []()Backup Menu [Section titled “Backup Menu”](#backup-menu)  Improved in this release When opening the backup menu (Menu - Backup) a new first selection menu opens that offers the choices for Load, New Show, Save To \, Save As, and Delete.\ The background coloring of these buttons helps also to distinguish fastly the different functions.\ At the top of the selection menu, the description input field is always visible. It displays the description of the currently loaded show file and allows also to modify it.\ On the bottom of this selection menu, the settings are now always visible. Tapping Save To \, for example, Save To Internal, will directly save the show file under the current show file name onto the selected drive. Save As opens a file list, and allows to overwrite other show files with the content of the current show file or to enter a new show file name. When a new show file name is entered, tap Save As … in the bottom right corner to finally save the show with the new name.\ Load and Delete will also open the same style of file list where the selected show can be loaded or deleted by tapping then the corresponding button in the bottom right corner: Load or Delete.\ The buttons to select the type (e.g., Shows, Backup, or Demo Shows), and the drive selector button are now also part of the Load, Save As, and Delete menus.\ Tapping New Show opens an input pop-up where the user can enter the show file name for their new show, or take the suggested show file name. Applying it will start the new show. When being in a file list (Load, Save As, or Delete), buttons at the bottom allow to display the history of the show file (Show History) or to display the description of the selected show file (Show Description / Edit Description). To go back to the selection menu, tap Back on the top left corner of the menu. Within the Save As list, the description of the show file can be also modified. Only one dialog of these two can be displayed at the same time. Line breaks within the description input field can be made now by just pressing Please or Enter. The input field for the description now allows using the on-screen keyboard to enter the description. To do so, tap the keyboard icon at the right edge of the input field. A pop-up with the on-screen keyboard at the bottom to enter the description opens. If the on-screen keyboard is not visible, tap the triangle icon in the top left corner.\ When a description is longer than 2 lines, the description cell in the list of show files will display ”\[…]” at the end of the second line to indicate this. For, e.g., deleting show files, it is now possible to do multi selections within the list of show files. As soon as 2 or more show files are selected within the Load or Save As menus, the buttons Save As … and Load are grayed out. The warning pop-up which appears when loading a show while the changes are not saved to the current show now also displays the name of the current show file. If you tap Save As … and the file is not found in accordance to the search, the name of the show file being searched will be used as a suggestion. In case there is a match with the searched show file name, the first show file within the matching list will be suggested. The backup menu is now a full-screen menu. When being in the Load Show, Save As, or Delete the top right area of the menu informs the user about the available space on the selected drive. When saving a show file and the destination drive does not have enough space, a pop-up informs now the user that the show file could not be saved successfully. **Hint:**\ On macOS the available space is the sum of free space and purgeable space. As Windows stations will freeze when using certain names as show file names, the software does not allow to use such show file names anymore. A pop-up informs the user if they used an illegal show file name.\ The illegal show file names are:\ CON, PRN, AUX, NUL COM1, COM2, COM3, COM4, COM5, COM6, COM7, COM8, COM9, LPT1, LPT2, LPT3, LPT4, LPT5, LPT6, LPT7, LPT8, and LPT9. *** ## []()Other Enhancements [Section titled “Other Enhancements”](#other-enhancements)  The grandMA3 onPC software running on Windows now checks if the minimum and recommended [system requirements](/grandma3/2-3/onpc_system_requirements/) are fulfilled. If not, a pop-up will inform the user before the application starts.  The indicator icons on preset pool buttons and sequence pool buttons were reworked: * In and out filter icons are now sharing the same spot: When only a filter for input is assigned, the filter icon looks like this: ; when only an output filter is assigned, the icon looks like this: ; when both, input filter and output filter are assigned, it looks like this: . This is valid for presets (input filter only) and sequences (both, input and output filter). * The indicators for referenced/embedded and integrated are also sharing the same spot: * Only referenced/embedded:  * Only integrated:  * Embedded and integrated:  * Furthermore, these icons and the number of the fixtures that have the preset applied are now cyan by default. * When a preset is set to be a MAgic preset, the indicators for the preset mode of the preset disappear now and on their spot, the MAgic icon appears. * The indicator for multi step presets was also reworked:  * On top of the indicator icon row, layer indicators are now placed. It displays indicators when there are values of the following layers stored within the preset: Absolute, Relative, Fade, and Delay. The coloring of these indicators follows the coloring of the layers themselves. As long as there are only absolute values part of the preset, no indicator for absolute will be displayed.  Groups and MAtricks pool objects that are referenced to other objects, e.g., into layouts, recipes, etc. display now also the reference icon:   The Import/Export menu was reworked regarding the ObjectType selection: The ObjectType selection was moved from the title bar to the left side of the main area.\ Tapping ObjectType opens the ObjectType selection dialog across the whole Import/Export menu. After selecting one ObjectType or tapping , the ObjectType selection dialog closes.\ When opening the Import/Export menu for the first time, the ObjectType selection dialog opens automatically.  Agenda * Pasting agenda events allow now directly to set a new start date by using the /Date option. To set the start date of the agenda event that will be pasted to 3.10.2042 as the second agenda event, type: User name\[Fixture]> Paste Agenda 2 /Date “3.10.2042” * It is now possible to copy all events of a day at once and paste them at another day, just by selecting the day within the ViewMode Year, Month, Week, or Day.\ Within these view modes, it is only possible to select 1 day at all or 1 event at all. * When using the Delete Old-functionality, a pop-up asks if the user wants to delete all events from the past. * The title bar buttons for Reset Selection and Delete Old are now only displayed when the Agenda window has the Setup mode active. * The workflow of the cut (), copy (), and paste () functionality in the setup mode of the agenda window changed and works now in the same way as in other places of the software: Select first the agenda entry, then tap the button of the desired action.  IfOutput, IfActive, and IfProg * IfOutput selects now only fixtures that have non default values. * IfOutput, IfActive, and IfProg select fixtures now in the order of their fixture and/or custom ID. * IfActive and IfProg are now selecting fixtures that have other attributes than the dimmer active or in the programmer. * IfActive and IfProg can now filter by objects, e.g., presets, attributes, feature groups, etc. To select only the fixtures that have the red color preset active in the programmer, type: User name\[Fixture]>IfActive Preset 4.”red” Learn more about [IfOutput](/grandma3/2-3/keyword_ifoutput/), [IfActive](/grandma3/2-3/keyword_ifactive/), and [IfProg](/grandma3/2-3/keyword_ifprogrammer/) in their help topics.  The dialogs “Select fixture type to import” and “Insert New Fixtures” in the patch were improved: * Select fixture type to import dialog: * The list of fixture types to be selected for import is now redesigned and follows the same style as known from the different share sites ([http://fixtureshare.malighting.com or](http://fixtureshare.malighting.com%C2%A0or) ): It has 3 columns (from left to right): Manufacturer, Fixture, and Mode.\ Within these 3 columns, a list displays always the currently available data, depending on the former action and/or search. The user has to select first a manufacturer to see all the available fixtures of the manufacturer. After selecting a fixture, all available modes will be displayed.\ An entry with yellow font color and a dark gray background is the selected entry. Light gray text under each manufacturer name, fixture name, and mode name, tells the user how many fixtures of the manufacturer are available, how many modes a fixture has, or how big the DMX footprint of the mode is. * The fixture types to import offers now all possible files from all available sources (MA, User, Shares) at once. There are no different tabs for each source anymore. To see and search only within a certain type of source, enable only the wanted source(s). Tap the icon of each source in order to enable or disable it for the search.\ Shares as source is disabled by default, but can be enabled by the user any time.\ The column for the fixtures of a manufacturer displays also per fixture from which source this fixture type os coming from. * The list of fixture types to patch new fixtures can be changed between the fixture types that are already part of the Show (Show) or to import one from the available libraries (Library). * Shares will be grayed out when there is no active connection with the world server. It will also be grayed out when the internal drive is not the selected one. * It is possible to navigate through the columns of Manufacturers, Fixtures, and Modes using the arrow keys. * Left and Right: Switch between the columns. * Up and Down: Scroll through the column. * Before the import of the fixture type to the show file, tap Description at the bottom to display the description and other information, like Version, Uploader, etc., of the fixture type. To adjust the vertical size of the description, tap, hold, and drag the top border of the area. * Insert New Fixtures: * The list of fixture types to be selected for import is now redesigned. To learn more about this new style, please read the first sub bullet point from the bullet point “Select fixture type to import dialog” above. * The new cells Mode and Dmx Footprint display the information of the selected fixture type. Tap Mode to change the used mode of the fixture(s) that shall be created. * The Apply button was renamed to Create! and has now a green background color. * The FID or CID area now suggests, depending on the quantity set, IDs that can take all fixtures in a row without causing a collision with existing fixtures. IDs that would cause a collision are grayed out. * The Patch field now has three more buttons Patch To Next Free Address, Patch To Next Free Universe, and Patch Offset. Furthermore, the calculator for direct input of a patch address and the sheet view are now simultaneously displayed. To apply a DMX address from the sheet view, the desired DMX address needs to be double-tapped. PatchOffset determines how many DMX channels shall be between the first channel of each fixture that will now be patched. * The Insert New Fixtures dialog allows now to change the Columns mode, too. Therefore, the title bar has now the corresponding button. Changing the Columns mode here changes it also in the patch menu, and vice versa.  When editing cells, it is possible to set negative values to Pan Offset and Tilt Offset in the patch menu. Exchanging fixture types should not create unnecessary selective preset data anymore by using existing global data for the swapped fixture type. When no existing global data exists for the fixture type, it will move/create global data for the new fixture type where global data exists for the old fixture type. Therefore the existing look is not explicitly preserved when there was no selective data for the fixture before the fixture swap. **Known limitation:**\ If you swap all fixtures using two or more fixture types to a new fixture type, you might get selective data for all but the first fixture type. To avoid this limitation swap one fixture to the new fixture type and save the patch before swapping the rest of your fixtures.  It is now possible to create a new line within grids, e.g., the macro editor or the recipe editor, by pressing Store and then tapping the New Line cell.  The color picker can now address fixtures that are using color wheels. **Known Limitation:**\ \- When a fixture type has more than one color wheel, the color picker can only handle up to 255 different color combinations across the color wheels.  New keywords Collect and Collection allow adding object index locations of the same type together into the collection. Additional actions can then be executed with the collection, e.g., import, store, delete, move, and many more. To enter the Collect keyword in the command line, use one of the options: * Press Select Select * Type **Collect** * Type the shortcut **coll** To enter the Collection keyword in the command line, use one of the options: * Press Fixture Fixture Fixture * Type **Collection** * Type the shortcut **collecti** To add an object into the collection, e.g., the second color preset, type: User name\[Fixture]> Collect Preset 4.2 To add then color preset 10, type: User name\[Fixture]> Collect Preset 4.10 To move the collection to the 20th color preset, type: User name\[Fixture]> Move Collection At Preset 4.20 Pool objects that are part of the collection, have an orange frame and display the collection order number in orange color centered on the top edge of the pool object. **Hint:**\ It is also possible to collect empty pool objects, e.g., for import or for store. **Important:**\ A collection stays always at the collected spot. To reset the collection, type: User name\[Fixture]> Collect  Updating multiple devices at once via the software update menu sends out the data now parallel to several devices at the same time and not in sequential order any more. To a maximum of 10 devices, the software update will be sent out simultaneously. As soon as the first device has received all data, the update for the next device will be sent out.\ During a running software update process, it is not possible to start a second one. As soon as the running process is done, a new software update process can be started again.\ If needed, a running software update process can now be stopped by tapping Cancel Update Process in the bottom right corner of the software update menu. The Select Update File functionality improved and imports now also the selected files to the hard drive. Therefore the button is now labeled Select and Import Update Files.\ Furthermore, the new function Delete Update Files allows to delete selected update files from the hard drive.  The Filter in the Network Menu and the Software Update Menu were split up: In the Network Menu it is called Session Filter and in the Software Update menu it is called Software Filter. This change allows to set up different values in the filters of each menu.  The fixture type editor now displays if there will be conflicts between the default value and the defined channel functions and channel sets, e.g., in case that the channel functions do not cover the set default value. In this case Show conflicts will be displayed at the bottom of the fixture type editor. Tapping it opens a pop-up that tells where the conflict is located.\ In addition, the name cell of the affected DMX Mode and the name cell of the affected attribute will be highlighted with a red font color, and the corresponding values will be highlighted in orange.  Xkeys can now access their secondary function directly as long as no object is assigned to the Xkey: Pressing X4 | Layout, for example, enters now Layout into the command line, when no object is assigned to this Xkey. Store and press X4 | Layout stores, as before, a new sequence to Xkey 4. From this point onwards, the keyword Layout can only be accessed by pressing MA + X4 | Layout, as before.  New master Grand.ProgXFade allows to crossfade the programmer. The new master Grand.ExecutorXFade allows to crossfade playbacks. To enable the crossfade functionality, switch the corresponding master on. Switching it off again disables the crossfade functionality again. Switching on the corresponding time master disables the XFade master, and vice versa, as only one of the two functions can be used at a time. When the Prog XFade is active, doing changes within the programmer will then put them into the programmer, but not output them until the Prog XFade fader is either pulled up to 100% or down to 0%, depending on its current fader position. When the Executor XFade is active, going cues will then output them when the Executor XFade fader is either pulled up to 100% or down to 0%, depending on its current fader position. Two new buttons in the top right corner of the executor bar display the program time (Prog Time) and the executor time (Exec Time). Depending on what is active, they display either the time or the XFade state. When the indicator bar on top of the button is blinking orange, XFade is active. When Time is active it will just be just orange without blinking.\ Furthermore, the master controls window got the Prog XFade fader added. The Prog XFade master is a setting per user profile.  The values coming from the programmer or playbacks of other users are now displayed with their own colors within the fixture sheet. * By default, cells with a lighter gray background and white font color indicate a value that is active or deactivated within the programmer of another user profile. * The values of playbacks started by other users have the same look as the playback of non-selected sequences from your user profile: Yellow font color. The color definitions can be changed within the color theme: * SheetColor.BackgroundOtherProgrammer * SheetColor.TextOtherProgrammer * SheetColor.TextOtherPlayback * SheetColor.TextOtherPlaybackTracked  New command options /Save and /NoSave: These options define if the show file will be saved or not when, e.g., shutting down, restarting, or rebooting the console/software, and when loading a show. These options are only taken into account when the /NoConfirm option is specified, too. To shut down the grandMA3 console and automatically save the show file, type: User name\[Fixture]> Shutdown /NoConfirm /Save To shut down the grandMA3 console without saving the show file, type: User name\[Fixture]> Shutdown /NoConfirm /NoSave The shortcut for /Save is /S, for /NoSave the shortcut is /NS.  grandMA3 consoles can now change their IP addresses during operation from AVAHI addresses (e.g., 169.254.x.y) to IP addresses assigned by a DHCP server. This will be the case if the DHCP server appears in the network after the console has booted. Furthermore, DHCP for the interface within the grandMA3 software has to be set to Yes.  grandMA3 consoles now boot faster.  grandMA3 onPC Windows Hardware Image: * Updated to Windows 10 IoT Enterprise 21H2. * Internet Explorer replaced by Microsoft Edge.  Macros and CMD input fields * The grandMA3 software translates now entered commands within macro lines or CMD fields (e.g., Sequence Sheet or Agenda) of cues into the syntax the command line would execute later. This helps to detect typos and other mistakes directly when applying the entered command. Proper names that are entered within quotes (” or ’) stay untouched from this interpretation. * Pressing hard keys with commands, e.g., Delete, Fixture, At, and many more enters now their command into the input field of macro lines and into CMD fields.  No title bar mode of windows The * 3D window * Layout window * Clock window allow now to enter a mode where these windows hide their title bar. To do so, open the context menu of the window, and deactivate Show Title Bar. In the context menu of the 3D window this button is located within the Misc-tab. The title bar disappears now. In this mode, it is not possible to change the size of the window. Furthermore, a small MA logo will be displayed in the bottom right corner of each window that is in fullscreen mode. This mode is mainly intended for installations that want to prevent that untrained people, e.g., facility management, who need to do simple operations, are not reconfiguring the views by mistake. In order to get close to a real fullscreen experience, the border of windows is thinner in this mode compared to the normal mode. To temporarily disable this mode in order to enter the context menu again, etc., press both MA keys (in the command control area), or press Ctrl + Alt (Windows), or press Ctrl + Option (macOS). The title bar appears for the time that both keys are being pressed.  When entering a range of phase, the range will automatically be recalculated to the number of fixtures in a way that the first and last fixtures do not have the same phase value.  The Update menu has now also the option to switch the input filter on or off by toggling InputFilter. The input filter setting applies only when updating presets.  When editing a fixture type, the list of DMX Channels allows now to define a resolution for virtual attributes (attributes without having an address for Coarse, Fine, and Ultra). To do so, the corresponding cell of the Virtual Resolution column needs to be edited. By default, it is set to 24bit.  Load and Goto: * Load and Goto can now be assigned as button functions to executors. When pressing an executor button with such a function, the corresponding Load/Goto pop-up appears for the sequence that is assigned to the executor. * When displaying the appearances within the Load/Goto pop-up the image used in the appearance are now also displayed. * The width of the Load/Goto pop-up was reduced. * The Load/Goto pop-up has now the possibility to move it to a different display by using the Edit Display Preferences functionality within the title bar. * The Load/Goto pop-up has an improved focus handling:\ When the pop-up opens, the focus is set to the search field. To set the focus into the list of cues press Please one time. To load or goto the selected cue press Please a second time.  The encoders display now in addition to the value also the name of a channel set if the value is part of a channel set.  It is now possible to trigger EncoderLeftCmd and EncoderRightCmd of executors by using OSC. To turn the encoder of executor 315 on page 1 by one click in counter-clockwise direction, use this OSC string: “/Page1/Encoder315,i,-1”.  MAtricks With the introduction of MAtricks into presets, the MAtricks button within the encoder bar displays now also the preset object where the current active MAtricks are coming from. Furthermore, this button displays now also markers for the different layers (fade, delay, and phasers), when values for the corresponding layers are part of the called object. All MAtricks properties, except the ones from the Layer section, provide now an additional value: No \, e.g., No Group, No Block, etc.\ This allows forcing MAtricks properties to be inactive when combining several MAtricks pool objects. For example: MAtricks 1 contains XBlock 4 and XWing 2. MAtricks 2 contains XGroup 2 and XWings No Wings. Calling first MAtricks 1 and then MAtricks 2 will result in XBlock 4 and XGroup 2. XWings will be set to No Wings, and therefore it will be ignored by modifying the selection. It is possible to use the remove option when storing onto existing MAtricks pool objects. When an active MAtricks property is stored in a MAtricks pool object and it is active in the MAtricks of the programmer, then it will be removed from the MAtricks pool object.  RDM over Art-Net: * The order of enabling the different switches (Session, global RDM, Art-Net Out/In/Setup, and EnableRdm per Art-Net line) in order to get RDM over Art-Net working is not important anymore. * The detection of RDM fixtures via Art-Net improved. * Each Art-Net universe within an Art-Net data line creates now its own RDM Port when there are RDM fixtures on the universe. * Such RDM ports are labeled with the name of the Art-Net data line they are coming from.  The new AutoCreate keyword creates objects depending on the given source objects, e.g., creates groups from the fixture types of the patched fixtures. To enter the AutoCreate keyword in the command line, use one of the options: * Type **AutoCreate** * Type the shortcut **Ac** * Type the shortcut **Au** Syntax: **AutoCreate \[Source-list] At \[Destination-list] (/Option)** Options: * /Single: For auto-creation of groups. For each fixture of the source, an own group will be created. * /All: For auto-creation of groups. For all fixtures of the source one single group will be created. When executing AutoCreate and having Selection defined as source-list the current active MAtricks settings will be taken into account. If a group exists already on the destination, a pop-up will appear and ask the user how they want to proceed: Overwrite, Merge, or Cancel. Requirement for the next 3 examples:\ Enough fixture types need to be part of the show. To create a group at group pool object 42 with all fixtures of fixture type 10, type: User name\[Fixture]> AutoCreate FixtureType 10 At Group 42 To create single fixture groups starting at group pool object 24 for all patched fixtures of fixture type 9, type: User name\[Fixture]> AutoCreate FixtureType 10 At Group 42 /Single To create single fixture groups starting at group pool object 101 for all patched fixtures of fixture types 9 and 10, type: User name\[Fixture]> AutoCreate FixtureType 9 + 10 At Group 101 /Single To create single fixture groups starting at group pool object 1 for all currently selected fixtures, type: User name\[Fixture]> AutoCreate Selection At Group 1 Requirements for the next example:\ Select 8 fixtures, set MAtricks XGroup to 2, and MAtricks X to 0. To create a group at group pool object 21 with all main selected fixtures (odd fixtures of the current selection), type: User name\[Fixture]> AutoCreate Selection At Group 21 /All Requirments for the next examples:\ The used layer and class need to exist within the patch and fixtures need to be set to them. The demoshow has this already set up. To create single fixture groups starting at group pool object 201 for all patched fixtures that are set to the layer “Backtruss” within the patch, type: User name\[Fixture]> AutoCreate FixtureLayer “Backtruss” At Group 201 /Single To create a group at group pool object 301 for all patched fixtures that are set to class “Spots” within the patch, type: User name\[Fixture]> AutoCreate FixtureClass “Spots” At Group 301 To create single fixture groups starting at group pool object 401 for all fixtures of fixture type 9 that are also set to fixture class “Spots, type: User name\[Fixture]> AutoCreate FixtureType 9 + 10 If FixtureClass “Spots” **Known Limitations:**\ - Auto Create is a command line only tool for version v1.7.\ \- For v1.7 the AutoCreate feature can only creates groups.\ \- The auto create collision pop-up does not report the colliding objects.  Keywords FixtureLayer, FixtureClass, FixtureType, and Stage can now be used in combination with the SelFix keyword. If only the first-named keywords are executed the same action is done as when executing the keyword together with SelFix.\ SelFix on one of these named keywords will select all fixtures of the specified object. To select all patched fixtures of fixture type 3, type: User name\[Fixture]> SelFix FixtureType 3 To select all fixtures patched on stage 1, type: User name\[Fixture]> SelFix Stage 1 To select all fixtures that are set to class “Spots” within the patch, type: User name\[Fixture]> SelFix FixtureClass “Spots” To select all fixtures that are set to layer “Backtruss” within the patch, type: User name\[Fixture]> SelFix FixtureLayer “Backtruss” The keywords FixtureType, FixtureLayer, and FixtureClass have now these key shortcuts: * FixtureType: MA + Fixture * FixtureLayer: MA + Fixture + Fixture * FixtureClass: MA + Fixture + Fixture + Fixture  Deactivation groups Deactivation groups define which other attributes shall be knocked out when activating an attribute. For example, when having active pan and/or tilt values in the programmer, the deactivation group “Position” takes care, that these attributes will be knocked out when activating XYZ attributes. By default, there are 2 automatically generated deactivation groups: Position and Color. A Deactivation Group can be set up within the patch: Menu - Patch - Attribute Definitions - Deactivation Groups. The definition of which attributes are organized within a deactivation group is done via the activation groups. Therefore, the Activation Groups-tab has the new column “Deactivation Groups”. Enter here per set up activation group if and to which deactivation group it should belong to.  The Select Interface drop-down to select a network interface displays now a network icon that is colored green or red to indicate if the interface has a connection established or not.\ Furthermore, when such an interface is set to use DHCP, the UI will display **No cable** everywhere this interface is selected.  New user right View: This user right is only allowed to call views, and to login to a different user. With introducing this user right, the user right None is now only allowed to login to a different user.  There are executor configurations within the executor configuration pool available for every object type that can be assigned to executors. Therefore, each object type has its own default executor configuration that will be used when assigning an object to an executor. To see the selected executor configuration of an object type, go to Menu - Preferences and Timing - Exec Configs. It is possible to change the selected executor configuration here by tapping the button of the desired object type and then selecting the desired executor configuration from the appearing drop down list.\ When migrating show files from older grandMA3 version to v1.7, the existing executor configurations are retained, but they will be shifted in the pool. They start now at pool object ID 14. This happens, because the new default executor configurations will be placed at the beginning of the pool.  The lists of available fader functions and button functions within the Assign Menu were reworked: Functions that are not functional for the object type of the assigned object were removed.  Clean start of the application on consoles, RPUs, and processing units: Press and hold Ctrl once the Mode Selection pop-up appears during the start-up process of the device.\ While holding Ctrl, either tap then the desired mode you want to enter or continue to hold Ctrl until the 10s countdown runs out. When allowing the timer to run out, the preselected mode (the button displayed with a lighter gray) will be used. After the Mode Selection pop-up has disappeared, release the Ctrl key.\ When you press and hold Ctrl and let the 10s countdown run out, the preselected mode (the button will be displayed with a lighter gray) will be clean started.\ When the clean start is performed, the grandMA3 software will start with no show file loaded and all user settings are set back to factory default.  The Assign menu offers now all assignable object types to be assigned to executors.  On grandMA3 light and grandMA3 full-size consoles (including the CRV models) the command line displays an [icon indicating the power status and the battery status](/grandma3/2-3/ws_ui_command_line/).\ When tapping now the icon the Battery status pop-up will appear. This pop-up reports more useful information about the power status and battery status like battery voltage, battery level, battery charging, A/C power status, UPS status, and if the battery is faulty.\ Furthermore, the charging behavior of the battery has been optimized to avoid prolonged charging and extend the lifetime of the battery.  The connector overlay can now easily be enabled within the Output configuration menu by tapping Show Connectors. To disable the overlay, tap the button again. **Restriction:**\ The connector overlay is only available for grandMA3 full-size, grandMA3 full-size CRV, grandMA3 light and grandMA3 light CRV models.  The system info window has now an HDD section that lists relevant information about the available disks, e.g, name, drive type, free space, and total space.  When using TrigType ‘Follow’ for cues, an additional TrigTime can be added. This follow time will start to count down after the transition (fade and delay times) into the cue has finished.  The Set key is now highlighted by its backlight when MAtricks are active in the programmer. Furthermore, the Fixture and Channel keys are also highlighted, when Fixture or Channel is the default of the command line.  The structure of the user library folder regarding fixture types and fixture type resources changed. Fixture types are now located in gma3\_library/fixturetypes. It is no longer distinguished between grandMA3 fixture types and GDTF fixture types.\ The additional new folder “fixturetyperesources” with its two subfolders called “gobos” and “meshes” is now the location for gobos and meshes. Copy your custom gobos and meshes into these subfolders to be able to import them to your show. Exported gobos and meshes are also located there.  Typing fixture IDs into the command and then turning the dimmer wheel selects now automatically the fixtures and applies the dimmer values to them.  Additional selective data in global or universal preset can be deleted by using the Cleanup command with the selective option.\ To delete the selective data from the global or universal color preset 1 to 10, type: User name\[Fixture]> Cleanup Preset 4.1 Thru 10 /Selective  The new function Connect to viz-key (In Menu - Settings - onPC Settings) allows to define if a plugged in grandMA3 viz-key should or should not connect to the grandMA3 onPC. This can be useful when a third-party visualizer is running on the same computer and the viz-key should always connect to the visualizer for it to grant visualization parameters.  Executing Default, Remove, or Release without specifying selection or attributes, applies the corresponding values to all attributes of the current selection.  It is possible to switch the feature groups in the encoder bar via shortcuts. To do so, press and hold Preset, and then press one of the numbers from 1 to 9 on the numeric keypad in the command area. To switch to the color feature group, press Preset + 4. *** ## []()What’s Changed [Section titled “What’s Changed”](#whats-changed) * The parameter count increased for these grandMA3 devices to the documented parameter count (when using grandMA3 software): * grandMA3 full-size and full-size CRV: 20 480 parameters * grandMA3 light and light CRV: 16 384 parameters * grandMA3 replay unit: 8 192 parameters * grandMA3 compact: 8 192 parameters * grandMA3 compact XT: 8 192 parameters * grandMA3 onPC command wing: 4 096 parameters * grandMA3 onPC fader wing: 4 096 parameters * grandMA3 onPC rack-unit: 4 096 parameters * grandMA3 onPC 2Port Node 2k: 4 096 parameters * grandMA3 onPC 2Port Node 2k PoE: 4 096 parameters * grandMA3 onPC 2Port Node DIN-Rail 2k: 4 096 parameters * All other grandMA3 devices stay unaffected by this change. * When opening the All-tab of the Add Window dialog, the focus is now set to the search input field. * The backup menu stays now open after saving a show. * The installer of grandMA3 onPC checks now for the [minimum required Windows version number](/grandma3/2-3/onpc_system_requirements/). * When using the SaveShow command and a show file name that is longer than 31 characters, the intended show file name will now be added as new first line to the description of the show file. * Colors * The color of the preset indicator within the fixture sheet, encoder bar, and sequence sheet changed to cyan. * The color for the relative text and phaser text were adjusted. Relative text is now brighter and phaser text is darker. This improves the distinctiveness between the 2 layers. * The icon of swipe buttons changed. A swipe button has now this icon:  * When a transition into the OffCue is running, a backward running fade bar on the executor and sequence pool object indicates this now. * The label dialog says now Label instead of Edit Name in its title bar. Furthermore, the object to label is now also displayed within the title bar, for example, Label Group 1 ‘All Spots’. * Clearing the programmer now switches the Single Step setting off. * Selecting an empty executor selects now the executor. * Furthermore, this does not create a new sequence anymore. The new sequence will then only be created when storing a new cue without specifying explicitly a sequence. * The button labels within the context menu of the Custom/Master Section window replaced the term Section with Area. * When opening a new fixture sheet window, sequence sheet window, or sequence content sheet window, the layer toolbar is now enabled by default. * The LUA Core has been updated to LUA v5.4.4. * When Split View mode is enabled and the Columns are set to Condensed, the patch menu does not have the tabs for ID Type, Layers, and Classes anymore. * The 14D button in the AfterRoll calculator of TiemcodeSlots was removed. * Renamed Sunlight to Daylight in the Date and Time menu and the Agenda. * Agenda events are executed with Admin user rights only. * The values active in the programmer of other users can now be stolen from these programmers by only knocking in these attributes into the own programmer. * Presets that are set to CuePart 0 within their settings are now called into the selected programmer part, and not into programmer part 0 anymore. Presets with a different dedicated programmer part will always be called into this dedicated programmer part. * Turning an encoder knocks in the attribute into the currently selected programmer part. * The Lua function GetSubFixture() now returns the handle of the corresponding fixture type when using GetSubFixture().fixturetype. Use GetSubfixture(1):Get(‘FixtureType’, Enums.Roles.Display) to get directly the name of the used fixture type. * The default intensity of the Point Light and the Ambient Light in the 3D window was changed to 15 % (Ambient Light) and 50 % (Point Light). * The settings Fixture Sort and Feature Sort in the fixture sheet, sequence sheet, and content sheet are disabled by default in new shows. *** ## []()Fixed Bugs [Section titled “Fixed Bugs”](#fixed-bugs-1) ### 3D [Section titled “3D”](#3d-1) | Description | | ----------------------------------------------------------------------------------------------------------------------------------------------------------------------------------------------------------------------------------------------------------------------------- | | Opening the dimmer of fixtures with blades the first time after loading a show animated a shaper movement within the 3D. This bug is fixed. Shapers do not animate anymore within a fixture when opening the dimmer for the first time. | | Gobos were not loaded correctly and displayed as “open” instead of from time to time, especially if the gobos had a high resolution. This bug is fixed. High-resolution gobos are now displayed reliably. | | Fixture Types that had geometries without a model linked did not display lenses under some circumstances in mesh qualities “Low”, “Simple”, and “Standard”. | | The “Pick Pivot” tool did not work correctly if meshes of a fixture were displayed with default meshes or boxes in lower body quality modes and the pan or tilt of the fixture were rotated. This bug is fixed. Pick pivot now works as expected in lower body quality modes. | | Virtual DMX Channels like a virtual pan or tilt were not visualized in the 3D window. This bug is fixed. Virtual channels are visualized in the 3D window. | | There was a crash if a fixture type had a lot of prism facets (48). This bug is fixed. It will not crash any longer if a fixture type’s prism has a lot of facets. | | It could happen that certain fixture types did not render their lenses when a body quality lower than High was selected. This bug is fixed. Lenses of 3D models should now also be rendered also in lower body qualities. | | High-resolution textures of 3D models were not correctly scaled to a lower resolution during mesh import in some cases. This bug is fixed. High-resolution textures are scaled down correctly now. The UV mapping is correct after scaling. | | The linearize and planar selection did not work as expected on a console. This bug is fixed. Linearize and planar selection now give the expected result on a console. | | Zoom to selection zoomed the camera to the origin of the 3D space. This bug is fixed. Zoom to selection zooms to best fit the selected fixtures in the 3D window. | | The beam of a fixture disappeared with shaking gobos in High Shadow Fancy render quality. This bug is fixed. Beams of fixtures do not disappear any longer if a gobo is shaking in High Shadow Fancy quality. | | Zooming the camera with the two-finger zoom multitouch gesture was not transferred to other stations on the network. This bug is fixed. Zooming the camera with the two-finger multitouch gesture is now synchronized to other stations on the network. | | Parent geometries were not rendered in some cases while their children were. This bug is fixed. If a child is rendered, its parents will also be rendered. | | Beams of multi-beam fixtures could have an offset between the beam geometry and the origin of the actual beam in some cases. This bug is fixed. Beams rendered with “Multi LED Dynamic Gobo” do not have an offset regarding their position any longer. | ### Command Line and Macro [Section titled “Command Line and Macro”](#command-line-and-macro-1) | Description | | ------------------------------------------------------------------------------------------------------------------------------------------------------------------------------------------------------------------------------------------------------------------------------------------------------------------------------------------------------------------------------ | | When moving a recipe line while being in a session, the recipe line got lost on all other stations. This bug is fixed. Moving objects while being in a session should not result in loose of data anymore. | | When entering a negative timecode slot offset for a timecode show, each value needed to be set negative, e.g., -1m -30s to get a negative offset of 1m30s. This bug is fixed. To enter a negative timecode slot offset it is enough to enter the offset as one negative time, e.g., -1m30s. | | When knocking in a new value for an attribute that playbacks a preset within a sequence knocked also the preset reference into the programmer. This bug is fixed. It should not be possible anymore to store a preset reference with a hard value into a cue. | | It was possible to knock in a preset reference when a cue was running with a preset, and only turning the encoder. This bug is fixed. Activating hard values does not knock in the preset reference from a running cue anymore. | | When overwriting an MAtricks pool object, the previous label was not respected. This bug is fixed. Store /Overwrite on a pool object keeps the previous label. | | The content of Lua plugins was not transferred within the session when a new station joined, and the Lua plugin was created on a station of the session. This bug is fixed. Lua plugins that are not imported into the software are now transferred correctly within the session. | | Assigning objects to recipes did not work when specifying 2 sequences by using a +, e.g., Assign Group 1 At Sequence 6 + 9 Cue 1 Part 0.1. This bug is fixed. Defining a range by using + works now also with sequences and cues. | | Executing the help command with a search term that has no help topic specified did nothing. This bug is now fixed. Executing Help with any search term opens now always the help pop-up. In case of search terms that are not connected to specific topics, the help will search for the term within all topics. | | It was possible to delete devices in the output configuration if they were part of the session. This bug is fixed. Devices of the session cannot be deleted anymore in the output configuration. | | Whenever the **If not empty** setting in the store settings was set to Merge or Overwrite, the preset mode was ignored when storing a preset. This bug is fixed. Presets are now stored with the correct mode no matter to which value the If not empty setting of the store settings is set to. | | Performing a store overwrite to an MAtricks pool object did also reset the name of the MAtricks pool object. This bug is fixed. Store overwrite to MAtricks pool objects does not overwrite the name of it anymore. | | The command line content was kept when loading a different show. This bug is fixed. Loading a new show clears now the command line, too. | | Store /Merge could cause that following blocked values would be displayed in the sequence sheet in the wrong color. This bug is fixed. The sequence sheet in track sheet mode displays now values in the correct color after a Store /Merge operation. | | Opening a drop-down within the store settings overlay removed **Store** as a keyword from the command line. This bug is fixed. **Store** is kept in the command line when opening a drop-down in the store settings overlay. | | Switching off multiple executors on different pages did not work. This bug is fixed. Off Page Thru.Thru switches off now all assigned objects on all pages. | | The handle assignments of executors could be restored to the default of the used executor configuration when assigning an appearance to a page. This bug is fixed. Assigning an appearance to a page should not change the executor handle assignment anymore. | | Moving pages could corrupt fixed executors in a way that they could not be deleted or moved anymore. This bug is fixed. Moving pages does not corrupt executors anymore. | | When activating a value for an attribute, other layers could be knocked in, if the attribute had values run by a cue on other layers. This bug is fixed. Attribute values of layers that are played back by a sequence will now be knocked in and automatically deactivated when the attribute will be activated by changing the value of only one layer. | | It was possible to rename the ShowData object. This bug is fixed. It is not allowed anymore to rename the ShowData object. Show files where this has happened will be fixed automatically when loading them in v1.7 or later. | | The software could crash when attempting to open pop-ups by using Lua commands, e.g., Lua “Cmd(‘label group 1’)”. This bug is fixed. Pop-ups cannot be opened anymore by using non UI-threads. | | The Lua function SetProgPhaser() did not accept negative values for acceleration and deceleration. This bug is fixed. Negative values within the Lua function SetProgPhaser are now handled correctly. | | Knockout as value did not work. This bug is fixed. For example, At Relative Knockout now switches off the relative values for the selected fixtures. | | When a station joined a session with a higher master priority while the station and the session had the same show file loaded, already running timecode generators stopped. This bug is fixed. Timecode generators keep on running when a station with a higher master priority will join into the session. | | When updating the preset data for the fixture that was used to store a universal preset, the new data was used only globally for the fixtures of the same fixture type. All other fixtures still used the former universal data. This bug is fixed. Updating a universal preset applies now the new data to all fixtures that can use the universal preset. | | The software crashed when invoking the Lua GetFader method outside of main coroutine in a plugin. This crash is fixed. The software does not crash anymore when calling the GetFader method. | | It was not possible to permanently assign the Call function to buttons of executors which had plugins assigned. This bug is fixed. Plugins on executors are now able to get the Call function assigned to the executor button. | | Cook /Merge of cues overwrote manually stored data of the cue. This bug is fixed. Manual data of a cue is now preserved when cooking the recipe of a cue again. | | Cloning fixtures within sequences that had preset links and hard individual timings lost the individual timing. This bug is fixed. Cloning within sequences clones now also individual timing correctly. | | Canceling the pop-up input of a macro executed the rest of the macro. This bug is fixed. Macros are switched off when canceling an input pop-up that was created by the macro. | | It was not possible to use LearnSpeed that was assigned to different executors simultaneously. This bug is fixed. Pressing several executor keys that have LearnSpeed assigned at the same time learn now the speed for their assigned object. | | Cloning did not respect the currently selected world. This bug is fixed. When being in a world, the clone function now only clones the fixtures that are part of the world. | | Exporting and importing a timecode show that had events of different cues assigned where the cue names are identical assigned always the first cue with this name to the corresponding timecode events. This bug is fixed. Importing a timecode show that has identical cue names for different cues assigned to different timecode events are now routed to the correct cues. | | The corresponding keys (Channel or Fixture) did not lit up for the selected command line default or when MAtricks (Set) where active. This bug is fixed. The corresponding keys for the command line default and active MAtricks are now highlighted. | | Using a global or universal preset for special values updated only the special values in the fixtures that held the global or universal values. This bug is fixed. Updating a global or universal preset updates the special values of all fixtures that use these presets for special values. | | Storing a cue using the options/CueOnly and /Remove did not remove the values in the target cue and respecting cue only. This bug is fixed. Store /Remove /CueOnly now works as expected. | | Deleting a data pool could not be oopsed. This bug is fixed. It is now possible to oops the deleting of data pools. | | Blocking a cue could change the tracked values of attributes, too. This bug is fixed. When blocking a cue, the tracked values are only blocked, and not changed and blocked anymore. | | It was not possible to execute the keyword of the current command line default, for example, Fixture. This bug is fixed. Executing, for example, Fixture, while Fixture is already the command line default now executes the command. | | Locked cues could change their content when using Bloc/Unblock or Store/Update. This bug is fixed. Locked sequences and cues cannot be modified anymore. | | Importing the same plugin to the same plugin pool object, and not having made any changes to the plugin pool object itself, prevented the plugin to be executed again. This bug is fixed. Importing a plugin again does not block the execution of the plugin anymore. | | The visual progress of progress bars, for example, called by plugins was always one step behind. This bug is fixed. The visual progress of progress bars is now more intuitive. | | The slot of a wheel was reset to the beginning of the corresponding channel function if the encoder was spun after a timeout when it was in physical readout. This bug is fixed. The value of an encoder controlling a wheel will not jump when spinning the encoder after a timeout. | | Parking and unparking of unpatched DMX channels when using the DmxAddress keyword did not work. This bug is fixed. Parking and unparking of DMX channels now works with the DmxAddress keyword and the DmxUniverse keyword. | | Tapping a user pool object, that had the default name, did not log in the user. This bug is fixed. Users with default names can log in by only tapping their user pool object. | | Copying a set of values from one fixture to another did not copy the active values that were the same as the default value of the attribute. This bug is fixed. Active, but unchanged values of attributes are now also copied from fixture to fixture. | | Edit on empty pool object worked differently depending on the object type: Some pools created only a new object, while other pools created the object and opened their editor. This bug is fixed. Editing an empty pool object now creates the pool object | | Creating a new user did not assign a user profile to the user. This bug is fixed. When creating a new user, the default user profile will be assigned to it. | | The stage calibration put the fixtures always below the stage. This bug is fixed. The stage calibration now positions the fixtures in a better way. | | The result when entering a formula for a value within the calculator of any MAtricks property was not correct. This bug is fixed. Working with formulas within the MAtricks calculators now works correctly. | | Storing color presets using fixtures that use more emitters than just RGB, could store the presets with only converted RGB values. This bug is fixed. Color presets are stored with the values that were active when storing the preset. | ### Connections [Section titled “Connections”](#connections-1) | Description | | ------------------------------------------------------------------------------------------------------------------------------------------------------------------------------------------------------------------------------------------------------------------------------------------------------------------------------------------------------- | | When connecting the MA viz-key via a USB hub to a computer it was not always recognized by the grandMA3 software. This bug is fixed. The MA viz-key should now always be detected when connecting it via a USB hub. | | It could happen that an Art-Net node was added as several nodes within the nodes tab in the Art-Net section of the DMX Protocols menu. This bug is fixed. A physical Art-Node will now be added as one single node within the nodes tab. | | Getting input to a dedicated timecode slot via MIDI timecode could let other timecode slots also shortly run for the time of their configured after roll time. This bug is fixed. Inputting MIDI timecode should only trigger the defined timecode slot anymore. | | The software could crash when MIDI packets were received that are bigger than the allowed packet length. This bug is fixed. MIDI packets that exceed the maximum packet size are now ignored. | | An input MIDI control change value of 127 to a master resulted in a master value of 99.9999940359. This bug is fixed. MIDI control change values of 127 are now correctly interpreted as 100%. | | When switching off and on a command wing that was connected to grandMA3 onPC running on macOS the output configuration was reset to default. This bug is fixed. Restarting a command wing that is connected to a macOS computer preserves now the output configuration the user has set up manually for the command wing. | | The software could crash when web remote connections were established and closed several times right after each other. This bug is fixed. Closing and establishing new web remote connections several times should not crash the software anymore. | | The grandMA3 software expected that a received MIDI Note On message will always have a MIDI Note Off received later. This bug is fixed. It is now possible to send several times the same MIDI Note On message and the corresponding Remote entry will always be triggered again. | | The software could crash when changing settings of RDM fixtures while having an RDM Device window open and the RDM tab within the Live Patch menu. This bug is fixed. The RDM Devices Window and the RDM-tab within the Live Patch menu can now be open at the same time and changes can be made to RDM fixtures without crashing the software anymore. | | Executing macros via the web remote executed the macros using the user profile of the user that was logged in on the station the web remote was connected to. This bug is fixed. Executing macros via the web remote executes the macros using the user profile of the user of the web remote. | | Flashing the TempFader of a DMX remote did not work. This bug is fixed. TempFader can now be flashed using DMX remotes. | | When triggering Load or Goto for a sequence using any remote, the corresponding pop-up did not appear. This bug is fixed. Load or Goto triggered by a remote now opens the corresponding pop-up. | ### Patch [Section titled “Patch”](#patch-1) | Description | | ------------------------------------------------------------------------------------------------------------------------------------------------------------------------------------------------------------------------------------------------------------------------------------------------------------------------------------------------------------------------------- | | When patching new fixtures with two or more breaks and changing the number of devices in the Insert New Fixture dialog, the suggested DMX addresses would cause collisions in the new fixtures. This bug is fixed. When changing the number of multi-break fixtures within the Insert New Fixture dialog DMX addresses without a collision across all breaks are now suggested. | | The universal fixture was exported to an MVR. This bug is fixed. The universal fixture is no longer exported to an MVR. | | Exchanging the fixture type of fixtures could change global data of presets into selective data. This bug is improved. Exchanging fixture types should not create unnecessary selective preset data anymore. | | Moving fixtures inside the patch caused blank fixture sheets and fixtures could not be selected anymore. This bug is fixed. Moving fixtures inside the patch does not cause any issues anymore. | | When changing the sorting of the columns in the patch menu, after leaving and entering the patch again, the sorting was reset. This bug is fixed. The column sorting within the patch menu is now remembered when leaving the patch menu. | | The number in the Used column was not correct in all tabs of the Split View mode. This bug is fixed. The Split View mode displays now the correct number in the Used column in all tabs. | ### Phaser [Section titled “Phaser”](#phaser) | Description | | -------------------------------------------------------------------------------------------------------------------------------------------------------------------------------------------------------------------------- | | When activating solo while being in a world, solo was applied to all fixtures of the show. This bug is fixed. Solo is now limited to the fixtures of the currently selected world. | | A phaser could still run after stomping it and updating the cue. This bug is fixed. Updating a cue with stomped attributes should not let run the phaser any longer. | | Double tapping a preset did not execute stomp with this preset when the program time was enabled. This bug is fixed. Executing stomp using a preset and enabled program time now stomps within the specified program time. | ### Playback [Section titled “Playback”](#playback-1) | Description | | -------------------------------------------------------------------------------------------------------------------------------------------------------------------------------------------------------------------------------------------------------------------------------------------------------------------------------------------- | | When having a label pop-up open it was not possible to playback a sequence by using Go+ \[large], Go- \[large], or Pause \[large]. This bug is fixed. The functionality of the large playback buttons is now still given when having pop-ups open. | | Moving the executor fader of a sequence up, while having a flash button pressed for the sequence did not output the sequence accordingly to the fader after releasing the flash. This bug is fixed. The sequence output follows now the fader after releasing a flash when the fader was moved while having flash active. | | The fade time of the off cue was ignored when the sequence was played back with HTP priority. This bug is fixed. HTP sequences will use the OffCue fade time when they are switched off. | | Active temp faders were set to 100% when devices joined or left the session. This bug is fixed. Temp faders remain on their current level when the session is re-initialized. | | Press and hold Flash, then press and hold Swop, and then releasing Flash as assigned button functions on an executor did not execute the Swop functionality. This bug is fixed. Starting a playback function first, then a second playback function, and after that releasing the first playback function, now executes the second function. | | When starting a playback it could happen that other playbacks were not switched off by the Off when Overridden function when they should be. This bug is fixed. Off when Overriden switches now playbacks off correctly. | ### Windows [Section titled “Windows”](#windows-1) | Description | | -------------------------------------------------------------------------------------------------------------------------------------------------------------------------------------------------------------------------------------------------------------------------------------------------------------- | | The Settings in the Edit-tab of the assign menu were always enabled when entering the Edit-tab. This bug is fixed. The state of the Settings-option is now always remembered across all locations. | | The list of show files in the backup menu always scrolled down when switching to a different drive. This bug is fixed. The backup menu does not scroll down the list of show files anymore unless the user scrolls it manually. | | The list of installed versions within the drive selector, e.g., in the backup menu, could be mixed in grandMA3 onPC running on macOS. This bug is fixed. In grandMA3 onPC running on macOS the order of installed versions within the drive selector is now in descending order, as on the other systems, too. | | When preset objects were grayed out, scribbles remained lit up. This bug is fixed. When presets are now grayed out, scribbles on the presets are also grayed out. | | When tapping into the empty area of a fixture sheet (also when it was set to channel mode), fixtures were selected. This bug is fixed. Tapping into the empty areas of the fixture will not select fixtures anymore. | | The EULA and Release Notes splash screens could be moved around. This bug is fixed. Splash screens are fixed in their position and size. | | Moving universes could hide fixtures within layout windows. This bug is fixed. Moving universes does not hide fixtures anymore. | | Help + tapping an element on one of the small screens opened the Help overlay on the small screens. This bug is fixed. Opening the help overlay for an element of the small screens opens the pop-up now on screen 1 in order to have it in a readable size. | *** ## []()Appendix [Section titled “Appendix ”](#appendix) * It is recommended to use a dedicated and a separate physical network for each grandMA3 session. * When using DMX protocols it is recommended to use a dedicated physical network for each protocol. * The recommended workflow for executor configurations that are different compared with the default executor configuration is to create a new executor configuration, do the changes in the new configuration and save the changes. * XML files with exported executor configurations from grandMA3 v1.2 and prior cannot be properly imported to grandMA3 v1.3 or later due to structural changes. * XML files with exported analog remote setups from grandMA3 v1.3 and prior cannot be properly imported to grandMA3 v1.4 or later due to structural changes. * XML files with exported timecode shows from grandMA3 v1.3 and prior cannot be properly imported to grandMA3 v1.4 or later due to structural changes. *** ## []()Known Limitations [Section titled “Known Limitations ”](#known-limitations) Software update via network to onPC stations requires confirmation during the install process at the destination system. Deleting a preset that is referenced by a cue the reference cannot be restored when oopsing the deletion. When multiple GlobalMasters exist on the network, each having the same session and location name, the station with the higher priority takes over automatically. If all stations have the same priority, the station with the longest Online Time becomes the GlobalMaster for all stations. Loading show files from previous versions deletes the programmer content.
# Release Notes 1.8
> Do you need help getting started in grandMA3? Perfect - here we describe a few quick steps to get you rolling. The manual will explain functionality in detail w
* [Get Started](/grandma3/2-3/key_rn_v1_8/#h2__1435677565) * [Bug Fix Version 1.8.8.2](/grandma3/2-3/key_rn_v1_8/#h2__146634055) * [Other Enhancements](/grandma3/2-3/key_rn_v1_8/#h2_1198082799) * [What’s Changed](/grandma3/2-3/key_rn_v1_8/#h2_563643534) * [Bug Fixes](/grandma3/2-3/key_rn_v1_8/#h2__146634055) * [Release Version 1.8.1.0](/grandma3/2-3/key_rn_v1_8/#h2__1841875975) * [Features](/grandma3/2-3/key_rn_v1_8/#h2_727740091) * [Multi Patch](/grandma3/2-3/key_rn_v1_8/#h3_1063964535) * [Grid Tools](/grandma3/2-3/key_rn_v1_8/#h3_1278483279) * [XYZ](/grandma3/2-3/key_rn_v1_8/#h3__1797581261) * [Store Sources](/grandma3/2-3/key_rn_v1_8/#h3_1020479761) * [Device Configuration](/grandma3/2-3/key_rn_v1_8/#h3__329342182) * [Extract](/grandma3/2-3/key_rn_v1_8/#h3__508884835) * [Content Sheet](/grandma3/2-3/key_rn_v1_8/#h3_320348620) * [Plugin Editor](/grandma3/2-3/key_rn_v1_8/#h3__46089734) * [Layout Window](/grandma3/2-3/key_rn_v1_8/#h3__1430353876) * [DMX Tester](/grandma3/2-3/key_rn_v1_8/#h3_1956195346) * [Update Menu](/grandma3/2-3/key_rn_v1_8/#h3__1345480982) * [Master Modes](/grandma3/2-3/key_rn_v1_8/#h3_1462218188) * [Other Enhancements](/grandma3/2-3/key_rn_v1_8/#h2_1084249605) * [What’s Changed](/grandma3/2-3/key_rn_v1_8/#h2_193902598) * [Bug Fixes](/grandma3/2-3/key_rn_v1_8/#h2_821083107) * [Appendix](/grandma3/2-3/key_rn_v1_8/#h2__1835053169) * [Known Limitations](/grandma3/2-3/key_rn_v1_8/#h2__1852571500) *** ## []()Get Started [Section titled “Get Started”](#get-started) Do you need help getting started in grandMA3? Perfect - here we describe a few quick steps to get you rolling. The manual will explain functionality in detail while the MA e-Learning within the MA University offers you all kinds of training. All information can be accessed through the MA Lighting website [www.malighting.com](http://www.malighting.com). Let’s go! To leave the Release Notes, tap I agree on the top right corner. The main screen of grandMA3 software opens. On the right side, you can see predefined views on view buttons. To switch between the views, tap the view buttons. If this is your first time starting grandMA3 software, patch some fixtures first. Or you can load one of the demo shows delivered with the software. Either way, press Menu. If you use grandMA3 onPC software, there is a  symbol in the top left corner there. Clicking the  symbol is the same as pressing Menu on a console. Tap Backup and then Load, now you are ready to load shows. You would like to get right on it? Switch Shows to Demo Shows in the title bar first. To do so, tap Shows repeatedly until it says Demo Shows. Once Demo Shows is displayed, it is possible to select any of them. After you selected a demo show, tap Load.\ In case a show was already loaded, a pop-up will appear asking if you want to save the current show first before loading the new one. It’s up to you! Here we go! Now you are ready to work with the grandMA3 software. It is as easy as that! Again - there are view buttons there, which change the screen content. At the bottom, you will find the encoder bar and the command line. Technically that is all you need to get started. For more information, see the grandMA3 help menu. To access the help in the console or the onPC, tap the view buttons named Help or visit the MA Lighting website. If you want to learn the grandMA3 software step by step, please join the MA e-Learning - it’s free of charge and available on the MA Lighting website. Have fun with using our grandMA3 software - Find all the improvements and changes of this software version further down. **Hint:**\ The grandMA3 software will start using the show file (or status) that was in operation before the software was shut down. *** ## []()Bug Fix Version 1.8.8.2 [Section titled “Bug Fix Version 1.8.8.2”](#bug-fix-version-1882) ## []()Other Enhancements [Section titled “Other Enhancements”](#other-enhancements)  When in the Fixture(s) to Patch dialog of the DMX Tester Encoder Bar, pressing the screen encoder patches the selected fixture to the set up patch address.  Multistep Phasers have a new show setting: DelayToPhase. The user can choose how delay timings are used to mimic the use of phase values of a phaser.\ When DelayToPhase is enabled, delay times across a range of fixtures with the same phase value creates a look similar to using a range of phase values without delay. For example, using an individual delay of 0 to 1s on a phaser having the same phase value, speed of 60 BPM, and the total sum of all step widths is 100%, will look similar to using a phase of 0 to 360 without delay. When DelayToPhase is disabled, delay values can be used to delay the start of multistep phasers and keep the triggered channels aligned to the phase values of the phaser. Access this new setting in Menu - Preferences and Timing - Timing.  Improved stability of MA-Net3 protocol and error handling.  Absolute and relative layers are now handled separately during preset update. When adding a relative layer value to a preset with an existing absolute layer value, the relative value will not be added to the cue where the preset is already used. Vice versa when adding an absolute layer value to a preset with an existing relative layer value, the absolute value will not be added to the cue where the preset is already used. **Known Limitation**:\ Recast will only recast presets to cues if there is a preset link in the absolute layer.  Preset pool objects can display only text, symbols, or both. The respective setting “Display Mode” is located in the settings of each preset pool window. These are the possible values: * Text and Symbol: Displays the name of the preset and the symbol (Pie charts or gobo images for example). * Text: Displays only the name of the preset. * Symbol: Displays only the symbol. Improved the speed of the Global Preset Update mechanism and added a red LED indicator to the MA logo of the command line to show when it is running. **Known Limitation:**\ Deleting, changing, moving, or exchanging objects while a Global Preset Update is processing is not yet fully supported for the following object types:\ -Data Pools\ -Presets (Selective, Global, and Universal)\ -Sequences\ -Cues, Cue Parts\ -Recipes\ The red indicator in the MA logo of the command line appears when a Global Preset Update is currently processing! The time needed for the process depends on the size of the show file and the number of references between objects. *** ## []()What’s Changed [Section titled “What’s Changed”](#whats-changed) * The following properties cannot be changed in the Live Patch anymore: * Toggling fixture types “Share Global” and “Is MArker”; * Editing the attributes “Physical From / To” and “DMX To” in fixture types; * Activation Group of attributes; * Deactivation Groups of Activation Groups; * Position, Rotation, and IsMainBeam of Geometries in fixture types; * Relations of DMX Modes in fixture types. * Releasing Flash does not reset the Temp Fader and keeps Flash active, when Flash and Temp Fader is used on a single cue. If Flash and Temp fader is used on a sequence containing more than 1 cue, the Temp Fader crossfades into the second cue. * Progress bars of processes that run in the background, for example, “Global Preset Update”, are displayed at the top of the displays. * Merge All Data is temporarily not available in the bug fix.\ This feature is under revision. We recommend not to use it in earlier versions. *** ## []()Bug Fixes [Section titled “Bug Fixes”](#bug-fixes) ### 3D [Section titled “3D”](#3d) | Description | | --------------------------------------------------------------------------------------------------------------------------------------------------------------------------------------------------------------------------------------------------------------------------- | | Displaying gobos could cause a freeze on Intel graphics cards. This bug is fixed. There is no freeze when a gobo is displayed. | | Labels incorrectly indicated fixtures as multipatch if more than one stage was used. This bug is fixed. The indication of multipatch is correct for more than one stage. | | Fixture types of the manufacturer ‘Set’ in the internal fixture library did not display any of their related textures. This bug is fixed. Set fixture types display their related textures. | | GLTF mesh files of environmental objects were not exported using MVR. This bug is fixed. GLTF meshes are now exported using MVR. | | It was not possible to control the DMX value of a channel if the Frequency property for that attribute was used in a fixture type. This bug is fixed. The DMX values of channels can be controlled via the encoders, that use the Frequency property in their fixture type. | | There was a possible crash when a show file contained an excessive number of meshes. This bug is fixed. | ### Command Line and Macro [Section titled “Command Line and Macro”](#command-line-and-macro) | Description | | ----------------------------------------------------------------------------------------------------------------------------------------------------------------------------------------------------------------------------------------------------------------------------------------------------------------------------------------------------------------------------------------------------------------------------------------------------------------------------------------------- | | When attributes had different channel sets with the same name, it was not possible to select these channel sets. This bug is fixed. All channel sets with the same name can be applied again. | | Starting to record a timecode show in the user interface failed, when the timecode show was renamed. This bug is fixed. The record mode starts, also when the timecode show was renamed. | | Migrating show files from v1.7 or earlier to v1.8.1.0 lost the fader type of events in timecode shows. This bug is fixed. Migrating show files stored with v1.7 or earlier directly to this version does not lose fader events of timecode shows. When show files were already migrated to v1.8.1.0, then please get in contact with tech support for further assistance to restore the fader events. | | Buttons in the encoder bar could be empty when joining a session. This bug is fixed. The graphical user interface displays all elements after joining a session. | | Changing the speed scale of cue/cue part to value “One” did not adjust the resulting speed when running grandMA3 on consoles or when running grandMA3 onPC on macOS. This bug is fixed. The speed scale value “One” works again as expected. | | The software could crash during copy and paste of new track groups and tracks in timecode shows. This bug is fixed. Copy and paste new timecode tracks and track groups do not crash the software. | | When the Fixture(s) to Patch dialog of the DMX Tester Encoder Bar was open, all dual encoders behaved as screen encoders. This bug is fixed. Only the 5th dual encoder can behave as the screen encoder in the Fixture(s) to Patch dialog of the DMX Tester Encoder Bar. | | When the selected executor was empty and you tried to open the Master Controls overlay, the software crashed. This bug is fixed. Opening the Master Controls overlay does not crash the software anymore when an empty executor is selected. | | The default device configuration was loaded starting the grandMA3 when the last time a device configuration with a custom name was active. This bug is fixed. Custom device configurations are not ignored when starting the grandMA3 software. | | If you used Capture, PanTilt and XYZ attributes were activated together in the programmer when using Capture. This bug is fixed. Capture knocks in only the attributes of one positioning system. This positioning system will activate its attributes with values that represent the current output position. When crossfading between both positioning systems, XYZ attributes will become only active when only XYZ data is output. | | When updating only relative data into a preset that contained also only relative data, absolute data was also added. This bug is fixed. Updating a preset brings only active data into the preset. | | When storing a cue where fixtures could perform MIB, MIB settings for this cue were not always offered. This bug is fixed. Cues that contain data of fixtures that can be prepositioned using MIB always offer MIB settings. | | When restarting or rebooting Mode2 or grandMA3, the main screen was not cleared immediately and the process could be paused. This bug is fixed. Restart or Reboot in Mode 2 or grandMA3 is executed immediately. | | If the Grand Master knob was turned while pressed, the pressed value was used when releasing the knob. This bug is fixed. Pressing and turning the Grand Master knob asserts the adjusted value when releasing. | | The software could crash while loading a show file on a Windows onPC station that was part of a session. This bug is fixed. Loading show files on a Windows onPC station while being in session should not crash the software. | | The software could get in an endless loop of the global preset update process when doing changes in the patch. This bug is fixed. The global preset update process should not get in an endless loop anymore. | | Storing a cue with the cue only option crashed the software when XYZ fixtures had active values in the programmer. This bug is fixed. Storing cues with Cue Only enabled should not crash the software when the fixture has XYZ enabled. | | Calling a channel set did not set the correct channel function of mode depending channels. This bug is fixed. When a channel set is called, the correct channel function of mode depending channels is activated. | | Properties in copied user profiles pointed to the source user profile. This bug is fixed. Copied user profiles reference only to their own properties. | | If a station loaded a new show file and left the session during upload, other stations could freeze during the show download. This bug is fixed. If the station loads a different show file and leaves the station, stations will cancel the show download. If the station has a previous version of the new show file on its hard drive, this show file will be loaded instead. If the station does not have this show file on its hard drive, a new show file with this name will be created. | | Park fixture X did only park the main fixture and not the multipatch fixtures. This bug is fixed. Park fixture x now includes the multipatch fixtures. | | Highlight and Solo did not work correctly within a multiuser session, utilizing different worlds. This bug is fixed. Highlight and Solo now work in multiuser sessions with different worlds. | | Off Selection did not deselect fixtures when used in combination with a world. This bug is fixed. Off Selection deselects fixtures in a world as well. | | Updating a preset or cue could also update values from other user profiles into the update target. This bug is fixed. Only values from the user profile which updates an object are updated into the updated object. | | When a proper name of an object started with a T or D and was not set into quotes by the user, the T or D were replaced by the keywords Thru or Default when calling the object via a command. This bug is fixed. Proper names are now handled correctly, even when the user does not put them into quotes. | | It was possible to move a recipe from a cue part into a cue. This bug is fixed. Moving recipes into cues is prohibited now. | | The grandMA3 software crashed when calling a view that contains a layout window that had a non-existing layout selected. This bug is fixed. The software does not crash anymore when a view is called that contains a layout window that has a non-existing layout selected. In this case, the layout window is changed to display the selected layout. | | Commands that were already entered into the command line could be executed by touching only the fader caps of an executor. This bug is fixed. Touching the fader caps of executors does not execute commands anymore. | ### Connections [Section titled “Connections”](#connections) | Description | | -------------------------------------------------------------------------------------------------------------------------------------------------------------------------------------------------------------------------------------------------------------------------------------------------------- | | xPort nodes did not output the correct DMX values when the master of a session changed and DMX was input via Art-Net or sACN. This bug is fixed. xPort nodes output the correct DMX values when the master changes. | | RDM fixtures connected to xPort nodes were only detected when the user pressed Remove Absent and/or Add Present in the Output Configuration menu, in case the xPort node got later invited to the session. This bug is fixed. RDM works with xPort nodes immediately after inviting them to the session. | | The grandMA3 software sent out the wrong Port ID in its RDM packets. This bug is fixed. RDM packets send by a grandMA3 device have the correct Port ID. | | Running grandMA3 onPC on Windows 11 version 22H2 did not detect USB drives. This bug is fixed. Running grandMA3 onPC running on Windows 11 version 22H2 provides USB drives. | | A station could enter a wrong standalone state, not being able to get invited to a session again. This bug is fixed. A device in standalone mode can be invited to the session. | | Session data merge was appearing even when the two show file names are different. This bug is fixed. When show file names are different, they are recognized as separate show files. | | When a large number of objects was moved or copied in a session, the connected station could become disconnected. This bug is fixed. Move or copy of objects does not disconnect stations. | | The software crashed when several text input pop-ups were opened at the same time. This bug is fixed. Opening several text input pop-ups at the same time does not crash the software anymore. | | When a Processing Unit joined a session, it outputted the default values of the fixtures for a short moment. This bug is fixed. Inviting a Processing Unit to a session outputs the correct values after the output is initialized. | | The grandMA3 software crashed when using IAC audio driver in a different application and it sent MIDI notes. This bug is fixed. grandMA3 software does not crash anymore when receiving MIDI messages that were sent to it by using the IAC audio driver. | | Unplugging a USB drive while having the desk locked terminated the desk lock. This bug is fixed. Desk lock stays active when unplugging a USB drive. | ### Patch [Section titled “Patch”](#patch) | Description | | ------------------------------------------------------------------------------------------------------------------------------------------------------------------------------------------------------------------------------------------------- | | Active programmer values could get stuck if the patch was changed at the same time in a session. This bug is fixed. The patch can be changed while having active programmer values. | | Editing any value of a fixture type in the fixture type editor, set the value to 0 when the DMX Readout was set to Percent. This bug is fixed. Changing values in fixture types is also possible in DMX Readout Percent. | | Deleting attributes in a fixture type recalculated color attribute values in presets. This bug is fixed. Deleting attributes in fixture types does not change values in presets for the remaining attributes. | | When the patch was changed, absolute color values were added to presets containing only relative color values. This bug is fixed. No absolute color values are added to presets containing only relative color values, when the patch is changed. | | When copying a fixture several times in the patch, show data was only cloned to the first copy. This bug is fixed. Copying fixtures in the patch clones the data to all copies. | | The software crashed when the user added multipatch fixtures to fixtures that have XYZ enabled. This bug is fixed. Multipatch fixtures can be added to XYZ fixtures. | ### Phaser [Section titled “Phaser”](#phaser) | Description | | ------------------------------------------------------------------------------------------------------------------------------------------------------------------------------------------------------------------------------------------- | | Changing attribute values on a connected station encoder utilized an active program time or individual time. This bug is fixed. Turning an encoder on a connected station does not use individual time or program time. | | Tapping a preset three times in a row stomped running phasers of the same attributes running in the programmer. This bug is fixed. It takes only 2 presses of a preset to stomp other phasers on the same attributes in the programmer. | | If cues with individual delay times, containing phasers reversing each other were triggered in a certain order, attributes were not properly asserted. This bug is fixed. Running cues with phasers reverting each other works as expected. | | Calling and storing two different presets with phasers at different speeds into a cue resulted in playing both phasers at the same speed. This bug is fixed. Different phasers retain their look when being stored into the same cue. | | When using the step keyword to integrate presets with only the main fixture selected, no steps for the subfixtures were created. This Bug is fixed. Step creates also steps for subfixtures if only the main fixture is selected. | | A preset containing a last step without absolute or relative value was not called correctly into the programmer. This bug is fixed. All steps from the preset are now called correctly into the programmer. | ### Playback [Section titled “Playback”](#playback) | Description | | ------------------------------------------------------------------------------------------------------------------------------------------------------------------------------------------------------------------------------------------------------------------------------------------------------------------------------------------------------------------------------------- | | In a certain combination of individual timing and cue timing, the cue output was not as expected. This bug is fixed. Using individual and cue timing does not create an output glitch anymore. | | When editing the recipe of a running cue, the old data of the recipe was still running on the output. This bug is fixed. Edited recipes update their output and release old data when the cue with the recipe is still running. | | When storing data into a cue of a sequence that was already running and had fixtures prepositioned by MIB, the prepositioning could be overwritten by data in previously started playbacks. This bug is fixed. When storing data into running sequences fixtures that were prepositioned by MIB do not get their current output values overwritten from previously started sequences. | | DMX channels could flicker when updating or storing a cue. This bug is fixed. DMX channels should not flicker anymore when updating or storing a cue. | | If the Program Time was set to 0 and activated, sequences with “Off on overridden” could be switched off when the programmer contained all fixtures of these sequences. This bug is fixed. Sequences with “Off On Overwridden” are not affected by the programmer with active Program Time. | | When a preset including MAtricks was assigned to an executor, the playback always had to be restarted. This bug is fixed. MAtricks changes are updated directly in presets that are played back. | | MIB was not working repeatedly, when MIB was used with Wrap Around activated. This bug is fixed. MIB is working continually, when Wrap Around is enabled. | | Sending a go command to a cue part could cause a crash. This bug is fixed. Cue parts cannot be executed independently by Go command. | | MIB could be executed when a dimmer phaser was running. This bug is fixed. A running dimmer phaser does not execute MIB. | | When starting a playback it could happen that not all attributes which contained data in the programmer were overwritten by the playback. This bug is fixed. Active values in the programmer are overwritten by a playback when starting it while Freeze is switched off. | | While playing back a timecode show, it could happen that timecode events did not trigger cues. This bug is fixed. Events in timecode shows always trigger their cues when played back. | | Cues were not triggered when two timecode shows were played back at the same time and both timecode shows triggered the same sequence. This bug is fixed. Playing back two timecode shows triggers the cues when they are in the same sequence. | ### Windows [Section titled “Windows”](#windows) | Description | | -------------------------------------------------------------------------------------------------------------------------------------------------------------------------------------------------------------------------------------------------------------------------------------- | | The master indicator colors could be displayed wrong if the Masters Overview in preferences and timing was opened if a session was established. This bug is fixed. The master indicator colors are displayed correctly after a session is established. | | The Content Sheet was not updated as expected if Link Type was set to “Selected” and Cue Mode “Manual” was selected. This bug is fixed. If an empty executor is selected while Link Mode is set to “Selected” and Cue Mode is set to “Manual” the content sheet is updating correctly. | | The default preset reference was missing in the Fixture Sheet. This bug is fixed. The default preset reference is displayed in the fixture sheet. | | The software could crash when scrolling a timecode window that displayed a new timecode show which contained only one track group. This bug is fixed. Scrolling the timecode window does not crash the software when the displayed timecode show is empty. | | Migrating show files from v1.7 or earlier to v1.8.1.0 caused a black area in views where the Mesh3DS pool was located before. This bug is fixed. Mesh3DS pool windows in views are migrated into Mesh pool windows when migrating a show file from v1.7 or earlier to this version. | | Unchecking the first cue part while in a scroll position displayed cue parts in the content sheet incorrectly. This bug is fixed. Unchecking parts in the content sheet while being in a scroll position displays all cue parts correctly. | | Closing the Import/Export menu in a new show crashed the software. This bug is fixed. The software does not crash when closing the Import/Export menu. | | After a restart of the grandMA3 application, the Display Selector could not appear when pressing Menu. This bug is fixed. When pressing Menu, the Menu and the Display Selector are always displayed. | *** ## []()Release Version 1.8.1.0 [Section titled “Release Version 1.8.1.0”](#release-version-1810) ## []()Features [Section titled “Features”](#features) The latest release of grandMA3 version 1.8.1.0 rolls out several enhancements that enrich your lighting experience. Read on for a quick introduction and find links for more information. ### []()Multipatch [Section titled “Multipatch”](#multipatch)  New in this release Multipatch is a function that adds extra fixtures to a fixture. Any multipatch fixture needs its own DMX patch. Adding multipatch fixtures to the patch will also add an extra virtual fixture in 3D.\ This can be used when two or more real lights should be controlled by the same patched fixtures. For example, an ACL bar consisting of 8 PAR cans that are controlled by only 1 dimmer channel.\ When the primary fixture has a DMX patch address, it does not cost you any parameters to add multipatch fixtures. When the primary fixture has no DMX patch address the parameters of the multipatch fixture count against your licensed parameters.\ Multipatch fixtures cannot be programmed individually. They are connected to the same ID(s) as the primary fixture. All fixtures, the primary and the multipatch fixture do the same. Any programming that existed on the primary fixture is also outputted on the multipatch fixtures. To add multipatch fixtures to your patch follow these steps: 1. Press Menu - Patch. 2. Select the fixtures you want to add multipatch fixtures to, then tap Create Multipatch. 3. A calculator appears. Enter the number of multipatch fixtures you want to add to every selected fixture. 4. Tap Please. 5. The multipatch fixtures are now added to the selected fixtures. 6. Assign every multipatch fixture a DMX address by tapping and holding their Patch cells. 7. In the Edit Patch dialog enter the desired DMX address and apply it. The multipatch fixtures are now added to your patch/show.\ In the multipatch fixtures, the values of all properties that will be inherited from the primary fixture are set into angular brackets (\).\ In addition, the inherited properties that cannot be modified by the user for the multipatch fixtures, are grayed out. It is possible to position them in 3D by changing their position in the patch menu. Use the encoders in the setup mode of the 3D window to arrange the multipatch fixtures in the 3D space. **Known Limitation:**\ Aligning several selected multipatch fixtures by using the encoders is not supported. Cutting a primary fixture will also cut its multipatch fixtures. It is possible to transfer a multipatch fixture to a different primary fixture by using the copy and paste functions. Copying a multipatch fixture to a primary fixture of a different fixture type takes over the settings of the new primary fixture, for example, FixtureType, FID, IDType, CID, and further.\ Pasting works as before: The fixture will be pasted into the selected line, which will move the currently selected line and all the following lines one line down. This means, that pasting a copied multipatch fixture will be bound to the primary fixture above the currently selected primary fixture. Each multipatch fixture gets automatically a CID of the new IDType Multipatch assigned. This allows addressing the multipatch fixtures, for example, to select them for setting them up in the 3D window or for patching them via the command line.\ To enter the Multipatch keyword in the command line, use one of the options: * Press Channel repeatedly until Multipatch appears in the command line * Type **Multipatch** * Type the shortcut **Mu** Multipatch fixtures can be addressed with a combination of Fixture ID and relative Multipatch ID. The selection color of multipatch fixtures is light red, for example in the layout window. When a multipatch fixture is selected, its primary fixture will alternate its selection color between yellow and light red, for example in the fixture sheet and the layout window. Selected multipatch fixtures do not get a position in the selection grid, and therefore cannot be used with MAtricks. Precondition: Have 5 fixtures (Fixture ID 1 to 5) with each one having 4 multipatch fixtures. To select the second multipatch fixture of fixture 4, type: User name\[Fixture]> Fixture 4 Multipatch 2 Now the user can use the encoders in the setup mode of the 3D window to arrange the muti-patch fixtures in the 3D space. To patch the third multipatch fixture of fixture 2 to DMX address 6 on DMX universe 42, type: User name\[Fixture]> Patch Fixture 2 Multipatch 3 42.6 When having multipatch fixtures selected, it is also possible to enter values for the attributes to them, but these values will be redirected to their primary fixture immediately. *** ### []()Grid Tools [Section titled “Grid Tools”](#grid-tools)  New in this release The Grid Tools allow modifying the current selection in the selection grid. The Grid Tools are available on the left side of the Selection Grid window.\ The available tools are: *  (Transpose): Interchanges the X and Y grid coordinates of every selected fixture. *  (Linearize Numerical): The currently selected fixtures are rearranged into a line starting at Grid 0/0/0. The new order of the fixtures is in ascending order by their Fixture IDs (and secondarily by the CIDs). *  (Linearize Left To Right, Top to Bottom): The currently selected fixtures are rearranged into a line starting at Grid 0/0/0. The new order of the fixtures is determined working from left to right first, and then from top to bottom, based on the current grid arrangement. *  (Linearize Top to Bottom, Left to Right): The currently selected fixtures are rearranged into a line starting at Grid 0/0/0. The new order of the fixtures is determined working from top to bottom first, and then from left to right, based on the current grid arrangement. *  (Rotate 90° clockwise): Rotates the currently selected fixtures by 90° in clockwise direction along the XY plane. *  (Rotate 90° counterclockwise): Rotates the currently selected fixtures by 90° in counterclockwise direction along the XY plane. *  (Mirror Grid at X-axis): Mirrors the fixtures in the grid along a vertical mirror line. *  (Mirror Grid at Y-axis): Mirrors the fixtures in the grid along a horizontal mirror line. *  (Center Alignment): When having different numbers of fixtures selected on different Y coordinates, they will be aligned together to their center on the X-axis. *  (Compress): Removes all gaps between fixtures, and moves the selection to the left and up, so that the selection starts at 0/0/0. It is possible to trigger the grid tools via command line using the Grid keyword.\ These are the commands for each tool: * Transpose: Grid ‘Transpose’ * Linearize Numerical: **Grid ‘Linearize’ ‘Numerical’** * Linearize Left To Right, Top to Bottom: Grid ‘Linearize’ ‘LeftToRight’ * Linearize Top to Bottom, Left to Right: Grid ‘Linearize’ ‘TopToBottom’ * Rotate clockwise: Grid ‘Rotate’ ‘Right’ * Rotate counterclockwise: Grid ‘Rotate’ ‘Left’ * Mirror Grid at X-axis: Grid ‘Flip’ ‘X’ * Mirror Grid at Y-axis: Grid ‘Flip’ ‘Y’ * Center Alignment: Grid ‘Align’ * Compress: Grid ‘Compress’ *** ### []()XYZ [Section titled “XYZ”](#xyz)  Improved in this release * Fading fixtures between XYZ and PanTilt or vice versa fades directly between the old and the new position. * Fading fixtures from one MArker to a different MArkers is supported. The MArker attribute of fixture types that have XYZ enable has Snap disabled. * The calculators and encoders set to the physical readout of the attributed X, Y, and Z are displaying the values of the assigned space with the unit Meters instead of Percent. * Editing a space by right-clicking it in the drop-down list when selecting a Target Space or Movement Space opens an editor for this space instead of the stage editor. * To enable XYZ for a fixture type it is also possible to change XYZ cell in the fixture type editor to Yes. **Known Limitation:**\ \- Using Goto or Load to transition from XYZ to Pan/Tilt or from Pan/Tilt to XYZ may not create a smooth fade.\ - Enabling Assert for a Cue that is transitioning from XYZ to Pan/Tilt or from Pan/Tilt to XYZ may not create a smooth fade.\ - CueParts with enabled Allow Duplicates do not work with fixtures that have XYZ enabled. *** ### []()Store Sources [Section titled “Store Sources”](#store-sources)  New in this release Incoming DMX data on DMX channels that have fixtures patched can be used as store source for presets and/or cues. To store the incoming DMX data, the **Data Source** in the Store Settings (Press and hold Store) needs to be set to DMX. For this **Data Source**, the **Use Selection** setting in the Store Settings needs to be set to All or All For Selected.\ When switching the **Data Source** to DMX, **Use Selection** will switch to All, when it is set to a different value as named before.\ Selecting a different **Use Selection** value is not possible when **Data Source** is set to DMX, and therefore these buttons will be grayed out When storing the incoming DMX, only the values are stored that are not at the default of the fixture type. In addition, values that are at fixture type default will be stored into the sequence when the sequence contains already this attribute with a different value. The resulting DMX output after the masters (sequence master, group master, playback master, grand master, etc.) can also be stored by using Output as **Data Source**.\ For this Data Source setting, the **Use Selection** needs also to be set to All or All For Selected. When using the command line, the options /Programmer, /DMX, and /Output can be used to determine the desired data source.\ To store the incoming DMX data to sequence 1 cue 42 for all attributes of the selecte fixtures, type: Fixture\[User name]> Store Sequence 1 Cue 42 /DMX /AllForSelected *** ### []()Device Configuration [Section titled “Device Configuration”](#device-configuration)  New in this release Added new functionality to save and load device configurations. A device configuration includes the output configuration and DMX protocol (Art-Net and sACN) configuration.\ To save a device configuration follow these steps: 1. Go to Menu - Output Configuration. 2. Tap Save Device Configuration. A pop-up opens. 3. Enter the file name for the device configuration, for example “My nice configuration”. 4. Tap Save. Tapping Load Device Configuration allows to select a saved device configuration and then load it by tapping Load. The title bar of the Output Configuration menu displays also the file name of the saved or loaded device configuration. The allocation between a real grandMA3 device and a line in the output configuration is done by matching IP addresses. Therefore, the IP address of a device in the output configuration can be changed by pressing and holding the IP cell.\ New devices, that are not already part of the session can by added to the device configuration by inserting a new device within the desired device type category. To do so, expand, for example the onPC section by tapping  in front of the onPC line, then tap and hold New onPC. **Hint:**\ When adding a new onPC device, it is also possible to add up to two configuration lines for the maximum number of onPC fader wings, that can be connected to a grandMA3 onPC station. To do so, unfold the configuration line of the desired onPC station itself. *** ### []()Extract [Section titled “Extract”](#extract)  New in this release It is possible to extract values of presets by specifying the preset, selection, fixture, cue, feature group, or attribute: * To extract all values from presets (that are currently active in the programmer) for the selected fixtures, type: User name\[Fixture]> Extract Selection To call the extracted values from preset 2.3 into the programmer for the selected fixtures, type: User name\[Fixture]> Extract Preset 2.3 To extract all values from presets (that are currently in the programmer) for fixtures 2 to 4, type: User name\[Fixture]> Extract Fixture 2 Thru 4 To extract the values from presets that are in cue 42 for the selected fixtures, type: User name\[Fixture]> Extract Cue 42 **Hint:**\ When extracting by specifying a fixture, selection, feature group, or attribute, presets must be active in the programmer for the desired fixtures. When extracting embedded presets or phaser presets which have presets integrated into their steps, extract will call directly the values of the source presets.\ Using the **/Single** option together with Extract makes it possible to extract one level down in the hierarchy of the presets.\ For example, create 2 color presets (“red” and “blue” presets) that are embedded into a different color preset (“odd/even red/blue”). The second preset color preset (“odd/even red/blue”) is embedded into All preset 21.1 (“cool look”).\ Select some fixtures and apply the All preset (“cool look”) to them.\ Executing Extract Selection /Single calls the second color preset (“odd/even red/blue”) into the programmer.\ Executing Extract Selection /Single again calls the first color presets (“red” and “blue” presets) into the programmer.\ When executing Extract Selection /Single a third time, the user gets the same result as when they would have used Extract Selection in the first step: The hard red and blue values without a preset link. **Known Limitation:**\ At the moment, Extract /Single works only with presets that are active in the programmer. *** ### []()Content Sheet [Section titled “Content Sheet”](#content-sheet)  Improved in this release * It is possible to select multiple cells in the horizontal direction. * Show Parts On separates the data into different sections per cue part. Show Parts Off, the entire data of the cue is displayed in one grid. * Cue Mode Manual allows to look at cues independent from the output cue. When Cue Mode is set to Manual, a cue list on the left side will be displayed. Selecting a cue in this cue list displays its content on the right side. * The Content Sheet allows a data merge of the cells of the same feature, when the values are identical. To merge cell, tap Merge Cells in the Content Sheet Settings. *** ### []()Plugin Editor [Section titled “Plugin Editor”](#plugin-editor)  Improved in this release * When editing a LuaComponent, the editor displays the line number of each line in front of them. The line number of the line the cursor is set to is highlighted in white. * Entering a tab character to the code of the plugin, the tab character is highlighted by a gray > at the beginning of the tab character. * To display the entire selection of available Lua code templates, tap Lua Code Templates in the title bar of the LuaComponent editor. To select the desired template tap into the code area of a template. A yellow frame around the template shows which one is selected. Tap Use Template at the bottom, to paste the selected template into the editor. A pop-up appears warning the user before overwriting the existing code. A code template provides a sample of code for a certain functionality, for example, a progress bar. * Tapping API Description in the title bar shows or hides the API area on the right-hand side of the editor. The API area offers all grandMA3 specific Lua functions. A search field at the top allows searching for functions. Tap a function to get more information displayed in the information section below the list of API functions. To enter the selected function to the position of the cursor in the editor, tap + on the right side of the information section, or double-tap the desired API function. * If syntax errors prevent the Lua component to be loaded into the Lua engine, the SyntaxError property turns to **Yes** and the component line turns red. *** ### []()Layout Window [Section titled “Layout Window”](#layout-window)  Improved in this release * Having multiple layout elements selected and editing them edits all of them simultaneously. When aligning values across the selected layout elements the selection order determines the alignment order. When toggling layout element properties while having multiple layout elements selected with different property values, they will switch to the same value and from there change their value together. * To enter the layout element editor from the Layout Encoder Bar, tap Edit Selected in the Layout Encoder Bar. * Cloning in layouts is possible by using this syntax: Clone \[Source\_List] At \[Destination\_List] If Layout \[“Layout\_Name” or Layout\_ID]\ This clone operation will add the fixtures of the Source-List into the specified layout at the position of the fixtures defined in the Destination-List. To be able to distinguish both layout elements, the new layout element will be placed with a small offset to the existing layout element. Also all settings of the layout element will be cloned, too. * The Rotate Encoder in the Layout Encoder Bar rotates the selected fixtures as a group. When only one fixture is selected, the encoder is grayed out. This functionality rotates the selected fixtures on the layout canvas and changes their position. * The Scale Encoder scales the arrangement of the selected elements in the X and Y direction. The Ratio Encoder scales the arrangement of the selected elements in the X direction. * When having elements in a layout selected and then editing the layout itself, the layout editor will automatically select these elements. * When assigning a fixture again into a layout, a pop-up offers to Overwrite the layout, Merge it into the layout, Remove the fixture from the layout, or to Cancel the operation. * Show Selection in the Layout View Settings allows displaying the selection (for example yellow border) at layout elements. To enable or disable the yellow frame of selected layout elements in the layout view, tap Show Selection in the Layout View Settings. When being in Setup mode, this setting is ignored and the selection is always displayed. * Leaving and entering the Setup mode the layout window resets the selected tool to the select tool (). *** ### []()DMX Tester [Section titled “DMX Tester”](#dmx-tester)  Improved in this release When enabling Tester Encoder Bar in the title bar of a DMX sheet and then setting focus into the DMX sheet, the encoder bar switches over to the DMX Tester Encoder Bar.\ The DMX Tester Encoder Bar allows fast access to the DMX Tester feature. There are four encoders available: * Universe: Changes the selected DMX address to a different universe. Tap Uni / Abs on the left side of the Universe encoder defines if the DMX channel selected for the DMX tester is set via a combination of Universe and Address (= Uni) or via an absolute DMX address (= Abs). In case of an absolute DMX address mode, the Universe encoder is grayed out. * Address: Changes the selected DMX address. * Tester Output: Defines to change the output of the DMX Tester to the selected DMX channel. * Patch: Opens an overlay to patch a fixture to the DMX channel that is set up on the Universe and Address encoders. The overlay displays the fixtures of the currently selected stage. To change to a different stage, tap Stage in the title bar in order to cycle through the available stages.\ Tap the cell of the DMX break of the fixture you want to patch to the new DMX address and then tap Patch ! at the bottom of the overlay. Enabling Show Unpatched Only displays fixtures that don’t have all of their DMX breaks patched. When disabled, all fixtures are displayed. The buttons above the encoders execute special actions: * Retain: Off will release the values on the former selected DMX address when changing the address. Retain On keeps the DMX tester value on the former selected DMX addresses until the user releases them. * DMX Channels: * All: All DMX channels can be used by the DMX Tester. * Patched: Only DMX channels that have fixtures patched to are useable. * Unpatched: Only DMX channels without patched fixtures can be used by the DMX tester. * Select All: Selects all DMX Channels that have an output by the DMX Tester. A blue frame around the cell of the DMX channel indicates the selection. * Release Selected: Release the DMX Tester values from the selected DMX channels. * Release Unselected: Release the DMX Tester values from all non-selected DMX channels. * Release All: Releases the DMX tester values on all DMX channels. * Park Selected: Parks the selected DMX channel. * UnPark Selected: Unparks the selected DMX channel. When a universe has DMX channels that output values from the DMX Tester, the universe pool object in the universe pool shows a T ( Tester). And also the fixture sheet indicates values from the DMX Tester with a white background on the DMX layer.\ Saving a show file while the DMX Tester is active does not store the DMX Tester values into the show file. When loading the show again, the DMX Tester does not output value. *** ### []()Update Menu [Section titled “Update Menu”](#update-menu)  Improved in this release The settings in the update menu are split into settings for presets and cues. All buttons are now at the bottom and arranged below the preset section on the left and below the cue section on the right. The following settings are available in the update window: * Presets: * Preset Update Mode: Original Content Only and Add New Content determine if only already existing attributes in the preset will be updated, or if also new attributes may be added to the preset. * Preset Mode: Auto, Selective, Global, ForceGlobal, and Universal define if the updated data will be added as selective, global, or universal data to the preset. * Input Filter: Defines if attributes of other feature groups may be updated to the preset (Input Filter is Off), or if only attributes of the same feature group of the preset may be updated to the preset (Input Filter is On). * Cues: * Sequence Update Mode: Original Content Only and Add New Content determine if only already existing attributes in the cue will be updated, or if also new attributes will be added to the cue. * Sequence Mode: Defines which cues will be offered for updating: All shows all possible cues. Selected offers only cues of the selected sequence, Last Called displays only cues of the sequence that was called as last one. * Cue Only: When Cue Only is on, the data will be updated for this cue only, and returns in the next cue to the status of values before the updated cue. The Cue Only setting in the update window is not linked with Cue Only in the Store Settings anymore. The update menu displays each possible object to update now within one row. Each row shows the following information from left to right: * Preset Pool No + Name * Preset No + Name and respectively * Sequence No + Name * Cue No + Name * Part No + Name *** ### []()Master Modes [Section titled “Master Modes”](#master-modes)  New in this release All masters, for example the grand master, a speed master, playback master, and other, can change their mode between Toggle, AlwaysOn, and Disabled. * Toggle: Switch the master on or off. The fader value of the master can always be changed and affects the output when the master is on. The indicator colors are gray (Off) and green (On). * AlwaysOn: The master is always on and cannot be switched off. The fader value of the master can always be changed and affects the output. The indicator color for AlwaysOn is white. * Disabled: The master is switched off and its fader value internally uses its default value. For example the grandmaster uses 100% for the grand master or the program time uses 0s. The indicator color for Disabled is red. The modes of all masters can be changed in Menu - Preferences and Timings - Masters.\ This menu displays the masters separated by their type and their membership in the show file. Masters can have a global membership which means that these masters are controlled by all users of the show file. Masters with a user membership are located within the user profile which means that every user profile has its own and individual set of these masters. Changing one of these masters does not affect the same master in a different user profile. The section of masters that are controlled by the user profile displays the name of the user behind their type, for example, **Selected (Admin)** for the masters that control the selected sequence of the Admin user. Masters of the global membership display (Global) behind their type, for example **Playback (Global)**. *** ### []()MAtricks [Section titled “MAtricks”](#matricks) To read more about this function, see [Transform](/grandma3/2-3/matricks_transform/) topic in the help system.  Improved in this release Added MAtricks setting Transform. Transform set to Mirror mirrors values depending on the other MAtricks settings, for example, Blocks, Groups, Wings. When Transform is set to Mirror: * The font color of the Transform button will change to yellow. * InvertStyle will change to Pan. When Transform is set back to None: * Inverts will be switched off. When a MAtricks settings, for example XWings, is set to None and Transform is set to Mirror, Invert for this setting will be disabled.\ If there are only values for one step active, the values will be mirrored in this step. As soon as there are attributes with two or more steps, Mirror will only mirror the values of the multi-step phasers. When working with Wings and an odd number of fixtures is selected (for example 7 fixtures are selected and XWings is set to 2), the center fixture will be marked as edge fixture (lighter green selection color compared with inverted selected color in the fixture sheet, selection grid window, 3D, and other). An edge fixture does not follow all values, for example when creating a mirrored circle with the seven selected fixture, the edge fixture in the center will only tilt, but not pan. This is done in order to keep the symmetry. Transform Mirror works by transforming values of the inverted fixtures to create symmetry. This requires altering the original values in the programmer. If you are transforming values that are called directly from a Preset or Integrated from Presets it is important to know that the transformed values will not have reference to the Preset. Storing the transformed values directly to a Cue will break the references to the presets for transformed values. To avoid losing references, store the transformations with MAtricks to a new Preset object. With the combination of transformed values with MAtricks the reference links will be automatically saved to the preset object. Calling this Preset with transformation MAtricks included will keep the links when you then store it to a Cue. In the MAtricks window, the PhaseTo calculators have buttons to set the value directly to 90°, 180°, 270°, or 360°. *** ## []()Other Enhancements [Section titled “Other Enhancements”](#other-enhancements-1)  New playback functions HalfSpeed and DoubleSpeed which result in halving or doubling the current speed of speed masters, presets, or sequences.\ HalfSpeed and DoubleSpeed can be assigned as button functions to executors that have speed masters or sequences assigned to them. For more information see [HalfSpeed](/grandma3/2-3/keyword_halfspeed/) and [DoubleSpeed](/grandma3/2-3/keyword_doublespeed/) help topics.\ When using HalfSpeed or DoubleSpeed the SpeedScale property of the master is modified accordingly.  Output Configuration menu: * To enable or disable RDM, tap RDM in the Output Configuration menu. The RDM button in the Network menu is linked with this new RDM button. * When switching the universe on an XLR port that is set to be an input port, the settings for Merge and Priority are taken from the new universe. * The name, type, and IP of the station that displays the output configuration are marked with a green background, also when no session is active.  DMX In Merge Mode Prio got the possible priorities reorganized. From now on, these priorities are available: Lowest, Low, LTP, High, Highest, Prog, and Super.  Improved the DMX Protocols menu. It allows setting the Merge Mode for the universes DMX data is input to per configuration line. When changing the Merge Mode for a configuration line, all universes that are defined by Local Universe and Amount are changed together. In the DMX Universes-tab of the Patch and Live Patch menu or by editing a universe in the pool it is still possible to change the Merge Mode for single universes independently. As soon as two or more universes of a configuration line have different Merge Modes, the Merge Mode cell will display **…** to indicate this. The Input Priority field is only editable when the Merge Mode is set to Prio.  Improved the PSN menu (Menu - In & Out - PSN): * The Merge Mode can be set here as in the DMX Protocols menu (see above). It is necessary to have patched MArker fixtures assigned to trackers, in order to be able to change the Merge Mode. If no trackers have a patched MArker fixture linked to them, the Merge Mode cell displays “No MArker” in orange font color. The Merge Mode cell displays the Merge Mode of the universes of the MArker fixtures that are assigned to the PSN trackers. * The ID of the PSN tracker is displayed in the new PSN ID column. Edit this column to pre setup trackers before the PSN system sends information. * The IDType column is removed, and the ID column is renamed to MArker ID. As PSN trackers need to be connected to MArker fixtures, and the MArker fixtures need to have a CID of the MArker IDType in order to be able that fixtures follow the MArker, it is now only possible to set MArker IDs to PSN trackers.  The shortcut MA + 5 on the keypad of grandMA3 devices executes the same as pressing Please on the internal keyboard. This allows a faster editing of cells or buttons when navigating the focus by using MA + 2 / 4 / 6 / 8.  Sequence Rate: * When moving a rate fader of a sequence up to 100%, the rate is now set to infinity which results in fade times of 0s. This applies also for speed masters that are assigned as rate master to sequences * Fade times modified by a rate master are displayed within the sequence sheet. In addition to the new resulting time, an asterisk (\*) will be displayed in front of the time in order to indicate the modification by a rate master. For example: \*10.42 When the rate master is pulled down to 0%, the times will be displayed as \*Stopped, and the executor label displays Stopped. When the rate master is pulled up to 100%, the executor label displays 1:∞.  When incoming packets are processed the font color for the name of the configuration line in the DMX Protocols menu name flashes to yellow. Similar to the green flashing when packets are sent out.  The DMX Curves editor allows adding points for DMX curves of Curve Mode ‘Custom’ in the grid area on the left side. Until now it was only possible to add points for custom curves in the 2D area o the right side.  MIDI Mode ‘Through’ receives and forwards MIDI Notes, MIDI Control Changes, and MIDI Program Changes.  Improved the color of an attribute doing a fade. The attribute gets a dark blue background during the fade.  The speed masters’ indicator bar blinks in accordance with the speed. This gives visual feedback about the speed that was set.  In the Phaser Editor, the forms are expanded by a circle form. To create a circle with this form, follow these steps: 1. Select at least one moving light fixture. 2. Add 2 points in the 2D area of the phaser editor. 3. Tap Form on the left tool bar. 4. Then tap Circle in the right tool bar. A perfectly shaped circle will be created. The circle form applies to the layer chosen in the Values button of the title bar of the Phaser Editor. If one or two steps are active in the programmer on the Absolute layer and Values is set to Absolute, the circle will be created on the Absolute Layer. If one or two steps are active in the programmer on the Relative layer and Values is set to Relative the circle will be created on the Relative layer. As it’s very common to create a circle around an absolute position, if there is an active single-step value on the Absolute layer, you can immediately create a circle on the Relative layer by setting Values to Relative and tapping the circle form.  It is possible to start recording a timecode show via command line using the new keyword Record. For more information see [Record](/grandma3/2-3/keyword_record/) help topic.  The Store Settings allows storing the current look in conjunction with the selected Use Selection option into cues or presets. For example, when Look is enabled and Use Selection is set to Active For Selected it stores the active values of the selected fixtures which have an open dimmer. Fixtures that have a closed dimmer, but other attributes active will get only their closed dimmer stored.  3D: * If a fixture is unpatched, the Patch label in 3D displays “Unpatched” for fixtures and “N/A” for environment objects. * To deselect fixtures using the 3D window, press - and then draw a lasso around the fixtures. * Beams and spots in the 3D window look more identical between the different render quality settings. This includes both the general look and the intensity, while the beam is “Open” or has a gobo inserted. * Show Selection in the 3D Settings defines if the models of fixtures in the 3D window shall display their selection state, or not. To enable or disable the display of the selection, tap Show Selection in the 3D Settings. When in Setup mode, this setting is ignored and the selection is always displayed. * The property Select by Label in the Label-tab of the 3D Settings allows defining if the user can select fixtures by selecting the labels on the spot of the fixtures in 3D. To be able to use this property, Show Label on Spot and any of the properties Add Fixture ID, Add CID, Add Patch, or Add Name need to be enabled.  The color picker supports direct control of the GDTF HSB attributes HSB\_Hue, HSB\_Saturation, and HSB\_Brightness. Only HSB attributes of GDTF files are supported by now.  Fixture library updated to Carallon 18.2.  Fixture types that have errors are displayed with a red font color in the Fixture Types-tab of the Patch menu. As long as a fixture type has errors, the corresponding fixtures are not displayed in the rest of the software, because they cannot work correctly. Editing the fixture type provides a more detailed description of the error when tapping Show Conflicts. Fixture Types that have an orange font color indicates a warning. These fixture types may not work properly, but they are accessible.  Calculators of attributes that have many channel functions available, display  and  on the left and right side of the tab-bar, in order to indicate the presence of more channel functions and to scroll through the different channel functions. It is also possible to scroll through the tab bar by using scroll gestures.  The software update menu displays a progress bar during a version import to the hard drive when using the Select and Import Update Files functionality.  A pop-up informs the user if they try to assign an IP address to an interface while a different interface has already an IP of the same subnet assigned. A pop-up also appears when the user tries to enter an IP address that is already used on a different station in the network.  Improved the network experience when using IGMP.  Sequences that are assigned to executors are displaying the reference icon () on their sequence pool object.  The backup menu displays the free disk space in the upper right corner of the menu.  The timecode property RawTCOffsetSlot returns the raw time of the set timecode slot offset.  Knock in and knock out behavior improved: * Knocking in or out a layer only affects the layer in the selected feature group. * When knocking in or out an attribute while having the absolute layer selected, all layers are affected. * When having a different layer than the absolute layer selected, the attribute will be only knocked in or out in the selected layer. * Knocking in or out only the absolute layer can be done by using the command line. To knock out the absolute layer for the dimmer attribute, type: User name\[Fixture]> Off Absolute Attribute “Dimmer” *** ## []()What’s Changed [Section titled “What’s Changed”](#whats-changed-1) * The maximum number of remote entries per remote type is set to 10 000. For OSC it is set to 1 024. * When a grandMA3 extension is connected to a grandMA3 console that is in a session and the session credentials are matching between both stations, the extension has also a green background in the Network menu. When using the Session Filter “My Session”, the grandMA3 extension appears only, when the session credentials are matching between the console and the extension. * Pressing Channel repeatedly switches through Channel, Universal, and used IDTypes. IDTypes that have no patched fixtures assigned are not appearing in the command line. * These fixture properties were renamed: * Ray Traceable is now called Follow Target * 3D Selectable is now called Selectable 3D * 3D Visible is now called Visible 3D * Attributes that change their value to a hard value, for example in a cue, with a fade time display the fading values on the absolute and relative layer, too. * When MArker fixtures were set to a different IDType than MArker, the IDType would be forced to be MArker when loading a show file from a previous version in grandMA3 v1.8 or later. A possible set CID is reset to None. When having such MArker fixtures connected to PSN trackers, they have to be connected again in the PSN menu. This applies also to other fixtures of other fixture types that have IsMarker set to Yes. * The assignment of SpecialExecutors 10 and 11 in new shows changed to the speed masters Speed 1 and Speed 2. * The color of the indicator bar of an active Prog Time and Exec Time changed from orange to green. * The order of keywords on X8 | DMX interchanged: * Press MA + X8 | DMX to enter DMXUniverse. * Press MA + X8 | DMX + X8 | DMX to enter DMXAddress. * The abbreviations of the following keywords changed: * DMXAddress: Dmxa * DMXUniverse: Dmx * DMXMode: Dmxm * In the Update Menu value LastCalled of the Sequence Mode setting changed to LastGo. * The windows of the default views in a new show has no filters assigned anymore. * The LuaComponent property IsRessource changed to IsResource. * When Con3 on grandMA3 consoles are set to DHCP and no DHCP server is available, the interface gets no IP address instead of an AVAHI IP address, which could conflict with Con1 if there was also no DHCP available. * The Mesh3DS keyword changed to Mesh. * The text “No Cable” when a network interface is down changed to “No IP”. * In the timecode editor and timecode window the button label changed from Select. target to Selection Target. * When you are on the Absolute layer, toggling the activation will now toggle the activation of all attributes on the Absolute layer and any non-default values on all other layers. If you are not on the Absolute layer, toggling activation will only toggle values of the current layer. * The MAtricks button in the recipe editors was renamed to Grid in order to match the naming of the MAtricks window. The order of the buttons changed to Reference, Grid, Layers, Shuffle, X, Y, and Z. The Invert toggle was removed, and all Invert properties are part of the Grid section.\ This change also affects the Programmer Parts window. * When storing the content of the programmer, the selected step will be reset to step 1. * These properties changed their names: * Cues: * Cmd to Command * CmdDelay to CommandDelay * Sequences: * CmdEnable to CommandEnable * OSC: * ReceiveCmd to ReceiveCommand * SendCmd to SendCommand * Timecode Event: * ExecuteCmd to Execute Command * CmdDelay keyword is renamed as CommandDelay. *** ## []()Bug Fixes [Section titled “Bug Fixes”](#bug-fixes-1) ### 3D [Section titled “3D”](#3d-1) | Description | | ---------------------------------------------------------------------------------------------------------------------------------------------------------------------------------------------------------------------------------------------------------------------------------------------------------------------------------------------------------------------------------------- | | The beam and the spot of multi-pixel fixtures were not visualized correctly when the Multi Led Beam Mode was set to Single Beam Dynamic Gobo. This bug is fixed. Beam and Spot are visualized correctly even if the dimmer of the first pixel of the multi-pixel fixture is closed. | | Fixtures were not visible in some cases when loading a show file from a prior version of grandMA3. This bug is fixed. The scaling of fixtures is reset to 1:1:1 on the X, Y, and Z axes when loading a show file from an older grandMA3 version. | | The attributes Blade1B, Blade2B, Blade3B, Blade4B, and ShaperRot were not visualized in the 3D. This bug is fixed. These attributes are visualized again in the 3D window. | | It was not possible to select a fixture in the 3D window by tapping its label in the spot. This bug is fixed. A fixture can be selected by tapping its label in the spot. | | Beams pointing to x=y=z=0 while using the 2D Top camera were not displayed. This bug is fixed. Beams pointing to the 3D origin and using the 2D Top camera are displayed now. | | Shadows were not drawn after moving a fixture that then cast a shadow into the beam of another light source. This bug is fixed. A shadow will be drawn once a fixture that casts a shadow is moved into another light beam. When using the 3D encoder bar to move the fixture it will take a short timeout until the new position of the fixture is updated and the shadow is displayed. | | Beams disappeared when pointing them into the camera on grandMA3 onPC stations that used recent series of AMD graphic cards. This bug is fixed. Beams will no longer disappear when pointing into the camera on a grandMA3 onPC station running on a recent AMD graphics card. | ### Command Line and Macro [Section titled “Command Line and Macro”](#command-line-and-macro-1) | Description | | ----------------------------------------------------------------------------------------------------------------------------------------------------------------------------------------------------------------------------------------------------------------------------------------------------------------------------------------------------------------------------------------------------------------------------------------------------------------------------------------------------------- | | Using the Lua function printf() could crash the software when a string variable was to be printed, but the value was of a different data type. This bug is fixed. Lua printf() does not crash the software anymore when returning a value of a different data type than it was specified. | | When changing the value of one attribute that is part of an activation group, the other attributes of the same activation group kept their preset references. This bug is fixed. When changing one attribute all other attributes of the same activation group now remove their preset references. | | When the current command has a number, it was not possible to enter a keyword by pressing the key that is put at the key of the current command line default. For example, when Fixture is the command line default it was not possible to enter the collection keyword by pressing Fixture + Fixture + Fixture for this command: Move Preset 1.1 Thru At Collection. This bug is fixed. It is possible to enter keywords that have their shortcut on the key the command line default is set to at moment. | | Selecting several executors and then storing sequences to it, kept only the first executor selected. This bug is fixed. All sequences stay selected when having several executors selected and then storing sequences onto them. | | Specifying a specific DMX address on an open range of DMX universes for the DMX tester failed. This bug is fixed. DMXUniverse Thru.1 At 100 works now as expected. | | Applying the default value to attributes that have several channel function and the default value is not part of the first channel function applied the corresponding value in the range of the first channel function. This bug is fixed. Setting the default value for attributes respects the correct channel function. | | When keyboard shortcuts are enabled, they were not always automatically disabled when setting the focus into the input field of the Import/Export menu or the Load Show dialog. This bug is fixed. Keyboard shortcuts are automatically disabled in the input fields of the Import/Export menu or the Load Show dialog. | | SelFix on a sequence put the fixtures always onto original grid position that was stored in the sequence. This bug is fixed. SelFix on sequences respects the current position of the grid cursor and adds the fixtures to the grid there. | | The arrangement tool of the layout window arranged fixtures in their ascending order of fixture IDs. This bug is fixed. The arrangement tool of the layout window now respects the selection order of the layout elements. | | Storing Remove values to a cue using the options /Merge /CueOnly did not remove the values in the target cue and respecting cue only. This bug is fixed. Store /Merge /CueOnly with Remove values removes values in the target cue and respects cue only. | | Entering very long commands into macros froze the UI for a time. This bug is fixed. Long commands input into macros are now processed faster so that the UI does not freeze anymore. | | Channel sets called the wrong values in some cases if the readout of the encoder bar was set to Dec8, Dec16, Dec24, Hex8, Hex16, or Hex24. This bug is fixed. Channel sets call the correct values now even in the decimal and hexadecimal readouts. | | When selecting a group and a fixture that is part of a group in a layout window, only the fixture was selected. This bug is fixed. Selecting several layout elements with different object types assigned selects them all reliable. | | When turning the transition encoder in the phaser encoder bar the value could jump from 100% to 0%. This bug is fixed. The transition value when turning the encoder follows the turning of the encoder. | | When turning the inner dual encoder rapidly down to 0% and then up again it could happen, that the value was stuck at 0%. This bug is fixed. The value of an encoder follows the encoder when turning it fast down to its software limit and then up again. | | When storing MAtricks with InvertStyle set to Pan, then switching it to any other value and recalling the MAtricks from the pool, InvertStyle was not set to Pan. This bug is fixed. The MAtricks settings InvertStyle, Transform, and ShuffleMode are always stored into MAtricks. | | Setting a negative value for Acceleration and Deceleration via command line failed. This bug is fixed. Negative values for Acceleration and Deceleration can be set again by using the command line. | | When setting a value via command line on the Acceleration or Deceleration layer and then opening its calculator, the value in the calculator could not be the same value as before. This bug is fixed. The calculator for Acceleration Deceleration open with the same value that was set before via encoders or command line. | | Toggling a selection (Please Please) and then selecting different fixtures, the previous selected fixture stayed selected. This bug is fixed. Toggling fixtures and then selecting different fixtures unselects the previously selected fixtures. | | The shortcut for the options /Save and /Screen was set to /S for both. This bug is fixed. /S is the shortcut for /Screen and /Sa is the shortcut for /Save. | | Newly created MIDI remotes set the In To property to a value of 128. Exporting and importing this MIDI remote again set the value to -128. This bug is fixed. New MIDI remotes have a value of 127 for the In To property and it is not possible to set a higher value. | | Executing a specific macro line failed when using the scheme Macro x.y. This bug is fixed. Macro 1.2 will execute the second macro line of the first macro. | | Updating a preset that contained additional selective data removed this data when using Preset Mode Auto. This bug is fixed. Preset Mode Auto does not remove selective preset data when updating a preset. | | When dragging a lasso around a layout element that was set to action ‘None’, a SelFix command was executed instead. This bug is fixed. Selecting layout elements with set the action to ‘none’ does nothing anymore. | | Labeling more than two DMX universes at the same time did not automatically increment the name when the name had a number at the end. This bug is fixed. The names of DMX universes will be automatically incremented during the labeling process. | | When adding a new character in the middle of a command that will be entered into a command input, the command was translated into keywords and the cursor jumped to the end of the command. This bug is fixed. Changing single characters in a command of a command input does not let the cursor jump to the end. | | When turning a preset or cue into a recipe and then editing the recipe, set the programmer par ID to 4 294 967 295. This bug is fixed. Editing the recipe after creating it by turning a preset or cue into a recipe does not change the programmer part ID to unexpected values. | | The software could crash when moving a recipe in a cue. This bug is fixed. Moving a recipe in a cue moves the recipe to the specified spot. | | Store /Remove removed also attributes that were deactivated in the programmer from the selected cue or preset. This bug is fixed. When removing attributes from cues or presets, deactivated values in the programmer are ignored. | | Commands in macros that were separated by a semicolon in a command cell were not applied correctly when the command behind the semicolon contained a clear keyword. This bug is fixed. Commands separated by a semicolon are correctly applied. | | It was not possible to enter Oops or Undo into the command cell, for example in a macro. This bug is fixed. Oops or Undo can be entered into command cells. When the input field of a command cell contains a string pressing Oops works as backspace, until the field is empty. Then pressing Oops enters Oops into the input field. | | It was possible to move a locked executor. This bug is fixed. Locked executors cannot be modified. | | The software crashed when executing blackout for the grand master while editing a macro line. This bug is fixed. While editing a macro line executing blackout for the grand master does not crash the software anymore. | | Selecting a group after selecting manually different fixtures put the fixtures of the group at the same starting point in the grid as the manual selection had. This bug is fixed. Selecting fixtures by calling a group puts the fixtures into the grid starting at the current position of the grid cursor. | | Opening the calculator of an attribute that had a lot of channel sets (65 k) crashed the console. This bug is fixed. Opening the calculator of an attribute with a lot of channel sets does not cause a crash any longer. | | The wrong channel function could be active on attributes that are following mode dependencies if the from and to values of the mode dependency had a small range while the encoder controlling the mode master was set to coarse resolution. This bug is fixed. Mode followers will have the correct channel function active even if the encoder of the mode master attribute is set to coarse. | | The store settings were not reset to default when executing a clear command via macro or typing it manually in the command line. This bug is fixed. Executing any clear command via any command cell or by typing it in the command line. | | When moving a preset that was used in a recipe, that value drop-down of the recipe editor did afterwards not offer the feature group anymore the moved preset is part of. This bug is fixed. The value drop-down in the recipe editor offers always all available feature groups in order to choose presets from. | | The console crashed when moving recipes in a cue or preset. This bug is fixed. Moving recipes in a preset or cue works. | | When using the dimmer wheel shortly behind with different fixtures selected, the value change of the second selection started at the starting value of the first selected fixtures. This bug is fixed. When using the dimmer wheel the dimmer value starts to change from the current value of the fixtures onwards. | | The Scroll Lock LED on grandMA3 consoles did inform the user about the current state. This bug is fixed. The Scroll Lock LED works again. | | It was not possible to move a fader over time when using grandMA3 onPC on Apple Silicon hardware. This bug is fixed. Executor 201 At 0 Fade 5 for example is now also possible on Apple Silicon hardware. | | The views of the default user profile and of copies of the default user profile could be overwritten by the default views when loading a new show and then loading the former show again. This bug is fixed. The default views are only initialized when starting a new show. | | Importing user profiles by using the Import/Export menu could crash the software when it tried to import onto the default user profile. This bug is fixed. Importing user profiles onto the default user profile is prohibited. | | Copying an agenda event that had no object assigned, had the Root object assigned when pasting it. This bug is fixed. Copying empty agenda object copies them 1:1. | | The software could crash when trying to use the CommandCall() function for the root object in a plugin, but outside of the main function. This bug is fixed. The software does not crash anymore when using the CommandCall() function outside the main function of a plugin. | | The software could crash when a connected drive reported a size of 0 bytes while using the backup menu. This bug is fixed. USB drives reporting a size of 0 bytes do not crash the software anymore. | | It was not possible to delete an empty layout while being in a different world than world 1. This bug is fixed. Empty layouts can be deleted, also when being in another world. | | Processing units kept values cleared when saving a show file, clearing the programmer and then loading the show file with the programmer values again. This bug is fixed. Loading a show file restores the correct programmer values, also on processing units. | | The software crashed when deleting a sequence that was assigned to Xkeys and where the used executor configuration was set to be higher or wider than 1. This bug is fixed. Assigned sequences on Xkeys can be deleted without crashing the software. | | The software crashed when the user tried to use the color picker with a fixture where the intensity of the emitters was very small. This bug is fixed. The color picker does not cause a crash anymore when a fixture type as unusual emitter intensities set. | | The software crashed when the user tried to edit the assigned movement or target space of a MArker fixture by editing the MArker fixture itself. This bug is fixed. It is only possible to change the assigned spaces of MArker fixtures when being in the Patch menu. | | It was not possible to enter the command Next Step into a command cell, for example in a macro. This bug is fixed. Next Step as command can be entered again into command cells. | | IfOutput, IfActive, and IfProg did not select instances of multi-instance fixtures. This bug is fixed. Multi-instance fixtures get selected when using IfOutput, IfActive, or IfProg. | | When toggling a grouping fixture and a child of the grouping fixture, only these two fixtures were toggled. This bug is fixed. Toggling grouping fixtures toggles all children of the grouping fixture. | | When moving a fader after a page change, it could happen, that the fader did not recognize the movement and wanted to go back to its previous position. This bug is fixed. A fader should not work against the movement done by the user. | | The software could crash when feature groups were switched and the maximum amount of 32 768 channel functions in the show file was exceeded. This bug is fixed. The limit of allowed channel functions was increased to 65 535. The software does not crash anymore when changing feature groups while the limit is exceeded. | | Deleting a locked sequence that is played back let the pop-up appear that warned the user that the object to be deleted has references that may affect the output. This bug is fixed. Locked objects cannot be deleted, and therefore the locked error message appears directly in the command line. | | Step appeared again and again in the command line when pressing MA + X5 \| Step and releasing MA first and then X5 \| Step and then pressing Clear. This bug is fixed. No keyword should appear in the command line when pressing Clear. | | Deleting layout elements, while not being in the setup mode with the layout window, deleted the assigned object of the layout element, too. This bug is fixed. Deleting layout elements is only possible when the layout window is in setup mode. | | Exporting plugins that were created in the grandMA3 software did only export a XML, and did not create the corresponding Lua file. This bug is fixed. Plugins that were created in the grandMA3 software are exported as XML files which contain the content of the plugin encoded in Base64. Plugins that were created in the grandMA3 software, where the user entered a FileName manually, a XML file and a corresponding Lua file will be created. | ### Connections [Section titled “Connections”](#connections-1) | Description | | -------------------------------------------------------------------------------------------------------------------------------------------------------------------------------------------------------------------------------------------------------------------------------- | | When changing the readout temporarily in a calculator of the In & Out menu, the entered value was not interpreted for the new readout. This bug is fixed. The entered value of calculators in the In & Out menu is applied respecting the temporarily changed readout. | | NDI input could have interchanged red and blue colors. This bug is fixed. The input of NDI streams is now checked in which color format the data is received and does not interchange red and blue anymore. | | When the name of a PSN tracker changed in the PSN stream, the new name would not be recognized by the grandMA3 software. This bug is fixed. Changing the name of a PSN tracker on the PSN sender changes also the name of the tracker in the PSN menu of grandMA3. | | When connecting an external monitor while the console or onPC was locked, the new display would not display the desk lock. This bug is fixed. Connecting new monitors display the desk lock information when it is active during the connection process. | | When a station changed its status to IdleMAster it could happen, that Art-Net or sACN were not output, though Send If IdleMaster for the corresponding protocol was enabled. This bug is fixed. Stations that are IdleMAster send out DMX network protocols when they should do. | | RDM did not work with fixtures that were connected to a grandMA3 xPort node or a processing unit. This bug is fixed. RDM works again with xPort nodes and processing units. | | It was not possible to delete the gateway entry of an interface. This bug is fixed. Gateways IP of interfaces can be deleted. | | The connected stations of a session did not display the Sender IP of a PSN system. This bug is fixed. The PSN menu displays the Sender IP on all stations of a session. | ### Patch [Section titled “Patch”](#patch-1) | Description | | ---------------------------------------------------------------------------------------------------------------------------------------------------------------------------------------------- | | When saving and loading a show file the set DMX curves in attributes in fixture types were lost. This bug is fixed. Saving and loading a show files preserves the DMX curves in fixture types. | | Exporting an MVR from the Live Patch did not work. This bug is fixed. Exporting MVRs is possible also when being in the Live Patch menu. | | The source column of fixture types that were imported from an MVR file displayed “2”. This bug is fixed. Fixture Types imported from an MVR file display “GDTF” as source. | ### Phaser [Section titled “Phaser”](#phaser-1) | Description | | --------------------------------------------------------------------------------------------------------------------------------------------------------------------------------------------------------------------------------------------------------- | | The allowed input range in the calculators for Acceleration and Deceleration was set to -100 % to +100 %. This bug is fixed. The allowed value input range for Acceleration and Deceleration matches now the limits of the encoders: -3 200 % to 3 200 %. | | Phasers restarted when changing their speed. This bug is fixed. Phasers change to their new values without restarting when adjusting the phaser layers. | ### Playback [Section titled “Playback”](#playback-1) | Description | | -------------------------------------------------------------------------------------------------------------------------------------------------------------------------------------------------------------------------------------------------------------------------------------------------------------------------------------- | | When flashing the temp fader of a sequence via a DMX remote, MIDI remote, DC remote from 0% upwards, the sequence did not play back. This bug is fixed. Remote input to the temp fader of a sequence controls the sequence in all situations. | | When dimmers decreased in a cue, and tracking was disabled in the sequence, the normal cue timing was applied. This bug is fixed. When dimmers decrease in a non-tracking sequence, the out timing is applied. | | Assigning a preset to an executor could later not playback the preset via the executor when the preset was played back via the preset pool at the time of the assignment. This bug is fixed. Selective presets can always be played from executors. | | Going to the next cue during a partial crossfade did not release attributes when they had to release. This bug is fixed. Attributes that should release in the next cue, are now released after a not finished crossfade with an addition Go+ into the cue. | | The applied output filter for preset playbacks excluded the fixtures of the output filter. This bug is fixed. The output filter for preset playbacks includes the fixtures of the filter and excludes all other fixtures. | | When playing back a cue with phasers and then moving up the fader, the phaser could be out of sync. This bug is fixed. Playing back cues with phasers keeps the attributes in the phaser in sync. | | Attributes that were set to Snap faded when using a crossfade functionality, for example ProgramXFade or ExecutorXFade. This bug is fixed. Snap attributes are always snapping when a crossfade is performed. | | When initializing a cue, for example after updating it, that was output at the same time, the command set in the cue was also executed again. This bug is fixed. Cue commands are only executed when starting the cue. | | Oopsing the value change of an attribute on a connected console did not update the DMX output. This bug is fixed. DMX output follows the value change, also when oopsing attribute changes of a connected station. | | When fixtures faded to a new position with stomped phasers, the fixtures first moved towards a wrong position before they started to fade to their correct and new position. This bug is fixed. Stomping a phasers to a new position lets the fixtures move correctly and straight to their new position. | | When tracking a relative phaser the phaser could restart every time going into a new cue. This bug is fixed. Tracked phasers do not restart when going into a new cue. | | When starting a playback again while the fade of the OffCue was running, the output values would jump. This bug is fixed. The output values of a playback do a smooth transition when starting the playback again while the fade of the OffCue is running. | | When changing the speed of a preset playback using the encoder of the executors in row 300 or 400, while the executor time was active, faded the speed down to 0. This bug is fixed. Changing the speed of preset playbacks on 300 and 400 executors is also possible when the executor time is on. | | When stomping the playback of a relative phaser by starting a new playback, the fixtures moved in an unexpected direction before going to their static value. This bug is fixed. Stomping the playback of relative phasers moves the fixtures directly to their new value. | | Played back presets could not be switched off anymore when the preset was changed from being selective to global or universal. This bug is fixed. Global and universal presets can be switched off when their playback was started when they were selective. Starting a playback of global or universal presets is not possible. | | When switching off a XYZ playback with a fade time in the OffCue, the fixtures always flipped during the fade. This bug is fixed. Fixtures only flip during the fade of an OffCue of a XYZ playback when it cannot be avoided. This depends on the current pan/tilt value combination the fixtures have and to where they should fade. | ### Windows [Section titled “Windows”](#windows-1) | Description | | --------------------------------------------------------------------------------------------------------------------------------------------------------------------------------------------------------------------------------------------------------------------------------------------------------------------------------------------------------------------------------------------------------------------------------- | | Closing the Edit Encoder Bar menu brought the user back to different locations depending on whether you pressed ESC or tapped X. This bug is fixed. Closing the Edit Encoder Bar menu brings the user back to the User Profile menu. | | When opening the dropdown for an interface in the output configuration, the Auto entry was always highlighted. This bug is fixed. The currently selected interface will be highlighted when opening an interface dropdown in the output configuration. | | When switching off a sequence and the Content Sheet was set to Cue Mode Next, the next cue that would be played back when starting the sequence again was not displayed. This bug is fixed. The Content Sheet displays always the next cue when Cue Mode is set to Next. | | When disabling and enabling the encoder bar of the color picker, the Mode was reset to Auto. This bug is fixed. When opening the color picker encoder bar again the Mode is remembered correctly. | | While dragging a lasso in a layout window doing a right-click the lasso frame did not disappear anymore until clicking one more time into the layout window. This bug is fixed. Right-clicking in the layout window while dragging a lasso removes the lasso frame now. | | When changing the WingID of a module, the content of the corresponding letter box display did not follow to the new WingID. This bug is fixed. Letter box displays follow with their conent to the new WingID when it is changed. | | When presets were played back from sequences the attributes in the fixture sheet did not display a preset marker. This bug is fixed. Preset markers are displayed when playing back presets in sequences. | | When entering the layout editor and column filtering was active, two lines of filters could appear. This bug is fixed. The layout editor displays only one row of filters. | | When having the layout encoder bar or the 3D encoder bar open the screen encoder was not accessible. This bug is fixed. The screen encoders are available when the layout encoder bar or the 3D encoder bar active. | | The Pos X, Pos Y, Width, and Height encoder were not available for layout elements that had something else than a fixture assigned and when the Arrangement was set to Camera. This bug is fixed. The position and size of layout elements can be changed even if the Arrangement mode is set to Camera. | | When a preset or cue was updated and the update menu stayed open, the settings of the update menu were reset to their defaults. This bug is fixed. The settings of the update menu are kept as long as the update menu is open. They are reset when closing and opening the update menu. | | The order of the tabs in the Object section of the assign menu was different between the different supported operating systems, and the order could change with every start of the grandMA3 software. This bug is fixed. The tabs in the Object section of the assign menu have a fixed order. | | The fixture sheet displayed parked fixtures when enabling Prog Only. This bug is fixed. Prog Only enabled in the fixture sheet displays only attributes and fixtures that are in the programmer. | | The entered show file name was reset to the current show file name when changing the drive in the Save As dialog of the backup menu. This bug is fixed. The desired show file name is not discarded when changing the selected drive in the backup menu. | | The plugin editor was not readable when using the daylight color theme. This bug is fixed. The plugin editor is useable, also when using the daylight color theme. | | The content sheet displayed tracked values in cyan color when a different user profile than the default one was used. This bug is fixed. The content sheet displays the correct tracking colors no matter which user profile is used. | | Tapping fixtures several times in the Content Sheet, DMX Sheet, or Layout View toggles the fixtures in the programmer. This bug is fixed. It is not possible to toggle fixtures by tapping them several times in the Content Sheet, DMX Sheet or Layout View. | | When hovering the buttons of the timecode editor or the timecode encoder bar, icons on these buttons changes their color to white. This bug is fixed. Hovering buttons in the timecode editor or the timecode encoder bar does not change the color of icons anymore in order to identify their states all the time correctly. | | When starting to slide in the + or - area of an MAtricks slider, and releasing the finger within the same area, the displayed value was not applied. This bug is fixed. Sliding and releasing in the MAtricks sliders applies the displayed values. | | The text alignment of some cells was unfortunate for a good readability. This bug is fixed. The Command Cells in Sequence Sheet, Macro editor, and Agenda, the cells Fixture Type, Mode, Layer, and Class in the Patch menus are displaying their values aligned to the left. | | Toggling the criterions in the recipe editor, or attributes in the filter editor toggled other elements in the editors when using Apple Silicon hardware. This bug is fixed. Clicking on toggle buttons when using Apple Silicon hardware toggles the clicked button. | | When having the layout editor open and then editing a different layout, the layout editor still displayed the content of the formerly edited layout. This bug is fixed. Layout and macro editor display the correct content when editing elements, also when changing to a different object and keeping the editor open. | | The fixture sheet changed the font color of attributes to yellow (playback from a different user), also when the values were still coming from the selected sequence. This bug is fixed. Font colors of attributes indicates always if the values are coming from the selected sequence (green, cyan, white, or purple) or if they are coming from a non-selected sequence (yellow) no matter which user plays back the sequence. | | The sequence sheet in track sheet mode displayed the wrong cue part ID, when the cue was collapsed while the value was not stored in part 0. This bug is fixed. The attribute cells in the sequence sheet display the correct cue part ID when the cue is collapsed. | | The faders in the color picker could go crazy when having two or more color picker windows open at the same time. This bug is fixed. Having two or more color picker windows open at the same time does not let the faders in the color picker jump around. | | The unpatched section in the Split By view of the patch menu hides fixtures that had not all of their DMX breaks patched. This bug is fixed. Unpatched are all fixtures that have not all of their DMX breaks patched. | *** ## []()Appendix [Section titled “Appendix”](#appendix) * It is recommended to use a dedicated and a separate physical network for each grandMA3 session. * When using DMX protocols it is recommended to use a dedicated physical network for each protocol. * The recommended workflow for executor configurations that are different compared with the default executor configuration is to create a new executor configuration, do the changes in the new configuration and save the changes. * XML files with exported executor configurations from grandMA3 v1.2 and prior cannot be properly imported to grandMA3 v1.3 or later due to structural changes. * XML files with exported analog remote setups from grandMA3 v1.3 and prior cannot be properly imported to grandMA3 v1.4 or later due to structural changes. * XML files with exported timecode shows from grandMA3 v1.3 and prior cannot be properly imported to grandMA3 v1.4 or later due to structural changes. *** ## []()Known Limitations [Section titled “Known Limitations”](#known-limitations) Software update via network to onPC stations requires confirmation during the install process at the destination system. Deleting a preset that is referenced by a cue the reference cannot be restored when oopsing the deletion. When multiple GlobalMasters exist on the network, each having the same session and location name, the station with the higher priority takes over automatically. If all stations have the same priority, the station with the longest Online Time becomes the GlobalMaster for all stations. Recast will only recast presets to cues if there is a preset link in the absolute layer. Deleting, changing, moving, or exchanging objects while a Global Preset Update is processing is not yet fully supported for the following object types:\ -Data Pools\ -Presets (Selective, Global, and Universal)\ -Sequences\ -Cues, Cue Parts\ -Recipes\ The red indicator in the MA logo of the command line appears when a Global Preset Update is currently processing! The time needed for the process depends on the size of the show file and the number of references between objects. Loading show files that were saved in previous versions deletes the programmer content.
# Release Notes 1.9
> Do you need help getting started in grandMA3? Perfect - here we describe a few quick steps to get you rolling. The manual will explain functionality in detail w
* [Get Started](/grandma3/2-3/key_rn_v1_9/#h2__1435677565) * [Bugfix Version 1.9.7.0](/grandma3/2-3/key_rn_v1_9/#h2__344179064) * [Other Enhancements](/grandma3/2-3/key_rn_v1_9/#h2_1198082799) * [Changes](/grandma3/2-3/key_rn_v1_9/#h2__656690415) * [Bug Fixes](/grandma3/2-3/key_rn_v1_9/#h2__146634055) * [Bugfix Version 1.9.3.3](/grandma3/2-3/key_rn_v1_9/#h2__1345613001) * [Bugfix Version 1.9.3.1](/grandma3/2-3/key_rn_v1_9/#h2_1786554881) * [Other Enhancements](/grandma3/2-3/key_rn_v1_9/#h2_400753621) * [Changes](/grandma3/2-3/key_rn_v1_9/#h2_332896111) * [Bug Fixes](/grandma3/2-3/key_rn_v1_9/#h2__1824648617) * [Release Version 1.9.2.2](/grandma3/2-3/key_rn_v1_9/#h2__1841879015) * [Features](/grandma3/2-3/key_rn_v1_9/#h2_727740091) * [Windows](/grandma3/2-3/key_rn_v1_9/#h3__1683156125) * [Quickeys](/grandma3/2-3/key_rn_v1_9/#h3_268725800) * [Notes](/grandma3/2-3/key_rn_v1_9/#h3_1601836855) * [Timers](/grandma3/2-3/key_rn_v1_9/#h3_412597360) * [Layouts](/grandma3/2-3/key_rn_v1_9/#h3__188810639) * [Graphics](/grandma3/2-3/key_rn_v1_9/#h3_1921435161) * [Phasers](/grandma3/2-3/key_rn_v1_9/#h3_1777432350) * [Filters](/grandma3/2-3/key_rn_v1_9/#h3_271449867) * [Backup Menu](/grandma3/2-3/key_rn_v1_9/#h3_1498318733) * [Title Bar Buttons](/grandma3/2-3/key_rn_v1_9/#h3__1221436992) * [Patch](/grandma3/2-3/key_rn_v1_9/#h3__1205445558) * [Encoder Bar](/grandma3/2-3/key_rn_v1_9/#h3_2107302277) * [Tracking](/grandma3/2-3/key_rn_v1_9/#h3_1174079095) * [XYZ](/grandma3/2-3/key_rn_v1_9/#h3__1797581261) * [3D](/grandma3/2-3/key_rn_v1_9/#h3_1895667430) * [Other Enhancements](/grandma3/2-3/key_rn_v1_9/#h2_827051770) * [Changes](/grandma3/2-3/key_rn_v1_9/#h2__242929343) * [Bug Fixes](/grandma3/2-3/key_rn_v1_9/#h2__628412833) * [Appendix](/grandma3/2-3/key_rn_v1_9/#h2__1835053169) * [Known Limitations](/grandma3/2-3/key_rn_v1_9/#h2__1852571500) *** ## []()Get Started [Section titled “Get Started ”](#get-started) Do you need help getting started in grandMA3? Perfect - here we describe a few quick steps to get you rolling. The manual will explain functionality in detail while the MA e-Learning within the MA University offers you all kinds of training. All information can be accessed through the MA Lighting website [www.malighting.com](http://www.malighting.com). Let’s go! To leave the Release Notes, tap I agree on the top right corner. The main screen of grandMA3 software opens. On the right side, you can see predefined views on view buttons. To switch between the views, tap the view buttons. If this is your first time starting grandMA3 software, patch some fixtures first. Or you can load one of the demo shows delivered with the software. Either way, press Menu. If you use grandMA3 onPC software, there is a  symbol in the top left corner there. Clicking the  symbol is the same as pressing Menu on a console. Tap Backup and then Load, now you are ready to load shows. You would like to get right on it? Switch Shows to Demo Shows in the title bar first. To do so, tap Shows repeatedly until it says Demo Shows. Once Demo Shows is displayed, it is possible to select any of them. After you selected a demo show, tap Load.\ In case a show was already loaded, a pop-up will appear asking if you want to save the current show first before loading the new one. It’s up to you! Here we go! Now you are ready to work with the grandMA3 software. It is as easy as that! Again - there are view buttons there, which change the screen content. At the bottom, you will find the encoder bar and the command line. Technically that is all you need to get started. For more information, see the grandMA3 help menu. To access the help in the console or the onPC, tap the view buttons named Help or visit the MA Lighting website. If you want to learn the grandMA3 software step by step, please join the MA e-Learning - it’s free of charge and available on the MA Lighting website. Have fun with using our grandMA3 software - Find all the improvements and changes of this software version further down. **Hint:**\ The grandMA3 software will start using the show file (or status) that was in operation before the software was shut down. *** ## []()Bugfix Version 1.9.7.0 [Section titled “Bugfix Version 1.9.7.0”](#bugfix-version1970) ## []()Other Enhancements [Section titled “Other Enhancements”](#other-enhancements)  The Command Line History window displays a command line input when Show Command Line is enabled.  Updated the MA Startshow and the grandMA3 Demoshow.\ Added new symbols to the Symbols library.  In the Network menu, your station name, type, IP, and version are shown in green for easier identification.  Improved MIB: * MIB also works with multi-instance fixtures that have a dimmer in the main fixture and have a dimmer in their subfixtures. * Attributes will be MIB’ed if they run a relative phaser as soon as the dimmer opens. * MIB works in cues that have several cue parts where the dimmer is stored in a later cue part than the attributes that should be MIB’ed.  Improved Total reference update and Ownership: * A Total Reference Update progress bar appeared when you created a new object in a pool while another object of the same pool was owned by another station. * When multiple users work in same data pool, the ownership functionality allows the user to create new objects, move, copy, delete, or oops already created objects within the same pool. * The ListOwnership command now displays detailed information about the children of an object ownership. * The lock symbol uses two colors to indicate the state of the ownership: * Yellow: Indirect ownership. For example, when a user edits a macro line the macro itself is indirectly owned. * Red: Direct ownership. This object is being edited directly by a different user.  The Software Update menu now includes a Trademarks tab. It lists all trademarks of the grandMA3 software. *** ## []()Changes [Section titled “Changes”](#changes) * The default mesh of a pigtail has changed. The pigtail of a fixture is now visualized as a cyan cube. The visualization of pigtails can be disabled in the window settings of the 3D viewer. Find the property “Show Pigtails” in the “Misc”-tab. Default: enabled. * Discard Update and Cancel Shutdown in the shutdown pop-up changed to Discard Update and Shutdown after receiving a software update. * If an absolute and a relative preset, both containing MAtricks, are used together, the MAtricks in the absolute preset will be used as their foundation. Any MAtricks setting that is missing in the absolute preset but which exists in the relative preset will be completed by the setting of the relative preset. * Trailing empty steps in the programmer that do not contain absolute or relative values are not output on the stage and also no longer stored or updated in cues. * Trailing empty steps can be stored in presets as template presets, however trailing empty steps will not be output on stage if selective presets are running in playback mode. * The focus in the clone pop-up is set to Low Priority. * The default link timing settings are changed to single and active only is disabled. *** ## []()Bug Fixes [Section titled “Bug Fixes”](#bug-fixes) ### 3D [Section titled “3D”](#3d) | Description | | -------------------------------------------------------------------------------------------------------------------------------------------------------------------------------------------------------------------------------------------------------------------------------------------------------------------------------------------- | | The attribute Gobo\*PosShake was not visualized. This bug is fixed. | | The 3D Positions area in the Patch menu did not display the purple preview boxes for fixtures when using the Arrangement mode in the encoder bar. This bug is fixed | | Gobo Rotation (Gobo\*PosRotate) was not visualized correctly in both directions in onPC running on Apple with M1 chip. This bug is fixed. | | There would be a position offset between the origin of the beam and the lens if the property “Multi Led Beam Mode” of a Render Quality was set to “Single Beam Mean Color” or “Single Beam Dynamic Gobo” in some cases. This bug is fixed. The origin of the beam does not move any longer when moving the head of a fixture using the tilt. | | If grandMA3 onPC Windows ran on stations equipped with Radeon RX- 5000 / 6000 graphics card series, the beams would not be properly displayed in 3D. This bug is fixed. | ### Command Line and Macro [Section titled “Command Line and Macro”](#command-line-and-macro) | Description | | ------------------------------------------------------------------------------------------------------------------------------------------------------------------------------------------------------------------------------------------------------------------------------------------------------------------------------------- | | Tapping several objects in a data pool that was not selected, for example for a command, created a wrong command. This bug is fixed. | | The software would crash If you sorted using the Appearance column in the layout editor. This bug is fixed. | | If you started a new show and Clear Output Stations was enabled, there would be no DMX output as the Connector Configuration would be completely cleared. This bug is fixed. Enabling Clear Output Stations when starting a new show deletes all entries in the Connector Configuration and creates a new entry for the own station. | | Knockout did not respect the defined layer. | | At Default did not respect the color readout of the user profile. This bug is fixed. When the encoder bar is set to CMY instead of RGB, At Default will set the values inverted to the RGB default values. | | The software would crash if the fader of an empty executor was moved via command line. This bug is fixed. | | It was possible to delete your own station from the Connector Configuration menu. This bug is fixed. | | Keyboard shortcuts did not trigger Macros assigned to Xkeys. This bug is fixed. | | When several commands were separated using semicolons within one command cell, for example in a macro, some of the commands would not be executed if there was a semicolon followed by a space. This bug is fixed. | | Creating a recipe would cook global data instead of selective data of the preset that was used. This bug is fixed. | | The software did not complete the required Total Reference Update process when oopsing the edit of a preset. This bug is fixed. | | Excluding fixtures recursively in a recursive fixture selection, for example, Fixture 1 Thru 3. - Fixture 2. did not work. This bug is fixed. | | In Timers, the stopwatch assigned to an executor could show the wrong time. This bug is fixed. | | When a session with a time code generator was disconnected and reconnected, the connected station’s timecode clock did not continue. This bug is fixed. | | On grandMA3 onPC for macOS the command key for selecting multiple items in a list did not work. This bug is fixed. | | If a group was labeled with shortcuts enabled, some key commands could accidentally end up in the programmer. This bug is fixed. | | Speed Masters did not offer the following button functions when assigned to an executor: Black, Flash, On, Off, and Toggle. This bug is fixed. | | If you imported a fixture in grandMA3 that on the other hand was exported in grandMA2, the system monitor would display a mismatch in the dependency count. This bug is fixed. | | If a new show was created and all checkboxes were checked, the EULA license would be displayed again. This bug is fixed. | | Calling a macro, executing the Load command and Goto did not work as expected in agenda. This bug is fixed. | | Off on Overridden would not work properly in combination if the program time was enabled. This bug is fixed. | | Using the encoders in the tab Data Edit of the Sequence Sheet Encoder bar the software could crash. This bug is fixed. | | Output configurations stored in 1.9.2.2 could not be loaded in 1.9.3.3. This bug is fixed. | | When selectively storing fixtures in presets and the setting Grid Merge Mode was set to **Append X**, the grid positions were not stored correctly in the preset. This bug is fixed. | | Using only the absolute values of a preset that contains absolute and relative values, could add the relative values of the preset to the cue. This bug is fixed. | ### Connections [Section titled “Connections”](#connections) | Description | | ------------------------------------------------------------------------------------------------------------------------------------------------------------------------------------------------------------------------------------------------------------------- | | In MIDI Remotes, a ControlChange value of 0 did not trigger the event that was assigned to it. This bug is fixed. | | If the time was updated before a complete midi Timestamp, the timecode would jump on minute changes. | | When switching between NDI sources, the system monitor displayed error messages. This bug is fixed. | | When booting a console without a network cable connected, it could happen that not all modules were connecting properly. This bug is fixed. The boot process has been improved so that modules connect more reliably. | | When loading a show file and enabling the Output Stations checkbox, the Connector Configuration menu could be missing an entry for your own station. This bug is fixed. When loading a show file, your own station will always be added to Connector Configuration. | ### Patch [Section titled “Patch”](#patch) | Description | | --------------------------------------------------------------------------------------------------------------------------------------------------------------------------------- | | Fixture types with a complex geometrical structure would not display lens geometries in some cases if several DMX modes referenced the same geometrical chain. This bug is fixed. | | Set fixture types were exported to MVR using wrong dimensions from the internal fixture library. This bug is fixed. | | The software would crash if you changed the DMX Curve of a realtime channel to a DMX Curve that did not exist using the command line. This bug is fixed. | | The software could crash when leaving the patch after deleting all unused fixture types. This bug is fixed. | ### Phaser [Section titled “Phaser”](#phaser) | Description | | --------------------------------------------------------------------------------------------------------------------------------------------------------------------------------------------------------------------------------------------------------------------------------------------------------------------------------------------------------------------------------------------------------------------------------------------------------------------------------------------------------------------------------------------------------------------------------------------------------------------------------------------------------------------------------------------------------------------------------------------------------------------------------------------------------------------------------------------------------- | | Phasers would stop working if fixtures and fixture types were deleted in the patch. This bug is fixed. | | The software would crash if MAtricks were changed several times and fixtures were deselected in the phaser editor. This bug is fixed. | | Step keyword followed by a non-preset object created an empty step. This bug is fixed. | | It was possible to create multiple phaser steps without a selection or a value change. This bug is fixed | | When double-tapping a phaser preset with the MAtricks Transform setting set to Mirror, the mirroring of the values in the programmer got lost. This bug is fixed. | | When storing a mirrored phaser into a cue and the MAtricks Transform was not in the preset but directly in the programmer, the resulting values in the cue were stored with a reference to the used phaser preset. This bug is fixed. When storing a mirrored phaser into a cue, the values in the cue will be stored without a preset reference, as long as the MAtricks Transform setting is not part of the used phaser preset. In this version, when loading show files from v1.9.3.3 or prior, the preset references in such cue parts are automatically removed. Side Note: As part of the bug, changing anything in the patch, updating a preset, or loading a show file from a prior version, would not mirror the values in the cues. This only applied when the MAtricks Transform setting itself was not stored directly in the phaser preset. | ### Playback [Section titled “Playback”](#playback) | Description | | ------------------------------------------------------------------------------------------------------------------------------------------------------------------------------------------------------------------------------------------------------------------------------------------------------------ | | Updating a step of a phaser preset that was played back by a sequence at the same time did not update the values of the step in the sequence. This bug is fixed. | | Pressing and releasing temp or flash buttons of executors started the sequence, but did not switch it off again on release. This bug is fixed. | | If an absolute and a relative preset were used in the same attribute, they could not be output using the programmer. This bug is fixed. | | A user with playback rights could not clear the programmer. This bug is fixed. | | It could happen that sequences kept running when switching them off after doing changes in the patch. This bug is fixed. | | Running very fast phasers made values of steps sometimes to interfere with DMX calculation rate of the grandMA3 software. Hence, some steps could not appear on the output. This issue has been improved. When running very fast phasers, the software makes sure to output at least one DMX frame per step. | ### Windows [Section titled “Windows”](#windows) | Description | | | ----------------------------------------------------------------------------------------------------------------------------------------------------------------- | - | | The Sequence Sheet in Track Sheet mode displayed wrong feature graphics for phaser steps. This bug is fixed. | | | The screen encoder would flicker in the UI if you scrolled in the command line history overlay. This bug is fixed. | | | Numbers could flash briefly in the title bar of the Clock Viewer when two Clock Viewer windows were open at the same time. This bug is fixed. | | | If you moved your onPC window across different screens, a black gap would show in the title bar. This bug is fixed. | | | If the sequence was set to Notes and Commands only, it would not work in combination with Auto Scroll. This bug is fixed. | | | If a show was saved onto a USB flash drive using different file names many times, the console´s memory information was displayed incorrectly. This bug is fixed. | | | The sequence sheet, set to track sheet did not show the correct color graphics for all steps of phasers. This bug is fixed. | | | The heading of the note area in the sequence sheet did not display cue point numbers correctly. This bug is fixed. | | *** ## []()Bugfix Version 1.9.3.3 [Section titled “Bugfix Version 1.9.3.3”](#bugfix-version-1933) ## Bug Fixes [Section titled “Bug Fixes”](#bug-fixes-1) ### Command Line and Macro [Section titled “Command Line and Macro”](#command-line-and-macro-1) | Description | | ---------------------------------------------------------------------------------------------------------------------------------------------------------------------------------------------------------------------------------------------------------------------------------------------------------------- | | When executing ReloadUI via the Lua Cmd() function, the software crashed. This bug is fixed. Executing Cmd(‘ReloadUI’) in Lua returns an error and does not execute it. When you have to execute ReloadUI via a Lua function, use the CmdIndirect() function instead. For example Lua “CmdIndirect(‘ReloadUI’)”. | ### Playback [Section titled “Playback”](#playback-1) | Description | | ------------------------------------------------------------------------------------------------------------------------------------------------------------------------------------------------------------------------------------------------------------------------------------------------------------------ | | When storing non-cooked values to a preset or to a cue part that contains a recipe all values were marked as non-cooked. Therefore, when changing the recipe later, the values in the object were not updated. This bug is fixed. | | When playing back sequences while they will be changed in the background, for example by changing recipes, they could end up in a state where they could not be started again. This bug is fixed. | | When a playback is running a multi-step value, calling a single-step preset for that value into the programmer showed all steps from the playback. This bug is fixed. Calling a preset with a single-step value for an already running multi-step value will show only one step in the programmer for that value. | ### Windows [Section titled “Windows”](#windows-1) | Description | | --------------------------------------------------------------------------------------------------------------------------- | | When loading a show file, empty view buttons could have the labels of the views of the former show file. This bug is fixed. | *** ## []()Bugfix Version 1.9.3.1 [Section titled “Bugfix Version 1.9.3.1”](#bugfix-version-1931) ## []()Other Enhancements [Section titled “Other Enhancements”](#other-enhancements-1)  Improved the Content Sheet in Manual Mode and the Load/Goto pop-ups: Cues and cue parts cannot be expanded anymore to display the recipes of the cue.  Improved the Compare Color Theme tool: The label of the Export button and the title of the Export pop-up have been changed to better indicate which color theme to export.  Improved the information when saving a show file and the disk space is full: * The Backup menu displays the disk space usage of the selected drive with different pulsating font colors. To learn more, read [Show File Handling](/grandma3/2-3/show_file_management/). * When booting the console, if the hard disk has less than 15 GB of free space, a pop-up will warn the user. To learn more, read [Show File Handling](/grandma3/2-3/show_file_management/). * When trying to save a show file and one of the drives used is full, the full disk warning pop-up informs the user on which drives the show file was saved and on which drives it could not be saved. To learn more, read [Save a Show File](/grandma3/2-3/sfh_save/). *** ## []()Changes [Section titled “Changes”](#changes-1) * When executing Kill for a sequence that is already running, Go+ is internally executed instead of On. *** ## []()Bug Fixes [Section titled “Bug Fixes”](#bug-fixes-2) ### 3D [Section titled “3D”](#3d-1) | Description | | ------------------------------------------------------------------------------------------------------------------------------------------------------------------------------------------- | | The software could crash when fixtures were selected but not visible within the selected camera and the Selection to Selection Grid functionality was used. This bug is fixed. | | The Focus tool button was displayed on the tool bar in the same place as the Select tool. This bug is fixed. When the 3D is in Setup mode, the Focus tool is provided as a separate button. | | Making an additional lasso selection in the 3D after changing values in the programmer cleared the previous fixture selection. This bug is fixed. | ### Command Line and Macro [Section titled “Command Line and Macro”](#command-line-and-macro-2) | Description | | --------------------------------------------------------------------------------------------------------------------------------------------------------------------------------------------------------------------------------------------------------------------------------------------------------------------------------------------------------------------------------- | | Cloning to the correct subfixtures did not occur when cloning from one multi-instance fixture to another fixture of the same fixture type. This bug is fixed. | | When switching from one fixture to another, as well as when switching from the inner encoder to the out encoder or vice versa, the attribute could change its value from its default value. This bug is fixed. Changing fixtures, as well as switching from the inner encoder to the outer encoder or vice versa will cause the attribute value to change from its current value. | | The attribute encoders had a grayed-out value area when the patch contained fixtures without an ID. This bug is fixed. | | When copying a cue and the source cue had a recipe with a phaser additional cue parts were created on the destination cue. This bug is fixed. Copying cues with recipes no longer creates additional cue parts on the destination cue. | | When stomping fixtures, non-multi-step values on layers would be knocked in as hard values, even if a preset was set on that layer. This bug is fixed. Stomping now knocks in non-multi-step values on layers and respects the preset reference. Furthermore, non-multi-step values are knocked in as deactivated values, when they are not already active in the programmer. | | When deleting a recipe from a cue, the cue was not cooked automatically. This bug is fixed. Cues are automatically cooked when a recipe is deleted from the cue, so the cooked values will disappear from the cue. | | When editing a command field, where both types of quotation were used together, the last quote was deleted. This bug is fixed. | | Adding multiple executors by pressing them into separate commands within one command cell added a **+** before the second executor. This bug is fixed. Pressing, for example, Off Executor 201 ; Go+ Executor 202 results now correctly in the command Off Page 1.201; Go+ Page 1.202. | | Setting fixtures to their default values by executing At Default could crash the software. This bug is fixed. | | Pressing + + or - - always changed the dimmer value in steps of 10 values according to the current readout. This bug is fixed. + + and - - always changes the dimmer value in steps of 10%. | | Disabled attributes in the At Filter were ignored by the Phaser Editor. This bug is fixed. | | When having a color phaser active in the programmer and then using the color picker to change the color in step 1 cleared all other steps from the programmer. This bug is fixed. | | MArkers did not take the size of their assigned movement space into account but used the physical values of the XYZ attributes. This bug is fixed. | | Setting the appearance of a layout element to none, the former appearance was still displayed. This bug is fixed. | | When importing timecode shows, the start time of time ranges was not imported correctly if it was originally greater than one minute. This bug is fixed. | | The content of the assigned scribble was also deleted when the name of an object was deleted. This bug is also fixed. | | It was not possible to Oops the locking of some objects, for example, Cameras, Timers, ViewButtons, or Worlds. This bug is fixed. | | Copying and pasting a range of fixtures in the programmer would cause all fixtures to take the values of the first fixture in the list of source fixtures. This bug is fixed. | | If a plugin opened a pop-up that should be able to scroll, but had no target to scroll, the software could crash. This bug is fixed. | | When copying and pasting information in the programmer, the pasted values were not output for the target fixtures until the user deactivated the values. This bug is fixed. | | It could happen that the old values remained as values of another user’s programmer when clearing the programmer. This bug is fixed. | | It was possible to corrupt world 1. This bug is fixed. | | When editing the time of timecode events by using the calculator of the time encoder, relative changes were not applied correctly. This bug is fixed. The time calculator of the timecode encoder bar adjusts the time of events correctly, for example:\* + 2: Adds 2 seconds to all selected events. | * 2: Moves the first selected event to 2 seconds, moves all other selected events, and maintains the spacing between all events. | | When editing values of attributes using the Content Sheet, only the values visible in the Content Sheet were transferred over into the cue. This bug is fixed. | ### Connections [Section titled “Connections”](#connections-1) | Description | | ---------------------------------------------------------------------------------------------------------------------------------- | | grandMA3 onPC could not start, when a USB device was connected that returned a length of 0 for its description. This bug is fixed. | ### Patch [Section titled “Patch”](#patch-1) | Description | | ------------------------------------------------------------------------------------------------------------------------------------------------------------------------------------------------------------------------ | | Filters were reset to all attributes when attributes were added to the show or moved within the show. This bug is fixed. Changes to the attribute structure in the show do not enable all attributes in filters anymore. | ### Phaser [Section titled “Phaser”](#phaser-1) | Description | | ------------------------------------------------------------------------------------------------------------------------------------------------------ | | If very high values on the Speed layer were combined with very low values on the Width or Measure layers, the software could crash. This bug is fixed. | | Speed 1 was used on the Speed Master layer when importing Phaser presets from XML files created prior to v1.9. | ### Playback [Section titled “Playback”](#playback-2) | Description | | ---------------------------------------------------------------------------------------------------------------------------------------------------------------------------------- | | It could happen that the content of newly triggered cues was not played back. This bug is fixed. | | When switching off sequences, it could happen that the output of the sequence was still kept. This bug is fixed. | | Tracked attributes snapped to their values instead of using the cue timing when executing Goto or Go- on a sequence. This bug is fixed. | | OffWhenOverridden switched off playbacks when another playback for only a subset of fixtures was started, and all fixtures had active values in the programmer. This bug is fixed. | | When a cue was triggered while the previous cue was still in transition, the cue out timings were ignored. This bug is fixed. | | When changing the MAtricks of a preset, the new values did not respect the Transform setting, resulting in incorrect output. This bug is fixed. | | When switching off a preset with MAtricks Transform set to Mirror, the software could crash. This bug is fixed. | ### Windows [Section titled “Windows”](#windows-2) | Description | | ---------------------------------------------------------------------------------------------------------------------------------------------------------------------------------------------------------------------------------------------------------------------------------------------------------------- | | The Sequence Sheet could display the wrong order of tracked data within cue parts of the same cue. This bug is fixed. | | The Break cell in the Sequence Sheet displayed the Feature Group Indicator Bar when a world was set as a break that contained all attributes. This bug is fixed. When a world is set for break, the Sequence Sheet displays the Feature Group Indicator Bar only when the world does not contain all attributes. | | It was possible to select several entries in the Select and Import Update Files dialog of the Software Update menu. This bug is fixed. | | Editing symbols in the Symbols pool did not display a preview of the symbol before importing it. This bug is fixed. | | The Select Step encoder in the 2D Phaser Bar did not display the correct information when a step other than step 1 was selected. This bug is fixed. | | Tapping Save in the Save changes? pop-up after editing a note did not save changes. This bug is fixed. | | When typing into the note area in the label dialog, the input was only visible on the screen where the label dialog had the focus. This bug is fixed. The text input in the note area of the label dialog is now visible on all screens. | | Changing the note of a cue by using the Label dialog did not immediately display the new text in the Info window. This bug is fixed. | | The notes of automatically triggered cues were not displayed in the Info window, for example, Follow or Time triggered cues. This bug is fixed. | | The Timecode Viewer did not always display all tool bar buttons. This bug is fixed. | | The user interface could not display its contents if a drive other than drive 1 was selected while ReloadUI was executed or a station joined the session. This bug is fixed. | | When zooming into the timecode viewer or editor, events were always displayed. This bug is fixed. | | The content sheet could display wrong values. This bug is fixed. | | It was not possible to change the mode of windows if the window itself was very small, for example, the Color Picker or the Phaser Editor. This bug is fixed. | *** ## []()Release Version 1.9.2.2 [Section titled “Release Version 1.9.2.2”](#release-version-1922) ## []()Features [Section titled “Features ”](#features) The latest release of grandMA3 version 1.9.2.2 rolls out several enhancements that enrich your lighting experience. Besides numerous improvements based on your highly appreciated feedback, many new and clever features have found their way into the software. Read on for a quick introduction and find links for more information. *** ### []()Windows [Section titled “Windows”](#windows-3)  Improved in this release All windows have icons. The icons are displayed in the Add Window dialog and in the title bar or pool title object of each window. In addition, the Add Window dialog got rearranged. It has these tabs available: * Common: A fixed selection of commonly used windows. All these windows are also available in one of the other tabs. * Data Pools: All object pools that are part of a data pool for example Sequences, MAtricks, Groups, and more. * Presets: All preset pools. * Pools: All pools that are part of the show data or the user profiles. For example, Appearances, Users, Cameras, and more. * Tools: General windows for displaying show data. For example, 3D Viewer, Agenda Viewer, Timecode Viewer, and more. * More: All different bars, playback windows, or info and system related windows. For example, Align Bar, Playback Window, System Monitor, and more. * All: Lists all windows with the ability to search and filter. In most tabs the windows are grouped in categories. These categories are displayed when opening the Add Window dialog on a big screen. They are hidden when opening the Add Window dialog on the small screens (screens 6 and 7 of grandMA3 light and full-size). The Common tab is sorted by importance. The other tabs are sorted by type and within a type in alphabetical order.\ The buttons in the Preset tab display their corresponding feature group number in the top left corner of the button. Use the number address presets via command line.\ For more information, see [Preset keyword](/grandma3/2-3/keyword_preset/). Furthermore, some windows were renamed in order to provide consistent and comprehensive names. For more information, see [Add window](/grandma3/2-3/wvm_add_window/). *** ### []()Quickeys [Section titled “Quickeys”](#quickeys)  New in this release Quickeys are pool objects that can have keys or functions assigned. Quickeys are stored in the Quickey pool window. Assign Quickeys to executors, Xkeys, or layouts. Or use them directly in the Quickeys pool.\ Quickeys that are latched, for example with the Quickeys that represent the MA keys, display the latch in a yellow font color. To latch a Quickey, tap and hold the Quickey, move the finger outside the pool object, and then release the finger. **Important:**\ The CLI (Command Line Interaction) is for Quickeys always disabled. The pool objects cannot interact with the command line, for example, Edit + tapping a Quickey cannot open the Quickey editor. To edit a Quickey execute the Edit command directly from the command line, for example, Edit Quickey 1. To enable CLI for the Quickey globally, tap CLI in the Quickey Pool Settings window of any Quickey Pool window. New Quickey keyword. For more information about Quickeys, see the following help topics: * [What are Quickeys?](/grandma3/2-3/quickeys/) * [Quickey Editor](/grandma3/2-3/quickeys_editor/) * [Use Quickey Pool Objects](/grandma3/2-3/quickeys_pool_objects/) * [Quickeys - Example](/grandma3/2-3/quickeys_example/) * [Quickey keyword](/grandma3/2-3/keyword_quickey/) *** ### []()Notes [Section titled “Notes”](#notes)  New in this release Notes allow adding information to objects, for example, cues, presets, groups, macros, and macro lines. In cues, for example, they can tell the operator about important actions on stage in order to trigger the next cue.\ Each object that has notes available, has a Note button in its editor, or have a Note cell (for example, cues in the sequence sheet). For more information about notes, see the following help topics: * [Notes](/grandma3/2-3/notes/) * [Note keyword](/grandma3/2-3/keyword_note/) * [Info window](/grandma3/2-3/si_info_window/) * [ListReference keyword](/grandma3/2-3/keyword_listreference/) * [Timecode settings](/grandma3/2-3/timecode_settings/) * [Assign key](/grandma3/2-3/key_assign/) * [Keys](/grandma3/2-3/keys/) To display the notes of all cues at once, the sequence sheet can be masked accordingly: the Mask tab in the Sequence Sheet Settings has a Note available. Enabling only the Note mask and disabling all other masks display only the notes. It is also possible to combine the different masks with the Note mask. The setting Line Height allows to define the height of a line in the sequence sheet. In case of having notes with multiple lines, Line Height can be changed in order to see the full note. The value **Auto** dynamically changes the height of each row to display the full note. To enter a new line in a note when using the command line, type the escape character \n in the command line.\ To enter the note\ *This note\ uses two lines.*\ via command line to group 2, type: User name\[Fixture]> Note Group 2 “This note\nuses two lines.” The label dialog displays also the notes area always. *** ### []()Timers [Section titled “Timers”](#timers)  New in this release The Timer pool object allows to be configured as a stopwatch or as a countdown. For example, to stop times during rehearsals in order to set up a fade time that matches the movements on stage. Or to countdown a time in order to inform the operator when they should pay attention to the actions on stage in order to trigger the next cue on time. For more information, see the following help topics: * [Timers](/grandma3/2-3/keyword_timer/) * [Timers - Stopwatch](/grandma3/2-3/timers_stopwatch/) * [Timers - Countdown](/grandma3/2-3/timers_countdown/) * [Timer keyword](/grandma3/2-3/keyword_timer/) * [RunningTimer keyword](/grandma3/2-3/keyword_runningtimer/) * [MyRunningTimer keyword](/grandma3/2-3/keyword_myrunningtimer/) * [Running playbacks](/grandma3/2-3/executor_running_playbacks/) * [User settings](/grandma3/2-3/user_settings/) * [Clock window](/grandma3/2-3/si_clock/) When a Countdown Timer is displayed in the clock window, a descending progress bar at the bottom of the window indicates also the remaining time.\ Expired countdown timers display the time in green color in the Clock Viewer window. The Off Menu and the Running Playbacks window display the running timers. Therefore, tap Sequences repeatedly until it is set to Timers.\ The keywords **RunningTimer** and **MyRunningTimer** addressing running timers from all users, or only timers started from the own user profile. Timers can also be assigned to executors and be operated from the executors.\ With adding an executor configuration for timers, the existing executor configurations are retained. All executor configurations from pool object ID 15 upwards until the next empty pool object are shifted in the pool. This takes place when migrating show files from older grandMA3 versions up to v1.9.\ When loading a show, a timer that was running while the show file was saved is loaded in paused state. *** ### []()Layouts [Section titled “Layouts”](#layouts)  Improved in this release * New value for appearances of a layout element: \ allows to use the appearance of the assigned object. * New properties Font Size and Text Size for layout elements. * New element property Full Resolution. * New layout property Markers and Value Colors. * Text on layout elements that is too long to display is cut off in a way so that the user does not see half-cut lines. This applies to labels of pool objects as well. * Setting layout elements to a dedicated font size will always display the text in the set size, no matter the zoom value of the layout. * The title bar in a Layout Viewer shows the data pool of the displayed layout. This information is only displayed if the layout is not part of the selected data pool. **Hint:**\ To see the same colors for values in a layout element as in the fixture sheet, assign a fixture with a dimmer in the layout element. The visibility for the value has to be enabled for the layout element, too. For more information, see the following help topics: * [Edit layout elements](/grandma3/2-3/layout_elements_edit/) * [Edit layout](/grandma3/2-3/layout_edit/) * [Create a layout](/grandma3/2-3/layout_create/) *** ### []()Graphics [Section titled “Graphics”](#graphics)  New in this release Feature Graphic\*\* \*\*is a setting in the Fixture Sheet, Sequence Sheet, and the Content Sheet. The attributes of the features Dimmer, Position, Gobo, and Color can have a small symbol displaying a graphic representation of the attribute values. These symbols can be shown or hidden by enabling or disabling the setting Feature Graphics in the context menu of these windows. For instance, the dimmer value is represented by a dimmer bar. The position values are represented by a crossed vertical and a horizontal line. Gobo attributes are displaying a small image of the gobo. Colors are displayed as small squares displaying the colors next to each color feature. The settings Fixture Graphic and Fixture Graphic Source are available in Fixture Sheets. They define which kind of icons are displayed in front of the Name cell of each fixture. Both settings are also located in the context menu of the fixture sheet. Resizing the Name column to a small size will hide the icon. That happens when only the icon is visible in order to see the fixture name. Fixture Graphic has these values: * **None**: No icon will be displayed. * **Flip**: Only the flip indicator bar will be displayed. * **Simple**: The combined intensity and color output of the fixture is displayed in a square icon. * **Gobo**: The intensity and color output of the fixture is displayed combined with the used gobo. Fixture Graphics displays only the gobo of one gobo wheel at a time. Gobo wheels in ascending order define which gobo is displayed. For example, when Gobo 1 is set to open, then the gobo of Gobo 2 is displayed. In all cases, except None, the Flip Indicator Bar will be displayed. It is displayed as a vertical bar with a white rectangle in it. The position of the rectangle in the flip indicator bar indicates the user in which flip area (combination of pan/tilt values) the fixture is located right now. The bigger the physical range of pan and tilt of a fixture type is, the more combinations of pan and tilt values are possible that point to the same position on stage. With the setting Fixture Graphic Source the user can define which values are taken in order to visualize the values in the icons of the Fixture Graphic setting. These are the different values of Fixture Graphic Source: * **Auto**: The values are visualized accordingly to the selected layer of the Layer Toolbar. * **Value**: The icon displays the output of the Absolute Layer and the Relative Layer. * **Output**: The values are visualized accordingly to the Output Layer. * **DMX**: The values are visualized as the resulting DMX values. *** ### []()Phasers [Section titled “Phasers”](#phasers)  New in this release The phaser layer SpeedMaster allows defining per attribute to which master of the type speed the phaser should adapt its speed to.\ By turning the SpeedMaster encoder or opening the calculator for an attribute on this layer, one of the 16 available masters of the type speed can be selected.\ The value of the speed layer is combined with the value of the selected master of the type speed.\ These values are also stored into presets and cues/cue parts. The speed indicator on executor labels and special executor labels of assigned speed masters is bigger and moved into the vertical center of the executor label. The SpeedMaster layer can be addressed by using the keyword SpeedMaster.\ For more information, see [SpeedMaster keyword](/grandma3/2-3/keyword_speedmaster/). With the addition of the SpeedMaster layer, the ProgramSpeed master was removed. The GrandSpeed master still exists but is not part of the Master Controls overlay and the Preferences and Timings menu anymore. The values on the SpeedMaster layer take precedence over Speed Master and Speed Scale settings of Sequence and Cue/Cue Part. Speed Masters can be paused. A paused Speed Master pauses all phasers used by the paused Speed Master. It is possible to stomp a range of fixtures or a group. For more information, see [Stomp keyword](/grandma3/2-3/keyword_stomp/). *** ### []()Filters [Section titled “Filters”](#filters)  Improved in this release The At Filter and Filters can be configured to take layers into account when storing, updating, cloning, or Fixture At Fixture operations. Therefore, filters can have Absolute, Relative, Timing, and Phaser enabled or disabled in the Filter Editor. These buttons are located on the right side of the Filter Editor. In addition, filters that filter layers can also be used as Input Filters for Presets, Preset Pools, or Sequences.\ Furthermore, layer filtering works also when specifying such a filter in an If statement. Example: Requirement: Create filter 42 which has only Relative in the layer section and all attributes enabled. Select a fixture, and activate absolute, relative, fade and delay values for Dimmer and Zoom.\ To store only the relative value into cue 3 of the selected sequence, and without selecting the filter in the pool beforehand, type: User name\[Fixture]> Store Cue 3 If Filter 42 **Known Limitation:**\ \- Using filters as Output Filters ignores layer filtering.\ \- Using filters for Break ignores layer filtering.\ \- Knocking in values does not take the layer filters of the At Filter into account. For example, when using At Preset or At Cue syntax. *** ### []()Content Sheet [Section titled “Content Sheet”](#content-sheet)  Improved in this release * When the Content Sheet is set to Cue Mode ‘Manual’, empty cues are displayed in a darker background and text. The Sequence Sheet does the same. * The screen encoder can scroll through the list of cues when Cue Mode is set to ‘Manual’. Therefore, the Content Sheet displays the selected cue immediately. * The list of cues in Cue Mode ‘Manual’ displays the currently active cue (not the displayed one) with a green frame around its row. * When the Cue Mode is set to ‘Manual’ and Show Parts is active, tapping a Part cell of a cue with different cue parts, unchecks all other parts of the cue, and displays only the data of the selected cue part. * When a cue is collapsed, a red text “DUP” in the bottom right corner of an attribute cell indicates, that there is duplicate data stored in different parts of the cue. This indicator is displayed in the Sequence Sheet (when Track Sheet is enabled), too. * The performance of the Content Sheet improved. *** ### []()Backup Menu [Section titled “Backup Menu”](#backup-menu)  New in this release It is possible to define the loaded segments of a show file. There are four show file segments available: * Show Data * Local Settings * Output Stations * DMX Protocols For more information, see [show file handling](/grandma3/2-3/show_file_management/). The data of the currently loaded show file will be kept for these segments, where the checkbox buttons are not enabled. The option keywords **/NoShowData**, **/LocalSettings**, **/OutputStations**, and **/DMXProtocols**, can be combined with the LoadShow keyword and NewShow keyword. When executing a LoadShow command without specifying an additional option keyword, it will load only the Show Data of the show file. For more information, see the following help topics: * [/LocalSettings](/grandma3/2-3/ok_localsettings/) * [/NoShowData](/grandma3/2-3/ok_noshowdata/) * [/OutputStations](/grandma3/2-3/ok_outputstations/) * [/DMXProtocols](/grandma3/2-3/ok_dmxprotocols/) * [/All](/grandma3/2-3/ok_all/) * [LoadShow keyword](/grandma3/2-3/keyword_loadshow/) * [NewShow keyword](/grandma3/2-3/keyword_newshow/) **Important:**\ To be able to use this feature, the show file needs to be saved with grandMA3 v1.9 or higher first. Show files saved with grandMA3 v1.8.8.2 or prior do not contain the Station Settings, Output Configuration, and DMX Protocols.  New in this release The folder Template Shows allows only to load template show files. For more information, see [show file handling](/grandma3/2-3/show_file_management/).\ For example, in theaters where a show file with all essential objects exists, and nobody should destroy it by mistake, and every user should be able to load this show file and work in a copy of the template show file. Learn more about the grandMA3 folder structure in the [Folder Structure topic](/grandma3/2-3/fm_folder_structure/). Furthermore, the /Type option keyword with the value “Template” can be used to load template show files via command line. For more information, see [/Type option keyword](/grandma3/2-3/ok_type/). *** ### []()Title Bar Buttons [Section titled “Title Bar Buttons”](#title-bar-buttons)  New in this release Every window with a title bar, except the following, allow configuring the availability of buttons in the title bar of the windows:\ Agenda Viewer, At Filter window, Clock Viewer, Command line History window, Custom Master Section window, Help window, Info window, Message Center window, Programmer Parts window, RDM Devices Viewer, Running Playbacks window, Selection Grid window, Sound Viewer, System Info window, System Monitor window, Timecode Viewer, and Trackpad window. This is configurable per user profile. To configure the title bar buttons, follow these steps: 1. Open a window with a title bar, for example the Fixture Sheet. 2. Tap MA in the left corner of the title bar. 3. The context menu opens. 4. Enable Edit Title Bar in the title bar of the context menu. 5. The available buttons change their style: * In the bottom left corner, a Yes or No indicates if this button is enabled to be displayed in the title bar. Furthermore, when it is enabled, the font color turns yellow. * The yellow number in the bottom right corner indicates the position of this title bar button in the total order of the visible title bar buttons. * Unavailable buttons for the title bar will be grayed out. 6. Enable or disable the settings you want to have in the title bar. The order of enabling the settings defines the order of the buttons in the title bar. The buttons will be set from right to left in the title bar.\ It is possible to change the order of the title bar buttons within the Title Buttons tab. This tab will be displayed when Edit Title Bar is enabled.\ The Title Buttons tab displays a list of buttons, that are active for the title bar. The selected entry can be moved up or down in the list. This changes the order of the buttons in the title bar.\ It is here also possible to remove single buttons or all buttons from the title bar, or to load the default again. When Edit Title Bar is enabled, a gray number in the tabs of the context menus indicates for how many settings a title bar button can be enabled. *** ### []()Patch [Section titled “Patch”](#patch-2)  New in this release Enabling Show 3D Positions in the title bar of the Patch or Live Patch menu opens a 3D area on the right side of the patch menu. Selecting fixtures there allows to directly position them while being in the Patch menu. Therefore, the 3D encoder bar appears when setting the focus into the 3D area. By tapping and holding the vertical divider between the patch area and the 3D area it is possible to change the size of the 3D area. Tapping 3D Positions Settings opens a context menu. It allows to change the settings of the 3D area. The Misc tab offers these settings: * **Wireframe**: Enables the rendering of the 3D scene as wireframe. By default this setting is disabled. * **Beam**: Changes the visualization of the beam. Available values are “Simple” and “Line” (Default: Simple). * **BodyQuality**: Changes the visualization of the fixture body. Available values are “Box”, “Standard”, and “Ultra” (Default: Standard): * Box: The whole bounding box of the fixture is visualized as one box. * Standard: The fixture is visualized with its original meshes until the vertex limit of 1 200 vertices is reached. If the overall vertex count of the fixture exceeds 1 200 vertices, the fixture is visualized with default meshes. * Ultra: The fixture is visualized with its original meshes no matter of its vertex count. A description of the settings of the tab Label can be found in the [3D topic](/grandma3/2-3/patch_3d_viewer/#toc_header_anchor_8). **Hint:**\ Body quality is not considered for environmental fixture types. Environmental fixture types are always rendered with their original meshes. The selection in the 3D Positions area is synchronized with the selection in the grid of the Patch menu. The dimmer of selected fixtures is visualized with an output of 100 % in the 3D area. The zoom of a fixture is visualized with the default value of the zoom attribute. Or respectively with the value of the Beam Angle of its Beam Geometry, if a fixture does not have a zoom attribute. Other functions of the fixture (for example color, iris, or gobo) are not visualized in the 3D area in the patch. **Hint:**\ Fixtures in the 3D Positions area do not visualize the current show output. For this purpose use a 3D window outside of the Patch or Live Patch. To adjust static fixtures (all fixtures that do not have a pan or tilt attribute), towards a position in the 3D stage, use the focus tool ().\ To do so: Select some fixtures, activate the focus tool, and then click the desired position in the 3D window. The fixtures will change their rotation towards this point. This tool is also in the 3D Viewer available when it has Setup enabled.  New in this release Subfixtures get the names of their geometries assigned when patching new multi-instance fixtures. *** ### []()Encoder Bar [Section titled “Encoder Bar”](#encoder-bar)  Improved in this release The Layer Toolbar in the Encoder Bar is rearranged:\ The buttons Values and Timings, Phaser Overall, and Phaser Steps group the single layers together. The individual layers are displayed on the right side of the layer group buttons.\ The single layers are grouped as follows: * Values and Timings: * Absolute * Relative * Fade * Delay * Phaser Overall: * Speed * Speed Master * Phase * Measure * Phaser Steps: * Acceleration * Deceleration * Transition * Width When switching between the different layer groups, the selection of the layer in the former layer group is remembered. When clearing the programmer, the selected layer group returns to **Values and Timings** and the **Absolute** layer. The selection of the layers in Phaser Overall and Phaser Steps stays as it is after clearing the programmer. The indicator bar of the layer group buttons indicate which layer will be selected when tapping the layer group button. For example, Phaser Overall and Phaser Steps are purple, but the user can choose different colors per phaser-related layer in the color theme. **Hint:**\ The colors for each phaser-related layer can be changed in the color theme in the ColorGroup “ProgLayer”. ***  Improved in this release When the pop-ups (when swiping) of Link Timing or Link Phaser in the encoder bar, offer more settings. These pop-ups still allow to change the link setting of the encoders between the values **Single** and **Feature**, and for timing layers and phaser layers in addition to **AtFilter**.\ Furthermore, the new buttons Active Only and MultiStep Only (only timing related layers and phaser related layers) allow to limit which attributes may be affected: * Active Only: When enabled, only attributes which have already values active in the programmer get the new values applied. For example, Pan has active absolute values, and Tilt is knocked out. Link Timing is set to **Feature** and has Active Only enabled: Turning on the fade encoder of Pan changes only the fade time for Pan. When Active Only is disabled, Tilt would also get the fade values set. * MultiStep Only: When it is enabled, the new values are only applied to attributes that have two or more steps active. The defaults are: * Link Value: **Single** * Link Timing: **Feature** * Active Only: **Enabled** * MultiStep Only: **Disabled** * Link Phaser: **AtFilter** * Active Only: **Disabled** * MultiStep Only: **Enabled** When clearing the programmer, Link Value will be reset to **Single**.  Improved in this release The MAtricks button in the encoder bar shifts the MAtricks label to the top, when an MAtricks pool object was called. In all other cases, the label MAtricks stays in the center of the button. *** ### []()Tracking [Section titled “Tracking”](#tracking)  Improved in this release In the Sequence Sheet it is possible to define a break per cue. A break stops values of attributes being tracked over the break.\ When defining a break for a cue, a filter or world needs to be entered into the Break cell. To do so, edit the Break cell in the sequence sheet.\ This allows to define breaks only for certain fixtures or attributes. For example, the dimmer could track further and all other attributes are stopped from tracking via the break.\ The Break cell displays the [Feature Group Indicator Bar](/grandma3/2-3/key_rn_v1_9/#FeatureGroupIndicatorBar), too. **Hint:**\ To set a full cue break, select Filter ‘All’ or World ‘All’. *** ### []()XYZ [Section titled “XYZ”](#xyz)  Improved in this release XYZ with values on the relative layers is implemented. This means, for example, that a relative XYZ phaser can be run around an absolute PanTilt position. All combinations of PanTilt and XYZ, and absolute and relative are supported. **Important:**\ When mixing absolute PanTilt with relative XYZ, the value of the Distance attribute in the PanTilt feature is important. This value defines where the relative XYZ values are added. The relative values for the attributes X, Y, and Z are relative to the size of the stage if no MArker fixture is set up on the relative layer for the MArker attribute. When a MArker fixture is set up on the relative layer for the MArker attribute, the relative XYZ values are relative to the movement space of the MArker fixture.\ The OffWhenOverriden setting of sequences turns off playbacks with relative PanTilt when relative XYZ is played back, and vice versa. Calling relative XYZ presets or hard values knocks out relative PanTilt values, and vice versa.\ When knocking in attributes of one position type (PanTilt or XYZ) while the other one has active values in the programmer or is played back, the values will be converted to the knocked in position type and converted to match the same position on stage. If several playbacks with values for both positioning systems are running, Pan, Tilt, and Distance will be knocked in. When the user wants to knock in the Position feature group while a transition from one system to the other one is happening, Pan, Tilt, and Distance will be knocked in.\ On FeatureGroup “Position”.”XYZ” knocks in all XYZ attributes, while On EncoderPage “Position”.2 will knock in only the attributes that are currently on this encoder page (in most cases this will be X, Y, Z, and Flip). When the value of the MArker attribute on the relative layer is 0, the absolute MArker value will be used. The hidden XYZ attribute “Mode” is not needed anymore. Therefore, it is not part of show files in v1.9. The physical readout of the attributes X, Y, and Z displays the values in meters of the stage (when MArker is set to 0), or of the size of the target space of the selected MArker fixture. When a fixture does not have XYZ values active in the programmer or played back, activating the MArker attribute will set the values for X, Y, and Z in the programmer to 0. Turning the encoders of the attributes X, Y, and Z by one click in the encoder resolution Coarse changes the value in physical readout and natural readout by 1m. The other encoder resolutions and encoder factors are also based on this size. The DMX channel of each XYZ attribute can be inverted per fixture type that uses XYZ attributes. *** ### []() 3D [Section titled “ 3D”](#3d-2)  New in this release To generate grid values for the selected fixtures, use the 3D view to Selection Grid tool () in the toolbar of the 3D Viewer.\ 3D view to Selection Grid works for all levels of selected fixtures for main fixtures and subfixtures. \ The grid values are determined by the position of the selected fixtures and subfixtures in the 3D Viewer. The grid values depend on a perspective representation of the camera that is selected in the 3D Viewer. To create perspective grid values from a selection, select fixtures or subfixtures and tap  in the 3D Viewer. A high-resolution representation of the positions of the fixtures in the selection grid is created.\ To reduce the resolution of the grid, use the Auto Remove Gaps functionality of the Selection Grid.  Improved in this release If the 3D Viewer is set to Stage All Stages, it displays all stages with their specific position and rotation. When on an onPC station the driver of the GPU has issues with OpenGL the 3D Viewer informs the user about the driver issue instead. In this case, the 3D Viewer also does not try to render 3D scenes anymore. Show Tool Bar in the 3D Viewer settings allows to hide or display the tool bar on the left side of the 3D Viewer window. When Show Tool Bar is off and the user enables the Setup in the title bar the 3D Viewer, the tool bar is displayed automatically. To adjust static fixtures (all fixtures that do not have a pan or tilt attribute), towards a position in the 3D stage, use the focus tool (). For more information, read the [Patch section](/grandma3/2-3/key_rn_v1_9/#Patch) above. For this tool the 3D Viewer needs Setup enabled. Shapers are visualized also if less than 4 blades are present in the fixture type. *** ## []()Other Enhancements [Section titled “Other Enhancements”](#other-enhancements-2)  Running fades of playbacks are continued when updating/storing other attributes in the playback. Fades that were running when saving a show file will resume when loading the show file again. Leaving the patch or inviting/dismissing stations continues running fades.  The PSN menu opened on a connected station displays position, speed, and rotation values from incoming PSN trackers.  Universes that receive PSN data, display “PSN In” in the universe pool.  OSC: * DataPools can be addressed in an OSC message via the **/DataPool** address. * Addressing a fader or button without specifying a page addresses the executor on the currently selected page. * OSC Messages now contain the cue name, sequence name and the cue number.  IfOutput, IfActive, and IfProg syntax: All three keywords executed on its own, selects only fixtures of the current command line default. **Requirement:**\ Command line default needs to be set to the Custom ID Type Houselights. * To select any fixture that has a houselight CID, and that has output on stage, type: User name\[Houselights]> IfOutput * To select the fixtures with the houselight CIDs 2 to 5 that have output on stage, type: User name\[Houselights]> IfOutput 2 Thru 5 All three keywords can be combined with the keywords of the different IDTypes in order to select only fixtures with corresponding CIDs, no matter which command line default is set. * To select all fixtures that have active values in the programmer and have a NonDim CID assigned, type: User name\[Fixture]> IfActive NonDim  The following object types display a reference icon () when they are referenced to another object: * Appearances * Scribbles * Views * Presets assigned to executors * Macros assigned to executors * Worlds assigned to executors  The Macro Editor displays the value in the Wait cell of the last macro line in red in order to indicate that this value is not used. The Wait value defines the trigger time/type for the next macro line.  Keyboard shortcuts are available on grandMA3 onPC stations to open or close the displays 2 to 7. By default, the shortcuts are Ctrl + Alt + 2 (screen 2) to Ctrl + Alt + 7 (screen 7).  New keyword **SwitchTograndMA3Software** . For more information, see [SwitchTograndMA3Software keyword](/grandma3/2-3/keyword_switchtograndma3software/).  The property UseForVisualization of DMXCurves allows defining if the DMX output, as defined by the DMXCurve, shall be visualized in the 3D or not. **Important:**\ When enabling this property for DMXCurves that were created by color-calibrated fixtures, the colors in the 3D will not match the real output on stage!  When copy and paste fixtures in the Patch, the pasted fixtures get a cyan text at the right side of the Name cell. The cyan text tells the user which fixture was the source of the pasted fixture. The show data of the source fixture will be cloned to the pasted fixture when leaving the Patch. Therefore, the text says “Cloned \”, for example, “Cloned 2” when the fixture Fixture ID 2 was the source fixture.  Clone: * Cloning across different attributes is possible. Syntax:\ Clone Fixture \[“Source\_Fixture\_Name” or Source\_Fixture\_Number] Attribute \[“Source\_Attribute\_Name” or Source\_Attribute\_Number] At (Fixture \[“Destination\_Fixture\_Name” or Destination\_Fixture\_Number]) Attribute \[“Destination\_Attribute\_Name” or Destination\_Attribute\_Number] (If \[Object] \[“Object\_Name” or Object\_Number])\ This allows to clone data to different fixtures even when they have different attributes for the same functionality, for example.\ When leaving out the destination fixtures, the attribute cloning will be done for the source fixtures only. For more information, see [clone keyword](/grandma3/2-3/keyword_clone/). **Hint:**\ Enter the real name of the attribute (not the pretty name) for “Source\_Attribute\_Name” and “Destination\_Attribute\_Name”.\ A list of attributes with all their settings can be displayed in Menu - Patch - Attribute Definitions, or when executing List Attribute. * A frame selection (dragging a lasso around fixtures in the Layout Viewer or the 3D Viewer) can be used to specify a clone destination. * The current selection can be used in clone commands by using the [Selection](/grandma3/2-3/keyword_selection/) keyword. * Cloning supports the usage of the option keyword **/NoDependencies**. When **/NoDependencies** is used in a clone command, the fixtures that are not part of a referenced object, are cloned only with hard values. When **/NoDependencies** is not added to a clone command, the destination fixtures will also be cloned in the referenced objects. For more detailed examples and more information, see [/NoDependencies](/grandma3/2-3/ok_nodependencies/).  []()Presets, Worlds, and Filters can display the Feature Group Indicator Bar at their lower edge. This bar is visible when an object has attributes of two or more feature groups stored. All presets have always the feature group indicator bar visible.\ The feature group indicator bar has a square for each feature group, displayed in white, gray, or red color. * White: Indicates that values of attributes of the corresponding feature group are stored in the preset. * Gray: Indicates, that no values of attributes of this feature group are stored in the preset. * Red: Indicates that at least one attribute of this feature group is not accessible at the moment. For example, when having a world with a limited set of attributes active.\ The square turns also red, when the currently selected world does not contain fixtures that can make use of the attribute data in the preset. The order of the squares is similar to the order of feature groups in the encoder bar, from left to right: * Dimmer * Position * Gobo * Color * Beam * Focus * Control * Shaper * Video If a show file contains additional feature groups, more squares will be added automatically to the bar.  The Oops overlay displays the history of the commands that can be undone (oopsed) in form of a grid.\ To open the Oops overlay follow these steps: 1. Press and hold Oops. 2. The Oops overlay opens. or 1. Execute the command Menu “OopsOverlay”. 2. The Oops overlay opens. The grid has these columns: * Elapsed Time / Session Time: The time that has passed since the command was executed or the absolute time when the command was executed. For more information see below the Columns setting. * Name: The command that was executed or the action that was done. The selected row(s), indicated by a blue background, are oopsed when tapping Undo last Action or Undo x Actions. The x indicates how many events will be oopsed.\ Only the last event or a coherent bunch of events, starting with the last event can be oopsed. In the Oops overlay, Create Oops, Oops Views, Oops Programmer and Oops Selection operate the corresponding settings of the [UserProfile](/grandma3/2-3/user_settings/).\ When Create Oops is disabled, no oops events will be created at all. In this case, the other oops settings are grayed out. The setting Oops Confirmation can be set to these values: * **Always**: Every time the user oopses at least one event, the user needs to confirm it. * **Main**: Only oopsing important actions need to be confirmed. For example, storing, moving, or deleting objects. * **Never**: No confirmation when oopsing events is needed. Scrolling with the screen encoder in the Oops menu selects/deselects entries, and pressing the screen encoder will oops the selected events. The title bar button Columns can be switched to the values Elapsed Time or Session Time: * **Elapased Time**: Displays the time that has passed since the command was executed. This time counts up every second. * **Session Time**: The absolute time of the session time when the command was executed is displayed in the Session Time column. When doing changes in the Patch or Live Patch, the Oops entries are cleared.  Oopsing an event on a station checks if the object was modified already by another station in the session. If the object was already changed by another station, the first station displays a failed message in the command line, telling the user, that it cannot perform the oops because the object was changed on a different station.  The option keyword **/NoDependencies** can be used when importing XML files. When specifying this option keyword during import, only the main elements of the XML file will be imported, and not the other elements that were exported as dependencies of the main element(s). For example, when a macro with an appearance assigned was exported. Usually, if during export **/NoDependencies** was not used, the XML file contains the macro as main element, and the appearance as dependent object. * In order to only import the macro to macro pool object 42 and do not import the appearance in addition, type: User name\[Fixture]> Import Macro Library “my exported macro.xml” At Macro 42 /NoDependencies When importing this macro again and not using the **/NoDependencies** option keyword, the macro and the appearance will be imported together. In addition, the Import/Export menu has toggle buttons in both sub-menus (Import and Export) in order to define if dependencies shall be imported or not. When Include Dependencies is enabled, dependencies will be exported or imported. When entering the Import/Export menu, Include Dependencies will always be enabled. Include Dependencies in the Import and Export sub-menus are linked together. **Important:**\ Importing Pages via the Import section of the Import/Export menu will only import executors. Include Dependencies is disabled, when selecting Pages in the Import/Export menu.  Adding a new node for preparation in Output Configuration, adds all possible options of xPort Nodes and I/O Nodes.  When leaving the session during an active show download the station will fall back to the previously loaded show file that was loaded before the show download started.  Global Preset Update was renamed Total Reference Update. Improved the speed of the Total Reference Update mechanism.  The Session Data Merge: * The option Merge All Data is back. * The Session Data Merge pop-up lists the object types that have differences between the two show files.  Data protection is now shown to users within a multi-user session. When a user modifies an object the object will be locked directly and parent objects will be locked indirectly so that other users cannot edit the same object at the same time. The modifying user takes the ownership for the locked object. The ownership is indicated on the locked object using a blinking red lock icon (), and additional text information about the station (name and IP) and the user that is working on the object. Indirectly locked objects are indicated using a blinking yellow lock icon (). When a user tries to edit such a locked object, a pop-up appears informing the user about the station and the user who owns the object. The pop-up has a countdown of 10s. By tapping into the pop-up the countdown is stopped. It is also possible to get the objects listed that are locked by ownerships by using the **ListOwnership** keyword.\ To get all ownerships listed, type: User name\[Fixture]> ListOwnership To get only the ownership information for a single object, for example group 1, type: User name\[Fixture]> ListOwnership Group 1 In this case, if the object is not owned, the command line feedback returns “not owned” as information. To list ownerships for all the child objects of a single object use a dot after the object ID. For example, to see which Macro lines of Macro 1 are owned, type: User name\[Fixture]> ListOwnership Macro 1 In this case, all Macro lines will be listed and show which are owned and which are not owned. When a user is logged in at several stations, the station where the user started editing an object, that calls values into the programmer (for example, groups, presets, or cues), displays the borders of the involved windows (for example fixture sheet) in green color. In addition, the same windows indicate in a yellow color that these are not the stations where the edit was started. But it is possible to continue and/or finish the editing also on the other stations with the same user as well. **Hint:**\ Objects can also be locked by automatic processes that are started as a follow-up of actions the user does. For example, when the user updates a preset, the Total Reference Update mechanism locks the needed objects with an ownership while it is running. If a user wants to edit an object, that is owned by a different user, the keyword **DropOwnership** can be used to force the release of an ownership. For example, to release group 1 from its current owner, type: User name\[Fixture]> DropOwnership Group 1 A pop-up with a 10 second timeout will appear and informs the user about trying to drop the ownership. The pop-up will appear on the console, where the user who owns the object is currently logged in.\ In order to drop the ownership, the user can confirm the pop-up. To keep object owned the user can decline the request.  It is possible to mark and copy the text of the Lua Code Templates. Pasting the copied code later in the Lua editor is also possible. This allows to add a template or parts of a template into a Lua component, instead of overwriting the whole code when tapping Use Template.  Preset pool windows and Sequence pool windows have a Action setting in their context menus, which defines what should happen when the user taps a pool object. Preset pools allow the following values for the Action setting: * **SelFix/At**: When there is no selection in the programmer, tapping a preset will select the fixture that can use the preset. Tapping it again, calls then the preset into the programmer. When the programmer has a selection, tapping a preset the first time will call the preset into the programmer. That is the default behavior. * **At**: When there is no selection in the programmer, tapping a preset does nothing. When the programmer has a selection, tapping it, calls the preset into the programmer. * **Flash**: Flashes a selective preset as long as it is tapped. Flash ignores fade times. * **Go+**: Tapping a selective preset plays it back. * **Temp**: Plays back a selective preset as long the user keeps it pressed. Temp respects the fade times. * **Toggle**: Toggles a selective preset between playing it back and off. Sequence pools allow these values for the Action setting: * **Select**: Tapping a sequence selects it. This is the default behavior. * **Flash**: Flashes a sequence as long as it is tapped. Flash ignores fade times. * **Go+**: Starts a sequence playback or goes to the next cue in the sequence. * **Temp**: Plays back a sequence as long the user keeps it pressed. Temp respects the fade times. * **Toggle**: Tapping a sequence plays it back or switches it off, depending on its current playback state. Pool windows of pools that support the Action setting, indicate the selected action in the top right corner of the pool title object with the corresponding icon.  When a trigger type is set for the OffCue of a sequence, Wrap Around will be disabled. Enabling Wrap Around for a sequence removes the trigger type for the OffCue.  The clock window allows to hide the fractions of a second when it displays the time of a timecode slot or timer. To do so, disable Show Fractions in the context menu of the clock window.  The setting Time Readout of user profiles changes also the readout of the countdown timer in the Agenda window when the countdown time is smaller than 1 day.  The LogIn button in the User Configuration Menu offers to log in with the selected user immediately. When having several users selected, the user that was selected first will be logged in.  Render Qualities: * Added setting DilutionType: Dilution Type defines the dilution intensity of the beam and the spot regarding the distance. There are three different dilution types available (The default is **None**): * None: The beam and spot are keeping their brightness over the distance. * Linear: Corresponds to a linear attenuation of the intensity over the distance. * Correct: Corresponds to a more realistic attenuation. * Added setting Dilution Scale: Dilution Scale defines the beam intensity dilution of the beam dilution. As higher the value, as less the beam is attenuated, resulting in a beam that remains visible over further distance. The default value is **100%**. * Added setting Native Colors: This fader interpolates between the native representation of colors and the intensities of the beams and spots. An automatic method that changes the colors and intensities so that the rendered beams are easier to separate. A higher value for native colors can make it impossible to distinguish between individual overlapping beams but provides stronger colors and higher contrasts. The default value is **0%**.  Selection Grid: * Added cursor movement by using the arrow keys of the keyboard, or by using MA + 2 / 4 / 6 / 8 on the number block of grandMA3 hardware. * A rectangular area of grid cells can be selected in order to fill the rectangle with fixtures afterwards. To do so, place the cursor at the start point. Then press and hold Shift and tap at the desired end point of the rectangle. Or press and hold Shift and use the arrow keys of the keyboard to define the size of the rectangle. * The grid position 0/0/0 is marked with a white frame. * The number of currently selected fixtures is shown in the title bar. * The fixture ID and custom IDs of fixtures are displayed at the center top of a fixture in the selection grid. In case, that a fixture has only one ID (FID or CID) then only this single ID is displayed. When several fixtures are placed at the same grid position, the IDs are displayed below each other. In case of having a lot of fixtures at the same grid position, a ”..” indicates that not all IDs can be displayed. * Renamed Auto Remove X Gaps to Auto Remove Gaps. Auto Remove Gaps removes the gaps in the selection grid on all axes. * New setting Auto Remove Offset removes empty space between the beginning of the grid and the first fixture when it is enabled.  If the Off Menu is set to My Playbacks Only, Everything Off changes to My Everything Off. This disables everything in the same user profile.  Kill can be assigned as a button function for an executor. Pressing the executor button plays the sequence or preset back using the kill functionality. All other playbacks or presets of the same Playback Master will be disabled using their OffCue Fade and/or Delay times. In addition, sequences and presets can be protected against kill. To do so, edit the settings of the desired sequence/preset, and enable Kill Protect. This sequence or preset will not be disabled if kill will be executed on another sequence or preset. Sequences or presets without playback master kill only those sequences or presets which do not have playback master either.  If the Patch window has Split View enabled and the DMX Universes tab is selected, fixtures that have a patch collision will be displayed in Conflicts.  The Insert New Fixtures dialog with Used Only enabled, displays only the used fixture modes and their specific used count.  When copying objects with a size of more than 1GB, the user is asked for confirmation.  The copy command supports additional arguments to provide for example, a name for a new object in advance. **Copy \[Object] \[“Source\_Name” or Source\_Number] At \[Object] \[“Destination\_Name” or Destination\_Number] Property “Property\_Name” “Value”** To do so, type: User name\[Fixture]> Copy Preset 1.1 At Preset 1.2 Property “Name” “This is the Copy”  The number of selected fixtures is displayed in the title bar of the Fixture Sheet, Selection Grid and 3D Window.  The Preferences and Timing menu got a clean up: Empty areas are not visible anymore.  It is possible to compare color themes and transfer colors and color definitions from one color theme to another color theme. This can be useful, when the user customized a color theme in an older grandMA3 version already and now needs the colors that were introduced with a new grandMA3 software version.\ The compare functionality can be found here: Menu - Desk Lights Color Theme - Compare. On the left side, the currently active color theme will be taken as the base for the comparison. On the right side, the user is asked for importing the comparing color theme (mainly the old one from the example above).\ As soon as this is done, the vertical indicator areas between both areas indicate where the differences in the color themes are by orange or green indicator bars. Scrolling down the list of colors to such an indicator displays also the line in the color theme in the same color. The colors of the indicators are: * Orange: This color exists in the base color theme, but not in the compared color theme. * Green: This color was transferred from the base to the compared color theme. It is possible to transfer colors from one color theme to the other. To do so, select the color that shall be transferred. Then tap the button with one arrow to the left or right. The arrow changes its direction depending in which color theme the color was selected.\ To transfer all differences into the compared color theme, tap the button with three arrows to the left or right. No selection is needed for this action.\ To see only the colors that are different, enable the filter button.\ Tapping the buttons with an arrow up or arrow down jumps to the lines that are different. The user can also edit the colors directly after transferring them into the compared color theme. To change the base color theme or the compared color theme, tap Select Base Theme or Select Compare Theme at the top of the menu. It is also possible to modify the base color theme in this menu. In order to apply the changes permanently, a modified color theme needs to be exported. Both color themes can be exported. Depending on the focus in the menu, the Export button displays the name of the color theme that will be exported when tapping Export ‘\’ As …\ When the user tries to leave the compare menu without exporting the color theme before, a pop-up appears. The user can decide in the pop-up whether to stay in the editor (Stay in Editor), export the color theme and exit the editor (Export and Exit), or to exit the editor without exporting the changes (Exit). **Known Limitation:**\ It is only possible to scroll both areas together by using the arrow up and arrow down buttons.  The station settings can be accessed via the StationSettings keyword.  The Lua function Dump() now lists read-only information, too.  The user profile setting Color Readout can be set to the values RGB or CMY. Depending on the set value, the encoders for the attributes ColorRGB\_R, ColorRGB\_G, and ColorRGB\_B are switching between RGB and CMY color mixing system.\ In addition, the fixture sheet, sequence sheet, content sheet, phaser editor have the Color Mode setting, which allows changing the readout individually between **Auto** (= the set value in the user profile), **RGB**, or **CMY**.\ The values applied via command line to these attributes take the value of the user profile setting into account:\ Attribute “ColorRGB\_B” At 56 sets Y to 56% when Color Readout is set to CMY.\ Attribute “ColorRGB\_R” At 42 sets R to 42% when Color Readout is set to RGB.  When copying a huge amount of data at once, a pop-up warns the user that this may take some time.  When turning a selective preset into a recipe, the selective fixtures are automatically added as selection into the recipe.  Help Viewer: * The Zoom Factor setting in the title bar allows to zoom the content of the help viewer smoothly. To do so, tap, hold, and scroll Zoom Factor. Only tapping Zoom Factor opens a pop-up that allows selecting a fixed zoom factor. * While the help window has focus pressing Home, End, Page Up, or Page Down scrolls accordingly to the beginning or end of the displayed topic, or scrolls up or down inside the displayed topic. When the focus is set to the search field, Home and End jumps to the beginning or end of the input text.  After a console received update files, a pop-up asks the user if they want to Update and Reboot, Update Later and Cancel Reboot, or Discard Update and Cancel Reboot. In the case of tapping Discard Update and Cancel Reboot, the received update files are deleted. When a station has update files received, and the reboot was postponed by the user, a red indicator on  in the control bar will appear. The button labels change accordingly when the station has received update files and the user laters wants to shut down the station.  Speed masters can be set via command line using the speed readouts BPM, Hertz, or Seconds: To set the first speed master to a speed of 42 BPM, type: User name\[Fixture]> Master 3.1 At BPM 42 To set the first speed master to a speed of 2 Hertz, type: User name\[Fixture]> Master 3.”Speed1” At Hz 2 To set the first speed master to a speed of 0.69 Seconds, type: User name\[Fixture]> Master 3.”Speed1” At Seconds 0.69 This is also valid for speed masters of other objects, that is sequences and presets.  Pool windows can be set to display a dedicated data pool only. To do this, the context menu (tap MA in the title pool object) of pools that are part of data pools offers the setting Data Pool.\ This setting can be set to any existing data pool. In this case, the pool window displays the data of this specific data pool. When the setting is set to **\** the pool window will display the data of the selected data pool.\ The pool title object displays the number of the data pool that is displayed by the pool window on the left side above the name of the pool. The data pool number is only displayed if the window has a fixed data pool selected. In the case of choosing **\**, no number is displayed.  The context menu of the DMX Sheet got minimally rearranged. Furthermore, it has the possibility to add an Appearance to the DMX Sheet.  The timecode window can have an Appearance assigned.  When storing a world while having only the main fixture of a multi-instance fixture selected, all following subfixtures can be accessible when being in the world. This works also when storing a grouping fixture into a world.\ The new setting Selection of worlds (accessible via EditSetting of a world) defines if subfixtures are accessible or not. Selection can be set as the following: * **Normal**: Subfixtures are part of the world, also when they were not selected at the time the world was stored. * **Strict**: Only the fixtures and subfixtures that were selected when storing the world are accessible. **Important:**\ Changes are not visible immediately, when changing Selection values for the world that is currently selected. A different world has to be selected before selecting the desired world again. **Hint:**\ When storing a world, the Selection property can be specified within the command: Store World \[“World\_Name or World\_Number] Property “Selection” \[“Value”]  Windows IoT (grandMA3 command wing XT and grandMA3 onPC rack-unit): * New user interface for the main menu of the operating system.\ The available buttons are rearranged. * The different start options (Clean Start and Terminal) of each software version are grouped together and are accessible via dropdown. * The desired startup application can be defined by tapping  and selecting an option in the autostart dropdown. * The Tools area on the left side allows to add individual program shortcuts. To add a new shortcut, tap , tap +, and then choose a program. To change the shortcut order, use  or . To delete a shortcut, select it and tap -. To change the name of a shortcut, double click the entry and enter a new name.  The design of pool objects that can be played back (for example, sequences, presets, and timecodes) was reworked. The playback icon is now in the top right corner. The fade bar at the bottom is now smaller.  The plugin editor displays a warning if the size of the LuaComponent exceeds the maximum allowed size of the editor. Confirming the warning displays as much as possible of the code, but does not allow to edit it. This needs to be done in an external code editor. In case, that the Lua code is of Source **Resource**, the warning displays also the path to the Lua file.\ The read-only property Source of LuaComponents tells the user where the Lua code is located: * **Showfile**: The code is part of the show file. * **Resource**: The Lua code was imported from a Lua file.  Improved message boxes created by Lua: The elements in the message box are sorted in alphabetical order.  Assign Menu: * When the Assign menu is open, Assign + pressing any executor button keeps the same tab of the Assign menu open for the new chosen executor. * The buttons for a fader function, a key function, or an encoder function can also be operated as a swipe button. Still opens the complete function list by tapping any of these buttons.  Improved the Cue Settings mask by the addition of these columns: Duration, Speed Master, Speed Scale, and Appearance.  Improved the file size limit of grandMA3 show files. They can be bigger than 2 GB.  It is possible to keep the terminal window open by adding the KEEPCONSOLE parameter to the Windows onPC shortcut:\ C:\Program Files\MALightingTechnology\gma3\_v.x.y.z\bin\app\_system.exe” HOSTTYPE=onPC KEEPCONSOLE=“1”  Improved calculator entry. Entering values with a percentage sign (%) in front of the value into a calculator scales the former value by the new value. For example, the old value is 50, and entering % 50 results in a value of 25.  Improved the Extract command: * Extract Selection knocks in deactivated values, and extracts them. Active values get extracted. * To only get the active attributes extracted and keep deactivated values untouched, use the /Active option keyword in the command. * Extract combined with a feature group or feature extracts only the targeted object.  Added new files to the symbols library, which are importable into the Symbols pool.  Added Reset Screens in the Touch Configuration menu. Reset Screens allows recalling the default screen configuration in case of misconfiguration of the screens.  Improved selector pop-ups in the Layout Viewer and the Timecode Viewer: They offer to switch to a different data pool in order to be able to not only select objects from the currently selected data pool.  Improved the buttons in the label dialog. Yellow icons display active areas.  A pop-up opens when deleting cue parts. It is possible to either delete cue parts and their values or delete cue parts, and move values into part 0 of the same cue. To be able to use this feature also via command line, the option keyword /MoveValues was introduced.\ To delete part 5 of cue 7 in the selected sequence, and move the values to part 0 of cue 7, type: User name\[Fixture]> Delete Cue 7 Part 5 /MoveValues  Improved toolbars. All tools are visible and automatically rearranging when the window size changes. The improvements are valid, for example, for example, Layout Viewer, 3D Viewer, MAtricks Editor, or Timecode Editor.  The position and rotation of geometries can be changed in the fixture type editor of the Live Patch now.  Improved the stability of the grandMA3 software when using the web remote feature.  New in the DMX Protocols menu: The option Output Delay offers to compensate for the differences in the DMX protocols. The output delay can be set up for every DMX protocol separately.  Added the possibility to enter values for different channel functions of an attribute when using the command line. When an attribute has several channel functions, the Attribute keyword supports entering values for a different channel function. To do so, the name of the channel function needs to be specified instead of the attribute name.\ For more information, see [Attribute keyword](/grandma3/2-3/keyword_attribute/).  Improved the appearance of variable names: GetUserVariable and GetGlobalVariable now return variable names in quotation marks. *** ## []()Changes [Section titled “Changes”](#changes-2) * The abbreviations of these keywords changed: * ChannelSet: **Chann** -> **ChannelS** * ChangeDestination: **Ch** -> **Chang** (**CD** is still available) * RunningTimecode: **RunningT** -> **RunningTimec** * SwitchTograndMA2Software: **Sw** -> **SwgMA2** * The shortcuts of these keywords changed: * Set: Assign + Assign + Assign -> MA + Assign * These keywords were renamed: * **CancelUpdate** -> **CancelSoftwareUpdate** * ****Cleanup** -> **CleanUp **** * **Cmdline** -> **CommandLine** * **ColorDef** -> **ColorDefinition** * **CueAbs** -> **CueAbsolute** * **CueRel** -> **CueRelative** * **DelGlobalVar** -> **DeleteGlobalVariable** * **DelUserVar** -> **DeleteUserVariable** * **DeleteOtherVersions** -> **DeleteOtherVersion** * **FaderX** -> **FaderCrossFade** * **FaderXA** -> **FaderCrossFadeA** * ****FaderXB** -> **FaderCrossFadeB**** * **GetGlobalVar** -> **GetGlobalVariable** * **GetUserVar** -> **GetUserVariable** * **GridPos** -> **GridPosition** * **IfProg** -> **IfProgrammer** * **KeyboardShortCuts** -> **KeyboardShortcut** * **Knockin** -> **KnockIn** * ****Knockout** -> **KnockOut**** * ******ListOwner** -> **ListOwnership****** * **ListRef** -> **ListReference** * **Login** -> **LogIn** * ****Logout** -> **LogOut**** * ******MemInfo** -> **MemoryInfo****** * **Node** -> **NetworkNode** * **PU** -> **ProcessingUnit** * **ReloadPlugins** -> **ReloadAllPlugins** * **RTChannel** -> **RealtimeChannel** * **ScreenConfig** -> **ScreenConfiguration** * **SelFix** -> **SelectFixture** * **SetGlobalVar** -> **SetGlobalVariable** * **SetUserVar** -> **SetUserVariable** * **Shutdown** -> **ShutDown** * **SwitchGma2Mode** -> **SwitchTograndMA2Software** * **Swop** -> **Swap** * **UnBlock** -> **Unblock** * **UnLock** -> **Unlock** * **UnPark** -> **Unpark** * **UnPress** -> **Unpress** * **/CopyCueDst **->** /CopyCueDestination** * **/CopyCueSrc **->** /CopyCueSourc** * **/NoConfirm** -> **NoConfirmation** * **/NoUndo** -> **NoOops** **Known Limitation:**\ Macros and commands, for example in cues, are not migrated to the new naming of these keywords! * New keywords: * **Kill** * **MyRunningTimer** * **Note** * **Quickey** * **RunningTimer** * **SpeedMaster** * **StationSettings** * **SwitchTograndMA3Software** * **Timer** * **DropOwnership** * **/DMXProtocols** * **/LocalSettings** * **/MoveValues** * **/NoShowData** * **/OutputStations** **Hint:**\ For more information about the new keywords, please read the corresponding sections above. * ****These keywords were removed: * **CommandLine** * **Escape** * **ExecKeyStatus** * **Font** * **HardwareStatus** * **LearnRate** * **Monitor** * **System** * **Texture** * **/OriginalFixtureOnly** * **/Highlight** * **/Lowlight** * These properties were renamed: * 3D Priority -> Priority * Config -> ExecutorConfiguration * CustomText -> CustomTextText * EncoderLeftCmd -> EncoderLeftCommand * EncoderRightCmd -> EncoderRightCommand * KeyCmd -> KeyCommand * MAEncoderLeftCmd -> MAEncoderLeftCommand * MAEncoderRightCmd -> MAEncoderRightCommand * MAKeyCmd -> MAKeyCommand * PositionH -> Height * PositionW -> Width * ReceiveCmd -> ReceiveCommand * SendCmd -> SendCommand * ShowAppearance -> FixtureAppearance * SwopProtect -> SwapProtect (Sequences and Presets) * TextAlignmentH -> CustomTextAlignmentH * TextAlignmentV -> CustomTextAlignmentV * TextColor -> CustomTextColor * UndoGeneral -> CreateOops * UndoProgrammer -> OopsProgrammer * UndoViews -> OopsViews - New color theme colors: * ColorDefinitions * Global.ClonedHint * Global.DarkOrangeIndicator * Global.SymbolsFrame * Global.TransparentWhite * Global.TransparentWhite25 * PoolDefault.Functionals * PoolDefault.Quickey * PoolDefault.Timers * Colors * Assignment.Quickey * Assignment.Timers * ColorThemeCompare.MissingRow * ColorThemeCompare.MergedRow * ColorThemeCompare.VisibleRows * DBObjectGrid.WarningText * DBObjectGrid.WarningBackground * EncoderBar.MultiStep * Exec.TextBright * FixtureSheetCell.BackgroundActiveIntegratedSpeedMaster * FixtureSheetCell.BackgroundActivePresetSpeedMaster * FixtureSheetCell.BackgroundActiveValueSpeedMaster * FixtureSheetCell.SymbolsBackground * FixtureSheetCell.SymbolsForeground * FixtureSheetCell.SymbolsFrame * FixtureSheetCell.TextProgValueSpeedMaster * FixtureSheetCell.TextSelectedPlaybackSpeedMaster * FixtureSpecials.ClonedHint * Help.ScrollThumb * Help.ScrollTrack * PoolButton.ActivePlayback * PoolWindow\.Functionals * PoolWindow\.Quickeys * PoolWindow\.Timers * PresetButton.ActiveFeatureGroupIndicator * PresetButton.FeatureGroupIndicatorBackground * PresetButton.FeatureGroupIndicatorDifferentWorld * PresetButton.InactiveFeatureGroupIndicator * ProgLayer.BackgroundActiveSpeedMaster * ProgLayer.SpeedMaster * Overlay.EditMixInNotOwner * SelectionGrid.Box000 * SelectionGrid.SelectionCountText * Timer.CountdownConfirmed * Timer.CountdownDisplay * Timer.CountdownProgress * Timer.StopwatchProgress * Timer.StopwatchDisplay * TimerButton.Countdown * TimerButton.Stopwatch * TitleButton.DataPoolIcon * TitleButton.DataPoolShadow * TitleButton.DataPoolText * TitleButton.SelectionCountIcon * TitleButton.SelectionCountText * TitleButton.SelectionCountShadow * TrackSheet.FullBreak * TrackSheet.FilteredBreak * Window\.EditMixInNotOwner * Window\.Quickeys - Deleted color theme colors: * Colors * PresetButton.TextConnectedCount * ScrollBar.BarH * ScrollBar.BarV * ScrollBar.Text - New grandMA3 Lua Functions: * DrawPointer * GetClassDerivationLevel * GetDependencies * GetLineAt * GetLineCount * GetReferences * HasDependencies * HasReferences * PropertyInfo - The default button function of speed masters assigned to special executors in new shows is LearnSpeed. - The button function in the default executor configurations Masters, and Playback Masters is Flash, and for the executor configuration Speed Masters it is LearnSpeed. - The value list of Master Priorities in the Network menu is sorted from High to Never in descending order. - The GridPosition layer is not displayed in the layer toolbar of the encoder bar. Executing GridPosition still displays the GridPosition layer in the fixture sheet when the layer to display is set to Auto. In addition, it is still possible to display the GridPosition layer in the fixture sheet by tapping GridPos in the layer toolbar of the fixture sheet. - No pop-up is displayed anymore, when using the syntax Fixture x At Fixture y. The data in the programmer is cloned immediately with the **/HighPrioMerge** option. The options **/Overwrite** and **/LowPrioMerge** also work when entered together with the command. - When two or more fixtures have conflicts in the patch addresses, the patch address of both fixtures will be displayed in red. - In new shows world 1 and filter 1 are labeled ‘All’. - Output Configuration in the main menu was renamed to Connector Configuration. - Multi-line editors, except in the Plugin editor, create a new line when pressing Shift + Please. A Please only applies the input. This applies, for example, in the Description input field in the Backup Menu, or in the Notes editor. - When calling a preset while having only the main fixture of a multi-instance fixture selected, the subfixtures get the preset now only applied when the main fixture itself does not have the attribute. - The setting MIDI via onPC command wing in the onPC Settings only toggles MIDI (in and out) for the command wing. MIDI from other USB devices is not toggled by this setting anymore, but is always enabled. - The dimmer value in layout elements does not display the percent sign(%) anymore. - The position and the IDs of Preset Pools, Groups, Sequences, Plugins, Macros, MAtricks, Executor Configurations, Pages, Layouts, and Timecodes within a data pool shifted by one number. This results, that for example, the strings send out via OSC are having a different ID for sequences. - The settings **DMX Offset** and **DMX Break** in Geometries with the Type **GeometryReference** can no longer be changed in the Live Patch. - The total number of Stages is limited to 128. - The minimum required operating system version for grandMA3 onPC running on Apple® macOS® changed from Apple® macOS® 10.13 High Sierra to Apple® macOS® 10.15 Catalina. for More information, see [onPC System Requirements](/grandma3/2-3/onpc_system_requirements/). *** ## []()Bug Fixes [Section titled “Bug Fixes”](#bug-fixes-3) ### 3D [Section titled “3D”](#3d-3) | Description | | --------------------------------------------------------------------------------------------------------------------------------------------------------------------------------------------------------------------------------------------------------------------------------- | | Two 3D Viewers having different stages with different surfaces selected, displayed the same surfaces. This bug is fixed. | | If several 3D Viewers were open and one of them had Setup enabled, all 3D Viewer windows displayed magenta preview boxes, even if they had a different stage selected. This bug is fixed. 3D Viewers only display preview boxes that belong to the stage that they have selected. | | Exporting fixture type into GDTF file failed, when a channel function had more than one logical channel and the first logical channel was not set to be the default one. This bug is fixed. | | GlTF meshes where exported into the 3ds folder of the GDTF file during export. This bug is fixed. GlTF meshes are exported into the glb folder when exporting a fixture type as GDTF. | | The first child of a grouping fixture did not have the correct label drawn in the magenta preview box when using Arrangement mode. | | The color space label in the title bar of the color picker window was not updated when switching from one color space to another. | | Render Quality in the 3D window title bar did not show a label when the selected render quality had the default name. | | Entering values in the calculator of an encoder did not always produce the expected output if the readout of the encoder bar was set to “Percent”. | | The lasso selection of some fixtures in the 3D viewer after changing a value did not reset the current selection, but added the newly selected fixtures. | | The color picker did not work correctly if a fixture type had only a “Saturation” (HSB\_Saturation) attribute without a “Hue” and “Brightness” attribute. | | The software could crash when clicking on a 3D model inside the 3D Viewer window. This bug is fixed. | ### Command Line and Macro [Section titled “Command Line and Macro”](#command-line-and-macro-3) | Description | | ------------------------------------------------------------------------------------------------------------------------------------------------------------------------------------------------------------------------------------------------------------------------------------------------------------------------------------------------------------------------------------------------------------------------------------------------------------------------------------------------------------------------------------------------------------------------------ | | Turning Off all users or user profiles kept the selection for the own user profile. This bug is fixed. Off User Thru or Off UserProfile Thru clears the values and selection of all user or user profiles. | | The /NoConfirm option keyword was ignored when using it with the CleanUp command. This bug is fixed. CleanUp \[Object] \[“Object\_Name” or Object\_Number] /NoConfirm suppresses the confirmation pop-up. | | It was possible to add recipes to cues. This bug is fixed. Recipes can only be added to presets and cue parts. | | Plugging or unplugging a USB drive executed the Select Drive command several times. This bug is fixed. Select Drive commands are only executed once when plugging or unplugging a USB drive. | | Entering several numbers connected with a + into a pop-up opened by a macro and using the numerical keypad did not execute the +. This bug is fixed. Entered + in pop-ups from macros are interpreted correctly. | | Moving recipes from one cue part to another cue part by using the graphical user interface was not possible. This bug is fixed. Moving recipes using the graphical user interface (for example Move + tap source recipe line + tap destination cue part) works fine. | | When spinning the inner ring of the Rotate encoder of the layout encoder bar and then switching to the outer ring, the rotation value snapped back to. Continuous spinning of outer ring did not change the value. This bug is fixed. Switching from inner ring to the outer ring or vice versa of the Rotate encoder is possible without snapping values back to 0 or encoders not changing their value. | | When starting grandMA3 onPC on Windows and specifying a non-existent plugin in the RUNPLUGIN argument, the application tried endlessly to find the plugin. This bug is fixed. When the specified plugin of the RUNPLUGIN argument is not found, the application will start, display an error message and returns more information to the system monitor. To load plugins with spaces in the filename, the RUNPLUGIN argument must be escaped. For example: “C:\Program Files\MALightingTechnology\gma3\_x.x.x\bin\app\_system.exe” HOSTTYPE=onPC RUNPLUGIN=\“file name.xml\“-1 | | The update menu listed a preset as update target, when only calling the preset into the programmer. This bug is fixed. Objects that are not changed are not offered to be updated in the update menu. | | When storing a preset, the LED of the Update key was still lit up. Or calling the same preset again switched off the LED of the Update key, also when there was a running playback that could be updated. This bug is fixed. The LED of the Update key indicates correctly if there are objects available to be updated, or not. | | When storing a range of dotted cues in between existing cues (for example, Store Cue 2.1 Thru 2.3 when having cues 1 to 3 already), created only the first dotted cue. This bug is fixed. Storing several dotted cues at once in between existing cues creates dotted cues as the user specified it in the command. | | Encoders did not switch to the channel function that was stored in the preset. The preset needs to have values stored for a different channel function of an attribute than the default channel function. This bug is fixed. When turning the encoder for an attribute after calling a preset with a value of a different channel function, the encoder changes the value now in the correct channel function. | | When a cue command was executed in a session, it was executed by using the selected data pool of the user that was logged at the GlobalMaster station. This bug is fixed. Cue commands are executed on the GlobalMaster station in a session by respecting the selected data pool of the user who plays back the cue with the cue command. | | When exporting the keyboard shortcuts, the resulting XML files were created in a wrong directory. This bug is fixed. Keyboard shortcuts have now a dedicated folder, The folder is located in gma3\_library/userprofiles. Exporting and importing keyboard shortcuts is using this directory. | | Tapping Edit Selected in the layout encoder bar could fail, when the layout had a smaller number of layout elements than the corresponding layout has as index. This bug is fixed. Using Edit Selected in the layout encoder bar works always when having layout elements selected. | | When copying user profiles, the Layout Element Defaults were not copied. This bug is fixed. Copying a user profiles copies also the Layout Element Defaults. | | When recording a timecode show while in a session and with different users, the displayed playhead was not properly synchronized after stopping and resuming the recording across all stations. This bug is fixed. The playhead of a timecode show is synchronized across all stations in the session during when stopping and resuming a recording. | | Having “Run as Administrator” activated for the grandMA3 onPC application on Windows, kept the terminal window open. This bug is fixed. The terminal window of grandMA3 onPC hides also when “Run as Administrator” is enabled for grandMA3 onPC on Windows computers. | | The Dual Encoder Press Factor of the encoder resolutions was not respected. This bug is fixed. The Dual Encoder Press Factor is taken into account during the press, hold, and turn of the outer encoder. | | When loading a show file the Oops stack was not cleared This bug is fixed. The list of events that can be oopsed is reset when loading a different show file. | | It was not possible to set the Universe and Address at the same time in the Address calculator of the Tester Encoder Bar in the DMX Sheet. This bug is fixed. Setting a relative DMX address (for example 2.1) in the Address calculator of the Tester Encoder Bar is possible. | | When selecting a channel function on an attribute encoder, the readout of the values was always in the readout of the first channel function. This bug is fixed. The displayed value on an encoder follows the selected readout of the user profile. | | Store /All or /AllForSelected only stored values in the cue. This bug is fixed. The preset references are stored if store/all or /AllForSelected is used. | | If “Lo” was entered in the command line and executed, the root object was locked. This bug is fixed. Lock and Unlock now require a target and the abbreviation is “Loc”. | | When editing two objects right behind each other without closing the editor first, for example macros, the command line did not revert back to the root when closing the editor. This bug is fixed. Closing the editor after editing several objects of the same type right behind each other, brings the command line back to the root. | | Copying cues with several cue parts and duplicate values created empty parts at the copy destination. This bug is fixed. Copying cue parts copies them correctly to the destination. | | The Update function was not available if a clone operation was performed before. This bug is fixed. Update is available after doing a clone operation. | | When the selected sequence was played back, pressing Goto Please or Load Please did not open the Goto or Load pop-up. | | Importing a sequence after exporting it did not work correctly when it used embedded presets. This bug is fixed. Embedded presets are exported correctly. Embedded presets that were exported with grandMA3 v1.8 or prior cannot be imported correctly. Please export embedded presets with v1.9 or later in order to be able to import them later correctly. | | Oopsing the deletion of a preset did not restore the references in cues to the preset. This bug is fixed. Preset references in cues are restored when oopsing the deletion of presets. | | Copying a sequence with a recipe did not cook the recipe in the copy. This bug is fixed. Copied sequences are automatically cooked. | | Commands in macros that ended with a quote were corrupted in a way that the last quote was ignored and therefore the words in the quote could be interpreted as keywords. This bug is fixed. Quotes in commands are treated correctly. | | The software crashed when executing Copy Attribute \[Source\_Attribute\_Number] At \[Destination\_Attribute\_Number]. This bug is fixed. The software does not crash anymore when executing such syntax. To transfer data from one attribute to another attribute, attribute cloning is implemented (see above). | | The Update key could blink even when there were no active values in the programmer. This bug is fixed. The Update key blinks only when there are active values that can be updated into active objects. | | The software could crash when deleting objects via Plugins. This bug is fixed. The software does not crash anymore when objects are deleted by Plugins. | | The software could freeze when the user entered an invalid value into a timing calculator, for example, **2’56 UP**. This bug is fixed. Entering invalid values into timing calculators ignores the values and applies no new values. | | Align stayed on when entering values for an attribute after using Align on a different attribute. This bug is fixed. Align is switched off when changing values of an attribute after using Align with a different attribute. | | Align stayed on when changing to a different encoder in an encoder bar of a window, for example the 3D window. This bug is fixed. Align is switched off when changing to a different encoder in an encoder bar of a dedicated window. | | The first four gobos in the gobo image pool could be unlocked. This bug is fixed. The fist four gobos in the gobo image pool are system locked and cannot be unlocked. | | When starting a new show, processing units sent out DMX values of 0. This bug is fixed. Processing units do not send DMX when a new show is started. | | The programmer was cleared when specifying a non-existing object in a command. This bug is fixed. Objects specified in commands that do not exist are not clearing the programmer anymore. | | Commands in command cells that were separated with semicolons were not applied correctly. This bug is fixed. Entering commands separated with semicolons are applied correctly in command cells. | | It was possible to import data from XML files that had forbidden characters in their file names. This bug is fixed. XML files with forbidden characters in the file name cannot be imported. | | When moving blocked cues, the values were not displayed in the correct color afterwards, and unblocking did not work correctly. This bug is fixed. Moving blocked cues correctly recalculates the tracking. | | When executing Macro, Macro +, or Macro -, the next cue was triggered. This bug is fixed. Invalid commands with the macro keyword does nothing anymore. | | When creating scribbles in a session, they were first only visible on the station they were created on. This bug is fixed. Scribbles can now be seen by other session members immediately after they were created. | | Oopsing a clone command on a connected console did not work. This bug is fixed. | | The wildcard (\*) at the beginning of a string or in between a string returned wrong results. This bug is fixed. | | When store merge Remove values into step 2 or above, an empty step remained. This bug is fixed. When removing values from steps, resulting empty steps will be also deleted. | | When calling a preset with individual timings and MAtricks timings into the programmer, the timings were summed up in the programmer. This bug is fixed. MAtricks timings of presets override the individual timings of presets. | | When storing a world in a multi-user environment the active attributes of other users were mixed together with the current selection. This bug is fixed. Only the selection and active attributes of the own programmer are taken into account when creating a new world. | | Pressing Oops several times in order to delete text from the command line did not delete quoted text. This bug is fixed. | | Cooked attribute values were not handled correctly during import and export. This bug is fixed. Recipes keep the information of cooked values. | | Exporting an object with a recipe did not export the used group as a dependent object. This bug is fixed. | | The Goto or Load pop-up did not open when setting Goto or Load as EncoderClick function to special executors 30 or 40. This bug is fixed. | | Storing a cue part to a range of cues did store a lot of cues with point cue numbers in between. This bug is fixed. For example, Store Cue 2 Thru 4 Part 1 stores cue part 1 in cues 2, 3, and 4. | | Values were not cloned to the correct sub-fixture, when multi-instance fixtures are cloned to different multi-instance fixtures. This bug is fixed. Note: This works only when cloning to fixtures of the same fixture type. | | The software could crash when editing the encoder resolution of an attribute that was added to the show by importing a user profile. This bug is fixed. | | Editing a scribble of a scribble pool object only transferred the content to other stations in the session when changing another property of the scribble afterward. This bug is fixed. Changing a scribble transfers the changes immediately to the other stations of the session. | | While being in a session, copying many sequences took a long time. This bug is fixed. | | When switching to a different channel function, the value was displayed in the natural readout of the attribute on the encoder. This bug is fixed. Encoders display the value in the natural readout that is defined for the attribute of the channel function while having the readout set to Natural. | | In the Layout view, cloning fixture positions only worked if the target fixtures did not previously exist in this layout. | | When recasting a preset that was used in a recipe, selective data for the fixtures used in the recipe was added to the cue / preset. This bug is fixed. Recasting presets excludes recipes in which the preset is used. | | When editing another sequence while having the sequence editor open, the settings of the previous sequence were edited instead. This bug is fixed. | | Calling channel sets of fixtures with subfixtures did not set the value of the channel set or set it for the wrong subfixture in some cases. | | Mirroring a sequence onto an existing sequence overwrote the existing one without confirmation. This bug is fixed. Assigning a sequence to an existing one asks the user if they want to do so. | | Executing ineffectual commands with **Edit**, for example, Edit Set, edited the root. This bug is fixed. Generally, editing the root is now blocked. | | Recasting a preset that had MAtricks removed the values, that were generated by the MAtricks, from the cue where the preset was used. This bug is fixed. Recast respects the MAtricks values. | | Storing with the option /Merge overwrote the existing attributes of a world with active attributes. This bug is fixed. Store /Merge with Worlds merges the data correctly. | | Fixture At Group commands or Group At Group commands did not apply the correct values to the destination fixtures. This bug is fixed. | | When tapping on a single fixture in the fixture sheet in order to create a clone command, tapping the first fixture after entering **At** into the command line the clone command was executed immediately. This bug is fixed. It is possible to specify multiple fixtures as a clone destination by tapping the fixtures in the fixture sheet. The clone command will be executed when the user presses Please. | | Oopsing a clone operation in the programmer did not work when the clone operation was performed by a user who did not use the Default user profile. This bug is fixed. Clone operation can be oopsed, no matter which user profile is used. | | When entering keyboard shortcuts on a macOS station by using Command, the resulting keyword could be stuck in the command line. This bug is fixed. | | The Destination Cue value in the Copy Cue pop-up was not recalled correctly from the saved preferences. This bug is fixed. | | When turning an attribute encoder, clearing the selection, selecting a new fixture, and turning the encoder again could snap the value back to default. This bug is fixed. Quickly changing selections while turning encoders does not snap back the attribute value to default. | | When creating a recipe in a cue, existing data of the cue could be deleted from the cue, also the recipe did not address the deleted attributes. This bug is fixed. | | When cooking a recipe, only the fixtures and attributes of the selected world and the selected filter were used. This bug is fixed. Cooking a recipe is now independent of the selected world and the selected filter. | | The Total Reference Update used only the fixtures and attributes of the selected world and the selected filter. This bug is fixed. The Total Reference Update is now independent of the worlds and filters. | | The dual encoder factors did not work when the encoder resolution was set to Fine. This bug is fixed. | | The number of fixtures using this preset did not update when the values on the fixtures were changed manually, for example, by turning the encoders. This bug is fixed. Presets update the number of times the preset is used correctly. | | When cloning in the programmer and the source fixture had a selective presets active that the destination fixture was not part of, created also a preset reference for the destination fixture to the selective preset. This bug is fixed. When cloning in the programmer and selective presets are involved, only hard values will be created. | | When copying a layout element, the set Action was not copied. This bug is fixed. | | When cloning in the programmer, the values in the programmer of another user profile could be reset to default. This bug is fixed. | | When copying an object and the target object already exists, the target was overwritten. This bug is fixed. If the target object in a copy command is not empty, a pop-up opens and asks for confirmation to overwrite the target. | ### Connections [Section titled “Connections”](#connections-2) | Description | | ---------------------------------------------------------------------------------------------------------------------------------------------------------------------------------------------------------------------------------------------------------------- | | When connecting a display to a console that is currently in Desk Lock, the Desk Lock was not enabled for the new display. This bug is fixed. Adding a display to a locked console locks also the connected display. | | When calling OSCData by name instead of the index number, the OSC command was not executed properly. This bug is fixed. When sending OSC commands the OSCData line can be addressed using the name. | | When receiving PSN from two or more different senders (different IP and/or port) only one PSN stream was read correctly. This bug is fixed. PSN input from two or more different senders is now handled correctly. | | When sending the same Art-Net universe to different unicast receivers, the Art-Net Sequence Counter was counting the packets in total for all receivers together. This bug is fixed. The Art-Net Sequence Counter is independent per unicast receiver. | | The software could crash when receiving OSC messages while loading a show file. This bug is fixed. Loading a show file while receiving OSC messages does not crash the software. | | In Agenda, triggering a macro was only possible via command. This bug is fixed. A macro in agenda can be triggered through a selected object and an action. | | When receiving MIDI timecode with a rate of 25 fps, the incoming signal stuck for a moment every full minute. This bug is fixed. Receiving MIDI timecode with a rate of 25 fps works without issues. | | An incoming timecode signal on a grandMA3 onPC station was jumping when a visualizer with a viz-key was running on the same computer. This bug is fixed. Visualizers with a viz-key connected do not interrupt the incoming timecode signal on the same station. | | Master faders did not work as expected, after receiving a MIDI message with value 0 for that fader. This bug is fixed. Faders with the Master function still work after receiving a MIDI message for the same master. | | OSC echoes in the system monitor for sent OSC messages did not address the correct sequence when the sequence had no custom name. This bug is fixed. | | grandMA3 onPC (Windows) only offered Intel VLAN adapters. This bug is fixed. All virtual network interfaces (except Bluetooth interfaces) are available in the grandMA3 onPC software. Slow interfaces with a speed lower than 100 MBit/s are not available. | | The console could stop sending DMX for a short moment when a different network interface was selected for MA-Net and a USB device was connected. This bug is fixed. DMX output does not pause when a USB device will be connected. | | The software could crash when receiving OSC data and the user deleted the corresponding OSC data configuration at the same time. This bug is fixed. | ### Patch [Section titled “Patch”](#patch-3) | Description | | ----------------------------------------------------------------------------------------------------------------------------------------------------------------------------------------------------------------------------------------------------------------------------------------------------------------------------------------------------------------------------------------------------------------------------------------------------------------------------------- | | DMX Curves assigned to 16 bit attributes caused the DMX output of these DMX channels to behave like an 8 bit channel. This bug is fixed. DMX Curves work correctly with 16 bit attributes. | | The software crashed when changing the DMX Curve for an attribute while editing a fixture. This bug is fixed. When editing a fixture DMX Curves can be set to attributes of the fixture. | | When adding new fixtures to the show, the universal fixture could be added to universal presets where a fixture holds the universal data. This bug is fixed. No fixtures are added to presets when adding new fixtures to the show. Unless the data gets cloned because the fixtures were created by copying them in the patch. | | If a Highlight Preset was reset to original and you left the patch, the user would not be asked to confirm this action. This bug is fixed. Changing a Highlight requires confirmation when leaving the patch. | | When entering the patch again after assigning different feature groups and features to attributes, these changes were reset. This bug is fixed. The assignment of different feature groups and features to attributes remains, also when doing other changes in the patch later. In case of assigning different feature groups and features, the affected cells have a orange font color. Tapping Reset to Default will revert all changes in the Attribute Definitions to default. | | When creating a DMX Curve that should mimic a switch curve a warning was displayed. This bug is fixed. Custom curves that mimic a switch curve can be created and visualized. | | Files in the folder gma3\_library/fixturetyperesources/meshes were deleted when an MVR file was imported. This bug is fixed. | | Fixtures imported from an MVR file could have a wrong rotation. This bug is fixed. | | Importing GDTF files with a Geometry of Type “Display” caused a crash. This bug is fixed. | | Storing individual special values, for example, default values, for XYZ attributes was impossible. This bug is fixed. | | When storing special values the content of all programmers in the show file was taken. This bug is fixed. Only the programmer content of the user who executes a store special values operation is taken into account. | | When trying to assign a newly created feature to an attribute, and the feature is part of a feature group with several features, the feature drop-down did not open the first time. | | The patch menu disappeared when the user started to edit a macro, and left the command line in the patch destination. This bug is fixed. Editing macros is not possible while being in the patch. | | When changing the DMX Invert properties of fixtures in the Live Patch, the output did not change immediately. This bug is fixed. | | When adding new DMX channels in between the existing ones in a fixture type, the default values of existing DMX channels could change. This bug is fixed. | ### Phaser [Section titled “Phaser”](#phaser-2) | Description | | ------------------------------------------------------------------------------------------------------------------------------------------------------------------------------------------------------------------------------------------------------------------------------------------------------------------------------------------------------------------------- | | It was not possible to create phasers that used values from different channel functions of the same attribute. This bug is fixed. Phasers with values of different channel functions are working as expected. | | It was not possible to adjust the Acceleration, Deceleration, Transition, or Width of a phaser when channel sets were used as absolute values in the steps. This bug is fixed. Phasers can be adjusted as requested, also when using channel sets. | | When there were phasers for different attributes in the programmer, and each phaser had a different number of steps, the phaser with the lower number of steps could get additional steps when changing the values on the Measure, Phase, or Speed layer for the second phaser. This bug is fixed. Phasers do not get additional steps when adjusting a different phaser. | | When exchanging the fixture type of a fixture, the MAtricks phase values of recipes could get ignored. This bug is fixed. | | When changing the MAtricks of a preset that was used in a recipe, the changed MAtricks were not always transferred into the recipe. This bug is fixed. | ### Playback [Section titled “Playback”](#playback-3) | Description | | --------------------------------------------------------------------------------------------------------------------------------------------------------------------------------------------------------------------------------------------------------------------------------------------------------------------------- | | When a sequence or preset had AutoStart disabled, it was not possible to play back the object by using Flash or Temp. this bug is fixed. Flash and Temp play back a sequence or preset, also when AutoStart is disabled. | | The DMX output could shortly jump when updating/storing cues or activating values in the programmer. This bug is fixed. The DMX output does not jump when storing or updating cues or knocking values into the programmer. | | Programmer values could return after dismissing processing units from the session, clearing the programmer, and then inviting the processing units again. This bug is fixed. Programmer values do not come back when clearing the programmer after dismissing processing units and then taking them again into the session. | | The Invert MAtricks settings of recipes did not work. This bug is fixed. MAtricks Inverts in recipe work again as expected. | | The output of a sequence could change when cooking a preset again, and oopsing recipe changes before. This bug is fixed. Oopsing changes on recipes are undone correctly. | | When changing a preset that was used together with another preset in a phaser the MAtricks values in the recipe of the other preset could get lost in the cue. This bug is fixed. Changing presets does not remove MAtricks values in cues of other presets. | | Restart Next Cue did not start the last cue of a sequence when Wrap Around was disabled. This bug is fixed. Restart Next Cue works also in combination with disabled Wrap Around setting. | | If a sequence was mirrored and a world filter applied, the cue timings were not displayed correctly anymore. | | Timecode events were not triggered anymore when the AfterRoll was running. This bug is fixed. | | The output of a sequence could not be correct when being in a session, when appearances were assigned via cue commands to the same sequence. This bug is fixed. | ### Windows [Section titled “Windows”](#windows-4) | Description | | ---------------------------------------------------------------------------------------------------------------------------------------------------------------------------------------------------------------------------------------------------------------------------------------------------------------------------------------------- | | When opening grandMA3 onPC on Windows again after disconnecting an additional monitor, the window of the application was still put on the non-existing monitor. This bug is fixed. GrandMA3 onPC windows are moved to the remaining monitors when starting grandMA3 onPC after disconnecting a monitor. | | The Content Sheet did not display the values of linked sequences properly. This bug is fixed. Values of linked sequences are displayed in the content sheet properly. | | The Pan and Tilt values in the Stage Calibration dialog were always displayed as Hex24 values. This bug is fixed. The Stage Calibration dialog follows the readout of the user profile to display the Pan and Tilt values. | | It was possible to close the Patch menu while the MVR Import dialog was open. This bug is fixed. The Patch menu cannot be closed anymore when the MVR Import dialog is still open. | | The Update menu closed itself when changing a property in it. This bug is fixed. Changing a property inside the update menu keeps the update menu open. | | Setting the font size in windows to 10 or 12 did not make any difference in the resulting look. This bug is fixed. Font sizes 10 or 12 in windows look different in sizes now. | | The order of the software versions in the Select Update pop-up in the Software Update menu was mixed. This bug is fixed. The order of the software versions in the Select Update pop-up is sorted by name. | | The background of the button functions of executors 130 and 140 in the executor label in the playback window or the executor bar had a circular background. This bug is fixed. The icons of button functions for all executors in the playback window or executor bar have a square background. | | When scrolling inside the Master tab in the Object-section of the Assign menu, the focus was not set to the next parent in the tree when reaching the end of a parent. This bug is fixed. Scrolling in the expanded list of Masters in the Object-section of the Assign Menu works without jumping focus. | | When switching to a different object type in the Object-section of the Assign Menu and then going back to the former object type, the currently assigned object could not be selected again. This bug is fixed. The currently selected object in the Assign Menu can be selected again after temporarily switching to a different object type. | | The Insert New Fixtures dialog had a View Mode button without functionality. This bug is fixed. The View Mode button in the Insert New Fixtures dialog is removed. | | When enabling Show Connectors on consoles, a connected grandMA3 extension displayed the wrong connectors. This bug is fixed. The extension displays a correct connector view. | | If the grandMA3 software was booted and the network menu was opened for the first time, all categories would collapse. This bug is fixed. All categories are expanded when opening the network menu. | | When creating a new show using the command line while the phaser overlay was open, the software could crash. This bug is fixed. The NewShow command can be used while the phaser overlay is open. | | When having a filter editor open and changing the name of the filter, the title bar of the filter editor did not update to the new name. | | It was possible to disable display 1 in the display selector on onPC stations. This bug is fixed. On onPC stations display 1 cannot be disabled anymore in the display selector. | | When editing the start time or start date of an agenda event, the corresponding pop-up did not open. This bug is fixed. | | When scrolling inside the API Description list the focus did not always follow the selected item. This bug is fixed. Inside the list of API Descriptions in the plugin editor, the focus is always on the selected item. | | It might have happened that the text in the layout elements overlapped with the dimmer bar. This bug is fixed. | | Processing units in standalone mode displayed the XRLs in green, which pretended output. This bug is fixed. Outputs are displayed as disabled if the processing unit is in standalone mode. | | The on screen keyboard could not enter a space when Shift or Caps Lock was active. This bug is fixed. | | The Assignment Editor did not search for numbers. This bug is fixed. Searching in the Assignment Editor for just numbers is possible. | | When changing the display preferences of the Assign menu, while the Edit tab was open, only the Edit tab changed to the new display. this bug is fixed. | | The clock window did not update the list of timecode slots, when a timecode slot was renamed. This bug is fixed. | | The calculator for the Tester Output encoder of the DMX Tester Encoder Bar in the DMX Sheet displayed a wrong input range. This bug is fixed. | | The Render Quality section in the Import section of the Import/Export menu did not offer the predefined render qualities for import. This bug is fixed. | | Entering a password into the login pop-up showed the password in readable text. This bug is fixed. The password input in the login pop-up masks the entered password with a \* for every character. | | Disabling Show Bottom Menu in the sMArt window blocked the possibility to open the settings menu for the sMArt window. This bug is fixed. | | Calling a view with a DMX Sheet did not jump to the selected fixtures, when Only Selection was enabled. This bug is fixed. | | The MVR Merge dialog displayed rotation values in quaternions. This bug is fixed. Rotation values are displayed in degrees. | | The screen encoder did not scroll in the System Monitor window or the Command Line History window. This bug is fixed. | | The sizes of the sequence settings pop-up were different and were dependent on the size of the sequence sheet from where the pop-up was opened. This bug is fixed. The size of the sequence setting pop-up should be the same for all sequence sheets on the same display. | *** ## []()Appendix [Section titled “Appendix ”](#appendix) * It is recommended to use a dedicated and a separate physical network for each grandMA3 session. * When using DMX protocols it is recommended to use a dedicated physical network for each protocol. * The recommended workflow for executor configurations that are different compared with the default executor configuration is to create a new executor configuration, do the changes in the new configuration and save the changes. * XML files with exported executor configurations from grandMA3 v1.2 and prior cannot be properly imported to grandMA3 v1.3 or later due to structural changes. * XML files with exported analog remote setups from grandMA3 v1.3 and prior cannot be properly imported to grandMA3 v1.4 or later due to structural changes. * XML files with exported timecode shows from grandMA3 v1.3 and prior cannot be properly imported to grandMA3 v1.4 or later due to structural changes. *** ## []()Known Limitations [Section titled “Known Limitations ”](#known-limitations) Software update via network to onPC stations requires confirmation during the install process at the destination system. When multiple GlobalMasters exist on the network, each having the same session and location name, the station with the higher priority takes over automatically. If all stations have the same priority, the station with the longest Online Time becomes the GlobalMaster for all stations. Recast will only recast presets to cues if there is a preset link in the absolute layer. Loading show files that were saved in previous versions deletes the programmer content.
# Release Notes 2.0
> Do you need help getting started in grandMA3? Perfect - here we describe a few quick steps to get you rolling. The manual will explain functionality in detail w
* [Get Started](/grandma3/2-3/key_rn_v2_0/#h2__1435677565) * [Bug Fix Version 2.0.2.0](/grandma3/2-3/key_rn_v2_0/#h2_1781474115) * [Other Enhancements](/grandma3/2-3/key_rn_v2_0/#h3__1137860005) * [Bug Fixes](/grandma3/2-3/key_rn_v2_0/#h2_72787598) * [Release Version 2.0.0.4](/grandma3/2-3/key_rn_v2_0/#h2__1841900993) * [Features](/grandma3/2-3/key_rn_v2_0/#h2_1142862430) * [Single Digit Input](/grandma3/2-3/key_rn_v2_0/#h3__1621154093) * [Fixture Type Presets](/grandma3/2-3/key_rn_v2_0/#h3__625988645) * [Show Creator](/grandma3/2-3/key_rn_v2_0/#h3__711745471) * [Tracking](/grandma3/2-3/key_rn_v2_0/#h3_1351829368) * [Tracking Shield](/grandma3/2-3/key_rn_v2_0/#h4_1351829368) * [Cue Zero](/grandma3/2-3/key_rn_v2_0/#h4_3660909) * [Dimmer Cue Only](/grandma3/2-3/key_rn_v2_0/#h4__1071679005) * [MIB](/grandma3/2-3/key_rn_v2_0/#h3__1085121338) * [Sheet Column Editing](/grandma3/2-3/key_rn_v2_0/#h3_2074549335) * [Fixture Sheet](/grandma3/2-3/key_rn_v2_0/#h3__704133460) * [Layouts](/grandma3/2-3/key_rn_v2_0/#h3_457312679) * [Windows, Views, and View Bar](/grandma3/2-3/key_rn_v2_0/#h3__526547644) * [Selection and Selection Grid](/grandma3/2-3/key_rn_v2_0/#h3__429320065) * [Encoder Bar](/grandma3/2-3/key_rn_v2_0/#h3_611477531) * [Encoder Bar Pool](/grandma3/2-3/key_rn_v2_0/#h4_828587241) * [Knob UI Style and Encoder UI Style](/grandma3/2-3/key_rn_v2_0/#h4_1480500119) * [Generators](/grandma3/2-3/key_rn_v2_0/#h3_1134998295) * [Random](/grandma3/2-3/key_rn_v2_0/#h3_1134998295) * [Bitmap](/grandma3/2-3/key_rn_v2_0/#h4_2012165831) * [Sounds](/grandma3/2-3/key_rn_v2_0/#h3_1838296282) * [Timecode](/grandma3/2-3/key_rn_v2_0/#h3_1779041226) * [Clone Window](/grandma3/2-3/key_rn_v2_0/#h3_1395527696) * [Special Dialog Window](/grandma3/2-3/key_rn_v2_0/#h3_304211589) * [Color Picker](/grandma3/2-3/key_rn_v2_0/#h4_1475112279) * [Shapers Dialog](/grandma3/2-3/key_rn_v2_0/#h3_304211589) * [3D](/grandma3/2-3/key_rn_v2_0/#h3__1137860005) * [MVR-xchange](/grandma3/2-3/key_rn_v2_0/#h3__985159704) * [Other Enhancements](/grandma3/2-3/key_rn_v2_0/#h2_1198082799) * [Changes](/grandma3/2-3/key_rn_v2_0/#h2__656690415) * [Bug Fixes](/grandma3/2-3/key_rn_v2_0/#h2__146634055) * [Appendix](/grandma3/2-3/key_rn_v2_0/#h2__1835053169) * [Known Limitations](/grandma3/2-3/key_rn_v2_0/#h2__1852571500) *** ## Get Started [Section titled “Get Started”](#get-started) Do you need help getting started in grandMA3? Perfect - here we describe a few quick steps to get you rolling. The manual will explain functionality in detail while the MA e-Learning within the MA University offers you all kinds of training. All information can be accessed through the MA Lighting website [www.malighting.com](http://www.malighting.com/). Let’s go! To leave the Release Notes, tap I agree on the top right corner. The main screen of grandMA3 software opens. On the right side, you can see predefined views on view buttons. To switch between the views, tap the view buttons. If this is your first time starting grandMA3 software, patch some fixtures first. Or you can load one of the demo shows delivered with the software. Either way, press Menu. If you use grandMA3 onPC software, there is a  symbol in the top left corner there. Clicking the  symbol is the same as pressing Menu on a console. Tap Backup and then Load, now you are ready to load shows. You would like to get right on it? Switch Shows to Demo Shows in the title bar first. To do so, tap Shows repeatedly until it says Demo Shows. Once Demo Shows is displayed, it is possible to select any of them. After you selected a demo show, tap Load.\ In case a show was already loaded, a pop-up will appear asking if you want to save the current show first before loading the new one. It’s up to you! Here we go! Now you are ready to work with the grandMA3 software. It is as easy as that! Again - there are view buttons there, which change the screen content. At the bottom, you will find the encoder bar and the command line. Technically that is all you need to get started. For more information, see the grandMA3 help menu. To access the help in the console or the onPC, tap the view buttons named Help or visit the [Online Manuals](https://www.malighting.com/training-support/online-manuals/) on the MA Lighting website. If you want to learn the grandMA3 software step by step, please see the [Quick Start Guide](/grandma3/2-3/qsg/) and join the MA e-Learning - it’s free of charge and available on the [MA Lighting website](https://www.malighting.com/). Have fun with using our grandMA3 software - Find all the improvements and changes of this software version further down. | | | | ------------------------------------------ | ------------------------------------------------------------------------------------------------------------------------- | |  | **Hint:** | | | The grandMA3 software will start using the show file (or status) that was in operation before the software was shut down. | *** ## Bug Fix Version 2.0.2.0 [Section titled “Bug Fix Version 2.0.2.0”](#bug-fix-version-2020) ### Other Enhancements [Section titled “Other Enhancements”](#other-enhancements)  Added the Select NDI Bandwidth setting for video pool objects set to Source **NDI**: The user can choose between the values **Lowest** and **Highest**. Select NDI Bandwidth defines the quality at which the NDI stream is request from the sender. By default, the value is set to **Lowest**.  Improved Import and Export in the Show Creator menu: * The Gaps setting in the Import and Export tabs are now independent from each other. * When entering Import or Export, the default states of Gaps for Import and Export are applied: * Import: Gaps on * Export: Gaps off *** ## Bug Fixes [Section titled “Bug Fixes”](#bug-fixes) ### 3D [Section titled “3D”](#3d) | Description | | ---------------------------------------------------------------------------------------------- | | The software could crash while loading a show file when using materials in meshes extensively. | ### Command Line and Macro [Section titled “Command Line and Macro”](#command-line-and-macro) | | | | ------------------------------------------------ | ------------------------------------------------------------------------------------------------------------------------------------------------------------------------------------------------------------------------------------------------------------------------ | |  | **Important:** | | | In order to preserve your looks on stage, the output for the following described recipe bugs is not corrected automatically, when loading a show file from v2.0.0.4. If you want to re-cook all recipes in your show file, execute Cook DataPool Thru /MergeLowPriority. | | Description | | ---------------------------------------------------------------------------------------------------------------------------------------------------------------------------------------------------------------------------------------------- | | When importing a timecode show, the Cue Destination of timecode events was not imported if the timecode event had Go+ set up as a token. | | When exporting and importing data pools or pages, the assigned objects could be moved to different executors. This bug is now fixed. When exporting data pool or pages, the executors are always exported with gaps, even if Gaps is disabled. | | When importing data pools the information about the assigned object in cue recipes for the value property was lost. | | When moving timecode events while being in a session on other stations the selected events were moved to the same time. The distance of the events to each other was discarded. | | Having several recipes using the same selection and using different selective presets caused incorrect cooking results. | | When changing recipes, the cooked data from other recipes that used selective presets was discarded. | | The data of recipes without MAtricks could not be cooked when several recipes used the same selection but only one of them used MAtricks. | | The hostname of xPort nodes was set to “Waiting” when the interface was set to use DHCP and no DHCP server was available. | | The software could crash when doing a screenshot while the scale factor of the display was not set to 1. | ### Patch [Section titled “Patch”](#patch) | Description | | ---------------------------------------------------------------------------------------------------------------------------------------------- | | The order of columns in the Patch menu was different compared with v1.9.7.0. | | In the Live Patch it was possible to change the Coarse, Fine, and Ultra DMX channels of fixture types. | | When importing fixture types that have two or more geometries with identical names, the linking of the attributes to the geometries were lost. | ### Windows [Section titled “Windows”](#windows) | Description | | ------------------------------------------------------------------------------------------------------------------------- | | The tool bar and the Record button could not be displayed in the Timecode Viewer window when switching on the Setup mode. | *** ## Release Version 2.0.0.4 [Section titled “Release Version 2.0.0.4”](#release-version-2004) ## Features [Section titled “Features”](#features) The latest release of grandMA3 version 2.0.0.4 rolls out several enhancements that enrich your lighting experience. Besides numerous improvements based on your highly appreciated feedback, many new and clever features have found their way into the software. Read on for a quick introduction and find links for more information. *** ### Single Digit Input [Section titled “Single Digit Input”](#single-digit-input)  New in this release Single Digit Input multiplies all input integer dimmer values below 10 by 10. To enable/disable Single Digit Input go to Menu - Settings - User Configuration - Profiles. When Single Digit Input is enabled, the following rules apply: * Only whole numbers from 1 to 9 are applied as values 10, 20, 30, 40, 50, 60, 70, 80, or 90. * Digits with decimal place, for example 1.5, are deemed as 1.5. * When specifying any attribute in a command (Attribute “Dimmer” …) single digit input is not applied. * When using the At command without any additional attributes being specified, the value is taken by the natural readout of the dimmer of the user profile. To apply a dimmer value of 50 to the currently selected fixtures as single digit input type: | | | | ------------------------------------------------------------------ | ------------------------- | |  | User name\[Fixture]> At 5 | To apply a dimmer value of 40 to fixtures 1 to 4, type: | | | | ------------------------------------------------------------------ | ------------------------------------------ | |  | User name\[Fixture]> Fixture 1 Thru 4 At 4 | See also [User Settings](/grandma3/2-3/user_settings/). *** ### Fixture Type Presets [Section titled “Fixture Type Presets”](#fixture-type-presets)  New in this release Fixture Type Presets allow to store presets directly in a fixture type. This can be useful, for example, when you have to use a fixture type in a different show file, and want to save time by creating your standard set of presets again. | | | | ------------------------------------------------ | ----------------------------------------------------------------------------------------------------------------------------------------------------------------------------------------------------------- | |  | **Important:** | | | Fixture Type Presets are not part of the GDTF DIN Specification. Therefore, Fixture Type Preset can be only transferred to different show files when using grandMA3 Fixture Types during export and import. | Using the new keyword AutoStore allows to store presets into fixture types.\ The syntax AutoStore FixtureType \[“FixtureType\_Name” or FixtureType\_Number] or AutoStore Fixture \[“Fixture\_Name” or Fixture\_Number] makes it possible to store the presets into the corresponding fixture type.\ When choosing the fixture type as target, presets that are only available for a special mode are also cloned as Fixture Type Preset for all other modes.\ When choosing a fixture as target, presets are only added as Fixture Type Presets to their corresponding modes. To break down feature groups or attributes even further, specify a filter in the If keyword. Executing the store command with fixtures or fixture types triggers a pop-up that asks the user whether to Merge the existing FixtureType Presets or to Overwrite them. Explore FixtureType Presets when editing a fixture type. To do so, go to Menu - Patch - Fixture Types - select the desired Fixture Type - Edit - select the desired mode - Edit - FT Presets. | | | | ------------------------------------------ | -------------------------------------------------------------------------------------------------------------------------------------------------- | |  | **Hint:** | | | The FixtureType editor now separates the different modes of a fixture type. To change a channel of a mode, select the mode first and then edit it. | To create presets out of a fixture type, use the AutoCreate keyword: AutoCreate Fixture \[“Fixture\_Name” or Fixture\_Number] At Preset \[“FeatureGroup\_Name” or FeatureGroup\_Number].\[“Preset\_Name” or Preset\_Number] Creating presets merges them with the already existing presets of the same name. As soon as a dedicated target is defined, the name resolving is ignored, and the presets are stored to the specified target location. Instead of using the command line to store presets into fixture types or creating presets out of fixture types, the Show Creator menu can be used.\ To learn more about this new menu, please [read below](https://malighting.clickhelp.co/smart/grandma3-user-manual-publication/features/a/h3_457312679). | | | | -------------------------------------------------- | ------------------------------------------------------------------------------ | |  | **Known Limitations:** | | | - Only presets that have a name, can be used for creating FixtureType Presets. | * At the moment, all presets are stored to a fixture type, but it should only be possible to store global and universal presets to fixture types. * Presets that contain attributes of different feature groups discard these attributes during import. | See also [AutoStore](/grandma3/2-3/keyword_autocreate/), [AutoCreate](/grandma3/2-3/keyword_autocreate/), [Store Presets to Fixture Types](/grandma3/2-3/sc_fixture_type_presets/), and [Create Presets from Fixture Types](/grandma3/2-3/sc_autocreate_groups/). *** ### Show Creator [Section titled “Show Creator”](#show-creator)  New in this release The Show Creator menu (Menu - Show Creator) combines the former Import/Export menu with new menus. The Show Creator stores presets into fixture types and auto-creates presets out of fixture types (see [FixtureType Presets](https://malighting.clickhelp.co/smart/grandma3-user-manual-publication/features/a/h3__625988645) above).\ The Show Creator menu offers different tabs: * Import: The only changes here are: * The addition of Gaps. When Gaps is enabled, the gaps that are part of the XML file will be imported, too. * The additon of Clear Collection for the Local area. Tapping Clear Collection resets the collection of items. - Export: The only change here is the addition of Gaps. When Gaps is enabled, the collected and empty pool objects will be exported as gaps into the XML file.\ Learn more about Gaps in the [/Gaps Option Keyword topic](/grandma3/2-3/ok_gaps/). * Create Groups: Creates groups based on the current patch. * Left area: Select objects you want to create a group for. Tapping Fixture Types switches to Classes and then to Layers. * The right area displays the group pool. The user can collect single places in the group pool where they want to create groups. * The Advanced mode changes the menu when it is enabled: * A center area appears that allows to select only a reduced set of fixtures that are matching the selected objects in the left area. * Tapping Clear Collection resets the collection of items. * Tap AutoCreate Groups /All or AutoCreate Groups /Single in order to create a group with all fixtures in it, or to create single fixture groups of every selected fixture. | | | | ------------------------------------------ | --------------------------------------------------------------------------------------------------- | |  | **Hint:** | | | For more information about AutoCreate, see [AutoCreate Keyword](/grandma3/2-3/keyword_autocreate/). | * Create Presets: Creates universal dimmer or color presets: * The top bar allows to switch between the creation of Dimmer or Color presets. * The left area is dependent if Dimmer or Color has been chosen: * Dimmer: Dimmer Increment defines the increase in value from one preset to the next. Dimmer presets are created from 0 % to 100 %. The input range for Dimmer Increment is from 5 % to 50 %. * Color: When creating color presets, presets will be created by the combination of Hue and Saturation. Therefore the user can define how many Hue values (Amount Hue) and Saturation values (Amount Saturation) will be combined when creating the presets. Sort By defines if the presets will be ordered by **Hue** or **Saturation** values. When enabling Book, the user can select whole swatch books or selected gels to create presets from. * The right area allows to collect the preset spots where the presets shall be created. * Tapping Clear Collection resets the collection of items. * Tapping Generate Dimmer or Generate Color creates the corresponding presets. Only the button of the chosen type is not grayed out. * Create Presets from FT: Creates presets in the show using the presets that are stored in fixture types. | | | | ------------------------------------------------ | ----------------------------------------------------------------------------------------------------------------------------- | |  | **Important:** | | | When collecting at least one preset in the pool before auto creating presets, the name resolution of presets will be ignored. | * The FixtureTypes area on the left side displays the fixture types used in the show. Select the fixture type you want to create presets. When unfolding the fixture types, it is also possible to select only a dedicated mode of the fixture type in order to create the presets. Only modes that contain Fixture Type Presets are listed. When Fixtures is enabled, this area displays the patched fixtures instead of the fixture types. In this mode, also only fixtures are listed where the fixtures types and modes contain Fixture Type Presets. * The right side allows to define which presets (filtered by feature group or attributes) are to be created out of the fixture types. Tapping  expands the feature group filter area for you to display the attributes’ filter. In this case the At Filter is also temporarily activated. * The Advanced mode changes the menu in this way when it is enabled: * The feature group/attribute filter area is replaced by a preset pool area. The user can then collect single places in the preset pool where they want the presets to be created. If you collect presets before creating them, the resulting name will be ignored. The feature groups bar known from the Import/Export tabs appear on the top. * The FixtureTypes area occupies only the left side of the menu. * The center area displays the presets that are part of the selected fixture type. * Tapping Clear Collection resets the collection of items. * The Source can be toggled between **FixtureType Presets** and **ChannelSets**: * **FixtureType Presets**: Creates presets from the presets stored in the fixture type. * **ChannelSets**: Creates presets based on the channel sets (that have a name) that are defined in the fixture type. By default Source is set to **ChannelSet**. * When a fixture type is selected, and the desired presets, feature groups, or attributes are selected, tap AutoCreate Presets. A pop-up asks whether to Overwrite or Merge existing presets, or to Cancel the operation. * Store Presets to FT: Allows to store existing and named presets of the show file into the fixture types in use. * The selector next to the left sidebar allows to define which presets (filtered by feature group or attributes) will be stored into fixture types. Tapping  expands the display of the attributes filter. In this case, also the At Filter is temporarily activated. * The FixtureTypes area lists all fixture types used in the show. The user needs to select the desired fixture types they want to store presets to. Enabling Fixtures will display the patched fixtures instead of the fixture types. * The Advanced mode in the title bar changes the menu when it is enabled: * The feature group/attribute filter area is replaced by a preset pool area. The user can collect single presets they want to store into the fixture types by clicking them. The feature groups bar known from the Import/Export tabs appear on the top. * The FixtureTypes area occupies only the center of the menu. * The right side displays the presets that are allready part of the fixture type. * When presets, feature groups or attributes and a fixture type are selected, tap AutoStore Presets in order to transfer the desired presets into the fixture type. A pop-up asks whether the user wants to Overwrite or Merge existing Fixture Type Presets or Cancel the operation. In the case of Overwrite, only the presets of the selected feature group are overwritten. Presets of other feature groups remain in the fixture type. See also [Show Creator](/grandma3/2-3/show-creator/).To store all possible presets to fixture type 9, overwriting existing fixture type presets, type: | | | | ------------------------------------------------------------------ | --------------------------------------------------------------------------------------- | |  | User name\[Fixture]> AutoStore Preset \*.\* At FixtureType 9 /Overwrite /NoConfirmation | To store possible color presets to the fixture type of fixture 1, merging existing fixture type presets, type: | | | | ------------------------------------------------------------------ | ---------------------------------------------------------------------------------- | |  | User name\[Fixture]> AutoStore Preset 4.1 Thru At Fixture 1 /Merge /NoConfirmation | To create color presets out of fixture type 9, type: | | | | ------------------------------------------------------------------ | ------------------------------------------------------------ | |  | User name\[Fixture]> AutoCreate FixtureType 9 At Preset 4.\* | To create all presets out of fixture type 9 and match them by name, type: | | | | ------------------------------------------------------------------ | ---------------------------------------------------------- | |  | User name\[Fixture]> AutoCreate FixtureType 9 At Preset \* | To create universal dimmer presets with a value incrementation of 25%, and the first preset is the 11th dimmer preset, type: | | | | ------------------------------------------------------------------ | ------------------------------------------------------------------------------ | |  | User name\[Fixture]> AutoCreate Universal 1 At Preset1.11 “DimmerIncrement” 25 | To create universal color presets with four different hues, 5 different saturations, get them sorted by saturation, and start at color preset 42, type: | | | | ------------------------------------------------------------------ | ---------------------------------------------------------------------------------------------------------------------- | |  | User name\[Fixture]> AutoCreate Universal 1 At Preset 4.42 “AmountHue” 4 “AmountSaturation” 5 “SortColor” “Saturation” | To create universal color presets with the gels 2 and 10 of the MA Lighting swatch book, and get them created at color preset 4.2, type: | | | | ------------------------------------------------------------------ | -------------------------------------------------------------------------------- | |  | User name\[Fixture]> AutoCreate Universal 1 At Preset 4.2 “GelList” Gel 1.2 + 10 | To create a universal color preset with the Mauve gel of manufacturer Lee as color preset 4.126, type: | | | | ------------------------------------------------------------------ | -------------------------------------------------------------------------------------- | |  | User name\[Fixture]>AutoCreate Universal 1 At Preset 4.126 “GelList” Gel “Lee”.”Mauve” | To create global beam presets out of the channel sets of fixture type 9, type: | | | | ------------------------------------------------------------------ | --------------------------------------------------------------------------------------------- | |  | User name\[Fixture]> AutoCreate FixtureType 9 At Preset \* If FeatureGroup “Beam” /ChannelSet | *** ### Tracking [Section titled “Tracking”](#tracking)  Improved in this release * Improved the asserting of cues: The new value \*\*X-Assert \*\*asserts values that were saved in previous cues together with the timing of the cue where X-Assert is set. Individual timings that track into the cue with the X-Assert are not respected, and the general cue timing is used. * Improved the Copy Cue pop-up: Due to the adjustments needed for Tracking Shield, the Copy Cue pop-up was enhanced: * The top part is about handling the data of the source cue, and the lower part gives access to options that define how the data is added to the destination cue. * Renamed “Source Cue” section “Copy Values from Source Cue”. * Renamed “Tracking into Destination Cue” section “Existing Values tracking into Destination”. * Renamed the value “Keep” Retain. * Renamed the value “Force Release” Replace with Release. * Renamed the value “Force Default” Replace with Default. * Refactored the “Cue Only” section into “Copy Values”: * Tracking: Stores the values at the destination as normal tracking values. * Cue Only: Stores the values at the destination as values only into this cue. The following cue Only stores previous values. (= Cue Only principle). * Added the new section “Protect from Tracking”: * Dimmer Cue Only: Stores only the dimmer values at the destination following the Cue Only principle when it is enabled. All other attributes will be stored as tracking values. For more information see [Dimmer Cue Only](/grandma3/2-3/key_rn_v2_0/#h4__1071679005). * Added a Tracking Shield section: * Off *  *  * To learn more about this topic, see [Tracking Shield](https://malighting.clickhelp.co/smart/grandma3-user-manual-publication/features/a/h3_1351829368). * Improved the Store Cue pop-up: * The “Store Values” column allows to define if the values will be be stored using the Tracking principle or if they will be stored using Cue Only. * The “Protect from Tracking” column allows to define if dimmer values only will be stored using Cue Only. This is the case when Dimmer Cue Only is enabled. This options works only when Tracking is selected. If it is not selected, it will be selected automatically when enabling Dimmer Cue Only. For more information see [Dimmer Cue Only](/grandma3/2-3/key_rn_v2_0/#h4__1071679005). * The column “Shield tracked values” allows to use Tracking Shield. If you select any mode in the “Shield tracked values” section, while Cue Only is selected in the “Store Values” section, Tracking will also be automatically selected. For more information see [Tracking Shield](https://malighting.clickhelp.co/smart/grandma3-user-manual-publication/features/a/h3_1351829368). * Improved the Delete Cue pop-up: * The user can now decide if they want to delete the values using the Tracking principle, Cue Only princple, or the Dimmer Cue Only principle. * Also, Tracking Shield modes were added.\ For more information see [Tracking Shield](https://malighting.clickhelp.co/smart/grandma3-user-manual-publication/features/a/h3_1351829368) and [Dimmer Cue Only](/grandma3/2-3/key_rn_v2_0/#h4__1071679005). | | | | -------------------------------------------------- | -------------------------------------------------------------------------------------------------------------------------------------------------------- | |  | **Known Limitation:** | | | The Delete Cue pop-up uses the Store preferences. Therefore, changing the preferences on one side will change the preferences on the other side as well. | #### Tracking Shield [Section titled “Tracking Shield”](#tracking-shield)  New in this release Tracking Shield is a tracking store mode that protects already tracked attributes from being changed unintentionally in cues where the dimmer value is above zero. The Tracking Shield has two modes: *  (Dimmer rising from 0): Protects attributes in the next cue where the dimmer value increases starting from zero. *  (Dimmer above 0): Protects attributes in the next cue where the dimmer value is above zero no matter the value it had before. For more information see [Tracking Shield](/grandma3/2-3/cue_tracking_shield/). **Examples** Requirement: 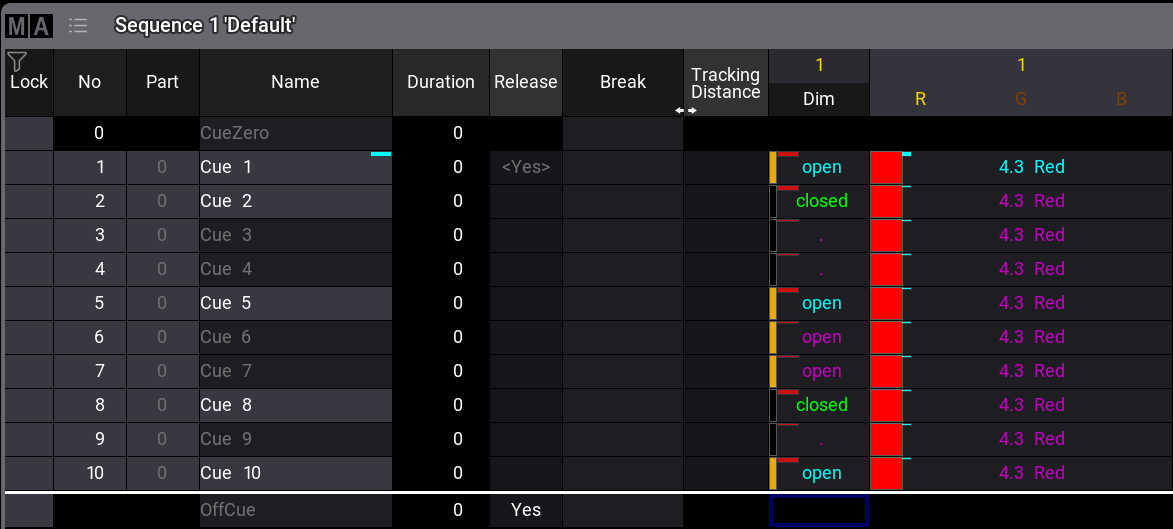 * Example 1: Store Fixture 1 to cue 3 with an intensity of 75 % and in blue. The look of cue 5 will be preserved. In this case, both modes of Tracking Shield will give the same result: 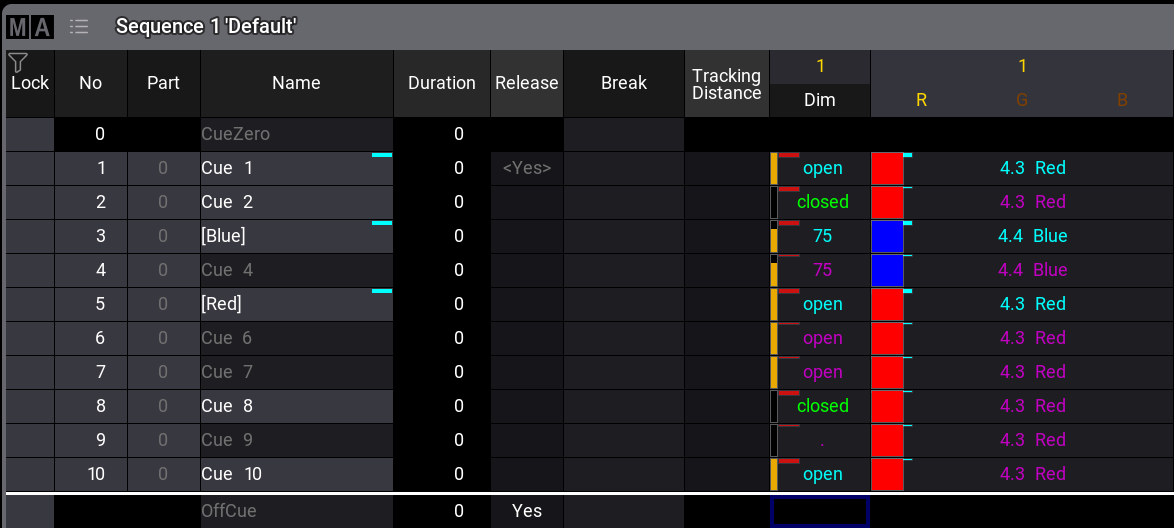 * Example 2: We start again with the state of the situation in the requirement. We now want to store fixture 1 with an intensity of 75 % and in blue again, but this time to cue 5. When using the mode “Dimmer rising from 0”, the following cues, where the dimmer rises again from 0, will be protected. The mode also preserves look of the following cues: 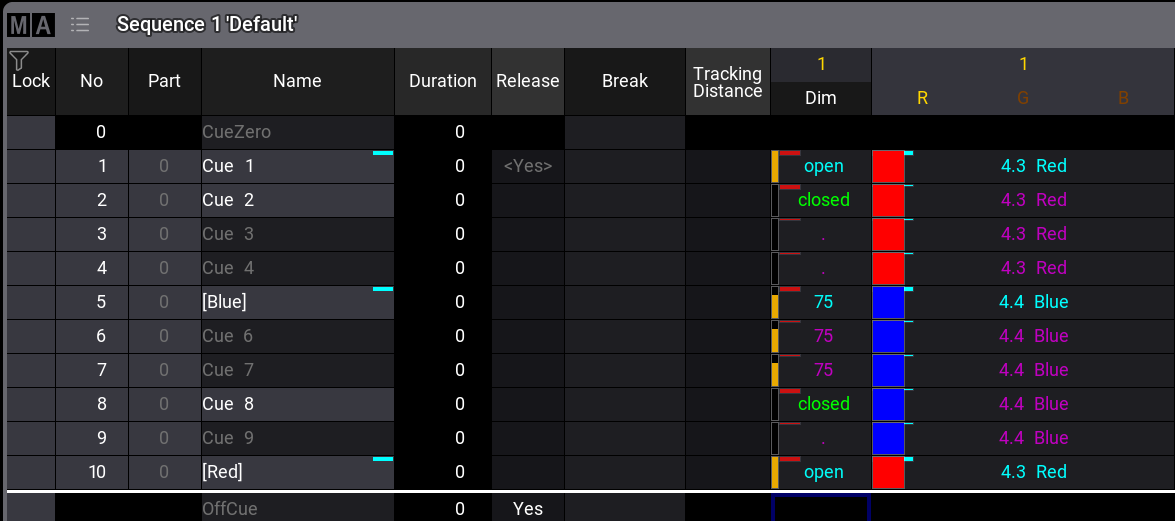 * Example 3: We start again with the state of the situation in the requirement. We now want to store fixture 1 with an intensity of 75 % and in blue again to cue 5. When using the mode “Dimmer above 0”, the look of the non-dimmer attributes in the next cue (cue 6) is preserved. In some cases this will result in the same outcome as as if storing /CueOnly: 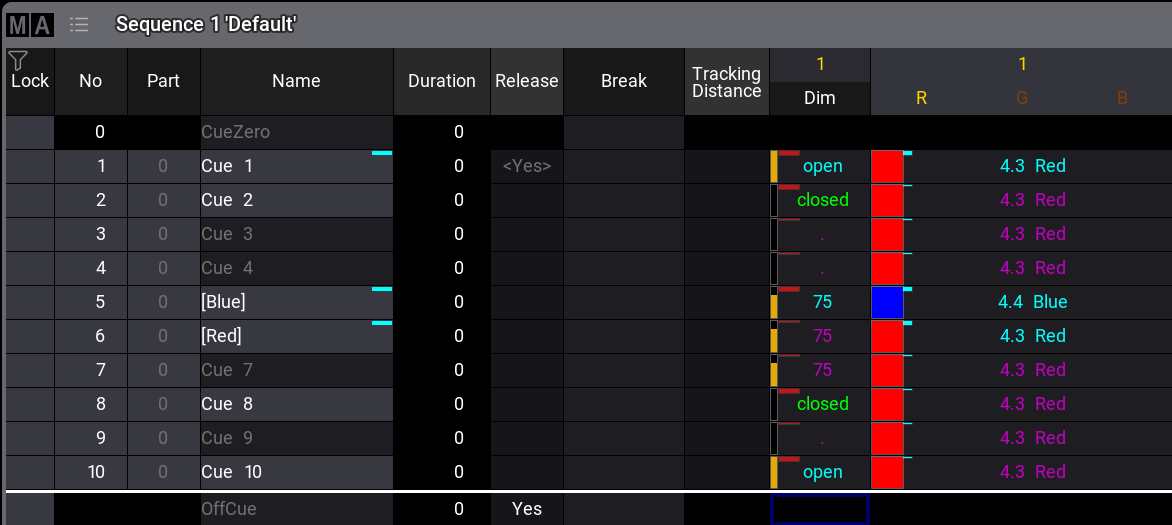 | | | | ------------------------------------------ | ------------------------------------------------------------------------------------------------------------------------------------------------------------------------------------------------------------------------------------------------ | |  | **Hint:** | | | Tracking Shield only protects non-dimmer attributes. If you want to preserve the look of the next cue for the dimmer too, combine Tracking Shield with the new option [Dimmer Cue Only](/grandma3/2-3/key_rn_v2_0/#h4__1071679005) when storing. | The new [/TrackingShield](/grandma3/2-3/ok_trackingshield/) option keyword allows to define directly which tracking shield mode shall be used: Syntax: /TrackingShield \[“Value”] These are the possible values: * **Off**: Tracking Shield will not be used. * **DimmerRisingFromZero** (DRZ): The principle of Tracking Shield in mode “Dimmer rising from 0” will be used. * **DimmerAboveZero** (DAZ): The principle of Tracking Shield in mode “Dimmer above 0” will be used. #### Cue Zero [Section titled “Cue Zero”](#cue-zero)  New in this release The Sequence settings offer Cue Zero Mode. This setting can be set to different values: * **Off**: Cue Zero is not used in the sequence. This is the default setting. * **All Used Attributes**: Cue Zero contains all default values of every fixture that is stored in the sequence. * **Only Used Dimmers**: Cue Zero only contains default dimmer values of every fixture that is stored in the sequence. See also [Sequence Settings](/grandma3/2-3/cue_sequence_settings/). #### Dimmer Cue Only [Section titled “Dimmer Cue Only”](#dimmer-cue-only)  Improved in this release When storing or copying cues using the Tracking principle, the existing Cue Only option was extended.\ **Cue Only** disabled is now called Tracking.\ **Cue Only** enabled stays as is and is mutually exclusive. The extension of Cue Only is the addition of the new mode **Dimmer Cue Only**. When selecting this value, only the dimmer attributes will be stored using the Cue Only principle. All other attributes will be stored as normal tracking values. When Tracking Shield is enabled the Tracking Shield principle is used to store values.\ To use **Dimmer Cue Only** via command line, use the existing [/CueOnly option keyword](/grandma3/2-3/ok_cueonly/): * /CueOnly “DimmerOnly”: Uses Dimmer Cue Only and releases the recently stored dimmer attributes in the next cue. * /CueOnly “DimmerOnlyDefaultNew”: Uses Dimmer Cue Only and sets recently stored dimmer attributes to the default value in the next cue. *** ### MIB [Section titled “MIB”](#mib)  Improved in this release When MIB is in progress, the MIB indicator in the Fixture Sheet will indicate this: * Fast flashing: Fixtures fade out in order to perform an MIB. * Slow flashing: Fixtures perform an MIB fade. The OffCue no longer displays MIB indicators.  New in this release Hold is a special value that can be set to prevent an MIB action. It can only be applied to a dimmer attribute and is equivalent to a value of 0.\ To prevent all fixtures (for example, scrollers) from performing an MIB action in the same cue, Hold can be used to distribute the movement across multiple cues. To expressly perform a movement with an open dimmer between two cues, Hold can be used to enhance individual fixtures. To learn more about Hold, please see the [Hold keyword](/grandma3/2-3/keyword_hold/), and [Move In Black](/grandma3/2-3/cue_mib/).  Improved in this release MIB also works when the dimmer raises from 0 on the relative layer. *** ### Editing of Sheet Columns [Section titled “Editing of Sheet Columns”](#editing-of-sheet-columns)  New in this release The columns of sheets are configurable in certain windows. These windows are the Sequence Sheet, Content Sheet, Fixture Sheet, the Layout Editor, the Agenda Viewer, RDM Devices Viewer, the Timecode Editor and Timecode Viewer.\ The arrangement can be stored to the preferences of the window and recalled from there. Furthermore, the arrangement is also stored with the window inside a view. To get the different options for column editing: Start a 2 Finger Scroll gesture in the header row of the desired sheet. The  symbol appears in the left corner. Tap . | | | | ------------------------------------------------ | ------------------------------------------------------------------------------------------------------------------------------------------------------ | |  | **Important:** | | | When using the trackpad on an Apple Mac computer, the gesture is the same as described. However the white focus frame inside the grid scrolls as well. | * Enter Column Editing: Enables the editing mode, where the user can show or hide columns or change the order of the columns. * Leave Column Editing: Allows to leave the editing mode. * Reset Column Filter: Resets the hidden columns to be displayed. * Reset Column Order: Resets the order of the columns to default. To change the order or visibility of a column: 1. Tap Enter Column Editing to start editing. 2. Tap a column header to show or hide this column. 3. Tap and hold a column, and drag it to the desired location. 4. The target location is indicated by a vertical red line. The red line appears shortly after starting to move the finger to the left or right. 5. Release the finger as soon as the desired location is reached. 6. Tap Leave Column Editing to exit the edit mode. To move a column without entering column editing: 1. Long press and hold a column until the vertical red target line appears. 2. Move the finger to the left or right. 3. Release the finger as soon as the desired location is reached. Attribute columns, for example, in the fixture sheet and track sheet mode of the sequence sheet, cannot be filtered out.\ In some sheets, for example in the Sequence Sheet, there are two areas of columns that can be sorted. First the area with the Lock, No, Part, and Name columns, and second the area with all other columns. The column header in such grids will turn red when you try to move a column around. This indicates the area to which you cannot move the column you are currently touching. The Column Editing replaces the following Mask settings in the Timecode Viewer window: Show Appearance, Show Target, and Note.  New in this release Columns can be edited or saved as Column Sets in the Sequence Sheet, Agenda Viewer, or RDM Devices Viewer. Also, a selector for different column sets can be displayed in the title bar of the corresponding windows. To edit the column sets of a window follow these steps: 1. Tap MA to enter the window settings. 2. Enter the Columns tab. To create a new Column Set: 1. Tap, hold, and swipe Columns. 2. Move your finger above New. 3. Release your finger. | | | | ------------------------------------------ | ------------------------------------------------------------------------------------------------------------------------------------------------------------------------------------------------- | |  | **Hint:** | | | When creating a new Column Set, the currently selected Column Set will be used as a template; Only columns that were visible in the sheet at a time already are offered in the Column Set editor. | To enable or disable the visibility of columns: Do a two-finger edit on Yes / No in the Visible column.\ By tapping Set All Visible or Set All Invisible, all columns will be set to Visible Yes, or Visible No. To change the order of the columns: Select the column, you want to move and change its position using  and .\ As soon as the order of columns has changed, it is possible to reset the order by tapping Reset Order.\ A white horizontal line divides the two different column areas where within each of them the columns can be reordered. To recall the changed columns set, the window needs to be stored in a view or to a window preference. To make the column set selector visible in the title bar of a window: 1. Tap MA to enter the window settings. 2. Enter the Columns tab. 3. Enable Edit Title Bar and then toggle Columns to Yes. By tap and hold on Columns in the title bar of a window, a Columns Set editor will open. It offers the same tools as described above.\ When entering Label into the command line and then tapping Columns in the title bar of a sheet, the label pop-up for the selected set opens. In the Sequence Sheet, the Column Sets replace the different mask settings of Cue Settings, Cue Timing, Preset Timing, Note, Command, and MIB Settings.\ When loading a show file from grandMA3 v1.9.7 or prior to grandMA3 v2.0 or later, the stored setting of masks is automatically migrated into Column Set 1.\ The Sequence Sheet also provides three additional sets, Track, MIB, and Timing.\ Each of these sets display the corresponding columns that the masks provided in previous versions.\ The normal Sequence Sheet mode and the Track Sheet mode each remember which column set was previously selected. *** ### Fixture Sheet [Section titled “Fixture Sheet”](#fixture-sheet)  New in this release The fixture sheet offers new Sheet Modes: * **Dimmer+**: Looks similar to the **Channel** mode. However, it additionally displays the attributes of the selected feature group. * **Sheet/Filter**: The Dimmer+ sheet mode has a similar look as the **Channel** mode. It displays all attributes unless the user defines a filter in the Mask tab of the Fixture Sheet Settings. Both modes have these features in common: * Vertical gray separators are displayed when there is a jump in IDs and when the IDType changes for fixtures that do not have a fixture ID. * Both modes are able to display the Fixture Graphics, but won’t display the Feature Graphics. The Merge Cells setting now differs between merging values per Feature or per FeatureGroups. Therefore, the toggle button changed a swipe button, and offers the values **None**, **Feature**, and **Feature Group**. Feature equals to the former enabled state of Merge Cells. In the sheet mode Channel, Dimmer+, Sheet/Filter it is possible to open a calculator for the attribute instead of editing the patch of the fixture. To edit the attribute, long press on the attribute, to open the patch, long press the Fixture ID. Switching off a fixture using the fixture sheet in Channel, Dimmer+, or Sheet/Filter mode switches off the whole fixture.  New in this release New Fixture Sheet setting Show Name Field allows to display or hide the name of the fixtures when the fixture sheet is set to Sheet Mode Channel. The new Fixture Sheet mask setting Show ID Type defines the displayed ID Type between the modes **Channel**, **Dimmer+**, or **Sheet/Filter**.\ When using these modes, and Show ID Type is enabled, the Fixture ID and CID are displayed together as soon as they are different, for example, 1:101. When both IDs are identical, only one number is displayed.  New in this release It is possible to assign filters, worlds, and the selections to reduce the number of fixtures or attributes displayed. As soon as a filter or world is assigned to the fixture sheet, the title bar informs the user about the assigned object and offers a button to remove the object from the fixture sheet.\ When the selection is assigned, the displayed fixtures change dynamically as the selection itself changes. Switching the fixture sheet to display the selection can be done by assigning the selection to the fixture sheet (Assign + Fixture + Fixture and tapping the title bar of the desired fixture sheet window), or by enabling Filter Selection in the MAsk tab of the Fixture Sheet context menu.\ To assign a filter or world to a fixture sheet, enter an Assign command into the command line and then tap into the title bar of the desired fixture sheet: 1. Enter a assign command into the command line: Assign Filter \[“Filter\_Name” or Filter\_Number] or Assign World \[“World\_Name” or World\_Number] 2. Tap the title bar of the desired fixture sheet. Furthermore, the Filter setting in the Mask tab of the Fixture Sheet Settings pop-up can be used to select a world. This also applies to the Sequence Sheet.  New in this release The Channel Set setting defines the readout of values that are part of channel sets: * **Value**: Only the value is displayed. * **Value+Name**: The value and the name of the channel set are displayed. * **Name**: Only the name of the channel set is displayed. This also applies the Sequence Sheet and the Content Sheet. See also [Window Settings](/grandma3/2-3/wvm_settings/).  Improved in this release * The fixture sheet displays now DMX values instead of the value inside a channel function, when a channel function was active. * Opening the calculator of an attribute on the Output Layer or the DMX Layer opens it for the Absolute layer. * When going through a selection by using Next and Prev and Fixture Sort is enabled, the main selected fixtures will be displayed first, and then the sub-selected fixtures will be displayed. * When the Layer setting of the fixture sheet is set to **Auto**, the resulting output value will be displayed, although the selected layer of the user profile is the Absolute layer. The value of the Absolute layer will be displayed when selecting the **Absolute** value of the Layer setting in the Fixture Sheet. *** ### Layouts [Section titled “Layouts”](#layouts)  Improved in this release * When assigning the selection to a layout, only the selected fixtures are taken. Sub selected fixtures are not assigned to the layout. * Assigning an object such as a sequence to a blank element in the layout view creates a new element in both setup and normal mode. * Added useful minimum and maximum for Position X, Position Y, Dimension W, and Dimension H. * When Dimension W and Dimension H are set to 0, and FitType is set to Canvas, ZoomToFit is not offered anymore. Also, AutoZoom is doing nothing under that condition. * The displayed appearance on a layout element can be rotated and mirrored using Rotatation and Mirror in the layout element editor. * The custom text of an object can be orientated vertically as well. * Scribbles assigned to objects can be displayed in layout elements. * The Auto tool () changes the function depending on the object area: * Tapping inside the area of a layout element, the move function is used. * Tapping outside of a layout element at the edges, allows to change the size of the element of the used axis. * Tapping outside of a layout element at the corners, uses the resize function to change the size. This tool does not respect the ratio. * Holding MA and tapping outside of a layout element at the corners, uses the resize tool with fixed ratio. * Improved the custom text properties: * Text Horizontal was renamed Align Horizontal. * Align Horizontal offers new values **Outside Left** and **Outside Right**, which would place the custom text outside of the layout element on the left or right side. * Text Vertical was renamed Align Vertical. * Align Vertical offers the new value **Below**, which places the text outside below the layout element. * The new setting Vertical displays the custom text in vertical direction, when it is enabled. * When the Layout Viewer is in Setup mode, the overall selection frame around all selected elements exceeds the outside corners. * When Show Selection in the Layout window is disabled, the border of layout elements that have an object assigned is hidden. * The Selection Mode setting of the Layout window defines if the lasso selection inside a Layout window shall result in a linear selection or in a 2D Grid selection arrangement in the selection grid.\ Depending on the selected mode, the frame color will be different: * 2D Grid: Green * Linearize: Yellow * In addition to the Selection Mode setting, tapping  in the Layout Viewer window arranges the selection in the selection grid correspondingly to the fixture positions of the currently displayed layout. * The Lasso Filter settings defines which layout elements will be selected when making a lasso selection: * **All**: All layout elements will be selected. * **Fixtures**: Only layout elements that have fixtures assigned get selected. * **Others**: Layout elements that have anything else than fixtures assigned will be selected. * Window Preferences can be stored and loaded in the Layout Viewer Window. See also [Layout View Settings](/grandma3/2-3/layout_view_settings/) and [Edit Layout Elements](/grandma3/2-3/layout_elements_edit/). *** ### Windows, Views, and View Bar [Section titled “Windows, Views, and View Bar”](#windows-views-and-view-bar)  Improved in this release * The View Bar can be positioned horizontally. To switch the position, open the Configure Display dialog and tap  above ShowViewBar. * The View Bar can show up to 3 columns of view buttons. To adjust the amount, use the + and - below ShowViewBar. * The View Bar can be scrolled. Each column offers up to 100 view buttons.\ When a view bar is scrolled above the initial count, tapping  in the upper right (vertical arrangement) or tapping  upper left (horizontal arrangement) allows to quickly return to the top of the view bar.\ The View Bars can be either scrolled vertically or horizontally. This is determined by the position of the View Bar. * View buttons indicate the type of object assigned to them by a colored indicator bar and the corresponding icon of the object type. * While pressing MA, the icon unhides the pool ID of the assigned object on a view button. * Views that have 2 or more screens stored are displayed by an additional screen icon, for example: . The white squares in the icon indicate which screens are part of the view. * Tapping an empty view button clears the screen, and the command line history will display the information “(Click on empty ViewButton)” in addition to the execution of the Delete ScreenContent command. * When storing a view, a screenshot button () in the top left corner of the store dialog offers to do a screenshot when enabled. After tapping OK, a new appearance will be created and then assigned to the view.\ As soon as two or more screens are selected in the Store View pop-up, the screenshot functionality will be temporarily grayed out.\ To remove the assignment of an Appearance from a View, edit the view, or a command that is based on this syntax:\ Assign Appearance At View \[“View\_Name” or View\_Number] * These objects can also be assigned to a view button: * [Encoder Bars](/grandma3/2-3/key_rn_v2_0/#h3_611477531) * Macros * MAtricks * Plugins * Quickeys * ScreenConfigurations * Timers * Users * When tapping view buttons that have filters, or worlds assigned, the object itself will be selected in the pool. * Improved View editor: Select the screen content mask in a similar way to a view button store. See also [View Bar and View Buttons](/grandma3/2-3/ws_ui_view_bar_and_buttons/).  New in this release Pool windows, for example, the Group Pool window, allow to set Pool Columns in their settings. The Pool Title Object displays an icon () if a pool column is set. Using Pool Columns retains the initial look in a pool window even if the pool window was resized after arranging the pool objects. To see how the pool columns works, try this example: 1. Open a Group Pool window using the complete screen size. 2. Store some groups and arrange them in a nice layout that fits the placement of the fixtures on stage. 3. Make the Group Pool window smaller. 1. As a result, the groups are shifted around in the window. 4. Set Pool Columns to the value 18 (the amount of a pool window, when it is opened using the full screen, while the view bar is enabled). As a result, the arrangement of the pool object inside the window stays consistent. When Pool Columns is set to a value that is smaller than the current width of the window, the remaining space will be displayed in black.\ To get back to a dynamic pool window, set Pool Columns to the value **Not Defined**. See also [Window Settings](/grandma3/2-3/wvm_settings/#h2__522911071). *** ### Selection and Selection Grid [Section titled “Selection and Selection Grid”](#selection-and-selection-grid)  Improved in this release * The title bar buttons of the Selection Grid window can be configured by enabling Edit Title Bar in the Selection Grid Window Settings. * It is possible to align the selection to the left, the center, or the right of the whole selection, by tapping , ,  in the tool bar. * The settings Auto Remove Gaps and Auto Remove Offset are combined in the new setting Preserve GridPositions. When Preserve GridPositions is enabled, the original grid position, for example, from the called group, will be applied. When it is disabled, all gaps and the offset to the origin of the grid will be suppressed. When tapping into the selection grid, Preserve GridPositions will be enabled in order to allow to add the next selection at the defined position.\ Also when storing a selection into an object, for example, a group, the state of Preserve GridPositions of the group will be recalled as long as Preserve GridPositions is disabled before calling the group. * Tapping  (Remove Gaps) takes out all gaps between the selected fixtures. *  (Remove Offset) removes the offset between the origin and the selection. * The multiply and divide tool (\*2 and /2) multiplies or divides the space on the x-axis relatively between fixtures inside the selection grid. * Tapping transforms the current selection to be symmetrical. * The MAtricks Transformation setting allows to retain the initial grid view when applying MAtricks. When it is disabled, the fixtures will not be displayed stacked in the selection grid, as soon as the user applies MAtricks. It is enabled by default. * Tapping  (Use MAtricks position and reset MAtricks) keeps the fixtures at their MAtricks transformed coordinates and removes the MAtricks. * The Move Grid Cursor setting in the title bar represents the Move Grid Cursor setting of the user profile. When selecting fixtures, Move Grid Cursor will work as specified in the user profile. If fixtures are selected through a group, the Move Grid Cursor setting from the called group gets applied. When switching the Move Grid Cursor value, the cursor changes immediately to a new grid position representing the new mode. * The Move Grid Cursor settings (Store Preferences, Groups, Preferences and Timing - Groups) have new values available: **\**, **Newline**, and **None**: * **\**: The setting of the user profile is taken when calling a group. * **Newline**: The grid cursor will be set to the first empty line (in Y direction) after selecting new fixtures. * **None**: The cursor won’t move when selecting fixtures or groups. * It is possible to open a temporary Selection Grid overlay when tapping Selection in the Encoder Bar. * The grid tools Align, Flip, Linearize, Rotate, and Transpose work now relative on the current grid position. * The Selection Grid window can display red center lines for the current selection. They can be enabled or disabled separately for X and Y in the context menu of the Selection Grid window by toggling Centerline X and Centerline Y. The color can be changed via the color definition SelectionGrid.Centerline in the color theme. * The font size of the fixture numbers in the selection grid boxes can be defined by the Font Size setting in the Selection Grid window settings. When it is set to **Automatic**, the font size depends on the size of the Selection Grid window and the zoom in the Selection Grid window. * The Selection Grid window has per default the Align Bar visible at its bottom. To hide the Align Bar, disable Align Bar in the settings menu of the Selection Grid window. * Off + tapping a fixture in the selection grid knocks out the fixture in the programmer. Whenever Setup mode is enabled, it is possible to knock out multiple fixtures at once using Off and dragging a lasso around your selection. * The Selection Grid window displays a green outline around the overall selection. With the new Setup mode, it is possible to move fixtures around in the selection grid. Example: 1. Select some fixtures, for example, Fixture 1 Thru 10. 2. Open a Selection Grid window. 3. Enable Setup in the title bar of the Selection Grid window. 4. Tap a fixture to select it. In case you want to move several fixtures at once, tap more fixtures, or do a lasso selection to select several fixtures. 5. Tap, hold and drag one of the selected fixtures to the new position. 6. When done with adjusting the grid positions, disable Setup. Use the Grid tools in the setup mode with partly selected fixtures. Setup mode can be left by executing ClearAll (3x Clear).\ Selecting fixtures again while being in Setup mode will toggle the selection state of the fixtures.\ When the Setup mode is enabled, Selection in the encoder bar will indicate this by a pulsating yellow indicator bar. The Selection Grid allows to place fixtures on negative grid coordinates. MAtricks X,Y and Z directions are now relative to the entire range of selected fixtures.\ This means that when moving through a selection with Next or Prev, if the selection does not start at grid 0/0/0, it is not necessary to continue moving through the grid until the first fixture will be mainly selected. This applies for Next/Previous, NextY/PreviousY, and NextZ/PreviousZ). When having multi-instance fixtures selected, pressing Down arranges the sub fixtures depending on the arrangement of the sub-fixtures inside the main fixture. It is also possible to go Up again to the former selection. This works for all levels of sub fixtures inside fixtures. Each level of selection can have its own MAtricks. The grid positions of sub fixtures are automatically determined by the positions defined by the geometries inside the fixture type. Furthermore, the Geometries tab inside the fixture type editor offers new columns in order to modify the grid positions manually: * **Grid Auto**: Can change between Auto and Manual. In Auto mode (default value), the positions are determined automatically. When set to Manual, the user can define the grid positions by their own using the following properties. * **Grid Swap XY**: Interchanges the grid positions between the X and Y axis. * **Grid Inv X**: Inverts the grid positions on the X-axis. * **Grid Inv Y**: Inverts the grid positions on the Y-axis. * **Grid Inv Z**: Inverts the grid positions on the Z-axis. * **Grid X**: Defines the position of the geometry on the X-Axis. * **Grid Y**: Defines the position of the geometry on the Y-Axis. * **Grid Z**: Defines the position of the geometry on the Z-Axis. The GridStore command transfers the grid positions in the selection grid of the selected subfixtures into the fixture. To do so: 1. Arrange the subfixtures in the selection grid. 2. Execute GridStore using the command line. The new Align Range functionality (Rx, Ry, and Rz in the MAtricks window) allows to define if the alignment of values is to be made across the whole selection (=Align Range is disabled), or if the values are to be aligned per row/column individually. This can be defined individually per axis.\ When an Align Range is enabled, the green frame around the selection in the Selection Grid window changes. Around each row or column (depending on the direction and the status of the different Aling Range settings), a dark sea green colored frame will be displayed. Improved the behavior when storing groups. Therefore, Group preferences are now located in the Preferences and Timings menu: * When Move Grid Cursor 1D Selection is enabled, **Move Grid Cursor** will be enabled in the group that was stored, given the Selection Grid has a selection only in one dimension. * Move Grid Cursor 2D/3D Selection will enable **Move Grid Cursor** in the group that was stored, given the Selection Grid has a selection in at least two dimensions. When assigning a group to an executor, define the desired group mode by changing Mode. Once you change it manually to anything else but None, this setting will not apply. *** ### Encoder Bar [Section titled “Encoder Bar”](#encoder-bar)  Improved in this release * In a world, the Encoder Bank Bar (read below in the [Encoder Bar Pool paragraph](/grandma3/2-3/key_rn_v2_0/#h4_828587241)) in the Encoder Bar now only displays Encoder Banks with attributes within that world, or with the attributes of the fixtures within that world.  New in this release The Encoder Bar window allows to switch the GUI style of the encoders to fader style. To do so, open the settings of the Encoder Bar window, and enable Fade Encoder. The encoder area in the Encoder Bar windows changes to fader style.\ It is also possible to show or hide the different elements of the encoder bar by enabling or disabling the different settings in the Encoder Bar window settings: * Title Bar: Shows or hides the title bar. Press both MA or Ctrl + Alt to temporarily show the title bar. * User Profile Settings: Shows or hides the buttons on the left side of the encoder bar that contain these user profile settings: Sync, Single Step, Align, and Readout. * Grand Master: Shows or hides the grand master fader. * Encoder Bank: Toggles the visibility of the [Encoder Bank](/grandma3/2-3/key_rn_v2_0/#h3_611477531) buttons. * Tool Pop-Ups: Shows or hides the tool buttons to the right of the encoder bank button: Selection, Phaser, and MAtricks. * Timing Buttons: Shows or hides the buttons Prog Time and Exec Time. * Encoder Page: Shows or hides the Encoder Page selector. * Layer Toolbar: Shows or hides the Layer Toolbar. * Step Buttons: Shows or hides step buttons. * Encoder Label: Shows the active value and the name above the encoder. This function works only when Fade Encoder is enabled. * Function Selector: Shows or hides the channel function area. * Fader Encoders: Changes the classic encoder to a fade encoder * The Encoder Bar is also available as an overlay. To open the Encoder Bar overlay, tap  in the Control Bar. The overlay always displays the encoder in fader style. * The Encoder Bar window allows to save and load Window Preferences. The Encoder Bar overlay displays only the following elements: Buttons Left, the Encoder Bank buttons, the encoder page selector, the Value button, the Layer tool bar, the Step Selector, and the five dual encoders. #### #### Encoder Bar Pool [Section titled “Encoder Bar Pool”](#encoder-bar-pool)  New in this release The encoder bar pool defines the arrangement of attribute encoders. Each UserProfile has its own encoder bar pool. To create an encoder bar pool, open the Add Window dialog, and tap Encoder Bars in the Pool tab. Encoder bar pool object 1 is the default encoder arrangement as known. This pool object cannot be modified by the user. To always go back to a functional arrangement of attribute encoders based on the patched attributes and their feature groups select encoder bar pool object 1. When selecting an Encoder Bar, the first Encoder Bank of the new selected Encoder Bar will be selected. Store a new encoder bar or copy the default one to start. The encoder bar area and the encoder bar window follows the selected pool object. When switching from one encoder bar to another, encoder bank 1 gets selected. The structure of the encoder bar:\ Inside an encoder bar pool object, the main elements are the encoder banks. Encoder banks represent the top button bar in the encoder bar. In the MA default encoder bar, these buttons are labeled with the names of the used feature groups.\ An encoder bank has children called Encoder Pages. To switch an encoder page, use the button on the left side of the Link Value button in the encoder bar.\ An encoder page has 5 dual encoder children, with settings for Inner Object and Outer Object. If only one attribute is assigned to a dual encoder inner or outer ring, the other ring is assigned to the same attribute and the dual encoder factor of the user profile is applied. Edit the Inner Object or Outer Object cell of an Encoder to assign a function to it.\ In the Assignment Editor, tap Attribute, and select the desired attribute from the list. It is also possible to search for an attribute. By using Filter in the title bar, you can also filter the list of attributes by all attributes that are used by fixture types in the show (**Used in Show**), by all attributes that are not used in the show (**Not Used**), or by all attributes that are used by the currently selected fixture (**Selection**). Switching this setting back to **All** displays all attributes that are part of the Attribute Definition in the Patch menu. As long as the Encoder Bar editor stays open, the set Filter and Search term are remembered when opening the Assignment Editor again.\ To clear the assignment of an encoder, choose Empty in the Assignment Editor. Instead of attributes, dual encoders can have other functions assigned to them, such as controlling the X and Y direction of the screen encoder. To achieve this, edit either the Inner Object or Outer Object of an Encoder and select the desired direction in the ScreenEncoderDirection tab in the Assignment Editor. As long as all Encoders on an Encoder Page have no used attribute assigned, the Encoder Page name will be displayed in red in the editor. As long as all Encoder Pages inside an Encoder Bank are empty, the name of the Encoder Bank will also be displayed in red. Unused attributes are also displayed in red when assigned to an encoder. When an encoder has only unused attributes assigned, it will also be displayed in red. Attributes are also marked in red when they are not available in the currently selected world. When an encoder has for the inner object or outer object nothing assigned or an unused attribute assigned, while the other object is a used attribute, the whole dual encoder gives access to the used attribute. In this case, the empty object of the encoder displays the function of the other object in angular brackets, for example, **<3 ‘Tilt’>**.\ When an encoder is empty on the inner and outer object or has both unused attributes assigned, the encoder won’t be displayed in the encoder bar at all. Encoders that have the same functionality on the inner and outer encoder, display this by the encoder icon where the inner and outer encoder are white. As the EncoderPage keyword was removed, the encoder pages can be addressed by using the EncoderBank keyword (MA + X15 | Page + X15 | Page + X15 | Page). To switch between the encoder bars, use the EncoderBar keyword (MA + X15 | Page + X15 | Page). To switch to the second encoder page of the fifth encoder bank, type: | | | | ------------------------------------------------------------------ | ------------------------------------------- | |  | User name\[Fixture]> Select EncoderBank 5.2 | To switch to the second encoder page of the fifth encoder bank of the second encoder bar, type: | | | | ------------------------------------------------------------------ | -------------------------------------------- | |  | User name\[Fixture]> Select EncoderBar 2.5.2 | To switch to the encoder page named ‘Song 2’ of the encoder bank called ‘Show’, type: | | | | ------------------------------------------------------------------ | ------------------------------------------------------- | |  | User name\[Fixture]> Select EncoderBank “Show”.”Song 2” | Each EncoderBank allows to execute a command when the Encoder Bank is selected. To define a command, the **Command** cell in the Encoder Bar editor of the desired Encoder Bank needs to be edited. The EncoderBank setting **SpecialDialog Tab** defines to which tab the [Special Dialog window](/grandma3/2-3/key_rn_v2_0/#h3_304211589) should switch, when this encoder bank gets selected. If the Special Dialog window should not switch the tab, set this setting to None.\ In addition to this encoder bank setting, the Special Dialog setting Link Encoder Bank needs to be enabled.\ For Encoder Bar pool object 1, all encoder banks, except Color and Shaper, are set to None. Color and Shaper encoder banks are set to Color tab and Shaper tab. To switch the encoder bank by using a shortcut, press: Preset + 1/2/3/…/9. Furthermore, the Encoder Bank buttons display their corresponding ID in the upper left corner. Encoder Bar pool objects can be assigned to ViewButtons. #### Knob UI Style and Encoder UI Style [Section titled “Knob UI Style and Encoder UI Style”](#knob-ui-style-and-encoder-ui-style)  New in this release The Knob UI Style setting in the user profile defines how knobs in the user interface can be operated by using the following windows:\ Playback window, XKeys window, Custom Master Section window, and their respective overlays. The Encoder UI Style setting in the user profile defines how encoders in the user interface can be operated by using the following windows:\ Encoder Bar window, Encoder Bar are on screen 1, command wing Bar window, and their respective overlays. To change these setting, go to Menu - Settings - User Configuration - Profiles. These are the possible values: * **None**: Only available for the Encoder Style. You cannot use gestures to change the values of encoders. * **Drag**: The fader overlay can be used to change values on encoders and knobs. * **Rotate**: To change values, use the [virtual encoder gesture](/grandma3/2-3/ws_gestures/) on encoders and knobs. To operate knobs or encoders when the Knob Style or Encoder Style is set to Drag: 1. Tap and hold the knob/encoder, drag it outside the knob/encoder, and release the finger. 2. A fader overlay opens. Depending on the drag direction, it opens horizontally or vertically. 3. Tap into the fader area and hold it. 4. To change the value, move the finger in the direction of the bar. 5. When the value is set, release the finger. 6. The overlay closes automatically when releasing the finger outside of the knob. 7. Tapping the fader opens a calculator. 8. If the position is held for more than one second, the fader value will be locked. The buttons - and + in the fader overlay allow changing the value by 10%.\ Tapping Resolution in the knob overlay changes the value between **Slow** and **Fast**. Depending on the resolution that was set, the value of the fader will either change in a slower or faster manner when the fader is moved in the overlay.\ Tapping Resolution in the encoder overlay changes the value between **Coarse**, **Fine**, **Increment**, and **Native**. Learn more about the encoder resolution in the [Encoder Resolution](/grandma3/2-3/operate_encoder_resolution_multiplier/) topic. Each knob/encoder overlay displays which fader function is assigned to the knob/encoder.\ When Encoder Left Command or Encoder Right Command are assigned to a knob, the fader overlay can also be used to operate the knob accordingly. Instead of - and +, the buttons in the overlay will display the assigned function for Encoder Left Command and Encoder Right Command. *** ### Generator [Section titled “Generator”](#generator) ####  New in this release [Section titled “ New in this release”](#new-in-this-release) Generators are objects that allow a dynamic value generation for special purposes, like randomization of values on attributes.\ Learn more about the different purposes in the following sub-chapters. Executing the ListReference command for a generator object, for example, a Random object, informs the user where this generator is used.\ When editing a generator object that is already used in a preset or cue, the values in the referenced object arealso updated. #### Random [Section titled “Random”](#random)  New in this release The generator type Random allows the randomization of values of attributes in different ways. Randoms are organized in the Generator pool. The Generator pool is part of the data pools. To address the generator pool objects, use the Generator keyword. To create and edit a new Generator object, open a Generator pool window (Data Pools-tab in the Add Window dialog), and edit an empty object.\ The Generator editor allows to set different values for the parameters of a Random Channel:\ The top area of the Random editor allows to manage the different Random Channels. Each Random Channel can be set to an attribute by editing the Attribute cell. | | | | ------------------------------------------ | ------------------------------------------------------------------------------------- | |  | **Hint:** | | | When no attribute is set, the Random Channel will be applied later to all attributes. | With the different Random Channels inside a Generator pool object it is possible to set up different randomizations for different attributes. Random channel parameters can be modified either using the table at the top area or the faders in the bottom area of the editor. The parameter are as following: * Speed: Defines the speed of how fast the values are randomized. This value is relative to the current playback speed. * Speed Variance: Defines through the selection how big the speed may differ. * Phase: Sets the Phase of the Random between 0° and 360°. * Phase Variance: Defines the size of variance of the Phase value. If the selected fixtures use the Random feature and this value is not 0%, their behavior will change. * Low: Defines the lowest value the random can reach. * Low Variance: Defines the degree of variation of the Low value. This adds some variation through the selected fixtures for the Low value. This variance acts only on the positive side of the Low value. * High: Defines the highest value the random can reach. * High Variance: Defines the size of value variance of the High value. This adds some variation through the selected fixtures for the High value. This variance acts only on the negative side of the High value. * Attack: Defines the size of the linear transition towards the High value. * Decay: Defines the size of the linear transition towards the Low value. * Ratio: Defines the ratio of how long fixtures will use the Low or High value. * Ratio Variance: Defines the amount of variance in the Ratio value. * Random Start: If Random Start is disabled, the Random will always start with the same random look every time the Random gets started. This might be useful in environments that need a predictable start. If Random Start is enabled, the random will start differently every time it will be started. * Speed Once: When Speed Once is disabled, speed changes are applied immediately to the running random. When it is enabled, the user has to call the random again. * Phase Once: When Phase Once is disabled, changes to the phase parameters are applied immediately. By default this setting is enabled. When the Generator editor is closed, the changes are applied to the Generator object. While editing a Generator object, tapping Revert discards all current changes back to the values that were valid when the Generator editor was opened.\ Tapping At applies the Generator to the current selection. When the Generator editor is open, the encoder displays the Generator Encoder Bar which provides access to the properties Speed, Speed Variance, Phase, Phase Variance, Low, Low Variance, High, and High Variance of the selected Random Channels. To apply a Generator to fixtures, select the desired fixtures, and tap the Generator pool object. To call the second Generator for the selected fixtures, type: | | | | ------------------------------------------------------------------ | ----------------------------------- | |  | User name\[Fixture]> At Generator 2 | To apply the Generator called ‘Flicker’ to the Zoom attributes of the selected fixtures, type: | | | | ------------------------------------------------------------------ | ------------------------------------------------------------ | |  | User name\[Fixture]> Attribute “Zoom” At Generator “Flicker” | | | | | ------------------------------------------ | ----------------------------------------------------------------------------------------- | |  | **Hint:** | | | We provide six different random generators that can be imported into your Generator pool. | #### Bitmap [Section titled “Bitmap”](#bitmap)  New in this release The generator type Bitmap allows to use media files (for examples, images, gobos, or videos) for mapping them to a selection of fixtures. Bitmaps are organized in the Bitmap pool. The Bitmap pool is part of the data pools. To address the Bitmap pool objects, use the Bitmap keyword. To create and edit a new Bitmap object, open a Bitmap pool window (Data Pools-tab in the Add Window dialog), and edit an empty object. The Bitmap editor has different areas to setup the Bitmap generator: The top area allows access to the Bitmap Configurations, and to the Bitmap Channels. To switch from one to the other, tap Config or Channel in the tab bar on the left side. * Bitmap Configurations: With the Bitmap Configurations, several media files can be set up inside one Bitmap Generator object. The Bitmap Configuration with the green background is the selected Bitmap Configuration that is output. To select a different Bitmap Configuration, tap the desired Bitmap Configuration then tap Select Bitmap Config.\ The media file of the selected Bitmap configuration is displayed in the Bitmap pool object. These are the Bitmap Configuration properties: * Content: The media file to be played back by the Bitmap Configuration. * Width / Height: The size of the canvas to which the source is mapped. The default size is 64 x 64 pixels. * Interpolate: Smoothens the transition from fixture to fixture when playing back a media file. * Alpha: When enabled, the alpha channel of the used media file is taken into account. * Content Mode: Can be set to None, Clip (media file uses the whole canvas size), or Wrap (media file is displayed several times across the canvas). * Control X / Y: Moves the canvas in X and Y direction. * Control Zoom: Zooms the canvas and keeps the aspect ratio. * Control Aspect: Changes the aspect ratio of the canvas in Y direction. * Control Rotate: Rotates the canvas. * Color R / G / B: Changes the color of the played back media files. When inserting a new Bitmap Configuration, the values for Control, Width, and Height will be set to the values of the selected Bitmap Configuration. * Bitmap Channels: A Bitmap Channel allows to setup to which attributes the media file should respond to: * Attribute: The attribute that the bitmap generator should use to create values for the selected fixtures. * Virtual Dimmer: The Bitmap Channel with this setting set to Yes, defines how virtual dimmers in fixtures are handled by the Bitmap. * Source: Defines which part of the used media file should be analyzed to create the final values for the attributes. * Value Low / High: Defines the value range of the attribute to which the source should be mapped. The bottom area grants always access via faders to the Control attributes of the selected Bitmap Configuration.\ Tap Reset All to set the settings that are available through the faders to their default. Furthermore, tapping Reset under a fader resets this particular fader. All settings that are available as faders can also be changed by using the Bitmap Generator Encoder Bar. This encoder bar appears when the Bitmap Generator Editor is open.\ While editing a Bitmap Generator object, tapping Revert discards all current changes back to the values that were valid when the Bitmap Generator editor was opened. Control Fixture defines which Bitmap Control fixture (see below) controls this Bitmap Generator right now.\ Enabling Link Control Fixture selects the set Bitmap Control Fixture in the Selection 2, and applies the Bitmap Generator to it. When selecting a Control Fixture, Link Control Fixture will be enabled automatically. Tap SpeedMaster to assign a speed master to the Bitmap Generator. The Speed Master setting of a Bitmap Generator controls the speed of the played back videos in this Bitmap Generator. Tapping At applies the Bitmap Generator to the current selection. Tapping Dimensions From Selection changes the Width and Height of the selected Bitmap Configuration so that it matches the size of the current selection in the selection grid.\ Auto Format: When this is enabled, Format Selection will be executed automatically as soon as the Bitmap Generator is applied to a new selection.\ When tapping Format Selection, the selection will be scaled in the selection grid so that it fits as close as possible to the size of the canvas. The ratio of the selection in the selection grid is taken into account when scaling the selection. To be able to output a Bitmap generator to fixtures, it is necessary to select fixtures and arrange them in the Selection Grid. Furthermore, the canvas of the selected Bitmap Configuration needs to be aligned in the selection grid with the selected fixtures. This can be done by using the Control attributes: X,Y, Zoom, Aspect, and Rotate.\ The canvas is used to map the media file of the Bitmap Generator object to the fixtures.\ The canvas is represented by a purple rectangle in the Selection Grid window. It is visible as long as one attribute of the selection uses a Bitmap Generator as a value.\ The selected Bitmap Generator pool object defines the canvas that will be displayed in the Selection Grid window. Bitmap Generator objects can be applied to a selection by applying them to the selected fixtures by using this syntax: At Bitmap \[“Bitmap\_Name” or Bitmap\_Number] Using this way, Bitmaps can be stored as values into selective presets or cues. | | | | ------------------------------------------ | ---------------------------------------------------------------------------------------------- | |  | **Hint:** | | | For testing purposes, we provide three simple video clips you can import into your Video pool. | | | | | ------------------------------------------ | ----------------------------------------------------------------------------------------------------------------------------------------- | |  | **Hint:** | | | If NDI input is used in a setup with several consoles and processing units, the NDI stream must be available at all calculating stations. |  New in this release With the new MA Lighting fixture type Bitmap Control, it is also possible to program the Bitmap Generators more versatile into cues or presets. To do so, 1. Patch at minimum one fixture using the MA Lighting Bitmap Control fixture type. Give it at least a FID. 2. Select the fixtures you want to apply the Bitmap Generator to. Make sure that they are arranged in the selection grid properly. 3. Apply the desired Bitmap to them, by tapping the Bitmap generator object in the pool or by using the At Bitmap syntax. 4. Select the Bitmap Control fixture. 5. Apply the desired Bitmap to the Bitmap Control fixture by tapping the Bitmap generator object in the pool or by using the At Bitmap syntax. This will set the Bitmap Generator as value on the Object attribute in the Gobo feature group of the Bitmap Control fixture. To apply a different BitmapConfiguration, scroll through the Config attribute. The attributes X, Y, R, G, B, and Zoom of the Bitmap Control fixture modifies the corresponding settings of the Bitmap generator. *** ### Sounds [Section titled “Sounds”](#sounds)  New in this release It is possible to import audio files into the sound pool. These audio files can be played back by using Go+ or to stop the playback by using Off in combination with the sound pool object, or by playing it back via an executor when the sound pool object is assigned to an executor. To select the sound interface that should output the sound go to Menu - Settings - Local Settings / onPC Local Settings and change the Audio Out Device to the desired interface. The Grand Sound Out master needs to be above 0 % to get an output. By using the master fader of a sound pool object the volume of each sound can be adjusted individually. In order to adjust the level of a sound file, the setting dB can be set to a value between -6 and +6. Sounds that are played back are also listed in the Off Menu and the Running Playbacks window, and can be switched off from there as well. The progress bar on sound pool objects display the playback progress. | | | | -------------------------------------------------- | -------------------------------------------------------------------------------------------------------------------------- | |  | **Known Limitation:** | | | The Sound Pool is limited to 100 MB. Sounds are only output at stations, that are GlobalMaster, IdleMaster, or Standalone. | Audio files that exceed the file size limit will be highlighted in red in the import dialogs.\ This applies also to images and video files when being imported. It is also possible to use third-party USB sound cards connected to the grandMA3 consoles. MA Lighting cannot guarantee that all USB sounds cards will work with grandMA3 consoles, as the number of different USB sound cards out in the field may be very high. In general, audio interfaces that are HD Audio-compliant and that are supported by the snd-hda-intel module should work.\ MA Lighting tested successfully these HD Audio-compliant devices: * Focusrite Saffire USB * M-Audio Air Hub * Palmer PLI 04 USB * Radial USB-Pro *** ### Timecode [Section titled “Timecode”](#timecode)  New in this release Sound pool objects can be assigned to tracks in timecode shows. Or when recording a timecode show, and then playing back a sound, the sound will also be recorded as a track in the timecode show.\ Sounds that are part of a timecode show will display the waveform of the sound file in the timecode track. A horizontal center line divides the left from the right audio track. During the playback of a timecode show, the sounds will also be played back through the defined Audio Out Device. For more information read above the [Sounds](https://malighting.clickhelp.co/smart/grandma3-user-manual-publication/features/a/h3_1838296282) paragraph. The color of the waveform can be changed via the color theme: Color definition Global.WaveForm is used by color Timecode.WaveFormColor. In case the audio file in use is corrupted, the  icon will be displayed on the left side of the track in use. Tapping this icon opens a pop-up and informs the user that the waveform could not be fully generated.  Improved in this release Several Timecode Viewer windows are connected together when they are set up to display the selected timecode show. This can be useful for example, in order to have the view mode Timeline in one window and the text view in another. The selected tools, View Modes, etc. can be set individually for each window.\ When several Timecode Viewer windows display the same timecode show, but it is not the selected timecode show, they are not linked together. The title bar buttons of the Timecode Viewer window can be configured like other windows like other windows. As soon as the displayed timecode show is set to a timecode slot that is not the internal, the Timecode Viewer window and the Timecode Editor will grant access to the Offset TC Slot directly in the title bar.  New in this release In Menu - Preferences and Timings - Global, the setting Timecode Events Recording from defines which user actions will be recorded: * **All Users** records the playback actions from all others. * **Single User** records only the playback actions from the user who started the timecode recording. This is the default. When Timecode Events Recording from is set to **Single User**, the timecode editor will display a dark yellow record button, when a different user records already into the same timecode show. The new setting Playback and Record of Timecode shows defines which types of events will be played back and recorded: * **Manual Events**: Only actions triggered by the user are recorded and played back. All automatically recorded events, for example, Follow Cues are not recorded, nor played back. If this value is set, any prior automatically recorded events will be displayed as a small black dot. Later changes of cue commands are respected when playing back the timecode show. This is the default value of the Playback and Record setting. * **All Events**: All events will be recorded and played back. When this value is set, the Execute Command cells display a ”---” to indicate, that the user cannot override the command execution of cue commands within the timecode show. Cue commands are recorded and later changes of the commands in cues are not part of the timecode show. With the introduction of Playback and Record the Ignore Follow setting got obsolete and is removed. The setting Record Remote Event defines whether playback action that are triggered by remote actions are recorded or not. When this setting is enabled, all remote events are recorded, regardless of the status of the Timecode Events Recording from setting.  Improved in this release * Improved the export and import of timecode shows: * The property FaderToken exits only for FaderSubTracks. * Added the missing Play and Rec properties when exporting or importing timecode shows. * Track groups are expanded upon creation in the timecode editor. * Markers are created in the selected track group instead of the track group with the last selected track. * When a fader is moved and the sequence AutoStart or AutoStop is used to start or stop the sequence, a cue event will be also recorded. Timecode shows from v1.9.7.0 or prior will add such an event when migrating to v2.0 or later. * Automatically recorded events display an icon next to the event diamond (), indicating the type of the event: * : This event was recorded as it was a timed cue, for example, triggered by the Follow time of a cue. * : * Right side of the event diamond: This event triggers also a command. * Center of the event diamond: This event was created when a command was executed in a cue. * : This event was triggered by a cue command. * : This event was triggered by moving a fader and AutoStart or AutoStop of the assigned sequence started or stopped the sequence. * : When a playback was switched off via Off When Overriden. * : The event was created by executing a macro. * : The event was created via a DMX remote. * : The event was created via a MIDI remote. * : The event was created via a DC remote. * The CMD icon () of events with disabled commands (either by disabling them in the timecode show by setting Execute Command to No, or by switching off Command Enable in a sequence) will be displayed in red. * The Target cell of a track displays the assigned object with its name now with a line break. * The default value of Record Go setting changed to **as Goto (Status)**. * Command Execution can also override the commands of recorded Off Cues. * The read-only column AbsTime reports the absolute time of events inside the timecode show. The column Time reports the time of events inside their Time Range. The Time encoder in the Timecode Encoder Bar displays as TC the absolute time, and with TR the time inside the Time Range. Both times are only displayed when the time and the absolute time are different. * The default value for Cursor Mode of Timecode Viewer windows changed to **Center**. * When recording new events, toggle events are recorded as Go+ and Off events, depending on whether the toggle started or stopped the sequence. * The new setting Fade Override per event allows to define a fade time for the event that overrides the cue fade time when the timecode show is played back. * Only faders that the user moves are recorded. Touching a fader without changing the fader level will no longer record the sequence. * Improved the behavior of the 2 finger scroll gesture in the timecode editor. * When two or more events are visually almost at the same place (+/- 1 pixel) an additional icon () is displayed to inform the user that not all events at this place can be displayed. The indicator disappears when zooming in, as there may be enough room to place the events side by side on the timeline. * The Settings menu of a timecode show privodes to lock or unlock the timecode show by tapping Lock. *** ### Clone Window [Section titled “Clone Window”](#clonewindow)  New in this release Clone operations can be done easily within the Clone window. Execute Clone in the command line. This will open the Clone window as a temporary overlay.\ When specifying a source and destination in the clone command, these fixtures will be put into the Clone window as source and destination.\ The settings of the Clone window that were active upon closing the window, will be recalled if you open it again. The Clone window is separated in two areas by several filter options that are placed between those areas. The Clone Source is on the left side, and the Clone Destination on the right side. To set source or destination fixtures or groups follow these steps: 1. Tap on source or destination side to set the focus to the desired side. 2. Tap + and select fixtures or groups in the pop-up. Then tap Add. 3. Or tap Add Selection at the bottom of the corresponding area in order to add the current selection as source or destination. When doing a 2 finger right-click gesture on an existing entry in one of the list, the fixture selection pop-up will also open. This allows to easily replace existing fixtures easily.\ If one side has fewer fixtures selected than the other one, the list of fixtures is repeated until they are equal. It’s possible to restrict the cloning process using the At Filter, Sequences, Groups, Presets, Worlds, or Layouts. Tapping All Items To All sets sequences, groups, presets, worlds, and layouts to all. All Items To None sets all these object types to none.\ Tapping Sequences, Groups, Presets, Worlds, or Layouts opens a pop-up where the user can select a subset of objects and then tap Choose, or they can tap Select None or Select All in order to deselect all objects or select all objects of the corresponding object type. When all object types are set to None, the clone operation takes place in the programmer.\ Depending on the selection state, the label of the buttons can differ between All, None, and Chosen: For example, All Sequences, No Sequences, or Chosen Sequences. And also the indicator bar of these buttons and the Clone button change accordingly: * Green: All items will be cloned. * Yellow: Some items are selected. * Gray: No object will be cloned. The selection and scrolling of entries is synchronized across both areas. The line which has the focus is highlighted with a white border at the top and bottom of the line. Also, the corresponding line in the other area shows the white border at the bottom and the top of the line. These tools and functions are available: * : Copies the selected fixtures to the clipboard. * : Pastes the fixtures of the clipboard to the position of the focus. * : Cuts the fixtures to the clipboard. * : Adds fixtures to the list. In the pop-up the user can choose between fixtures or groups. When choosing group, the fixtures of the group will be added. * : Removes the selected fixtures from the list. * : Moves the selected fixtures up in the list. This applies only to manually added fixtures. Automatically added fixtures cannot be moved. * : Moves the selected fixtures down in the list. This applies only to manually added fixtures. Automatically added fixtures cannot be moved. * : Interchanges the fixtures of source list and destination list. * Add Selection: Adds the selected fixtures of the programmer to the list. * Clear List: Clears the list completely. * Include Dependencies: During the resulting clone operation, the fixtures in use will also be cloned in the referenced objects. For example, when cloning a sequence that uses presets, the fixtues will also be cloned in the presets that are used. * Clone: Starts the clone operation for the clone setup you created. Depending on the state of the selected objects, the button is labeled as Clone Show (All items set to All), Clone Selected Objects (Some items have a subset of objects selected), or Clone Programmer (All items set to None). * Tapping Reset in the title bar resets the whole Clone menu back to default. When a clone operation is executed the command line history returns the resulting clone command. *** ### Special Dialog Window [Section titled “Special Dialog Window”](#special-dialog-window) The Special Dialog window combines specialized windows for certain functionalities, for example, the color picker for operating the color engines of fixtures and the shapers dialog for operating the shapers engine of fixtures. To open a special dialog window, open the Add Window pop-up, go to Common or Tools, then tap Special Dialog.\ To switch between the different functions, tap Color or Shapers on the left side in the Special Dialog window. The settings of the Color Picker and the Shapers Dialog can be accessed via the context menu of the Special Dialog window, and then tapping on Color or Shapers.\ The Show Tabs setting on the Display tab lets the user decide whether or not to see the tab bar on the left. The setting Tab defines which functionality will be displayed in the Special Dialog window. This setting changes its value dynamically when tapping Color or Shapers on the left side in the Special Dialog window. The Link Encoder Bank setting defines if the Special Dialog window follows the selected tab the encoder bank. To learn more about this setting, read the [Encoder Bar Pool section](/grandma3/2-3/key_rn_v2_0/#h4_828587241) above. #### Color Picker [Section titled “Color Picker”](#color-picker) This is the Color Picker as it is known from previous versions. | | | | ------------------------------------------------ | --------------------------------------------------------------------------------------------------------------------------------------------------- | |  | **Important:** | | | All Color Picker windows in show files from v1.9.7.0 or prior or migrated to the Special Dialog window when loading the show file in v2.0 or later. | #### Shapers Dialog [Section titled “Shapers Dialog”](#shapers-dialog)  New in this release The Shapers Dialog offers to change the shapers of fixtures in a graphical way. The vaues that are used to visualize the shapers are ones from the DMX layer. The titlebar of the Shapers Dialog offers different settings, modes and views to control the blades of shaper fixtures. * Auto POV: Sets the POV (Point of View) rotation of the fixture in relation to the 3D positioning. | | | | ------------------------------------------ | ------------------------------------ | |  | **Hint:** | | | Auto POV is not available at moment! | * Show POV: When enabled, a fader to manually rotate the POV is displayed. * Mini Faders: Displays faders in the window depending on the set value: * **None**: No faders are displayed. * **Full**: Faders for rotation and blades are displayed. The function of the faders for the blades depend on the value of the Control setting. * **Blades**: Faders for the blades are displayed. The function of the faders depend on the value of the Control setting. * **Rotation**: A fader for the rotation is displayed. * The Link setting defines if other blades will be moved as well when moving one blade: * **None**: Each shaper can be controlled on its own. * **All**: Moving one shaper moves the other 3 shapers accordingly. * **Parallel**: When moving one shaper, the shaper on the opposite of the beam will be moved accordingly. * **Mirrored**: Moving one shaper will also move the shaper on the opposite of the beam symmetrically. * To change the control mode of the faders, tap Control: * **Ins+Rot** The user defines the depth of insertion (I) and the rotation (R) of the blades. * **A+B**: Operates the corners (A & B) of the blades. | | | | ------------------------------------------ | ------------------------------------------------------------------------------------------------------------------------------------------------------------------------------------ | |  | **Hint:** | | | All modes can be used, no matter the type of shaper engine of the fixture that is physically built in. The grandMA3 software converts the different modes to the correct DMX values. | * To change the display mode, tap View. Select between: * **Graphical**: Shows shaper visualization. * **Fader**: Only shows faders. The displayed faders are dependend of the Control setting. A Rotation faders is always displayed in this View mode. In the graphical view mode the main area of the Shapers Window is divided into two parts: * Center: Displays a graphical representation of the shapers unit. The blades are labeled from 1 to 4. The corners of the blades are labeled with A and B in addition to the number of blades. The white lines display how far the blades are inserted into the beam.\ Tap and hold one of the labels and drag it to change the shaper/corner accordingly. When tapping outside a label, the closest label will be taken, - Right: Depending on the Mini Faders setting, the faders are displayed. When the Shapers Window has focus, the encoder bar will display the Shapers Encoder Bar. Depending on the mode you selected, the encoders display the corresponding functions. To enable the Reset Bar, enter the window settings and enable Reset Bar. The reset bar is now displayed at the bottom of the window: * Reset Shaper: Resets blades and rotation. * Reset Blades: Resets the blades only. The faders that are visible, have also reset buttons: * Reset POV: Resets the POV rotation. * Reset Rot: Resets rotation of the shaper unit. * Reset 1 / 2 / 3 / 4: Resets the single blades. *** ### 3D [Section titled “3D”](#3d-1)  New in this release The new Shadow Quality setting defines the quality/resolution of the rendered shadow that an object casts, when fixture’s beam hits the object.\ The Shadow Quality setting can be defined per fixture in the Patch menu. It is only available for fixtures that are not using environmental fixture types.\ With the introduction of the per fixture Shadow Quality setting, the Shadow \[Px] setting of Render Qualities has become obsolete and has been removed.  Improved in this release The 3D Viewer window setting Lum. Spread (Luminous Spread) controls how visible the difference in brightness between different fixture types is.\ Recap: The fixture type with the highest luminous intensity defines that this intensity as 100% brightness in the 3D Viewer window. When there are also fixture types used that have a much lower Luminous Intensity, they will be rendered much darker at their 100% dimmer output. To allow the user to adjust this intensity difference (and therefore deviate from reality) to better see the darker fixture, the Luminous Spread setting can be used with different values: * When this setting is set to 100%, the Luminous Intensities are rendered as before. * Setting Luminous Spread to 0% renders all beams of fixtures with the same maximum brightness. * The default of Luminous Spread in the 3D Viewer window settings is set to 80%.  Improved in this release * Improved the performance of the Follow tool in the 3D Viewer window when using multi-pixel fixtures. * To toggle the display of the environment objects in the 3D Viewer, use the setting Render Environmental. * The arrangement tool of the 3D Viewer Encoder Bar respects the selection grid. The selected fixtures are arranged in the order of their position on the x-axis in the selection grid. This means that multiple fixtures with the same x-position in the selection grid are treated as one fixture by the arrangement tool. *** ### MVR-xchange [Section titled “MVR-xchange”](#mvr-xchange)  New in this release The MVR-xchange feature allows to connect several devices, for example, grandMA3 console, Visualizers, and CAD software, in order to exchange the data via MVR directly by using a network connection. This makes the manual transport of MVR files via USB drives obsolete. The MVR-xchange is specified in the DIN SPEC 15801:2023-12. To configure the MVR-xchange in the grandMA3 software, go to Menu - In & Out - MVR. The top area provides these elements: * Group: Enter a name in order to define your own exchange group. All devices that have the same group name, belong to the same exchange group. * Interface: Defines which network interface will be used for the exchange of MVR files. Interface is part of the local settings of a device. * Enable: In order to be able to exchange MVR files with other stations, make sure to activate Enable. | | | | ------------------------------------------ | ---------------------------------------------------------------------------------------------- | |  | **Hint:** | | | Your station needs to be part of a grandMA3 session in order to be able to do the MVR-xchange. | The bottom area changes its content via the three different tabs: * Local: The Local tab lists all MVR files of the stations that are committed into the MVR-xchange group. For more information on how to commit MVR files see the Files tab further down in this list of tabs. * Services: This tab lists all stations that are part of the same MVR-xchange group.\ Once a station joins an MVR-xchange group, a connection to this station will be automatically established. Existing connections are indicated by a green background of the station in the list.\ In order to interrupt this connection, select the station and tap Leave. The background of the station will turn red. To establish the connection again, select the station, and tap Join. * Files: In the Files tab it is possible to provide an MVR file for other stations, or to download MVR files from other stations. All MVR files that are shared within the same MVR-xchange group are listed here. * In order to provide an MVR file, tap Commit MVR. A file browser pop-up opens. From there select the MVR file, and tap Commit. The file is now provided for other stations. * If you want to download and use an MVR file of a different station, select it in the list, and tap Request. | | | | ------------------------------------------------ | ----------------------------------------------------------------------------------------------------------------------------------------------- | |  | **Important:** | | | The MVR-xchange needs to be enabled in order to be able to commit or request files, or to see the other stations of the same MVR-xchange group. | | | | | ------------------------------------------ | ---------------------------------------------------------------------------------------------------------------------------------------------------------------------------------------------------------------------------------------------------------------------------------------------------------------------------------------------------------------------------------------------------- | |  | **Hint:** | | | If you change the name of the group or enable the MVR-xchange, the list of stations in the Services tab will be cleared and the stations will be discovered anew. This may take a while.Oopsing changes is only possible in the Local tab.The exchange of MVR files with other stations other than grandMA3 stations is only supported by the following products at the moment :\* Production Assist | * BlenderDMX | The SendMVR keyword was introduced for this feature. It can be used in order to commit or request MVR files, or to join or leave the connection to other devices. Syntax: SendMVR \[“Type”] \[Number] SendMVR “Commit” \[“Path/to/folder/name”] \[“Name”] To establish a connection to the third service device, type: | | | | ------------------------------------------------------------------ | ---------------------------------------- | |  | User name\[Fixture]> Send MVR “Join” “3” | To end the connection to the first service device, type: | | | | ------------------------------------------------------------------ | ---------------------------------------- | |  | User name\[Fixture]> SendMVR “Leave” “1” | To commit the MVR file “BestShow\.mvr” (which is located at C:\ProgamData\MA Lighting Technology\gma3\_library\mvr) to the MVR-xchange group, type: | | | | ------------------------------------------------------------------ | ------------------------------------------------------------------------------------------------------------------- | |  | User name\[Fixture]> SendMVR “Commit” “C:\ProgramData\MA Lighting Technology\gma3\_library\mvr\BestShow” “BestShow” | To request the second file, type: | | | | ------------------------------------------------------------------ | ------------------------------------------ | |  | User name\[Fixture]> SendMVR “Request” “2” | For more information see [SendMVR keyword](/grandma3/2-3/keyword_sendmvr/). *** ## Other Enhancements [Section titled “Other Enhancements”](#other-enhancements-1)  Improved the help: The version 2.0 rolls out a new help system that offers more features. It is possible to: * Watch videos\ To view how a video is displayed in the new system see [Videos in the Help](/grandma3/2-3/atm_videos_in_the_help/). * Use breadcrumbs to navigate in articles * Magnify screenshots if necessary.\ To magnify a screenshot, tap it once. * Read pop-up texts for more information\ To view how a pop-up text is displayed see [CurrentUser()](/grandma3/2-3/lua_objectfree_currentuser/) The help viewer has a new structure.\ For more information see [About the Help](/grandma3/2-3/about_the_manual/).  Improved demo content: * Updated the MVR demo file (Demostage\_MVR): Updated fixtures and their models and updated environment models. * Updated the Simple\_Show * Updated the Demoshow\_grandMA3 * Updated the MA\_Startshow: * The user is now allowed to rename the groups without breaking the functionality of the used macros. * Also the Dimmer and Phaser sequences can be renamed. * New macros are added per group of fixtures, that change the Selection Mode of the recipes between Normal and Strict. * Improved the Speed macros. * Updated the predefined panic macro and added the DumpLog macro.  Improved the Backup Menu: * The Backup Menu disables Load or New Show if none of the four checkbox buttons (Show Data, Local Settings, Output Stations, and DMX Protocols) is selected. * The header of all sub-menus of the Backup Menu are identical. * When selecting several rows, the complete rows will be displayed as marked. * When the drive of an older software version is selected in the Backup menu, Save, Save as, and New Show are grayed out. If the user has selected the drive of an older software version using the command line and executes the SaveShow command, a pop-up will inform the user that the showfile could not be saved. * When loading a show file from a future version (for example, from v2.1), a pop-up informs the user that the show file cannot be loaded as it comes from a future version. * The button to open the onscreen keyboard for the Description field moved from the right side to the left side of the Description field.  Improved the Update menu: * An additional set of columns is displayed when the show file has more than one data pool. This helps identify which data pool contains the objects that can be updated. * To gain more space for the list of objects that can be updated, the buttons with the different settings were moved an area that can be collapsed or expanded. This is valid for both: Presets and Sequences.\ Each area always displays the values of the settings in a compressed representation.\ To expand a setting area, tap  in one of the areas. * Replaced the Cue Only setting in the Sequence area with the “Cue ” section where the user can decide between Tracking and Cue Only when updating. * The new “Protect from Tracking” section allows to use Dimmer Cue Only for Update, and the “Shield tracked values” section offers access to the different Racking Shield modes for Update.\ For more information see [Tracking Shield](https://malighting.clickhelp.co/smart/grandma3-user-manual-publication/features/a/h3_1351829368) and [Dimmer Cue Only](/grandma3/2-3/key_rn_v2_0/#h4__1071679005).  Improved the update operation: * When updating, the software now uses the Use Selection value **Active** for all update operations, unless the user specifies a different value by using the command line. For example, [/All](https://malighting.clickhelp.co/smart/project-test-grandma3-user-manual/key_ok_all), [/AllForSelected](/grandma3/2-3/ok_allforselected/), or [/ActiveForSelected](/grandma3/2-3/ok_activeforselected/). * Select an entire cue instead the single Parts as an Update target. If values already exist in single parts and you update with the setting Sequence Update Mode set to **Add New Content**, the values will be updated in their respective parts.  Improved the Store /Merge operation when using programmer parts or cue parts: * Attributes per fixture that already exist in cue parts will be stored into their respective cue parts when doing a Store /Merge operation. The programmer part where the values are in will be ignored in this case. * Attributes per fixture that are active in a programmer part, but do not yet exist in a part of the target cue, will be stored into a cue part that has the same part number as the programmer part.  Improved the input of Notes in the label dialog:\ The numeric keypad on the grandMA3 hardware can now be used to enter characters or apply changes. Oops can also be used as backspace when editing notes.  Improved pop-ups: Pop-ups now open at the position where the user tapped on the screen.  Improved the Title Bar Buttons: Title bar buttons can also be configured for temporary menus, such as the Edit Sequence menu or the Edit tab of the Assign menu.  Improved Timers: * The playback commands Flash and Temp can be used to control a timer. * Reworked the Timer Link Type setting: The user can choose between: * **Not Linked**: Triggering a sequence will not trigger the timer. * **\**: Triggering the selected sequence will trigger the timer. * **Link Last**: Triggering any sequence will trigger the timer. * **Sequence x**: Triggering this dedicated sequence will trigger the timer. All sequences of the same data pool are offered. When a sequence has a custom name, only the sequence number and the sequence name will be displayed in the list. * For each timer, three colors define the appearance of the time when it is displayed in the Clock Viewer window or on the timer pool object. The colors are: Stopwatch Color, Countdown Color, and Countdown Confirmed. * Timers have a read-only property “ElapsedTime”. Countdown timers in addition, have a read-only property “RemainingTime”. * When changing the Timer Mode of a running timer, the timer will not continue to run, and reset its time.  Improved MAtricks: * When entering speed values for MAtricks using the command line it is possible to define the desired speed readout with the speed value.\ To apply the speed value of 10Hz to the Speed From X property of the selection MAtricks, type: | | | | ------------------------------------------------------------------ | --------------------------------------------------------------- | |  | User name\[Fixture]>Set Selection MAtricks “SpeedFromX” “Hz 10” | When setting a speed value in the MAtricks without a unit, the value is set in the unit that is defined as the speed readout of the user profile. | | | | ------------------------------------------------ | ----------------------------------------------------------------------------------------------------------------------------------------------------------------------------------------------------------------- | |  | **Important:** | | | Loading show files created in previous versions that contain macros with the MAtricks **Speed To X** and **Speed From X** properties set will have a different result. These macros must be adjusted accordingly. | * MAtricks properties Groups for all axes allow to set a value of 1.  Improved macro triggers: * Go+ Macro \[“Macro\_Name” or Macro\_Number].\[“Macroline\_Name” or Macroline\_Number]: Executes the defined macro line and all further macro lines. * Call Macro \[“Macro\_Name” or Macro\_Number].\[“Macroline\_Name” or Macroline\_Number]: Executes only defined macro line.  Lua/Plugins: * Improved the Lua function file. For more information on how to create the Lua function file, read [HelpLua](/grandma3/2-3/keyword_helplua/). * The coroutine.yield function of Lua can wait until the show status is active or until a specified time has elapsed. To wait until the show file is in active state or after 1 second, use this code:\ coroutine.yield({activeShowstatus=1.0}) * The path of user plugins was added to the package.path. This includes the relative paths: ”./?.lua” as well as ”./requirements/?.lua”. * LightUserData can be converted to strings by using the tostring() function. In this case, the function ToAddr() is called. Also concatenating works in this case. For example,\ Cmd(“At “..myPreset)\ has the same functionality as\ Cmd(“At “..myPreset:ToAddr()) * The Lua CleanUp() function can execute all grandMA3 API functions. * It is possible to access the Collection via Lua by using the BaseObject property. To get the name of the pool, the currently collected objects are part of, use this code:\ Printf(CurrentProfile().Collection.BaseObject.Name) * Improved the ToAddr() Lua function. Instead of a number in the address of an object, the name will be used. Therefore, the boolean option “with\_name” was added:ToAddr(light\_userdata:handle, boolean:with\_name): string:address * lmproved the Addr() Lua function: If the new argument boolean:force\_commandline\_index-based\_address is set to true the returned address uses the indices of the command line.\ Addr(light\_userdata:handle\[, light\_userdata:base\_handle\[, boolean:force\_parent-based\_address\[, boolean:force\_commandline\_index-based\_address]]]): string:numeric\_root\_address * To see the difference, try out this function: return function() — Stores the handle in a variable. local mySequence = DataPool().Sequences\[1] — Converts the handle to a numerical address and store in variable. local mySequenceAddress1 = ToAddr(mySequence, false) — Converts the handle to an address including name and store in variable. local mySequenceAddress2 = ToAddr(mySequence, true) — Send a go command with the numerical address appended. Cmd(“Go %s”, mySequenceAddress1) — Send a go command with the address including name Cmd(“Go %s”, mySequenceAddress2) end * The elements of the MessageBox() function are able to get a defined order. If there is a mixture of ordered and unordered elements, first the unordered elements are sorted by name and then the ordered elements are added, sorted by their given order. To define the order, the parameter order needs to be added with an integer value, for example **order=1**.\ Here is an example of the MessageBox() where all elements are defined in an order: local function main() — create inputs: local states = { {order=4, name = “Color”, state = true, group = 1}, {order=3, name = “Gobo”, state = false, group = 1}, {order=2, name = “Position”, state = true, group = 2}, {order=1, name = “Dimmer”, state = false, group = 2} } local inputs = { {order=3, name = “Numbers Only”, value = “1234”, whiteFilter = “0123456789”}, {order=1, name = “Text Only”, value = “TextOnly”, blackFilter = “0123456789”}, {order=2, name = “Maximum 10 characters”, value = “abcdef”, maxTextLength = 10} } local selectors = { { name=“Swipe Selector”, selectedValue=2, values={Xylophone=3, Piano=2, Drums=3, \[“some stuff”]=4}, type=0}, { name=“Radio Selector”, selectedValue=2, values={grandMA2=1, grandMA=2, grandMA3=3}, type=1} } local commands={ {value=1, name=“Ok”, order=4}, {value=0, name=“Cancel”, order=3}, {value=4, name=“What?”, order=2}, {value=3, name=“Wait”, order=1} } — open messagebox: local resultTable = MessageBox( { title = “Messagebox example”, message = “This is a message”, message\_align\_h = Enums.AlignmentH.Left, message\_align\_v = Enums.AlignmentV.Top, states = states, inputs = inputs, selectors = selectors, commands = commands, backColor = “Global.Default”, — timeout = 10000, —milliseconds — timeoutResultCancel = false, icon = “logo\_small”, titleTextColor = “Global.AlertText”, messageTextColor = “Global.Text” } ) — print results: Printf(“Success = “..tostring(resultTable.success)) Printf(“Result = “..resultTable.result) for k,v in pairs(resultTable.inputs) do Printf(“Input ‘%s’ = ‘%s’“,k,v) end for k,v in pairs(resultTable.states) do Printf(“State ‘%s’ = ‘%s’“,k,tostring(v)) end for k,v in pairs(resultTable.selectors) do Printf(“Selector ‘%s’ = ‘%d’“,k,v) end end return main * It is possible to read the time of timecode slots using the ObjectList() function. Using Time returns the absolute value of the time, while TimeString returns the time in a format that a human can read. See this function on how to read the time of timecode slot 1: local function main() local t1 = ObjectList(“TimecodeSlot 1”)\[1].Time local t2 = ObjectList(“TimecodeSlot 1”)\[1].TimeString Echo(t1) Echo(t2) end return main * The read only properties **Full Path** and **File Exists** of Lua Components tell the user the whole path of the used Lua file, and inform if the configured Lua file exists at the destination. In case it does not exist, the text color will turn to red for the whole row of the Lua Component. * The content of a Lua Component can be listed. However, it is limited to 1024 characters including overhead.  Improved the Connector Configuration: * MIDI Mode is split up into MIDITC Mode and MIDIData Mode: * MIDITC Mode defines whether MIDI Timecode is input (In), output (Out), or input and also output again (Through). * MIDIData Mode defines whether MIDI Notes, MIDI Program Changes, or MIDI Control Changes are input, output, or input and output again. * The new column Devices in Session informs the user about connected and expected devices in the session. For more information on colors, read the following text below.  Improved the System Info window: * The Network tab informs the user about the number of connected and expected stations in the session. When a number is green, the expected number of devices is connected. If it is red, the number of connected devices is also displayed. The number of the expected devices is displayed in parentheses. Furthermore, the background of the area will pulsate. * The title bar of the System Info window can be hidden by disabling Show Title Bar.  Improved the Network Menu: * It remembers the sorting within the columns when it is opened again. * The inputs for HostName, Session, and Location now check for the maximum input length of 31 characters and also for characters that are allowed. * When the Network Menu is open, and devices of station types that are not listed still appear, they will be displayed directly. * Added the new tab Station Control. It allows to enable and disable the most common network related settings of the grandMA3 system. All settings of this tab are also located in other places, too. The settings are organized by station-related (for example, Web Remote, Remote HID, Send Art-Net If IdleMaster, and other) and session-related settings (RDM, DC Remotes, DMX Remotes, MIDI Remotes, PSN, MVRxchange, Art-Net Input, sACN Input, and other).  Improvements in the Graphical User Interface: * The graphics of the encoders in the Playback Window, XKeys Window, and Custom Master Section Window improved. * Changed the Update icon that appears on objects that can be updated while the Update Menu is open. * Faster initial drawing of a view when calling a view. * Sequences display their playback priority in the sequence pool and on executors with icons: * Super:  * Swap:  * HTP:  * Highest:  * High:  * LTP: No icon * Low:  * Lowest:  * While pressing MA, IDs that are too long to be properly displayed in their designated area, are scrolling through. This can be useful, for example, when a sequence from a different data pool is assigned to an executor. * The buttons in the Shutdown menu are labeled in addition to the icons. On consoles, the Shutdown menu offers an additional Reboot button. * When touching a column or window in the area to resize them, a resize icon appears. In addition, when resizing columns a white vertical line appears to display the edge of the column. The color line can be adjusted in the color theme. * Improved some icons in the tool bars. * Improved the status of the battery indicator in the command line on grandMA3 full-size and light consoles.  Improved the Off Menu and the Running Playbacks Window: * The different object types are now available via a horizontal tab bar at the top of the window. There are now buttons for disabling playbacks of different types of objects. * In addition, the All tab displays all running playbacks. The playbacks in the All tab are grouped together by their object types. * The displayed objects are filtered by the current user, but can also be changed by tapping Started by. When My Playbacks Only is activated Started by will be temporarily deactivated. * An additional DataPool filter can also be applied to filter the playbacks by Data Pools. * When Off Mode is enabled, the Running Playbacks window allows switching off playbacks by tapping them. * The Running Playbacks and the Off Menu display appearances. * The buttons in the title bar of the Running Playbacks window can be configured using the Edit Title Bar functionality in its context menu. * When opening the Off Menu, the focus is set to Everything Off. * The Sheet Style mode displays also the priority of a running sequence. * The Off Menu and the Running Playbacks Window also display running [sound files](/grandma3/2-3/key_rn_v2_0/#h3_1838296282).  Improved the command line interaction (CLI) of Go+ \[large], Go- \[large], and Pause \[large]: When pressing Go+ \[large], Go- \[large], or Pause \[large], they do not interact with the content of the command line any longer.  Improved XYZ: * The fading of fixtures from XYZ to PanTilt or vice versa is improved. * When opening the calculator to set a value for the MArker attribute, the Channel Sets tab lists the patched MArker fixtures. As soon as MArkers are patched on two or more stages, the button labels also display the stage the MArker is patched into. * When blocking cues that have tracked PanTilt and XYZ data, the positioning system that was used last in the cues before will get blocked.  Improved Recipes: * If a recipe contains data that cannot be cooked, the name of the recipe is displayed in red. For example, a selection that cannot call the selected preset.\ The recipe is displayed in red, when an ingredient is missing at all. * If several cues are selected, all recipes included will be displayed, allowing editing of multiple recipes at a time. * When editing selection, values, or MAtricks the pop-up allows filtering. * Improved cooking of Recipes: The current Cook /Merge behavior is now available as Cook /MergeLowPriority.\ Cook /Merge removes values that are flagged as cooked, then cooks the values from the recipes and also replaces values at the destination based on the recipe ingredients. * The Recipe setting Selection Mode defines how subfixtures are handled when only main fixtures are part of the selection of the recipe: * **Normal**: Values are passed down to the subfixtures. * **Strict**: Values are strictly applied to only the fixtures that are part of the selection. | | | | ------------------------------------------ | -------------------------------------------------------------------------------------------------------------------------- | |  | **Hint:** | | | When migrating show files from v1.9.7.0. or earlier, the Selection Mode setting will be set to Strict in existing recipes. | * The Value cells display the icons for selective, global, and universal data, MAtricks and phaser, when a preset is used. Therefore, the Stored Data column got obsolete and was removed. * [Generators](/grandma3/2-3/key_rn_v2_0/#h4__2007147697) and [Bitmaps](/grandma3/2-3/key_rn_v2_0/#h4_2012165831) are available as values for recipes. * The setting Filter allows to assign a Filter or World to a recipe.  Improved Window Preferences: When creating a new window, the first stored preferences of a window are loaded by default. This applies to all windows, except pool windows.  Improved the Sequence Sheet: * It is possible to test a command that is entered for a cue, without activating the cue. To do so, enable Show Command Test in the Mask tab of the Sequence Sheet context menu. When this is done, the command cells that contain commands a  will be displayed on the left side of the cell. Tapping the play icon executes the command of the cue. * To view a sequence in a sequence sheet, use the Assign command in combination with sequence (Assign Sequence \[“Sequence\_Name” or Sequence\_Number]) and tap the title bar of the Sequence Sheet. * Empty phaser steps show tracked values of the previous step. * In new shows Cue Part Appearance is set to **Num+Name**.  Improved the command input in macros and command cells: The command input, for example, in macros, cues, or agenda events, displays a preview of the entered command. This helps to see if the entered commands will be interpreted by the software as intended before applying the input. Furthermore, the command input pop-up has the setting Resolve Executor Assignments. When this setting is enabled, and executors are pressed while inputting a command, not the page and executor will be entered, but the handle of the object that is assigned to the pressed executor. When a handle is used, object type, number, and name will be displayed with yellow text color in the preview. For example: Sequence 1 ‘Go Look’. A handle is an ID and name-independent identifier of an object. This makes it possible to rename the object later or move it within the pool without the need to adjust the macro, too. Handles can also be used in the command line directly: To set the variable “MyHandle” to the Handle of Macro 1, type: | | | | ------------------------------------------------------------------ | ----------------------------------------------------------- | |  | User name\[Fixture]> SetUserVariable “MyHandle” #\[Macro 1] | or | | | | ------------------------------------------------------------------ | --------------------------------------------------------- | |  | User name\[Fixture]>SetUserVariable “MyHandle” At Macro 1 | To go to the next cue in sequence 23 using the handle of the sequence, type: | | | | ------------------------------------------------------------------ | ---------------------------------------- | |  | User name\[Fixture]> Go+ #\[Sequence 23] | | | | | ------------------------------------------ | ------------------------------------------------------------------------------------------------------------------------------------------------------------------------------------------------------------------ | |  | **Hint:** | | | Using handles instead of the object number or object name to call an object, eliminates the need to update macros and commands after moving the object to a different location or changing the name of the object. | The command input allows to go through the command line history, by pressing Arrow Up or Arrow Down.  Improved the macro editor: * Adding a new line in the macro editor, directly opens the command input. * The macro editor allows to undo all current changes ever since opening the editor at once by tapping Revert was possible.  Improved the usage of values in commands: When specifying values for option keywords, especially number values, the input was simplified. Before: /XResolution = “64” After: /XResolution=64  Improved Appearances: * The name of a new appearance will be determined by the media file (image or video) that is used in the appearance.\ If the name is the default name, appearances that use an image do not display the name on the appearance object in the Pool window. * Media objects that can be used in an appearance (images, videos, symbols, and gobos) can be assigned to an appearance. Also assigning images to an empty appearance creates a new appearance with the image. * Appearances used in pool windows are displayed in the background of the pool window. Empty pool elements do not display the pool appearance. * Assigning an appearance to another appearance creates a copy of the first appearance. * The Appearance editor allows to undo the current changes directly by tapping Revert.  Improved images: It is possible to store screenshots of views or NDI streams directly as images. To do so, use the [/Screen](/grandma3/2-3/ok_screen/) option keyword or [/NDI option keyword](/grandma3/2-3/ok_ndi/) in combination with [Store](/grandma3/2-3/keyword_store/) and [Image](/grandma3/2-3/keyword_image/) keywords.\ The option keyword [/ScreenOnly](/grandma3/2-3/ok_screenonly/) allows to define which parts of the screen will be used: * /ScreenOnly “Yes” (this is the default, also when the /ScreenOnly is not defined at all): The screenshot only includes the area that can be defined by the user. * /ScreenOnly “No”: The whole screen including view bar, encoder bar, and other is used for taking the screenshot. To store a screenshot of screen 1 as image 5 of the area that can be defined by user, type: | | | | ------------------------------------------------------------------ | ------------------------------------------------ | |  | User name\[Fixture]> Store Image 3.5 /Screen “1” | To store a screenshot of the whole screen 1, with encoder bar, view bar, and other as image 6, type: | | | | ------------------------------------------------------------------ | ----------------------------------------------------------------- | |  | User name\[Fixture]> Store Image 3.6 /Screen “1” /ScreenOnly “No” | See also [/ScreenOnly option keyword](/grandma3/2-3/ok_screenonly/). To store a screenshot of the first NDI stream 1 as image 13, type: | | | | ------------------------------------------------------------------ | -------------------------------------------- | |  | User name\[Fixture]> Store Image 3.13 /NDI=0 | See also [/NDI option keyword](/grandma3/2-3/ok_ndi/). When executing Store for an empty image, a store menu opens and offers the choice of a source and resolution. The resolution can be defined via the command line as well by using the [/XResolution option keyword](/grandma3/2-3/ok_xresolution/) and [/YResolution option keyword](/grandma3/2-3/ok_yresolution/).  Improved the Clock Viewer: When selecting a timer to be displayed, also timers from a different data pool can be displayed.  Improved ListReference: * The references and dependencies returned to provide additional information in the Info column, for example when a fixture is part of the selection of a different user, which has highlight enabled, the Info cell informs the current user about highlight in the selection. * The behavior when executing ListRefrence in combination with the Info window improved: * If no Info window is open, or if Auto List Reference is set to **None** in either of the open windows, the Info pop-up will be opened. * As soon as Auto List Reference is set to **None** in at least one or more Info windows, the information returned will be displayed in the Info windows.  Improved the Info window when working with appearances: When the new Info window setting Use Target Appearance is enabled, the appearance of the displayed object will be shown.  The If keyword can be used in commands combined with the [FeatureGroup](/grandma3/2-3/keyword_featuregroup/) and the [EncoderBank](/grandma3/2-3/keyword_encoderbank/) keywords. For example, in order to filter by Groups, Worlds, Presets, Filters, or Selection.  MA on the internal keyboard works in the same way as MA on the surface of the consoles and command wings.  Improved date and time configuration on onPC stations: The functionality Set Date and Time to OS Settings in the onPC Local Settings resets the date and time of the grandMA3 onPC application back to the date and time of the operating system.  Improved the System Monitor Window: * The system monitor timestamp uses the UTC time. * The system monitor displays per row now 1. time 2. the name of the service and the message in a row.  Added the possibility to transfer values of properties to other objects: In order to set properties of an object to the same value as another object, the Set command has been extended. General Syntax:\ Set \[Object\_Type] \[“Target\_Object\_Name” or Target\_Object\_Number] Property \[“Property\_Name”] At \[Object\_Type] (\[“Source\_Object\_Name” or Source\_Object\_Number]) (Property \[“Property\_Name”]) To transfer the value of the Priority setting of sequence 1 to sequence 42, type: | | | | ------------------------------------------------------------------ | ---------------------------------------------------------------------- | |  | User name\[Fixture]> Set Sequence 42 Property “Priority” At Sequence 1 | To transfer the name of the selected sequence to the name of group 5, type: | | | | ------------------------------------------------------------------ | ---------------------------------------------- | |  | User name\[Fixture]> Label Group 5 At Sequence | For more information see [Set keyword](/grandma3/2-3/keyword_set/).  The SetUserVariable and SetGlobalVariable commands also support the properties of objects. To set the user variable “myVar” to the CueFade value of Cue 1 of the selected sequence, type: | | | | ------------------------------------------------------------------ | ------------------------------------------------------------------------ | |  | User name\[Fixture]> SetUserVariable “myVar” At Cue 1 Property “CueFade” | To set the global variable “PositionX” to the 3D X coordinate of fixture 1, type: | | | | ------------------------------------------------------------------ | ------------------------------------------------------------------------------- | |  | User name\[Fixture]> SetGlobalVariable “PositionX” At Fixture 1 Property “PosX” | To set the global variable “myShow” to the name of the loaded show file, type: | | | | ------------------------------------------------------------------ | -------------------------------------------------------------------------------------- | |  | User name\[Fixture]>SetGlobalVariable myShow At Root “MANetSocket” Property “Showfile” | You can get the name using the /Look option keyword for properties that have an index with a corresponding name. To set the user variable “mySeqPrioIdx” to the Priority index value of the selected sequence, type: | | | | ------------------------------------------------------------------ | ----------------------------------------------------------------------------------- | |  | User name\[Fixture]> SetUserVariable “mySeqPrioIdx” At Sequence Property “Priority” | To set the user variable “mySeqPrioName” to the Priority name of sequence 42, type: | | | | ------------------------------------------------------------------ | --------------------------------------------------------------------------------------------- | |  | User name\[Fixture]> SetUserVariable “mySeqPrioName” At Sequence 42 Property “Priority” /Look |  Improved the Stomp command: If Stomp is used in a FeatureGroup without selection, stomp will be executed in all fixtures.  IfOutput is now working with Full or Zero for fixture selection.  Improved the special values: At Highlight and At Lowlight load the highlight/lowlight values of the selected fixtures into the programmer.  The Output Configuration does not create a new entry if the station IP changes.  Improved Preset Pool settings: * The setting Display Mode has a new value called **Auto**. When this value is set, only the appearance of the preset is displayed. This only applies to presets that have an appearance assigned. Presets without an appearance will still display their names. * The setting Action has a new value called **SelFix/Extract**. This value acts similarly to **SelFix/At**, but instead of calling the preset reference into the programmer, the values will be called extracted into the programmer.  Improved Align: The Align Bar offers access to the new **XY Rotation** setting. The entered value will rotate the following alignment of values across the selection grid.\ Use tap, hold and drag inside the circle graphics of the XY Rotation setting to graphically adjust the value. The arrow in the circle snaps at 0°, 45°, 90°, 135°, 180°, 225°, 270°, and 315°. Example: Requirement: Load the Demoshow\_grandMA3 1. Select the group “LED Tiles Back”. 2. Set RotXY in the Align Bar to 45°. 3. At 0 Thru 100 The dimmer values will be aligned at a 45° angle across the selection grid. This can also be done with all other attributes.  Improved the Total Reference Update: When the Total Reference Update is shorter than 500 ms, no progress bar will be displayed.  Improved the MemoryInfo keyword: Added the new option keywords /Limit and /Sort: * /Limit: Defines how many entries will be displayed. It expects a number as value. Syntax: MemoryInfo /Limit \[Limit\_Number] * /Sort: Defines how to sort the results MemoryInfo displays. Possible values are: “Asc”, “Desc”, and “None”. Syntax: MemoryInfo /Sort \[“Sort\_Name”] To display the 5 objects that are occupying the most memory, type: | | | | ------------------------------------------------------------------ | ----------------------------------------------------- | |  | User name\[Fixture]> MemoryInfo /Sort “Desc” /Limit 5 |  Improved the scribble editor in the label dialog: It has now the same style and buttons as when editing a scribble in the scribble pool.  Improved the Command Line History: * By performing a right-click gesture on a command a pop-up opens which allows you to: * Copy: Copies the command to the clipboard. * Execute Again: Executes the command again. * Copy and Overwrite to Command Line: Copies the command into the command line. Existing command line content will be discarded. * Add to Command Line: Copies the command at the end of existing command line content. This pop-up can also be opened by pressing Please on the internal keyboard or by pressing the screen encoder. * When tapping Jump to Bottom in the Command Line History window, the focus jumps down to the newest command line history entry. * When pressing Clear, the Command Line History will show what type of clear was executed. * Increased the maximum number of lines that the Command Line History Window can display to 2 048.  Improved the Main Menu overlay: The installed software version is displayed in the title bar.  Improved the handling of sessions: The first 32 session slots (Category A) are reserved for 16 consoles and 16 processing units, additional consoles and processing units will join the session as Category B session members.\ For example, this can be used in order to get up to 250,000 parameters in a session by only using processing unit M. Or when using only processing unit M and wanting to have more than 1 console in the session.\ When adding several devices to the session at the same time, they will be added following their internal order in the software. This order is represented by the No column in the Network menu.  Added commands to remote control devices more efficiently in a session: * Disconnect: Disconnects the specified station from the session. Compared with Dismiss, Disconnect only disables the network of the station and but does not reset the session name and location of the device. Disconnect can only be executed for stations that are part of the same session. * Reconnect: Takes the specified station back into session that is specified by its name and location at the station. Reconnect works only for stations that have the same Session Name and Location as the device that sends the Reconnect command. The sending device needs to be part of the session. To learn more about the commands and their syntax, please read [Disconnect](/grandma3/2-3/keyword_disconnect/) and [Reconnect](/grandma3/2-3/keyword_reconnect/).  Improved the behavior of Session Data Merge: The Include Playback setting in the Station Control tab of the Network Menu defines per station if the changes of playbacks are to be consired in the Session Data Merge. If it is enabled, the changes made on playbacks will be taken into account. Include Playbacks is enabled by default.  The /Wait option keyword delays the execution of the store command. It also defines the countdown time of the pop-ups of ShutDown, Restart, Reboot, and so on. Enter the waitime milliseconds.\ To delay the Store Cue 5 command by 3 seconds, type: | | | | ------------------------------------------------------------------ | ------------------------------------------- | |  | User name\[Fixture]> Store Cue 5 /Wait 3000 | To set the countdown of the ShutDown pop-up to 20 seconds, type: | | | | ------------------------------------------------------------------ | ---------------------------------------- | |  | User name\[Fixture]>ShutDown /Wait 20000 |  Improved the tool tips for elements in the user interface: Add Window dialog, At Overlay.  Improved the preview feature NDI: * Updated NDI to version 5.6.0. * Third-Party software does not need to be enabled anymore to use NDI. * When the NDI source provides a resolution bigger than FullHD, a low bandwidth stream will be requested.  The SFTP access can be enabled or disabled by tapping SFTP Access in the Station Control tab of the Network menu, or via command line. To disable the SFTP access, type: | | | | ------------------------------------------------------------------ | ---------------------------------------------------------------------- | |  | User name\[Fixture]> Set Root “MANetSocket” Property “EnableSFTP” “No” |  Improved the grandMA3 onPC for macOS installer: When the Security setting **Allow applications downloaded from** is set to “App Store and identified developers”, the installer can be opened immediately by double-clicking the .pkg file.\ In case of having this setting set to “App Store”, right-click on the .pkg file, click **Open**, click **Open** in the pop-up.  Improved color selection dialogs, for example, in the Scribble Editor: When tapping into the color area, the set brightness stays as is. In addition, the color interface of the Appearance editor got a brightness fader as well.  Improved the Hue fader in the color picker: The indicator bar on top of the fader label displays the set hue color.  Improved filters: * Select Filter \[“Filter\_Name” or Filter\_Number] selects the filter permanently. The filter that was selected, will be indicated by a yellow frame. * Call Filter \[“Filter\_Namne” or Filter\_Number] selects the filter temporarily for the next action (Store, Update, At, and Clone) only. The filter that was called is indicated by a flashing yellow frame. * The Filter pool windows allow to set the Action to Select or Call. The default is Call. * When a Filter is selected, it has the yellow selected border in the pool.\ When a filter is called, the called filter pool object will get a flashing yellow frame. As soon as the At filter is modified no filter is called anymore.\ In this case the selected border will disappear from the selected filter pool object. Instead the indicator bar at the top is highlighted in yellow. * The At Filter applies always, also when applying values in the programmer, or when blocking/unblocking cues. Encoders and the dimmer wheel are excluded from that rule.  The Force Login setting forces the user to log in with a user when starting the grandMA3 Software. To enable Force Login, go to Menu - Settings - Local Settings / onPC Settings.  Improved the Assignment Editor: When no object is assigned, the Assignment Editor opens displaying the second tab, instead of the first tab (Empty tab).  Improved the columns in the Patch menu: The columns Pan Offset, Tilt Offset, Pan DMX Invert, Tilt DMX Invert, Pan Enc Invert, and Tilt Enc Invert are grouped into the parent columns Offset, DMX Invert, and Enc Invert.  Added the Local Settings menu for consoles. It can be accessed via Menu - Settings - Local Settings. It offers to change the Audio Out Device and the Force Login setting.  Improved the Network Interfaces menu of grandMA3 xPort Nodes: The IP address of the first interface is now displayed in the first row. The second IP is displayed in the second row. | | | | ------------------------------------------------ | ------------------------------------------------------------------------------------------------------------------------------------------------------------------- | |  | **Important:** | | | With the adjustment of the sorting of the network interfaces of xPort nodes, the DHCP setting in the first row applies now also to the IP address of the first row. |  Improved the My Interfaces menu of consoles and onPC stations: The Extended tab allows to change the Gateway, DHCP Timeout, and DNS server settings per interface.  Improved the Agenda Viewer Window: The title bar buttons are configurable.  Improved the command line operation in order to add more objects into a closed If statement: When an If statement is already closed with an EndIf, pressing + removes the EndIf, and an additional object can be added. After adding the object the EndIf is also added again.  Improved the feedback when exporting fixture types: A progress abr appears now when exporting fixture types.  Improved the importing of fixture types: * The caching of the fixture type library is faster. This caching happens when importing a fixture type the first time after the installation of a new software version. * When searching for a fixture type, the file name of the fixture type XML files are also taken into account.  Improved the User Configuration/Web Remote: * The users Admin, Guest, and 3D cannot login on web remote devices. * When the logged in user at a web remote device gets deleted, the user will get a Login prompt displayed. * When the Remote user has set up a password, the user has to enter the password when logging in on a web remote device. * The passwords the user can set for the Admin user gets reset when loading the show. The password of the Guest cannot be changed anymore. * Specify name and password in the URL in order to connect to a station. This is how to do it: https\://\[IP]:8080/?user=\[User name]\&Password=\[password],\ for example **:8080/?user=Michael\&Password=qwerty**  Improved the attribute calculator: * When All Channel Sets is active, the Channel Sets area displays the channel sets of all channel functions at the same time. This setting is per attribute. The User Attribute Preferences editor (Menu - Settings - User Configuration - Profiles - Edit Encoder Bar) allows also to change this setting by editing the corresponding cell in the IgnoreChannelFunctions column. * When a different filter other than filter 1 is called or selected, the calculator displays a filter icon () in its title bar.  Improved the handling of HSB attributes: The expected physical range of the HSB\_Saturation and HSB\_Brightness attributes is now percentage. Fixture types from older versions will be automatically migrated if their HSB\_Saturation and/or HSB\_Brightness channel functions have a physical range from 0 to 1. The same applies to show files that will be converted from grandMA2 to grandMA3 using the show file converter (in Mode 2) and the import of GDTF files.  Improved the fixture type editor: * Improved the geometries: The beam types **PC**, **Fresnel**, and **Glow** were added to the Beam Types property of a beam geometry according to the GDTF DIN SPEC 15800:2022. **PC** and **Fresnel** are visualized the same as **Wash** in the 3D Viewer, while **Glow** is visualized as **None**. * Improved Channel Functions: The custom names of the Channel Functions are now forced to be unique for each Logical Channel. * An error message is displayed in the Show Conflicts pop-up of the fixture type editor if a channel function cannot be controlled because the maximum number of channel functions in the show file has been exceeded.  Added setting **Dive Into** per Fixture Type DMX Mode: When Dive Into is set to **Yes**, the encoder bar can control attributes of subfixtures, when the main fixture is selected and does not have the same attribute available.\ When Dive Into is set to No, the encoder bar controls only the attributes of the selected fixtures and cannot change the values of lower subfixtures anymore.  Improved the Playback window, XKeys window, Custom Master Section window, command wing Bar window, and System Info window: Their title bars can be hidden when disabling Show Title Bar in the settings.  Improved Masters: * Masters that are assigned to executors: When the Master is set to Toggle, and the Master is switched on, the executor label will change its background to green. The color can be defined in the color theme: Exec.GrandMasterActive. * When the Grand MAster is pulled down, the Grand Master label in the encoder bar will flash red. In addition, when the Grand Master is assigned to an executor or special executor, these ones will flash red as well. * Masters that are set to Toggle can be executed with the button function Temp when they are off. They will then be temp’ed to the their current master fader level.  Improved Encoders: When assigning a function to EncoderLeftCommand or EncoderRightCommand, the Encoder setting will be ignored.  Improved the handling of USB drives: More USB drives will be detected with their correct names instead of a long number as name.  Extended the maximum depth of levels in presets (embedded presets and recipe presets) from 5 to 10.  Added functionality to + and - when keeping them pressed: During press and hold of + and - it is possible to select or deselect fixtures in the fixture sheet.  Added COMMAND parameter for Windows onPC: The value of COMMAND will be executed when starting grandMA3 onPC. The COMMAND needs to be added to the Target of the grandMA3 shortcut. This is the format: COMMAND="""command to be executed""". For example, COMMAND="""Go+ Macro 1""".  Improved the power loss pop-up: If the grandMA3 full-size and light consoles are running on the internal battery, an additional pop-up appears as soon as 50% of the battery’s capacity are reached. This pop-up informs the user that the show file will be automatically saved once 60 seconds have elapsed. If there are no changes in the show file, the pop-up will not appear.  Improved the Store Settings overlay (long-press Store): * Added more space between the different sections. * Refactored the “Cue Only” section into “Copy Values”: * Tracking: Stores the values at the destination as normal tracking values. * Cue Only: Stores the values at the destination as values only into this cue. The following Cue Only stores previous values. (= Cue Only principle). * Added the new section “Protect from Tracking”: * Dimmer Cue Only: Stores only the dimmer values at the destination following the Cue Only principle when it is enabled. All other attributes will be stored as tracking values. For more information see [Dimmer Cue Only](/grandma3/2-3/key_rn_v2_0/#h4__1071679005). * Added a Tracking Shield section: * Off *  *  * For more information see [Tracking Shield](https://malighting.clickhelp.co/smart/grandma3-user-manual-publication/features/a/h3_1351829368).  Improved OSC: The OSC buffer size was extended to 2 048 bytes, for sending and receiving OSC.  Improved MVR Import: When the MVR Merge pop-up has Columns set to Full, the column **My Stage** allows to define on which stage the fixture shall be imported. If the fixture to be imported exists already in the show file, the My Stage cell of the fixture has the corresponding stage entered. If the fixture does not exist, yet, Stage 1 is set up. *** ## Changes [Section titled “Changes”](#changes) * New keywords: * [AutoStore](/grandma3/2-3/keyword_autostore/) * [Bitmap](/grandma3/2-3/keyword_bitmap/) * [Disconnect](/grandma3/2-3/keyword_disconnect/) * [EncoderBank](/grandma3/2-3/keyword_encoderbank/) * [EncoderBar](/grandma3/2-3/keyword_encoderbar/) * [Generator](/grandma3/2-3/keyword_generator/) * [GridStore](/grandma3/2-3/keyword_gridstore/) * [Hold](/grandma3/2-3/keyword_hold/) * [MyRunningSoundFile](/grandma3/2-3/keyword_myrunningsoundfile/) * [MyRunningTimecode](/grandma3/2-3/keyword_myrunningtimecode/) * [Reconnect](/grandma3/2-3/keyword_reconnect/) * [RunningSoundFile](/grandma3/2-3/keyword_runningsoundfile/) * [SendMVR](/grandma3/2-3/keyword_sendmvr/) * New option keywords: * [/ChannelSet](/grandma3/2-3/ok_channelset/) * [/Limit](/grandma3/2-3/ok_limit/) * [/NDI](/grandma3/2-3/ok_ndi/) * [/ScreenOnly](/grandma3/2-3/ok_screenonly/) * [/Sort](/grandma3/2-3/ok_sort/) * [/TrackingShield](/grandma3/2-3/ok_trackingshield/) * [/Wait](/grandma3/2-3/ok_wait/) * [/XResolution](/grandma3/2-3/ok_xresolution/) * [/YResolution](/grandma3/2-3/ok_yresolution/) * Removed keywords: * EncoderPage | | | | ------------------------------------------ | ------------------------------------------------------------------------------------------ | |  | **Hint:** | | | For more information about the new keywords, please read the corresponding sections above. | - New color theme colors: * ColorDefinitions: * Global.WaveForm * PoolDefault.Bitmaps * PoolDefault.EncoderBar * PoolDefault.Generators * Colors: * Assignment.EncoderBar * Assignment.Filter * Assignment.UpdatePreset * Assignment.UpdateSequence * CloneUI.All * CloneUI.Chosen * CloneUI.None * ColumnSetGrid.Separator * DBObjectGrid.WarningBackground * DBObjectGrid.WarningText * EndlessFader.Background * EndlessFader.FaderLocked * EndlessFader.Knob * EndlessFader.StripActive * EndlessFader.StripInactive * EndlessFader.TextActive * EndlessFader.TextInactive * Exec.GrandMasterActive * FixtureSheetCell.ExtendedSheetModeFrame * Global.Charging * Global.Running * Help.Breadcrumb * Help.TableHead * Help.TableRowEven * Help.TableRowOdd * LayoutView\.EditFrame * PoolButton.UpdateFront * PoolButton.UpdateBack * PoolButton.UpdateBackground * PoolButton.UpdatePreset * PoolButton.UpdateSequence * PoolWindow\.Bitmaps * PoolWindow\.EncoderBars * PoolWindow\.Filler * PoolWindow\.Generators * RotationButton.Arrow * RotationButton.Circle * RotationButton.Marking * SelectionGrid.BitmapOutline1 * SelectionGrid.BitmapOutline2 * SelectionGrid.Centerline * SelectionGrid.SelectionOutline1 * SelectionGrid.SelectionOutline2 * SelectionGrid.SetupActiveIndicator * SelectionGrid.SetupLasso * ShowCreator.DirectionIcon * ShowCreator.Section * Timecode.CommandExistsButDisabled * Timecode.CommandExistsButDisabledSelected * Timecode:IncompleteWaveFormWarning * Timecode.LinkOverlayColor * Timecode.RecordSingleUserActive * Timecode.SkippedNonUserEvents * Timecode.TriggerIcon * Timecode.TriggerIconSelected * Timecode.WaveFormColor * UIGrid.ResizeLine * UIGrid.UserFilterHiddenFactor * UpdateMenu.CellAltBackground * UpdateMenu.CellBackground * UpdateMenu.ExtendedOptionsBackground * UpdateMenu.OptionsLabelText * UpdateMenu.OptionsSummaryLabelText * UpdateMenu.OptionsSummaryValueText - Removed color theme colors: * ColorDefinitions: * PoolDefault.Functionals * Colors: * PoolWindow\.Functionals * New grandMA3 Lua Functions: * CmdlineChildren() * CurrentCue() * CurrentScreenConfig() * FirstDmxModeFixture() * GetScreenContent() * GetSelectedAttribute() * GridMoveSelection() * GridsGetColumnById() * GridsGetExpandedHeaderCellState() * GridsGetRowById() * IsLocked() * NeedShowSave() * NextDmxModeFixture() * ReleaseProfiling() * SelectedFeature() * SelectedLayout() * SelectedTimecode() * SelectedTimer() * SetChildrenRecursive() * TestPlaybackOutput() * TestPlaybackOutputSteps() * Renamed the MIDIMode property in the Output Configuration MIDITC Mode. * The Lua PopupInput() function returns the actual Lua index of the items table, which starts counting at 1. * The At command uses the natural readout when no attribute is specified. As soon as an attribute is specified when using At, the readout of the encoder bar/user profile is taken into account. This can be overruled with specifying the readout together with the value. * In new shows, the existing and selected sequence is also assigned to executor 201. * Changed the button text from Reset Selected to Reset MAtricks in the EditSettings menu of presets. * If new objects are assigned in a layout, the insert position will be centered at the touch location. * It is no longer possible for two geometries to have the same name. The same applies to Emitters, Filters, DMX Modes and Wheels. The name must be unique. * XYZ was removed in the fixture type editor. To toggle XYZ for each DMX mode, directly edit the XYZ cell. * The FixtureType editor now separates the different modes of a fixture type. To change a channel of a mode, select the mode first and then edit it. * If a show file created in prior versions is loaded in the current version, trailing empty steps which do not contain absolute or relative values in cues, will be removed. * Moved these symbol files from lib\_symbols to lib\_symbols/symbols: * 0\_degree\_black.png * 0\_degree\_white.png * 180\_degree\_black.png * 180\_degree\_white.png * 270\_degree\_black.png * 270\_degree\_white.png * 360\_degree\_black.png * 360\_degree\_white.png * 90\_degree\_black.png * 90\_degree\_white.png * in\_order\_black.png * in\_order\_white.png * mirrored\_black.png * mirrored\_white.png * non\_mirrored\_black.png * non\_mirrored\_white.png * shuffle\_black.png * shuffle\_white.png * Value sorting of columns changed from long-press of the header cell to tap, hold and swipe down. Right-click on a header cell for sorting did not change. * The passwords the user can set for the Admin user gets reset when loading the show. The password of the Guest user cannot be changed anymore. * The screen configuration and rights of the default users (Guest, Admin, 3D, and Remote) cannot be changed anymore. * The IsMArker property of fixture types changed to Special Purpose. It can have the values **MArker** and **BitmapController**. * Renamed RGB/HSB Space setting in the color picker Color Space. * onPC Settings renamed to onPC Local Settings. * Removed the word “Show” from all buttons in the settings pop-up of the Custom Master Section window. * The buttons to open the Custom Master Section overlay () and the Playbacks overlay () interchanged their positions in the Control Bar. *** ## Bug Fixes [Section titled “Bug Fixes”](#bug-fixes-1) ### 3D [Section titled “3D”](#3d-2) | Description | | --------------------------------------------------------------------------------------------------------------------------------------------------------------------------------------------------- | | The 3D Viewer did not display the red lock symbol when the displayed camera was locked. This bug is fixed. | | If 3D priority was disabled, the software did not react directly to it. This bug is fixed. | | Making changes in the Arrangement tool in the 3D Viewer Encoder Bar did not create entries in the Oops History. This bug is fixed. Changes on the arrangement can be oopsed. | | The dimensions of the stage bounding box in the 3D Viewer window were not instantly enlarged when a fixture was moved out of it using the 3D Viewer Encoder Bar to move it. This bug is fixed. | | No shadow was displayed in the beam if Render Quality setting Beam was set to Standard, the settings Shadow and Gobo were enabled. This bug is fixed. | | In some cases, beams from fixture types with rectangular beams were cut off mid-air or did not create spots on the ground when shadows were enabled. This bug is fixed. | | The size of rectangular beams did not match the size of the spot when shadows were enabled or Gobo was set to Animated in the used Render Quality. This bug is fixed. | | Fading between Gobo slots was not displayed correctly for Render Qualities with the Gobo property set to “Animated”. This bug is fixed. | | Beams could cause visual artifacts when using a 2D camera in the 3D Viewer. This bug is fixed. | | When using a render quality with Beam set to “High” and Multi Led Beam Mode set to “Single Beam Dynamic Gobo” in the 3D Viewer, the color of the beams and spots were incorrect. This bug is fixed. | | Textures in the 3D Viewer window were not displayed when running grandMA3 onPC on Windows PCs that use an Intel Iris graphics card. This bug is fixed. | | The previous selection was not reset when selecting new fixtures after changing values in the 3D Viewer or Layout Viewer Encoder Bar. This bug is fixed. | | The selection of fixtures could be reset when selecting new fixtures in the 3D Viewer window after deselecting fixtures of the selection. This bug is fixed. | | The grandMA3 software could crash when loading a show file that contained a lot of materials. This bug is fixed. | | Fixture types with multiple beam geometries that have different luminous intensities could appear too dark in the 3D Viewer window. This bug is fixed. | | glTF meshes could have incorrect position offsets when using the internal mesh offsets of glTF files. This bug is fixed. | ### Command Line and Macro [Section titled “Command Line and Macro”](#command-line-and-macro-1) | Description | | -------------------------------------------------------------------------------------------------------------------------------------------------------------------------------------------------------------------------------------------------------------------------------------------------------------------------------------------------------------------------- | | The calculator of the Speed Master layer did not allow to select speed masters that had a space in their names. This bug is fixed. | | When assigning a sequence to another sequence while being in a session, the action could not be oopsed the first time. This bug is fixed. Mirroring a sequence can be oopsed. | | When executing Edit List the current cue was edited. This bug is fixed. Executing Edit List returns “Not Allowed” in the command line and does nothing else. | | Custom names of speed masters were displayed with capital letters in the calculator of the Speed Master layer. This bug is fixed. | | When using the Arrangement tool in the Layout Viewer, the proposed arrangement was not in the same order as the user selected the fixtures. This bug is fixed. | | The different Export functions of Lua returned nil in case of successful export. This bug is fixed. Lua returns boolean values when executing any export function. | | Progress bars initiated by plugins displayed the progress starting at 1. This bug is fixed. The progress of progress bars takes the defined start and end values of the SetProgressRange() function into account. | | A hook on RunningSequences in a plugin only returned information if the Off menu was open at the same time. This bug is fixed. | | At commands were not taken into account by the CreateUndo() Lua function. This bug is fixed. | | When using the filter function in dropdowns opened with the Lua function PopupInput(), the returned value did not match the total index of the selected item. This bug is fixed. | | When trying to switch off the selected element of a pool by specifying only the pool, for example Off Timecode, the selected sequence was switched off. This bug is fixed. Off combined with an object keyword switches either all elements of the given object type off (for example, Off Preset) or switches off the selected object in a pool (for example, Off Timer). | | When selecting elements in a layout, two Oops events were created. This bug is fixed. | | Custom Gels could not be exported or imported. This bug is fixed. Custom Gels are exported to gma3\_library/userprofiles/gels. From there they can also be imported. | | It was not possible to use Delete, Copy, and Insert in combination with events in the Agenda Viewer when it was in Setup mode and View Mode was set to Month, Week, or Day. This bug is fixed. | | It was impossible to use a variable as value for an option keyword, for example, Store View 1 /Screen $“Var”. This bug is fixed. | | Extract /Single could not be oopsed. This bug is fixed. | | When moving the cursor in between an existing command and then pressing hardkeys, put the keywords or numbers at the end of the command. This bug is fixed. Pressing hardkeys enters the keywords or numbers at the position of the cursor to the existing command. | | Oops was not possible after cancelling a label pop. This bug is fixed. | | MA + Please on the internal keyword did not work. | | It was not possible to create a line break in the Notes tab of the Info window. This bug is fixed. | | When patching a fixture using the Patch command, the feature graphics could disappear in the fixture sheet. This bug is fixed. | | When storing individual times into a cue and choosing the release store option, the individual times were not stored. This bug is fixed. | | When an image was mirrored or rotated inside an appearance, the image disappeared when zooming a layout where this appearance was used. This bug is fixed. | | The software could crash if many PSN trackers were created and deleted right after. This bug is fixed. | | Pressing Off + Time + Please on a newly created show did crash the software. This bug is fixed. | | Park Thru and Unpark Thru did not work as expected. When executing Park Thru or Unpark Thru, the command is completed to Park Fixture Thru or Unpark Fixture Thru. | | Adding a new user profile deactivated the programmer content of users. This bug is fixed. | | The software could crash if you used, for example, a **Pan only** filter for a sequence that has Pan, Tilt, and XYZ attributes stored. This bug is fixed. | | It was not possible to set values using the command line in the physical readout in 0.01 steps. This bug is fixed. | | Using MA + 2 or MA + 8 while the focus was set to the command line in order to scroll through the last commands, the commands disappeared whenever you released 2 or 8. This bug is fixed. | | When adding a new line or a space to a note in the notes area of the Sequence Sheet or in the Info Window, the new line or space was trimmed if you did not enter text shortly after. This bug is fixed. Notes will not be trimmed as long as the notes area has focus. | | When activating a channel set within an attribute calculator, the corresponding attributes of the activation group stayed inactive. This bug is fixed. | | The software could crash if you did collapse a track group inside a timecode show after the user moved tracks from one to the other track group. This bug is fixed. | | When doing mathematical calculations inside the MAtricks calculators, the results could be wrong. This bug is fixed. | | When a user was labeling an object, while another user tried to drop the ownership from this object, and the first user decided to keep the ownership, the label pop-up was also closed. This bug is fixed. | | When creating and editing a scribble by right-clicking it in the Scribble pool, and then closing the editor without doing any changes, the scribble pool object looked like it had content. This bug is fixed. Editing a newly created scribble and then closing the editor without applying these changes made the Scribble be empty. | | Move Grid Cursor did not work as expected when the order of the selected fixtures was not straight in the patch. This bug is fixed. The patch order of fixtures in the patch is not relevant anymore for Move Grid Cursor. | | A Timer linked to a sequence lost the reference if the sequence was moved afterward. This bug is fixed. | | No spaces before + and - were added when pressing + or - while having focus on a command input pop-up. This bug is fixed. | | It was possible to change the content of locked plugins. This bug is fixed. | | When trying to set a value for an attribute that exists in the show file but the selected fixtures do not have, the value was applied to the selected attribute. This bug is fixed. If the selected fixtures do not have the specified but existing attribute, the desired value will not be set at all. | | If multiple fixtures were selected, and the first fixture in the selection did not have the specified attribute, the command did not work. This bug is fixed. The values are set to the attribute for the fixture in the selection that has the specified attribute. | | The software could crash when listing the cues to update in the Temp destination. This bug is fixed. | | The software could crash when the user changed the geometry setting of the automatically created XYZ channels inside a fixture type. This bug is fixed. The geometry setting of XYZ channels are locked now. | | When pressing Help and then a different key with an action keyword, for example, Copy, the Help keyword in the command line was overwritten with Copy. This bug is fixed. | | If the new selection had no attributes on the current encoder page, the user had to cycle through all encoder pages until useable attributes were reached. This bug is fixed. When changing the selection, the selected encoder page will switch to the first encoder page with attributes the current selection uses. | | When having only fixtures patched that do not use all feature groups, the wrong encoder bank buttons could be highlighted when selecting a different feature group. This bug is fixed. | | The indicator bar of encoder bank buttons of custom-created feature groups were not colored correctly. This bug is fixed. | | Timecode events whose time matched the timecode duration time weren’t triggered. This bug is fixed. | | The software could crash when adding or manipulating a lot of configurations for Art-Net or sACN at the same time. This bug is fixed. | | The software crashed when the user tried to copy ScreenContent 1 at ScreenContent 2. This bug is fixed. | | If a command was prepared in the command line, it was not possible to complete it with the keyboard. This bug is fixed. | | When loading a show file along with its Output Configuration, duplicate entries could be created in the Connector Configuration. This bug is fixed. | | The attribute calculators did not apply ranges correctly when they contained at least one negative value. This bug is fixed. | | When pressing Alt, AltGr, or option the input of the command line could get selected. This bug is fixed. | | Sometimes not all properties of an appearance were applied to layout elements. This bug is fixed. | | Storing offset values in a multi-user session, stored the offset values for all active fixtures in all programmers. This bug is fixed. Only the programmer of the user who executes Store Offset will be taken into account. | | Cue commands that contained parentheses were not executed anymore. This bug is fixed. In addition, when working in a multi-user session, the pop-up will appear on the GlobalMaster station only when the same user is logged in as the user who triggered the cue. | | When auto creating a group, the command line could return a nothing to be done message, although the group was created correctly. This bug is fixed. | | Tapping an empty but existing group several times toggled the current selection. This bug is fixed. Tapping empty groups does not affect the current selection anymore. | | When executing macros while the focus was set to screen 6 or 7, not all popups triggered by the macro appeared. This bug is fixed. | | Cloning fixtures to a layout, where the destination fixtures were already part of the layout did not move their layout elements to the position of the source fixtures. This bug is fixed. | | The software crashed when executing a command, that required the specification of an index value by using the Index keyword, but the index value was not specified by the user. This bug is fixed. | | When loading a different show or when deleting the plugin, while a plugin is running, kept the plugin running. This bug is fixed. | | When storing a cue into a seqeunce before a cue that had a Break applied, the wrong value could be added to the cue that had the break applied. This bug is fixed. | | It was not possible to delete empty groups from layouts. This bug is fixed. | | When cloning without using dependencies within a sequence and the source and destination fixtures have different values in the used color preset of the cues, the correct preset reference was created but the destination fixture values in the cues were incorrect. This bug is fixed. | | When entering value ranges into the calculators of the color picker encoders, the values were not always applied correctly. This bug is fixed. | | Multiple cue part 0 could be created by oopsing the deletion of cues with several cue parts. This bug is fixed. | | When switching from the inner to the outer dual encoder or vice versa and both encoders had the same attribute assigned, Align was reset. This bug is fixed. | | Window preferences were not transmitted into the session, when storing them. This bug is fixed. | | Copied recipes were not automatically cooked. This bug is fixed. | | Values in cues after a cue break could change when changing the values in cues before the break. This bug is fixed. | | The tracking of relative values did not stop at cues that had a break defined. This bug is fixed. | | CleanStart of grandMA3 onPC did not work on macOS Sonoma. This bug is fixed. | | The pop-up warning the user that due to changes in the patch the data was incompatible for Session Data Merge was gone. This bug is fixed. | | Relative math operations in the calculators of the MAtricks properties did not deliver the expected result. This bug is fixed. | | Copied recipes could lose their reference to the preset or group in use. This bug is fixed. In case a recipe has selective data and a reference to an object, the selective data is discarded. | | Fixtures that were not part of the stage the 3D was showing, could not be assigned to a layout. This bug is fixed. | | Absolute programmer vaues were discarded when calling a relative MAgic preset. This bug is fixed. | | Copying a cue to another one did not overwrite the recipes correctly if the user had chosen to overwrite the destination cue. This bug is fixed. | | The software could crash when the login pop-up appeared on the web remote after refreshing the page in the browser. This bug is fixed. | | Changing the value of the Brightness fader or Quality fader in the Color Picker in some cases could result in incorrect colors. This bug is fixed. | | If a new keyboard shortcut was created using an already existing combination, the old one was not properly removed. This bug is fixed. | | When assigning a different user profile to the admin user, this assignment was reset when loading the show again. This bug is fixed. | | When importing a data pool using the Include Dependencies option, the MAtricks value of imported recipes was cleared. This bug is fixed. | | When using the color picker with subfixtures, the color of the main instance was included as well to the resulting color. This bug is fixed. | | Offset values were not removed when executing Store Offset /Remove. This bug is fixed. | ### Connections [Section titled “Connections”](#connections) | Description | | -------------------------------------------------------------------------------------------------------------------------------------------------------------------------------------------------------------------------------------- | | Remotely triggered sequences were using the executor time of the admin user. This bug is fixed. The executor time of the logged-in user on the station where the remote event is executed is used when triggering a sequence remotely. | | The timecode generator of a timecode slot did not continuously output timecode when Generator Looped was enabled. This bug is fixed. | | When a network connection was set to value Yes of the Slow property, it stayed at this value until the next full-install. This bug is fixed. The user can change the Slow setting manually again. | | When using an onPC command wing and a onPC fader wing at the same station connecting an additional usb device changed the Connector Configuration. This bug is fixed. | | The DMX Remotes had to be toggled off and on again to continue the functionality after changes were made in the session. This bug is fixed. | | OSC command messages were sent even if the network was disabled. This bug is fixed. | ### Patch [Section titled “Patch”](#patch-1) | Description | | -------------------------------------------------------------------------------------------------------------------------------------------------------------------------------------------------------------------------------------------------------------------- | | Geometries’ type got lost and pasted back as geometry type “Geometry” whenever geometries were copied. They also lost the value of their properties during copying. This bug is fixed. | | The software would crash if fixtures were cut from one stage and pasted directly on the new stage row instead of the fixture row. This bug is fixed. | | The fixture type library displayed a blank manufacturer name and blank fixture name if the fixture type description contained the special characters ”<” or ”>”. This bug is fixed. | | The default name of a custom fixture type was exported as empty. This bug is fixed. The default name is now exported. Example: Manufacturer\@Fixture\_type 1.xml | | The default name of a custom attribute was exported as empty. This bug is fixed. When a user creates an attribute, the user is prompted to name the attribute. | | The resulting rotation of geometries could be wrong if they were rotated along 2 or 3 axes. This bug is fixed. | | When editing the geometries of a fixture type, a crash could occur when cutting and pasting geometry references from one parent to another. This bug is fixed. | | When editing the geometries of a fixture type, a crash occurred if an infinite loop was created with geometry references that referenced each other. This bug is fixed. A message is displayed in the Fixture Type Errors in case of creating such an infinite loop. | ### Phaser [Section titled “Phaser”](#phaser) | Description | | ---------------------------------------------------------------------------------------------------------------------------------------------------------------------------------- | | The Measure encoder always displayed 1 as value when no value was active. This bug is fixed. As long as no value is active on the Measure layer, the encoder won’t show any value. | | The automatic cooking of recipes using phaser presets did not always apply the new values immediately. This bug is fixed. | | When mirroring position phasers using MAtricks pool objects, it could happen that they were not mirrored correctly. This bug is fixed. | ### Playback [Section titled “Playback”](#playback) | Description | | ----------------------------------------------------------------------------------------------------------------------------------------------------------------------------------------------------------------------------------------------------------------- | | A running sequence or preset was not fixed when enabling AutoFix for it. This bug is fixed. | | During the recording of timecode shows, cues with already existing timecode events were not recorded. However, their cue commands were recorded again. This bug is fixed. Cue commands will not be recorded, if the cue is already recorded in the timecode show. | | If a CMD Delay for the off cue was longer than the fade time of the cue, the CMD got triggered at the wrong time. This bug is fixed. | | Flash and Temp buttons would not release properly if the command line was not empty. This bug is fixed. | | Moving recipes from one to another cue part inside a sequence did not work as expected. This bug is fixed. | | When pressing and releasing the Temp buttons of executors very fast, it could happen that the sequence did not turn off again. This bug is fixed. | | Sequences could not be played back when the first cue was empty, MIB should happen for the second cue, and OffWhenOverriden was enabled. This bug is fixed. | | When executing a secondary executor button function (MA + Executor Button) and releasing MA first, kept the playback function, for example, Flash, active when releasing the Executor Button afterwards. | | When playing back a preset with a recipe and changing the ingredients at the same time, the cooked result was wrong. This bug is fixed. | | When a remote (DC, DMX, or MIDI) triggered a playback, the playback was started by the Remote user, but not by the user profile of the Remote user. This bug is fixed. | | Fixtures did not fade to their new values in other attributes when MIB was enabled and the dimmer was also fading to 0 in the same cue. This bug is fixed. | | When using <<< or >>> to go to a cue, and then updating it, while the original cue fade would have still be running, the playback engine faded into the cue. This bug is fixed. | | The resulting phaser could be wrong when using a phaser preset in a recipe of a different preset.This bug is fixed. | ### Windows [Section titled “Windows”](#windows-1) | Description | | ----------------------------------------------------------------------------------------------------------------------------------------------------------------------------------------------------------------------------------------------------------------------------------------------------------------- | | The help window went back to the start page when the user changes the color theme. This bug is fixed. | | When adding a scribble to an object by having the label dialog opened on a small screen, tapping Apply did nothing. This bug is fixed. | | The input range in the Speed Master calculator was wrong. This bug is fixed. The input range in the calculator of the Speed Master layer is now set from 0 to 16. | | The Feature Group Indicator Bar was displayed in some cases, also when the attributes were available within the selected world. This bug is fixed. | | The Feature Group Indicator Bar displayed indicators for Shapers and Video feature groups even when no attributes of those feature groups were used in the show. This bug is fixed. | | The input to the Store View pop-up was not displayed on all displays. This bug is fixed. The Store View pop-up is synchronized across all displays. | | It was possible to select several entries in the Load and Save As sections of the Backup menu. This bug is fixed. In the Backup menu, it is only possible to select one entry at a time. | | When opening an Assignment Editor, the focus was not always set to the input field. This bug is fixed. Opening an Assignment editor sets the focus on the input field. Pressing Please applies the first entry of the list. | | The scroll position of the Align Bar, Selection Bar, and Step Bar was not stored in views. This bug is fixed. | | Assign Menu offered Master as a fader function for timers. This bug is fixed. Timers do not have any fader function they can use. | | When switching from Mode2 to grandMA3 software on a grandMA3 console, it could happen, that the End User License Agreement was displayed again, also when it was already accepted by the user in the past. | | Opening the Import/Export menu twice on two screens made it impossible to select an object type and the command line was stuck in the data pool destination. This bug is fixed. The Import/Export menu can only be opened once at the same time. | | When opening the Link Values dropdown on screen 8 of a grandMA3 light or full-size console, it could briefly display buttons for Active Only and MultiStep Only. This bug is fixed. | | When scrolling with a mouse inside the Agenda Viewer, two days displayed the yellow selection frame. This bug is fixed. | | When opening the macro editor, the width of the columns was reset to default. This bug is fixed. The macro editor remembers the individual width of the columns. | | When doing a lasso selection in the timeline area of the timecode editor for the first time, it could happen that no or not all events were selected. This bug is fixed. | | The Power Loss pop-up on grandMA3 full-size and light consoles did not appear when another pop-up was open. This bug is fixed. The Power Loss pop-up appears always when the power to a grandMA3 full-size or light console gets lost. | | The icon of the appearance and the name of a filter or world moved to the right in the sequence sheet, the bigger the height of the line was. This bug is fixed. | | If User1 command was active and you called a view containing more than one screen, the Playback bar in screen 2 was replaced by the Xkeys bar. | | The EULA and Release Notes were not displayed at the small screens of CRV consoles. The EULA could not be accepted on the small screens of Light and Full-Size Consoles. This bug is fixed. | | The Color Picker did not show load or save options for the window setting. This bug is fixed. | | The color output of fixtures with CIE attributes did not correspond to the shown color in the fixture sheet and selection grid. This bug is fixed. | | The pan/tilt calculator did show wrong values when using it with the natural readout set to physical on the relative layer. This bug is fixed. | | A long press on the input field of the label dialog opened a second text input pop-up. This bug is fixed | | Calling a view using a sequence sheet where Auto Scroll was activated, always scrolled down starting in cue 1 and ending in the current cue. This bug is fixed. | | Environmental objects with fixture ID could not be selected in the fixture sheet set to channel mode. This bug is fixed. | | Editing a fixture with Edit and tapping a fixture in the fixture sheet that is in channel mode did not open the patch. This bug is fixed. | | Using the different Bar windows (for example, Align Bar, Step Bar, and Selection Bar), the sizes of the buttons through the different windows would look different. This bug is fixed. When the Bar windows are the same size, the size of the buttons is now better aligned. | | The colors Fixture Graphic icon could be different across different fixtures. This bug is fixed. | | When recalling the displayed layout in the Layout Viewer, the stored position and zoom of the layout were not recalled correctly. This bug is fixed. | | When tapping a cell in the Sheet mode of the Phaser Editor, the corresponding step was not always selected. This bug is fixed. | | When loading a show file or creating a new show with Output Stations enabled, the name of the used Output Configuration was not cleared. This bug is fixed. | | When latching MA in the Command Section overlay, and closing it, the latched MA status was released. This bug is fixed. A latched MA button now remains latched until the user releases it. | | When a user with ‘View’ user rights had a Clock Viewer window open, it always displayed the clock. This bug is fixed. The Clock Viewer window displays always the clock source that was selected, no matter of the user rights. | | In the timecode show and timecode slot settings, User Bits could not be entered using the hexadecimal format. This bug is fixed. | | The Save and Load Preferences feature was not working when using the Content Sheet. This bug is fixed. | | When adding a padding to a Layout Element, it was added outside the element border. This bug is fixed. Paddings for Layout Elements are added inside the border of the Layout Element. | | Doing a right-click into the text input area when editing the command cell of a macro line, opened a second text input. This bug is fixed. | | When editing a value cell in the Content Sheet or in the Sequence Sheet in Track Sheet Mode, the value was not recalled correctly into the calculator. This bug is fixed. | | The Info window did not display the notes correctly when calling a view with an Info window. This bug is fixed. | | The Transpose setting in the Sequence sheet window did not work. This bug is fixed. | | The software could freeze when opening an attribute calculator in the Content Sheet after doing a losso selection from bottom to top. This bug is fixed. | | When a value in the speed layer was applied and a calculator was opened again, the value was not displayed properly. This bug is fixed. | | The software could crash if an old showfile was loaded and the delete tool of the phaser editor was used. This bug is fixed. | | The Notes tab in the Info window did not display the appearance of the window. This bug is fixed. | | When opening the command line history, the screen encoder could flicker. This bug is fixed. | | The on screen keyboard of the password input in the login pop-up did not mask the entered password. This bug is fixed. | | When rotating a selection of fixtures in the Layout Viewer, for example, by 90°, the resulting values were not correct. This bug is fixed. | | When having several color pickers open, and changing color in one of them, could cause the faders in the other ones to jitter. This bug is fixed. | | Small Selection Grid windows did not display the grid position cursor when using Auto Scroll. This bug is fixed. | | The Menu did not open when pressing Menu, while the Add Window pop-up was open. This bug is fixed. | | Message boxes created by plugins did not had scroll bars when the content was bigger than the pop-up size could display. This bug is fixed. | | The 3 or More Finger Scroll gesture did not work if you showed or hid the title bar of a window. This bug is fixed. | | The Sequence Sheet Encoder Bar did not display encoders for fade and delay of custom feature groups. This bug is fixed. | | The Update menu did not refresh its content when Sequence Mode was set to Selected or LastGo and the selected sequence or the last sequence executed did change in between opening the Update menu, closing it, and opening it again. This bug is fixed. | | The list of presets in the Import and Export tabs of the Show Creator did not update when switching between the different feature groups. This bug is fixed. | | When changing the width or height of a display, it was not possible to set a value that was twice the previous value. This bug is fixed. | | When opening calculators, for example in the 3D Encoder Bar, they could open on the screen where the corresponding window was open. This bug is fixed. The calculators of encoder bars now open on the screen that belongs to the encoder bar, no matter where the window is located that opened the encoder bar. | | Relative values were displayed in the Content Sheet in gray. This bug is fixed. The Content Sheet displays relative values with its normal pink. | | The font color of the MAtricks button in the encoder did not turn yellow, when the MAtricks were active. This bug is fixed. | | When Lock Position was enabled in a Layout Window, Show Title Bar could not be toggled. This bug is fixed. | | The Xkeys windows and Command control overlay did not display the correct keyboard shortcuts for the Xkeys. This bug is fixed. | | Entering ListReference into the command line and then tapping an executor in a letter box screen could open the Info pop-up on the letter box screen. This bug is fixed. The Info pop-up opens in such cases on the corresponding big screen. | | When enabling the Layer toolbar or the Recipe area in the Sequence editor, they were not displayed. This bug is fixed. | *** ## Appendix [Section titled “Appendix”](#appendix) * It is recommended to use a dedicated and a separate physical network for each grandMA3 session. * When using DMX protocols it is recommended to use a dedicated physical network for each protocol. * The recommended workflow for executor configurations that are different compared with the default executor configuration is to create a new executor configuration, do the changes in the new configuration and save the changes. * XML files with exported executor configurations from grandMA3 v1.2 and prior cannot be properly imported to grandMA3 v1.3 or later due to structural changes. * XML files with exported analog remote setups from grandMA3 v1.3 and prior cannot be properly imported to grandMA3 v1.4 or later due to structural changes. * XML files with exported timecode shows from grandMA3 v1.3 and prior cannot be properly imported to grandMA3 v1.4 or later due to structural changes. *** ## Known Limitations [Section titled “Known Limitations”](#known-limitations) | | | | ----------------------------------------- | ------------------------------------------------------------------------------------------------------------------------ | |  | Software update via network to onPC stations requires confirmation during the install process at the destination system. | | | | | ----------------------------------------- | --------------------------------------------------------------------------------------------------------------------------------------------------------------------------------------------------------------------------------------------------------------------------------------------- | |  | When multiple GlobalMasters exist on the network, each having the same session and location name, the station with the higher priority takes over automatically. If all stations have the same priority, the station with the longest Online Time becomes the GlobalMaster for all stations. | | | | | ----------------------------------------- | ----------------------------------------------------------------------------------------- | |  | Recast will only recast presets to cues if there is a preset link in the absolute layer. | | | | | ----------------------------------------- | ---------------------------------------------------------------------------------------- | |  | Loading show files that were saved in previous versions deletes the programmer content. |
# Release Notes 2.1
> ](/grandma3/2-3/keyrnv21/#h22047761382)
* [Get Started](/grandma3/2-3/key_rn_v2_1/#GetStarted) * [Bug Fix Version 2.1.1.5](/grandma3/2-3/key_rn_v2_1/#offline-topic) * [Other Enhancements](/grandma3/2-3/key_rn_v2_1/#h2__989068108)[\ ](/grandma3/2-3/key_rn_v2_1/#h2__2047761382) * [Changes](/grandma3/2-3/key_rn_v2_1/#h2__2047761382) * [Bug Fixes](/grandma3/2-3/key_rn_v2_1/#h2__473760171) * [Release Version 2.1.1.2](/grandma3/2-3/key_rn_v2_1/#h2__1841901983) * [Features](/grandma3/2-3/key_rn_v2_1/#h2_613882109) * [Partial Show Read (PSR)](/grandma3/2-3/key_rn_v2_1/#h3__228527687) * [3D](/grandma3/2-3/key_rn_v2_1/#h3_1570501958) * [Geometry Viewer](/grandma3/2-3/key_rn_v2_1/#h3__139560060) * [Other Enhancements](/grandma3/2-3/key_rn_v2_1/#OtherEnhancements) * [Changes](/grandma3/2-3/key_rn_v2_1/#h2__656690415) * [Bug Fixes](/grandma3/2-3/key_rn_v2_1/#BugFixes) * [Appendix](/grandma3/2-3/key_rn_v2_1/#Appendix) * [Known Limitations](/grandma3/2-3/key_rn_v2_1/#KnownLimitations) *** ## []()Get Started [Section titled “Get Started”](#get-started) Do you need help getting started in grandMA3? Perfect - here we describe a few quick steps to get you rolling. The manual will explain functionality in detail while the MA e-Learning within the MA University offers you all kinds of training. All information can be accessed through the MA Lighting website [www.malighting.com](http://www.malighting.com). Let’s go! To leave the Release Notes, tap I agree on the top right corner. The main screen of grandMA3 software opens. On the right side, you can see predefined views on view buttons. To switch between the views, tap the view buttons. If this is your first time starting grandMA3 software, patch some fixtures first. Or you can load one of the demo shows delivered with the software. Either way, press Menu. If you use grandMA3 onPC software, there is a  symbol in the top left corner there. Clicking the  symbol is the same as pressing Menu on a console. Tap Backup and then Load, now you are ready to load shows. You would like to get right on it? Switch Shows to Demo Shows in the title bar first. To do so, tap Shows repeatedly until it says Demo Shows. Once Demo Shows is displayed, it is possible to select any of them. After you selected a demo show, tap Load.\ In case a show was already loaded, a pop-up will appear asking if you want to save the current show first before loading the new one. It’s up to you! Here we go! Now you are ready to work with the grandMA3 software. It is as easy as that! Again - there are view buttons there, which change the screen content. At the bottom, you will find the encoder bar and the command line. Technically that is all you need to get started. For more information, see the grandMA3 help menu. To access the help in the console or the onPC, tap the view buttons named Help or visit the Online Manuals on the MA Lighting website. If you want to learn the grandMA3 software step by step, please see the [Quick Start Guide](https://help.malighting.com/Page/grandMA3/grandMA3_Quick_Start_Guide/en) and join the MA e-Learning - it’s free of charge and available on the MA Lighting website. Have fun with using our grandMA3 software - Find all the improvements and changes of this software version further down. | | | | ------------------------------------------ | ------------------------------------------------------------------------------------------------------------------------- | |  | **Hint:** | | | The grandMA3 software will start using the show file (or status) that was in operation before the software was shut down. | *** ## Bug Fix Version 2.1.1.5 [Section titled “Bug Fix Version 2.1.1.5 ”](#bug-fix-version-2115) ## Other Enhancements [Section titled “Other Enhancements ”](#other-enhancements)  Improved the notifications when loading show files: If a show file contains corrupted presets or cues, the Message Center will list the corrupted and discarded presets and cues in the System Errors mode of the message center. *** ## Changes [Section titled “Changes”](#changes) * Reverted a Playback Bugfix from version 2.1.1.2: If you had a Sequence with absolute and relative dimmer values and turned off Soft LTP for the sequence, the dimmer did not behave correctly when playing back the sequence. *** ## Bug Fixes [Section titled “Bug Fixes”](#bug-fixes) ### Command Line and Macro [Section titled “Command Line and Macro”](#command-line-and-macro) | Description | | --------------------------------------------------------------------------------------------------------------------------------------------------------------------------------------------------------------------------------------------------- | | The duration of cues in newly created sequences after using Partial Show Read was always set to 0 seconds. | | The assignment of a sound to a track in a timecode show got lost when loading an older show file in v2.1.1.2. | | Recipes in the programmer that had selective presets selected would not cook on a connected station if a sequence was already running for the targeted fixtures and attributes. | | The software could crash when loading a show file from a previous version that used XYZ. | | When loading a show file using Partial Show Read the Cue Destination in the timecode shows of the local show file got lost. | | The software could crash when deleting sequences while being in a world. | | If the mode of a fixture type was changed, for example from “Basic” to “Extended”, fixtures of this type did not share previous values of global preset data anymore. Instead only the first patched fixture kept values of the global preset data. | ### Patch [Section titled “Patch”](#patch) | Description | | ---------------------------------------------------------------------------------------------------------- | | With some GDTF files, there were no DMX modes visible in the library, and the files could not be imported. | ### Playback [Section titled “Playback”](#playback) | Description | | ------------------------------------------------------------------------------------------------------------------------------------------------------------------------------------------------------------------------------- | | If you updated a preset that was part of a running sequence, the updated values did not appear in the output of that running sequence until you restarted it. | | New cue values were not output when clearing the programmer after updating or storing into the running cue if the DMX mode of a fixture was changed before. This problem only occured in a session with other grandMA3 devices. | ### Windows [Section titled “Windows”](#windows) | Description | | --------------------------------------------------------------------------------------------------------------------------------------------------- | | It could happen that the Scale fader in the Layout Viewer window settings could only be at minimum or maximum value, but not at a value in between. | | Preset pools did not display the cyan pool number indicating how many fixtures currently use the preset. | *** ## Release Version 2.1.1.2 [Section titled “Release Version 2.1.1.2 ”](#release-version-2112) ## Features [Section titled “Features”](#features) The latest release of grandMA3 version 2.1.1.2 rolls out several enhancements that enrich your lighting experience. Besides numerous improvements based on your highly appreciated feedback, many new and clever features have found their way into the software. Read on for a quick introduction and find links for more information. *** ### Partial Show Read (PSR) [Section titled “Partial Show Read (PSR)”](#partial-show-read-psr)  New in this release Partial Show Read allows to transfer objects from a different show into the currently loaded show file. Especially when dealing with objects that contain fixture data, Partial Show Read is able to transfer the data to the different patch of the loaded show file. | | | | ------------------------------------------------ | -------------------------------------------------------------------------------------------------------------------------- | |  | **Important:** | | | The show file to be PSR’ed needs to be saved with the current version that is running on the station where you do the PSR. | To access the PSR menu, go to Menu - Show Creator - PSR.\ A tab bar at the top with tabs in arrow shape guide the user through the different PSR steps. In a first step, select a show file you want to PSR into your current loaded show file. This will be done in the Show tab. Select the desired show file from a drive, and then tap Patch in the tab bar or Select at the bottom for the next step. PSR offers only show files from the internal drive (of the current version) or from an USB drive. A pop-up asks the user if they want to save the show file with a different name. This offers the possibility to continue with a new copy of the original show file.\ The show file will be saved with the new name. Enter the new name and then tap Rename. If you don’t want to rename the show file, just tap Do Not Rename. Not changing the name and tapping Rename has the same outcome as tapping Do Not Remame. If the selected file is suitable for PSR, the PSR menu will shift to the Patch tab. In this Partial Show Read Prepare menu the user can adjust the patch of both show files.\ The left side (PSR Patch) is the patch of the show file to be imported. The right side (Local Patch) represents the patch of the currently loaded show file. The title bars of both sides also display the show file names. To reset all changes and filters, tap Reset. When Hide Environmental is enabled, the environmental fixtures are not displayed in the menu. In order to adjust the patch of the to be PSR’ed show file towards the resulting patch, the user can change the Stage, FixtureID, IDType, and CID by editing the corresponding cells. When the user changes any of these properties, the font color turns from white to cyan. The Default value for Stage means that the fixtures are imported into the same stage as in the PSR show file.\ Cells that cannot be edited have a darker background color. This applies to the PSR Patch and the Local Patch areas.\ In the IDType cells on the PSR Patch side, two names of IDTypes may appear in one cell. This happens when an IDType was renamed in the PSR show. They will be displayed with this naming scheme: Name in PSR Show (Name in Local Show). The names of the IDTypes of the PSR Show cannot be taken over into the Local Show. Also when changing the IDType of a fixture on the PSR Patch side, both IDType names may be displayed.\ Rows with fixtures on both sides are called matched.\ The fixtures inside the Patch are grouped together and follow this order: 1. Fixtures that are taken from the local show file. 2. Fixtures taken from the PSR show file. 3. Not taken fixtures from the local show file. 4. Not taken fixtures from the PSR show file. These four blocks are separated by each other with white lines on both sides. When entering the Patch tab the software automatically matches the fixtures in this order: 1. Fixture ID 2. Custom ID 3. Name 4. GUID The fixtures with a green background will exist with their respective fixture types in the show file after completing the Partial Show Read Prepare step. To define which fixtures are used, use the tools that are located between both areas: *  (Use selected fixture): The selected fixtures will be marked to be used. *  (Swap selected fixture): The fixture on the other side will be marked. *  (Don’t use selected fixtures): The marking of the selected fixtures will be removed. It is possible to use different fixtures on the right side and the left side. But it is not possible to use the fixtures of both sides of the same row. Using the search field allows to filter the patches by fixture names, FixtureID and CID.\ Additional filters are available to filter the lists: * Stage: Displays the fixtures of the selected stage. * Match Type: Displays the fixtures depending on their matching state. * **None**: No filtering applies. * **Matched**: Displays only fixture pairs that are matched together. * **Unmatched**: Displays only the fixtures that are not matched together. * **Conflicted:** Displays only the conflicting fixtures. * FixtureType: Displays only the fixtures of the selected fixture type. * Layer: Displays only the fixtures of the selected layer. * Class: Displays only the fixtures of the selected class. To reset all filters at once, tap Reset Filters. The buttons at the bottom allow fast selection of which fixtures will be taken: * Use PSR Only: The resulting patch contains only the fixtures from the PSR show file. * Use Local Only: The resulting patch contains only the fixtures of the local show file. * Merge PSR: The fixtures that exist only in the PSR show file are added to the fixtures of the local show file. Fixtures that exist on both sides will result in taking the ones of the current show file. * Merge Local: The fixtures that exist only in the local show file are added to the fixtures of PSR show file. Fixtures that exist on both sides will result in taking the ones of the PSR show file. If you applied filters to the lists, these buttons will only include the filtered items. In case that a fixture might not have a Fixture ID and CID anymore in the resulting patch, the fixture will be set to the new IDType PSR and get a consecutive CID.\ This can happen when different fixtures may be set to the same IDType/CID combination and one of them has no Fixture ID set. It is not allowed to match an environmental fixture with a normal fixture. In this case the system monitor informs the user.\ The resulting patch will use the Universal fixture, Universal fixture type, and the DMX Universe settings of the local show file. When done with matching the patch, tap Import in the tab bar or Proceed at the bottom in order to switch over to import objects of the PSR show file. Before the Import tab will be entered, a summary pop-up informs the user about how many fixtures are taken from the PSR show file and how many are taken from the local show file, how many are matched, replaced and deleted, and how many fixtures from the PSR show file are not taken over to the local show file. To return to the patch without applying the displayed changes, tap Cancel in the summary pop-up. The PSR Import menu is divided into two areas: * The left area displays a tree view of the show file to be PSR’ed with its different pools, and displays the objects the user selected last for the selected object type in the tree of the left area.\ The title bar also displays the name of the show file. * The right side displays the corresponding pool in the local show file. The title bar also displays the name of the show file. Navigate in the object tree to the objects you want to import.\ To unfold a level in the tree, tap  .\ To mark an object for import, tap its checkbox.\ If you select objects to import them, they will be listed in the center area, and will get a yellow checkmark in the tree view. To indicate that some child objects are selected for import, the parent object (for example the Filter pool when selecting a filter) shows a gray checkmark.\ When selecting an object that has a reference, the reference will be marked for import as well. In this case, the referenced object will get a purple checkmark. For example, when selecting an appearance, the referenced image will get the purple checkmark.\ The number behind the checkmark box indicates the level of hierarchy the object is in. This happens due to the automatic import because of a reference. The colors of the indicator bars indicate the following states: * Green: Compared to the local show file, this element contains newer data in the show file that PSR will read. * Orange: The children of this element are a mixture of older and newer data in the PSR show file. * Red: Compared to the local show file, this element contains only older data in the PSR show file. The center area allows to define at which spot in the pool the object will be imported. Therefore change the Import Index property to the desired value, or use the pool in the Local area. The orange collected frames in the pool view on the right side will inform the user where the object will be imported. Only the objects that are selected in the PSR area can be defined where to be imported when tapping into the pool at the Local area. The Import Index value can also be set to \. In this case, the same object exists in both show files, for example when both show files have the same show file as origin. When the Import Index is set to \, the object to be imported will be merged to the matching object in the local show file. When the desired objects are selected, tap Import in order to transfer the objects into the local show file.\ After tapping Collapse All the tree will be collapsed. The whole tree will be expanded when tapping Expand Selected.\ The selected elements will be cleared when tapping Clear Selection. Objects that were imported are marked as imported in the object tree. They can not be imported again. To remove already imported items from the PSR tree, tap Cleanup. This helps to see what has not been imported yet. Going back to the Show tab closes also the Partial Show Read process. Also doing structural changes in the current show file, for example, changing the patch will close the Partial Show Read process. System locked objects, for example, filter 1 or world 1, are not offered to be imported during PSR. | | | | -------------------------------------------------- | ---------------------------------------------------------- | |  | **Known Limitations:** | | | - By entering the Import tab, the programmer gets cleared. | * References from fixtures to custom appearances in the PSR show cannot be preserved when importing the fixtures. * A Partial Show Read is only possible if the console is in Standalone or Idle master state. | For more information about PSR see the [Partial Show Read (PSR)](/grandma3/2-3/sc_psr/) topic in the help manual. *** ### 3D [Section titled “3D”](#3d)  New in this release The Render Qualities define how haze is displayed in the 3D Viewer window.\ To do so, edit a Render Quality pool object, tap Haze Settings and enable Enabled.\ These are the settings the user can alter in order to change the rendering of the haze: * Particle Quality: How accurate the clouds of haze are rendered. * Particle Size: How much haze will be in the air. * Haze Scale: Changes the resolution of the used haze texture. * Layers: How many layers of haze are used in depth. The higher the value, the more spatial the haze looks. * Blend: Defines the visibility of the haze in the beams. * Animation Speed: The speed at which haze moves around. The movement of the haze is only visible when the 3D Viewer window has Priority mode enabled. Three pre-defined Render Qualities with haze enabled were added to the Render Quality pool in new shows.\ They are also available for import into older show files. The existing settings of Render Qualities are part of the new Main Settings tab in the Render Quality editor. If the fixtures are positioned in a resulting volume that is too big, the 3D Viewer window displays a message in the top right corner. Haze will not be rendered in this case. | | | | ------------------------------------------------ | -------------------------------------------------------------------------------------------------------------------------------------------- | |  | **Important:** | | | The more realistic the haze setting, the more performance is needed. Use it wisely! We recommend using haze only on a separate onPC station. | | | | | -------------------------------------------------- | -------------------------------------------------------------------------------------------------------------------------------------------------------------------------------------- | |  | **Restriction:** | | | As soon as 90% of the 10GB Show Data limit are reached, the Haze feature will be disabled automatically. The 3D Viewer window will display a corresponding text when this is the case. | For more information about Render Qualities and Haze see the [Render Quality](/grandma3/2-3/patch_render_quality/) topic in the help manual.  Improved in this release * The 3D Viewer window can now display 3 gobo wheels of a fixture at the same time. * Beams are now cut off at the boundaries of the stage bounding box in the 3D Viewer window even if Shadow is disabled. * Dilution set to **Linear** or **Correct** as well as Shadow enabled in the Render Quality settings now work even if Gobo is disabled. *** ### Geometry Viewer [Section titled “Geometry Viewer”](#geometry-viewer)  New in this release The Geometry Viewer offers a 3D view of the selected geometry tree inside the Geometry tab of the Fixture Type editor. The selected part of the geometry is displayed with a yellow color inside the 3D area on the right.\ The following tools are available: * (Camera focus): When enabled, the camera moves so that the selected geometry is in the center of the 3D area. * (World model transformation): Defines if the axis will follow the world or the selected geometry. * (Translation mode): Lets you move around the selected geometry. To do so, tap and hold the arrow of the selected axis and move it around. When finished, release your finger. * (Rotation mode): Lets you rotate the selected geometry. * (Scale mode): Lets you scale the selected geometry. When you tap the block in the center of the axis indicators, all 3 axis are scaled together. For more information about Geometry Viewer see the [Link Models to Geometries](/grandma3/2-3/ft_link_models_geometries/) topic in the help manual. *** ## []()Other Enhancements [Section titled “Other Enhancements”](#other-enhancements-1) Improved the grandMA2 to grandMA3 Show Converter: To see the improvements, go to the [grandMA2 Release Notes document](https://help2.malighting.com/Page/grandMA2/releasenotes/en/3.9).  Updated predefined content: * Demoshow\_grandMA3.show * Simple\_Show\.show * Predefined views in new shows  Improved executor labels: When you use Encoder Left Command or Encoder Right Command on the 300 or 400 row, the executor label displays 2 icons on the left side indicating the current function. Only icons for the predefined functions can be displayed.  Improved the Assign menu: When assigning a function to an Encoder, functions that have already been assigned to Encoder Left Command and Encoder Right Command will be cleared, and vice versa. They are mutually exclusive.  Improved the command wing Bar window: The command wing Bar window offers the same settings for configuration of the encoder bar area as the Encoder Bar window. The settings to configure the encoder bar area are located in the Encoder Bar tab of the window settings pop-up.\ The Custom Master Section tab has the settings related to the master section, and the Playbacks tab has all settings for the playback bar area.  The possibility to transfer values of properties to other objects also supports the following selected objects: * Camera, Encoder Bar, and Render Quality * Filter, World * DataPool, ExecutorConfiguration, Filter, Layout, Page, and World * User * Attribute and FeatureGroup To label group 1 with the name of the selected attribute, type: | | | | ------------------------------------------------------------------ | ----------------------------------------------- | |  | User name\[Fixture]> Label Group 1 At Attribute | To set the user variable myEncoderBar to the name of the selected encoder bar, type: | | | | ------------------------------------------------------------------ | ------------------------------------------------------------------------------- | |  | User name\[Fixture]> SetUserVariable myEncoderBar At EncoderBar Property “Name” |  Improved the behavior when using the Help pop-up: * Help Please: Opens the temporary Help pop-up and keyboard focus is set to the Search field + Lists all keywords in the command line history. * Press and hold Help and then press Any key: The temporary Help pop-up opens with the corresponding topic of the key. * Help Any key Please: The temporary Help pop-up opens with the corresponding keyword topic. * To open the help article that was opened last time, press 2x Help or tap 2x ?.  Improved the Help Viewer: * The Search input field can be used with the on-screen keyboard. * When opening a search result, all results remain open on the left side to jump quickly to a another topic.  Improved the Knob UI Style in the user profile: The value None is now also available. When set to None, operating a knob in the UI does nothing.  Improved the Clone Menu: The Filter pop-up in the Clone menu lets you select a filter from the filter pool when you tap Filter Pool.  Improved the Info window: * Renamed Window Mode (before Link Type). The Window Mode setting now works when the Info window displays a macro. * New value **All Cues** of the Window Mode setting allows you to see the notes of all cues at a glance.\ When a cue has an appearance assigned and Use Target Appearance is enabled and Notes Appearance is set to **Label + Note**, the title row of the cue will display the image of the appearance and the note area of the cue will display the background part of the appearance.\ The current cue has a green border, same as in the Sequence Sheet.\ When Auto Scroll is enabled, the list of notes scrolls automatically further when going through the sequence. * New value **Sequence and Cues** of the Window Mode is similiar to All Cues, but it also displays the sequence and its note at the top if the list. * Renamed Link Type (before Auto List Reference). * The notes of cue parts are also displayed in the Info window. * The Settings pop-up allows you to change all settings. They were previously only available in the title bar. It is also possible to configure which settings should appear in the title bar. * New settings were added to the Info window: * Tabs: When disabled, the tab bar in the Info window is hidden. * Selected Tab: Defines which tab is the selected one in the tab bar. * Edit Note: When enabled, all cues will be displayed, no matter of the Show Empty status. Also a notes area for every cue will be displayed. Tapping into the note area of the cue sets the cursor into the area and lets you edit the note of the cue. This button is displayed in the title bar by default. * Show Empty: Defines whether cues without notes are displayed or not. This setting is enabled by default. * Notes Appearance: Defines which parts in the Note tab display the appearance: * **Off**: No appearance will displayed. * **Note**: The note area only displays the appearance. * **Label + Note**: The appearance will be displayed in the note area and the title row of the cue. * The Info window lets you save and load window preferences.  Added the possibility to display the name of the media files in case the name is automatically hidden or the pool object has a custom name. To do so, press and hold MA. In this case, the Appearance pool, Gobo pool, Image pool, Mesh pool, Sound pool, and Symbol pool will display the file names of the used files.  Improved Import dialog for Media Pool objects: Removed the Name column of the Import pop-up. The FileName column is still present. The FileSize column displays now the file size of the image. Removed unnecessary columns.  Improved Lua: * The Lua Core has been updated to Lua v5.4.6. * The ObjectList() API function got some options: * selected\_as\_default: Whent set to true, the selected object of the defined object type will be returned. To get the selected encoder bar, use this:\ ObjectList(‘EncoderBar’,{selected\_as\_default=true}) * reverse\_order: When set to true, the order of the list will be inverted. * The GetObject() function has been added. It returns the first object matching the syntax, or the selected object if no unique match. * The MessageBox() function got the AutoCloseOnInput property. When it is set to true (default) the message box will close when pressing Please. If it is set to false, pressing Please will set the focus to the next text input when the focus is already in a text input. In this example the property is set to false: local function main() — create inputs: local states = { {name = “State A”, state = true, group = 1}, {name = “State B”, state = false, group = 1}, {name = “State C”, state = true, group = 2}, {name = “State D”, state = false, group = 2} } local inputs = { {name = “Numbers Only”, value = “1234”, whiteFilter = “0123456789”}, {name = “Text Only”, value = “TextOnly”, blackFilter = “0123456789”}, {name = “Maximum 10 characters”, value = “abcdef”, maxTextLength = 10} } local selectors = { { name=“Swipe Selector”, selectedValue=2, values={\[“Test”]=1,\[“Test2”]=2}, type=0}, { name=“Radio Selector”, selectedValue=2, values={\[“Test”]=1,\[“Test2”]=2}, type=1} } — open messagebox: local resultTable = MessageBox( { title = “Messagebox example”, message = “This is a message”, message\_align\_h = Enums.AlignmentH.Left, message\_align\_v = Enums.AlignmentV.Top, commands = {{value = 1, name = “Ok”}, {value = 0, name = “Cancel”}}, states = states, inputs = inputs, selectors = selectors, backColor = “Global.Default”, — timeout = 10000, —milliseconds — timeoutResultCancel = false, icon = “logo\_small”, titleTextColor = “Global.AlertText”, messageTextColor = “Global.Text”, autoCloseOnInput = true } ) — print results: Printf(“Success = “..tostring(resultTable.success)) Printf(“Result = “..resultTable.result) for k,v in pairs(resultTable.inputs) do Printf(“Input ‘%s’ = ‘%s’“,k,v) end for k,v in pairs(resultTable.states) do Printf(“State ‘%s’ = ‘%s’“,k,tostring(v)) end for k,v in pairs(resultTable.selectors) do Printf(“Selector ‘%s’ = ‘%d’“,k,v) end end return main * Labels linked to UI Objects, for example the labels of inputs, are highlighted with yellow text color as soon the input field has focus. * Added the possibility for Lua to wait for a number of Lua cycles:\ coroutine.yield({lua=x}), where x is the number of cycles to wait. Improved the display of file sizes: The file sizes of images, meshes and plugin components are displayed in the best matching unit. The unit is also displayed with the file size. Improved the Off Menu and the Running Playbacks window: * When My Playbacks Only is enabled, Started by is disabled, and its value switches to the same user. Disabling My Playbacks Only resets Started by to its previous value. * The number in the lower right corner of each tab indicates how many playbacks of its object type are currently running. As soon as My Playbacks Only is active, or Started by is set to something else than **\**, or DataPool is set to something else than **All DataPools**, two numbers will be displayed: x / y. * x represents the number of running playbacks based on the made settings. * y represents the number of all running playbacks. * It is possible to move the Off menu to a different screen using the Screen Selector ( ). * The Sheet Style displays additional information, for example: * Sequences: Cue Number, Cue Name, Trigger, and User * Macros: Trigger, Line Number, Line Name, and User * Timecodes: User and Cursor * Presets: Trigger, Feature Group, and User * Timers: Trigger, Elapsed Time, Remaining Time, Timer Mode, and User * The Trigger column indicates which object started the playback, for example, by an executor, by a cue, from the pool itself, the command line, etc. As soon as the starting object, for example, the pool window from where the playback was started, does not exist anymore, the Trigger cell will be cleared. * When Hold List is enabled, playbacks that are switched off after enabling this feature are grayed out. This prevents the Off Menu and the Running Playbacks window from changing the list of running playbacks too much, especially if a lot of sequences are flashing all the time.  Improved the command editor (macros, cue commands, and many more): When Preview Variables is enabled, the preview of the command displays the content of the specified variable. This only works if the variable already exists at that time.  Improved the behavior of the Time key: No matter what value Time Key Target in the user profile is set to, once At is part of the command line, pressing Time will cycle through the value layer keywords. For example pressing At 5 0 Time will result in the command At 50 Fade.  Improved the playback output when updating or storing cues: * When updating or storing untouched fixtures do not assert their playback state anymore. * When updating individual fade or delay times in the current cue, the ouput is not asserted again. * When updating cues that are currently running one or more phasers, the speed and transition of the running phasers stays untouched.  Improved the workflow with GDTF: * GDTF files with the file extension .GDTF can now be imported. * Improved the compliance with GDTF v1.2 (DIN SPEC 15800:2022-02): * The following geometry types are visible in the user interface but their specific properties are not listed or editable in the user interface or the data structure: * Added these Geometry types: * Laser * Protocol * Wiring Object * PinPatch * Inventory * Structure * Support * Magnet * The following properties are available in the user interface: * Added ColorSpace. * Added the Default Channel Function setting to the DMX Channels of fixture types. * The following properties are not visible and not editable within the user interface or the data structure: * Added EmitterSpectrum property for the Beam geometry type * Added Gamut * Added the Properties collect * Added Animation System properties to Wheel Slot. * Added DominantWaveLength and DiodePart properties to the Emitter * Added Color property to a Filter * Added Gamut, ColorSpaceData, OriginalAttribute and CustomName property to the Channel Function * Added Fixture Type Macros * Added UserID and ModifiedBy properties to the Revision | | | | ------------------------------------------ | ------------------------------------------------------------------------------------------------------------------------------------------------------------------------------------------------------------- | |  | **Hint:** | | | The added properties, collects, and geometry types are saved in the show file and exported when exporting a GDTF or grandMA3 fixture type. This also applies if the GDTF is created as part of an MVR export. |  Improved the Camera editor: The Roll property of cameras is now available in the editor. The properties have also been rearranged a bit and are better grouped.  Improved the Content Sheet: The recipes of the currently displayed cue will be displayed in the same recipe area as in the sequence sheet when Show Recipes in the Mask tab of the window settings is enabled.  Improved the Special Dialog Shaper: * The Shaper Dialog now supports fixtures that have less than 4 blades. * The Shaper Dialog now supports fixtures that only have blade insert attributes, but not blade rotate attributes. * When a fixture has less then 4 blades, or does not have a full set of attributes to control a blade, the faders of the missing blades or functions will be grayed out. * When there are three attributes per blade used in a fixture type, the Conflicts pop-up will inform the user about this misconfiguration.  Improved the network interfaces: It is possible to renew the DHCP Lease of an interface by setting RenewDHCP in the My Interfaces menu to Yes.  Improved the Fixture Sheet: * Dimmer+ and Sheet/Filter sheet modes: The separator lines between a fixture and its subfixtures are thinner and are dashed. * The new Mask setting Hide Subfixtures does not display subfixtures in the fixture sheet when it is enabled. * When enabling Fixture Sort in the Fixture Sheet Settings: When you select all fixtures and go through them by pressing Next, the selected fixture is always displayed in the center of the sheet.  Improved Handles: It is possible to address the children of an object for which the handle was used:\ \#\[Object].Children To delete macro lines 1 to 5 of macro 42 by using the handle of macro 42, type: | | | | ------------------------------------------------------------------ | ------------------------------------------------- | |  | User name\[Fixture]> Delete #\[Macro 42].1 Thru 5 |  Improved cue commands in sequences: Commands can be disabled per cue part. The existing column for Command Delay is grouped together with the new Enabled column in a grouping column called Command. The single Command column stays separated in order to be able to change its size independently.\ The Enabled column can be set to Yes or No, and defines if the command of the cue part will be executed or not. It is only possible to edit this cell if there is a command set up in the cue part. In addition, the Cue Command (former Command Enable) property of Sequences was adjusted: It can be set to these values: * Enabled: The commands are executed per cue part respecting the Enabled setting of the cue part. * Force No: No command of any cue part will be executed. The Enabled setting of each cue part is overruled by this value. * Force Yes: The commands of all cue parts will be executed. the Enabled setting of each cue part is overruled by this value.  Improved the display of setting that is overruled: For example, Cue Command and MIB Mode settings of cue parts can be overruled by settings of the sequence (Cue Command and MIB with their Force values).\ If the overruling is active, the cells in the Sequence sheet display the overruled value surrounded by exlamation marks.\ For example: !Yes!\ In addition, the column header displays the forced value.\ For example:\ Enabled\ Force No  Improved the display and resizing of single columns that are part of a grouped column in the Sequence Sheet (for example, the Trig group column): * To indicate a clear separation of the single columns within the group column, a gray separator line is displayed in the header row. * Tap and hold the new separator line to resize single columns within grouped columns.  Improved the Pool Columns setting of pool windows: * Take Current Width in the calculator of Pool Columns applies the current set width of the pool window as value for Pool Column. * Scrolling is only possible in vertical direction for pool windows with Pool Column set to a value that is less or equal to the maximum number of columns the pool window could display.  Improved the View Bar: By tapping  at the bottom of the View Bar, it is possible to scroll the View Bar to the next set of View Buttons. When having a horizontal View Bar, tapping  scrolls further to the next set of View Buttons.\ The size of scrolling depends on the number of View Buttons in the View Bar. To enable this feature, go to Menu - Configure Display and enable .  Improved the display of the DMX Footprint when importing fixture types: Fixture Types that have geometry references display now their correct DMX Footprint in the Import dialog.  Improved the merging of fixture type geometries:\ By default, geometries that do not have attributes that are used further down in the geometry tree will be merged together.\ With the **Merge Geometries** option in the Geometries tab of the fixture type editor, you can define manually whether geometries will be merged.\ For example, when setting Merge Geometries to No the merging for all geometries of an Martin MAC Aura in Extended mode, the fixture sheet will have this tree structure in the fixture sheet: * Base instance with no attributes * Yoke instance with pan attribute * Head instance with tilt attribute * Beam instance with dimmer, color, beam focus, and control attributes * Aura instance with dimmer, color, and shutter attributes When keeping the geometries merged together (Merge Geometries set to Yes), the structure for the same mode looks like this: * Main instance with position attributes * Beam instance with dimmer, color, beam focus, and control attributes * Aura instance with dimmer, color, and shutter attributes  Improved the fixture type editor when working with geometries: * When setting DMX break offsets of multiple geometry references at once, the offsets are automatically calculated depending on the linked DMX mode with the largest offset. * The pop-up when selecting a link to a geometry of a DMX channel now displays the geometries in a tree view.  Added the possibility to see a preview of the subfixtures and attributes of a fixture mode within the Fixture Type Editor:\ The new tab Subfixture Overview when editing the Mode of a Fixture Type (Menu - Patch - Fixture Types - Edit - DMXModes - Edit) displays the different subfixtures of the DMX Mode along with the attributes each instance is using. This gives a preview of the structure and the distribution of the attributes across the subfixtures without the need to apply all changes to the patch and see the result in the fixture sheet only.\ When a subfixture has more than 128 attributes, the overhead will not be displayed.\ Attributes that are displayed in orange indicate that the attribute has no channel function that uses a valid attribute. For example, dimmer is a valid attribute and Dummy is an invalid attribute. Such attributes are not displayed in the fixture sheet.  Added the possibility to set a Default value for each Channel Function of a DMX Channel and select a Channel Function for the Default value of a DMX Channel of a fixture type:\ When editing the DMX Mode of a fixture type the column Default Channel Function defines which channel function of the DMX Channel is used for the Default value of the DMX Channel.This allows, for example, to set the default of the Gobo1 DMX Channel to the Gobo Rotation channel function instead of the Gobo Indexing channel function.\ The Default value of the DMX Channel is set into angular brackets, for example <30>. This indicates, that the value is coming from the Channel Function that is set as Default Channel Function. Changing it at one place will change it at the other place, too.\ When a ChannelFunction does not have a Default value set, the DMX From value of the Channel Function will be used. Furthermore, by expanding the DMX Channel in the Fixture Type Editor down to the Channel Functions, the user can set a Default Value per Channel function.\ In addition the attribute calculator (pressing an encoder or editing a cell in the fixture sheet or in sheet mode of the sequence sheet) offers ChannelFunction Default in the Specials tab to set the value of the attribute to default value of the selected channel function.  Improved the Select Mode pop-up in the Patch: It is now possible to search for modes.  Improved the display of presets: When creating a circular reference from one preset recipe to another preset recipe, an infinity symbol () appears. Furthermore, the Info window will display such references/dependencies in red font color.  Added an indicator for cooked values from recipes: In Track Sheet mode, the Sequence Sheet displays a green square in the top right corner of the value cell when the value is a cooked value from a recipe.\ Also the color for recipes (for example, the cooking pot icon when there is no error in the recipe) changed in general from orange to green.  Added a recipe related setting to presets: If Recipe Template setting is enabled in a recipe preset, the recipe itself will be loaded into the programmer part and will be cooked there. Presets that have this setting enabled, are shown with a cooking pot icon with the lid open (().\ With this new setting and the already existing functionality, these workflows are possible: * Recipes and Receipe Template enabled: Recipe itself will be loaded as recipe into the programmer part. * Recipe with selection and Recipe Template disabled: Cooked data will be loaded into the programmer. Attributes reference to the recipe preset. * Recipes without selection and Recipe Template disabled: Cooked data will be loaded into the programmer. Attributes reference to the preset used in the recipe. If Recipe Template is enabled, there is no need to cook a recipe preset itself. In this case, Cook will be grayed out.  Improved the indication why recipes could not be cooked: When a group used in the recipe is empty, the selection of the recipe cannot use the preset, the MAtricks don’t allow to cook data for the selection of the recipe, or when the selected filter of the recipe hinders from cooking, the corresponding cell gets marked with red text color.\ When the selection of a recipe could not be fully cooked, the font color will turn orange.  Added the CleanUp functionality for recipes. If the recipe is not cooked it gets deleted in the cleanup process.\ To clean up all recipes in all parts of all cues in sequence 1, type: | | | | ------------------------------------------------------------------ | ----------------------------------------------- | |  | User name\[Fixture]>CleanUp Sequence 1.\*.\*.\* | \*\* \*\* Added Flip to the list of Codes for Quickeys.  Added the opportunity to cancel long running operations, for example when copying or storing a huge amount of data.\ To do so, press and hold for 5s: * MA + ESC or * Shift + Esc During the 5s, a red progress bar will appear at the bottom of the screen and informs about the initiation of the cancellation. A following red progress bar may appear when it takes a few moments to stop the running operation and oops the already done changes. At this time the user can release the pressed hard keys. Operations that cannot be cancelled display a lock symbol on the left side of the progress bar.  Added the Network Time Protocol (NTP): The Network Time Protocol allows to set the Session Time to an external time source. To do so: 1. Go to Menu - Settings - Date and Time - Time Server. 2. Set Extern TimeSync Mode from **None** to **NTP**. 3. Enter the IP or URL of the NTP server you want to use at Server IP or Server Name. Once TimeSync Mode is set to **NTP**, date and time in the Session Time tab cannot be changed manually anymore.\ The IdleMaster or GlobalMaster station distributes the time into the session, even if other stations in the session have a different NTP server set up. The right area in the Time Server tab displays the System Monitor messages that are related to the NTP feature. When a Server Name is entered, the URL is automatically resolved to the IP of the server, and the IP is displayed as well at Server IP. The time a NTP server will deliver is always the UTC time. To match it to your local time, adjust the Time zone in the Session Time tab.  Improved the Playback window: The Playback window lets you save and load window preferences.  Improved the display of the lock symbol (). Each type has a different color: * Orange: Locked by user via the [Lock command](/grandma3/2-3/keyword_lock/). * Gray: Position locked. These objects cannot be moved around. For example, Timecode Slots. * Red: System locked. These objects cannot be modified by the user at all. For example, World1 or Encoder Bar 1. In addition, the Lock column in sheets displays different kinds of locks using more intuitive abbreviations: * UL: User Lock * PL: Position Lock * SL: System Lock  Improved the workflow when managing pages: Page 1 can now be deleted or moved to a different page. But as page 1 always has to exist, a new page 1 will be automatically created when moving or deleting page 1.  Added Stomp, SelFix, and Assign to the list of keys where the user can do several successive operations while pressing and holding the key.  Improved the Add Window dialog: The All tab now also shows the window icons.  Improved the Command Section overlay: It is possible to change the dimmer value by scrolling with the mouse wheel while the mouse is above the dimmer wheel area.  Improved the handling of the universal fixture type: It is not possible anymore to delete the Default DMX Mode.  Improved the DMX Mode pop-up: Used modes of a fixture type are listed first, then all unused ones.  Improved the Timecode Viewer: When the View Mode is set to Text, the Play and Rec columns now also stay visible.  Improved the System Info window: All graphs that can be viewed display in addition also the current value.  Improved the Session Data Merge: Added the possibility to keep the show file currently running on your station. To do so, tap Keep my Show File in the Session Data Merge pop-up.  Improved Layouts: Layout elements will not be displayed anymore, when the IDs of the assigned fixture get removed. The layout editor still displays these layout elements, but changes the font color of the whole row to red.  Improved the workflow when using MVR-xchange: A message appears when commiting a file in MVR-xchange that was already commited before.  Added indirect color mixing to the color picker: The color picker supports indirect color mixing in a defined RGB Color Space. A color space must be defined in the fixture type for indirect color mixing. To define the color space, edit the fixture type and go to the PhysicalDescriptions tab. Here you will find the Color Space collect. Add a new ColorSpaceData.\ You can choose between the predefined color spaces “sRGB” (Adobe sRGB, HDTV IEC 61966-2-1:1999), “ProPhoto” (Kodak ProPhoto ROMM RGB ISO 22028-2:2013) and “ANSI” (ANSI E1.54-2021). Or define a custom color space via “Custom”.\ The color space needs to be linked by the “ColorSpaceData” property of the channel functions of the ColorRGB\_R, ColorRGB\_G and ColorRGB\_B channels used to control the indirect color mixing. *** ## Changes [Section titled “Changes”](#changes-1) * New keywords: * [ChannelFunctionDefault](/grandma3/2-3/keyword_channelfunctiondefault/) * [GoboImage](/grandma3/2-3/keyword_goboimage/) * [PSR](/grandma3/2-3/keyword_psr/) * New option keywords: * [/SubTab](/grandma3/2-3/ok_subtab/) | | | | ------------------------------------------------ | -------------------------------------------------------------------------------------------------------------------------------------------------------------------------------------------------------------------------------- | |  | **Important:** | | | The /SubTab option keyword is only used by the PSR menu so far. But as the user has to follow a certain workflow through the PSR menu, it is not possible for the user to change the sub tabs of the PSR menu by using commands. | | | | | ------------------------------------------ | ------------------------------------------------------------------------------------------ | |  | **Hint:** | | | For more information about the new keywords, please read the corresponding sections above. | * New color theme colors: * ColorDefinitions: * Global.ButtonAdditionalText * Global.Cooked * Colors: * BandFader.Background * BandFader.FaderLocked * BandFader.Knob * BandFader.StripActive * BandFader.StripInactive * BandFader.TextActive * BandFader.TextInactive * ColorPicker.HSBIcon * FixtureSheetCell.FullyCookedIndicator * PoolButton.PositionLocked * PoolButton.SystemLocked * PoolButton.UserLocked * Progress.NotCancellable * Progress.CancelBarLeft * Progress.CancelBar Right * Progress.CancelText * PSR.DefaultText * PSR.DisabledText * PSR.MatchMixBK * PSR.MatchOlderBK * PSR.MatchSameBK * PSR.MatchYoungerBK * PSR.Selected * PSR.SelectedDependency * PSR.SelectedInTree * PSR.SelectedText * PSR.Separator * TrackSheet.HeaderHintColor * UIGrid.ActiveBackground * UIGrid.SubColumnIndicator * UITab.AdditionalInfoText * UITab.ArrowBackground * Changed color theme colors: * PoolButton.Cooking references now from Global.Cooked * PoolButton.Global references now from Global.GlobalPreset * PoolButton.Matricks references now from Global.Cooked * Removed color theme colors: * Colors: * EndlessFader.Background * EndlessFader.FaderLocked * EndlessFader.Knob * EndlessFader.StripActive * EndlessFader.StripInactive * EndlessFader.TextActive * EndlessFader.TextInactive * PoolButton.Locked - New grandMA3 Lua Functions: * GetAttributeColumnId(light\_userdata:handle, light\_userdata:attribute): integer:column\_id * GetObject(string:address): light\_userdata:handle * SelectedDrive(nothing): light\_userdata:handle * The ActiveOnly property of filters was removed. * The file permission of the grandMA3 onPC app on macOS changed to 775. * Renamed the Slow column in the My Interfaces menu to Speed Mb/s. Also the values 100 or 1000 are displayed instead of Yes or No. * Changed the icon for the test functionality in the Command cell in the Sequence Sheet to . * Renamed the SoundFiles tab in the Off menu and Running Playbacks window to Sounds. * Renamed the sequence setting Command Enable to Cue Command. * The Settings dropdown in the main menu does not offer the Touch Configuration anymore on onPC stations, as this is handled by the operating system. * Info Window: * Renamed Window Mode (before Link Type) * Renamed Link Mode (before Auto List Reference) * When the Multicast Input limit for sACN (20 inputs) is reached, instead a pop-up a text at the bottom of the sACN menu will inform the user. * “Dive Into” for DMX Modes in the Fixture Type editor can no longer be toggled in the Live Patch. * The general color of recipes changed from orange to green. * The maximum number for Fixture ID and CID was limited to 1 000 000. Show files with higher IDs won’t be adjusted. The fixtures still work as expected, but when changing the IDs, no IDs above the limit can be set anymore. * The scroll wheel direction for the 3D viewer zoom was inverted. *** ## []()Bug Fixes [Section titled “Bug Fixes”](#bug-fixes-1) ### 3D [Section titled “3D”](#3d-1) | Description | | -------------------------------------------------------------------------------------------------------------------------------------------------------------------------------------------------------------------------------------------- | | Assigning a fully transparent appearance to the bounding box of the stage did not hide the bounding box. | | The 3D Window Settings pop-up was too big for screens 6 and 7. | | For big stages, the intensity of the Point Light was too bright. | | With many fixtures in a show, it could happen that shadows were displayed in the wrong beam in the 3D Viewer window. | | Under certain circumstances, not all beams and spots of multi pixel fixtures were displayed in the 3D Viewer window when Multi Led Beam Mode was set to **Single Beam Dynamic Gobo** or **Single Beam Dynamic Gobo** and Shadow was enabled. | | Visual artifacts could occur in the 3D Viewer window when Shadow was enabled while the Light Scale or Render Scale setting was set to a very low value. | | The state of the gear indicating the rendering of a frame while the 3D Viewer window is running below 2 fps could be wrong if Render Scale or Light Scale was set to a value below 100%. | | Beams could be drawn several times in the 3D Viewer window if Shadow was enabled while the 3D Viewer window was iterating. | ### Command Line and Macro [Section titled “Command Line and Macro”](#command-line-and-macro-1) | Description | | ----------------------------------------------------------------------------------------------------------------------------------------------------------------------------------------------------------------------------------------------------------------------------------------------------------------------------------------------------------------------------------------------------------------------------------------------------------------------------------------------------------------------------------------------------------------------------------- | | The display of a handle was not restored correctly when oopsing the deletion of the referenced object. | | The auto-generated names of individual fixture groups could contain an additional counter, if the fixture names themselves were already numbered consecutively. | | The command Fixture Thru. was not working anymore. | | When setting a sequence in the Timer Link Type setting from the command line, the specified sequence was not always entered. | | When importing a sequence that references a speed master or rate master, the reference was lost when importing the sequence. This bug is now fixed. The reference in the imported sequence is adjusted to the speed master with the same number in the new show file. | | The color of the resulting string in the preview of the command editor was wrong when concatenating strings and variables. | | Concatenation of numbers and variables in order to create cue numbers, for example Store cue 1.$number, created a cue part. | | Macros that contained only Clone as command in a macro line did nothing when being executed. | | The space bar of the internal keyboard did not work in the Lua editor if keyboard shortcuts were enabled. | | When editing a macro line that contained a handle, the first characters of the handle declaration ( #\[ ) could be cut off. | | The software could crash when repeatedly selecting multi-instance fixtures that had an invalid subfixture index. | | The software could crash when moving a cue part to a different cue part. | | A cue part could get lost when moving it to a different cue. | | Return, the arrow keys, and Backspace could get blocked when CapsLock was active for a longer time when using grandMA3 onPC running on macOS. | | It could happen that the folders of installed previous grandMA3 versions were not available on grandMA3 onPC running on macOS. | | When changing properties of objects, such as the Wait property of macro lines, where the value can be a number or a name, the new value was not set when using a name as property value. | | The POV value for the Shaper unit was not applied to the fixture when using the calculator of the POV fader in the Shaper Dialog. | | The notes of presets got lost when updating presets that contained notes and MAtricks. | | When using handles of sequences in commands for playing back sequences, additional specified timings were not used. | | Adressing cues by using handles was only possible, if the cue was adressed first and then the sequence. | | A string followed by a handle was breaking the automatically added space in macros. | | When a desk was locked, the faders could still be moved and influenced the playback. This bug is now fixed. Faders can still be moved during desk lock, but they don’t change the playback anymore. When leaving the desk lock, the faders will return to their correct levels. | | Commands that used a handle to an encoder bar were not working after loading the show file again, as the handle to the encoder bar got corrupted. | | The calculators for color faders, for example, in the Appearance editor did not apply the entered values correctly. | | The software could crash when oopsing the deletion of a sequence while a filter was active. | | Changes in cue recipes were not always taken into account when the value of the recipe was preset recipe. | | The display of the charge level of the UPS on grandMA3 full-size and light consoles was inaccurate. | | When cloning data only in one preset by using the Clone Menu, the resulting operation cloned data only in the programmer. | | When storing active values into a preset that were coming from a recipe, a reference to the recipe was stored as well, although storing embedded was disabled. | | Using the Clone Menu for cloning from or to fixtures by adressing them via their CID did not work. | | The software looked like freezed when doing large AutoStore operations. This bug is now fixed. A progress bar appears now in case of larger AutoStore operations. | | Stations left the session when moving a recipe from one part to a another part of the same cue. | | The option keyword /NoConfirmation did not work when using it in a Cook command. | | When copying cues the cooking state of values was also copied to the destination, although the recipe itself was not copied. This lead to the problem when cooking later a different recipe in the destination cue, the other values were cleared as there was no corresponding recipe in the cue anymore. | | When editing a cooked value in the tracking sheet, the cooking state of the vaue was not removed. | | Storing data directly into a recipe set the wrong preset mode for the recipe. | | When editing commands, for example in macros, were misinterpreted when a string inside the command contained a pound sign (#). | | When taking screenshots for the appearance of views, the entire screen was used, not just the user-defined area, if the display scale was not set to 1. | | Recipes could not be cooked when the used selection did not start at grid coordinate 0/0/0 and MAtricks in use had a value set for X, Y, or Z. | | When knocking out the relative layer on a connected station while the absolute layer still had active values, the output did not update correctly. | | Oopsing the removal of fixtures in a group did not auto cook the corresponding recipes. This bug is fixed. | | Recipe settings like FadeFrom or FadeTo could be applied to previous recipes in the same cue. | | When inviting processing units again into session all stations of the session could briefly output the playback state of the invited processing units. | | Filters did not work as expected when the Phaser layers were excluded in the filter. | | When assigning appearance to a range of cues, cues with dotted cue numbers were ignored. | | The software could crash when toggling the control bar off and on using the screen encoder. | | When enabling highlight while being in session with processing units, the fixtures that were highlighted last could flash up briefly with their highlight values. | | The software could crash when cutting timecode events in the the Timecode Editor while the Selection Mode was set to TimeRanges. | | When deleting an embedded preset the presets that were embedded did not update their reference indicator. | | Normal timecode events could be mistakenly treated as automatically recorded events which did not play them back when Playback and Record was set to **Manual Events**. | | When creating and labeling cues within the same operation, the consecutive numbering of the cue labels did not work as expected. | | Editing the value of an attribute using fixture sheet did not apply the new value when doing it the first time after enabling All Channel Sets. | | Changing the Store Settings of the user profile using the command line applied the new settings after the next store operation. | | When changing the size of an executor the assigned handles that were not from the executor configuration in use were overwritten by the handles of the executor configuration, | | When targeting an non-existing attribute in a command, the command was instead executed for the selected attribute. | | The software could crash when disabling Preserve Grid Position in the Selection Grid window while fixtures were selected that did not had a grid X value set up in the fixture type. | | The Encoder Bar broke if a value was applied via a command to an attribute that did not exist in the selected Encoder Bar. | | The At Filter did not change the displayed attributes according to the selected world. | | Typing a $ into a macro command could cause the command to break. | | During show migration, empty column sets were reset to visible in the sequence sheet with track sheet mode enabled. | | Encoders in physical read-out could be stuck on a specific value. | | If the destination of the command line was changed, the Go+ \[large], Go- \[large], and Pause \[large] keys did not work. | | When changing wing IDs via command, the console could crash. | | It was possible to move a Timecode event beyond the beginning of the time range. | | Objects the user locked in grandMA3 v1.9 could not be unlocked in grandMA3 v2.0. | | The DMX Priority Input Merge did not work correctly for XYZ attributes. | | Recipes that had empty groups assigned were not automatically cooked when the group was filled with fixtures. | | The software could crash when letting the fader move automatically for a long time and in parallel change the appearances of the assigned sequences all the time. | | Knob UI Style set to None, allowed using the Rotate gesture to change values. | | When starting the grandMA3 software, an additional output configuration could be created. | | Preserve Grid Position in the Selection Grid window did not work when having Preview enabled. | | The Layout editor did not allow to set the Action of layout elements that had a World assigned to ‘Select’. | | The values of shaper attributes could jump around when having Link in the Shaper Dialog set to the value All. | | The software could crash when trying to move or copy fixtures from one stage into a space. | | Executing the command Lua “GetTokenNameByIndex(550)” crashed the software. | | The secondary handles (press and hold MA) on an encoder executor were not mutually exclusive between Encoder and Encoder Left/Right Command. | | Macro lines that used handles were not executed correctly when the macro line had Execute set to No. | | Exported user profiles contained invalid entries for non existing attributes. This increased the size of the user profile file. | | Imported MAtricks from v1.9.7.0 or prior did not set the same values as they did in the past. | | Commands could stay in the command line when they were coming from Quickeys that were triggered by macros. | | When deleting a cue with recipes and deciding that the data should be moved to 0, the recipes were not moved to part 0. | | Moving cues to different sequences let a timecode event point to the cue in the new sequence, although the timecode track was pointing to the old sequence. This bug is now fixed. When moving a cue to a different sequence the corresponding timecode event get invalid: The Cue Destination and Token will be removed from the event. The cells in the text view will display a red background. Th events in the timeline view will display a **?**. Show files with timecode shows that have such a setup will be cleaned up when loading them the first time in v2.1 or later. | | When a Quickey was executed by a macro the Code of the Quickey stayed in the command line and was executed until pressing Esc. | | It was not possible to unlock several locked objects at the same time using the user interface. For example, multiple cues in the Sequence sheet. | | The predefined macros for circular copy were outdated. | | In some cases when a timecode show was recorded and Playback and Record setting was set to **All Events** and changed to **Manual Events** afterwards, the events were not editable. | | When executing Cook /Overwrite for objects that contained empty recipes, all values were removed from the cue. | | When importing a preset that was previously exported, the values in the imported preset sometimes where changed. | | A cue did not store a phaser when the phaser was running in programmer part 2. | | When patching or unpatching fixtures in the Live Patch, the DMX Sheet did not update correctly when DMX Channels in the Tester Encoder Bar was set to **Patched** or **Unpatched**. | | If you had several programmer parts and executed Store Cue x Part y, only the data of programmer part y was stored. This bug is now fixed. Store Cue x Part y stores the content of all programmer parts into part y. | | It was not possible to store a new sequence onto an executor when a cue was edited at the same time by a different user. | | When using From/To for Fade, Delay, Phase or Speed within the MAtricks in order to generate the values, the Rx, Ry, or Rz of the MAtricks was always treated as disabled. | | It was not possible to export or import Quickeys. | | It was not possible to record the levels of group masters or masters into timecode shows. | | When oopsing the change of the Tester Output in the Tester Encoder Bar while having several channels selected, pressing Oops 1x oopsed it only for the last selected channel. | | When using AutoStore to store presets into a fixture type and using the Sheet Style in the Advanced Mode of the Show Creator, most times all presets were stored instead of the selected ones. | | When pressing Time and toggling through the layer keywords, the last character of the command in the command line was removed with every cycle. | | It was not possible to oops the adjustments of faders in the Bitmap Editor or the Generator Editor. | | When the Selection Mode of the Layout Viewer window was set to 2D Grid and the user executed Ctrl + A, the fixtures of assigned presets and sequences in the layout were selected, too. | | The TimeOffset for onPC stations was also processed by consoles when loading a show file. | | It was not possible to apply division or multiplication directly to timing inputs. | | CuePart numbers of Preset Pools were not respected when storing presets to a cue. | | When opening the Off Menu by pressing Off twice, one Off still remained in the command line. This bug has been fixed. Now the command line gets cleared after pressing Off twice. | ### Connections [Section titled “Connections”](#connections) | Description | | ----------------------------------------------------------------------------------------------------------------- | | When using MIDI Control Changes to flash, black, or temp a sequence, the playback did not stop when releasing. | | When receiving sACN multicast packets again on the same station, not all packets were recognized. | | OSC send feedback of the previous cue when going into the next cue. | | Faders that were controlled by a Remote would not work properly if the input range did not cover the whole range. | | | | - | ### Patch [Section titled “Patch”](#patch-1) | Description | | --------------------------------------------------------------------------------------------------------------------------------------------------------------------------- | | The applied Offset values for Pan or Tilt were sometimes off by 1. | | The software sometimes crashed when patching a fixture type that had a relation to a different geometry than the follower of the relation. | | When exporting a fixture type using the Patch menu, the GDTF tab was also selectable when exporting a fixture type of source grandMA2. | | When entering a LongName for a new fixture type, the LongName was lost when leaving and re-entering the patch. | | The software could crash when toggling **Dive Into** for the DMX Mode in the Live Patch. | | If an appearance was assigned to a DMX universe, the DMX Universe List displayed neither the universe name in the name cell nor the appearance name in the appearance cell. | | When copying fixtures in the patch, the following clone process did not clone layout elements. | | The software could crash when using XYZ and when the user deleted all DMX Modes of the universal fixture type. | | Geometry references that referenced another geometry reference did not have a model linked. | | The geometries of fixture types were internally created several times which increased the show file size. | | The software crashed when building an endless loop of two geometry references referencing each other. | ### Phaser [Section titled “Phaser”](#phaser) | Description | | ----------------------------------------------------------------------------------------------------------------------------------------------------------------------------------------------------------------------------------------------------------------------------------- | | When multiple steps were selected and then the values were stolen from the programmer, the step selector in the encoder bar told the user that they are in step 1. This bug is now fixed. In this case, the step selector now correctly displays that all steps are still selected. | | When building a color phaser, the fixture sheet in **Dimmer+** or **Sheet/Filter** was only displaying the color of the current step in the graphic. | | Changed values of phaser layers in a preset could get lost if the MAtricks of the preset were changed afterwards. | | The dimmer attribute was knocked in into step 1 when tapping Select All Steps in the encoder bar or in the Phaser Editor. | | When tapping T\|T (Mirror Time) in the Phaser Editor while having only an absolute value step 1 and having multi-step values on other value layers, the absolute value was moved to step 2. | | The software could crash when creating the third step of a phaser using this type of command: Step 3 Preset 1.3. | | In a multi user session Stomp affected multiple users. | | It was sometimes not possible to Oops Stomp in a session. | ### Playback [Section titled “Playback”](#playback-1) | Description | | --------------------------------------------------------------------------------------------------------------------------------------------------------------------------------------------------------------------------------------------------------------------------------------------------------------------------------------- | | When updating a preset it could happen that a running cue could also be updated with the new preset, but the Update Menu would close and not offer to update the cue when it was opened again. | | When having keyboard shortcuts enabled, Shift + scrolling the mouse wheel did not execute the MAEncoderLeft and MAEncoderRight functions of a encoder knob. | | When changing the Tracking Distance setting of a cue, the output of the current cue did not change if it was affected by the changed tracking distance. | | When attributes were released by the end of a tracking distance, the attributes snapped to their new values instead of using the respective fade time of the cue. | | Sequences that contained a relative phaser where in step a 0 was stored were immediately switched off when Off When Overriden was enabled. | | Sequences were not always switched off when trying to switch them off using the Off command while the sequence was going through automatically triggered cues, for example, follow cues. | | When starting a preset playback using the Flash function, the playback stayed on upon the release of Flash. | | Recipes in the programmer with MAtricks that use the Transform setting were not correctly played back as soon as a second recipe used the same selection. | | The image color of a Generator was not reset when the playback stopped. | | Generator values could remain in a cue after the corresponding Generator was deleted, and newly created Generators could be automatically linked to that cue. | | If you had a Sequence with absolute and relative dimmer values and turned off Soft LTP for the sequence, the dimmer did not behave correctly when playing back the sequence. | | It was possible that after loading a show file MIB pre-positioned attributes already while the dimmer was not closed, yet. | | Cues with absolute values in the cue and relative values from a recipe in the cue could have not the mixed output of both layers. | | Recipes that used Generators as Value and used filters did not filter correctly. | | The console could crash when replacing a video that was played back by a Bitmap. | | The software crashed when a cue was played back that contained recipes with PanTilt presets and XYT presets for the same selection. This bug is fixed now. In these cases, the data of the last recipe will be used now. When loading show files from v2.0 or prior into v2.1 or later, all recipes will be automatically cooked again. | | MIB could pre-position attributes in cues already when in a later cue part MIB was set to Early. although the dimmer was not-closed between both cues. | | Timecode shows that include sequences were not triggered properly when using **Auto Start** or **Auto Stop**. | ### Windows [Section titled “Windows”](#windows-1) | Description | | ------------------------------------------------------------------------------------------------------------------------------------------------------------------------------------------------------------------------------------------------------------------------------------------ | | It was not possible to select multiple fixture types in the Advanced mode of the Show Creator. | | When editing a note while keyboard shortcuts were active, pressing Space did not add a space. | | When moving a layout element using the encoders, the yellow selection frame in the layout did not move immediately with the element. | | When using the web remote with a user profile other than the default user profile, the Shaper Dialog always displayed the information of the default user profile. | | The Clone menu generated wrong syntax when the user wanted to clone from or to subfixtures. | | The Clone menu did not update the selected objects when new objects were added while the Clone menu was open. This bug is now fixed. When creating a new object, such as a sequence, while the Clone menu is open, the sequence button will change from All Sequences to Chosen Sequences. | | When closing and reopening a full-screen display on a second screen in Microsoft Windows, the position of the mouse cursor was not displayed correctly. | | The content of the encoder bar area on grandMA3 compact and compact XT consoles could be mixed up when the user had a Timecode Viewer window in Setup mode, pressed U1 or U2 twice and then set focus back to the Timecode Viewer window. | | The software could crash when using a color theme that did not contain all color definitions of v2.0 and then opening an Encoder Bar window that should display the endless faders. | | The faders of the Shaper Dialog did not work when calling a view that had the View Mode of the Shaper Dialog set to **Faders**. | | The software could crash when using the POV fader of the Shaper Dialog with fixtures that had a blade rotation attribute assigned instead of the shaper rotation attribute. | | The Patch Offset buttons in the Insert new Fixtures dialog and the Edit Patch dialog had different styles. | | The software crashed when the Clone menu was open and the user executed the command. | | The height of the buttons did not change immediately when tapping Line Height in the Filter overlay of the Clone menu. | | The Fixture Sheet did not display values for color attributes of multi-instance fixtures when the Sheet Mode was set to **Dimmer+** or **Sheet/Filter**. | | The Off Menu and the Running Playbacks window had unused space at their bottoms. | | When making changes in the Shaper Dialog and calling the same view again, the changes were not overwritten by the settings of the view. | | The sheet modes Dimmer+ and Sheet/Filter of the fixture sheet displayed dimmer values always as snapping in the feature graphics area. | | It was not possible to change the encoder resolution for an encoder which had only an attribute assigned to the outer encoder. | | The dimmer bar in the fixture sheet could display a wrong value of the dimmer, when the master fader of the playback was not at 100 %. | | The numbers in the Clock Viewer window could have different styles for the same window size but different position on the screen. | | It was not possible to scroll in the Content Sheet when using the 2 finger scroll gesture. | | The Fixture Sheet set to Sheet Mode **Dimmer+** or **Sheet/Filter** did not release the blue background when a cue fade had finished. | | The Fixture Sheet set to Sheet Mode **Dimmer+** or **Sheet/Filter** displayed always all attributes, also when they were not available in the current world. | | The Content Sheet set to Sheet Mode **Channel** did not always display all Fixture IDs or CIDs. | | When the Off menu was open or a Running Playbacks window was visible, the Oops History got unnecessary entries added as soon as a playback was started or switched off. | | The fixture and feature graphics in the Fixture Sheet could be scaled wrong when using Sheet Modes **Dimmer+** or **Sheet/Filter**. | | The Step Selector in the Phaser Editor or the Encoder Bar always displayed step 1 after calling phaser preset instead of 1/n. This bug is now fixed. When callign a 2 step phaser preset the Step Selector displays 1/2. | | The encoder bar showed graphical glitches in the web remote during connection to a grandMA3 compact console. | | The Settings button in the title bar was not displayed in the Sequence Editor when it was displayed on screen 7. | | When scrolling horizontally in Content Sheet that was set to Cue Mode Manual the divider between the cue area and the data area could also be moved. | | When running grandMA 3 onPC on macOS it was not possible to hide the title bar, if the software was not in fullscreen mode. | | Horizontal scrolling in the System Monitor was not possible if the front size was set to 28 or higher. | | When creating a new filter no attributes were selected, and the select all button was not reacting at the first tap. | | The Sequence Sheet was sometimes executing Auto Scroll, even if the setting was disabled. | | The order of buttons in the control bar on the web remote was not identical to the control bar on the station itself. | | When the Fixture Sheet had Feature Sort enabled, the selected feature group was not always moved to the left side when changing the feature group directly after selecting some fixtures. | | The Edit Sound popup was missing buttons for Notes and Installed. | | The columns editor did not display the different column sets when you tapped through them. | | In some cases in the calculator the mouse wheel could not be used to scroll the list of channel sets. | | The fixture sheet did not indicate a position change with a blue marker when Wrap Around was enabled and the first cue was triggered by pressing Go +. | | When changing the colors by hovering over a fader and scrolling in the fader mode of the color picker, the other faders within the same grouping would jump to different positions. | | Pools did not display existing objects when Show Empty was disabled and the fixture selection could not use the object. | | It was not possible to see which fixtures where selected in the Patch window, when they were the selected at the cells that displayed the existing appearance of the fixture. | | The 1D graphs in the Phaser Editor could display the curve incorrectly. | | When assigning a filter to the content sheet it sometimes was not applied immediately. | | The Calibrate Position menu of the 3D Viewer window could not be closed by pressing Esc. | | In the Running Playbacks window the focus sometimes jumped away from the window to the command line when switching tabs. | | In a session the connected station always displayed the group master marker in the fixture sheet when it was active previously. | | Assignment editor pop-ups sometimes displayed a New Object line, for example when tapping Input Filter in the Preset Pool Window settings pop-up. | | When opening dropdowns, the focus could be set to an entry that was not the entry of the current value. | | When storing a view on a web remote device, the screenshot of the display on the host device was taken. | ### Additional Bug Fixes [Section titled “Additional Bug Fixes”](#additional-bug-fixes) | Description | | --------------------------------------------------------------------------------------------------------------------------------------------------------------------------------------------------------------------------------- | | In new shows the User Attribute Preferences were not initialized properly. | | If you had a fixture selected and executed Unblock Cue Thru, in some cases the output of the fixture would be turned off. | | Updating a preset or cue could change their output. | | If Oops was applied after updating a cue, the restored values in the DMX Output and Fixture Sheet were wrong. | | The software crashes when loading showfiles from version 1.5 or prior that contained plugins. | | The Thickness option in Scribbles did not work. | | Setting a time, such as a cue fade, where the value came from a variable did not work. | | When importing fixtures using PSR, the positions of subfixture layout elements could change.Also, dimmer values in cues and presets could change to 0.This happened if a multi-instance fixture type had CanHaveChildren enabled. | | In the speed calculator of the generators, the BPM only accepted values between 0 and 1. All results resulted in a Stop. | | Updating a preset could switch off other fixtures that were generating phaser output in the same cue where the updated preset is also used. | | When loading a show in the PSR menu, mirrored sequences in the local show file broke. | | The fixture sheet could display wrong DMX values after leaving Preview mode. | | When playing back a cue using X-Assert, the timing of other cue parts than cue part 0 used always the timing of cue part 0 | | Updating a preset could remove the preset references of other presets on the relative layer in later cues. | | In rare cases it could happen that a playback would get stuck and ignore commands such as Off, On, Go, or when toggling Off when Overridden. | | The software could crash when streaming data in the network. | *** ## []()Appendix [Section titled “Appendix”](#appendix) * It is recommended to use a dedicated and a separate physical network for each grandMA3 session. * When using DMX protocols it is recommended to use a dedicated physical network for each protocol. * The recommended workflow for executor configurations that are different compared with the default executor configuration is to create a new executor configuration, do the changes in the new configuration and save the changes. * XML files with exported executor configurations from grandMA3 v1.2 and prior cannot be properly imported to grandMA3 v1.3 or later due to structural changes. * XML files with exported analog remote setups from grandMA3 v1.3 and prior cannot be properly imported to grandMA3 v1.4 or later due to structural changes. * XML files with exported timecode shows from grandMA3 v1.3 and prior cannot be properly imported to grandMA3 v1.4 or later due to structural changes. *** ## []()Known Limitations [Section titled “Known Limitations”](#known-limitations) | | | | ----------------------------------------- | ------------------------------------------------------------------------------------------------------------------------- | |  | Software update via network to onPC stations requires confirmation during the install process at the destination system. | | | | | ----------------------------------------- | --------------------------------------------------------------------------------------------------------------------------------------------------------------------------------------------------------------------------------------------------------------------------------------------- | |  | When multiple GlobalMasters exist on the network, each having the same session and location name, the station with the higher priority takes over automatically. If all stations have the same priority, the station with the longest Online Time becomes the GlobalMaster for all stations. | | | | | ----------------------------------------- | ------------------------------------------------------------------------------------------ | |  | Recast will only recast presets to cues if there is a preset link in the absolute layer. | | | | | ----------------------------------------- | --------------------------------------------------------------------------------------- | |  | Loading show files that were saved in previous versions deletes the programmer content. | | | | | ----------------------------------------- | --------------------------------------------------------------------------------------------------------------------------------------------- | |  | When using Partial Show Read, the models of fixture types that have no DMX channels (environmental fixture types) are not imported correctly. |
# Release Notes 2.2
> Do you need help getting started in grandMA3? Perfect! Here we describe a few quick steps to get you rolling. The manual will explain functionality in detail wh
* [Let’s Get Started](/grandma3/2-3/key_rn_v2_2/#h2__1435677565) * [Bug Fix Version 2.2.5.2](/grandma3/2-3/key_rn_v2_2/#h2_1781471903) * [Bug Fixes](/grandma3/2-3/key_rn_v2_2/#h2_1399259183) * [Bug Fix Version 2.2.5.0](/grandma3/2-3/key_rn_v2_2/#h2_1781474115) * [Other Enhancements](/grandma3/2-3/key_rn_v2_2/#h2_594496323) * [Bug Fixes](/grandma3/2-3/key_rn_v2_2/#h2__1190835831) * [Release Version 2.2.1.1](/grandma3/2-3/key_rn_v2_2/#h2_727740091) * [Features](/grandma3/2-3/key_rn_v2_2/#h2_727740091) * [Tags](/grandma3/2-3/key_rn_v2_2/#h3_1566500637) * [Recipe Editor](/grandma3/2-3/key_rn_v2_2/#h3__1639612175) * [Other Enhancements](/grandma3/2-3/key_rn_v2_2/#h2_1198082799) * [Changes](/grandma3/2-3/key_rn_v2_2/#h2_1879708368) * [Bug Fixes](/grandma3/2-3/key_rn_v2_2/#h2__146634055) * [Deprecated](/grandma3/2-3/key_rn_v2_2/#h2__756870347) * [Appendix](/grandma3/2-3/key_rn_v2_2/#h2__1835053169) * [Known Limitations](/grandma3/2-3/key_rn_v2_2/#h2__1393830384) *** ## []()Let’s Get Started [Section titled “Let’s Get Started”](#lets-get-started) Do you need help getting started in grandMA3? Perfect! Here we describe a few quick steps to get you rolling. The manual will explain functionality in detail while the MA e-Learning in the MA University offers you all kinds of training. All information can be accessed through the MA Lighting website [www.malighting.com](http://www.malighting.com). Let’s go! To leave the Release Notes, tap I agree on the top right corner. The main screen of grandMA3 software opens. On the right side, you can see predefined views on view buttons. To switch between the views, tap the view buttons. If this is your first time starting grandMA3 software, patch some fixtures first. Or you can load one of the demo shows delivered with the software. Either way, press Menu. If you use grandMA3 onPC software, there is a  symbol in the top left corner there. Clicking the  symbol is the same as pressing Menu on a console. Tap Backup and then Load, now you are ready to load shows. Would you like to get right on it? Switch Shows to Demo Shows in the title bar first. To do so, tap Shows repeatedly until it says Demo Shows. Once Demo Shows is displayed, it is possible to select any demo show in the list. After you selected a demo show, tap Load.\ In case a show was already loaded, a pop-up will appear asking if you want to save the current show first before loading the new one. It’s up to you! Here we go! Now you are ready to work with the grandMA3 software. It is as easy as that! Again - there are view buttons there, which change the screen content. At the bottom, you will find the encoder bar and the command line. Technically that is all you need to get started. For more information, see the grandMA3 help menu. To access the help in the console or the onPC, tap the view buttons named Help or visit the Online Manuals on the MA Lighting website. If you want to learn the grandMA3 software step by step, please see the [Quick Start Guide](https://help2.malighting.com/Page/grandMA3/grandMA3_Quick_Start_Guide/en) and join the MA e-Learning - it’s free of charge and available on the MA Lighting website. Have fun with using our grandMA3 software! Find all the improvements and changes of this software version further down. | | | | ------------------------------------------ | ------------------------------------------------------------------------------------------------------------------------- | |  | **Hint:** | | | The grandMA3 software will start using the show file (or status) that was in operation before the software was shut down. | *** ## Bug Fix Version 2.2.5.2 [Section titled “Bug Fix Version 2.2.5.2”](#bug-fix-version-2252) ## Bug Fixes [Section titled “Bug Fixes”](#bug-fixes) ### 3D [Section titled “3D”](#3d) | Description | | ------------------------------------------------------------------------------------------------------------------------------------------------------------------------------------------ | | If you calibrated a fixture that was part of a grouping fixture, for example a truss, with the Position Calibration dialog, the position of the fixture was displaced after tapping Solve. | ### Command Line and Macro [Section titled “Command Line and Macro”](#command-line-and-macro) | Description | | ------------------------------------------------------------------------------------- | | If you set a custom command in an executor and executed it, the software could crash. | | Changing MAtricks in a recipe could lead to a crash in the software. | ### Connections [Section titled “Connections”](#connections) | Description | | ----------------------------------------------------------------------------------------------------------------------------------------------------------------------- | | In some cases, leaving the patch on a station with a web remote connected would crash the software. | | In some cases, the touch response of faders was not working correctly. The touch response of the fader was either missing or displayed without the fader being touched. | ### Playback [Section titled “Playback”](#playback) | Description | | ----------------------------------------------------------------------------------------------------------------------------------------------------------------------------------------- | | Updating a preset with XYZ values that was used in an earlier cue could assert pan and tilt values instead of XYZ values in the current output. | | In some rare cases the main sequence unexpectedly jumped to the first cue when pressing Go+. | | If the MIB delay was set to a time less than 1 second and the playback faded from a dimmer phaser to a closed dimmer, the MIB values would be applied before the dimmer was fully closed. | *** ## Bug Fix Version 2.2.5.0 [Section titled “Bug Fix Version 2.2.5.0 ”](#bug-fix-version-2250) ## Other Enhancements [Section titled “Other Enhancements”](#other-enhancements)  Improved the recipe editor: * The recipe editor has a **Lock** column in its grid. If the recipe line is set to UL (UserLock) and you tap CleanUp, the corresponding lines will not be cleaned up. If you deselect objects, for example, presets during recipe editing, the lock will be respected and the corresponding objects cannot be deselected while they are locked.  Improved the patch menu: * When moving fixtures in the patch via Cut and Paste or via a command and the destination is not on the same level within the same parent, a pop-up opens. The pop-up allows you to choose between keeping the Absolute position and rotation in 3D space or keeping the Relative position and rotation offset of the parent. Tap Cancel to cancel the action altogether. /NoConfirmation will suppress the pop-up if the default is set to Absolute. /Type “Relative” sets the conversion mode to relative. /Type “Absolute” sets the conversation mode to absolute.  Increased the tolerance for small jumps in external timecode signals. *** ## Bug Fixes [Section titled “Bug Fixes”](#bug-fixes-1) ### Command Line and Macro [Section titled “Command Line and Macro”](#command-line-and-macro-1) | Description | | ------------------------------------------------------------------------------------------------------------------------------------------------------------------------------------------------------------------------------------- | | It was possible to use the command line to assign object actions to objects, even if these actions were not a part of options in the UI. | | Turning an empty encoder would execute commands in the command line. | | If a timecode event was assigned and triggered by an encoder and then Delete was pressed, the software could crash. | | Handles of macros could break after a PSR. For example #\[Group ‘StartShow Group 1 Linear’] turned to #\[FFFFFFFFFFFFFFFF]. | | A cue part would not be automatically recooked if the Allow Duplicates column was set to **Yes** after the cue part was cooked with values of the same attributes as in the cue. | | If you created a recipe with a group that contained subfixtures without a valid ID and applied MAtricks, the MAtricks would not be applied correctly. | | On some mac devices, the grandMA3 onPC application did not appear in the settings, which meant that the sound input did not work. | | If you created a recipe using the recipe editor and stored it to multiple cues, the recipe would only be stored to one of the cues. | | When cooking recipes it could happen that not all fixtures of the selection used the selected values, even if they were capable to do so. | | If blocked attributes have been unblocked, the values of unrelated fixtures that were still blocked would be displayed as unblocked in cyan in the track sheet. | | If you used macOS, the onPC software sometimes would not start. | | If presets had Cue Part settings other than the default and you created a recipe with the recipe editor, the presets would not be added to the defined programmer part but in the order they were selected. | | In some cases, if you executed valid commands using a macro or plugin that for example included /CueOnly, the command line history would falsely display errors. | | If you executed DumpLog /NoAutoClose while no USB drive was connected, the pop-up would ignore /NoAutoClose and a countdown would appear. | | Storing recipes in a cue with the same group but a different preset did not store the recipe in a new recipe line. | | If you copied a recipe line with values that refer to another recipe line to a new recipe line, the **Value** cell would remain empty. | | If you migrated a show file from v2.1.1.5 into v2.2, the software could freeze. | | The console could crash when importing an MVR file into a show during a session. | | If **Allow Duplicates** was disabled and you created a recipe with a preset in a cue and another recipe with a phaser that used the same attribute in a cue part, cooking would not work if the cooking mode was set to Low Priority. | | If Wrap Around was disabled for a sequence, the sequence was not triggered by an agenda event. | | It was possible to assign a tag to itself by executing an incomplete assign command. | | Renumbering some cues of a sequence also renumbered cues of the sequence that were not selected. | | If you moved an image in the image pool quickly after moving another image, the software could crash. | | In certain show files, when you changed the XYZ values to pan tilt in the programmer, the pan and tilt values were incorrect. | | If you imported a sequence, most MIB settings would be lost. | | If you migrated a show file to the new software version, in some cases presets would wrongly be selective instead of global. | | The DoubleSpeed, HalfSpeed, and Speed 1 commands were passed to the speed master assigned to the sequence, but should have only affected the sequence. | | The software could crash when importing fixtures with custom meshes that used textured materials via Partial Show Read. | | In some cases the software would crash if you tapped Rename in the Rename Show File pop-up. | | Changing the speed in sequences that had the same speed master assigned using DoubleSpeed, HalfSpeed or Speed1 would lead to different speeds in the sequences and speed master. | ### Connections [Section titled “Connections”](#connections-1) | Description | | ----------------------------------------------------------------------------------------------------------------------------------------------------------------------------------------------------------------------------------------------------------------------------------- | | If a console was disconnected from a session and a fader was moved, the fader position would not be synchronized in the data merge process. This would lead to two different positions of the same fader. | | If a console was disconnected from a session and a preset or executor configuration was changed, two different versions of the same preset or executor configuration would exist on different devices after merging the session data. | | If the master console with a higher priority unexpectedly dropped out of a session and a different show file was loaded in the session, the show file of the higher priority master would be used in the session without a warning as soon as it rejoined the session. | | DMX channels 511 and 512 of an incoming DMX signal were not recognized and the DMX universe displayed no incoming values. | | If you selected a USB stick in the backup menu, the software could crash. | | If you had two sessions with the same session index but different software versions, one of them in version 2.2, in the same network, devices in the session would crash. | | If a session was created with normal priority, then a high priority station was invited and Keep Session’s Show File was selected, a processing unit that was additionally invited would not accept the current show file. Instead, it triggered another session data merge pop-up. | | If you were in a session and loaded a different show file on the connected station, the show file would not be loaded on all devices in the session. | | In some cases, the previously saved show file of a station with a higher priority could falsely be overwritten after inviting a station to a session and keeping the session’s show file. | | If you had a console and an onPC in session, connected via web remote to the console and then started a new show on the onPC, the console could crash. | | Pressing the sleep button on an external keyboard connected to a console could cause the console to freeze. | ### Patch [Section titled “Patch”](#patch) | Description | | ------------------------------------------------------------------------------------------------------------------------------------------------------------------------------------------------------------------- | | The offsets of DMX channels of fixture types using breaks could be wrong. | | Patching MArkers and changing their rotation in the patch would not show their rotation values if you reentered the patch. | | If you changed the size of a target space of a MArker, the XYZ values of fixtures that were spread across the space of that MArker would not be automatically updated. | | In sessions, it could happen, that X, Y, and Z values would all change if you turned an encoder to change one of the values. | | When fixtures were copied in the patch, relative pan/tilt values could be lost. | | Creating multipatch fixtures in the patch could cause the software to crash. | | Defective fixture types could lead to preset and cue data being lost if you migrated a show file to the new software version. In addition, a notification now informs the user to adjust the invalid fixture types. | ### Phaser [Section titled “Phaser”](#phaser) | Description | | ---------------------------------------------------------------------------------------------------------------------------------------------------------------------- | | Updating a dimmer preset, that was part of a phaser step, stored into a cue, did not apply the phaser with the updated value in the cue. | | If a cue already had reference data of phaser presets in it, and new phaser data was stored in a step of the phaser, this would result in lost phaser data in the cue. | | If you had an open phaser editor, turned the first or second encoder and changed from 2D Bar to Phaser Bar, the software could crash. | ### Playback [Section titled “Playback”](#playback-1) | Description | | ---------------------------------------------------------------------------------------------------------------------------------------------------------------------------------------------- | | If a running cue was deleted, the cue would still be played back and the sequence would not be stopped. This bug is fixed. Now the sequence will be disabled after the running cue is deleted. | | A Goto event during encoder movement caused the value to snap or jump to 0. This bug is improved to prevent values from jumping to 0. | ### Windows [Section titled “Windows”](#windows) | Description | | --------------------------------------------------------------------------------------------------------------------------------------------------------------------------------------------------------------------------------------- | | If you migrated a show file to the new software version, the pool action of the plugins pool would be set to **None** instead of **Call**. | | If timecode events were recorded using pool objects, they were displayed as events triggered by DC Remotes in the timeline. | | In the login pop-up, the password field could not be reached pressing Tab. | | The label pop-up on screen six and seven would not automatically change to appearance tab if new appearance was created and entered. Instead it stayed on the keyboard tab. | | The names and numbers of groups that only contained a single fixture were not displayed in Selection of recipe lines. | | If you recorded a timecode and disabled Setup, the record button would disappear but the timecode recording would still be running. | | Filtered sheets would not automatically update to include recently added fixtures if the fixtures met the filter criteria. | | If the At filter was set to exclude Relative, cooking would fail and recipe lines would be displayed in red. | | Editing a sequence or an executor could lead to multiple Lua errors in the system monitor. | | The info window sometimes did not display the notes, when changing the selected sequence. | | After restarting the software on Windows or Mac, some feature groups could be missing in the encoder bar. | | In the timecode viewer, rows of track groups would be displayed too big and needed to be opened manually every time, instead of staying opened. | | Appearances would not be displayed in the load and goto pop-up for sequences when toggling Cue Appearance. | | If you turned a preset into a recipe, inserted a new recipe line, and opened the value selector, there would be no option to select other recipe lines. | | If a quickey pool was visible and then the selected data pool was changed, quickeys of the previous data pool would still be triggered, given that empty objects of the new quickey pool of the selected data pool were selected. | | The current cue was not displayed in the title bar of the sequence sheet. | | Adding a group to the selection using the clone dialog would change the original fixture selection order of that group. | | If you had a session with multiple output stations that were displayed in a layout and one device was dismissed from the session, the color of the layout element only would change if the status of a second station was changed, too. | | When loading a show file in v2.2, pools lost their assigned appearances. | | It was not possible to call a view by tapping it in the layout viewer. | | For the object action load the wrong icon was displayed on the object in the pool. | *** ## Release Version 2.2.1.1 [Section titled “Release Version 2.2.1.1”](#release-version-2211) ## Features [Section titled “Features”](#features) The latest release of grandMA3 version 2.2.1.1 rolls out several enhancements that enrich your lighting experience. Besides numerous improvements based on your highly appreciated feedback, many new and clever features have found their way into the software. Read on for a quick introduction and find links for more information. *** ### Tags [Section titled “Tags”](#tags)  New in this release The new Tags feature allows you to organize, link and cross-reference objects throughout the software. It is also a great tool for busking shows. All objects that have the same tag can be triggered or selected together. To open the Tags pool, open the Add Window dialog and go to Pools - Tags. There are three ways to assign tags to objects: * Open the editor of a tag pool object, tap Add New Tag Reference, select an element and then tap Assign. * Open the editor of a pool object, for example a sequence, tap Settings - Tags - Assign. * Use the command line. Syntax: Assign Tag \[“Tag\_Name” or Tag\_Number] At \[Object] \[“Object\_Name” or Object\_Number] For more information on how to use tags in the command line see the [Tag keyword](/grandma3/2-3/keyword_tag/). When a tag is assigned to a pool object,  is displayed on the pool object. The names and numbers of assigned tags are displayed on Tags in the pool object settings. Editors like the Sequence editor or the Macro editor display the assigned tags of the object in an area between the title bar and the grid. They can be edited and perform pool actions like the pool objects. The background color of the appearance assigned to the tag defines the background color of the tag displayed in the editor. To open the tags pop-up 1. Open the EditSettings pop-up for pool objects or the Edit Sequence pop-up for sequences. 2. Tap Tags. 3. Select a tag and tap Unassign or Assign. Already assigned tags can be unassigned or vice versa. The left side of the pop-up shows tags that are assigned to the corresponding pool object. The right side shows tags that are not assigned.\ In the pop-up, tags can also be locked and unlocked and protected against Kill Instant and Kill Delayed (see below). The default action of objects in the tags pool is ListReference. The Tag Editor shows the objects the tag is assigned to in the grid offering information about: * **Datapool**\*\*:\*\* Shows the corresponding Data Pool. * **Class**\*\*:\*\* Shows the object type of the assigned reference. * **No:** Shows the number of the corresponding pool object. * **Name**\*\*:\*\* Shows the name of the pool object. * **Protect:** The assigned reference is protected against Kill Instant and Kill Delayed. The default is **No.** Multiple objects can be assigned to a tag at the same time using Add New Tag Reference in the tag editor. In the Add Tag References pop-up, multiple objects can be selected and assigned consecutively. To do so, select an object line and tap Assign. If you enable Settings in the title bar of tag editor, Name, Scribble, Appearance, Tags, Note, and Tag Type can be set and Forward Commands can be toggled on or off. Tags are recursive, meaning it is possible to assign a tag to another tag. The following Tag Types can be selected: * **Kill Instant**: Other playbacks using the same tag will start their OffCue immediately when starting the sequence. * **Kill Delayed**: Sequence that was started will complete its fade in first and then the other playbacks using the same tags will start their OffCue. For tag types to function, the tag and tag type need to be set before triggering the sequence. Otherwise, the tag type will work as soon as the corresponding sequences have been triggered once. When a playback is started by a tag, the **Trigger** column in the Off Menu and Running Playbacks window will report the tag. | | | | ------------------------------------------ | ---------------------------------------------------------------------------------------------------------------------------------------------------------------------------------------------------------------------------------------------------------------------- | |  | **Hint:** | | | Kill Protect does not protect a sequence from being disabled by Kill Instant or Kill Delayed if executed by a tag. For more information on Kill Protect see [Sequence Settings](/grandma3/2-3/cue_sequence_settings/) and [Kill Keyword](/grandma3/2-3/keyword_kill/). | If Forward Commands is toggled on, playback commands can be executed for all references of a tag. It is on by default.\ This applies to >>>, <<<, Go+, Go-, Goto, HalfSpeed, Load, On, Off, Pause, Rate1, Speed1, Toggle, and Top. *** ### Recipe Editor [Section titled “Recipe Editor”](#recipe-editor) \*\* \*\*Improved in this release The Recipe Editor is introduced to improve and speed up the workflow for creating and editing recipes. This is done by using the user interface to define selections (Groups), values (Presets, Bitmaps, Generators), filters (Filters, Worlds), and MAtricks. Recipes are cooked when a recipe is generated based on LTP. The Recipe Editor replaces and is based on the Programmer Parts window. The Recipe Editor can be found in the Add Window pop-up in Tools - Recipe Editor. To create a recipe using the recipe editor, enable the edit recipe mode. There are multiple ways to do this: * Tap Edit Recipe in the title bar of the recipe editor * Enable Edit Recipe in the **At Overlay** * Press MA + Edit + Please For more information on how to edit recipes using the command line see the [EditRecipe keyword](/grandma3/2-3/keyword_editrecipe/). To disable the edit recipe mode, press Esc or use one of the options described to enable it. Once the edit recipe mode is disabled, all pools work as usual. While the edit recipe mode is enabled, Edit and Esc flash alternately. Each object type that can be used for a recipe will have its pool window marked with a green . The following windows use the recipe indicator: * Groups * Preset Pools * MAtricks * Worlds * Filters * Layout Viewer * Fixture Sheet | | | | ------------------------------------------ | -------------------------------------------------------------------------------------------------------------------------------- | |  | **Hint:** | | | Make sure you set the Pool Action setting in the corresponding pools to **SelFix/At** or **At** so you can use them for recipes. | To create a recipe: 1. Enable the edit recipe mode. 2. Select fixtures, for example, Group 1.\ The selected groups are indicated by a green frame around the pool objects.\ Multiple groups can be selected at the same time. 3. Select the values, for example, a color preset At Preset 4.4. Presets that are not compatible with fixtures of the selected group will be grayed out.\ All objects selected for recipes are indicated by a green frame in their pool windows. Tap on a selected object again to deselect it.\ You can add multiple values to a selection, a single recipe line is created for each selected value.\ A feature group indicator bar at the bottom of the group objects show the feature groups that are active in the recipe for for this very group. 4. Store the new recipe to a cue or a preset.\ Storing a recipe clears the recipe editor and only groups will remain as selected objects. | | | | ------------------------------------------ | -------------------------------------------------------------------------------------------------------------------------------------------------------------------------------------------------------------------- | |  | **Hint:** | | | The order of recording selections and values has an impact on how the recipe is handled. The last recipe line determines the output if several recipe lines with the same selection referring to the same attribute. | | | | | ------------------------------------------ | --------------------------------------------------- | |  | **Hint:** | | | It is possible to create recipes with empty groups. | | | | | ------------------------------------------ | ------------------------------------------------------------------------------------------------------------------------------------------------------------------------- | |  | **Hint:** | | | It is not possible to directly enter values into a recipe, they have to be stored in a preset first. If no preset is selected, the values are stored into the programmer. | Executing EditRecipe with a corresponding cue or preset, for example, EditRecipe Cue 1, ***EditRecipe 1***, or ***EditRecipe Preset 2.2***, enables the edit mode for the specific object in the recipe editor. With sequences and executors, for example, ***EditRecipe Sequence 1***, ***EditRecipe Page 1.204***, the running cue is edited. Tap CleanUp in the title bar to delete all recipes that use the same selection with multiple presets of the same feature group. Only the last object that generates the output is kept. For example, when Group 1 + Red + Yellow + Blue is selected and then CleanUp is tapped, the recipe lines for Group 1 + Red + Yellow will be deleted. If you tap an already selected preset again to deselect it, the corresponding recipe line will also be deleted. CleanUp is only active when the same fixtures are used with multiple items of one feature group. Otherwise the button will be grayed out. With Edit Recipe disabled this button is not visible. Off Group \[“Group\_Name” or Group\_Number], Off Preset \[“FeatureGroup\_Name” or FeatureGroup\_Number].\[“Preset\_Name” or Preset\_Number], or Off and tap a group or a preset can also be used to remove the corresponding recipe line. If a group has multiple lines linked, all of them are removed in the recipe. You can define a different selection, for example, by tapping Group 2. A brown frame around pool objects indicates the values for previous selections, for example, Group 1. Tap Group 1 again and the previously defined values for this selection are highlighted in green again. Open the MAtricks overlay to define specific MAtricks values to the recipe lines. While using the MAtricks editor to edit a recipe, the editor is displayed with “(Recipe)” and the green pot icon in the title bar. * Pool objects of MAtricks, Worlds, and Filters have a brown colored frame around them when they are used by a recipe. * MAtricks values that do not come from a pool object, Worlds, or Filters are indicated by small green icons (, , or) on the right in the Name cell of recipes. * If the fixtures of the selected group are only partly used, the text in the values column is displayed in orange. This happens for example if not all fixtures of the selection in use can use the selected preset or a world is added to a recipe line. Use the Columns tab in the window settings to adjust the columns of the recipe editor individually. Find more improvements for recipes below in [Other Enhancements](/grandma3/2-3/key_rn_v2_2/#Improved_Recipes). *** ## Other Enhancements [Section titled “Other Enhancements”](#other-enhancements-1)  Updated predefined content: * Predefined views in new shows * New predefined macros * Updated demo shows: * MA\_StartShow * Simple\_Show  Updated Carallon fixture library to v19.9.  Improved Recipes: * Added Enabled column to recipes. To disable recipe lines for cooking, right-click **Yes** in the corresponding recipe line of the Enabled column. The recipe line is marked red and Enabled is set to **No**. * Improved the pop-up of the Values column. The Edit Values pop-up displays preset, bitmaps and generators pools on the left and their pool objects on the right. Tapping on a preset pool expands its presets. Use the filter to filter for pool object names and pool numbers of the corresponding preset. The appearance and scribble are also previewed. Tap DataPool in the title bar of the Edit Values pop-up to change the data pool. * In the Show Recipes mask in the sequence sheet, the sequence editor and the content sheet, it is now possible to [adjust the columns](/grandma3/2-3/ws_ui_adjustable_columns/). * Added CleanUp Recipes to the Ed**it Setting** of presets to remove recipes in the editor. * The MAtricks properties “X”, “Y”, and “Z” were added to recipes. * The + and - on the left side can add or delete Programmer Parts and Recipes. In previous versions they added or deleted Programmer Parts only. \*\* \*\*Improved the Sequence Sheet: * When the Executor Time or Executor Crossfade overrides cue timings, a yellow text will appear above the corresponding cue timings in the Sequence Sheet, indicating the Executor Time in seconds or the Executor Fader in percent. A **!** next to the cue’s original cue time indicates that the cue is currently being overwritten by the executor time. * The setting Show Recipes is enabled by default in new shows and user profiles. In the title bar, Show Recipes is displayed by default. * Added a column to the sequence sheet called **Individual Timing**.\*\* \*\*It influences the prioritization of general cue timings (**Cue Fade**, **Cue Delay**) and individual timings (**Indiv Fade**, **Indiv Delay**).\ There are two values: * Default: Individual timings are prioritized over general cue timings. * Normalized: General cue timings are set as the maximum time for individual timings. If individual timings have a range of values, these values will be scaled to the new maximum time set by the corresponding general cue timings.  Improved the behavior when changing properties of cues or sequences:\ When a sequence is running, commands like, CueFade 5, will address the running cue. When the sequence is off, the sequence itself will be addressed. This applies to properties of sequences and cues. For example, the name: Label will address the sequence when the sequence is off, and it will address the running cue when the sequence is on. **** Improved Preferences and Timings: * Added 50 Timing Masters that can be set to a value between 0 seconds and 10 seconds. The following properties can be set to a timing master instead of a numeric value: * Timings in sequences, except for Command Delay, Snap Delay and Trig Time. * Playback Timings in Preferences and Timings (new, see below) To set a timing master: * Use the calculator that appears when editing the value of one of these properties.\ To set different timing masters for in and out timings, type it manually into the CueFade or CueDelay calculators (when condensed timing is enabled in the sequence sheet). For example, Timing1/Timing2 (no spaces in front or inside the string!). * Use the command line. Syntax: Cue \[“Cue\_Name” or Cue\_Number] CueFade “Timing1” * Use timing masters for playback commands: ***Goto Cue 5 Fade “Timing5”*** - Improved the Masters tab: * To label a master, type Label + tap a master. * To assign the master quickly, for example to an executor, type Assign + tap a master. * Added Playback Timings to the Timings tab: This menu allows you to set the default values for actions triggered by Goto, Go-, >>>, and <<<. They can be set to **CueTiming**, using the timings set in the cue (only for Goto and Go-), a numeric value, or a timing master. **CueTiming** sets the timing values of the target cue and ignores the timings of other cues. Values that are tracked into the target cue, and therefore do not have a defined timing in that cue, will use the timing of Part 0. The default values are: * Goto: CueTiming * Go-: CueTiming * \>>>: 0 * <<<: 0 \*\* \*\*Improved Content Sheet: * The setting Show Recipes is available in the title bar by default. * Added CuePart Appearance to the content sheet settings. Choose between **Off**, **Number**, and **Num+Name** as options for how the appearances of cues are displayed in the content sheet.  Added a special value to Specials in the attribute calculator called **Deactivate**: * It deactivates data in the programmer, for example, to exclude specific attribute data from being stored in a cue.\ Deactivate can also be used in a command. For more information on how to use deactivate in the command line see the [Deactivate keyword](/grandma3/2-3/keyword_deactivate/).  Improved Layouts: * The Layout Element editor has the Load from Default and Save as Default feature. It is possible to set defaults and save, for example, a ppearances, notes, size, and scribbles. * It is now possible to create Layout Element Defaults. Either in the Layout editor or in the Menu - Preferences and Timings - Layout Elements. * Output Stations can be assigned to a Layout, for example, Assign onPC 1 At Layout 1. The appearance of the object shows the device type. Editing the assigned Output Station will open a device configuration menu.\ Assigned output stations display their current network state in an indicator bar. The colors displayed in the indicator bar are based on the defined network colors. Edit and tapping an assigned ouput station will open the generic editor. Therefore, **Stati\*\*\*\*on** was added to Layout Element Defaults. * The Align Selection () function was added to the Layout window. Enable Setup. A toolbar opens on the left side of the window. Lasso all relating elements that should be aligned. Then tap  in the toolbar. * Select using the contents of the layout pool, for example, SelectFixtures Layout 1. Only fixtures within the corresponding layout, and no other fixtures that may be part of other object types, for example, groups in the layout, will be selected. * Action in the **General** settings of the Edit pop-up for layout elements now follows the individual Object Action set for pool objects. When set to **\