Assign Object to an Executor
Many objects can be assigned to an executor. The executor is a physical key, fader, or encoder that controls the assigned object. The physical devices can also be represented as on-screen controllers.
 | Quick Steps: |
| 1. Press Assign. |
- Tap what should be assigned or press the relevant keys.
- Press the executor where it should be.These are the simplest steps to assign something to an executor - read below for details. |
Assigning Objects Using Keys and Pools
Section titled “Assigning Objects Using Keys and Pools”It is easy to assign something to an executor.
Press Assign followed by the desired object and then the executor to which it should be assigned.
Here are three variations on how it works. The examples use sequences, but it can be any of the allowed types:
Example 1
Section titled “Example 1”Using only the keys to assign sequence 3 at executor number 105 on the current page, type:
Assign Sequ 3 At MA + X16 | Exec 1 0 5 Please
Example 2
Section titled “Example 2”It is also possible to use a combination of keys and pools.
Having a pool visible on one of the screens makes it possible to combine key presses with pool selection.
- Tap and swipe out of the sequence pool object that should be assigned.
- Swipe to the Assign option and release the screen.
- Press one of the keys associated with the desired executor.
Example 3
Section titled “Example 3”Pressing the keys puts keywords into the command line. This means it can also be typed as a command line input.
| User name[Fixture]>Assign Sequence 4 At Page 2.301 |
This command will assign sequence 4 to executor 301 on executor page 2. The page keyword needs to be used when addressing executors on specific pages. The page needs to exist before it can be addressed.
| Hint: |
| The process for assigning special executors and Xkeys is the same as the process described for executors. |
Assign Objects Using the Assign Menu
Section titled “Assign Objects Using the Assign Menu”The Assign menu offers a visual approach to assigning something to the executors. Use the assign menu by selecting the executor first and then selecting the object.
There are three main ways to open the Assign Menu:
- Press Assign followed by any of the keys associated with the desired executor.
- Tap the executor label in the Mini Executor Bar (do not do a long press - it opens the editor instead).
- Tap on the desired executor in the the Playbacks Window or the Playback Controls menu.
This is the Assign menu:

Assign Menu - Object tab
The title bar has a toggle button called Lock Executor. This can be used to lock the executor from changes. It does not lock the executor from playing back or performing other functions normally; the lock only prevents making changes to the executor.
This is the Object page of the Assign menu. This page is selected by tapping Object on the right side.
The top has several tabs. One for each object type that can be assigned to the executor and a special one used to select an Empty object. The other tabs open a selection list. The list will contain the possible objects of that type.
The different types are:
Tap Sequence to open the list of possible sequences. It could look like this:
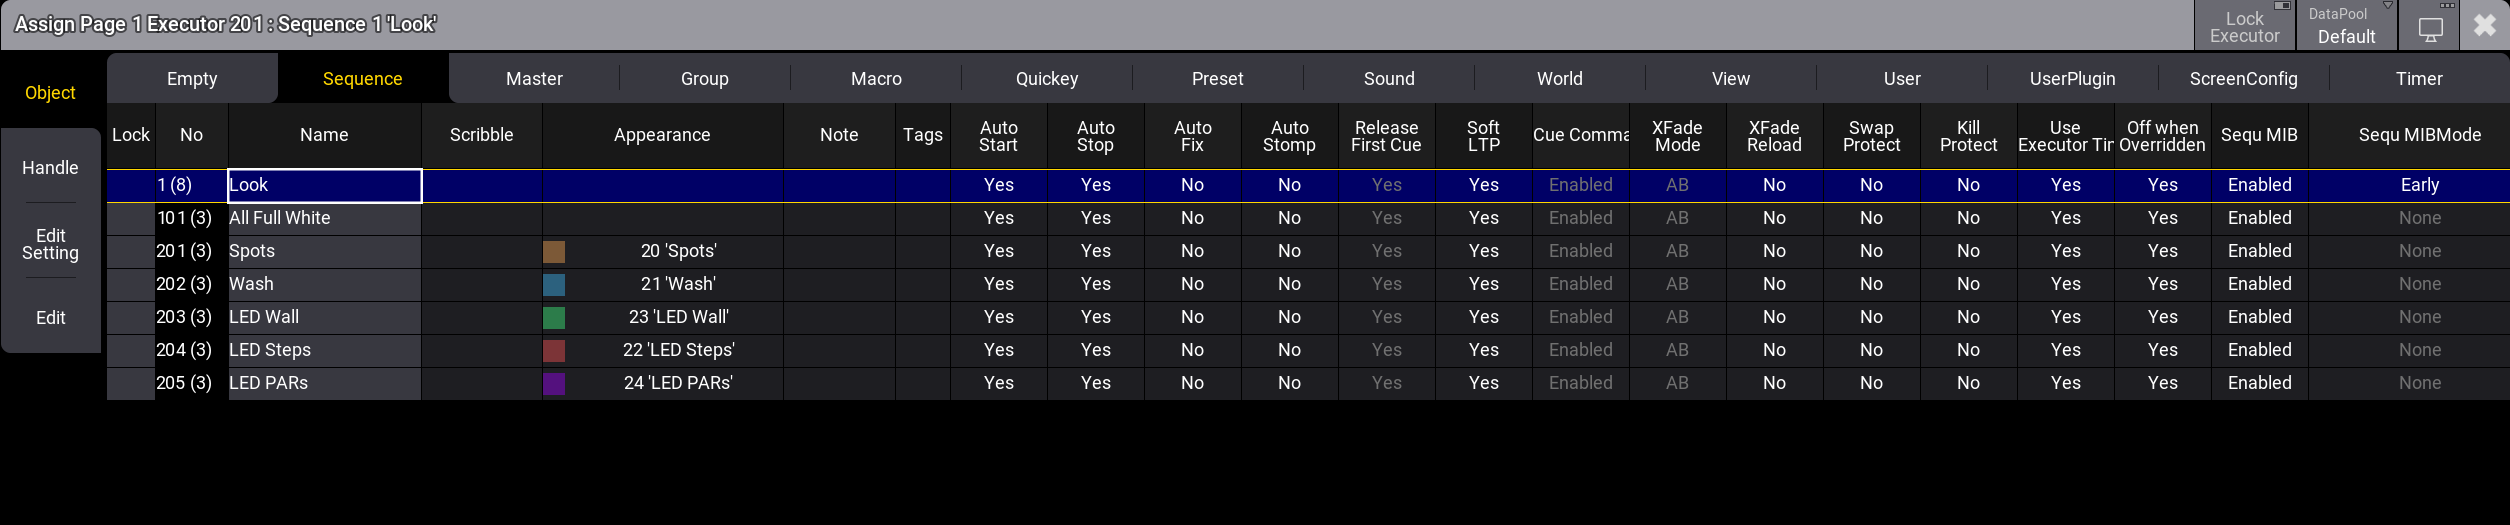
Assign menu in the sequence object tab with Sequence 1 ‘Look’ selected
Each allowed type that can be assigned to an executor provides a list of the available objects. The DataPool in the title bar makes selecting an object from a different data pool easy.
Select the desired object by tapping it.
The default Executor Configuration for the object type is applied to the executor when assigning an object to an empty executor. When there is already an object assigned, the executor configuration is not recalled, when assigning a different object to the executor. This, including executor expansion, can be defined in the handle tab.
Change Key Function and Executor Size Using the Handle Tab
Section titled “Change Key Function and Executor Size Using the Handle Tab”When the executor, special executor, or Xkey has something assigned, changing the functions assigned to the executor keys, faders, and encoders is possible.
It is also possible to assign functions using keys or commands. For more information, read below.
If continuing to work in the Assign menu, tap Handle on the left side.
It could look like this:
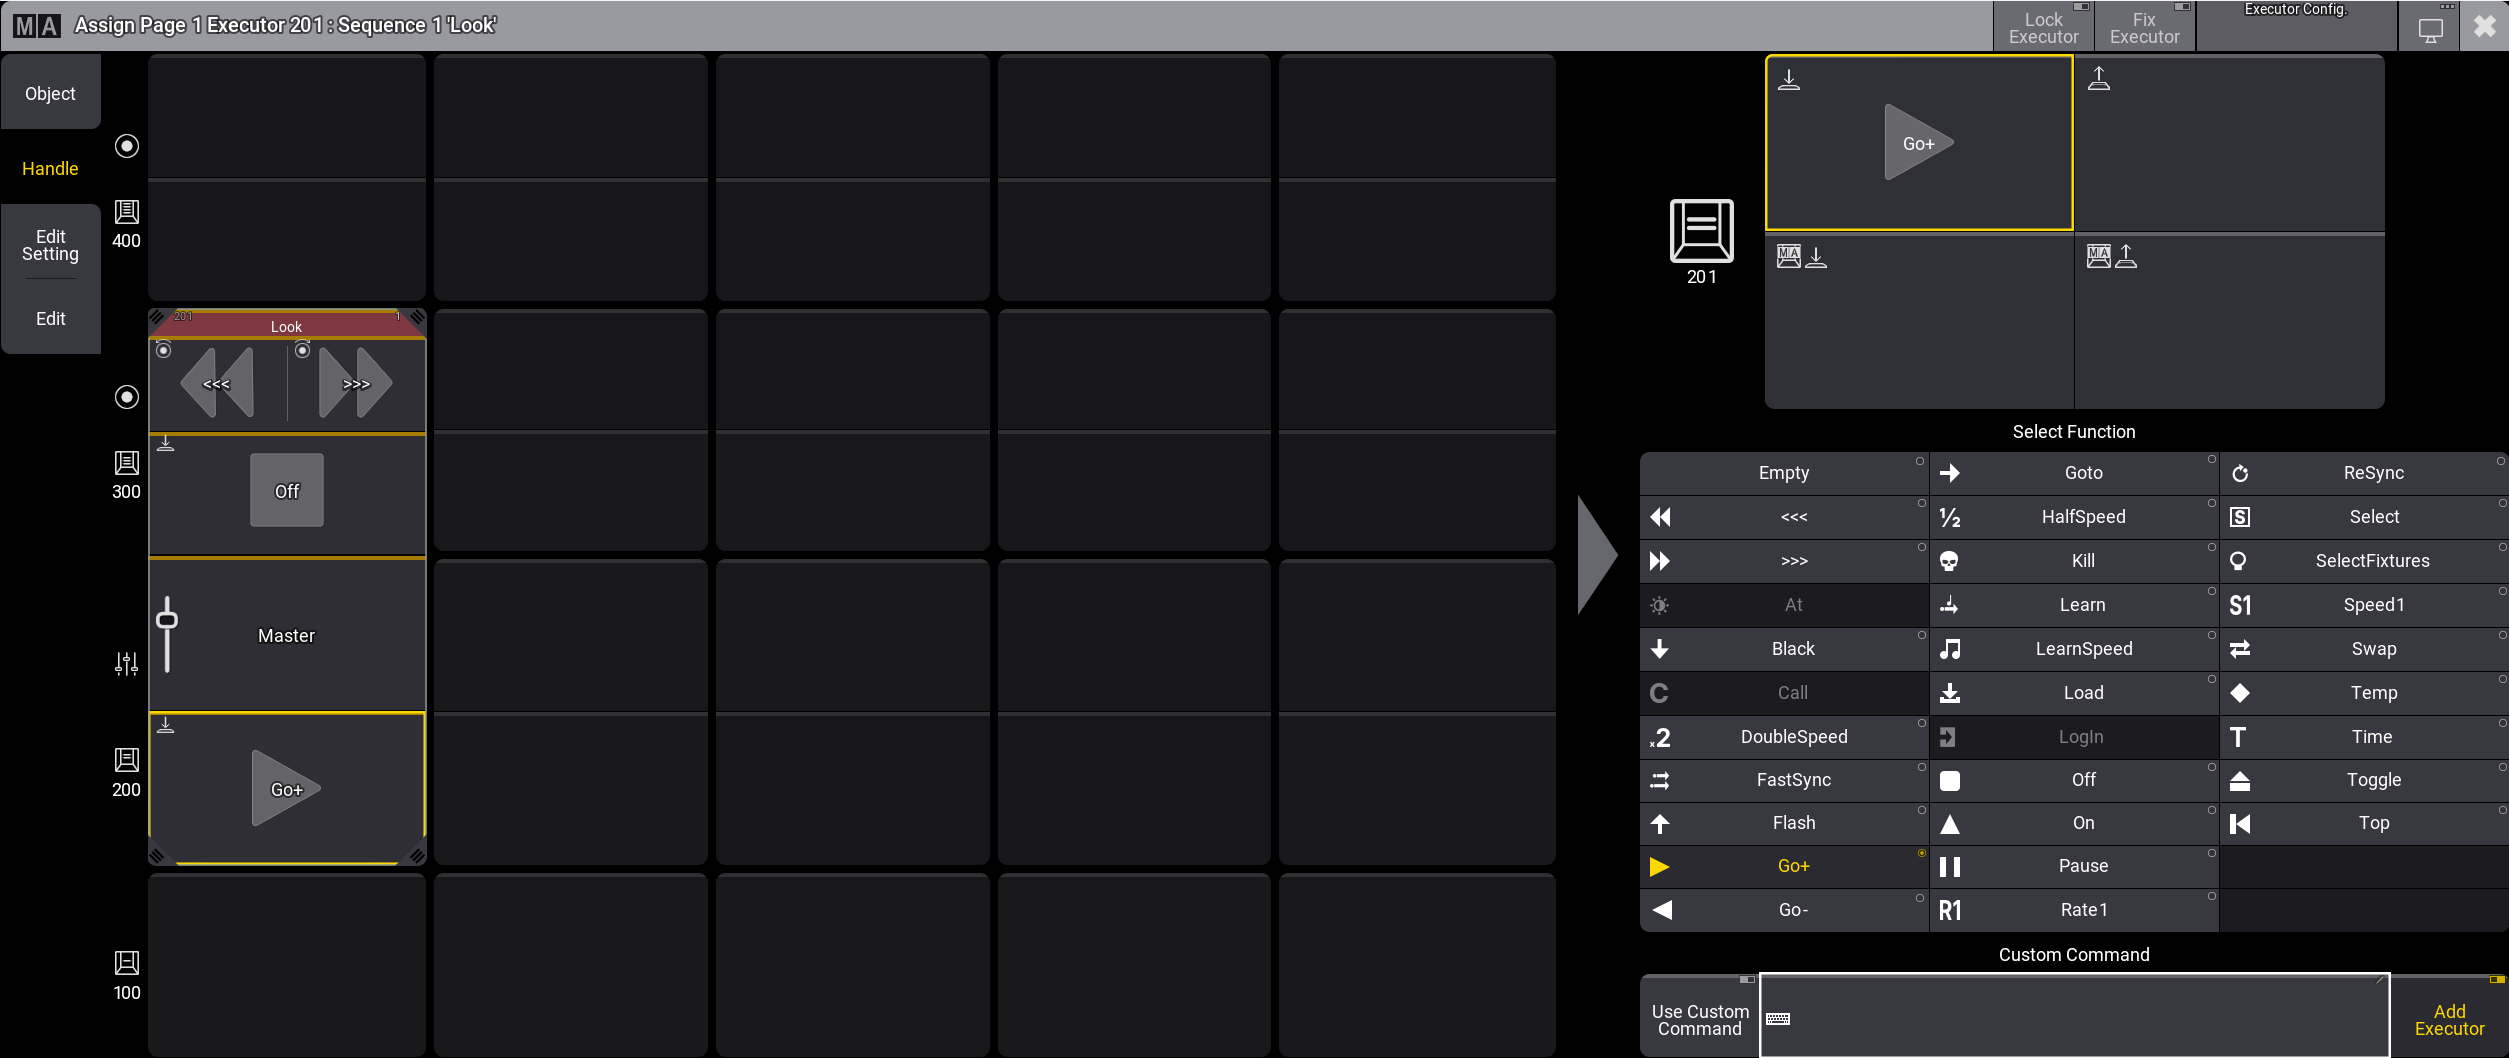
Assign menu on the Handle tab with Sequence 1 ‘Look’ and the key executor 201 selected
In the title bar, enable Fix Executor to latch the selected executor to all pages, same as the Fix Keyword does.
The handle tab of the assign menu is split up in two sides. On the left hand side of the menu a table represents the executors of of the same section. The assign menu of the special executors displays all special executors. The right side of the menu is designed to set different options for the selected executor.
The executor section is displayed on the left. The selected executor button is indicated by a yellow frame and is brighter compared to executors that are not selected. The title bar is blinking in red. The name of the assigned object is displayed in the middle of title bar. The starting number of the executor is on the left and the number of the assigned pool object on the right. Tapping an empty executor in the handle tab creates a new empty executor and the assign menu switches to the object tab.
The example image above shows executor 201 with space above and to the right. The size of the selected executor can be extended using any of the four resize corners (![]() ). Executors can be expanded if there are empty executors next to them. Depending on whether the resizing or moving of an executor was successful or not, the border of the executor will shortly flash green or red. To move the entire executor, tap, hold, and drag in the executor’s title bar. Tapping an executor with a less saturated appearance will select this executor.
). Executors can be expanded if there are empty executors next to them. Depending on whether the resizing or moving of an executor was successful or not, the border of the executor will shortly flash green or red. To move the entire executor, tap, hold, and drag in the executor’s title bar. Tapping an executor with a less saturated appearance will select this executor.
The elements (key, fader, or encoder) of the selected executor are indicated by icons in the upper left corner. The selected function, except fader functions, with the corresponding icon is displayed in the center. The color of the bar at the top of the executor button indicates the assigned object category (Sequence, Master, Group, etc.). The rest of the button will be the same color as the appearance color of the object if the button is not selected. If a button has more than one trigger option assigned to it, the button will split to display the multiple options.
If executors have multiple functions assigned, and the assigned objects have individual appearances, then it could look like this:
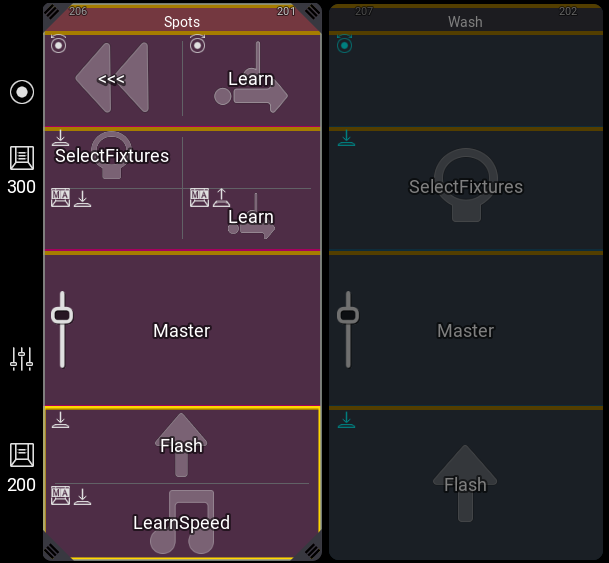
Two executors with executor 206 ‘Spots’ selected
Trigger Options
Section titled “Trigger Options”The keys, faders, and encoders have different functions. The available functions depend on the object assigned to the executor and the executor itself. Different functions are available when using a key, fader, or encoder.
Set different options for the selected executor, on the right side of the handle tab. Depending on whether a key, fader or encoder is selected, the menu on the right changes.
At the top, choose how to trigger the key, fader, or encoder.
A key can have up to four different trigger options:
 : Press the key to trigger the selected function.
 : Release the key to trigger the selected function.
 : Press and hold MA and press the key to trigger the selected function.
- : Release MA and the key to trigger the selected function.
An encoder has six different trigger options:
 : Rotate the encoder to the left to trigger the selected function.
 : Rotate the encoder to the left to decrease the value of the selected function and to the right to increase the value.
 : Rotate the encoder to the right to trigger the selected function.
- : Press and hold MA and rotate the encoder to the left to trigger the selected function.
- : Press and hold MA and rotate the encoder to the left to decrease the value of the selected function and to the right to increase the value.
- : Press and hold MA and rotate the encoder to the right to trigger the selected function.
| Hint: |
| When only the encoder or key trigger option is used, without the MA trigger option, then the trigger option remains accessible when pressing MA. |
A fader has one trigger option:
 : Move the fader up or down to use the selected function.